headlamp FORD E SERIES 2016 4.G Owners Manual
[x] Cancel search | Manufacturer: FORD, Model Year: 2016, Model line: E SERIES, Model: FORD E SERIES 2016 4.GPages: 319, PDF Size: 6.18 MB
Page 6 of 319
Jump Starting the Vehicle...........................117
Customer Assistance
Getting the Services You Need...............120
In California (U.S. Only)...............................121
The Better Business Bureau (BBB) Auto
Line Program (U.S. Only).......................122
Utilizing the Mediation/Arbitration Program (Canada Only)........................123
Getting Assistance Outside the U.S. and Canada.........................................................123
Ordering Additional Owner's Literature.....................................................124
Reporting Safety Defects (U.S. Only)..............................................................125
Reporting Safety Defects (Canada Only)..............................................................125
Fuses
Fuse Specification Chart............................127
Changing a Fuse...........................................134
Maintenance
General Information
....................................136
Opening and Closing the Hood...............136
Under Hood Overview
.................................137
Engine Oil Dipstick.......................................138
Engine Oil Check...........................................138
Oil Change Indicator Reset
.......................138
Engine Coolant Check................................139
Automatic Transmission Fluid Check............................................................142
Brake Fluid Check.........................................144
Power Steering Fluid Check
......................145
Washer Fluid Check.....................................145
Fuel Filter
.........................................................145
Changing the 12V Battery..........................145
Checking the Wiper Blades.......................147
Changing the Wiper Blades......................147
Adjusting the Headlamps.........................148
Removing a Headlamp
..............................150 Changing a Bulb
.............................................151
Bulb Specification Chart............................153
Changing the Engine Air Filter.................155
Vehicle Care
General Information
....................................156
Cleaning Products
........................................156
Cleaning the Exterior...................................156
Waxing..............................................................157
Cleaning the Engine....................................158
Cleaning the Windows and Wiper Blades...........................................................158
Cleaning the Interior....................................159
Cleaning the Instrument Panel and Instrument Cluster Lens........................159
Cleaning Leather Seats
..............................160
Repairing Minor Paint Damage...............160
Cleaning the Alloy Wheels
.......................160
Vehicle Storage
..............................................161
Wheels and Tires
General Information
....................................163
Tire Care...........................................................164
Using Snow Chains
......................................182
Tire Pressure Monitoring System...........183
Changing a Road Wheel............................186
Technical Specifications...........................190
Capacities and Specific- ations
Engine Specifications - 5.4L V8...............191
Engine Specifications - 6.8L.....................191
Motorcraft Parts - 5.4L V8........................192
Motorcraft Parts - 6.8L
..............................194
Vehicle Identification Number.................195
Vehicle Certification Label
........................196
Transmission Code Designation.............196
Capacities and Specifications - 5.4L V8...................................................................197
3
E-Series (TE4) Canada/United States of America, enUSA, Edition date: 03/2015, Second Printing Table of Contents
Page 47 of 319
GENERAL INFORMATION
Condensation in Lamp Assemblies
Exterior lamps have vents to
accommodate normal changes in air
pressure.
Condensation can be a natural by-product
of this design. When moist air enters the
lamp assembly through the vents, there is
a possibility that condensation can occur
when the temperature is cold. When
normal condensation occurs, a fine mist
can form on the interior of the lens. The
fine mist eventually clears and exits
through the vents during normal operation.
Clearing time may take as long as 48 hours
under dry weather conditions.
Examples of acceptable condensation are:
•
The presence of a fine mist (no streaks,
drip marks or large droplets).
• A fine mist covers less than 50% of the
lens.
Examples of unacceptable condensation
are:
• A water puddle inside the lamp.
• Streaks, drip marks or large droplets
present on the interior of the lens.
If you see any unacceptable condensation,
have your vehicle checked by an authorized
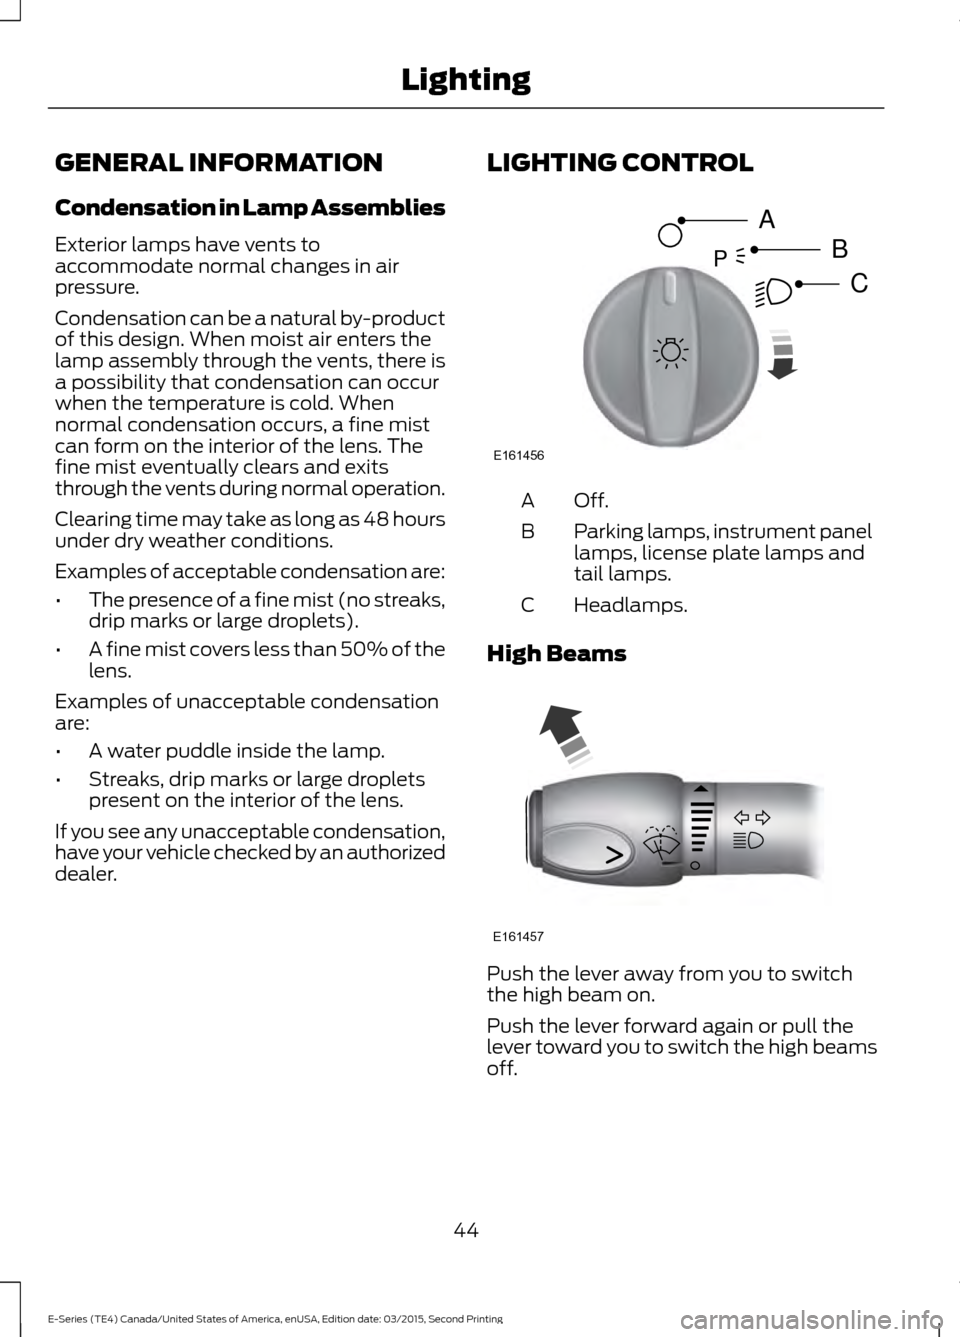
dealer. LIGHTING CONTROL Off.A
Parking lamps, instrument panel
lamps, license plate lamps and
tail lamps.
B
Headlamps.
C
High Beams Push the lever away from you to switch
the high beam on.
Push the lever forward again or pull the
lever toward you to switch the high beams
off.
44
E-Series (TE4) Canada/United States of America, enUSA, Edition date: 03/2015, Second Printing LightingE161456
A
B
CP E161457
Page 48 of 319
Headlamp Flasher
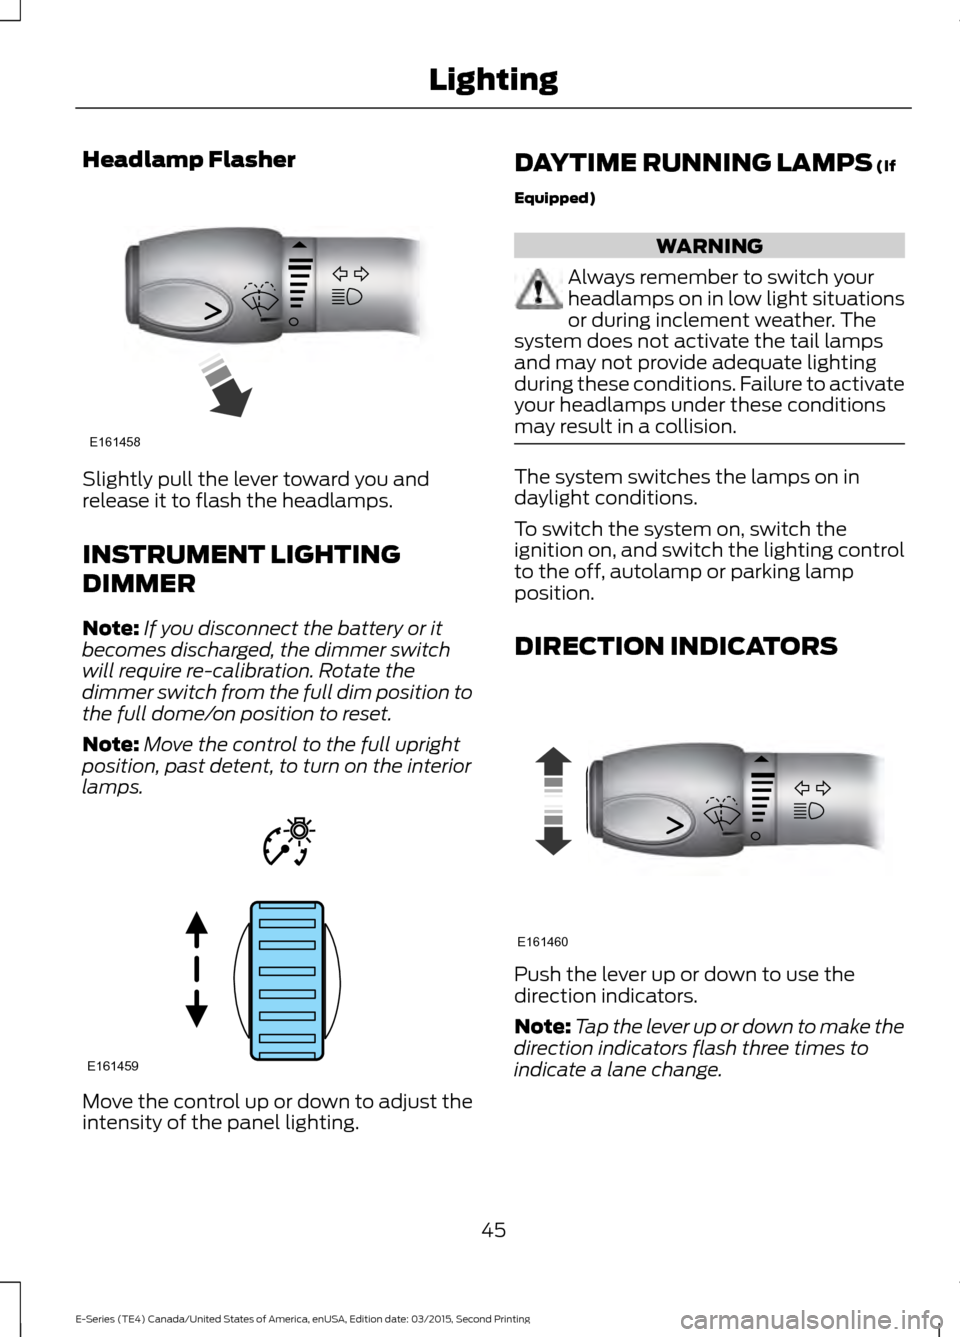
Slightly pull the lever toward you and
release it to flash the headlamps.
INSTRUMENT LIGHTING
DIMMER
Note:
If you disconnect the battery or it
becomes discharged, the dimmer switch
will require re-calibration. Rotate the
dimmer switch from the full dim position to
the full dome/on position to reset.
Note: Move the control to the full upright
position, past detent, to turn on the interior
lamps. Move the control up or down to adjust the
intensity of the panel lighting. DAYTIME RUNNING LAMPS (If
Equipped) WARNING
Always remember to switch your
headlamps on in low light situations
or during inclement weather. The
system does not activate the tail lamps
and may not provide adequate lighting
during these conditions. Failure to activate
your headlamps under these conditions
may result in a collision. The system switches the lamps on in
daylight conditions.
To switch the system on, switch the
ignition on, and switch the lighting control
to the off, autolamp or parking lamp
position.
DIRECTION INDICATORS
Push the lever up or down to use the
direction indicators.
Note:
Tap the lever up or down to make the
direction indicators flash three times to
indicate a lane change.
45
E-Series (TE4) Canada/United States of America, enUSA, Edition date: 03/2015, Second Printing LightingE161458 E161459 E161460
Page 55 of 319
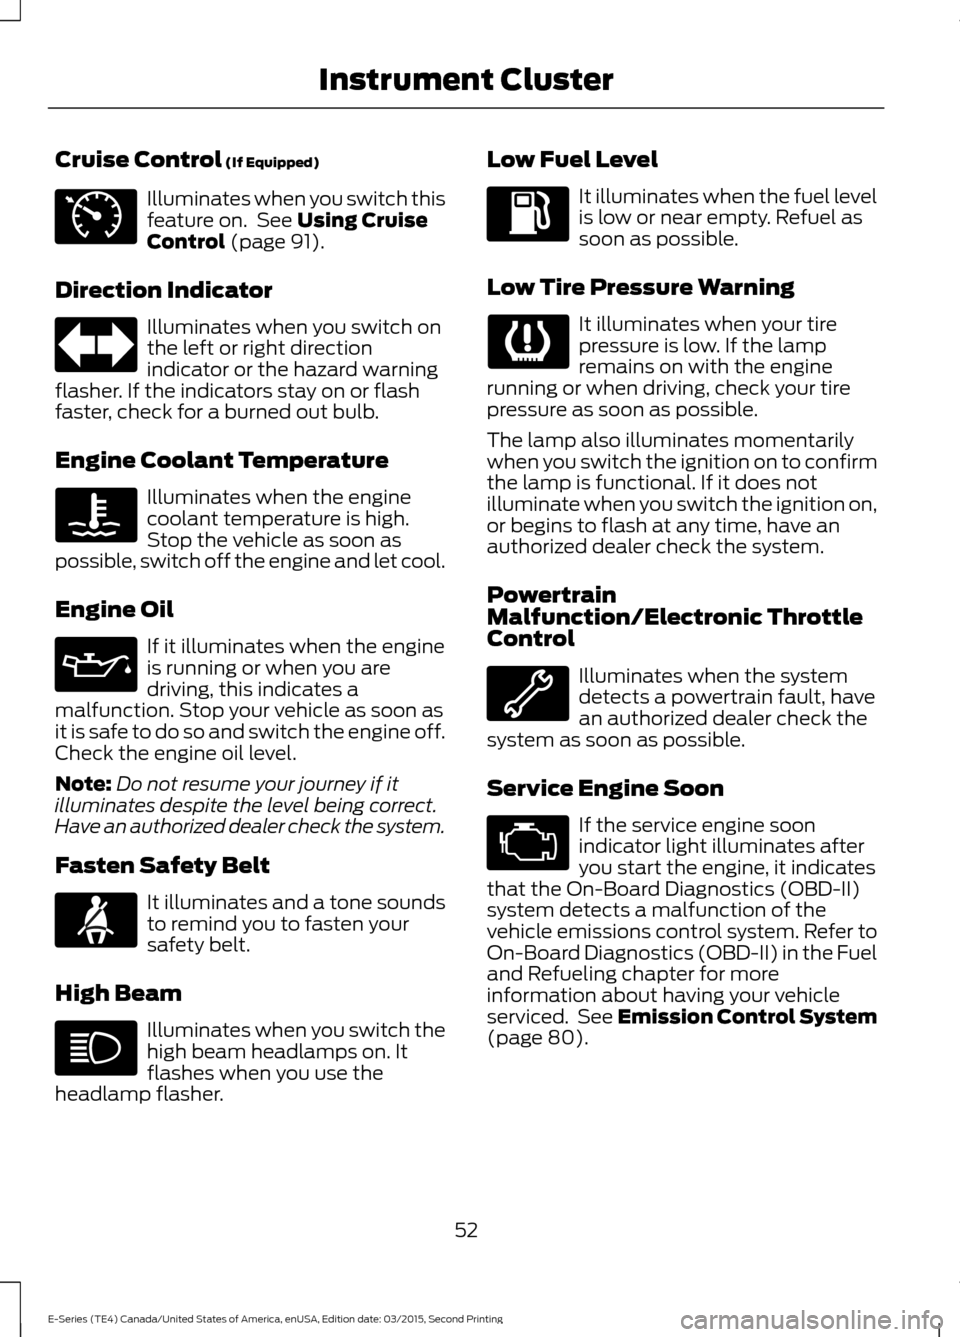
Cruise Control (If Equipped)
Illuminates when you switch this
feature on. See
Using Cruise
Control (page 91).
Direction Indicator Illuminates when you switch on
the left or right direction
indicator or the hazard warning
flasher. If the indicators stay on or flash
faster, check for a burned out bulb.
Engine Coolant Temperature Illuminates when the engine
coolant temperature is high.
Stop the vehicle as soon as
possible, switch off the engine and let cool.
Engine Oil If it illuminates when the engine
is running or when you are
driving, this indicates a
malfunction. Stop your vehicle as soon as
it is safe to do so and switch the engine off.
Check the engine oil level.
Note: Do not resume your journey if it
illuminates despite the level being correct.
Have an authorized dealer check the system.
Fasten Safety Belt It illuminates and a tone sounds
to remind you to fasten your
safety belt.
High Beam Illuminates when you switch the
high beam headlamps on. It
flashes when you use the
headlamp flasher. Low Fuel Level It illuminates when the fuel level
is low or near empty. Refuel as
soon as possible.
Low Tire Pressure Warning It illuminates when your tire
pressure is low. If the lamp
remains on with the engine
running or when driving, check your tire
pressure as soon as possible.
The lamp also illuminates momentarily
when you switch the ignition on to confirm
the lamp is functional. If it does not
illuminate when you switch the ignition on,
or begins to flash at any time, have an
authorized dealer check the system.
Powertrain
Malfunction/Electronic Throttle
Control Illuminates when the system
detects a powertrain fault, have
an authorized dealer check the
system as soon as possible.
Service Engine Soon If the service engine soon
indicator light illuminates after
you start the engine, it indicates
that the On-Board Diagnostics (OBD-II)
system detects a malfunction of the
vehicle emissions control system. Refer to
On-Board Diagnostics (OBD-II) in the Fuel
and Refueling chapter for more
information about having your vehicle
serviced. See Emission Control System
(page
80).
52
E-Series (TE4) Canada/United States of America, enUSA, Edition date: 03/2015, Second Printing Instrument ClusterE71340
Page 56 of 319
If the light is blinking, engine misfire is
occurring which could damage your
catalytic converter. Drive in a moderate
fashion (avoid heavy acceleration and
deceleration) and have an authorized
dealer check your vehicle immediately.
WARNING
Under engine misfire conditions,
excessive exhaust temperatures
could damage the catalytic
converter, the fuel system, interior floor
coverings or other vehicle components,
possibly causing a fire. Have your vehicle
serviced immediately. The service engine soon indicator light
illuminates when you first switch on the
ignition prior to engine start to check the
bulb and to indicate whether the vehicle
is ready for Inspection/Maintenance (I/M)
testing.
Normally, the service engine soon light will
stay on until you switch the engine on, and
then turn off if no malfunctions are
present. However, if after 15 seconds the
service engine soon light blinks eight times,
it means that the vehicle is not ready for
I/M testing. See Emission Control
System (page 80).
Traction Control System Displays when the traction
control is active. If the light
remains on, have an authorized
dealer check the system immediately.
Traction Control System Off It will illuminate when the driver
disables traction control. Transmission Tow/Haul Illuminates when the driver
activates the tow/haul feature.
If the light flashes steadily, have
an authorized dealer check the system
immediately, damage to the transmission
could occur.
AUDIBLE WARNINGS AND
INDICATORS
Fail-Safe Cooling Warning Chime
Sounds when the coolant gauge pointer
has moved to hot. There are three stages
of chimes:
• Stage 1 is a single chime when the
engine temperature begins to overheat.
• Stage 2 is multiple chimes and engine
power becomes limited in order to help
cool the engine.
• Stage 3 is multiple chimes and the
engine will shut down.
Headlamps On Warning Chime
Sounds when you remove the key from the
ignition and open the driver's door and you
have left the headlamps or parking lamps
on.
Key in Ignition Warning Chime
Sounds when you open the driver's door
and you have left the key in the ignition.
Parking Brake On Warning Chime
Sounds when you have left the parking
brake on and drive your vehicle. If the
warning chime remains on after you have
released the parking brake, have the
system checked by your authorized dealer
immediately.
53
E-Series (TE4) Canada/United States of America, enUSA, Edition date: 03/2015, Second Printing Instrument ClusterE138639 E194301 E161509
Page 76 of 319
Before starting the engine check the
following:
•
Make sure all occupants have fastened
their safety belts.
• Make sure the headlamps and
electrical accessories are off.
• Make sure the parking brake is on.
• Make sure the transmission is in park
(P) or neutral (N).
• Turn the ignition key to the on position.
Note: Do not touch the accelerator pedal.
1. Fully press the brake pedal.
2. Turn the key to the start position to start the engine. Release the key when
the engine starts.
Note: The engine may continue cranking
for up to 15 seconds or until it starts.
Note: If you cannot start the engine on the
first try, wait for a short period and try again.
Failure to Start
If you cannot start the engine after three
attempts, wait 10 seconds and follow this
procedure:
1. Fully press the brake pedal.
2. Fully press the accelerator pedal and hold it there.
3. Start the engine.
Stopping the Engine When Your
Vehicle is Stationary
1. Shift into park (P) or neutral (N).
2. Turn the key to the off position.
3. Apply the parking brake. Stopping the Engine When Your
Vehicle is Moving WARNING
Switching off the engine when the
vehicle is still moving will result in a
loss of brake and steering assistance.
The steering will not lock, but higher effort
will be required. When the ignition is
switched off, some electrical circuits,
including air bags, warning lamps and
indicators may also be off. If the ignition
was turned off accidentally, you can shift
into neutral (N) and re-start the engine. 1. Put the transmission into neutral (N)
and use the brakes to bring your vehicle
to a safe stop.
2. When your vehicle has stopped, shift into park (P) or neutral (N) and switch
the ignition off.
3. Apply the parking brake.
Guarding Against Exhaust Fumes WARNING
If you smell exhaust fumes inside
your vehicle, have your vehicle
checked by your authorized dealer
immediately. Do not drive your vehicle if
you smell exhaust fumes. Carbon
monoxide is present in exhaust fumes.
Take precautions to avoid its dangerous
effects. Important Ventilating Information
If you stop your vehicle and then leave the
engine idling for long periods of time, we
recommend that you do one of the
following:
•
Open the windows at least 1 in (3 cm).
• Set your climate control to outside air.
73
E-Series (TE4) Canada/United States of America, enUSA, Edition date: 03/2015, Second Printing Starting and Stopping the Engine
Page 135 of 319
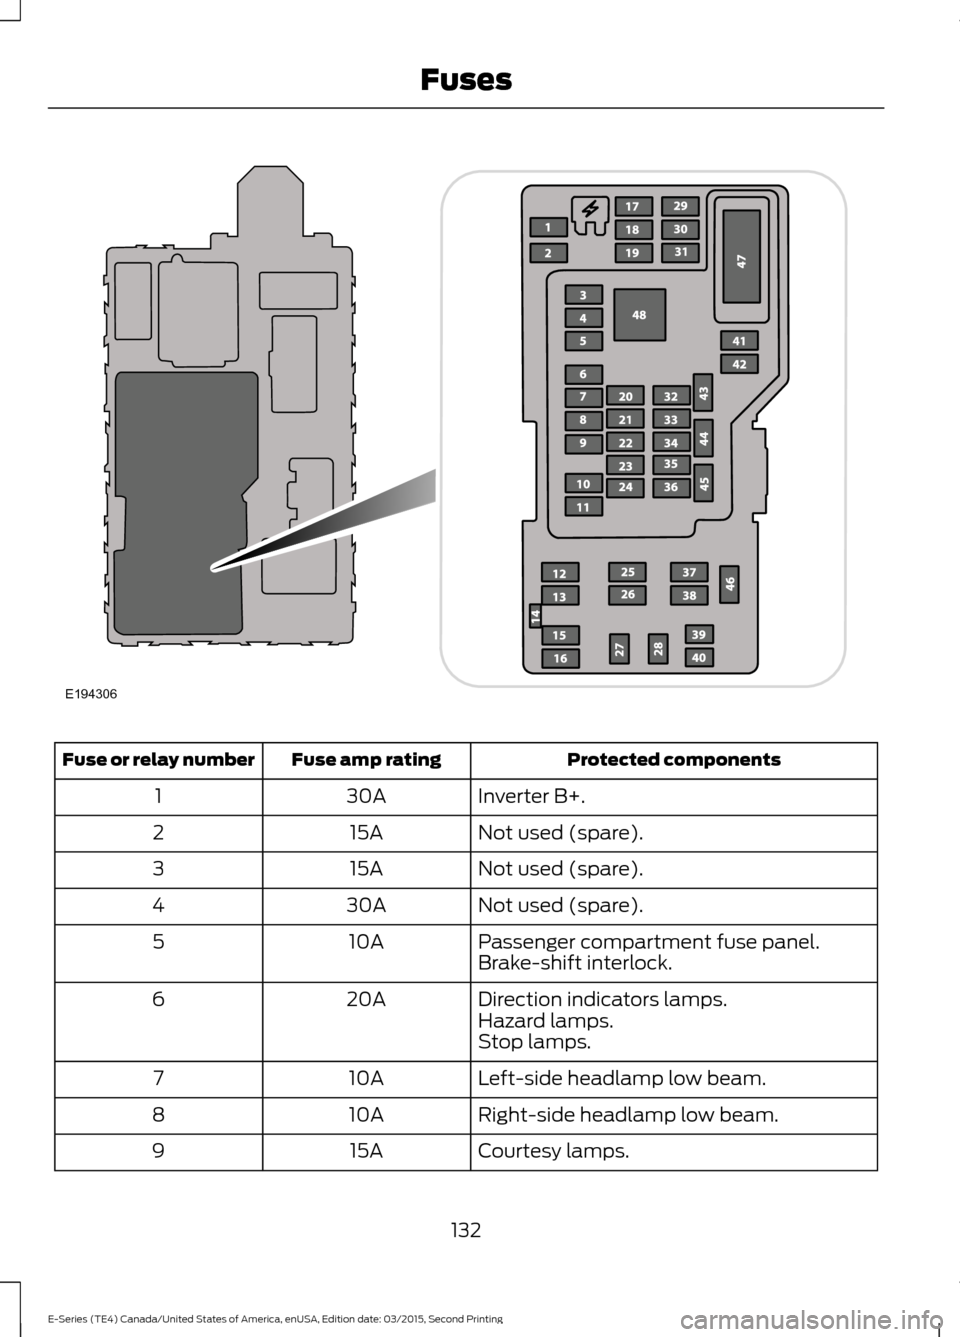
Protected components
Fuse amp rating
Fuse or relay number
Inverter B+.
30A
1
Not used (spare).
15A
2
Not used (spare).
15A
3
Not used (spare).
30A
4
Passenger compartment fuse panel.
10A
5
Brake-shift interlock.
Direction indicators lamps.
20A
6
Hazard lamps.
Stop lamps.
Left-side headlamp low beam.
10A
7
Right-side headlamp low beam.
10A
8
Courtesy lamps.
15A
9
132
E-Series (TE4) Canada/United States of America, enUSA, Edition date: 03/2015, Second Printing FusesE194306
Page 136 of 319
Protected components
Fuse amp rating
Fuse or relay number
Switch illumination.
15A
10
Not used (spare).
10A
11
Not used (spare).
7.5A
12
Mirrors.
5A
13
SYNC.
10A
14
Global positioning system module.
Not used (spare).
10A
15
Not used (spare).
15A
16
Door locks.
20A
17
Not used (spare).
20A
18
Not used (spare).
25A
19
Diagnostic connector (except stripped
chassis).
15A
20
Not used (spare).
15A
21
Parking lamps.
15A
22
License plate lamps.
Headlamp high beams.
15A
23
Horn (except stripped chassis).
20A
24
Demand lighting.
10A
25
Cluster (except stripped chassis).
10A
26
Ignition switch feed.
20A
27
Audio mute (start).
5A
28
Cluster (except stripped chassis).
5A
29
Not used (spare).
5A
30
Not used (spare).
10A
31
Restraints module.
10A
32
Trailer brake controller.
10A
33
Not used (spare).
5A
34
133
E-Series (TE4) Canada/United States of America, enUSA, Edition date: 03/2015, Second Printing Fuses
Page 151 of 319
Note:
Make sure that the wiper blade locks
into place. Lower the wiper arm and blade
back on the windshield. The wiper arms will
automatically return to their normal position
when you turn the ignition on.
• Replace wiper blades at least once per
year for optimum performance.
• You can improve poor wiper quality by
cleaning the wiper blades and the
windshield.
ADJUSTING THE HEADLAMPS
We properly aim the headlamps on your
vehicle at the assembly plant. If your
vehicle has been in an accident, have an
authorized dealed check the alignment of
your headlamps.
Vertical and Horizontal Aim
Adjustment (Sealed Beam
Headlamps)
Use the mechanical aimers on your vehicle
to aim the headlamps. If mechanical
aimers are used and the cross-car sight
line is in any way blocked, set the legs of
the universal adaptor all to the same
setting, such that the cross-car sight line
is no longer blocked (per the instructions
for the brand of mechanical aimer you are
using). You can also aim the headlamps
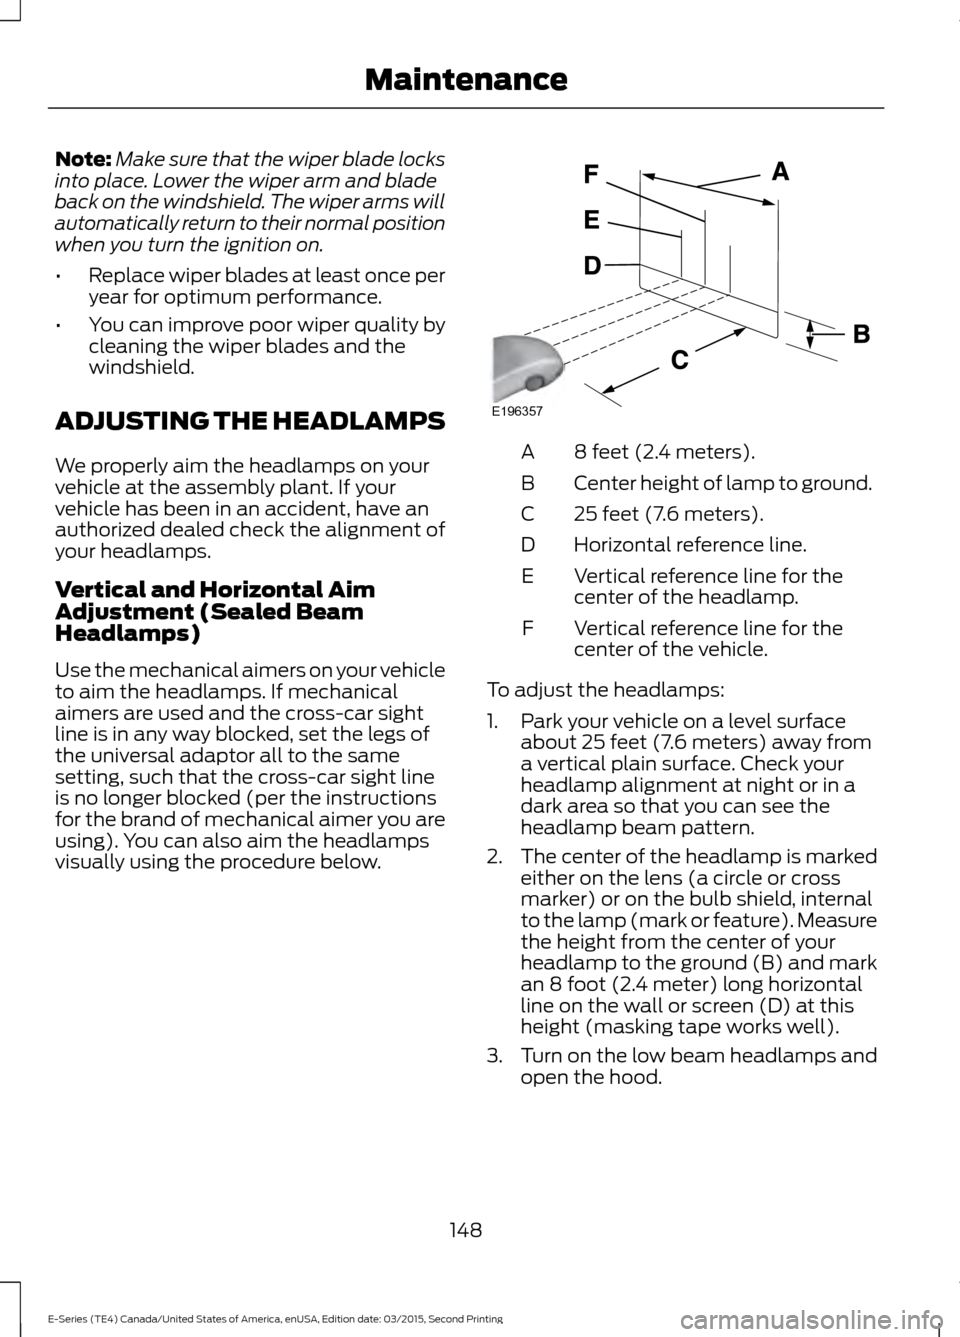
visually using the procedure below. 8 feet (2.4 meters).
A
Center height of lamp to ground.
B
25 feet (7.6 meters).
C
Horizontal reference line.
D
Vertical reference line for the
center of the headlamp.
E
Vertical reference line for the
center of the vehicle.
F
To adjust the headlamps:
1. Park your vehicle on a level surface about 25 feet (7.6 meters) away from
a vertical plain surface. Check your
headlamp alignment at night or in a
dark area so that you can see the
headlamp beam pattern.
2. The center of the headlamp is marked
either on the lens (a circle or cross
marker) or on the bulb shield, internal
to the lamp (mark or feature). Measure
the height from the center of your
headlamp to the ground (B) and mark
an 8 foot (2.4 meter) long horizontal
line on the wall or screen (D) at this
height (masking tape works well).
3. Turn on the low beam headlamps and open the hood.
148
E-Series (TE4) Canada/United States of America, enUSA, Edition date: 03/2015, Second Printing MaintenanceE196357
Page 152 of 319
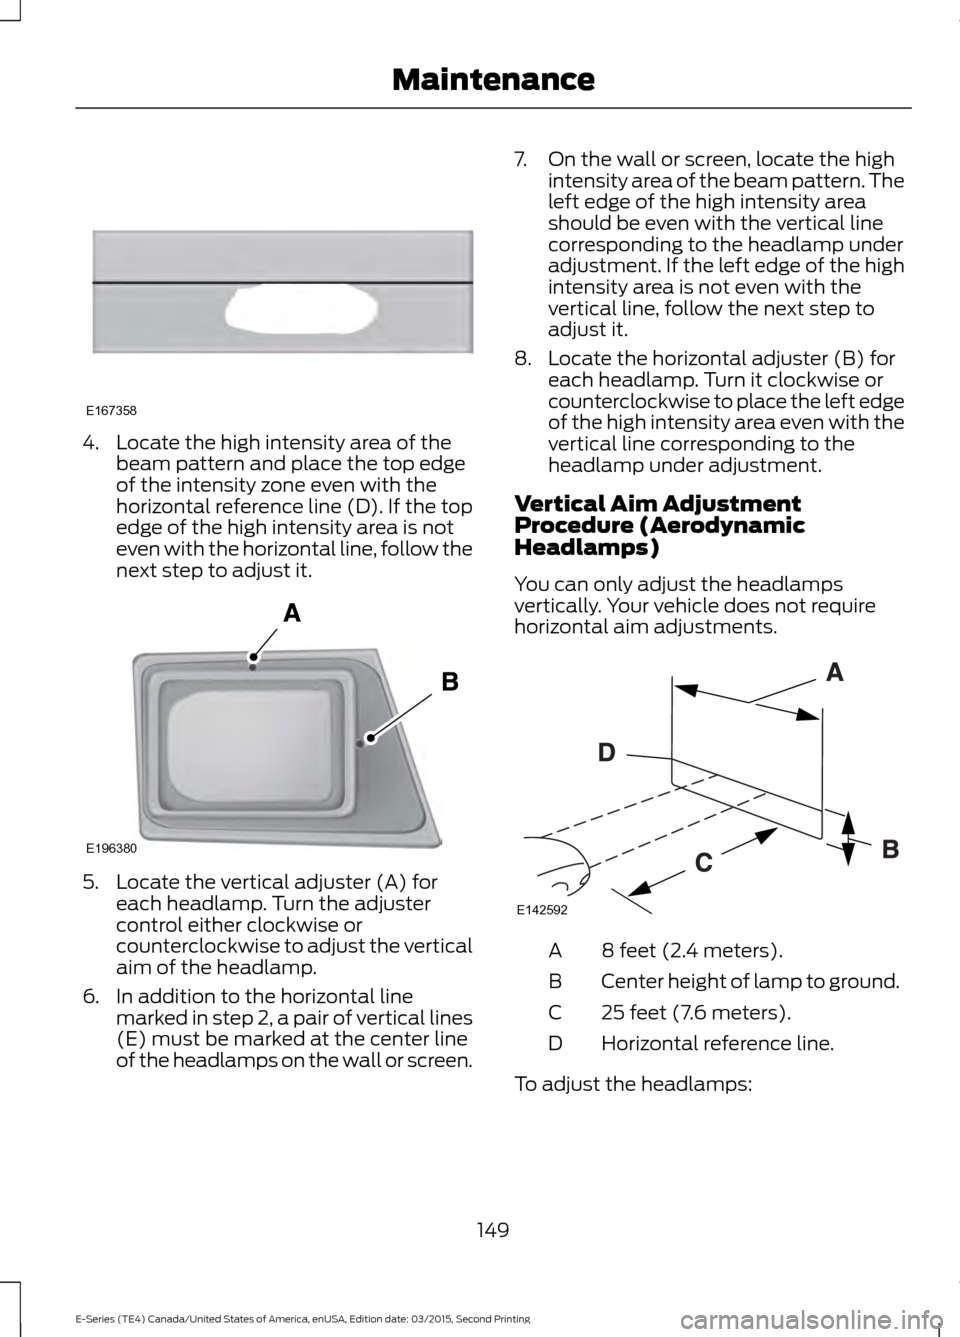
4. Locate the high intensity area of the
beam pattern and place the top edge
of the intensity zone even with the
horizontal reference line (D). If the top
edge of the high intensity area is not
even with the horizontal line, follow the
next step to adjust it. 5. Locate the vertical adjuster (A) for
each headlamp. Turn the adjuster
control either clockwise or
counterclockwise to adjust the vertical
aim of the headlamp.
6. In addition to the horizontal line marked in step 2, a pair of vertical lines
(E) must be marked at the center line
of the headlamps on the wall or screen. 7. On the wall or screen, locate the high
intensity area of the beam pattern. The
left edge of the high intensity area
should be even with the vertical line
corresponding to the headlamp under
adjustment. If the left edge of the high
intensity area is not even with the
vertical line, follow the next step to
adjust it.
8. Locate the horizontal adjuster (B) for each headlamp. Turn it clockwise or
counterclockwise to place the left edge
of the high intensity area even with the
vertical line corresponding to the
headlamp under adjustment.
Vertical Aim Adjustment
Procedure (Aerodynamic
Headlamps)
You can only adjust the headlamps
vertically. Your vehicle does not require
horizontal aim adjustments. 8 feet (2.4 meters).
A
Center height of lamp to ground.
B
25 feet (7.6 meters).
C
Horizontal reference line.
D
To adjust the headlamps:
149
E-Series (TE4) Canada/United States of America, enUSA, Edition date: 03/2015, Second Printing MaintenanceE167358 E196380 E142592