low oil pressure FORD E SERIES 2017 4.G Owners Manual
[x] Cancel search | Manufacturer: FORD, Model Year: 2017, Model line: E SERIES, Model: FORD E SERIES 2017 4.GPages: 318, PDF Size: 6.21 MB
Page 9 of 318
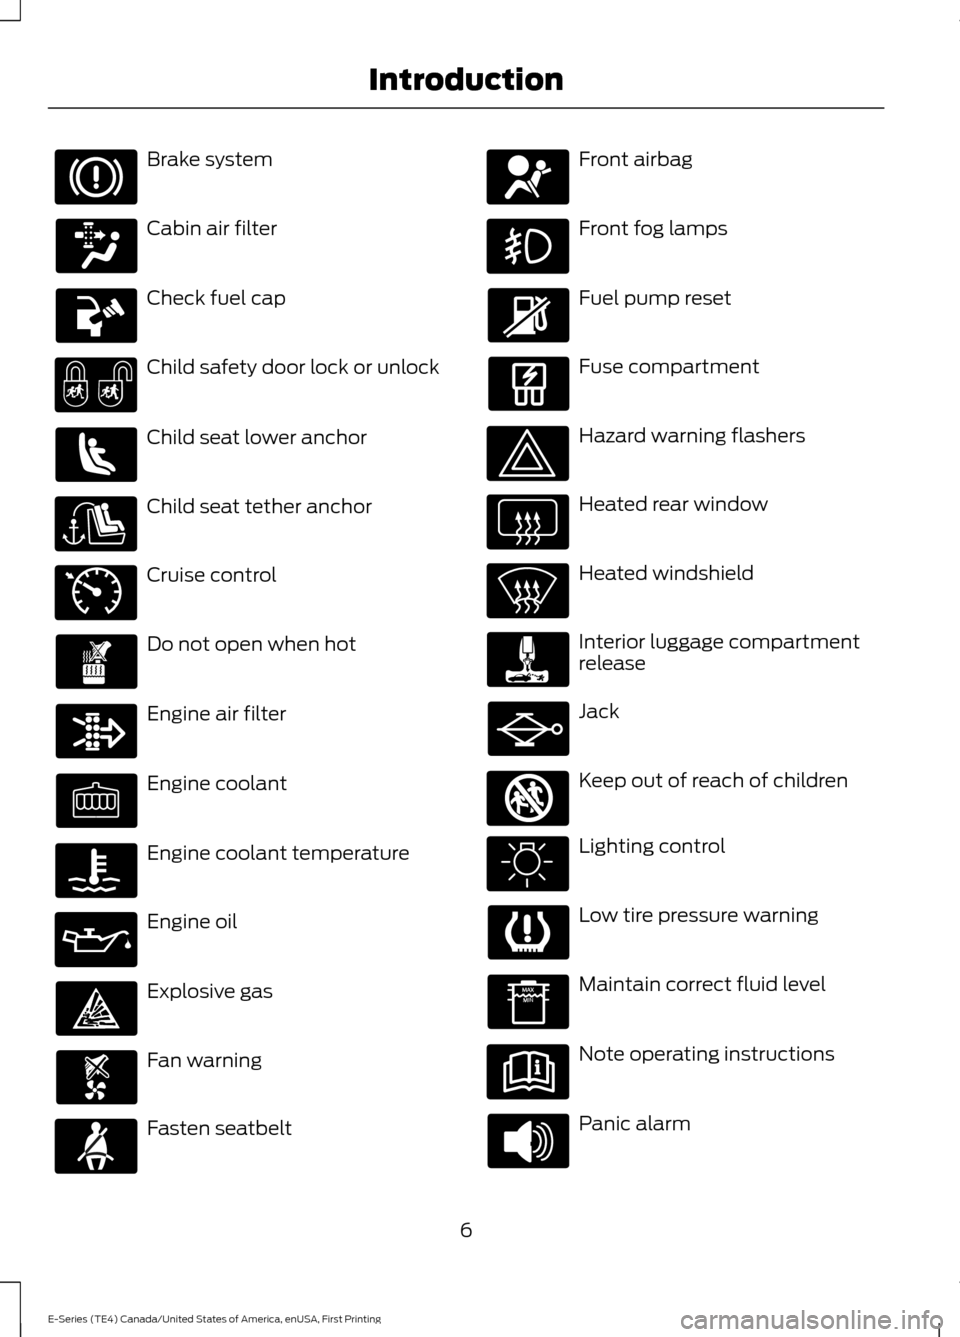
Brake system
Cabin air filter
Check fuel cap
Child safety door lock or unlock
Child seat lower anchor
Child seat tether anchor
Cruise control
Do not open when hot
Engine air filter
Engine coolant
Engine coolant temperature
Engine oil
Explosive gas
Fan warning
Fasten seatbelt Front airbag
Front fog lamps
Fuel pump reset
Fuse compartment
Hazard warning flashers
Heated rear window
Heated windshield
Interior luggage compartment
release
Jack
Keep out of reach of children
Lighting control
Low tire pressure warning
Maintain correct fluid level
Note operating instructions
Panic alarm
6
E-Series (TE4) Canada/United States of America, enUSA, First Printing Introduction E71340 E161353
Page 54 of 318
Trip Computer
See Information Displays (page 55).
Vehicle Settings and Personalization
See
Information Displays (page 55).
Engine Oil Pressure Gauge
Indicates the engine oil pressure. The
needle should stay in the normal operating
range. If the needle falls below the normal
range, stop the vehicle and switch off the
engine. Check the engine oil level and add
oil if needed. If the oil level is correct, have
an authorized dealer check the system.
WARNING LAMPS AND
INDICATORS
The following warning lamps and
indicators alert you to a vehicle condition
that may become serious. Some lamps
illuminate when you start your vehicle to
make sure they work. If any lamps remain
on after starting your vehicle, refer to the
respective system warning lamp for further
information.
Note: Some warning indicators appear in
the information display and function the
same as a warning lamp but do not display
when you start your vehicle.
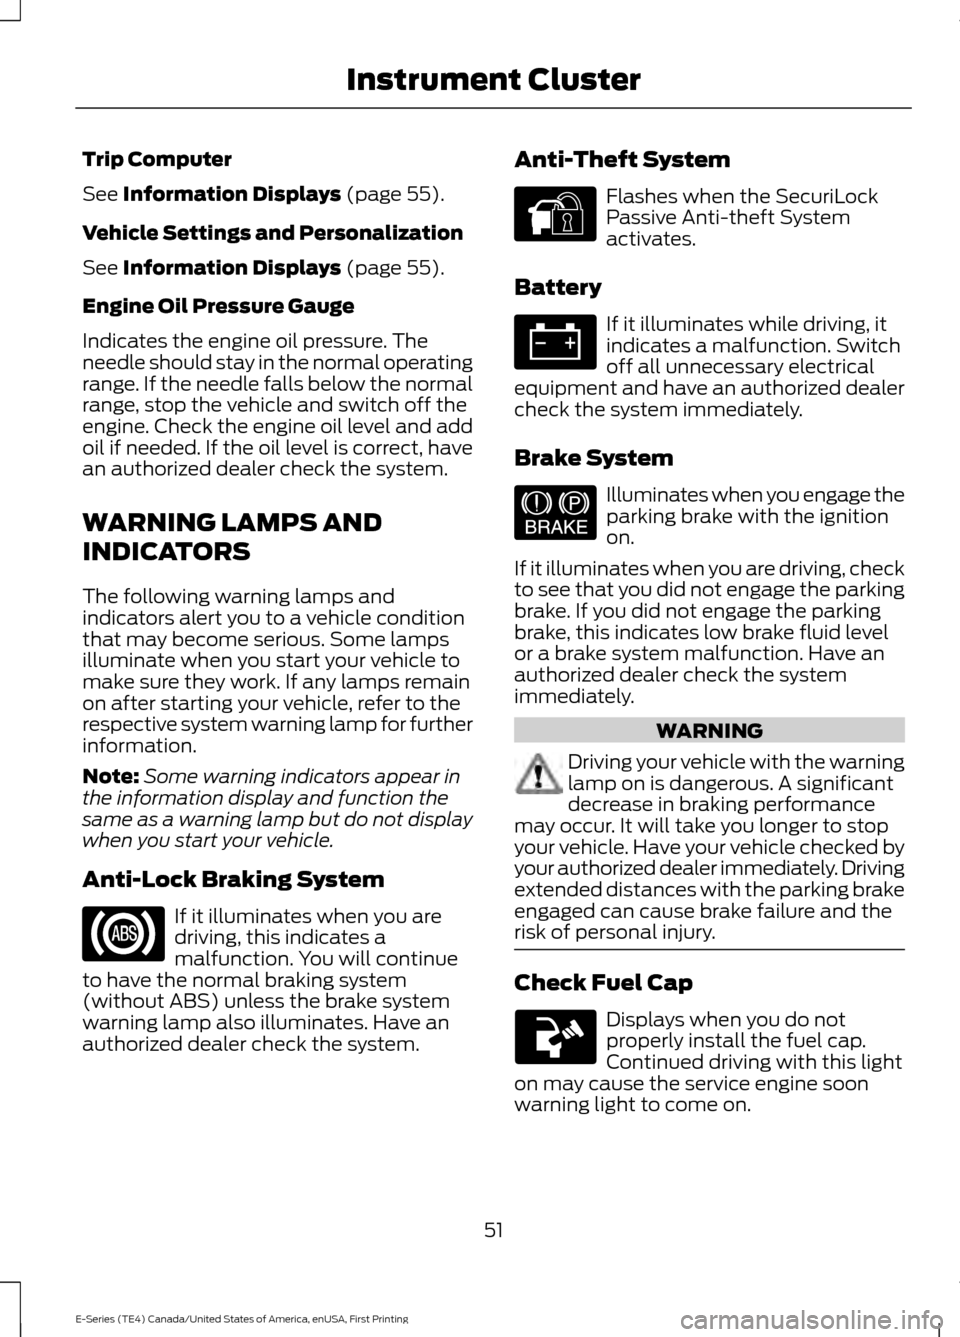
Anti-Lock Braking System If it illuminates when you are
driving, this indicates a
malfunction. You will continue
to have the normal braking system
(without ABS) unless the brake system
warning lamp also illuminates. Have an
authorized dealer check the system. Anti-Theft System Flashes when the SecuriLock
Passive Anti-theft System
activates.
Battery If it illuminates while driving, it
indicates a malfunction. Switch
off all unnecessary electrical
equipment and have an authorized dealer
check the system immediately.
Brake System Illuminates when you engage the
parking brake with the ignition
on.
If it illuminates when you are driving, check
to see that you did not engage the parking
brake. If you did not engage the parking
brake, this indicates low brake fluid level
or a brake system malfunction. Have an
authorized dealer check the system
immediately. WARNING
Driving your vehicle with the warning
lamp on is dangerous. A significant
decrease in braking performance
may occur. It will take you longer to stop
your vehicle. Have your vehicle checked by
your authorized dealer immediately. Driving
extended distances with the parking brake
engaged can cause brake failure and the
risk of personal injury. Check Fuel Cap
Displays when you do not
properly install the fuel cap.
Continued driving with this light
on may cause the service engine soon
warning light to come on.
51
E-Series (TE4) Canada/United States of America, enUSA, First Printing Instrument Cluster E144845 E144522
Page 55 of 318
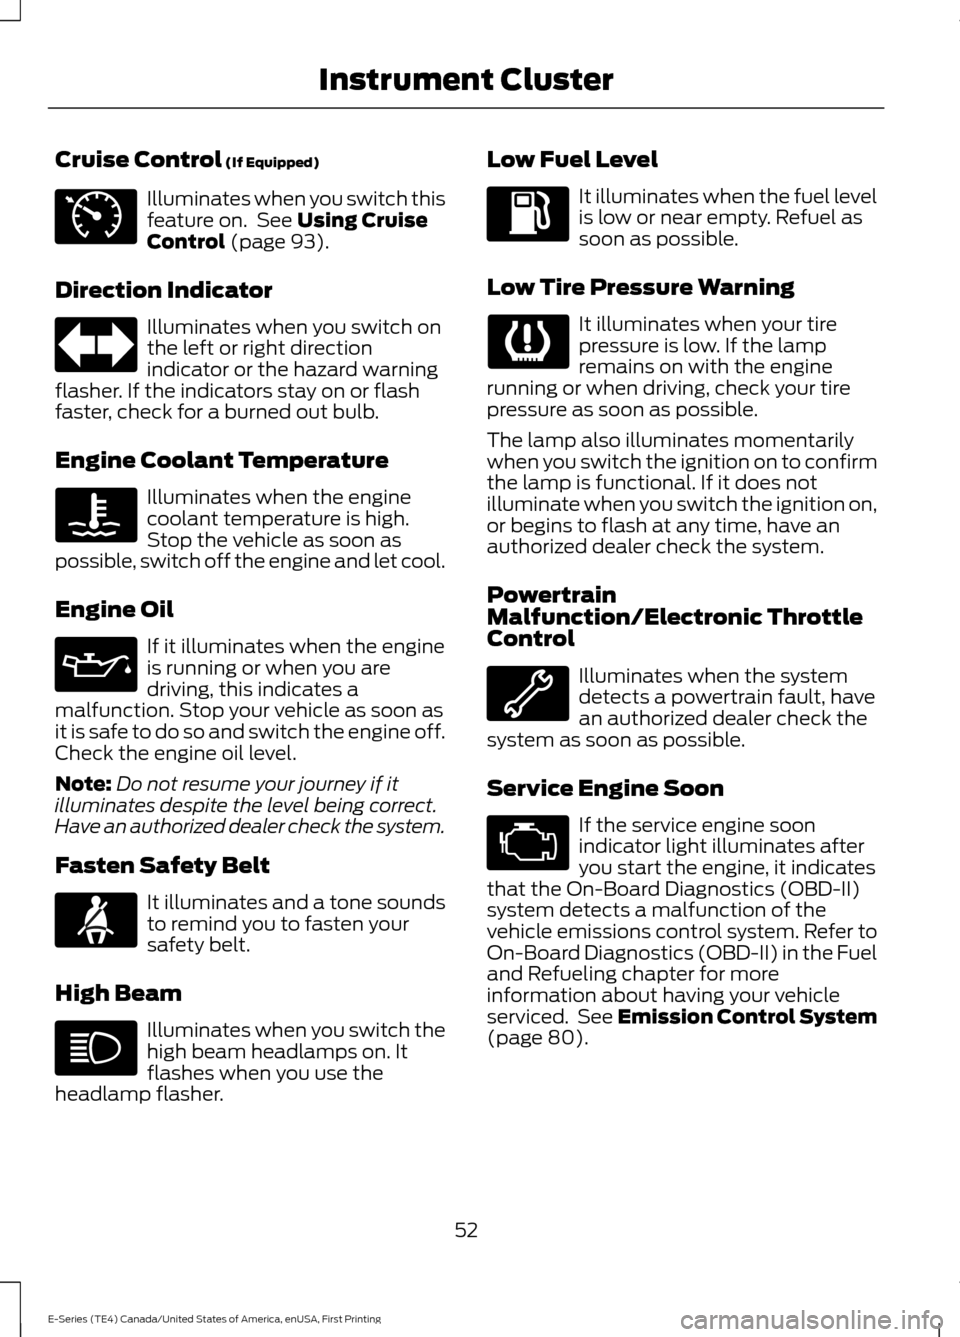
Cruise Control (If Equipped)
Illuminates when you switch this
feature on. See
Using Cruise
Control (page 93).
Direction Indicator Illuminates when you switch on
the left or right direction
indicator or the hazard warning
flasher. If the indicators stay on or flash
faster, check for a burned out bulb.
Engine Coolant Temperature Illuminates when the engine
coolant temperature is high.
Stop the vehicle as soon as
possible, switch off the engine and let cool.
Engine Oil If it illuminates when the engine
is running or when you are
driving, this indicates a
malfunction. Stop your vehicle as soon as
it is safe to do so and switch the engine off.
Check the engine oil level.
Note: Do not resume your journey if it
illuminates despite the level being correct.
Have an authorized dealer check the system.
Fasten Safety Belt It illuminates and a tone sounds
to remind you to fasten your
safety belt.
High Beam Illuminates when you switch the
high beam headlamps on. It
flashes when you use the
headlamp flasher. Low Fuel Level It illuminates when the fuel level
is low or near empty. Refuel as
soon as possible.
Low Tire Pressure Warning It illuminates when your tire
pressure is low. If the lamp
remains on with the engine
running or when driving, check your tire
pressure as soon as possible.
The lamp also illuminates momentarily
when you switch the ignition on to confirm
the lamp is functional. If it does not
illuminate when you switch the ignition on,
or begins to flash at any time, have an
authorized dealer check the system.
Powertrain
Malfunction/Electronic Throttle
Control Illuminates when the system
detects a powertrain fault, have
an authorized dealer check the
system as soon as possible.
Service Engine Soon If the service engine soon
indicator light illuminates after
you start the engine, it indicates
that the On-Board Diagnostics (OBD-II)
system detects a malfunction of the
vehicle emissions control system. Refer to
On-Board Diagnostics (OBD-II) in the Fuel
and Refueling chapter for more
information about having your vehicle
serviced. See Emission Control System
(page
80).
52
E-Series (TE4) Canada/United States of America, enUSA, First Printing Instrument ClusterE71340
Page 140 of 318
To reset the oil life monitoring system do
the following:
1.
Switch the ignition on. Do not start the
engine.
2. Fully press the accelerator and brake pedals at the same time.
3. Keep the accelerator and brake pedals
fully pressed.
4. After three seconds, a message displays confirming the reset procedure
is in progress.
5. After 25 seconds, a message displays confirming the reset procedure is
complete.
6. Release the accelerator and brake pedals.
7. Switch the ignition off.
ENGINE COOLANT CHECK WARNINGS
Do not add engine coolant when the
engine is hot. Steam and scalding
liquids released from a hot cooling
system can burn you badly. Also, spilling
coolant on hot engine parts can burn you. Do not put engine coolant in the
windshield washer fluid container. If
sprayed on the windshield, engine
coolant could make it difficult to see
through the windshield. To reduce the risk of personal injury,
make sure the engine is cool before
unscrewing the coolant pressure
relief cap. The cooling system is under
pressure. Steam and hot liquid can come
out forcefully when you loosen the cap
slightly. Do not add coolant further than the
MAX mark. When the engine is cold, check the
concentration and level of the coolant at
the intervals listed in the scheduled
maintenance information. See Scheduled
Maintenance
(page 268).
Note: Make sure that the coolant level is
between the
MIN and MAX marks on the
coolant reservoir.
Note: Coolant expands when it is hot. The
level may extend beyond the
MAX mark.
Maintain coolant concentration within
48% to 50%, which equates to a freeze
point between -30°F (-34°C) and -34°F
(-37°C). Coolant concentration should be
checked using a refractometer. We do not
recommend the use of hydrometers or
coolant test strips for measuring coolant
concentration.
Adding Coolant WARNING
Never remove the coolant reservoir
cap while the engine is running or hot.
Note:
Automotive fluids are not
interchangeable. Do not use coolant or
windshield washer fluid outside of its
specified function and vehicle location.
Note: Do not use stop leak pellets, cooling
system sealants, or non-specified additives
as they can cause damage to the engine
cooling or heating systems. Resulting
component damage may not be covered by
the vehicle Warranty.
137
E-Series (TE4) Canada/United States of America, enUSA, First Printing Maintenance
Page 154 of 318
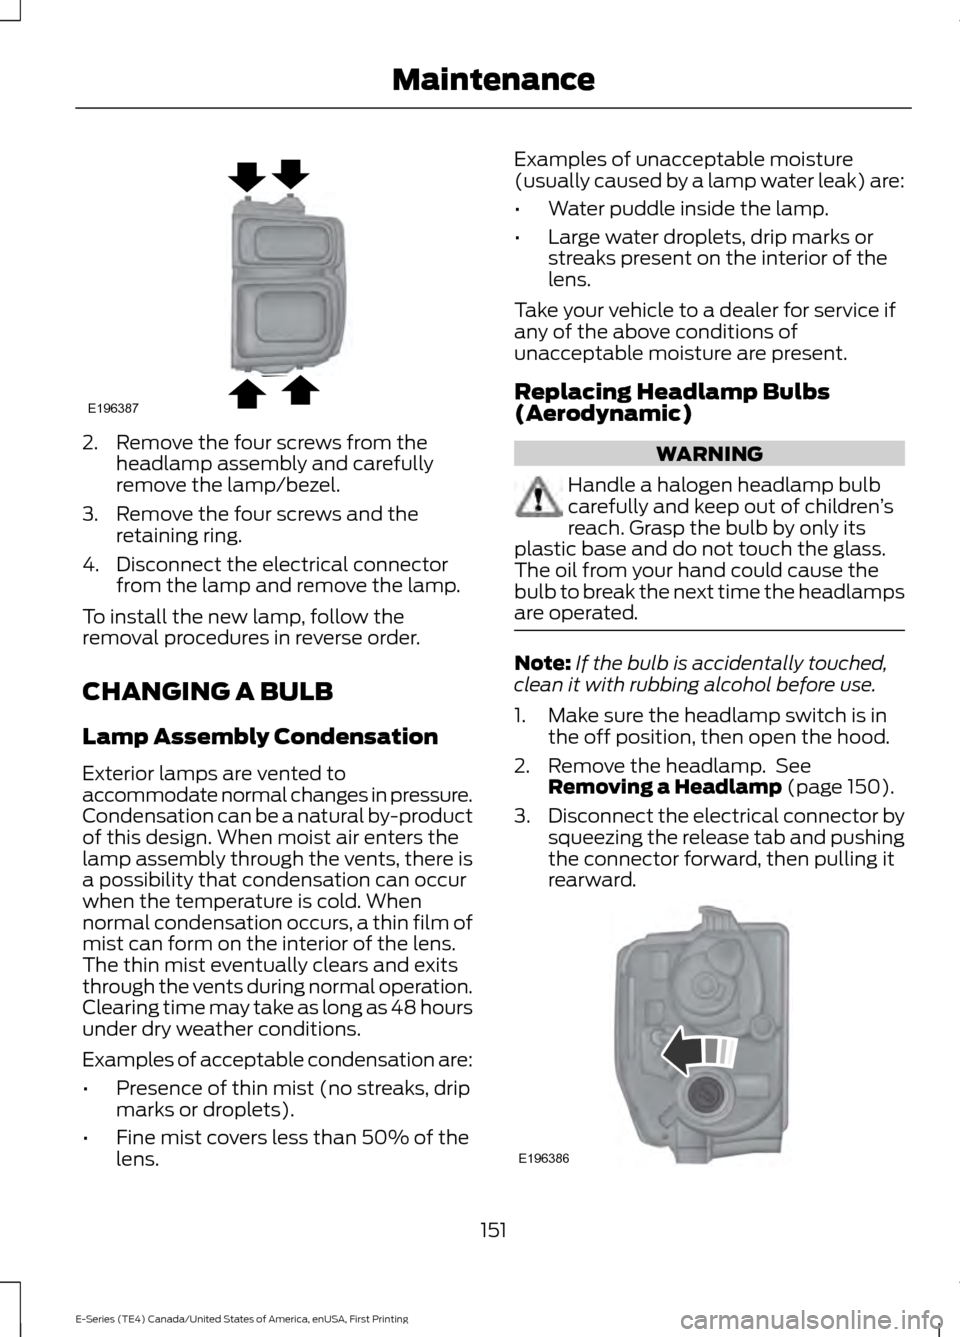
2. Remove the four screws from the
headlamp assembly and carefully
remove the lamp/bezel.
3. Remove the four screws and the retaining ring.
4. Disconnect the electrical connector from the lamp and remove the lamp.
To install the new lamp, follow the
removal procedures in reverse order.
CHANGING A BULB
Lamp Assembly Condensation
Exterior lamps are vented to
accommodate normal changes in pressure.
Condensation can be a natural by-product
of this design. When moist air enters the
lamp assembly through the vents, there is
a possibility that condensation can occur
when the temperature is cold. When
normal condensation occurs, a thin film of
mist can form on the interior of the lens.
The thin mist eventually clears and exits
through the vents during normal operation.
Clearing time may take as long as 48 hours
under dry weather conditions.
Examples of acceptable condensation are:
• Presence of thin mist (no streaks, drip
marks or droplets).
• Fine mist covers less than 50% of the
lens. Examples of unacceptable moisture
(usually caused by a lamp water leak) are:
•
Water puddle inside the lamp.
• Large water droplets, drip marks or
streaks present on the interior of the
lens.
Take your vehicle to a dealer for service if
any of the above conditions of
unacceptable moisture are present.
Replacing Headlamp Bulbs
(Aerodynamic) WARNING
Handle a halogen headlamp bulb
carefully and keep out of children
’s
reach. Grasp the bulb by only its
plastic base and do not touch the glass.
The oil from your hand could cause the
bulb to break the next time the headlamps
are operated. Note:
If the bulb is accidentally touched,
clean it with rubbing alcohol before use.
1. Make sure the headlamp switch is in the off position, then open the hood.
2. Remove the headlamp. See Removing a Headlamp (page 150).
3. Disconnect the electrical connector by
squeezing the release tab and pushing
the connector forward, then pulling it
rearward. 151
E-Series (TE4) Canada/United States of America, enUSA, First Printing MaintenanceE196387 E196386
Page 166 of 318
Miscellaneous
•
Make sure all linkages, cables, levers
and pins under your vehicle are covered
with grease to prevent rust.
• Move vehicles at least 25 ft (7.5 m)
every 15 days to lubricate working parts
and prevent corrosion.
Removing Vehicle From Storage
When your vehicle is ready to come out of
storage, do the following:
• Wash your vehicle to remove any dirt
or grease film build-up on window
surfaces.
• Check windshield wipers for any
deterioration.
• Check under the hood for any foreign
material that may have collected
during storage such as mice or squirrel
nests.
• Check the exhaust for any foreign
material that may have collected
during storage.
• Check tire pressures and set tire
inflation per the Tire Label.
• Check brake pedal operation. Drive
your vehicle
15 ft (4.5 m) back and
forth to remove rust build-up.
• Check fluid levels (including coolant,
oil and gas) to make sure there are no
leaks, and fluids are at recommended
levels.
• If you remove the battery, clean the
battery cable ends and check for
damage.
Contact an authorized dealer if you have
any concerns or issues.
163
E-Series (TE4) Canada/United States of America, enUSA, First Printing Vehicle Care
Page 204 of 318
Note:
Ford recommends using DOT 4 Low
Viscosity (LV) High Performance Brake Fluid
or equivalent meeting WSS-M6C65-A2. Use
of any fluid other than the recommended
fluid may cause degraded brake
performance and not meet the Ford
performance standards. Keep brake fluid
clean and dry. Contamination with dirt,
water, petroleum products or other
materials may result in brake system
damage and possible failure. Note:
Automatic transmissions that require
MERCON LV transmission fluid should only
use MERCON LV transmission fluid. The
use of any other fluid may cause
transmission damage.
CAPACITIES AND SPECIFICATIONS - 6.8L WARNING
The air conditioning refrigerant system contains refrigerant under high pressure.
Only qualified personnel should service the air conditioning refrigerant system.
Opening the air conditioning refrigerant system can cause personal injury.
Capacity
Item
6.0 qt (5.7 L)
Engine oil (with oil filter)
30.4 qt (28.8 L)1
Engine coolant
32.5 qt (30.8 L)1
Engine coolant - with auxiliary rear heat
Between MIN/MAX on brake fluid reservoir
Brake fluid
Between MIN/MAX on power steering fluidreservoir
Power steering fluid
17.4 qt (16.5 L)2
Automatic transmission fluid
6.6 pt (3.1L)3
Dana Limited Slip Axle fluid
M70FF (M267FF)
E-350
9.7 pt (4.6L)3
Dana Limited Slip Axle fluid
M70HD (M273HD)
E-450
6.6 pt (3.1L)3
Dana conventional axle fluid
M70FF (M267FF)
E-350
9.7 pt (4.6L)3
Dana conventional axle fluid
201
E-Series (TE4) Canada/United States of America, enUSA, First Printing Capacities and Specifications
Page 272 of 318
Ford Motor Company has recommended
maintenance intervals for various parts
and component systems based upon
engineering testing. Ford Motor Company
relies upon this testing to determine the
most appropriate mileage for replacement
of oils and fluids to protect your vehicle at
the lowest overall cost to you and
recommends against maintenance
schedules that deviate from the scheduled
maintenance information.
We strongly recommend the use of only
genuine Ford, Motorcraft or
Ford-authorized re-manufactured
replacement parts engineered for your
vehicle.
Additives and Chemicals
This owner's manual and the Ford
Workshop Manual list the recommended
additives and chemicals for your vehicle.
We do not recommend using chemicals or
additives not approved by us as part of
your vehicle
’s normal maintenance. Please
consult your warranty information. Oils, Fluids and Flushing
In many cases, fluid discoloration is a
normal operating characteristic and, by
itself, does not necessarily indicate a
concern or that the fluid needs to be
changed. However, a qualified expert, such
as the factory-trained technicians at your
dealership, should inspect discolored fluids
that also show signs of overheating or
foreign material contamination
immediately.
Make sure to change your vehicle
’s oils and
fluids at the specified intervals or in
conjunction with a repair. Flushing is a
viable way to change fluid for many vehicle
sub-systems during scheduled
maintenance. It is critical that systems are
flushed only with new fluid that is the same
as that required to fill and operate the
system or using a Ford-approved flushing
chemical.
Owner Checks and Services
Make sure you perform the following basic
maintenance checks and inspections every
month or at six-month intervals. Check every month
Engine oil level.
Function of all interior and exterior lights.
Tires (including spare) for wear and proper pressure. Windshield washer fluid level. Check every six months
Battery connections. Clean if necessary.
Body and door drain holes for obstructions. Clean if necessary. Cooling system fluid level and coolant strength.
Door weatherstrips for wear. Lubricate if necessary.
269
E-Series (TE4) Canada/United States of America, enUSA, First Printing Scheduled Maintenance
Page 273 of 318
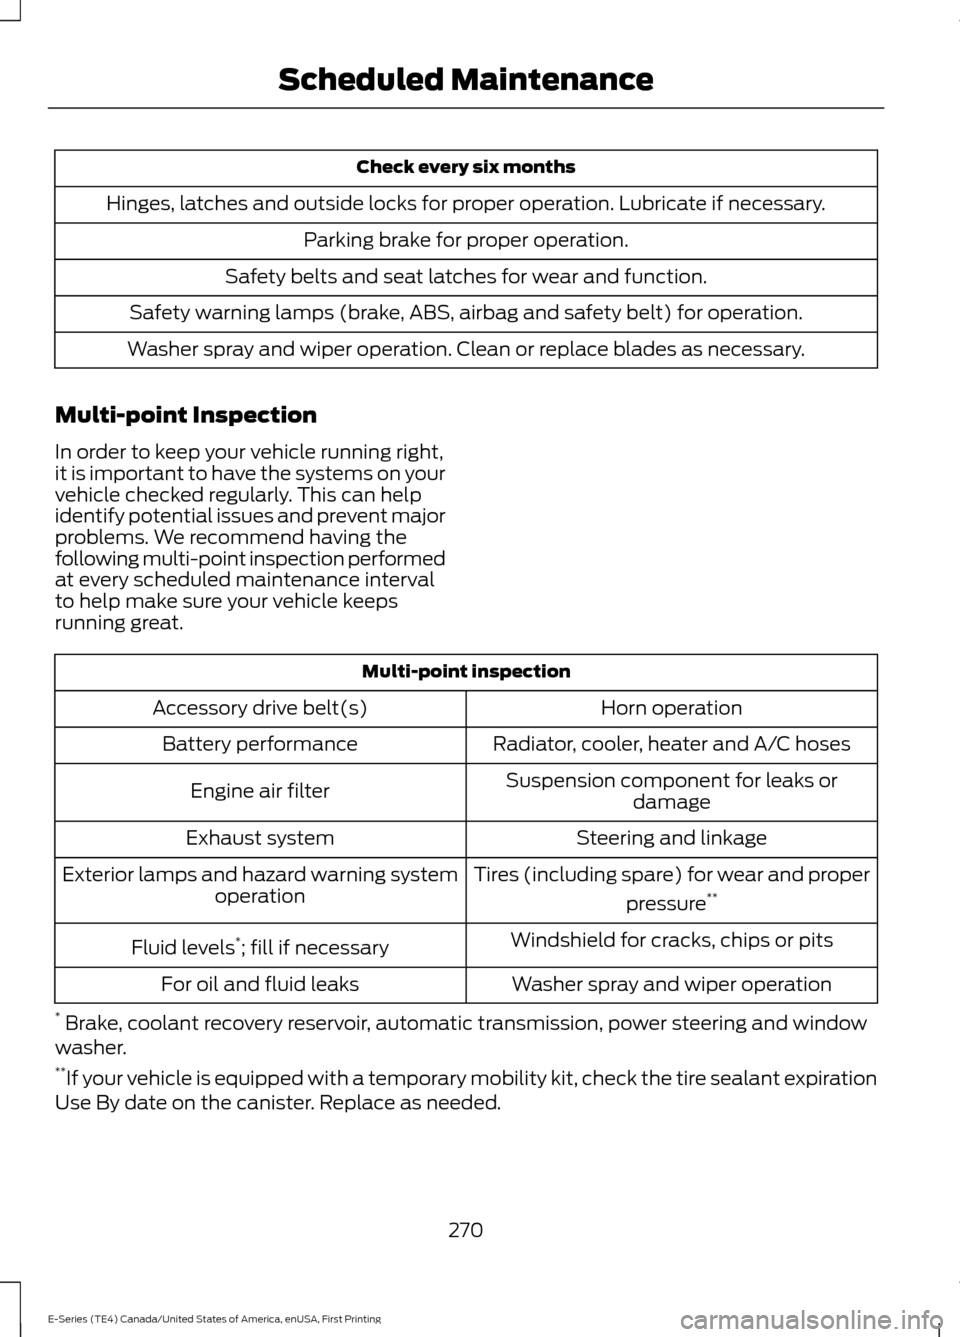
Check every six months
Hinges, latches and outside locks for proper operation. Lubricate if necessary. Parking brake for proper operation.
Safety belts and seat latches for wear and function.
Safety warning lamps (brake, ABS, airbag and safety belt) for operation.
Washer spray and wiper operation. Clean or replace blades as necessary.
Multi-point Inspection
In order to keep your vehicle running right,
it is important to have the systems on your
vehicle checked regularly. This can help
identify potential issues and prevent major
problems. We recommend having the
following multi-point inspection performed
at every scheduled maintenance interval
to help make sure your vehicle keeps
running great. Multi-point inspection
Horn operation
Accessory drive belt(s)
Radiator, cooler, heater and A/C hoses
Battery performance
Suspension component for leaks ordamage
Engine air filter
Steering and linkage
Exhaust system
Tires (including spare) for wear and properpressure**
Exterior lamps and hazard warning system
operation
Windshield for cracks, chips or pits
Fluid levels *
; fill if necessary
Washer spray and wiper operation
For oil and fluid leaks
* Brake, coolant recovery reservoir, automatic transmission, power steering and window
washer.
** If your vehicle is equipped with a temporary mobility kit, check the tire sealant expiration
Use By date on the canister. Replace as needed.
270
E-Series (TE4) Canada/United States of America, enUSA, First Printing Scheduled Maintenance
Page 318 of 318
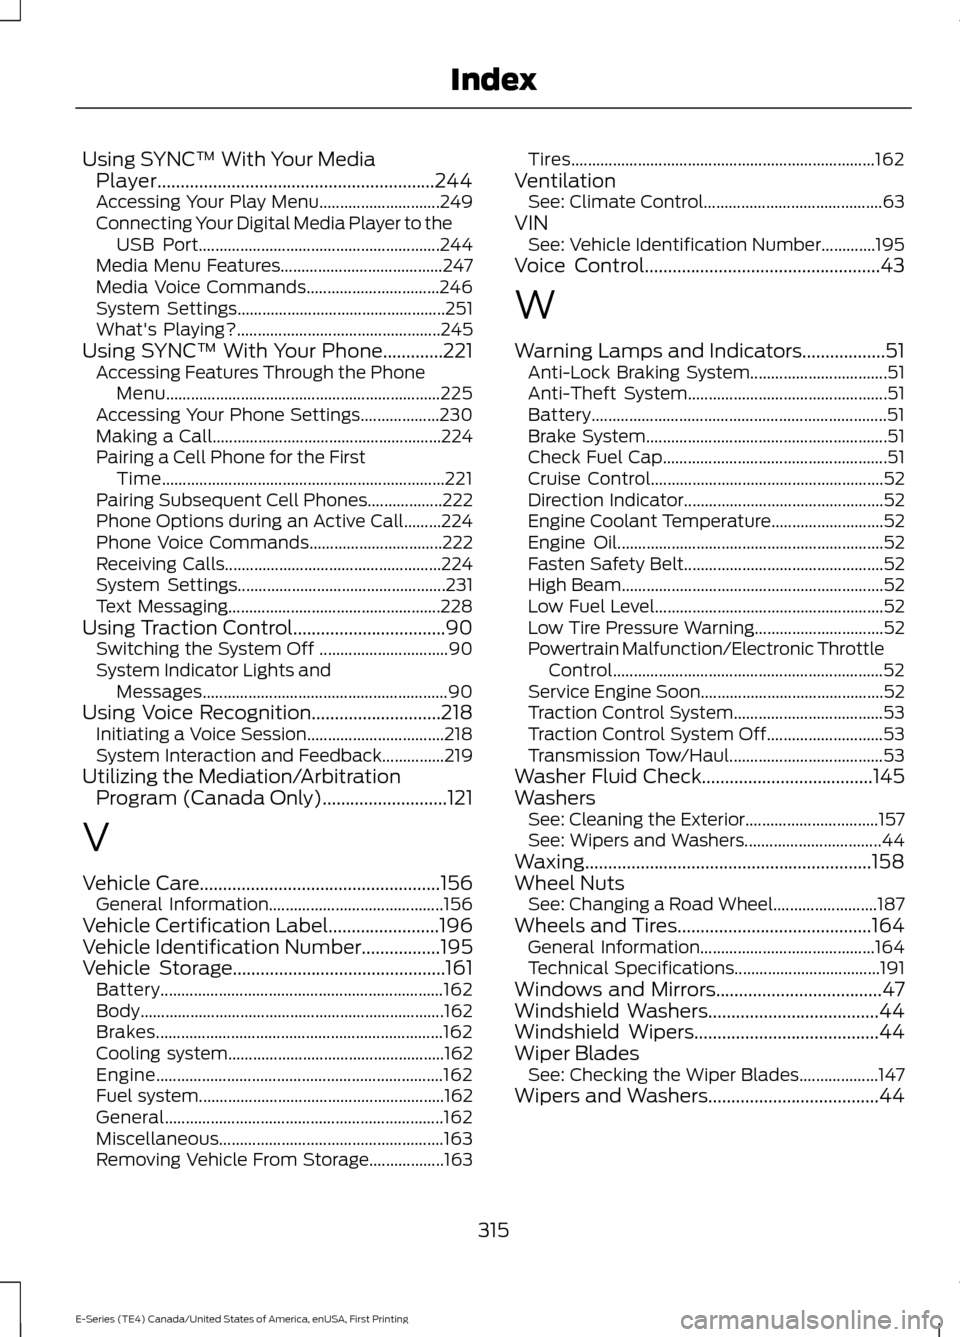
Using SYNC™ With Your Media
Player............................................................244
Accessing Your Play Menu............................. 249
Connecting Your Digital Media Player to the USB Port.......................................................... 244
Media Menu Features....................................... 247
Media Voice Commands................................ 246
System Settings.................................................. 251
What's Playing?................................................. 245
Using SYNC™ With Your Phone.............221
Accessing Features Through the Phone
Menu.................................................................. 225
Accessing Your Phone Settings................... 230
Making a Call....................................................... 224
Pairing a Cell Phone for the First Time.................................................................... 221
Pairing Subsequent Cell Phones.................. 222
Phone Options during an Active Call.........224
Phone Voice Commands................................ 222
Receiving Calls.................................................... 224
System Settings.................................................. 231
Text Messaging................................................... 228
Using Traction Control.................................90 Switching the System Off ............................... 90
System Indicator Lights and Messages........................................................... 90
Using Voice Recognition............................218 Initiating a Voice Session................................. 218
System Interaction and Feedback...............219
Utilizing the Mediation/Arbitration Program (Canada Only)...........................121
V
Vehicle Care
....................................................156
General Information.......................................... 156
Vehicle Certification Label........................196
Vehicle Identification Number.................195
Vehicle Storage..............................................161 Battery.................................................................... 162
Body........................................................................\
. 162
Brakes..................................................................... 162
Cooling system.................................................... 162
Engine..................................................................... 162
Fuel system........................................................... 162
General................................................................... 162
Miscellaneous...................................................... 163
Removing Vehicle From Storage.................. 163Tires........................................................................\
.
162
Ventilation See: Climate Control........................................... 63
VIN See: Vehicle Identification Number.............195
Voice Control
...................................................43
W
Warning Lamps and Indicators..................51 Anti-Lock Braking System................................. 51
Anti-Theft System................................................ 51
Battery....................................................................... 51
Brake System.......................................................... 51
Check Fuel Cap...................................................... 51
Cruise Control........................................................ 52
Direction Indicator................................................ 52
Engine Coolant Temperature........................... 52
Engine Oil................................................................ 52
Fasten Safety Belt................................................ 52
High Beam............................................................... 52
Low Fuel Level....................................................... 52
Low Tire Pressure Warning............................... 52
Powertrain Malfunction/Electronic Throttle Control................................................................. 52
Service Engine Soon............................................ 52
Traction Control System.................................... 53
Traction Control System Off............................ 53
Transmission Tow/Haul..................................... 53
Washer Fluid Check.....................................145
Washers See: Cleaning the Exterior................................ 157
See: Wipers and Washers................................. 44
Waxing..............................................................158
Wheel Nuts See: Changing a Road Wheel......................... 187
Wheels and Tires..........................................164 General Information.......................................... 164
Technical Specifications................................... 191
Windows and Mirrors....................................47
Windshield Washers
.....................................44
Windshield Wipers........................................44
Wiper Blades See: Checking the Wiper Blades................... 147
Wipers and Washers.....................................44
315
E-Series (TE4) Canada/United States of America, enUSA, First Printing Index