automatic FORD E SERIES 2018 Owners Manual
[x] Cancel search | Manufacturer: FORD, Model Year: 2018, Model line: E SERIES, Model: FORD E SERIES 2018Pages: 323, PDF Size: 7.09 MB
Page 5 of 323
Audible Warnings and Indicators............55
Information Displays
General Information.....................................56
Information Messages.................................61
Climate Control
Manual Climate Control.............................64
Hints on Controlling the Interior Climate..........................................................................65
Rear Passenger Climate Controls...........66
Seats
Sitting in the Correct Position..................68
Head Restraints.............................................68
Manual Seats.................................................69
Power Seats....................................................69
Auxiliary Power Points
Auxiliary Power Points..................................71
Starting and Stopping theEngine
General Information.....................................73
Ignition Switch................................................73
Starting a Gasoline Engine.........................73
Engine Block Heater.....................................75
Fuel and Refueling
Safety Precautions.......................................76
Fuel Quality - E85.........................................76
Fuel Quality - Gasoline................................78
Running Out of Fuel.....................................78
Refueling...........................................................79
Fuel Consumption........................................80
Engine Emission Control
Emission Law..................................................82
Catalytic Converter.......................................83
Transmission
Automatic Transmission............................86
Rear Axle
Limited Slip Differential.............................89
Brakes
General Information....................................90
Hints on Driving With Anti-Lock Brakes..........................................................................90
Parking Brake...................................................91
Traction Control
Principle of Operation.................................92
Using Traction Control................................92
Parking Aids
Rear View Camera........................................93
Cruise Control
Principle of Operation.................................95
Using Cruise Control....................................95
Driving Aids
Steering............................................................96
Load Carrying
Load Limit........................................................97
Towing
Towing a Trailer............................................102
Trailer Sway Control...................................103
Recommended Towing Weights...........103
Essential Towing Checks..........................107
Towing the Vehicle on Four Wheels......113
Driving Hints
Breaking-In......................................................114
Reduced Engine Performance.................114
2
E-Series (TE4) Canada/United States of America, enUSA, Edition date: 201712, Second Printing
Table of Contents
Page 6 of 323
Economical Driving......................................114
Driving Through Water................................115
Floor Mats........................................................115
Roadside Emergencies
Roadside Assistance...................................117
Hazard Flashers............................................118
Fuel Shutoff....................................................118
Jump Starting the Vehicle.........................119
Transporting the Vehicle............................121
Customer Assistance
Getting the Services You Need...............122
In California (U.S. Only).............................123
The Better Business Bureau (BBB) AutoLine Program (U.S. Only)......................124
Utilizing the Mediation/ArbitrationProgram (Canada Only).......................125
Getting Assistance Outside the U.S. andCanada........................................................125
Ordering Additional Owner's Literature.........................................................................126
Reporting Safety Defects (U.S. Only)..........................................................................127
Reporting Safety Defects (Canada Only)..........................................................................127
Fuses
Fuse Specification Chart..........................129
Changing a Fuse...........................................137
Maintenance
General Information...................................139
Opening and Closing the Hood..............139
Under Hood Overview...............................139
Engine Oil Dipstick.......................................141
Engine Oil Check...........................................141
Oil Change Indicator Reset......................142
Engine Coolant Check...............................142
Automatic Transmission Fluid Check.........................................................................146
Brake Fluid Check........................................149
Power Steering Fluid Check....................150
Washer Fluid Check....................................150
Changing the 12V Battery..........................151
Checking the Wiper Blades......................152
Changing the Wiper Blades.....................152
Adjusting the Headlamps.........................153
Removing a Headlamp..............................154
Changing a Bulb...........................................154
Bulb Specification Chart..........................156
Changing the Engine Air Filter................158
Vehicle Care
General Information...................................159
Cleaning Products.......................................159
Cleaning the Exterior..................................159
Waxing..............................................................161
Cleaning the Engine.....................................161
Cleaning the Windows and Wiper Blades..........................................................................161
Cleaning the Interior...................................162
Cleaning the Instrument Panel andInstrument Cluster Lens.......................162
Repairing Minor Paint Damage..............163
Cleaning the Wheels..................................163
Vehicle Storage............................................164
Wheels and Tires
General Information...................................166
Tire Care..........................................................167
Using Snow Chains.....................................185
Tire Pressure Monitoring System..........186
Changing a Road Wheel...........................189
Technical Specifications...........................192
Capacities and Specifications
Engine Specifications - 6.2L...................194
Engine Specifications - 6.8L...................194
Motorcraft Parts - 6.2L..............................195
3
E-Series (TE4) Canada/United States of America, enUSA, Edition date: 201712, Second Printing
Table of Contents
Page 17 of 323
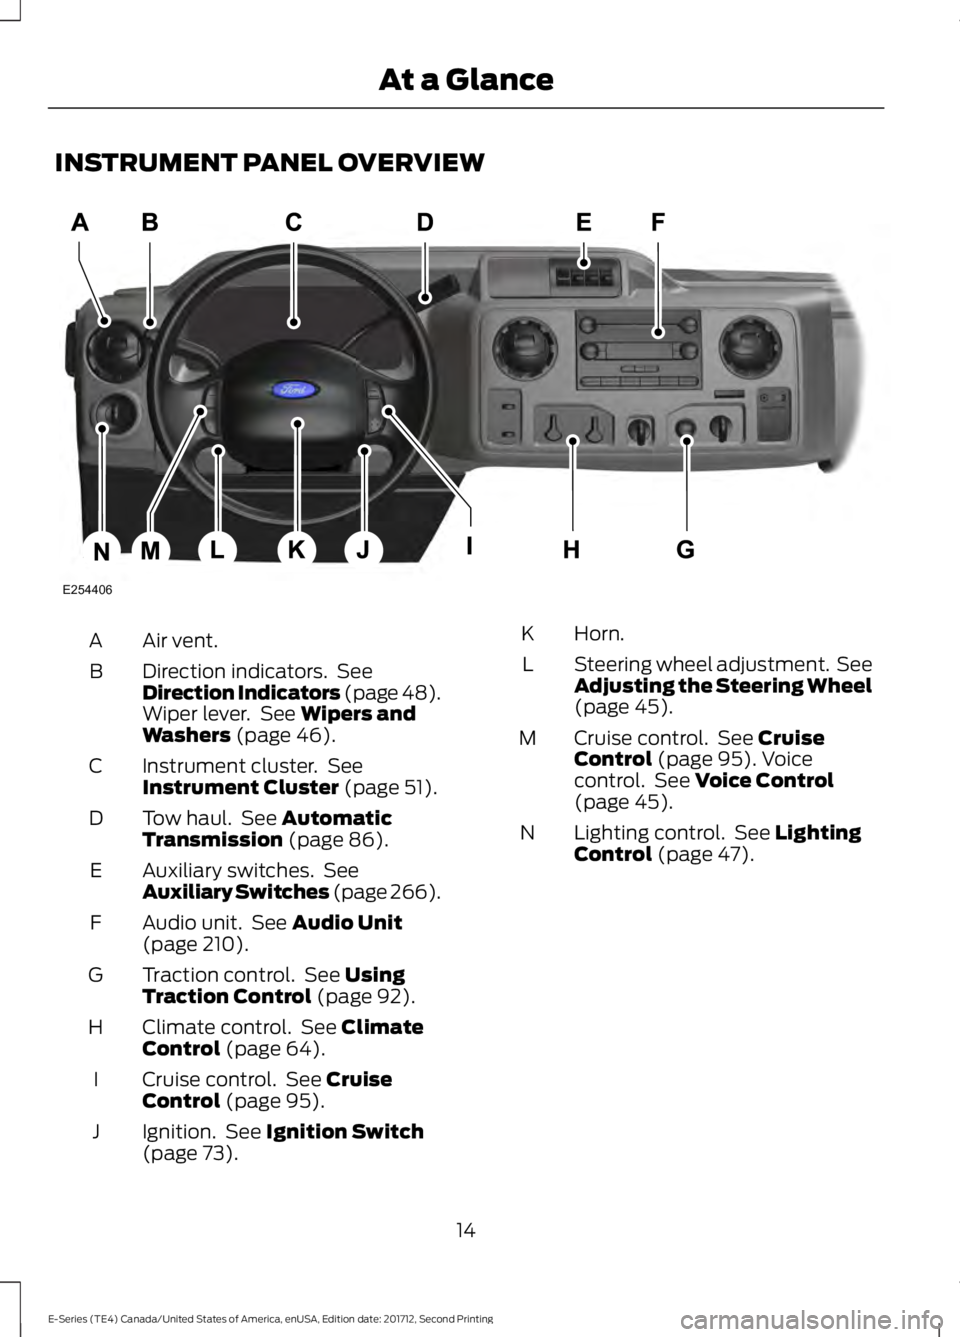
INSTRUMENT PANEL OVERVIEW
Air vent.A
Direction indicators. SeeDirection Indicators (page 48).Wiper lever. See Wipers andWashers (page 46).
B
Instrument cluster. SeeInstrument Cluster (page 51).C
Tow haul. See AutomaticTransmission (page 86).D
Auxiliary switches. SeeAuxiliary Switches (page 266).E
Audio unit. See Audio Unit(page 210).F
Traction control. See UsingTraction Control (page 92).G
Climate control. See ClimateControl (page 64).H
Cruise control. See CruiseControl (page 95).I
Ignition. See Ignition Switch(page 73).J
Horn.K
Steering wheel adjustment. SeeAdjusting the Steering Wheel(page 45).
L
Cruise control. See CruiseControl (page 95). Voicecontrol. See Voice Control(page 45).
M
Lighting control. See LightingControl (page 47).N
14
E-Series (TE4) Canada/United States of America, enUSA, Edition date: 201712, Second Printing
At a GlanceE254406
Page 20 of 323
Use a child safety seat (sometimes calledan infant carrier, convertible seat, ortoddler seat) for infants, toddlers, orchildren weighing 40 pounds (18kilograms) or less (generally age four oryounger).
Using Lap and Shoulder Belts
WARNINGS
Airbags can kill or injure a child in achild seat. Never place a rear-facingchild seat in front of an active airbag.If you must use a forward-facing child seatin the front seat, move the seat upon whichthe child seat is installed all the way back.
Airbags can kill or injure a child in achild seat. Children 12 and undershould be properly restrained in therear seat whenever possible.
Depending on where you secure achild restraint, and depending on thechild restraint design, you may blockaccess to certain seatbelt buckleassemblies and LATCH lower anchors,rendering those features potentiallyunusable. To avoid risk of injury, occupantsshould only use seating positions wherethey are able to be properly restrained.
When installing a child safety seat withcombination lap and shoulder belts:
•Use the correct seatbelt buckle for thatseating position.
•Insert the belt tongue into the properbuckle until you hear a snap and feel itlatch. Make sure the tongue is securelyfastened in the buckle.
•Keep the buckle release buttonpointing up and away from the safetyseat, with the tongue between the childseat and the release button, to preventaccidental unbuckling.
•Place the vehicle seat upon which thechild seat will be installed in the uprightposition.
•Put the seatbelt in the automaticlocking mode. See Step 5. This vehicledoes not require the use of a lockingclip.
Perform the following steps wheninstalling the child seat with combinationlap and shoulder belts:
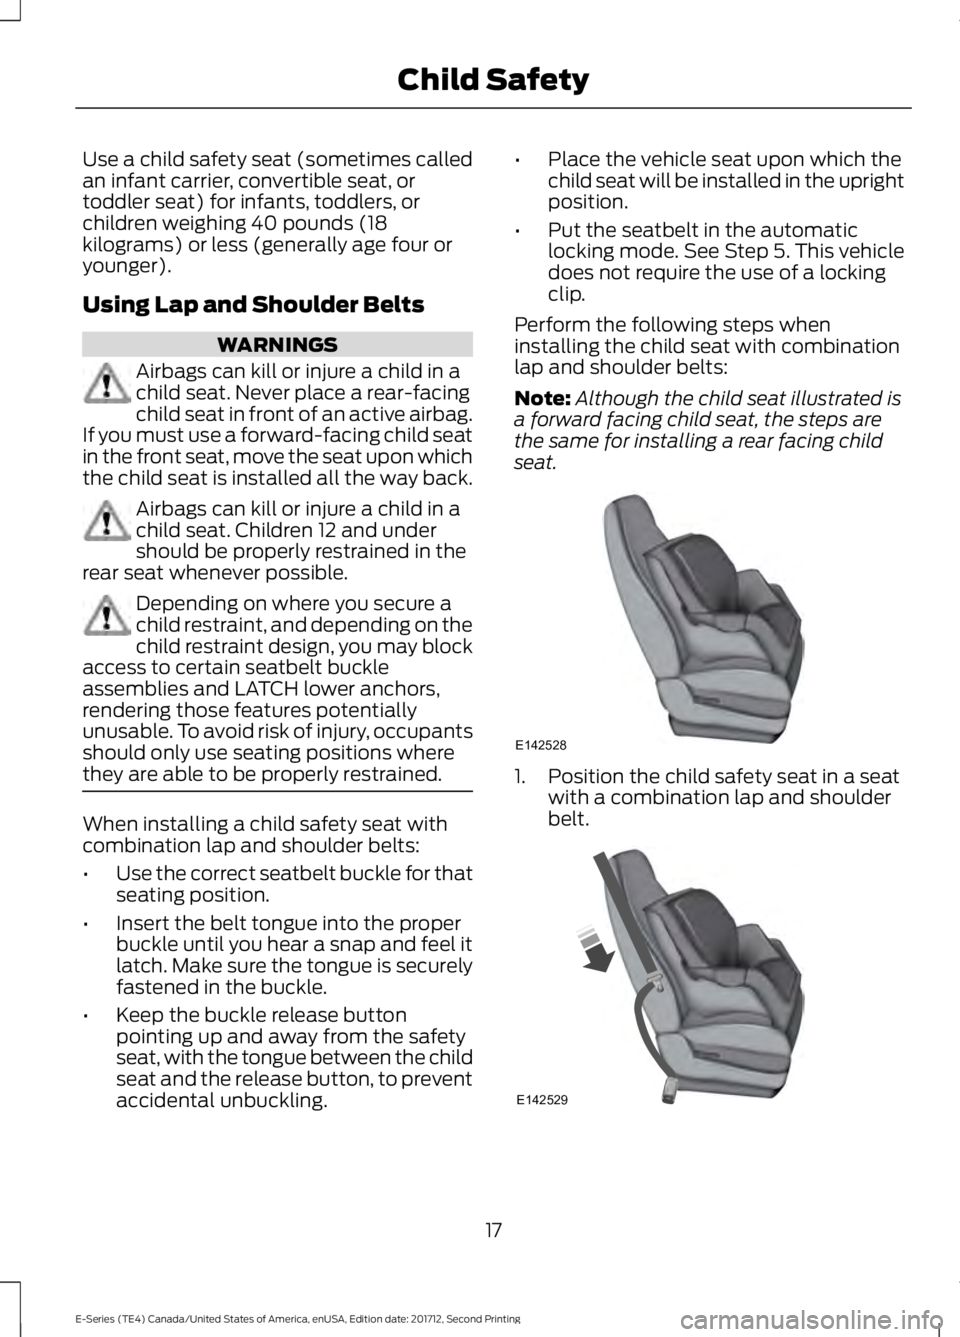
Note:Although the child seat illustrated isa forward facing child seat, the steps arethe same for installing a rear facing childseat.
1. Position the child safety seat in a seatwith a combination lap and shoulderbelt.
17
E-Series (TE4) Canada/United States of America, enUSA, Edition date: 201712, Second Printing
Child SafetyE142528 E142529
Page 21 of 323
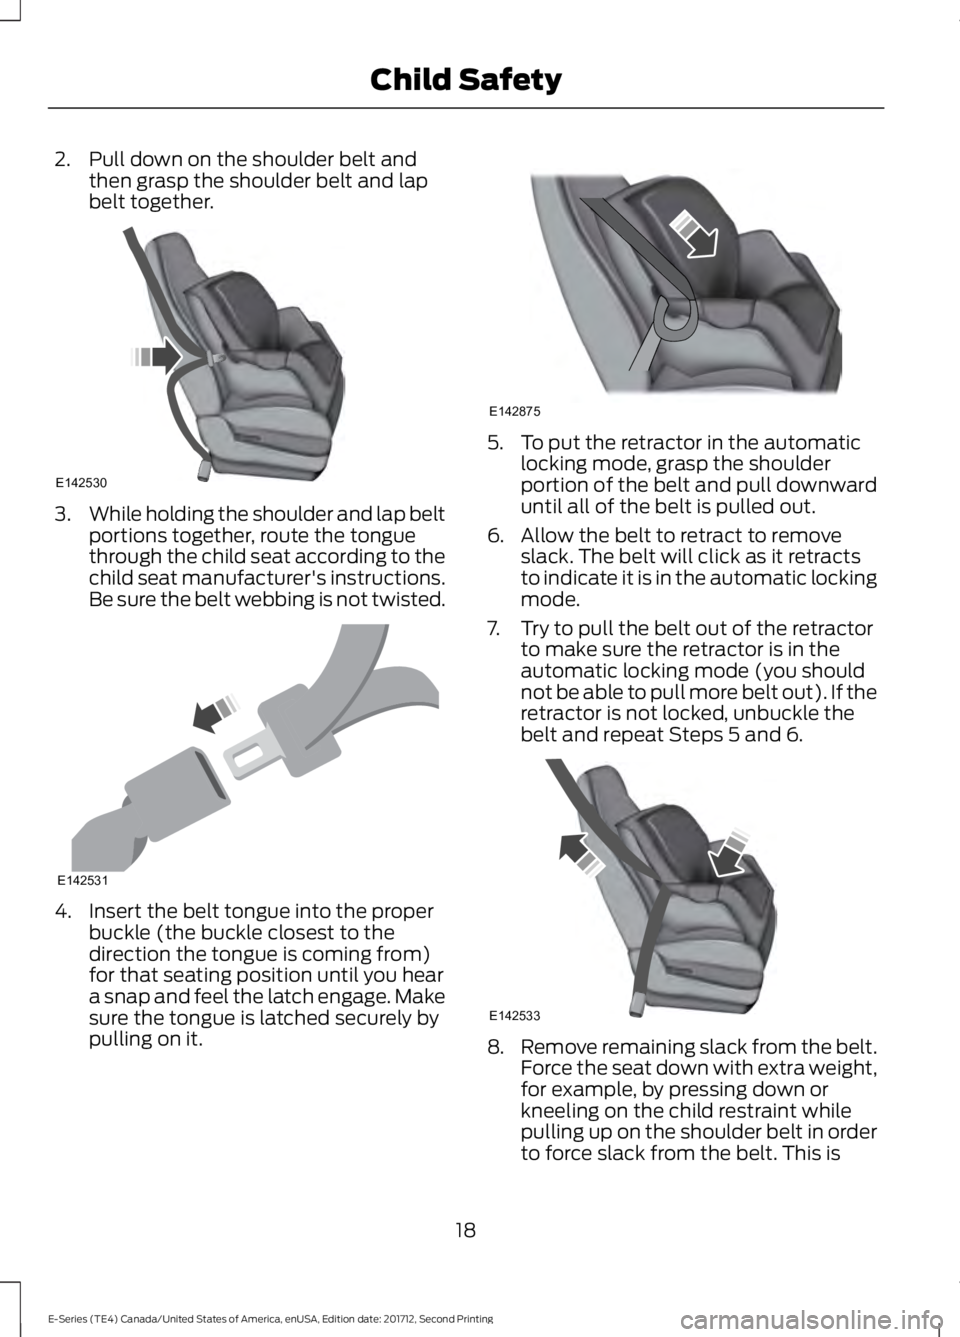
2. Pull down on the shoulder belt andthen grasp the shoulder belt and lapbelt together.
3.While holding the shoulder and lap beltportions together, route the tonguethrough the child seat according to thechild seat manufacturer's instructions.Be sure the belt webbing is not twisted.
4. Insert the belt tongue into the properbuckle (the buckle closest to thedirection the tongue is coming from)for that seating position until you heara snap and feel the latch engage. Makesure the tongue is latched securely bypulling on it.
5. To put the retractor in the automaticlocking mode, grasp the shoulderportion of the belt and pull downwarduntil all of the belt is pulled out.
6. Allow the belt to retract to removeslack. The belt will click as it retractsto indicate it is in the automatic lockingmode.
7. Try to pull the belt out of the retractorto make sure the retractor is in theautomatic locking mode (you shouldnot be able to pull more belt out). If theretractor is not locked, unbuckle thebelt and repeat Steps 5 and 6.
8.Remove remaining slack from the belt.Force the seat down with extra weight,for example, by pressing down orkneeling on the child restraint whilepulling up on the shoulder belt in orderto force slack from the belt. This is
18
E-Series (TE4) Canada/United States of America, enUSA, Edition date: 201712, Second Printing
Child SafetyE142530 E142531 E142875 E142533
Page 28 of 323
PRINCIPLE OF OPERATION
WARNINGS
Always drive and ride with the seatbackrest upright and the lap beltsnug and low across the hips.
To reduce the risk of injury, makesure children sit where they can beproperly restrained.
Never let a passenger hold a child onhis or her lap while your vehicle ismoving. The passenger cannotprotect the child from injury in a crashwhich may result in serious injury or death.
All occupants of the vehicle,including the driver, should alwaysproperly wear their safety belts, evenwhen an airbag supplemental restraintsystem is provided. Failure to properly wearyour safety belt could seriously increasethe risk of injury or death.
It is extremely dangerous to ride in acargo area, inside or outside of avehicle. In a crash, people riding inthese areas are more likely to be seriouslyinjured or killed. Do not allow people to ridein any area of your vehicle that is notequipped with seats and safety belts. Besure everyone in your vehicle is in a seatand using a safety belt properly.
In a rollover crash, an unbeltedperson is significantly more likely todie than a person wearing a safetybelt.
Each seating position in your vehiclehas a specific safety belt assemblywhich is made up of one buckle andone tongue that are designed to be usedas a pair. 1) Use the shoulder belt on theoutside shoulder only. Never wear theshoulder belt under the arm. 2) Neverswing the safety belt around your neck overthe inside shoulder. 3) Never use a singlebelt for more than one person.
WARNINGS
When possible, all children 12 yearsold and under should be properlyrestrained in a rear seating position.Failure to follow this could seriouslyincrease the risk of injury or death.
Safety belts and seats can becomehot in a vehicle that has been closedup in sunny weather; they could burna small child. Check seat covers andbuckles before you place a child anywherenear them.
Front and rear seat occupants,including pregnant women, shouldwear safety belts for optimumprotection in an accident.
All seating positions in this vehicle havelap and shoulder safety belts. Alloccupants of the vehicle should alwaysproperly wear their safety belts, even whenan airbag supplemental restraint systemis provided.
The safety belt system consists of:
•Lap and shoulder safety belts.
•Shoulder safety belt with automaticlocking mode, (except driver safetybelt).
•Height adjuster at the front outboardseating positions.
•Safety belt pretensioner at the frontoutboard seating positions.
•Safety belt warning light and chime.
•Crash sensors and monitoring systemwith readiness indicator.
25
E-Series (TE4) Canada/United States of America, enUSA, Edition date: 201712, Second Printing
SeatbeltsE71880 E67017
Page 30 of 323
All safety restraints in the vehicle arecombination lap and shoulder belts. Thedriver seatbelt has the first type of lockingmode. The front outboard passengerseatbelt has both types of locking modesdescribed as follows:
Vehicle Sensitive Mode
This is the normal retractor mode, whichallows free shoulder belt lengthadjustment to your movements andlocking in response to vehicle movement.For example, if the driver brakes suddenlyor turns a corner sharply, or the vehiclereceives an impact of about 5 mph(8 km/h) or more, the combinationseatbelts lock to help reduce forwardmovement of the driver and passengers.
In addition, the retractor is designed to lockif you pull the webbing out too quickly. Ifthe seatbelt retractor locks, slowly lowerthe height adjuster to allow the seatbeltto retract. If the retractor does not unlock,pull the seatbelt out slowly then feed asmall length of webbing back toward thestowed position. For rear seatbelts, reclinethe rear seat backrest or push the seatbackrest cushion away from the seatbelt.Feed a small length of webbing backtoward the stowed position.
Automatic Locking Mode
In this mode, the shoulder beltautomatically pre-locks. The belt will stillretract to remove any slack in the shoulderbelt. The automatic locking mode is notavailable on the driver seatbelt.
When to Use the Automatic LockingMode
Use this mode any time a child safety seat,except a booster, is installed in thepassenger front seating position. SeeChild Safety (page 15).
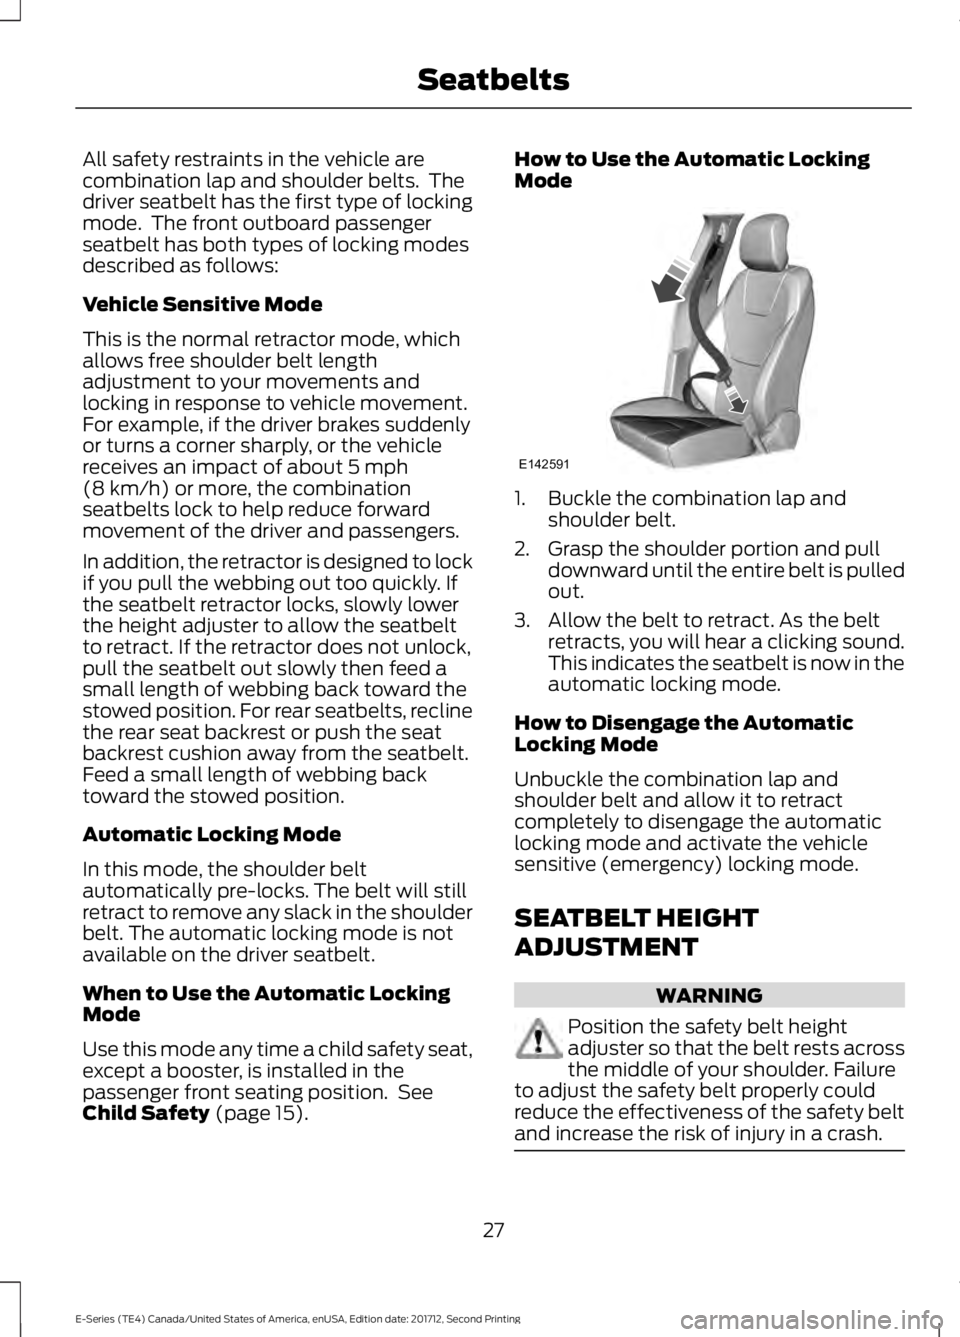
How to Use the Automatic LockingMode
1. Buckle the combination lap andshoulder belt.
2. Grasp the shoulder portion and pulldownward until the entire belt is pulledout.
3. Allow the belt to retract. As the beltretracts, you will hear a clicking sound.This indicates the seatbelt is now in theautomatic locking mode.
How to Disengage the AutomaticLocking Mode
Unbuckle the combination lap andshoulder belt and allow it to retractcompletely to disengage the automaticlocking mode and activate the vehiclesensitive (emergency) locking mode.
SEATBELT HEIGHT
ADJUSTMENT
WARNING
Position the safety belt heightadjuster so that the belt rests acrossthe middle of your shoulder. Failureto adjust the safety belt properly couldreduce the effectiveness of the safety beltand increase the risk of injury in a crash.
27
E-Series (TE4) Canada/United States of America, enUSA, Edition date: 201712, Second Printing
SeatbeltsE142591
Page 46 of 323
PASSIVE ANTI-THEFT
SYSTEM (If Equipped)
Note:The system is not compatible withnon-Ford aftermarket remote start systems.Use of these systems may result in vehiclestarting problems and a loss of securityprotection.
Note:Metallic objects, electronic devicesor a second coded key on the same keychain may cause vehicle starting problemsif they are too close to the key when startingthe engine. Prevent these objects fromtouching the coded key while starting theengine. Switch the ignition off, move allobjects on the key chain away from thecoded key and restart the engine if aproblem occurs.
Note:Do not leave a duplicate coded keyin the vehicle. Always take your keys andlock all doors when leaving the vehicle.
SecuriLock®
The system is an engine immobilizationsystem. It is designed to help prevent theengine from being started unless acorrectly coded key for your vehicle is used.Using an incorrectly coded key mayprevent the engine from starting. Amessage may appear in the informationdisplay.
If you are unable to start the engine with acorrectly coded key, a malfunction hashappened and a message may appear inthe information display.
Automatic Arming
The engine immobilization system armsimmediately after you switch the ignitionoff.
Automatic Disarming
Switching the ignition on with a correctlycoded key disarms the engineimmobilization system.
Replacement Keys
The integrated keyhead transmitterfunctions as a programmed ignition keythat operates all the locks and starts yourvehicle, as well as a remote control.
If your keys are lost or stolen and you donot have a spare correctly coded key, youwill need to have your vehicle towed to anauthorized dealer. You need to erase thecoded keys from your vehicle and programnew coded keys.
Store an extra correctly coded key awayfrom the vehicle in a safe place to helpprevent any inconveniences. See anauthorized dealer to purchase additionalspare or replacement keys.
Note:Your vehicle comes with twointegrated keyhead transmitters.
Programming a Spare IntegratedKeyhead Transmitter
You can program your own integratedkeyhead transmitter or standardSecuriLock coded keys to your vehicle. Thisprocedure will program both the engineimmobilizer keycode and the remote entryportion of the remote control to yourvehicle
Only use integrated keyhead transmittersor standard SecuriLock keys.
You must have two previouslyprogrammed correctly coded keys and thenew unprogrammed key readily accessible.See an authorized dealer to have the sparekey programmed if two previouslyprogrammed correctly coded keys are notavailable.
Read and understand the entire procedurebefore you begin.
43
E-Series (TE4) Canada/United States of America, enUSA, Edition date: 201712, Second Printing
Security
Page 53 of 323
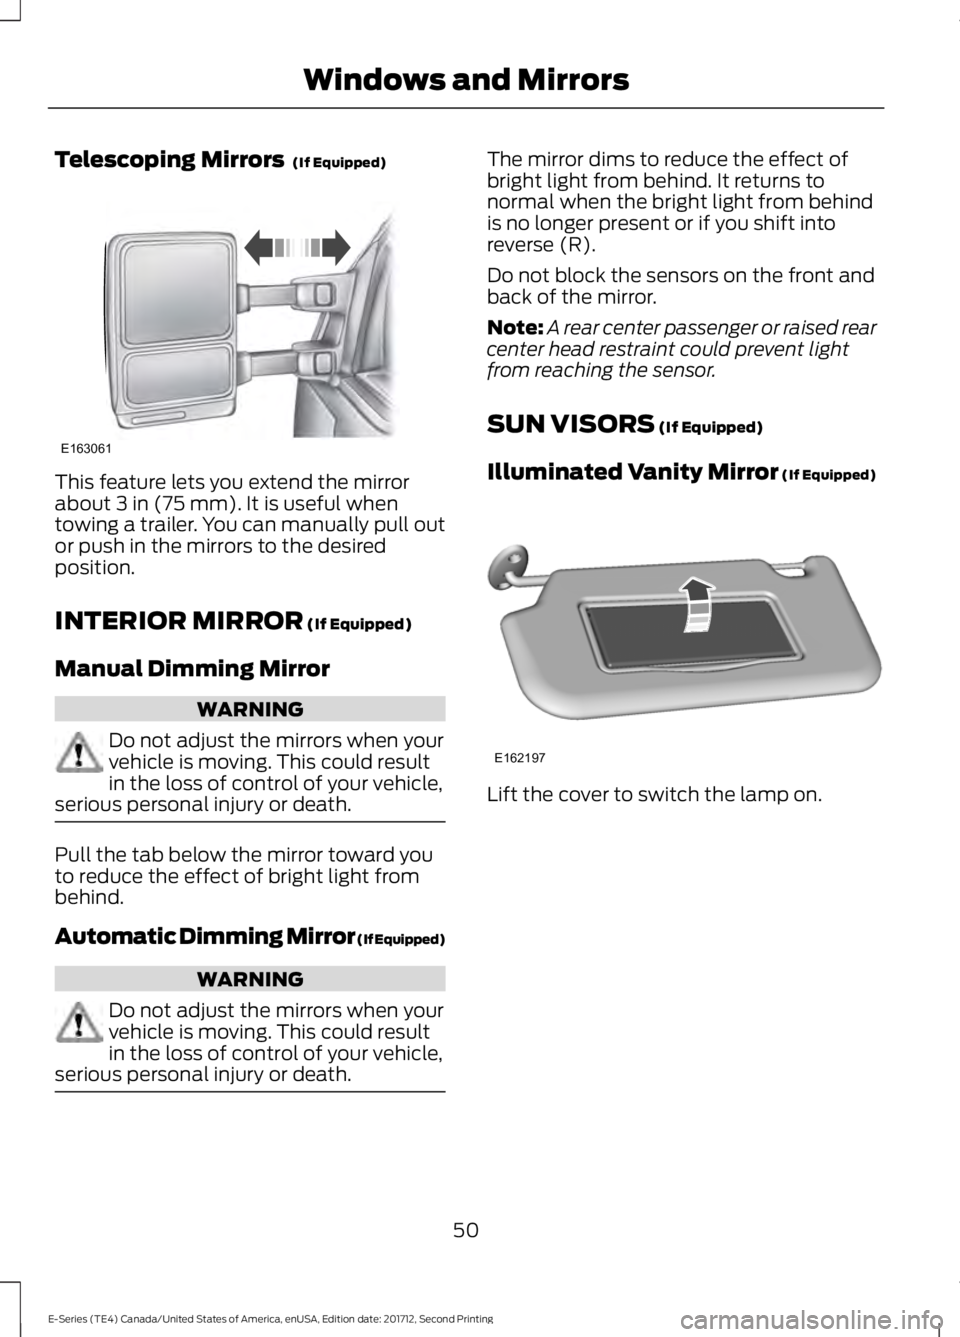
Telescoping Mirrors (If Equipped)
This feature lets you extend the mirrorabout 3 in (75 mm). It is useful whentowing a trailer. You can manually pull outor push in the mirrors to the desiredposition.
INTERIOR MIRROR (If Equipped)
Manual Dimming Mirror
WARNING
Do not adjust the mirrors when yourvehicle is moving. This could resultin the loss of control of your vehicle,serious personal injury or death.
Pull the tab below the mirror toward youto reduce the effect of bright light frombehind.
Automatic Dimming Mirror (If Equipped)
WARNING
Do not adjust the mirrors when yourvehicle is moving. This could resultin the loss of control of your vehicle,serious personal injury or death.
The mirror dims to reduce the effect ofbright light from behind. It returns tonormal when the bright light from behindis no longer present or if you shift intoreverse (R).
Do not block the sensors on the front andback of the mirror.
Note:A rear center passenger or raised rearcenter head restraint could prevent lightfrom reaching the sensor.
SUN VISORS (If Equipped)
Illuminated Vanity Mirror (If Equipped)
Lift the cover to switch the lamp on.
50
E-Series (TE4) Canada/United States of America, enUSA, Edition date: 201712, Second Printing
Windows and MirrorsE163061 E162197
Page 57 of 323
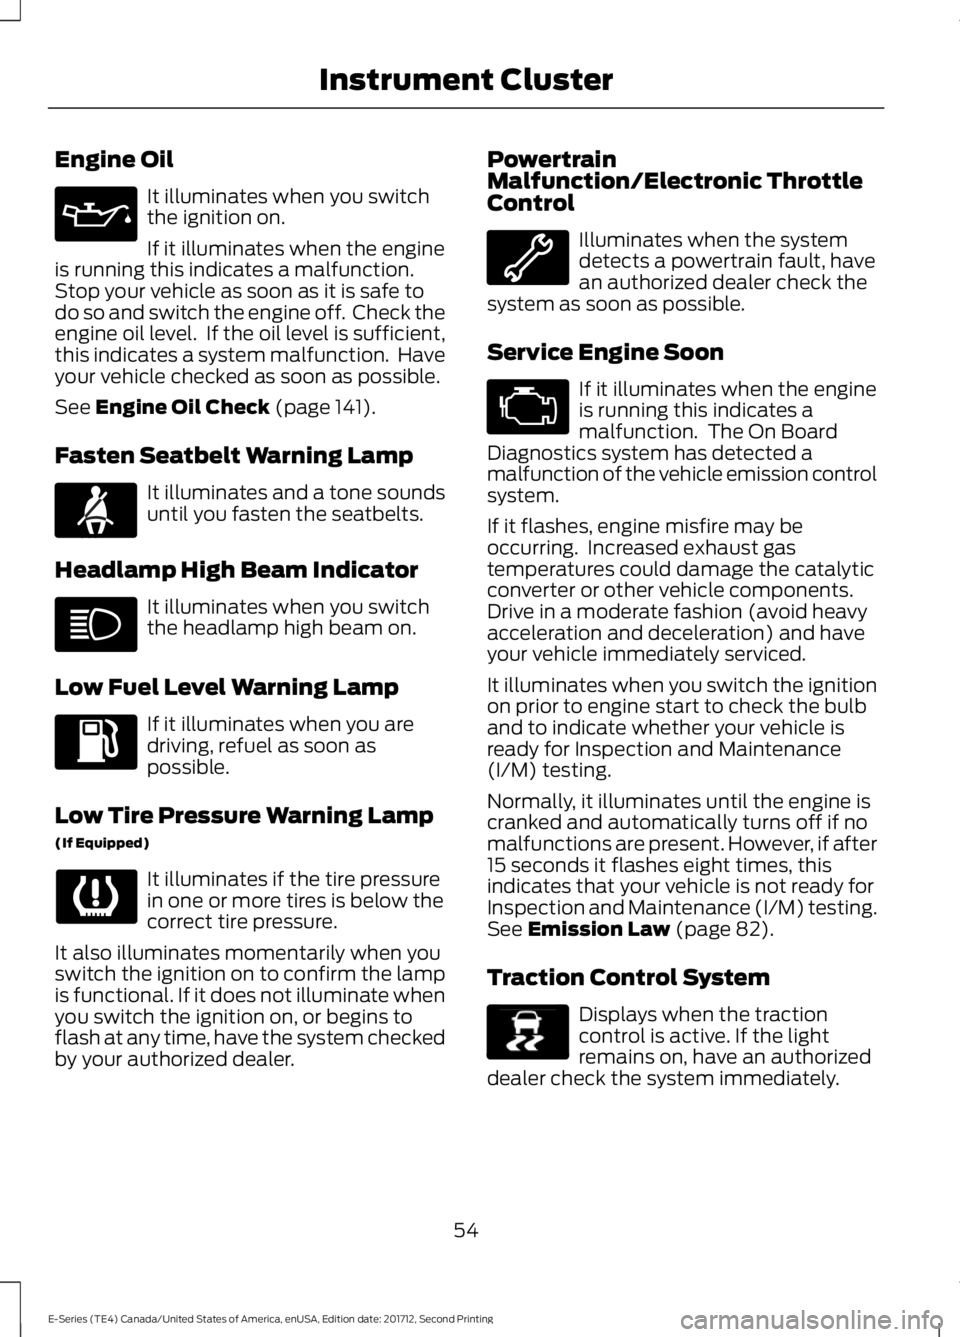
Engine Oil
It illuminates when you switchthe ignition on.
If it illuminates when the engineis running this indicates a malfunction.Stop your vehicle as soon as it is safe todo so and switch the engine off. Check theengine oil level. If the oil level is sufficient,this indicates a system malfunction. Haveyour vehicle checked as soon as possible.
See Engine Oil Check (page 141).
Fasten Seatbelt Warning Lamp
It illuminates and a tone soundsuntil you fasten the seatbelts.
Headlamp High Beam Indicator
It illuminates when you switchthe headlamp high beam on.
Low Fuel Level Warning Lamp
If it illuminates when you aredriving, refuel as soon aspossible.
Low Tire Pressure Warning Lamp
(If Equipped)
It illuminates if the tire pressurein one or more tires is below thecorrect tire pressure.
It also illuminates momentarily when youswitch the ignition on to confirm the lampis functional. If it does not illuminate whenyou switch the ignition on, or begins toflash at any time, have the system checkedby your authorized dealer.
PowertrainMalfunction/Electronic ThrottleControl
Illuminates when the systemdetects a powertrain fault, havean authorized dealer check thesystem as soon as possible.
Service Engine Soon
If it illuminates when the engineis running this indicates amalfunction. The On BoardDiagnostics system has detected amalfunction of the vehicle emission controlsystem.
If it flashes, engine misfire may beoccurring. Increased exhaust gastemperatures could damage the catalyticconverter or other vehicle components.Drive in a moderate fashion (avoid heavyacceleration and deceleration) and haveyour vehicle immediately serviced.
It illuminates when you switch the ignitionon prior to engine start to check the bulband to indicate whether your vehicle isready for Inspection and Maintenance(I/M) testing.
Normally, it illuminates until the engine iscranked and automatically turns off if nomalfunctions are present. However, if after15 seconds it flashes eight times, thisindicates that your vehicle is not ready forInspection and Maintenance (I/M) testing.See Emission Law (page 82).
Traction Control System
Displays when the tractioncontrol is active. If the lightremains on, have an authorizeddealer check the system immediately.
54
E-Series (TE4) Canada/United States of America, enUSA, Edition date: 201712, Second Printing
Instrument Cluster E71880 E138639