lock FORD E SERIES 2021 Workshop Manual
[x] Cancel search | Manufacturer: FORD, Model Year: 2021, Model line: E SERIES, Model: FORD E SERIES 2021Pages: 301, PDF Size: 3.05 MB
Page 142 of 301
WARNING: Always make sure that
objects cannot fall into the driver foot
well while your vehicle is moving. Objects
that are loose can become trapped
under the pedals causing a loss of
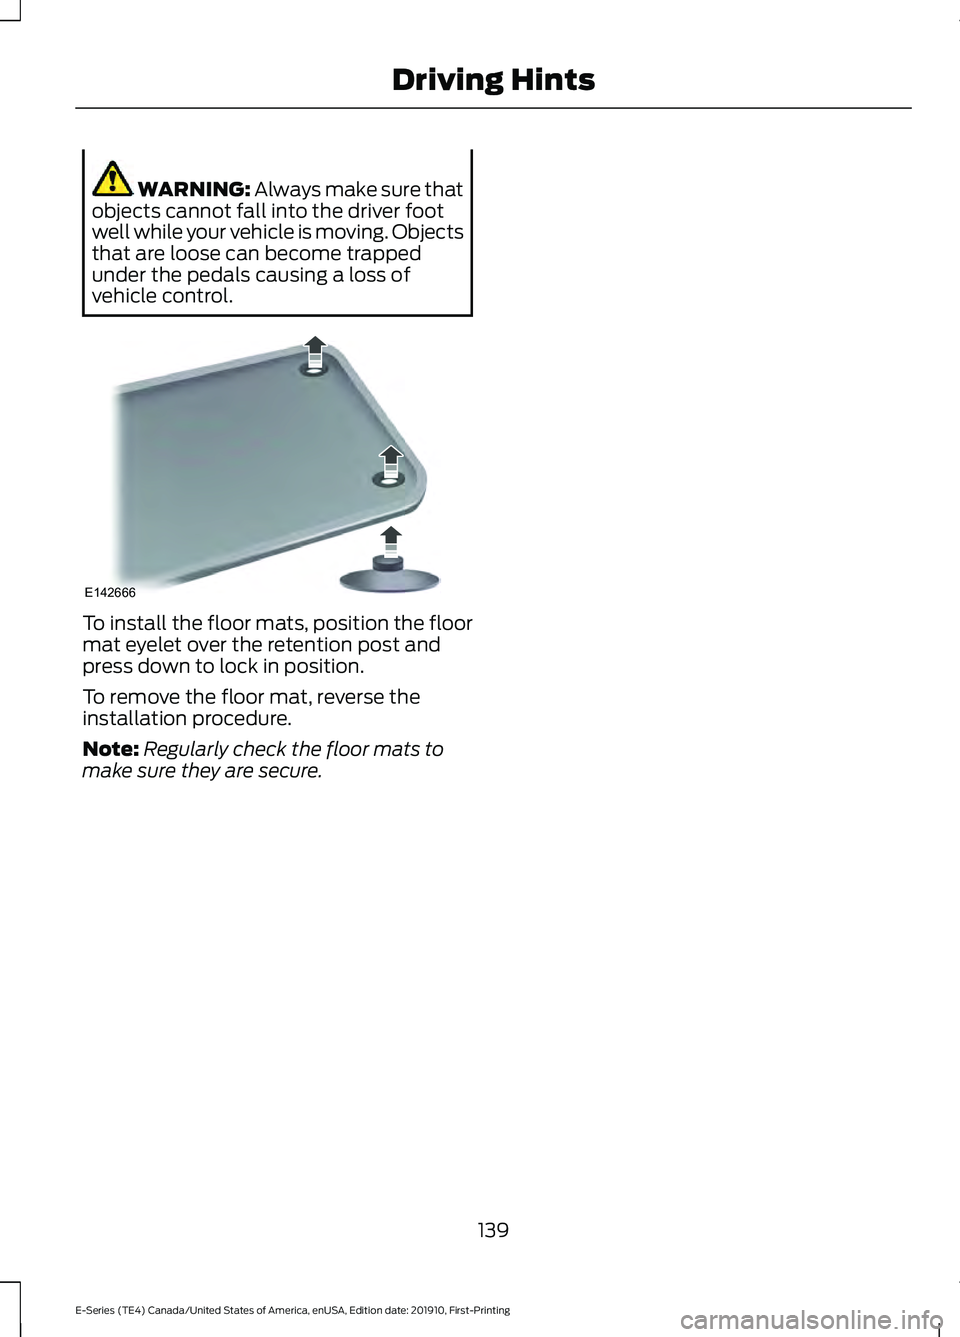
vehicle control. To install the floor mats, position the floor
mat eyelet over the retention post and
press down to lock in position.
To remove the floor mat, reverse the
installation procedure.
Note:
Regularly check the floor mats to
make sure they are secure.
139
E-Series (TE4) Canada/United States of America, enUSA, Edition date: 201910, First-Printing Driving HintsE142666
Page 143 of 301
ROADSIDE ASSISTANCE
Vehicles Sold in the United States:
Getting Roadside Assistance
To fully assist you should you have a
vehicle concern, Ford Motor Company
offers a complimentary roadside
assistance program. This program is
separate from the New Vehicle Limited
Warranty.
The service is available:
•
24 hours a day, seven days a week.
• For the coverage period supplied with
your vehicle.
Roadside Assistance covers:
• A flat tire change with a good spare
(except vehicles supplied with a tire
inflation kit).
• Battery jump start.
• Lock-out assistance (key replacement
cost is the customer's responsibility).
• Fuel delivery — independent service
contractors, if not prohibited by state,
local or municipal law, shall deliver up
to 2 gal (8 L) of gasoline or 5 gal (20 L)
of diesel fuel to a disabled vehicle.
Roadside Assistance limits fuel delivery
service to two no-charge occurrences
within a 12-month period.
• Winch out — available within 100 ft
(30 m) of a paved or county
maintained road, no recoveries. •
Towing — independent service
contractors, if not prohibited by state,
local or municipal law, shall tow Ford
eligible vehicles to an authorized dealer
within
35 mi (56 km) of the
disablement location or to the nearest
authorized dealer. If a member
requests a tow to an authorized dealer
that is more than
35 mi (56 km) from
the disablement location, the member
shall be responsible for any mileage
costs in excess of
35 mi (56 km).
• Roadside Assistance includes up to
$200 for a towed trailer if the disabled
eligible vehicle requires service at the
nearest authorized dealer. If the towing
vehicle is operational but the trailer is
not, then the trailer does not qualify for
any roadside services.
Vehicles Sold in the United States:
Using Roadside Assistance
Complete the roadside assistance
identification card and place it in your
wallet for quick reference. This card is in
the Owner's Manual kit.
United States vehicle customers who
require Roadside Assistance, call
1-800-241-3673.
If you need to arrange roadside assistance
for yourself, Ford Motor Company
reimburses a reasonable amount for
towing to the nearest dealership within
35 mi (56 km)
. To obtain reimbursement
information, United States vehicle
customers call 1-800-241-3673.
Customers need to submit their original
receipts.
140
E-Series (TE4) Canada/United States of America, enUSA, Edition date: 201910, First-Printing Roadside Emergencies
Page 146 of 301
2.
Start the engine of the disabled vehicle.
3. Once the disabled vehicle has been started, run both vehicle engines for an
additional three minutes before
disconnecting the jumper cables.
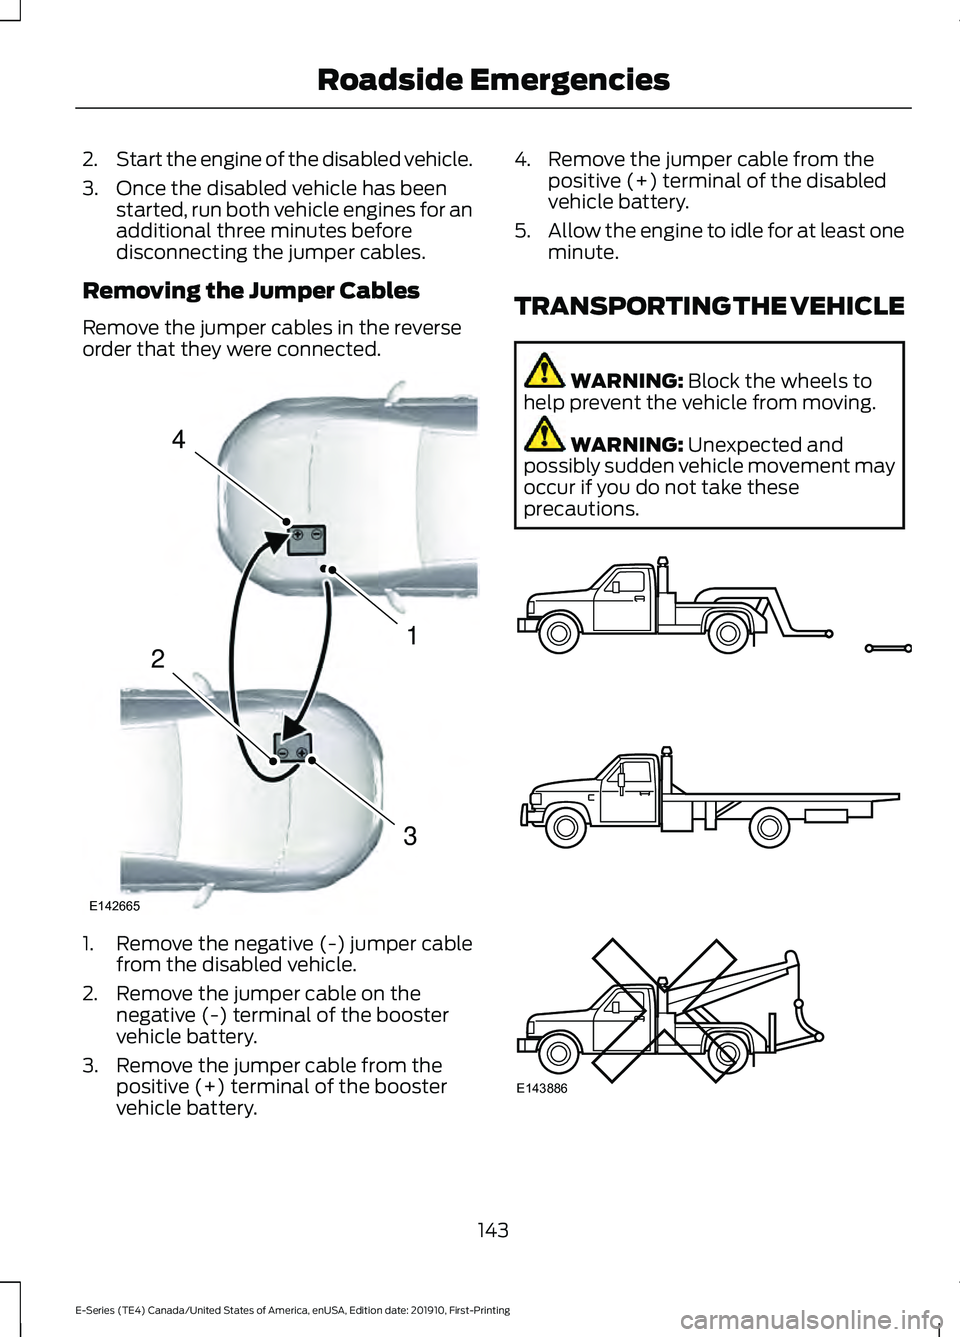
Removing the Jumper Cables
Remove the jumper cables in the reverse
order that they were connected. 1. Remove the negative (-) jumper cable
from the disabled vehicle.
2. Remove the jumper cable on the negative (-) terminal of the booster
vehicle battery.
3. Remove the jumper cable from the positive (+) terminal of the booster
vehicle battery. 4. Remove the jumper cable from the
positive (+) terminal of the disabled
vehicle battery.
5. Allow the engine to idle for at least one
minute.
TRANSPORTING THE VEHICLE WARNING: Block the wheels to
help prevent the vehicle from moving. WARNING:
Unexpected and
possibly sudden vehicle movement may
occur if you do not take these
precautions. 143
E-Series (TE4) Canada/United States of America, enUSA, Edition date: 201910, First-Printing Roadside Emergencies4
1
3
2
E142665 E143886
Page 155 of 301
Protected Component
Fuse
Rating
Fuse
Number
Horn.
20 A
1
Blower motor.
50 A
2
Not used.
—
3
Starter relay.
30 A
4
Not used (spare).
20 A
5
Upfitter relay 4 (cutaway).
20 A
6
Not used (spare) (stripped chassis).
Not used.
—
8
Not used.
—
10
Power point 4.
20 A
12
Yaw sensor (stripped chassis).
10 A
13
Not used (spare) (cutaway).
Forward looking radar (cutaway).
10 A
14
Not used (spare) (stripped chassis).
Not used.
—
15
Not used.
—
16
Powertrain control module run/start feed.
10 A
17
Anti-lock brake system run/start feed.
10 A
18
Not used.
—
19
Wiper power.
30 A
20
Not used.
—
21
Wiper module (stripped chassis).
10 A
22
Not used (spare) (cutaway).
Not used.
—
23
Body control module - run power in feed 2.
40 A
24
Body control module - run power in feed 1.
50 A
25
Not used.
—
26
152
E-Series (TE4) Canada/United States of America, enUSA, Edition date: 201910, First-Printing Fuses
Page 157 of 301
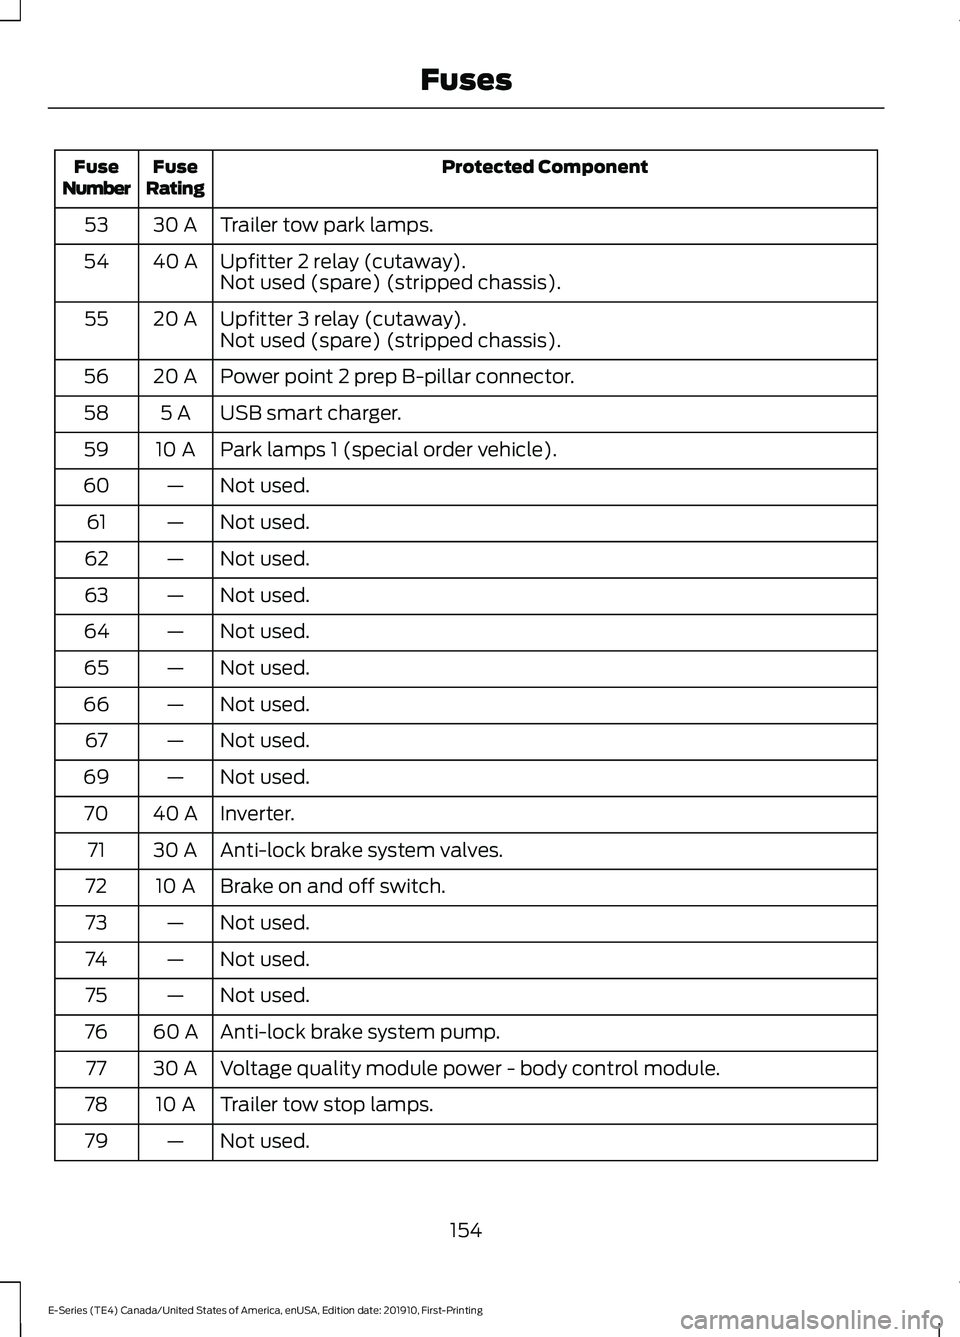
Protected Component
Fuse
Rating
Fuse
Number
Trailer tow park lamps.
30 A
53
Upfitter 2 relay (cutaway).
40 A
54
Not used (spare) (stripped chassis).
Upfitter 3 relay (cutaway).
20 A
55
Not used (spare) (stripped chassis).
Power point 2 prep B-pillar connector.
20 A
56
USB smart charger.
5 A
58
Park lamps 1 (special order vehicle).
10 A
59
Not used.
—
60
Not used.
—
61
Not used.
—
62
Not used.
—
63
Not used.
—
64
Not used.
—
65
Not used.
—
66
Not used.
—
67
Not used.
—
69
Inverter.
40 A
70
Anti-lock brake system valves.
30 A
71
Brake on and off switch.
10 A
72
Not used.
—
73
Not used.
—
74
Not used.
—
75
Anti-lock brake system pump.
60 A
76
Voltage quality module power - body control module.
30 A
77
Trailer tow stop lamps.
10 A
78
Not used.
—
79
154
E-Series (TE4) Canada/United States of America, enUSA, Edition date: 201910, First-Printing Fuses
Page 160 of 301
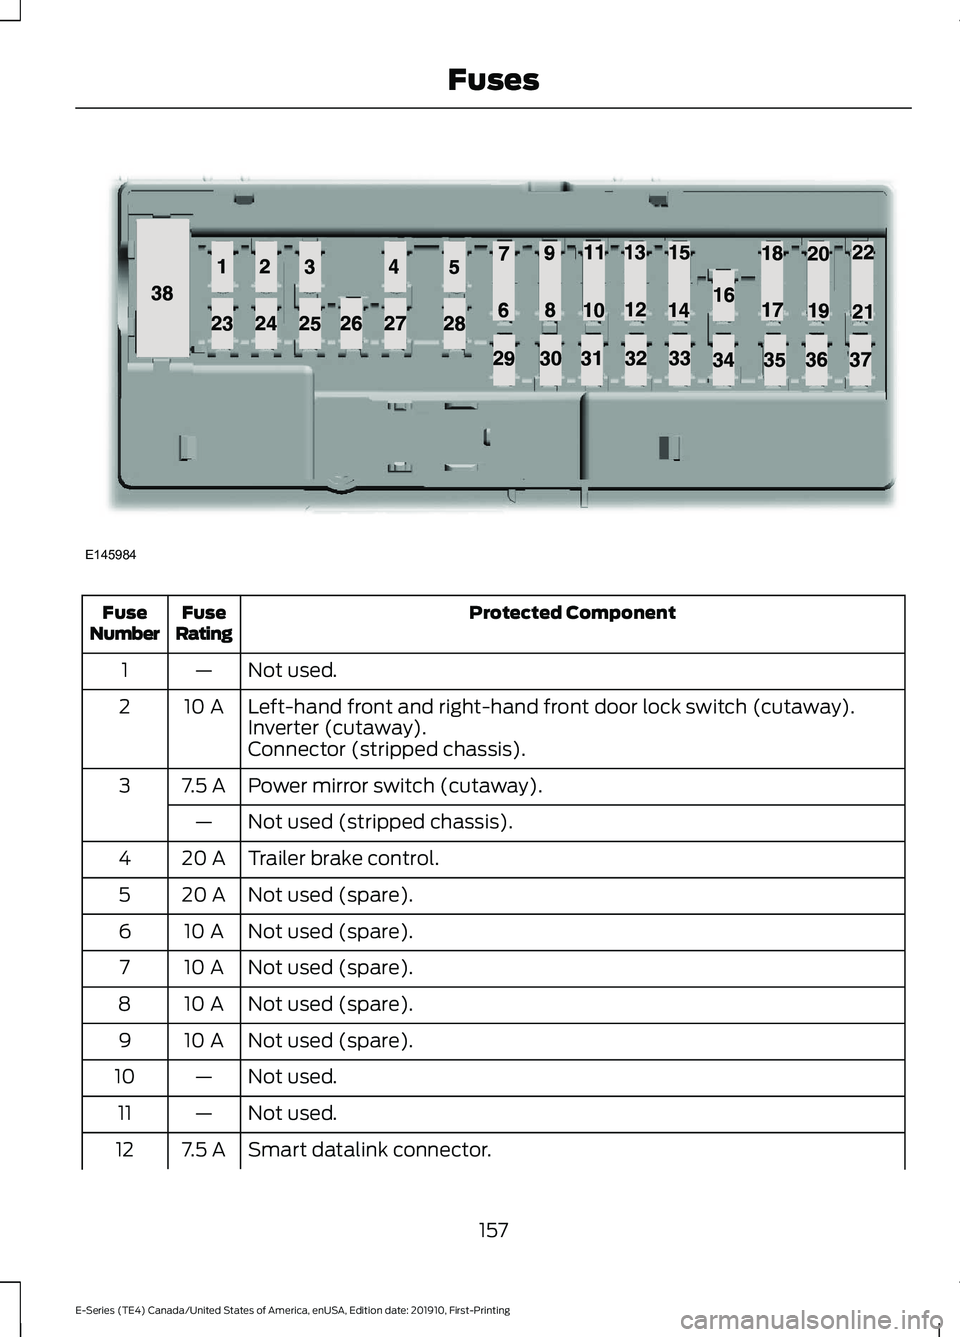
Protected Component
Fuse
Rating
Fuse
Number
Not used.
—
1
Left-hand front and right-hand front door lock switch (cutaway).
10 A
2
Inverter (cutaway).
Connector (stripped chassis).
Power mirror switch (cutaway).
7.5 A
3
Not used (stripped chassis).
—
Trailer brake control.
20 A
4
Not used (spare).
20 A
5
Not used (spare).
10 A
6
Not used (spare).
10 A
7
Not used (spare).
10 A
8
Not used (spare).
10 A
9
Not used.
—
10
Not used.
—
11
Smart datalink connector.
7.5 A
12
157
E-Series (TE4) Canada/United States of America, enUSA, Edition date: 201910, First-Printing FusesE145984
Page 164 of 301
GENERAL INFORMATION
Have your vehicle serviced regularly to help
maintain its roadworthiness and resale
value. There is a large network of
authorized dealers that are there to help
you with their professional servicing
expertise. We believe that their specially
trained technicians are best qualified to
service your vehicle properly and expertly.
They are supported by a wide range of
highly specialized tools developed
specifically for servicing your vehicle.
If your vehicle requires professional service,
an authorized dealer can provide the
necessary parts and service. Check your
warranty information to find out which
parts and services are covered.
Use only recommended fuels, lubricants,
fluids and service parts conforming to
specifications. Motorcraft® parts are
designed and built to provide the best
performance in your vehicle.
Precautions
•
Do not work on a hot engine.
• Make sure that nothing gets caught in
moving parts.
• Do not work on a vehicle with the
engine running in an enclosed space,
unless you are sure you have enough
ventilation.
• Keep all open flames and other burning
material (such as cigarettes) away
from the battery and all fuel related
parts.
Working with the Engine Off
1. Set the parking brake and shift the transmission to park (P). 2. Switch off the engine.
3. Block the wheels.
Working with the Engine On WARNING: To reduce the risk of
vehicle damage and personal burn
injuries, do not start your engine with the
air cleaner removed and do not remove
it while the engine is running.
1. Set the parking brake and shift the transmission to park (P).
2. Block the wheels.
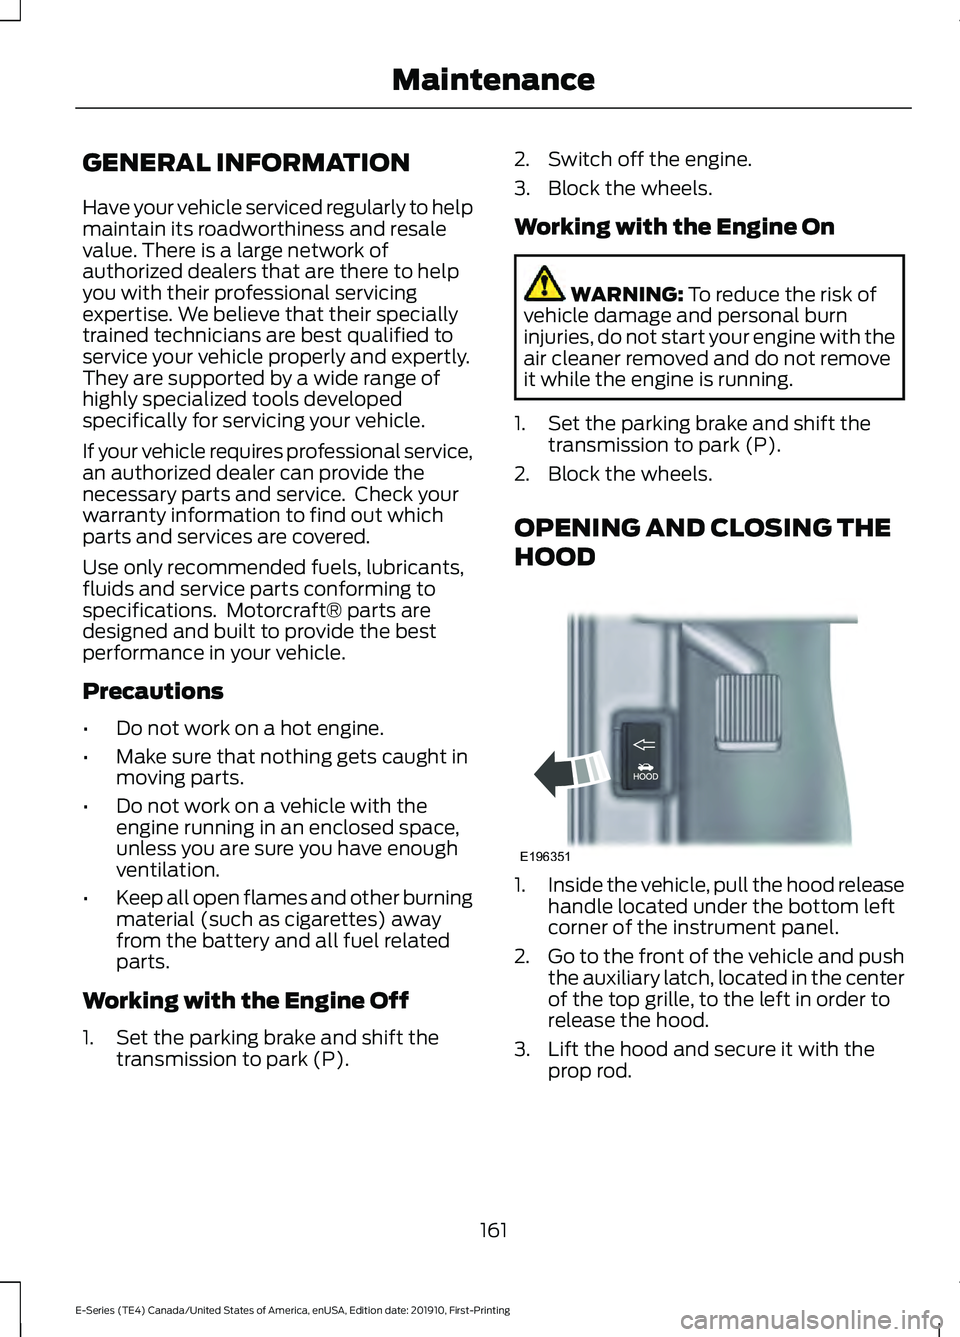
OPENING AND CLOSING THE
HOOD 1.
Inside the vehicle, pull the hood release
handle located under the bottom left
corner of the instrument panel.
2. Go to the front of the vehicle and push
the auxiliary latch, located in the center
of the top grille, to the left in order to
release the hood.
3. Lift the hood and secure it with the prop rod.
161
E-Series (TE4) Canada/United States of America, enUSA, Edition date: 201910, First-Printing MaintenanceE196351
Page 167 of 301
Only use oils certified for gasoline engines
by the American Petroleum Institute (API).
An oil with this trademark symbol
conforms to the current engine and
emission system protection standards and
fuel economy requirements of the
International Lubricants Specification
Advisory Committee (ILSAC).
To top up the engine oil level do the
following:
1. Clean the area surrounding the engine
oil filler cap before you remove it.
2. Remove the engine oil filler cap. See Under Hood Overview (page 162).
Turn it counterclockwise and remove
it.
3. Add engine oil that meets Ford specifications. See
Capacities and
Specifications (page 223). You may
have to use a funnel to pour the engine
oil into the opening.
4. Recheck the oil level.
5. If the oil level is correct, replace the dipstick and make sure it is fully seated.
6. Replace the engine oil filler cap. Turn it clockwise until you feel a strong
resistance.
Note: Do not add oil further than the
maximum mark. Oil levels above the
maximum mark may cause engine damage.
Note: Make sure you install the oil filler cap
correctly.
Note: Soak up any spillage with an
absorbent cloth immediately.
OIL CHANGE INDICATOR
RESET
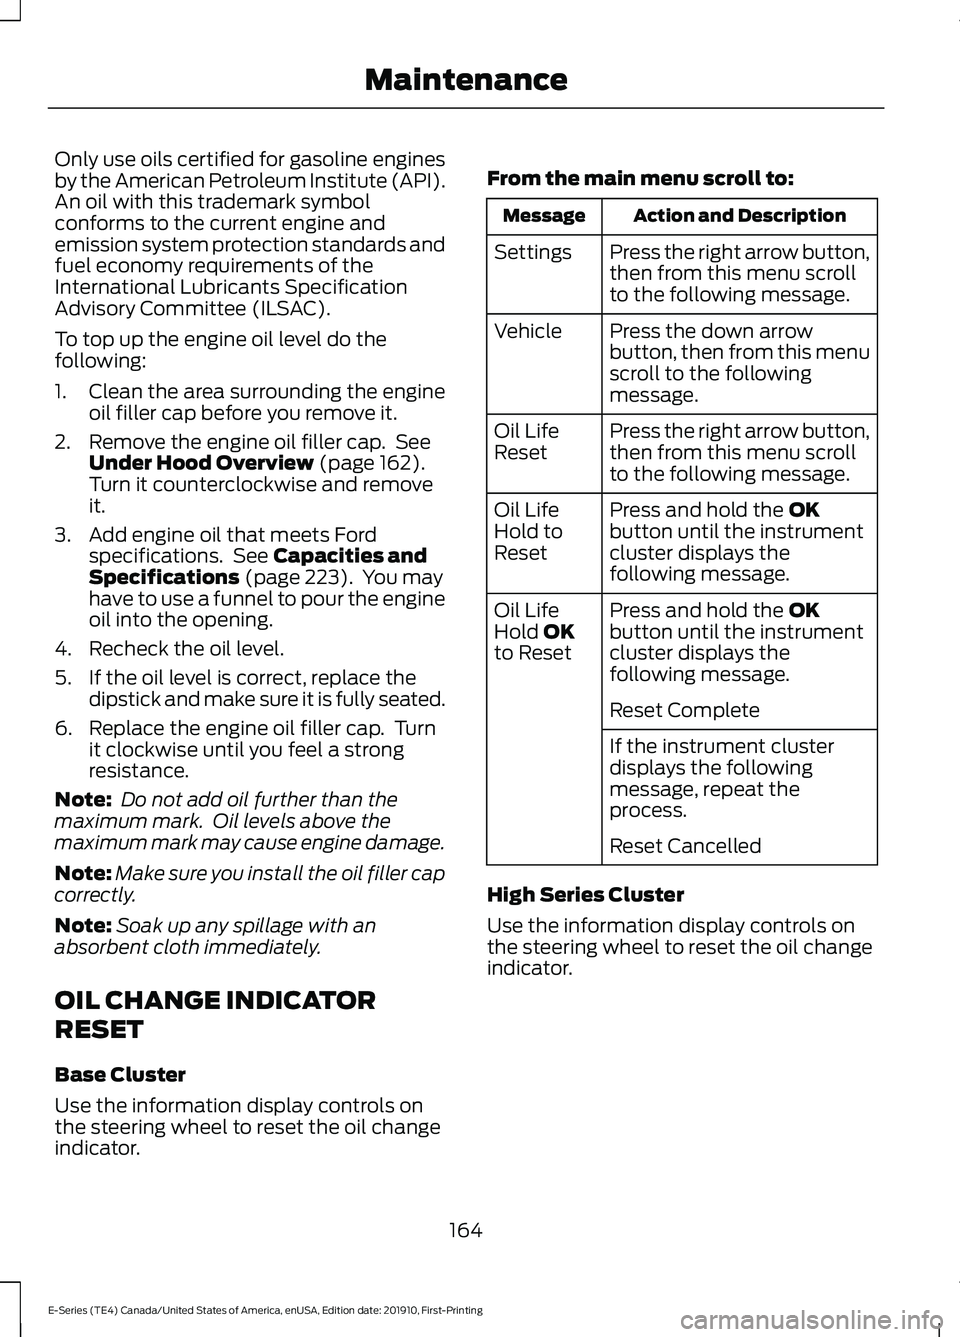
Base Cluster
Use the information display controls on
the steering wheel to reset the oil change
indicator. From the main menu scroll to: Action and Description
Message
Press the right arrow button,
then from this menu scroll
to the following message.
Settings
Press the down arrow
button, then from this menu
scroll to the following
message.
Vehicle
Press the right arrow button,
then from this menu scroll
to the following message.
Oil Life
Reset
Press and hold the
OK
button until the instrument
cluster displays the
following message.
Oil Life
Hold to
Reset
Press and hold the
OK
button until the instrument
cluster displays the
following message.
Oil Life
Hold OK
to Reset
Reset Complete
If the instrument cluster
displays the following
message, repeat the
process.
Reset Cancelled
High Series Cluster
Use the information display controls on
the steering wheel to reset the oil change
indicator.
164
E-Series (TE4) Canada/United States of America, enUSA, Edition date: 201910, First-Printing Maintenance
Page 169 of 301
WARNING: Do not remove the
coolant reservoir cap when the engine is
on or the cooling system is hot. Wait 10
minutes for the cooling system to cool
down. Cover the coolant reservoir cap
with a thick cloth to prevent the
possibility of scalding and slowly remove
the cap. Failure to follow this instruction
could result in personal injury.
Note: Automotive fluids are not
interchangeable. Do not use coolant or
windshield washer fluid outside of its
specified function and vehicle location.
Note: Do not use stop leak pellets, cooling
system sealants, or non-specified additives
as they can cause damage to the engine
cooling or heating systems. Resulting
component damage may not be covered by
the vehicle Warranty.
It is very important to use prediluted
coolant approved to the correct
specification in order to avoid plugging the
small passageways in the engine cooling
system. See
Capacities and
Specifications (page 219). Do not mix
different colors or types of coolant in your
vehicle. Mixing of engine coolants or using
an incorrect coolant may harm the engine
or cooling system components and may
not be covered by the vehicle Warranty.
Note: If prediluted coolant is not available,
use the approved concentrated coolant
diluting it to 50/50 with distilled water. See
Capacities and Specifications (page 219).
Using water that has not been deionized
may contribute to deposit formation,
corrosion and plugging of the small cooling
system passageways.
Note: Coolants marketed for all makes and
models may not be approved to Ford
specifications and may cause damage to
the cooling system. Resulting component
damage may not be covered by the vehicle
Warranty. If the coolant level is at or below the
minimum mark, add prediluted coolant
immediately.
To top up the coolant level do the
following:
1. Unscrew the cap slowly. Any pressure
escapes as you unscrew the cap.
2. Add prediluted coolant approved to the correct specification. See
Capacities and Specifications (page
219
).
3. Add enough prediluted coolant to reach the correct level.
4. Replace the coolant reservoir cap. Turn
the cap clockwise until it contacts the
hard stop.
5. Check the coolant level in the coolant reservoir the next few times you drive
your vehicle. If necessary, add enough
prediluted engine coolant to bring the
coolant level to the correct level.
If you have to add more than
1.1 qt (1 L) of
engine coolant per month, have your
vehicle checked as soon as possible.
Operating an engine with a low level of
coolant can result in engine overheating
and possible engine damage.
Note: During normal vehicle operation, the
coolant may change color, and slightly
darken. As long as the coolant is clear and
uncontaminated, this color change does not
indicate the coolant has degraded nor does
it require the coolant to be drained, the
system to be flushed, or the coolant to be
replaced.
In case of emergency, you can add a large
amount of water without coolant in order
to reach a vehicle service location. In this
instance, qualified personnel:
1. Must drain the cooling system.
2. Chemically clean the coolant system.
166
E-Series (TE4) Canada/United States of America, enUSA, Edition date: 201910, First-Printing Maintenance
Page 178 of 301
Clean the wiper blades with washer fluid
or water applied with a soft sponge or
cloth.
CHANGING THE WIPER
BLADES
You can manually move the wiper arms
when the ignition is off. This allows for ease
of blade replacement and cleaning under
the blades.
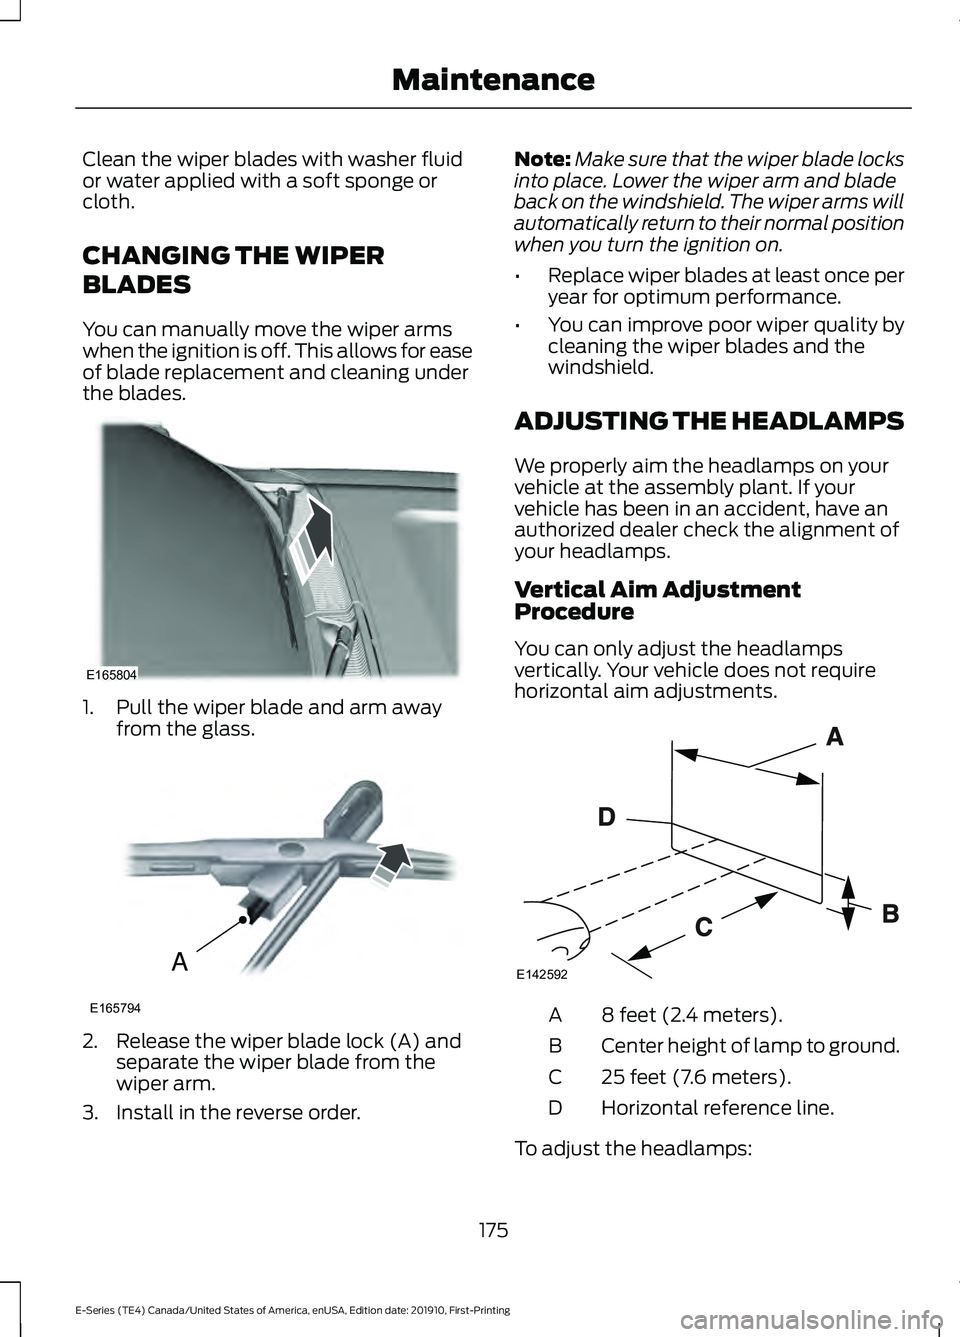
1. Pull the wiper blade and arm away
from the glass. 2. Release the wiper blade lock (A) and
separate the wiper blade from the
wiper arm.
3. Install in the reverse order. Note:
Make sure that the wiper blade locks
into place. Lower the wiper arm and blade
back on the windshield. The wiper arms will
automatically return to their normal position
when you turn the ignition on.
• Replace wiper blades at least once per
year for optimum performance.
• You can improve poor wiper quality by
cleaning the wiper blades and the
windshield.
ADJUSTING THE HEADLAMPS
We properly aim the headlamps on your
vehicle at the assembly plant. If your
vehicle has been in an accident, have an
authorized dealer check the alignment of
your headlamps.
Vertical Aim Adjustment
Procedure
You can only adjust the headlamps
vertically. Your vehicle does not require
horizontal aim adjustments. 8 feet (2.4 meters).
A
Center height of lamp to ground.
B
25 feet (7.6 meters).
C
Horizontal reference line.
D
To adjust the headlamps:
175
E-Series (TE4) Canada/United States of America, enUSA, Edition date: 201910, First-Printing MaintenanceE165804 A
E165794 E142592