key FORD E SERIES 2021 Owners Manual
[x] Cancel search | Manufacturer: FORD, Model Year: 2021, Model line: E SERIES, Model: FORD E SERIES 2021Pages: 301, PDF Size: 3.05 MB
Page 4 of 301
Introduction
About This Manual
..........................................5
Symbols Glossary ............................................
5
Data Recording ..................................................
7
Perchlorate ........................................................
11
Ford Credit ........................................................
12
Replacement Parts Recommendation ........................................................................\
....
12
Special Notices ...............................................
12
Mobile Communications Equipment ........................................................................\
...
14
Environment
Protecting the Environment .......................
15
At a Glance
Instrument Panel ...........................................
16
Child Safety
General Information ......................................
17
Installing Child Restraints ...........................
19
Booster Seats .................................................
23
Child Restraint Positioning ........................
25
Seatbelts
Principle of Operation ..................................
27
Fastening the Seatbelts .............................
28
Seatbelt Height Adjustment ....................
30
Seatbelt Warning Lamp and Indicator Chime ............................................................
30
Child Restraint and Seatbelt Maintenance ................................................
31
Seatbelt Extensions ......................................
31
Supplementary Restraints System
Principle of Operation ..................................
32
Driver and Passenger Airbags ...................
33
Crash Sensors and Airbag Indicator .......
37
Airbag Disposal ..............................................
38Keys and Remote Controls
General Information on Radio
Frequencies .................................................
39
Remote Control .............................................
39
Replacing a Lost Key or Remote Control ........................................................................\
...
41
Doors and Locks
Locking and Unlocking ................................
42
Security
Passive Anti-Theft System ........................
45
Steering Wheel
Adjusting the Steering Wheel ...................
47
Cruise Control - Vehicles With: Adaptive Cruise Control .............................................
47
Cruise Control - Vehicles With: Cruise Control ..........................................................
48
Information Display Control .....................
48
Horn ...................................................................
48
Wipers and Washers
Windshield Wipers .......................................
49
Windshield Washers ....................................
49
Lighting
General Information ....................................
50
Lighting Control .............................................
50
Autolamps ........................................................
51
Instrument Lighting Dimmer .....................
51
Daytime Running Lamps .............................
51
Direction Indicators .......................................
52
Automatic High Beam Control
What Is Automatic High Beam Control ........................................................................\
...
53
Switching Automatic High Beam Control On and Off ...................................................
53
1
E-Series (TE4) Canada/United States of America, enUSA, Edition date: 201910, First-Printing Table of Contents
Page 36 of 301
particularly to occupants who are not
properly restrained or are otherwise out of
position at the time of airbag deployment.
Thus, it is extremely important that
occupants be properly restrained as far
away from the airbag module as possible
while maintaining vehicle control.
Routine maintenance of the airbags is not
required.
DRIVER AND PASSENGER
AIRBAGS
WARNING: Do not place your arms
on the airbag cover or through the
steering wheel. Failure to follow this
instruction could result in personal injury. WARNING:
Do not place a
rearward facing child restraint in front of
an active airbag. Failure to follow this
instruction could result in personal injury
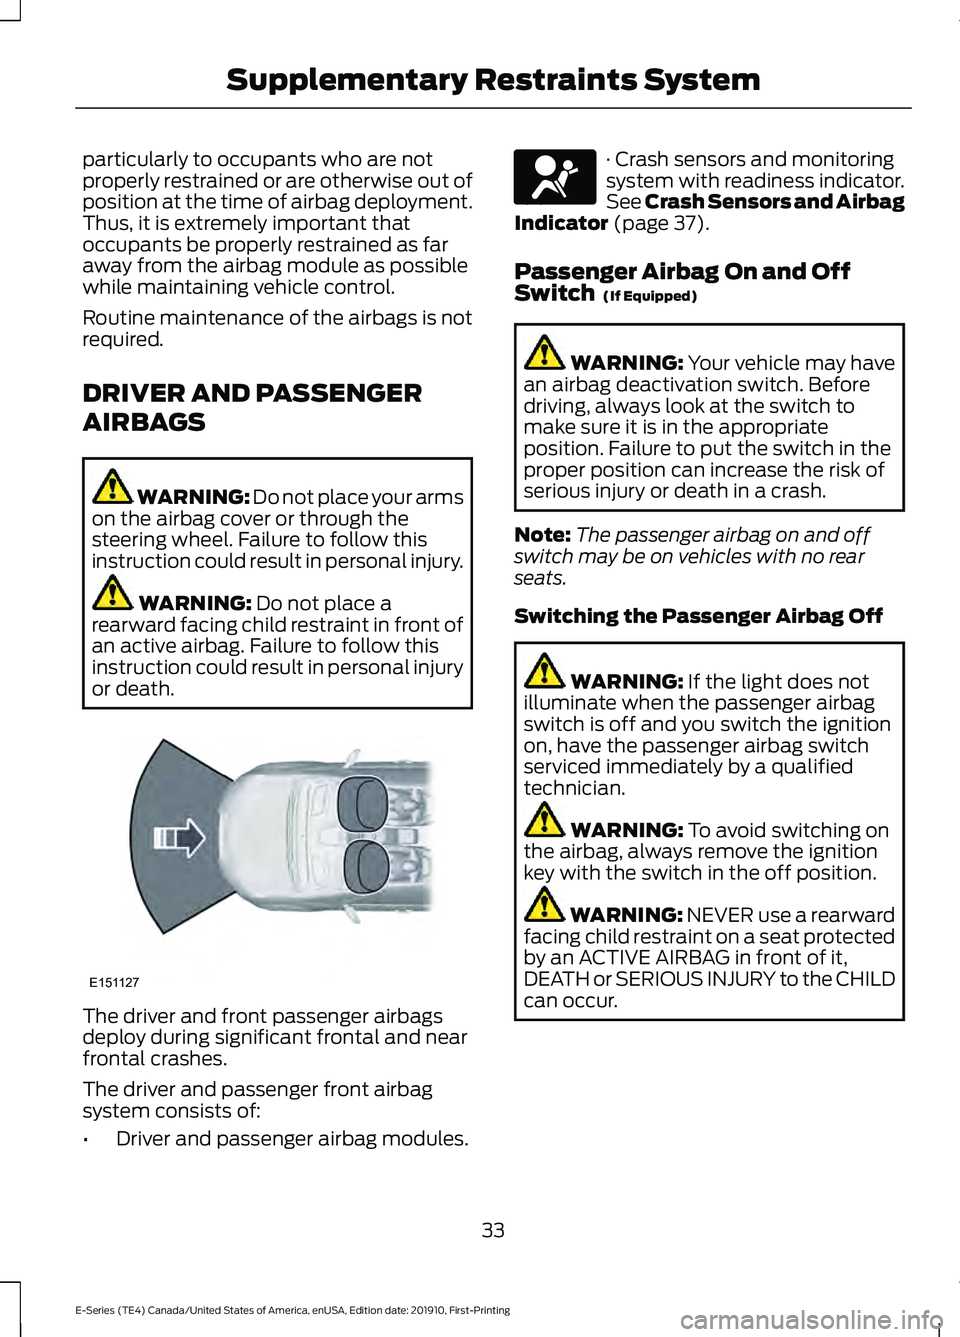
or death. The driver and front passenger airbags
deploy during significant frontal and near
frontal crashes.
The driver and passenger front airbag
system consists of:
•
Driver and passenger airbag modules. · Crash sensors and monitoring
system with readiness indicator.
See Crash Sensors and Airbag
Indicator
(page 37).
Passenger Airbag On and Off
Switch
(If Equipped) WARNING:
Your vehicle may have
an airbag deactivation switch. Before
driving, always look at the switch to
make sure it is in the appropriate
position. Failure to put the switch in the
proper position can increase the risk of
serious injury or death in a crash.
Note: The passenger airbag on and off
switch may be on vehicles with no rear
seats.
Switching the Passenger Airbag Off WARNING:
If the light does not
illuminate when the passenger airbag
switch is off and you switch the ignition
on, have the passenger airbag switch
serviced immediately by a qualified
technician. WARNING:
To avoid switching on
the airbag, always remove the ignition
key with the switch in the off position. WARNING: NEVER use a rearward
facing child restraint on a seat protected
by an ACTIVE AIRBAG in front of it,
DEATH or SERIOUS INJURY to the CHILD
can occur.
33
E-Series (TE4) Canada/United States of America, enUSA, Edition date: 201910, First-Printing Supplementary Restraints SystemE151127 E67017
Page 37 of 301
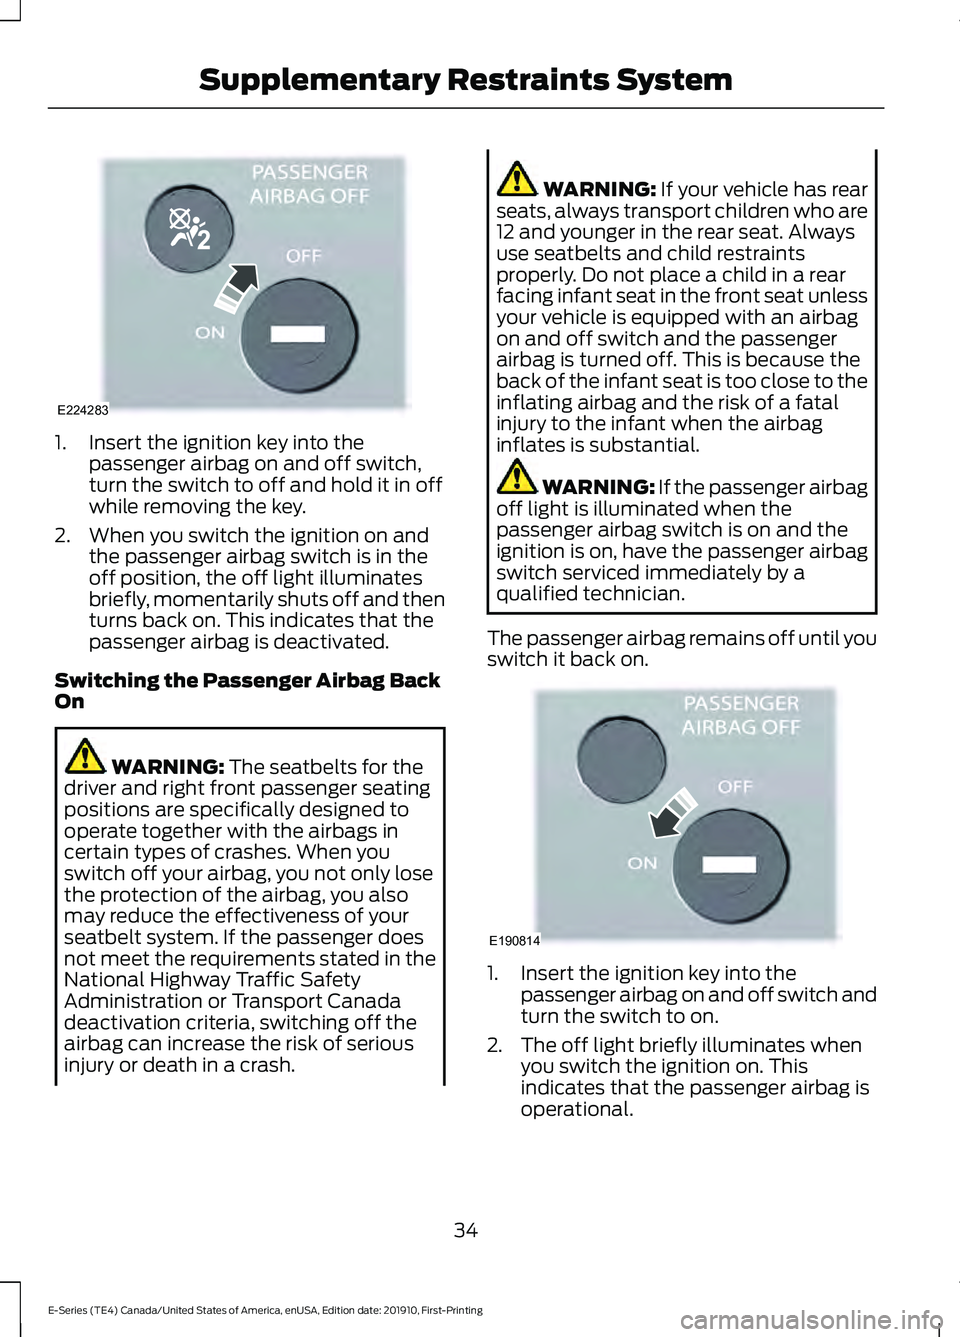
1. Insert the ignition key into the
passenger airbag on and off switch,
turn the switch to off and hold it in off
while removing the key.
2. When you switch the ignition on and the passenger airbag switch is in the
off position, the off light illuminates
briefly, momentarily shuts off and then
turns back on. This indicates that the
passenger airbag is deactivated.
Switching the Passenger Airbag Back
On WARNING: The seatbelts for the
driver and right front passenger seating
positions are specifically designed to
operate together with the airbags in
certain types of crashes. When you
switch off your airbag, you not only lose
the protection of the airbag, you also
may reduce the effectiveness of your
seatbelt system. If the passenger does
not meet the requirements stated in the
National Highway Traffic Safety
Administration or Transport Canada
deactivation criteria, switching off the
airbag can increase the risk of serious
injury or death in a crash. WARNING:
If your vehicle has rear
seats, always transport children who are
12 and younger in the rear seat. Always
use seatbelts and child restraints
properly. Do not place a child in a rear
facing infant seat in the front seat unless
your vehicle is equipped with an airbag
on and off switch and the passenger
airbag is turned off. This is because the
back of the infant seat is too close to the
inflating airbag and the risk of a fatal
injury to the infant when the airbag
inflates is substantial. WARNING:
If the passenger airbag
off light is illuminated when the
passenger airbag switch is on and the
ignition is on, have the passenger airbag
switch serviced immediately by a
qualified technician.
The passenger airbag remains off until you
switch it back on. 1. Insert the ignition key into the
passenger airbag on and off switch and
turn the switch to on.
2. The off light briefly illuminates when you switch the ignition on. This
indicates that the passenger airbag is
operational.
34
E-Series (TE4) Canada/United States of America, enUSA, Edition date: 201910, First-Printing Supplementary Restraints SystemE224283 E190814
Page 42 of 301
GENERAL INFORMATION ON
RADIO FREQUENCIES
This device complies with Part 15 of the
FCC Rules and with Licence exempt RSS
Standards of Industry Canada. Operation
is subject to the following two conditions:
•
This device may not cause harmful
interference, and
• This device must accept any
interference received, including
interference that may cause undesired
operation. WARNING: Changes or
modifications not expressively approved
by the party responsible for compliance
could void the user's authority to operate
the equipment. The term "IC:" before the
radio certification number only signifies
that Industry Canada technical
specifications were met.
The typical operating range for your
transmitter is approximately
33 ft (10 m).
Vehicles with the remote start feature will
have a greater range. One of the following
could cause a decrease in operating range:
• Weather conditions.
• Nearby radio towers.
• Structures around the vehicle.
• Other vehicles parked next to your
vehicle.
Other short distance radio transmissions,
for example amateur radios, medical
equipment, wireless headphones, remote
controls and alarm systems can also use
the radio frequency used by your remote
control. If the frequencies are jammed, you
will not be able to use your remote control.
You can lock and unlock the doors with the
key.
Note: Make sure to lock your vehicle before
leaving it unattended. Note:
If you are in range, the remote control
will operate if you press any button
unintentionally.
Note: The remote control contains sensitive
electrical components. Exposure to moisture
or impact may cause permanent damage.
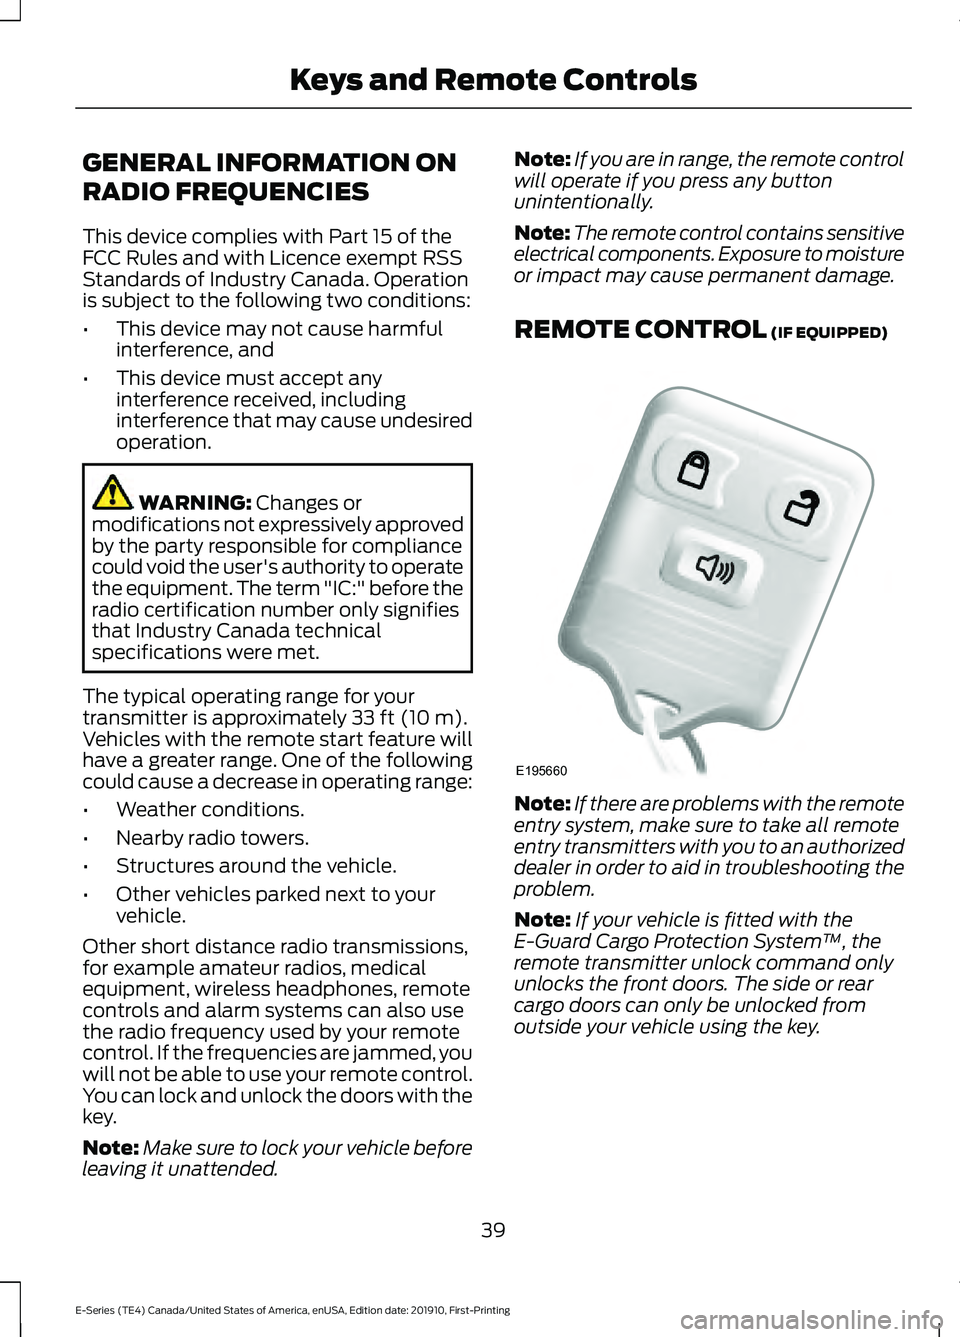
REMOTE CONTROL
(IF EQUIPPED) Note:
If there are problems with the remote
entry system, make sure to take all remote
entry transmitters with you to an authorized
dealer in order to aid in troubleshooting the
problem.
Note: If your vehicle is fitted with the
E-Guard Cargo Protection System ™, the
remote transmitter unlock command only
unlocks the front doors. The side or rear
cargo doors can only be unlocked from
outside your vehicle using the key.
39
E-Series (TE4) Canada/United States of America, enUSA, Edition date: 201910, First-Printing Keys and Remote ControlsE195660
Page 43 of 301
Reprogramming the Remote
Control
You must have all remote controls readily
accessible before beginning this
procedure. Any remote control that is not
present during the programming procedure
will no longer operate your vehicle.
Note:
You can program a maximum of four
coded keys to your vehicle.
Note: Do not apply the brake pedal during
this procedure.
1. Switch the ignition from off to on 8 times within 10 seconds, finishing in the
on position. The doors lock then unlock
to confirm that programming has
started.
2. Press any button on the remote control
that you want to program within 20
seconds. The doors lock then unlock
to confirm that programming was
successful.
3. Repeat step 2 to program each additional remote control.
4. After you have programmed all remote
controls, switch the ignition off.
5. The doors lock then unlock to confirm that programming is complete.
Changing the Remote Control
Battery
The remote control uses one coin-type
three-volt lithium battery CR2032 or
equivalent. Make sure that you dispose of
old batteries in an
environmentally friendly way.
Seek advice from your local authority
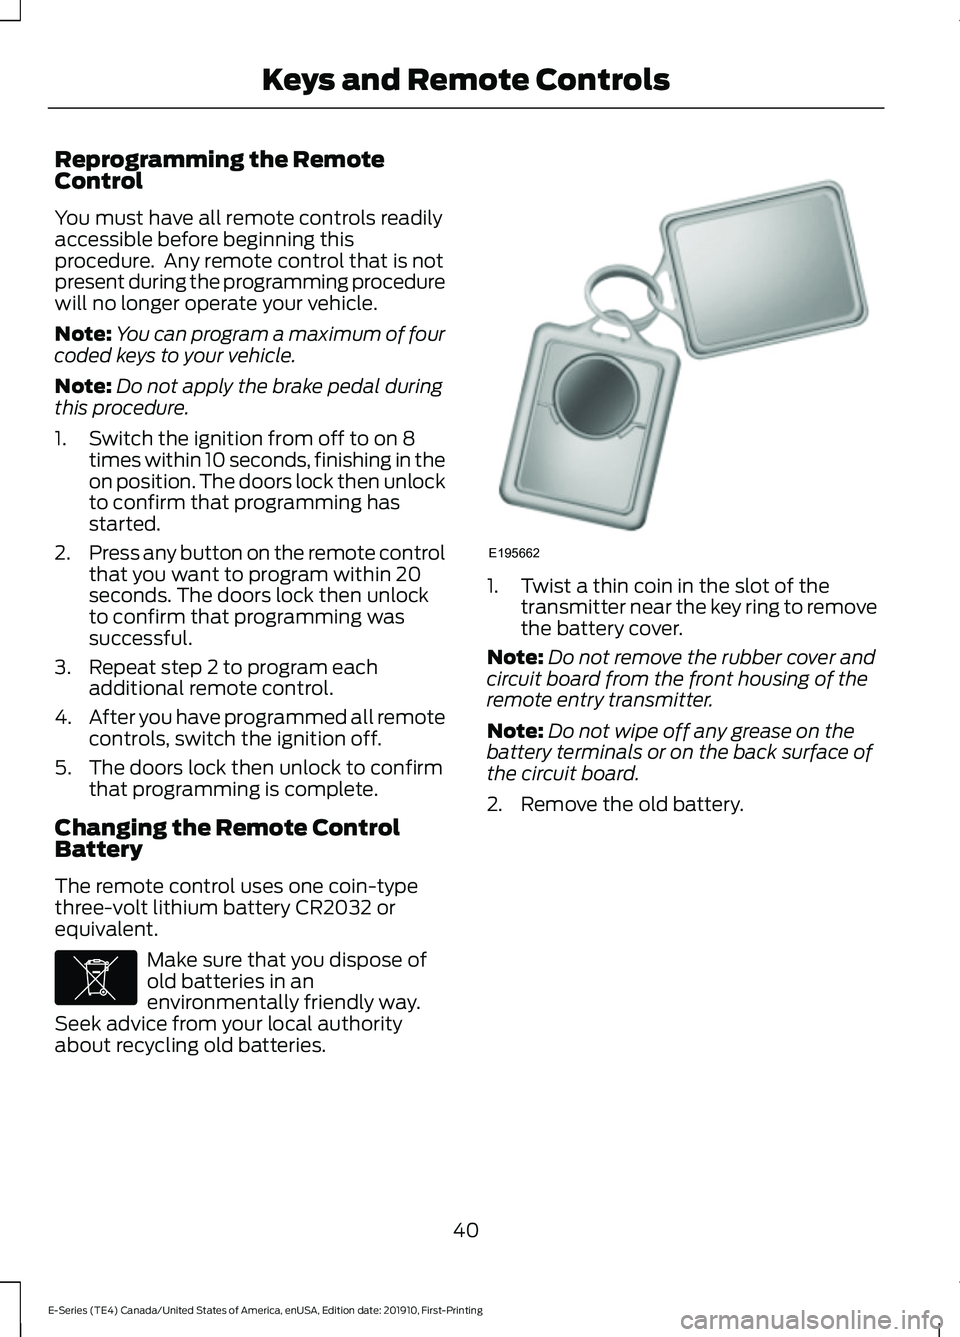
about recycling old batteries. 1. Twist a thin coin in the slot of the
transmitter near the key ring to remove
the battery cover.
Note: Do not remove the rubber cover and
circuit board from the front housing of the
remote entry transmitter.
Note: Do not wipe off any grease on the
battery terminals or on the back surface of
the circuit board.
2. Remove the old battery.
40
E-Series (TE4) Canada/United States of America, enUSA, Edition date: 201910, First-Printing Keys and Remote ControlsE107998 E195662
Page 44 of 301
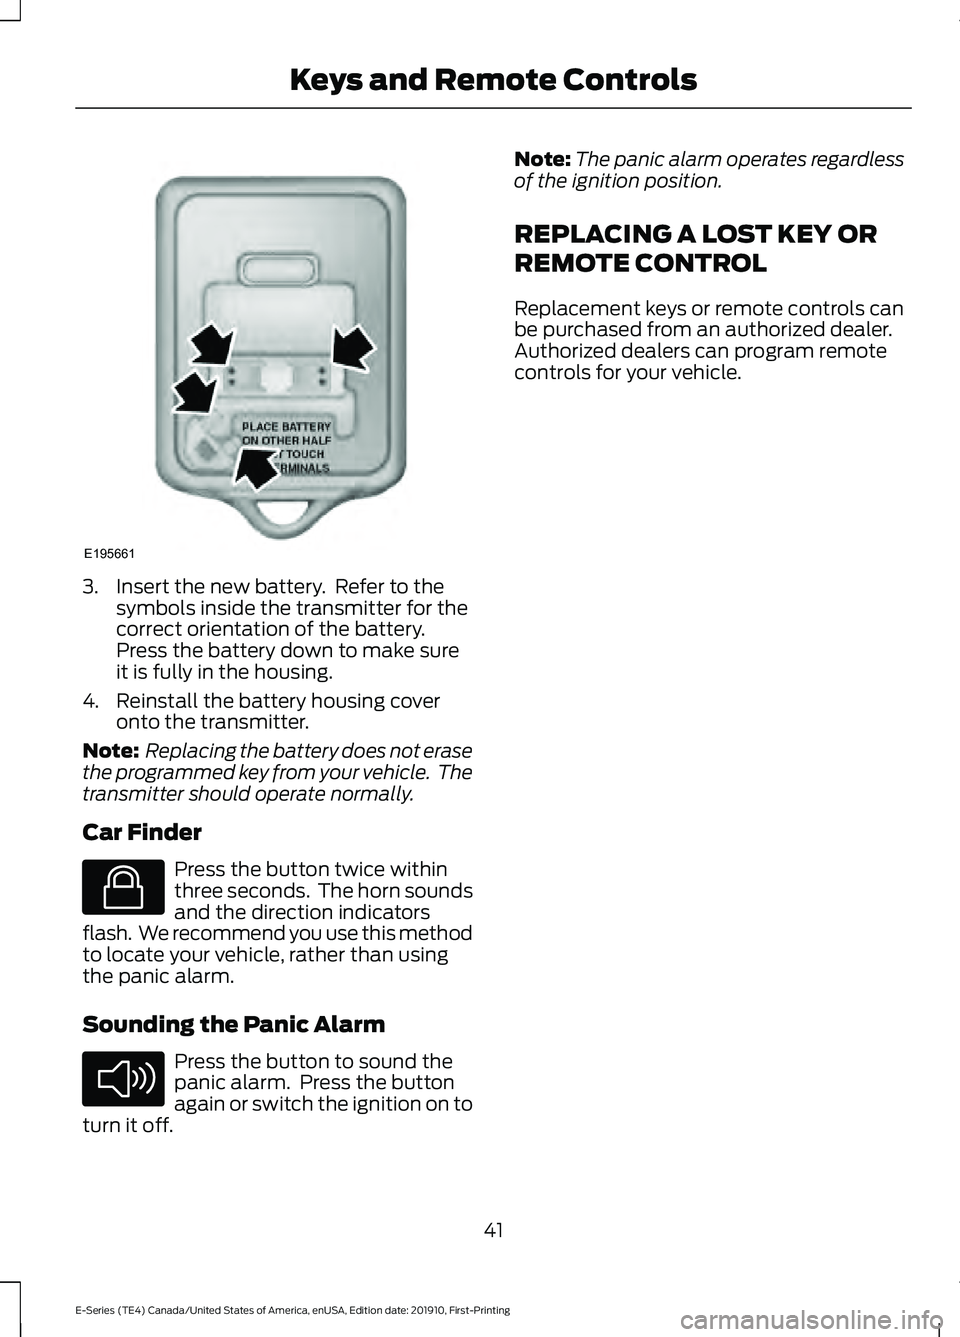
3. Insert the new battery. Refer to the
symbols inside the transmitter for the
correct orientation of the battery.
Press the battery down to make sure
it is fully in the housing.
4. Reinstall the battery housing cover onto the transmitter.
Note: Replacing the battery does not erase
the programmed key from your vehicle. The
transmitter should operate normally.
Car Finder Press the button twice within
three seconds. The horn sounds
and the direction indicators
flash. We recommend you use this method
to locate your vehicle, rather than using
the panic alarm.
Sounding the Panic Alarm Press the button to sound the
panic alarm. Press the button
again or switch the ignition on to
turn it off. Note:
The panic alarm operates regardless
of the ignition position.
REPLACING A LOST KEY OR
REMOTE CONTROL
Replacement keys or remote controls can
be purchased from an authorized dealer.
Authorized dealers can program remote
controls for your vehicle.
41
E-Series (TE4) Canada/United States of America, enUSA, Edition date: 201910, First-Printing Keys and Remote ControlsE195661 E138623 E138624
Page 45 of 301
LOCKING AND UNLOCKING
You can use the power door lock control
or the remote control to lock and unlock
your vehicle.
Power Door Locks (If Equipped)
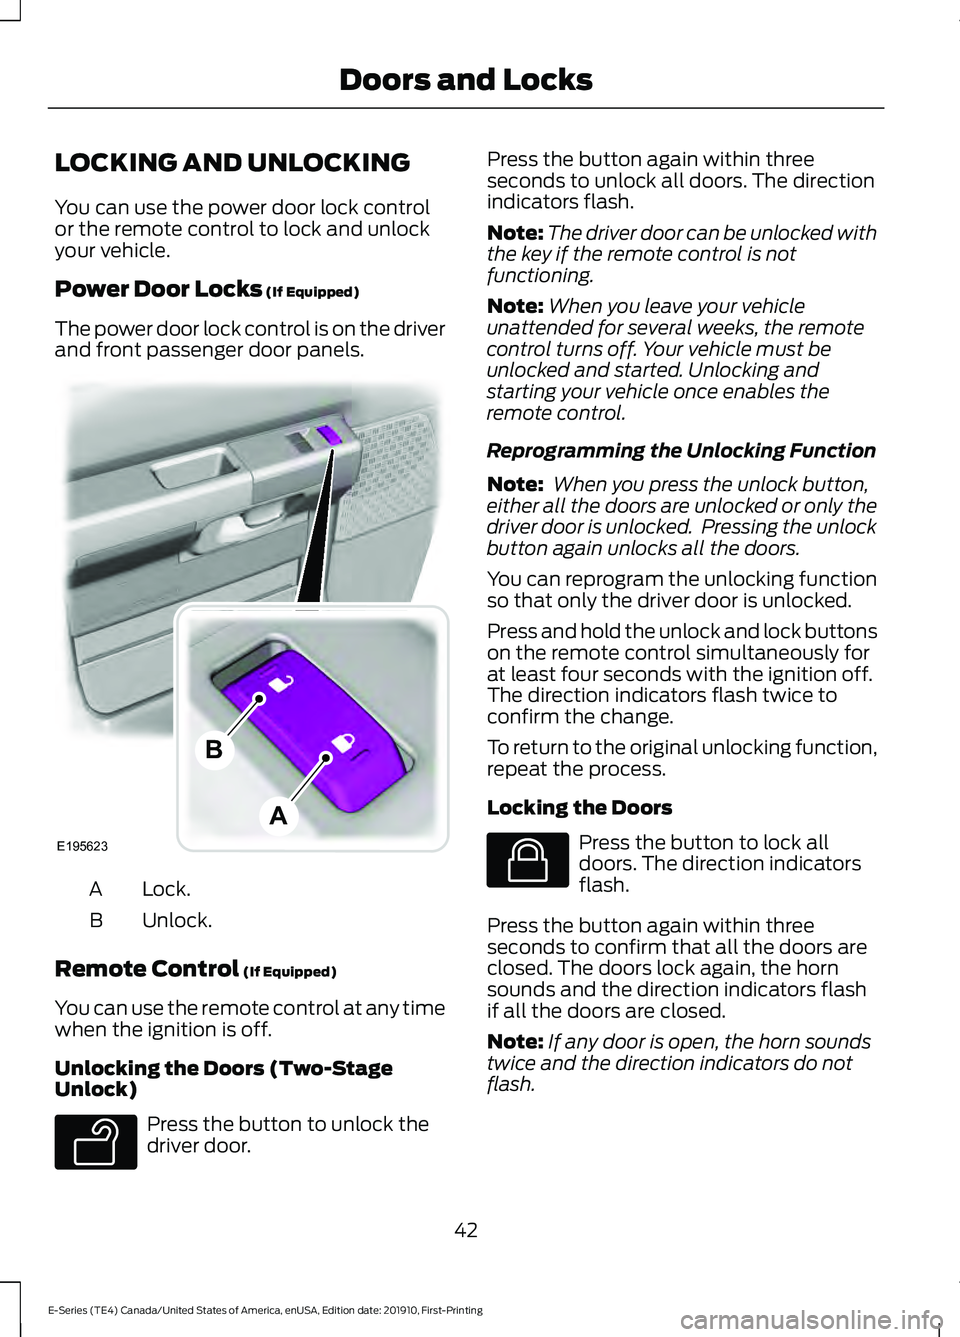
The power door lock control is on the driver
and front passenger door panels. Lock.
A
Unlock.
B
Remote Control
(If Equipped)
You can use the remote control at any time
when the ignition is off.
Unlocking the Doors (Two-Stage
Unlock) Press the button to unlock the
driver door. Press the button again within three
seconds to unlock all doors. The direction
indicators flash.
Note:
The driver door can be unlocked with
the key if the remote control is not
functioning.
Note: When you leave your vehicle
unattended for several weeks, the remote
control turns off. Your vehicle must be
unlocked and started. Unlocking and
starting your vehicle once enables the
remote control.
Reprogramming the Unlocking Function
Note: When you press the unlock button,
either all the doors are unlocked or only the
driver door is unlocked. Pressing the unlock
button again unlocks all the doors.
You can reprogram the unlocking function
so that only the driver door is unlocked.
Press and hold the unlock and lock buttons
on the remote control simultaneously for
at least four seconds with the ignition off.
The direction indicators flash twice to
confirm the change.
To return to the original unlocking function,
repeat the process.
Locking the Doors Press the button to lock all
doors. The direction indicators
flash.
Press the button again within three
seconds to confirm that all the doors are
closed. The doors lock again, the horn
sounds and the direction indicators flash
if all the doors are closed.
Note: If any door is open, the horn sounds
twice and the direction indicators do not
flash.
42
E-Series (TE4) Canada/United States of America, enUSA, Edition date: 201910, First-Printing Doors and LocksE195623
A
B E138629 E138623
Page 48 of 301
PASSIVE ANTI-THEFT
SYSTEM
Note:
The system is not compatible with
non-Ford aftermarket remote start systems.
Use of these systems may result in vehicle
starting problems and a loss of security
protection.
Note: Metallic objects, electronic devices
or a second coded key on the same key
chain may cause vehicle starting problems
if they are too close to the key when starting
the engine. Prevent these objects from
touching the coded key while starting the
engine. Switch the ignition off, move all
objects on the key chain away from the
coded key and restart the engine if a
problem occurs.
Note: Do not leave a duplicate coded key
in the vehicle. Always take your keys and
lock all doors when leaving the vehicle.
SecuriLock®
The system is an engine immobilization
system designed to prevent someone from
starting the engine unless they use a
correctly coded key for your vehicle. Using
an incorrectly coded key may prevent the
engine from starting. A message may
appear in the information display. If you
are unable to start the engine with a
correctly coded key, a malfunction has
happened and a message may appear in
the information display.
Automatic Arming
The engine immobilization system arms
immediately after you switch the ignition
off.
Automatic Disarming
Switching the ignition on with a correctly
coded key disarms the engine
immobilization system. Replacement Keys
If your keys become lost or stolen and you
do not have a spare correctly coded key,
you need to have your vehicle towed to an
authorized dealer. You need to erase the
coded keys from your vehicle and program
new coded keys.
Store an extra correctly coded key away
from the vehicle in a safe place to help
prevent any inconveniences. See an
authorized dealer to purchase additional
spare or replacement keys.
Note:
Your vehicle comes with two
integrated keyhead transmitters.
Programming a Spare Integrated
Keyhead Transmitter
You can program your own integrated
keyhead transmitter or standard
SecuriLock coded keys to your vehicle.
This procedure programs both the engine
immobilizer keycode and the remote entry
portion of the remote control to your
vehicle
Only use integrated keyhead transmitters
or standard SecuriLock keys.
You must have two previously
programmed correctly coded keys and the
new unprogrammed key readily accessible.
See an authorized dealer to have the spare
key programmed if two previously
programmed correctly coded keys are not
available.
Read and understand the entire procedure
before you begin.
1. Insert the first previously programmed
correctly coded key into the ignition.
2. Switch the ignition from off to on. Keep
the ignition on for at least three
seconds, but no more than 10 seconds.
3. Switch the ignition off and remove the
first correctly coded key from the
ignition.
45
E-Series (TE4) Canada/United States of America, enUSA, Edition date: 201910, First-Printing Security
Page 49 of 301
4. After three seconds but within 10
seconds of switching the ignition off,
insert the second previously correctly
coded key into the ignition.
5. Switch the ignition from off to on. Keep
the ignition on for at least three
seconds, but no more than 10 seconds.
6. Switch the ignition off and remove the
second previously programmed
correctly coded key from the ignition.
7. After three seconds but within 10 seconds of switching the ignition off
and removing the previously
programmed correctly coded key,
insert the new unprogrammed key into
the ignition.
8. Switch the ignition from off to on. Keep
the ignition on for at least six seconds.
9. Remove the newly programmed correctly coded key from the ignition.
If you successfully program the key, it
starts the engine and operates the remote
entry system, if the new key is an
integrated keyhead transmitter.
If you did not successfully program the key,
wait 10 seconds and repeat Steps 1 through
8. If you are still unsuccessful, take your
vehicle to an authorized dealer.
Note: You can program a maximum of
eight coded keys to your vehicle. All eight
can be integrated keyhead transmitters.
46
E-Series (TE4) Canada/United States of America, enUSA, Edition date: 201910, First-Printing Security
Page 62 of 301
Engine Oil Pressure Gauge
Indicates engine oil pressure. At normal
operating temperature, the level indicator
is in the normal range. If the pressure gauge
falls below the normal range, stop your
vehicle, switch off the engine and check
the engine oil level. Add oil if needed. If the
oil level is correct, have your vehicle
checked by an authorized dealer.
Engine Coolant Temperature
Gauge
WARNING: Do not remove the
coolant reservoir cap when the engine is
on or the cooling system is hot. Wait 10
minutes for the cooling system to cool
down. Cover the coolant reservoir cap
with a thick cloth to prevent the
possibility of scalding and slowly remove
the cap. Failure to follow this instruction
could result in personal injury.
Indicates engine coolant temperature. At
normal operating temperature, the level
indicator is in the normal range. If the
engine coolant temperature exceeds the
normal range, stop your vehicle as soon as
possible, switch off the engine and let the
engine cool.
Fuel Gauge
The fuel gauge indicates about how much
fuel is in the fuel tank.
The arrow adjacent to the fuel pump
symbol indicates on which side of your
vehicle the fuel filler door is located.
Note: The fuel gauge may vary slightly
when your vehicle is moving or on a slope. Low Fuel Reminder
A low fuel level reminder displays and
sounds when the distance to empty
reaches
75 mi (120 km) to empty for
MyKey, and at 50 mi (80 km), 25 mi
(40 km), 10 mi (20 km) and 0 mi (0 km)
for all vehicle keys.
Note: The low fuel reminder can appear at
different fuel gauge positions depending on
fuel economy conditions. This variation is
normal.
Distance to Empty
Indicates the approximate distance your
vehicle can travel on the fuel remaining in
the tank. Changes in driving pattern can
cause the value to not only decrease but
also increase or stay constant for periods
of time.
Transmission Fluid Temperature
Gauge
Indicates transmission fluid temperature.
At normal operating temperature, the level
indicator is in the normal range. If the
transmission fluid temperature exceeds
the normal range, stop your vehicle as soon
as possible and verify the airflow is not
restricted by snow or debris blocking
airflow through the grille.
Special operating conditions such as
snowplowing, towing, or off-road use may
cause higher than normal operating
temperatures. See
Special Operating
Conditions Scheduled Maintenance
(page
255).
To lower the transmission temperature
into the normal range, alter the severity of
your driving conditions. Operating the
transmission for extended periods with the
gauge in the higher than normal area may
cause internal transmission damage. If the
gauge continues to show high
temperatures, see an authorized dealer.
59
E-Series (TE4) Canada/United States of America, enUSA, Edition date: 201910, First-Printing Instrument Cluster