key FORD E SERIES 2022 User Guide
[x] Cancel search | Manufacturer: FORD, Model Year: 2022, Model line: E SERIES, Model: FORD E SERIES 2022Pages: 300, PDF Size: 3.18 MB
Page 85 of 300
GENERAL INFORMATION
WARNING: Extended idling at high
engine speeds can produce very high
temperatures in the engine and exhaust
system, creating the risk of fire or other
damage. WARNING:
Do not park, idle or
drive your vehicle on dry grass or other
dry ground cover. The emission system
heats up the engine compartment and
exhaust system, creating the risk of fire. WARNING: Do not start the engine
in a closed garage or in other enclosed
areas. Exhaust fumes can be toxic.
Always open the garage door before you
start the engine. WARNING:
Exhaust leaks may
result in entry of harmful and potentially
lethal fumes into the passenger
compartment. If you smell exhaust
fumes inside your vehicle, have your
vehicle inspected immediately. Do not
drive if you smell exhaust fumes.
If you disconnect the battery, your vehicle
may exhibit some unusual driving
characteristics for approximately
5 mi
(8 km) after you reconnect it. This is
because the engine management system
must realign itself with the engine. You
can disregard any unusual driving
characteristics during this period.
The powertrain control system meets all
Canadian interference-causing equipment
standard requirements regulating the
impulse electrical field or radio noise.
When you start the engine, avoid pressing
the accelerator pedal before and during
operation. Only use the accelerator pedal
when you have difficulty starting the
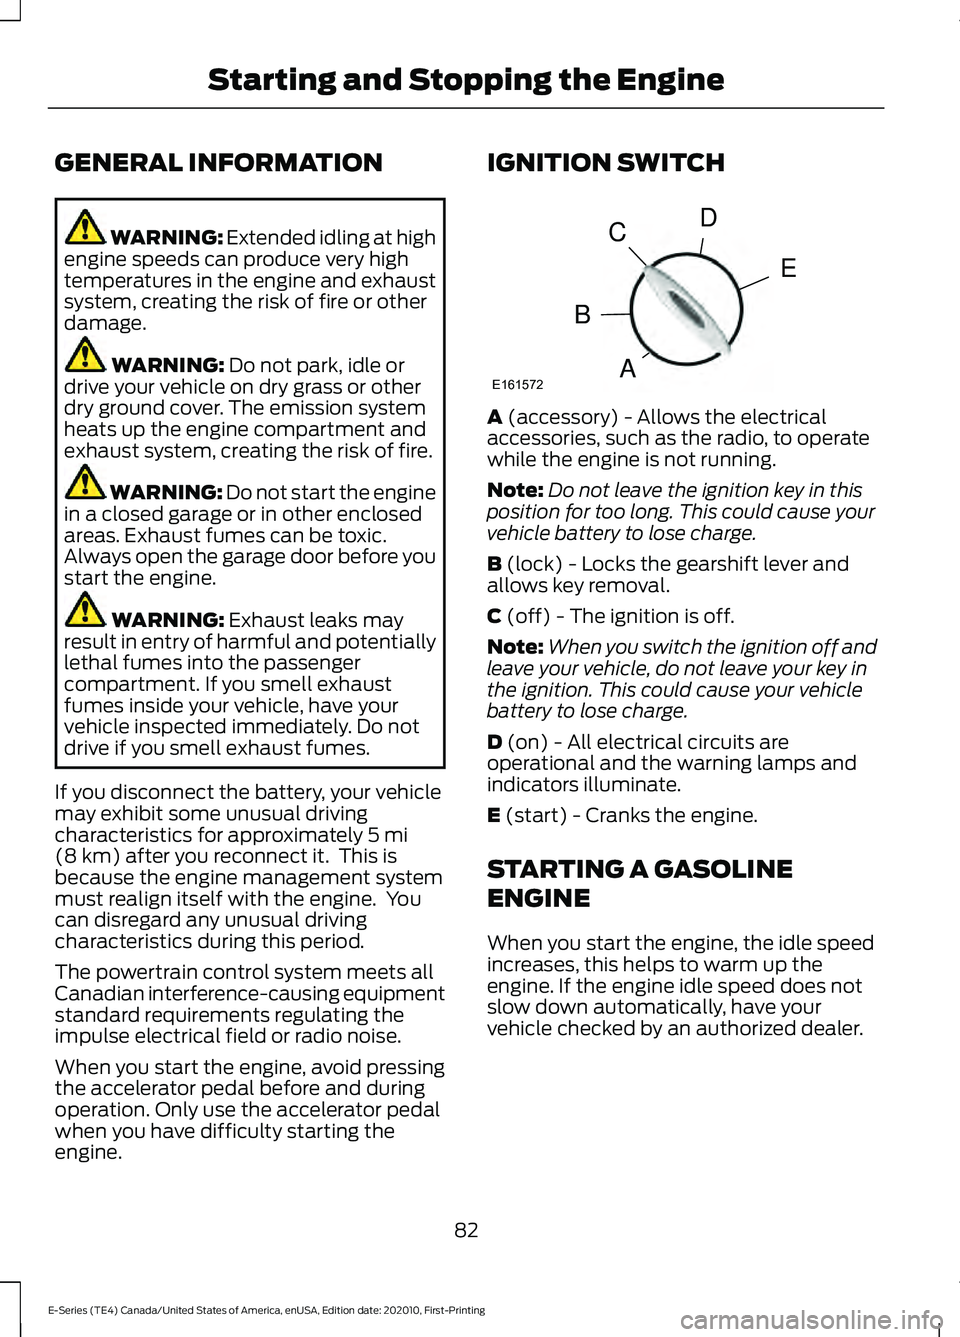
engine. IGNITION SWITCH
A
(accessory) - Allows the electrical
accessories, such as the radio, to operate
while the engine is not running.
Note: Do not leave the ignition key in this
position for too long. This could cause your
vehicle battery to lose charge.
B
(lock) - Locks the gearshift lever and
allows key removal.
C
(off) - The ignition is off.
Note: When you switch the ignition off and
leave your vehicle, do not leave your key in
the ignition. This could cause your vehicle
battery to lose charge.
D
(on) - All electrical circuits are
operational and the warning lamps and
indicators illuminate.
E
(start) - Cranks the engine.
STARTING A GASOLINE
ENGINE
When you start the engine, the idle speed
increases, this helps to warm up the
engine. If the engine idle speed does not
slow down automatically, have your
vehicle checked by an authorized dealer.
82
E-Series (TE4) Canada/United States of America, enUSA, Edition date: 202010, First-Printing Starting and Stopping the EngineE161572
D
E
C
B
A
Page 86 of 300
Before starting the engine check the
following:
•
Make sure all occupants have fastened
their safety belts.
• Make sure the headlamps and
electrical accessories are off.
• Make sure the parking brake is on.
• Make sure the transmission is in park
(P) or neutral (N).
• Turn the ignition key to the on position.
Note: Do not touch the accelerator pedal.
1. Fully press the brake pedal.
2. Turn the key to the start position to start the engine. Release the key when
the engine starts.
Note: The engine may continue cranking
for up to 15 seconds or until it starts.
Note: If you cannot start the engine on the
first try, wait for a short period and try again.
Failure to Start
If you cannot start the engine after three
attempts, wait 10 seconds and follow this
procedure:
1. Fully press the brake pedal.
2. Fully press the accelerator pedal and hold it there.
3. Start the engine.
Stopping the Engine When Your
Vehicle is Stationary
1. Shift into park (P) or neutral (N).
2. Turn the key to the off position.
3. Apply the parking brake. Stopping the Engine When Your
Vehicle is Moving WARNING: Switching off the
engine when the vehicle is still moving
will result in a loss of brake and steering
assistance. The steering will not lock, but
higher effort will be required. When the
ignition is switched off, some electrical
circuits, including air bags, warning lamps
and indicators may also be off. If the
ignition was turned off accidentally, you
can shift into neutral (N) and re-start the
engine.
1. Put the transmission into neutral (N) and use the brakes to bring your vehicle
to a safe stop.
2. When your vehicle has stopped, shift into park (P) or neutral (N) and switch
the ignition off.
3. Apply the parking brake.
Guarding Against Exhaust Fumes WARNING:
If you smell exhaust
fumes inside your vehicle, have your
vehicle checked by your authorized
dealer immediately. Do not drive your
vehicle if you smell exhaust fumes.
Carbon monoxide is present in exhaust
fumes. Take precautions to avoid its
dangerous effects.
Important Ventilating Information
If you stop your vehicle and then leave the
engine idling for long periods of time, we
recommend that you do one of the
following:
• Open the windows at least 1 in (3 cm).
• Set your climate control to outside air.
83
E-Series (TE4) Canada/United States of America, enUSA, Edition date: 202010, First-Printing Starting and Stopping the Engine
Page 98 of 300
Your vehicle may not pass the I/M test if
the service engine soon indicator is on or
not working properly (bulb is burned out),
or if the OBD-II system has determined
that some of the emission control systems
have not been properly checked. In this
case, the vehicle is not ready for I/M
testing.
If the vehicle
’s engine or transmission has
just been serviced, or the battery has
recently run down or been replaced, the
OBD-II system may indicate that the
vehicle is not ready for I/M testing. To
determine if the vehicle is ready for I/M
testing, turn the ignition key to the on
position for 15 seconds without cranking
the engine. If the service engine soon
indicator blinks eight times, it means that
the vehicle is not ready for I/M testing; if
the service engine soon indicator stays on
solid, it means that your vehicle is ready
for I/M testing.
The OBD-II system checks the emission
control system during normal driving. A
complete check may take several days.
If the vehicle is not ready for I/M testing,
you can perform the following driving cycle
consisting of mixed city and highway
driving:
1. 15 minutes of steady driving on an expressway or highway followed by 20
minutes of stop-and-go driving with at
least four 30-second idle periods.
2. Allow your vehicle to sit for at least eight hours with the ignition off. Then,
start the vehicle and complete the
above driving cycle. The vehicle must
warm up to its normal operating
temperature. Once started, do not turn
off the vehicle until the above driving
cycle is complete.
If the vehicle is still not ready for I/M
testing, you need to repeat the above
driving cycle.
95
E-Series (TE4) Canada/United States of America, enUSA, Edition date: 202010, First-Printing Engine Emission Control
Page 99 of 300
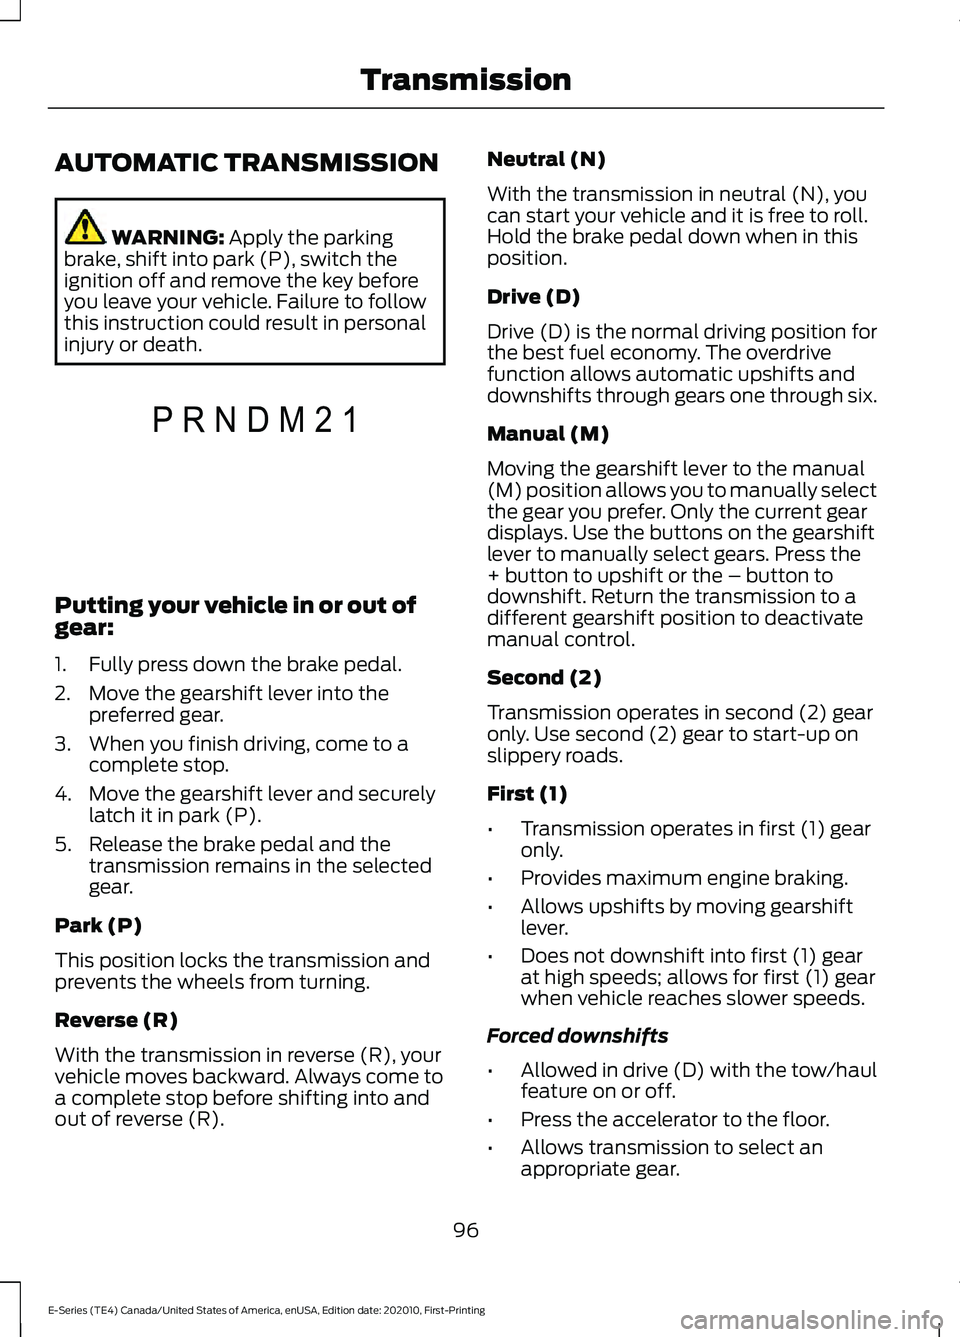
AUTOMATIC TRANSMISSION
WARNING: Apply the parking
brake, shift into park (P), switch the
ignition off and remove the key before
you leave your vehicle. Failure to follow
this instruction could result in personal
injury or death. Putting your vehicle in or out of
gear:
1. Fully press down the brake pedal.
2. Move the gearshift lever into the
preferred gear.
3. When you finish driving, come to a complete stop.
4. Move the gearshift lever and securely latch it in park (P).
5. Release the brake pedal and the transmission remains in the selected
gear.
Park (P)
This position locks the transmission and
prevents the wheels from turning.
Reverse (R)
With the transmission in reverse (R), your
vehicle moves backward. Always come to
a complete stop before shifting into and
out of reverse (R). Neutral (N)
With the transmission in neutral (N), you
can start your vehicle and it is free to roll.
Hold the brake pedal down when in this
position.
Drive (D)
Drive (D) is the normal driving position for
the best fuel economy. The overdrive
function allows automatic upshifts and
downshifts through gears one through six.
Manual (M)
Moving the gearshift lever to the manual
(M) position allows you to manually select
the gear you prefer. Only the current gear
displays. Use the buttons on the gearshift
lever to manually select gears. Press the
+ button to upshift or the – button to
downshift. Return the transmission to a
different gearshift position to deactivate
manual control.
Second (2)
Transmission operates in second (2) gear
only. Use second (2) gear to start-up on
slippery roads.
First (1)
•
Transmission operates in first (1) gear
only.
• Provides maximum engine braking.
• Allows upshifts by moving gearshift
lever.
• Does not downshift into first (1) gear
at high speeds; allows for first (1) gear
when vehicle reaches slower speeds.
Forced downshifts
• Allowed in drive (D) with the tow/haul
feature on or off.
• Press the accelerator to the floor.
• Allows transmission to select an
appropriate gear.
96
E-Series (TE4) Canada/United States of America, enUSA, Edition date: 202010, First-Printing TransmissionP R N D M 2 1E307627
Page 102 of 300
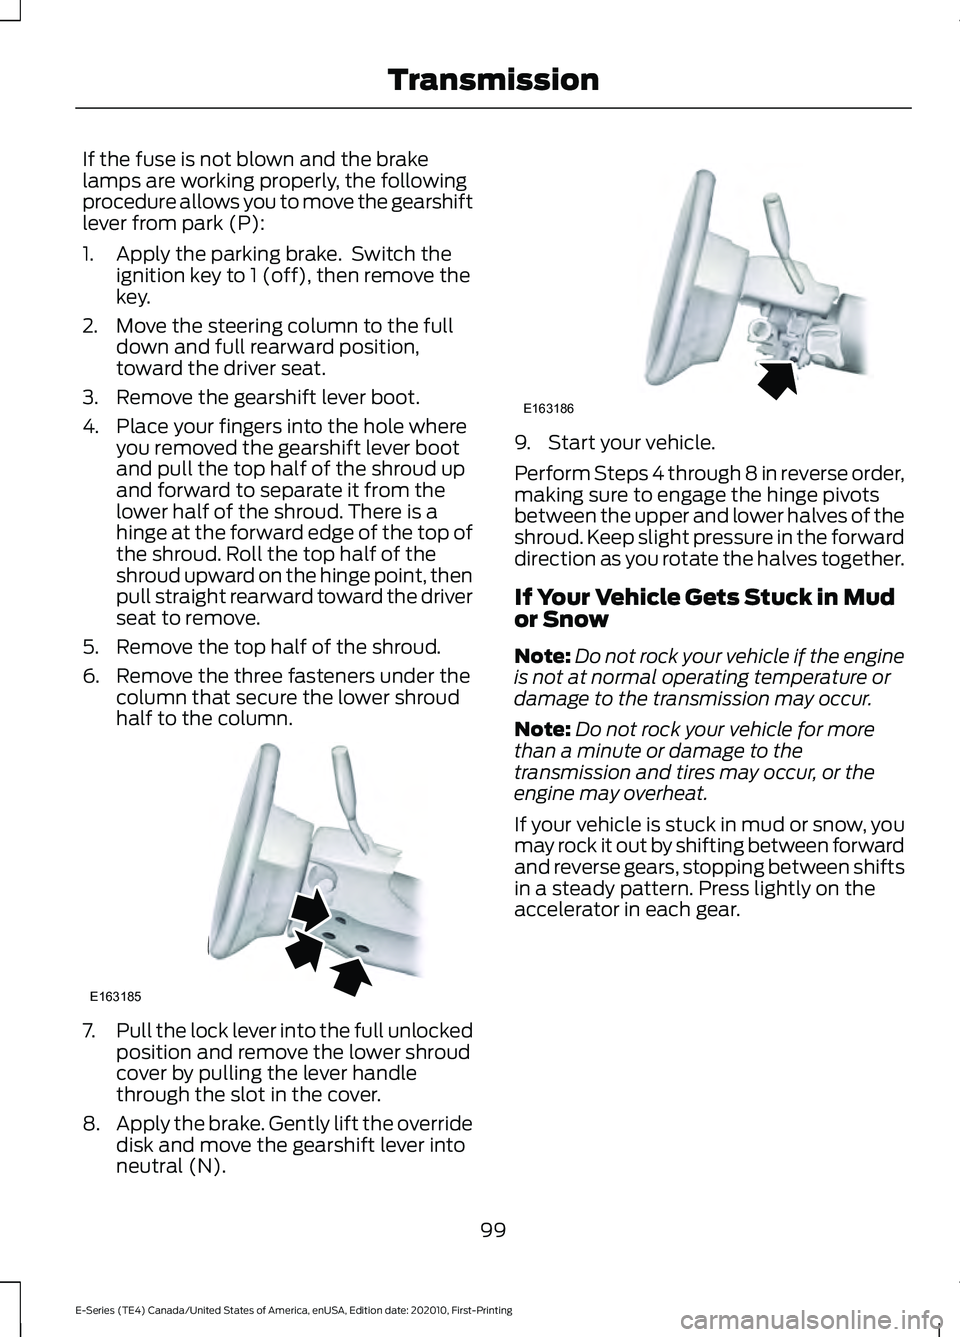
If the fuse is not blown and the brake
lamps are working properly, the following
procedure allows you to move the gearshift
lever from park (P):
1. Apply the parking brake. Switch the
ignition key to 1 (off), then remove the
key.
2. Move the steering column to the full down and full rearward position,
toward the driver seat.
3. Remove the gearshift lever boot.
4. Place your fingers into the hole where you removed the gearshift lever boot
and pull the top half of the shroud up
and forward to separate it from the
lower half of the shroud. There is a
hinge at the forward edge of the top of
the shroud. Roll the top half of the
shroud upward on the hinge point, then
pull straight rearward toward the driver
seat to remove.
5. Remove the top half of the shroud.
6. Remove the three fasteners under the column that secure the lower shroud
half to the column. 7.
Pull the lock lever into the full unlocked
position and remove the lower shroud
cover by pulling the lever handle
through the slot in the cover.
8. Apply the brake. Gently lift the override
disk and move the gearshift lever into
neutral (N). 9. Start your vehicle.
Perform Steps 4 through 8 in reverse order,
making sure to engage the hinge pivots
between the upper and lower halves of the
shroud. Keep slight pressure in the forward
direction as you rotate the halves together.
If Your Vehicle Gets Stuck in Mud
or Snow
Note:
Do not rock your vehicle if the engine
is not at normal operating temperature or
damage to the transmission may occur.
Note: Do not rock your vehicle for more
than a minute or damage to the
transmission and tires may occur, or the
engine may overheat.
If your vehicle is stuck in mud or snow, you
may rock it out by shifting between forward
and reverse gears, stopping between shifts
in a steady pattern. Press lightly on the
accelerator in each gear.
99
E-Series (TE4) Canada/United States of America, enUSA, Edition date: 202010, First-Printing TransmissionE163185 E163186
Page 105 of 300
The sound of the pump operating may be
heard by the driver. This is a normal
characteristic of the system.
The reserve system provides reduced
braking power, so the vehicle should be
operated under these conditions with
caution, and only to seek service repair and
removal of the vehicle from the roadway.
Note:
For vehicles with the Hydromax
system operating under normal conditions,
the noise of the fluid flowing through the
booster may be heard whenever you apply
the brake. This condition is normal. Vehicle
service is not required.
If braking performance or pedal response
becomes very poor, even when you
strongly press the pedal, it may indicate
the presence of air in the hydraulic system
or leakage of fluid. Stop your vehicle as
soon as it is safe to do so. Have the system
checked as soon as possible.
HINTS ON DRIVING WITH
ANTI-LOCK BRAKES
The anti-lock braking system does not
eliminate the risks when:
• You drive too closely to the vehicle in
front of you.
• Your vehicle is hydroplaning.
• You take corners too fast.
• The road surface is poor.
Note: If the system activates, the brake
pedal may pulse and may travel further.
Maintain pressure on the brake pedal. You
may also hear a noise from the system. This
is normal. PARKING BRAKE WARNING: Apply the parking
brake, shift into park (P), switch the
ignition off and remove the key before
you leave your vehicle. Failure to follow
this instruction could result in personal
injury or death.
Apply the parking brake whenever you park
your vehicle.
• For vehicles with a foot operated
parking brake, press the pedal down.
• For vehicles with a hand operated
parking brake, pull the parking brake
lever up. It illuminates when you switch
the ignition on and apply the
parking brake. It also illuminates
momentarily when you switch
the ignition on to confirm the
lamp is functional. If it does not
illuminate when you switch the ignition on
or begins to flash at any time, have the
system checked by an authorized dealer.
If it illuminates when your vehicle is
moving, make sure you disengage the
parking brake.
If the parking brake is disengaged, this
indicates a low brake fluid level or a brake
system fault. Have your vehicle checked
as soon as possible.
To release the parking brake:
• For vehicles with a foot operated
parking brake, pull the parking brake
release lever.
• For vehicles with a hand operated
parking brake, push the parking brake
lever down.
102
E-Series (TE4) Canada/United States of America, enUSA, Edition date: 202010, First-Printing BrakesE270480
Page 121 of 300
DRIVER ALERT
WARNING: You are responsible for
controlling your vehicle at all times. The
system is designed to be an aid and does
not relieve you of your responsibility to
drive with due care and attention. Failure
to follow this instruction could result in
the loss of control of your vehicle,
personal injury or death. WARNING: The system may not
function if the sensor is blocked. WARNING:
Take regular rest
breaks if you feel tired. Do not wait for
the system to warn you. WARNING:
Certain driving styles
may result in the system warning you
even if you are not feeling tired. WARNING:
In cold and severe
weather conditions the system may not
function. Rain, snow and spray can all
limit sensor performance. WARNING:
The system will not
operate if the sensor cannot track the
road lane markings. WARNING:
If damage occurs in the
immediate area surrounding the sensor,
have your vehicle checked as soon as
possible. WARNING:
The system may not
correctly operate if your vehicle is fitted
with a suspension kit not approved by
us.
Note: Keep the windshield free from
obstructions. For example, bird droppings,
insects and snow or ice. Note:
If you have a blocked camera or
damaged windshield, the system may not
function.
Note: The system remembers the last
setting when you start your vehicle, unless
it detects a MyKey ™.
Note: If enabled in the menu, the system
activates at speeds above
40 mph
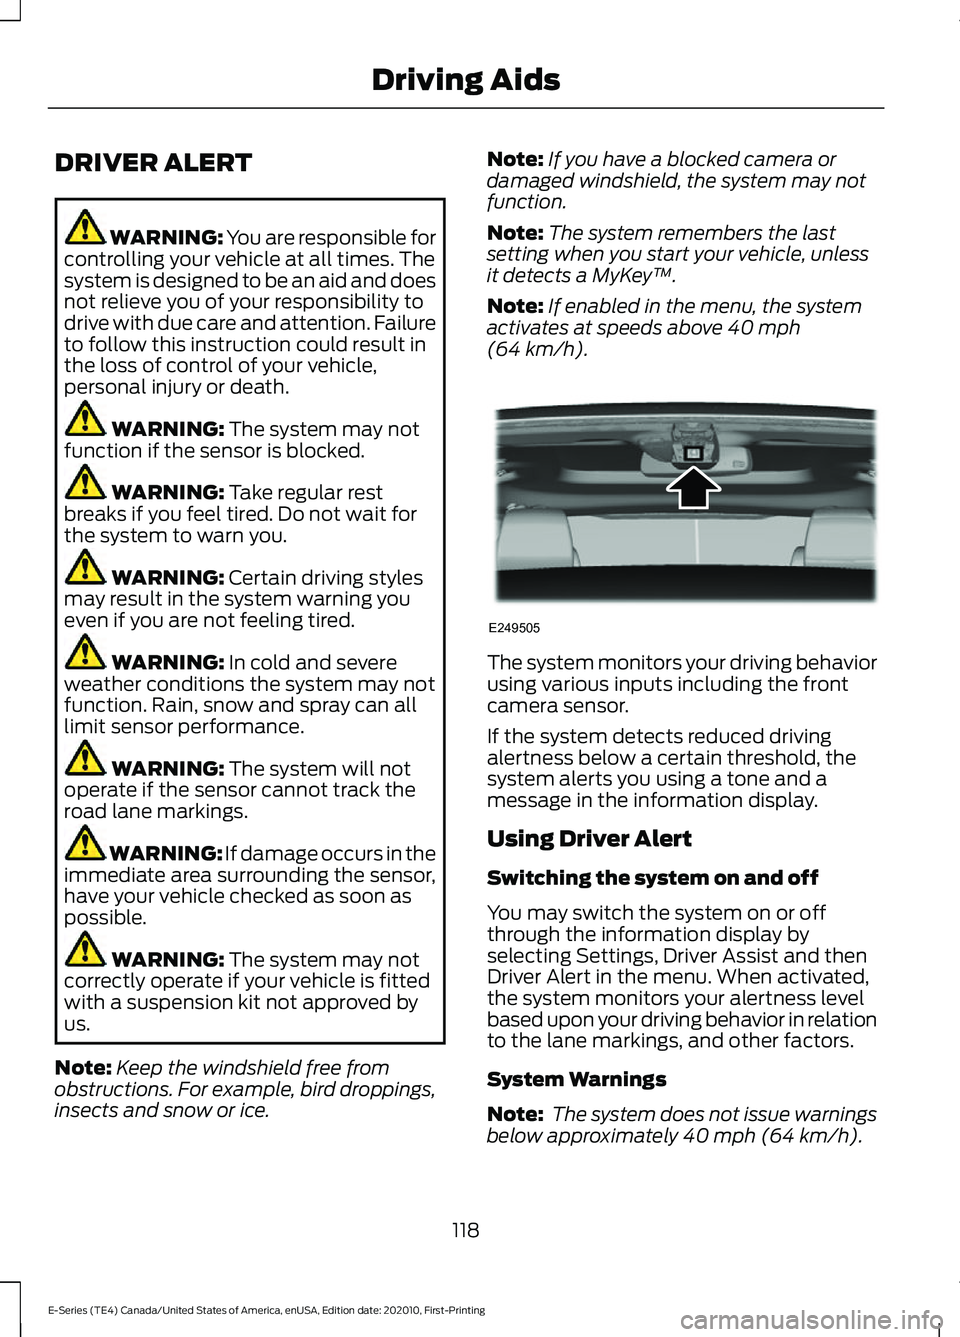
(64 km/h). The system monitors your driving behavior
using various inputs including the front
camera sensor.
If the system detects reduced driving
alertness below a certain threshold, the
system alerts you using a tone and a
message in the information display.
Using Driver Alert
Switching the system on and off
You may switch the system on or off
through the information display by
selecting Settings, Driver Assist and then
Driver Alert in the menu. When activated,
the system monitors your alertness level
based upon your driving behavior in relation
to the lane markings, and other factors.
System Warnings
Note:
The system does not issue warnings
below approximately
40 mph (64 km/h).
118
E-Series (TE4) Canada/United States of America, enUSA, Edition date: 202010, First-Printing Driving AidsE249505
Page 123 of 300
When you switch the system on and it
detects an unintentional drift out of your
lane is likely to occur, the system notifies
or assists you to stay in your lane through
the steering system and information
display. The system provides a warning by
an audible tone.
Switching the System On and Off
Note:
The system on or off setting is stored
until it is manually changed, unless a MyKey
is detected. If the system detects a MyKey,
it defaults to on and the mode is set to alert.
Note: If a MyKey is detected, pressing the
button does not affect the on or off status
of the system. You can only change the
mode and sensitivity settings. Press the button to switch the
system on or off. The button is
above the audio unit or on the
center console.
System Settings
The system sensitivity and intensity can
be adjusted through the display screen.
See General Information (page 65). The
system remembers the last selection. You
do not need to readjust the setting each
time you turn on your vehicle.
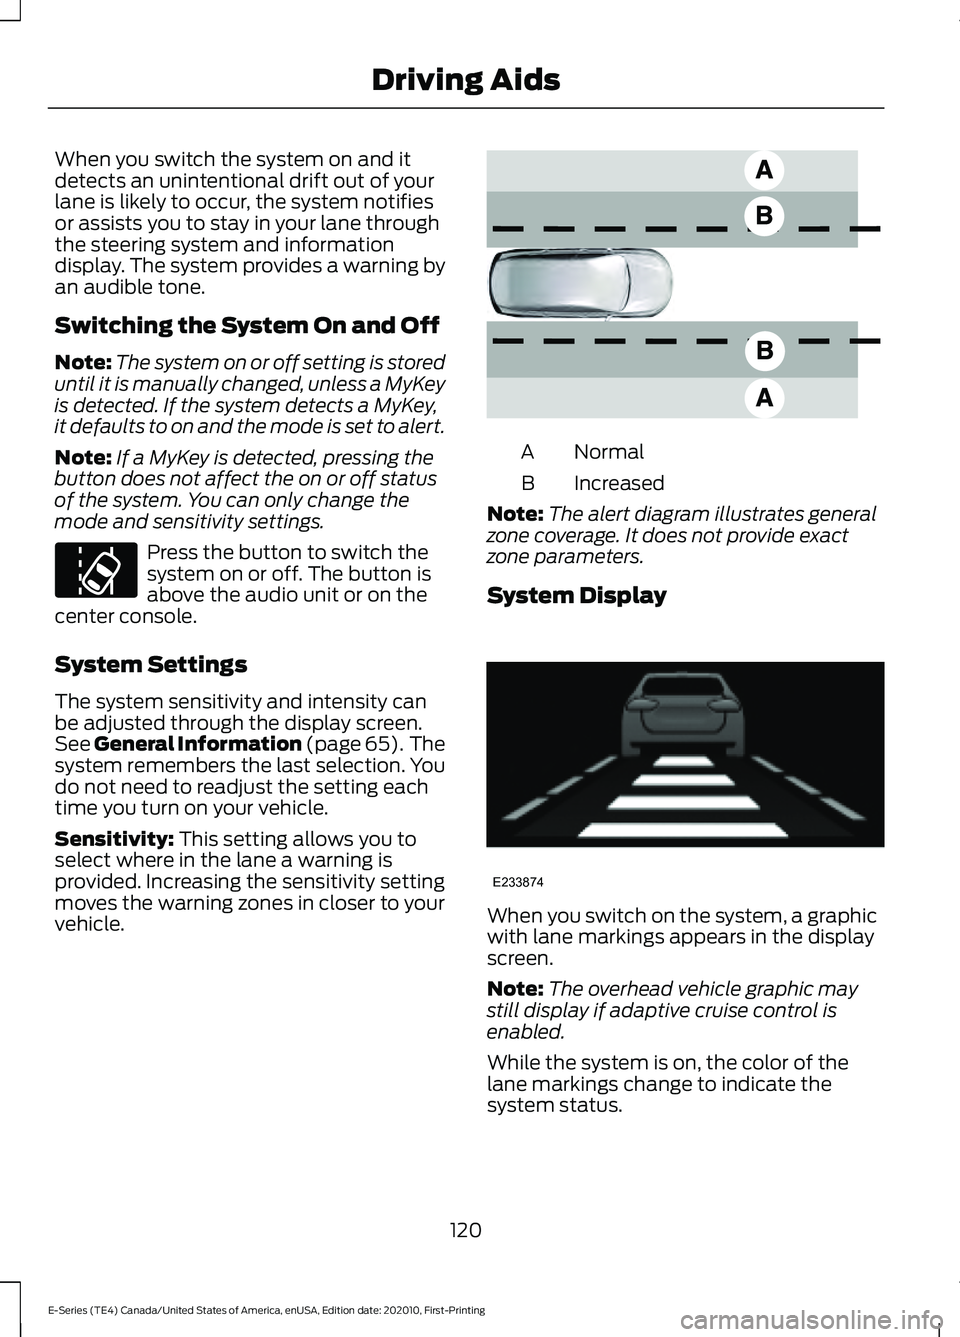
Sensitivity: This setting allows you to
select where in the lane a warning is
provided. Increasing the sensitivity setting
moves the warning zones in closer to your
vehicle. Normal
A
Increased
B
Note: The alert diagram illustrates general
zone coverage. It does not provide exact
zone parameters.
System Display When you switch on the system, a graphic
with lane markings appears in the display
screen.
Note:
The overhead vehicle graphic may
still display if adaptive cruise control is
enabled.
While the system is on, the color of the
lane markings change to indicate the
system status.
120
E-Series (TE4) Canada/United States of America, enUSA, Edition date: 202010, First-Printing Driving AidsE173233 E165517 E233874
Page 128 of 300
Note:
We recommend that you switch the
system off if you install a snow plow or
similar object in such a way that it may
block the radar sensor. Your vehicle
remembers the selected setting across key
cycles.
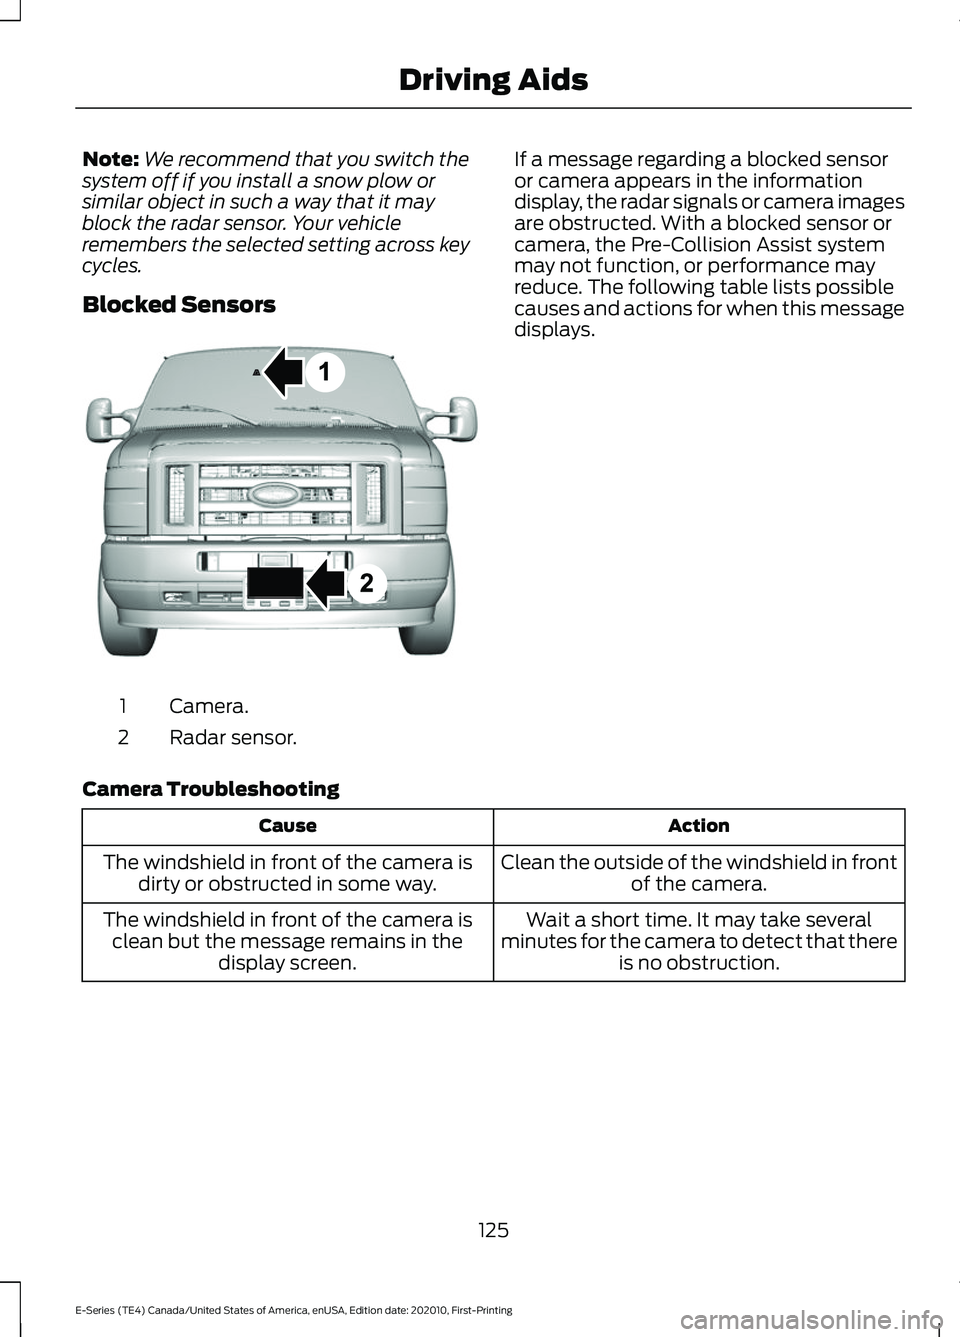
Blocked Sensors Camera.
1
Radar sensor.
2 If a message regarding a blocked sensor
or camera appears in the information
display, the radar signals or camera images
are obstructed. With a blocked sensor or
camera, the Pre-Collision Assist system
may not function, or performance may
reduce. The following table lists possible
causes and actions for when this message
displays.
Camera Troubleshooting Action
Cause
Clean the outside of the windshield in frontof the camera.
The windshield in front of the camera is
dirty or obstructed in some way.
Wait a short time. It may take several
minutes for the camera to detect that there is no obstruction.
The windshield in front of the camera is
clean but the message remains in the display screen.
125
E-Series (TE4) Canada/United States of America, enUSA, Edition date: 202010, First-Printing Driving AidsE310549
Page 147 of 300
ROADSIDE ASSISTANCE
Vehicles Sold in the United States:
Getting Roadside Assistance
To fully assist you should you have a
vehicle concern, Ford Motor Company
offers a complimentary roadside
assistance program. This program is
separate from the New Vehicle Limited
Warranty.
The service is available:
•
24 hours a day, seven days a week.
• For the coverage period supplied with
your vehicle.
Roadside Assistance covers:
• A flat tire change with a good spare
(except vehicles supplied with a tire
inflation kit).
• Battery jump start.
• Lock-out assistance (key replacement
cost is the customer's responsibility).
• Fuel delivery — independent service
contractors, if not prohibited by state,
local or municipal law, shall deliver up
to 2 gal (8 L) of gasoline or 5 gal (20 L)
of diesel fuel to a disabled vehicle.
Roadside Assistance limits fuel delivery
service to two no-charge occurrences
within a 12-month period.
• Winch out — available within 100 ft
(30 m) of a paved or county
maintained road, no recoveries. •
Towing — independent service
contractors, if not prohibited by state,
local or municipal law, shall tow Ford
eligible vehicles to an authorized dealer
within
35 mi (56 km) of the
disablement location or to the nearest
authorized dealer. If a member
requests a tow to an authorized dealer
that is more than
35 mi (56 km) from
the disablement location, the member
shall be responsible for any mileage
costs in excess of
35 mi (56 km).
• Roadside Assistance includes up to
$200 for a towed trailer if the disabled
eligible vehicle requires service at the
nearest authorized dealer. If the towing
vehicle is operational but the trailer is
not, then the trailer does not qualify for
any roadside services.
Vehicles Sold in the United States:
Using Roadside Assistance
Complete the roadside assistance
identification card and place it in your
wallet for quick reference. This card is in
the Owner's Manual kit.
United States vehicle customers who
require Roadside Assistance, call
1-800-241-3673.
If you need to arrange roadside assistance
for yourself, Ford Motor Company
reimburses a reasonable amount for
towing to the nearest dealership within
35 mi (56 km)
. To obtain reimbursement
information, United States vehicle
customers call 1-800-241-3673.
Customers need to submit their original
receipts.
144
E-Series (TE4) Canada/United States of America, enUSA, Edition date: 202010, First-Printing Roadside Emergencies