ignition FORD E SERIES 2022 Service Manual
[x] Cancel search | Manufacturer: FORD, Model Year: 2022, Model line: E SERIES, Model: FORD E SERIES 2022Pages: 300, PDF Size: 3.18 MB
Page 143 of 300
TOWING THE VEHICLE ON
FOUR WHEELS
Emergency Towing
WARNING: If your vehicle has a
steering wheel lock make sure the
ignition is in the accessory or on position
when being towed.
You can flat-tow (all wheels on the
ground, regardless of the powertrain or
transmission configuration) your disabled
vehicle (without access to wheel dollies
or vehicle transport trailer) under the
following conditions:
• Your vehicle is facing forward so you
tow it in a forward direction.
• You shift into Neutral (N). If you cannot
shift into Neutral (N), you may need to
override the transmission. See
Transmission
(page 96).
• Maximum speed is 35 mph (56 km/h).
• Maximum distance is
50 mi (80 km).
Recreational Towing
Note: Put your climate control system in
recirculated air mode to prevent exhaust
fumes from entering the vehicle. See
Climate Control
(page 74).
Follow these guidelines if you have a need
for recreational (RV) towing. An example
of recreational towing would be towing
your vehicle behind a motorhome. These
guidelines are to make sure you do not
damage the transmission during towing.
Do not tow your vehicle with any wheels
on the ground, as vehicle or transmission
damage may occur. It is recommended to
tow your vehicle with all four wheels off
the ground, for example when using a
vehicle transport trailer. Otherwise, you
cannot tow your vehicle.
140
E-Series (TE4) Canada/United States of America, enUSA, Edition date: 202010, First-Printing Towing
Page 162 of 300
Protected Component
Rating
Item
Anti-lock brake system
valves.
30 A
71
Brake on and off switch.
10 A
72
Not used.
—
73
Not used.
—
74
Not used.
—
75
Anti-lock brake system
pump.
60 A
76
Voltage quality module
power - body control
module.
30 A
77
Trailer tow stoplamps.
10 A
78
Not used.
—
79
Trailer tow backup lamps.
10 A
80
Not used.
—
81
Upfitter switch (factory
location for ignition power).
5 A
82
Upfitter switch (optional
location for power at all
times).
5 A
83
Not used.
—
84
Not used.
—
85
Not used.
—
86
Not used.
—
87
Not used.
—
88
Not used.
—
89
B-pillar (cutaway).
40 A
91
Instrument panel (stripped
chassis).
Park lamps 3 (special order
vehicle).
10 A
93
159
E-Series (TE4) Canada/United States of America, enUSA, Edition date: 202010, First-Printing Fuses
Page 165 of 300
Protected Component
Rating
Item
Not used.
—
11
Smart datalink connector.
7.5 A
12
Cluster.
7.5 A
13
Steering column control
module.
Not used (spare).
15 A
14
Not used (spare).
15 A
15
Not used.
—
16
Not used.
7.5 A
17
Climate mode switch.
7.5 A
18
Radio transceiver module
and telematics control unit.
5 A
19
Telematics control unit.
Ignition switch.
5 A
20
Not used.
5 A
21
Body builder B-pillar
connector (cutaway).
5 A
22
Not used (stripped chassis).
5 A
Not used (spare).
30 A
23
Not used (spare).
30 A
24
Not used (spare).
20 A
25
Not used (spare).
30 A
26
Not used (spare).
30 A
27
Not used (spare).
30 A
28
Upfitter interface module
(cutaway).
15 A
29
Not used (stripped chassis).
—
Not used (spare).
5 A
30
Smart datalink connector.
10 A
31
162
E-Series (TE4) Canada/United States of America, enUSA, Edition date: 202010, First-Printing Fuses
Page 170 of 300
ENGINE OIL DIPSTICK
MINA
MAX
B
ENGINE OIL CHECK
1. Make sure that your vehicle is on level ground.
2. Check the oil level before starting the engine, or switch the engine off after
warm up and wait 10 minutes for the
oil to drain into the oil pan.
3. Remove the dipstick and wipe it with a clean, lint-free cloth.
4. Reinstall the dipstick and make sure it is fully seated.
5. Remove the dipstick again to check the
oil level.
Note: If the oil level is between the
maximum and minimum marks, the oil level
is acceptable. Do not add oil.
6. If the oil level is at the minimum mark, immediately add oil.
7. Reinstall the dipstick. Make sure it is fully seated.
Note: The oil consumption of new engines
reaches its normal level after approximately
3,000 mi (5,000 km). Adding Engine Oil WARNING:
Do not add engine oil
when the engine is hot. Failure to follow
this instruction could result in personal
injury. WARNING: Do not remove the filler
cap when the engine is running.
Do not use supplemental engine oil
additives because they are unnecessary
and could lead to engine damage that the
vehicle warranty may not cover.
1. Clean the area surrounding the engine oil filler cap before you remove it.
2. Remove the engine oil filler cap.
3. Add engine oil that meets our specifications. See
Capacities and
Specifications (page 226).
4. Reinstall the engine oil filler cap. Turn it clockwise until you feel a strong
resistance.
Note: Do not add oil further than the
maximum mark. Oil levels above the
maximum mark may cause engine damage.
Note: Immediately soak up any oil spillage
with an absorbent cloth.
Engine Oil Pressure Warning Lamp WARNING:
If it illuminates when
you are driving do not continue your
journey, even if the oil level is correct.
Have your vehicle checked. It illuminates when you switch
the ignition on.
167
E-Series (TE4) Canada/United States of America, enUSA, Edition date: 202010, First-Printing MaintenanceE161560
Page 183 of 300
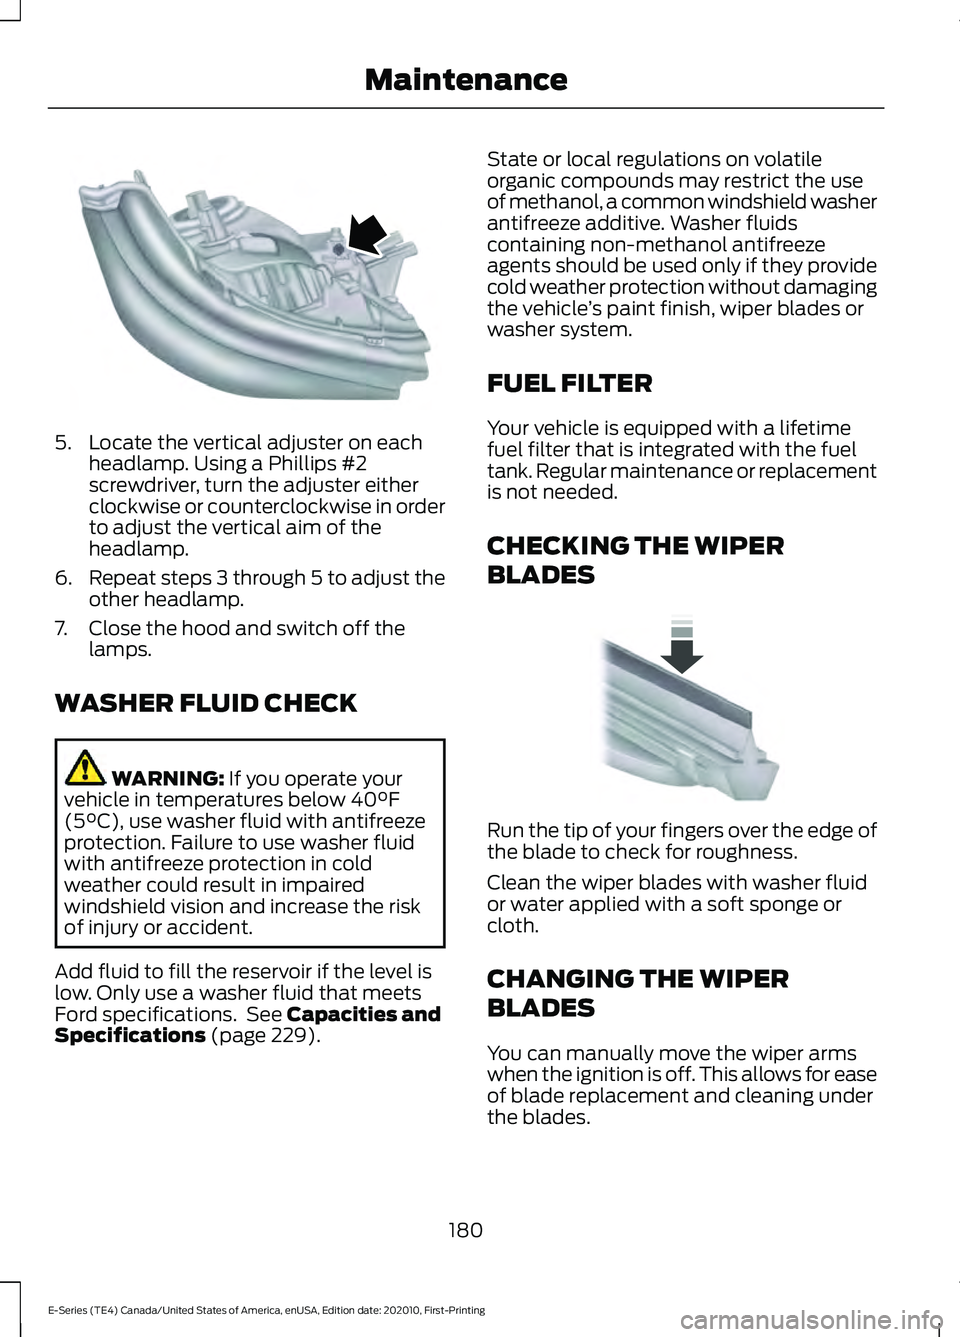
5. Locate the vertical adjuster on each
headlamp. Using a Phillips #2
screwdriver, turn the adjuster either
clockwise or counterclockwise in order
to adjust the vertical aim of the
headlamp.
6. Repeat steps 3 through 5 to adjust the
other headlamp.
7. Close the hood and switch off the lamps.
WASHER FLUID CHECK WARNING: If you operate your
vehicle in temperatures below 40°F
(5°C), use washer fluid with antifreeze
protection. Failure to use washer fluid
with antifreeze protection in cold
weather could result in impaired
windshield vision and increase the risk
of injury or accident.
Add fluid to fill the reservoir if the level is
low. Only use a washer fluid that meets
Ford specifications. See
Capacities and
Specifications (page 229). State or local regulations on volatile
organic compounds may restrict the use
of methanol, a common windshield washer
antifreeze additive. Washer fluids
containing non-methanol antifreeze
agents should be used only if they provide
cold weather protection without damaging
the vehicle
’s paint finish, wiper blades or
washer system.
FUEL FILTER
Your vehicle is equipped with a lifetime
fuel filter that is integrated with the fuel
tank. Regular maintenance or replacement
is not needed.
CHECKING THE WIPER
BLADES Run the tip of your fingers over the edge of
the blade to check for roughness.
Clean the wiper blades with washer fluid
or water applied with a soft sponge or
cloth.
CHANGING THE WIPER
BLADES
You can manually move the wiper arms
when the ignition is off. This allows for ease
of blade replacement and cleaning under
the blades.
180
E-Series (TE4) Canada/United States of America, enUSA, Edition date: 202010, First-Printing MaintenanceE163806 E142463
Page 184 of 300
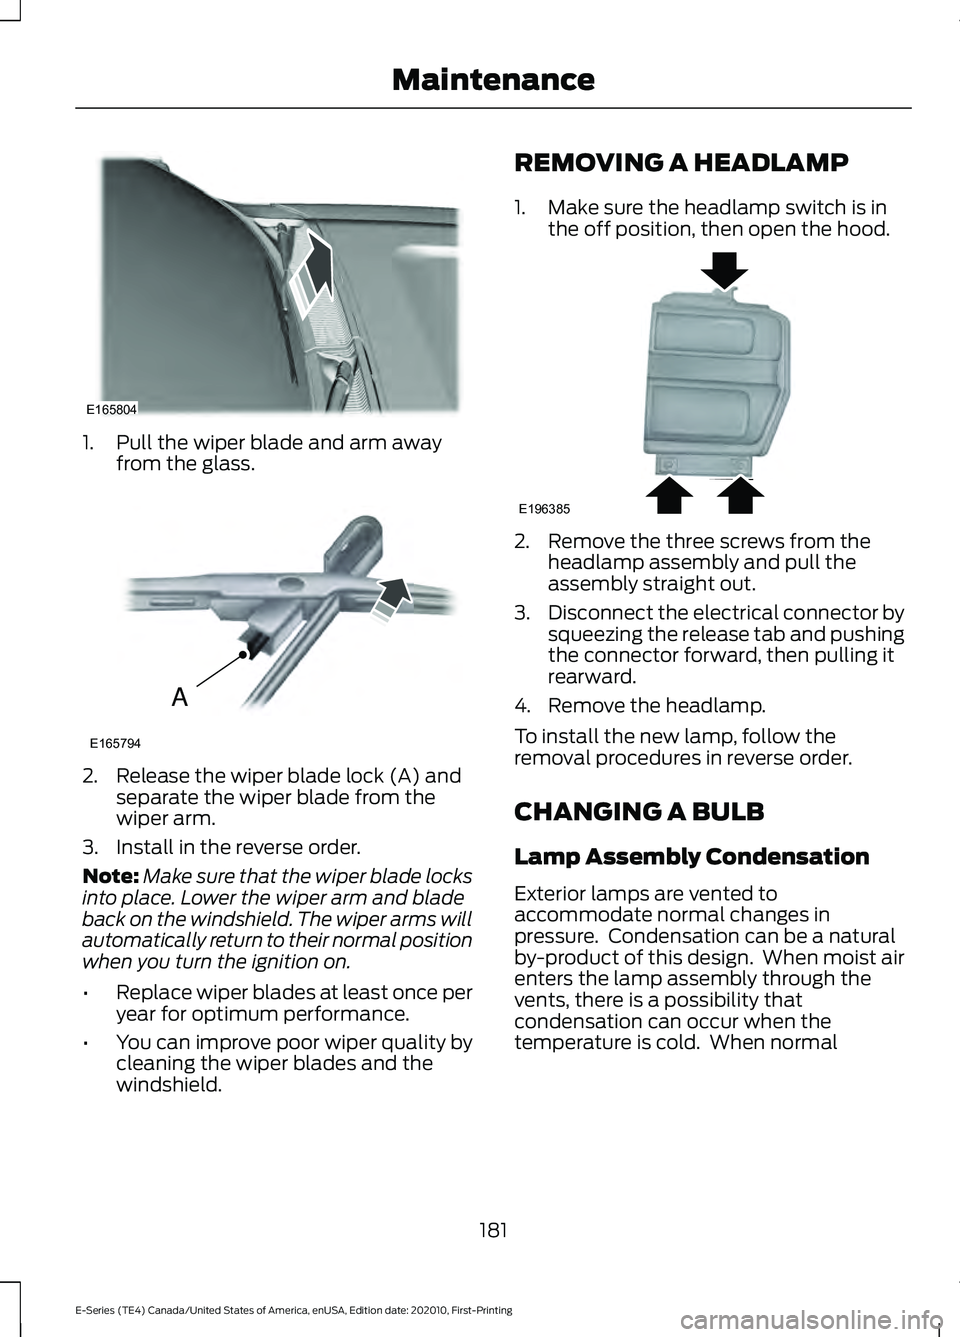
1. Pull the wiper blade and arm away
from the glass. 2. Release the wiper blade lock (A) and
separate the wiper blade from the
wiper arm.
3. Install in the reverse order.
Note: Make sure that the wiper blade locks
into place. Lower the wiper arm and blade
back on the windshield. The wiper arms will
automatically return to their normal position
when you turn the ignition on.
• Replace wiper blades at least once per
year for optimum performance.
• You can improve poor wiper quality by
cleaning the wiper blades and the
windshield. REMOVING A HEADLAMP
1. Make sure the headlamp switch is in
the off position, then open the hood. 2. Remove the three screws from the
headlamp assembly and pull the
assembly straight out.
3. Disconnect the electrical connector by
squeezing the release tab and pushing
the connector forward, then pulling it
rearward.
4. Remove the headlamp.
To install the new lamp, follow the
removal procedures in reverse order.
CHANGING A BULB
Lamp Assembly Condensation
Exterior lamps are vented to
accommodate normal changes in
pressure. Condensation can be a natural
by-product of this design. When moist air
enters the lamp assembly through the
vents, there is a possibility that
condensation can occur when the
temperature is cold. When normal
181
E-Series (TE4) Canada/United States of America, enUSA, Edition date: 202010, First-Printing MaintenanceE165804 A
E165794 E196385
Page 190 of 300
•
Never wash or rinse the engine while it
is hot or running; water in the running
engine may cause internal damage.
• Never wash or rinse any ignition coil,
spark plug wire or spark plug well, or
the area in and around these locations.
• Cover the battery, power distribution
box, and air filter assembly to prevent
water damage when cleaning the
engine.
CLEANING THE WINDOWS AND
WIPER BLADES
Car wash chemicals and environmental
fallout can result in windshield and wiper
blade contamination. Dirty windshield and
wipers will result in poor windshield wiper
operation. Keep the windshield and wiper
blades clean to maintain windshield wiper
performance.
To clean the windshield and wiper blades:
• Clean the windshield with a
non-abrasive glass cleaner. When
cleaning the interior of the windshield,
avoid getting any glass cleaner on the
instrument panel or door panels. Wipe
any glass cleaner off these surfaces
immediately.
• For windshields contaminated with
tree sap, chemicals, wax or bugs, clean
the entire windshield using steel wool
(no greater than 0000 grade) in a
circular motion and rinse with water.
• Clean the wiper blades with isopropyl
rubbing alcohol or windshield washer
concentrate.
Note: Do not use razor blades or other
sharp objects to clean or remove decals
from the inside of the heated rear window.
The vehicle warranty does not cover
damage caused to the heated rear window
grid lines. CLEANING THE INTERIOR WARNING: Do not use cleaning
solvents, bleach or dye on the vehicle's
seatbelts, as these actions may weaken
the belt webbing. WARNING:
On vehicles equipped
with seat-mounted airbags, do not use
chemical solvents or strong detergents.
Such products could contaminate the
side airbag system and affect
performance of the side airbag in a crash.
For fabric, carpets, cloth seats and seats
equipped with side airbags:
• Remove dust and loose dirt with a
vacuum cleaner.
• Remove light stains and soil with
Motorcraft Professional Strength
Carpet & Upholstery Cleaner.
• If grease or tar is present on the
material, spot-clean the area first with
Motorcraft Spot and Stain Remover. In
Canada, use Motorcraft Multi-Purpose
Cleaner.
• If a ring forms on the fabric after spot
cleaning, clean the entire area
immediately (but do not oversaturate)
or the ring will set.
• Do not use household cleaning
products or glass cleaners, which can
stain and discolor the fabric and affect
the flame retardant abilities of the seat
materials.
Mirrors
Do not clean the housing or glass of any
mirror with harsh abrasives, fuel or other
petroleum or ammonia-based cleaning
products.
187
E-Series (TE4) Canada/United States of America, enUSA, Edition date: 202010, First-Printing Vehicle Care
Page 219 of 300
How Temperature Affects Your Tire
Pressure
The tire pressure monitoring system
monitors tire pressure in each pneumatic
tire. When driving in a normal manner, a
typical passenger tire inflation pressure
may increase about 2
–4 psi (14– 28 kPa)
from a cold start situation. If the vehicle is
stationary overnight with the outside
temperature significantly lower than the
daytime temperature, the tire pressure may
decrease about 3 psi (21 kPa) for a drop of
30°F (17°C) in ambient temperature. This
lower pressure value may be detected by
the tire pressure monitoring system as
being significantly lower than the
recommended inflation pressure and
activate the system warning light for low
tire pressure. If the low tire pressure
warning light is on, visually check each tire
to verify that no tire is flat. If one or more
tires are flat, repair as necessary. Check
the air pressure in the road tires. If any tire
is under-inflated, carefully drive the vehicle
to the nearest location where air can be
added to the tires. Inflate all the tires to
the recommended inflation pressure.
Tire Pressure Monitoring System Reset
Procedure WARNING:
To determine the
required pressure(s) for your vehicle, see
the Safety Compliance Certification
Label (on the door hinge pillar,
door-latch post or the door edge that
meets the door-latch post, next to the
driver seat) or the Tire Label on the
B-Pillar or the edge of the driver door.
Note: You need to perform the tire pressure
monitoring system reset procedure after
each tire rotation. To provide the vehicle's load carrying
capability, some vehicles require different
recommended tire pressures in the front
tires as compared to the rear tires. The tire
pressure monitoring system on these
vehicles illuminate the low tire pressure
warning light at two different pressures:
one for the front tires and one for the rear
tires.
Since tires need to be rotated to provide
consistent performance and maximum tire
life, the tire pressure monitoring system
needs to know when the tires are rotated
to determine which set of tires are on the
front and which are on the rear. With this
information, the system can detect and
properly warn of low tire pressures.
System reset tips:
•
To reduce the chances of interference
from another vehicle, perform the
system reset procedure at least
3 ft
(1 m) away from another vehicle
undergoing the system reset procedure
at the same time.
• Do not wait more than two minutes
between resetting each tire sensor or
the system can time-out and you have
to repeat the entire procedure on all
four wheels.
• A double horn sounds indicating the
need to repeat the procedure.
Performing the System Reset Procedure
- Single Rear Wheel
Read the entire procedure before
attempting.
1. Drive the vehicle above
20 mph
(32 km/h) for at least two minutes,
then park in a safe location where you
can easily get to all four tires and have
access to an air pump.
2. Place the ignition in the off position and
keep the key in the ignition.
216
E-Series (TE4) Canada/United States of America, enUSA, Edition date: 202010, First-Printing Wheels and Tires
Page 220 of 300
3. Cycle the ignition to the on position
with the engine off.
4. Turn the hazard flashers on then off three times. You must accomplish this
within 10 seconds. If you successfully
enter the reset mode, the horn sounds
once, the system indicator flashes and
a message shows in the information
display. If this does not occur, please
try again starting at step 2. If after
repeated attempts to enter the reset
mode, the horn does not sound, the
system indicator does not flash and no
message shows in the information
display, have the system checked as
soon as possible.
5. Train the tire pressure monitoring system sensors in the tires using the
following system reset sequence
starting with the left front tire in the
following clockwise order: Left front -
driver side front tire, Right front -
passenger side front tire, Right rear -
passenger side rear tire, Left rear -
driver side rear tire.
6. Remove the valve cap from the valve stem on the left front tire. Decrease the
air pressure until the horn sounds.
Note: The single horn tone confirms that
the sensor identification code has been
learned by the module for this position. If
you hear a double horn, the reset procedure
was unsuccessful, and you must repeat it.
7. Remove the valve cap from the valve stem on the right front tire. Decrease
the air pressure until the horn sounds.
8. Remove the valve cap from the valve stem on the right rear tire. Decrease the
air pressure until the horn sounds. 9. Remove the valve cap from the valve
stem on the left rear tire. Decrease the
air pressure until the horn sounds.
Training is complete after the horn
sounds for the last tire trained, driver
side rear tire, the system indicator
stops flashing, and a message shows
in the information display.
10. Turn the ignition off. If you hear two short tones, the reset procedure was
unsuccessful and you must repeat it.
If you hear two short beeps when the
ignition is off after repeating the
procedure, have the system checked
as soon as possible
11. Set all four tires to the recommended
air pressure as indicated on the
Safety Compliance Certification
Label, affixed to either the door hinge
pillar, door-latch post, or the door
edge that meets the door-latch post,
next to the driver seating position or
Tire Label located on the B-Pillar or
the edge of the driver door.
CHANGING A ROAD WHEEL WARNING: To determine the
required pressure(s) for your vehicle, see
the Safety Compliance Certification
Label (on the door hinge pillar,
door-latch post or the door edge that
meets the door-latch post, next to the
driver seat) or the Tire Label on the
B-Pillar or the edge of the driver door.
Note: You should only use tire sealants in
roadside emergencies as they may cause
damage to the tire pressure monitoring
system sensor.
217
E-Series (TE4) Canada/United States of America, enUSA, Edition date: 202010, First-Printing Wheels and Tires
Page 226 of 300
ENGINE SPECIFICATIONS
7.3L V8 Engine
Engine
445 in³ (7,293 cm³)
Displacement.
Minimum 87 octane
Required fuel.
1-5-4-8-6-3-7-2
Firing order.
Coil near spark plug with spark plug wire
Ignition system.
0.049 in (1.25 mm) - 0.053 in (1.35 mm)
Spark plug gap.
10.5:1
Compression ratio.
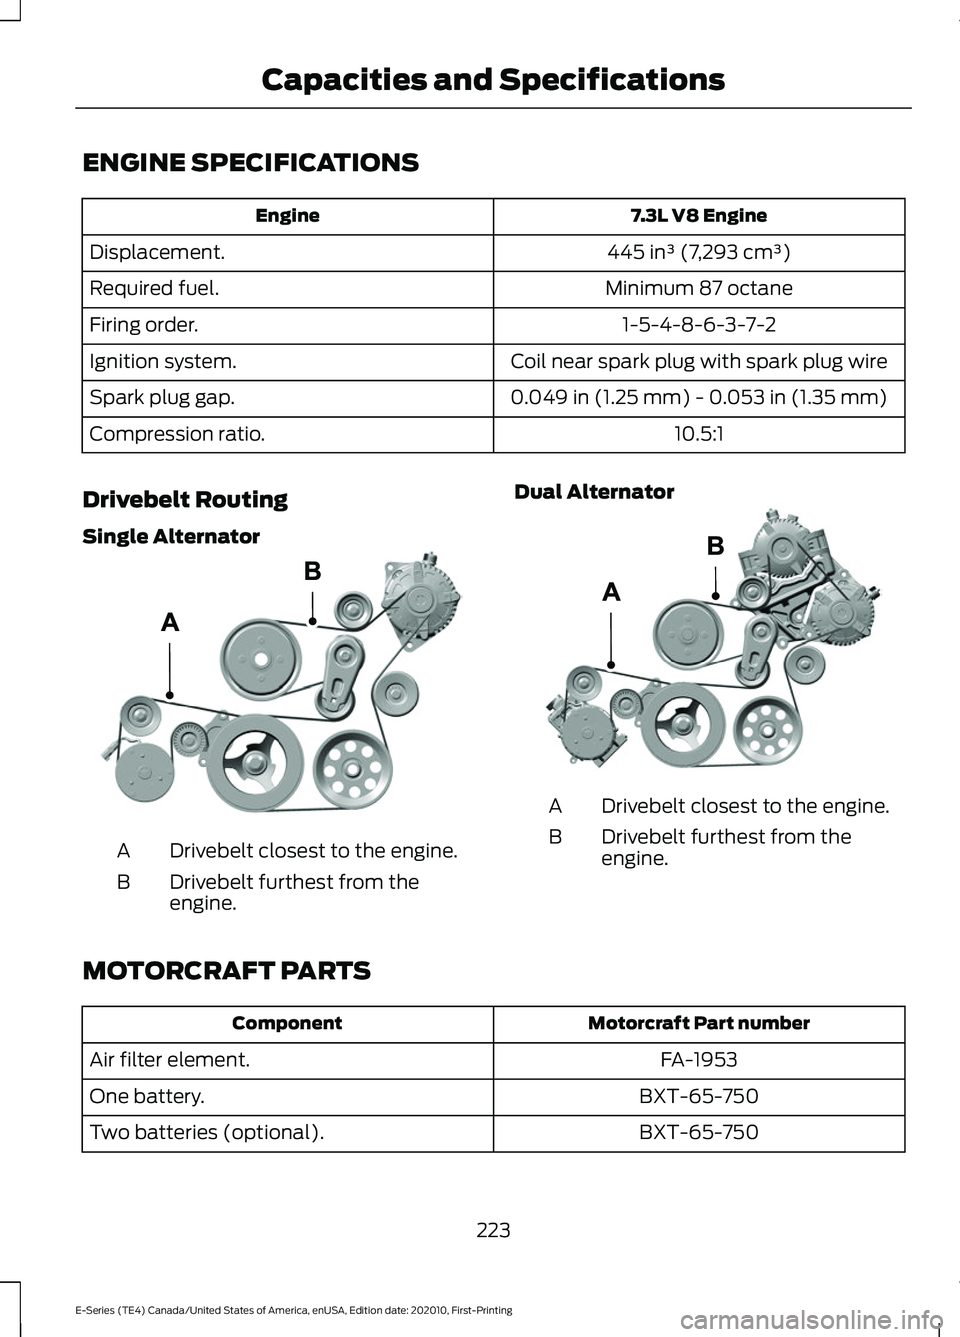
Drivebelt Routing
Single Alternator Drivebelt closest to the engine.
A
Drivebelt furthest from the
engine.
B Dual Alternator Drivebelt closest to the engine.
A
Drivebelt furthest from the
engine.
B
MOTORCRAFT PARTS Motorcraft Part number
Component
FA-1953
Air filter element.
BXT-65-750
One battery.
BXT-65-750
Two batteries (optional).
223
E-Series (TE4) Canada/United States of America, enUSA, Edition date: 202010, First-Printing Capacities and SpecificationsE305075 E298579