automatic transmission FORD E SERIES 2022 Owners Manual
[x] Cancel search | Manufacturer: FORD, Model Year: 2022, Model line: E SERIES, Model: FORD E SERIES 2022Pages: 300, PDF Size: 3.18 MB
Page 5 of 300
Automatic High Beam Control Indicators
........................................................................\
..55
Overriding Automatic High Beam Control ........................................................................\
..
55
Windows and Mirrors
Power Windows .............................................
57
Exterior Mirrors ................................................
57
Interior Mirror ..................................................
58
Sun Visors ........................................................
58
Instrument Cluster
Gauges ..............................................................
59
Warning Lamps and Indicators ................
62
Audible Warnings and Indicators ............
64
Information Displays
General Information .....................................
65
Information Messages ................................
69
Climate Control
Manual Climate Control ..............................
74
Hints on Controlling the Interior Climate ........................................................................\
...
75
Rear Passenger Climate Controls ...........
76
Seats
Sitting in the Correct Position ...................
77
Head Restraints ..............................................
77
Manual Seats ..................................................
78
Power Seats ....................................................
79
Auxiliary Power Points
Auxiliary Power Points ................................
80
Starting and Stopping the Engine
General Information .....................................
82
Ignition Switch ................................................
82
Starting a Gasoline Engine ........................
82Engine Block Heater
....................................
84
Fuel and Refueling
Safety Precautions .......................................
86
Fuel Quality - E85 .........................................
86
Fuel Quality - Gasoline ...............................
88
Running Out of Fuel .....................................
88
Refueling ..........................................................
89
Fuel Consumption ........................................
90
Engine Emission Control
Emission Law ..................................................
92
Catalytic Converter .......................................
93
Transmission
Automatic Transmission ............................
96
Rear Axle
Limited Slip Differential ...........................
100
Brakes
General Information ....................................
101
Hints on Driving With Anti-Lock Brakes ........................................................................\
.
102
Parking Brake ................................................
102
Hill Start Assist .............................................
103
Traction Control
Principle of Operation ...............................
104
Using Traction Control ..............................
104
Stability Control
Principle of Operation ...............................
105
Using Stability Control ..............................
106
Parking Aids
Rear View Camera .......................................
107
Cruise Control
What Is Cruise Control ..............................
109
2
E-Series (TE4) Canada/United States of America, enUSA, Edition date: 202010, First-Printing Table of Contents
Page 6 of 300
Switching Cruise Control On and Off
........................................................................\
109
Setting the Cruise Control Speed .........
109
Canceling the Set Speed ...........................
110
Resuming the Set Speed ...........................
110
Cruise Control Indicators ...........................
110
Using Adaptive Cruise Control ................
110
Driving Aids
Driver Alert ......................................................
118
Lane Keeping System .................................
119
Steering ............................................................
122
Pre-Collision Assist .....................................
123
Load Carrying
Load Limit .......................................................
127
Towing
Towing a Trailer .............................................
132
Recommended Towing Weights ............
133
Essential Towing Checks ..........................
134
Towing the Vehicle on Four Wheels ......
140
Driving Hints
Reduced Engine Performance .................
141
Economical Driving ......................................
141
Breaking-In .....................................................
142
Driving Through Water ...............................
142
Floor Mats .......................................................
142
Roadside Emergencies
Roadside Assistance ..................................
144
Hazard Flashers ...........................................
145
Fuel Shutoff ...................................................
145
Jump Starting the Vehicle ........................
146
Transporting the Vehicle ...........................
147
Customer Assistance
Getting the Services You Need ..............
149In California (U.S. Only)
............................
150
The Better Business Bureau (BBB) Auto Line Program (U.S. Only) .......................
151
Getting Assistance Outside the U.S. and Canada ........................................................
152
Ordering Additional Owner's Literature ........................................................................\
.
153
Reporting Safety Defects (U.S. Only) ........................................................................\
.
153
Reporting Safety Defects (Canada Only) ........................................................................\
.
154
Fuses
Fuse Specification Chart ..........................
155
Changing a Fuse ..........................................
163
Maintenance
General Information ...................................
165
Opening and Closing the Hood ..............
165
Under Hood Overview ...............................
166
Engine Oil Dipstick .......................................
167
Engine Oil Check ..........................................
167
Oil Change Indicator Reset ......................
168
Changing the Engine Air Filter ................
168
Engine Coolant Check ...............................
169
Automatic Transmission Fluid Check ........................................................................\
.
173
Brake Fluid Check ........................................
176
Power Steering Fluid Check ......................
177
Changing the 12V Battery ..........................
177
Adjusting the Headlamps .........................
179
Washer Fluid Check ...................................
180
Fuel Filter ........................................................
180
Checking the Wiper Blades .....................
180
Changing the Wiper Blades ....................
180
Removing a Headlamp ...............................
181
Changing a Bulb ............................................
181
Vehicle Care
General Information ...................................
184
Cleaning Products .......................................
184
3
E-Series (TE4) Canada/United States of America, enUSA, Edition date: 202010, First-Printing Table of Contents
Page 7 of 300
Cleaning the Exterior
..................................185
Waxing .............................................................
186
Cleaning the Engine ...................................
186
Cleaning the Windows and Wiper Blades ........................................................................\
.
187
Cleaning the Interior ...................................
187
Cleaning the Instrument Panel and Instrument Cluster Lens .......................
188
Cleaning Leather Seats .............................
188
Repairing Minor Paint Damage ..............
189
Cleaning the Wheels ..................................
189
Vehicle Storage ............................................
189
Wheels and Tires
General Information ...................................
192
Tire Care ..........................................................
193
Using Snow Chains ......................................
211
Tire Pressure Monitoring System ...........
212
Changing a Road Wheel ............................
217
Technical Specifications ...........................
221
Capacities and Specifications
Engine Specifications ................................
223
Motorcraft Parts ..........................................
223
Bulb Specification Chart ..........................
225
Engine Oil Capacity and Specification ........................................................................\
226
Cooling System Capacity and Specification .............................................
227
Fuel Tank Capacity .....................................
228
Air Conditioning System Capacity and Specification ............................................
229
Washer Fluid Specification .....................
229
Automatic Transmission Fluid Capacity and Specification ...................................
230
Brake Fluid Specification ..........................
231
Rear Axle Fluid Capacity and Specification ..............................................
231
Hydraulic Power Steering Fluid Capacity and Specification ....................................
233Vehicle Identification
Vehicle Identification Number
...............
234
Connected Vehicle
Connected Vehicle Requirements ........
235
Connected Vehicle Limitations .............
235
Connecting the Vehicle to a Mobile Network ......................................................
235
Connected Vehicle – Troubleshooting ........................................................................\
235
Audio System
General Information ..................................
236
Audio Unit ......................................................
236
Digital Radio .................................................
239
Connecting a Bluetooth® Device ..........
241
Satellite Radio .............................................
242
Streaming Bluetooth Audio ....................
244
Playing Media From a USB Device .......
244
USB Port ........................................................
245
Using Voice Recognition ..........................
245
Accessories
Accessories ...................................................
246
Auxiliary Switches .......................................
247
Ford Protect
Ford Protect ..................................................
249
Scheduled Maintenance
General Maintenance Information ........
251
Normal Scheduled Maintenance .........
254
Special Operating Conditions Scheduled Maintenance ............................................
256
Customer Information
Radio Frequency Certification Labels ........................................................................\
259
4
E-Series (TE4) Canada/United States of America, enUSA, Edition date: 202010, First-Printing Table of Contents
Page 21 of 300
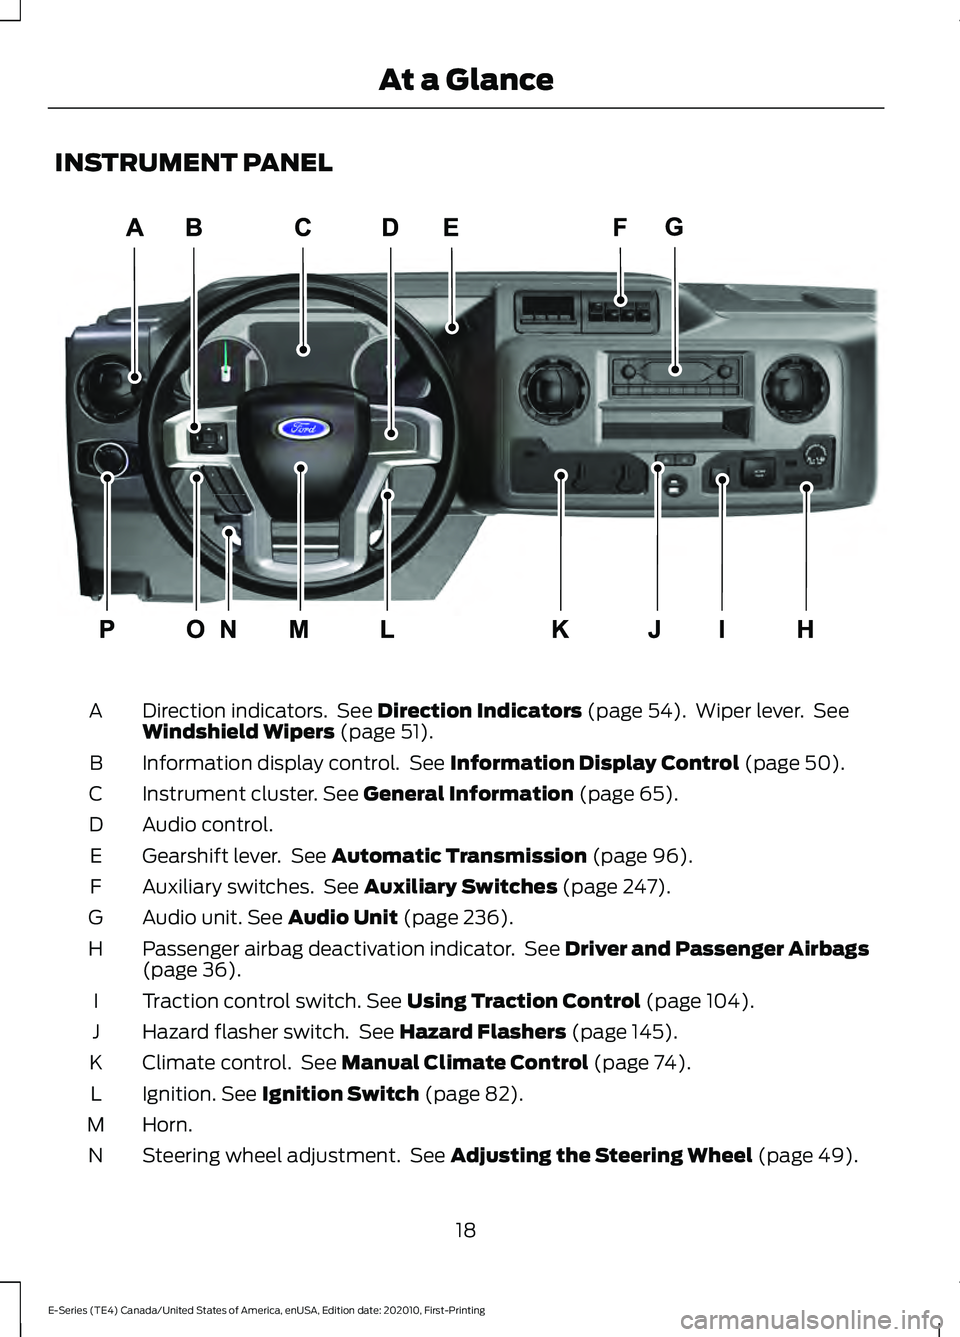
INSTRUMENT PANEL
Direction indicators. See Direction Indicators (page 54). Wiper lever. See
Windshield Wipers (page 51).
A
Information display control. See
Information Display Control (page 50).
B
Instrument cluster.
See General Information (page 65).
C
Audio control.
D
Gearshift lever. See
Automatic Transmission (page 96).
E
Auxiliary switches. See
Auxiliary Switches (page 247).
F
Audio unit.
See Audio Unit (page 236).
G
Passenger airbag deactivation indicator. See
Driver and Passenger Airbags
(page 36).
H
Traction control switch.
See Using Traction Control (page 104).
I
Hazard flasher switch. See
Hazard Flashers (page 145).
J
Climate control. See
Manual Climate Control (page 74).
K
Ignition.
See Ignition Switch (page 82).
L
Horn.
M
Steering wheel adjustment. See
Adjusting the Steering Wheel (page 49).
N
18
E-Series (TE4) Canada/United States of America, enUSA, Edition date: 202010, First-Printing At a GlanceE307562
Page 99 of 300
AUTOMATIC TRANSMISSION
WARNING: Apply the parking
brake, shift into park (P), switch the
ignition off and remove the key before
you leave your vehicle. Failure to follow
this instruction could result in personal
injury or death. Putting your vehicle in or out of
gear:
1. Fully press down the brake pedal.
2. Move the gearshift lever into the
preferred gear.
3. When you finish driving, come to a complete stop.
4. Move the gearshift lever and securely latch it in park (P).
5. Release the brake pedal and the transmission remains in the selected
gear.
Park (P)
This position locks the transmission and
prevents the wheels from turning.
Reverse (R)
With the transmission in reverse (R), your
vehicle moves backward. Always come to
a complete stop before shifting into and
out of reverse (R). Neutral (N)
With the transmission in neutral (N), you
can start your vehicle and it is free to roll.
Hold the brake pedal down when in this
position.
Drive (D)
Drive (D) is the normal driving position for
the best fuel economy. The overdrive
function allows automatic upshifts and
downshifts through gears one through six.
Manual (M)
Moving the gearshift lever to the manual
(M) position allows you to manually select
the gear you prefer. Only the current gear
displays. Use the buttons on the gearshift
lever to manually select gears. Press the
+ button to upshift or the – button to
downshift. Return the transmission to a
different gearshift position to deactivate
manual control.
Second (2)
Transmission operates in second (2) gear
only. Use second (2) gear to start-up on
slippery roads.
First (1)
•
Transmission operates in first (1) gear
only.
• Provides maximum engine braking.
• Allows upshifts by moving gearshift
lever.
• Does not downshift into first (1) gear
at high speeds; allows for first (1) gear
when vehicle reaches slower speeds.
Forced downshifts
• Allowed in drive (D) with the tow/haul
feature on or off.
• Press the accelerator to the floor.
• Allows transmission to select an
appropriate gear.
96
E-Series (TE4) Canada/United States of America, enUSA, Edition date: 202010, First-Printing TransmissionP R N D M 2 1E307627
Page 100 of 300
Tow/Haul Mode
To activate tow/haul, press the
button on the gearshift lever.
The TOW HAUL indicator light
illuminates in the instrument cluster.
The tow/haul feature:
• Delays upshifts to reduce the frequency
of transmission shifting.
• Provides engine braking in all forward
gears, which slows your vehicle and
assists you in controlling your vehicle
when descending a slope.
• Depending on driving conditions and
load conditions, may downshift the
transmission, slow your vehicle and
control your vehicle speed when
descending a hill, without pressing the
accelerator pedal. The amount of
downshift braking provided varies
based upon the amount you press the
brake pedal.
The tow/haul feature improves
transmission operation when towing a
trailer or a heavy load. All transmission
gear ranges are available when using
tow/haul.
To deactivate the tow/haul feature and
return to normal driving mode, press the
button on the gearshift lever again. The
TOW HAUL light deactivates. Tow/haul
also deactivates when you power down
your vehicle. WARNING: Do not use tow/haul
when the road surface is slippery. Failure
to follow this instruction could result in
the loss of control of your vehicle. Understanding Your SelectShift
Automatic
™ Transmission Note:
When pressing the button on the
gearshift lever, you can cycle through the
available drive modes.
Your vehicle has a SelectShift Automatic ™
transmission gearshift lever. The
SelectShift Automatic transmission gives
you the ability to change gears up or down
without a clutch.
To prevent the engine from running at too
low an RPM, which may cause it to stall,
SelectShift still makes some downshifts
if it has determined that you have not
downshifted in time. Although SelectShift
makes some downshifts for you, it still
allows you to downshift at any time if the
SelectShift determines that damage to
the engine does not occur from
over-revving.
SelectShift does not upshift, even if the
engine is approaching the RPM limit. Shift
manually by pressing the + button.
Note: Engine damage may occur if you
maintain excessive engine revving without
shifting.
SelectShift does not automatically upshift,
even if the engine is approaching the RPM
limit. Shift manually by pressing the (+)
paddle.
97
E-Series (TE4) Canada/United States of America, enUSA, Edition date: 202010, First-Printing TransmissionE161509 E318028
Page 101 of 300
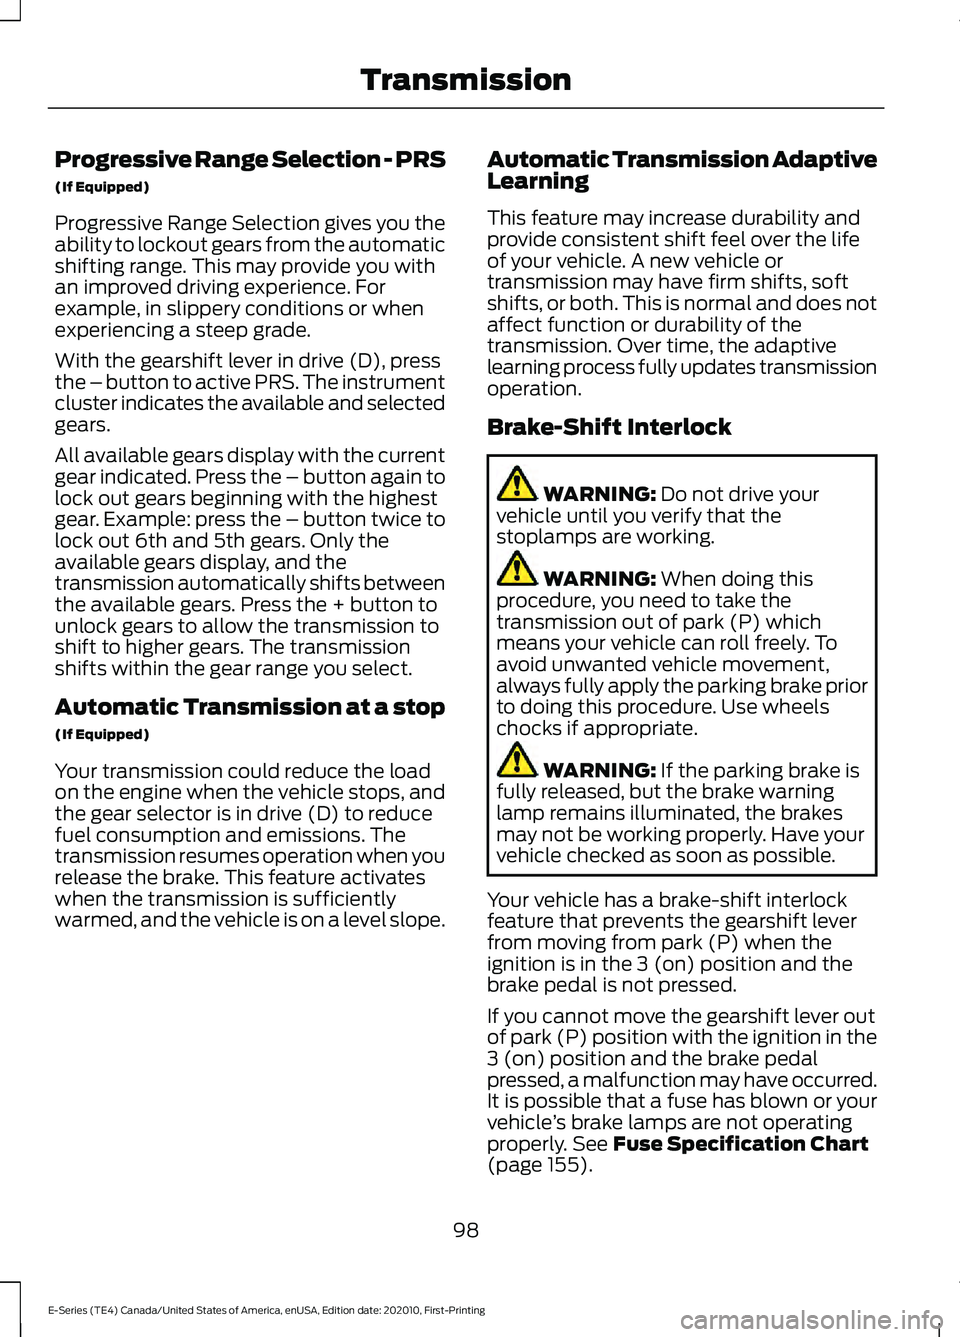
Progressive Range Selection - PRS
(If Equipped)
Progressive Range Selection gives you the
ability to lockout gears from the automatic
shifting range. This may provide you with
an improved driving experience. For
example, in slippery conditions or when
experiencing a steep grade.
With the gearshift lever in drive (D), press
the – button to active PRS. The instrument
cluster indicates the available and selected
gears.
All available gears display with the current
gear indicated. Press the – button again to
lock out gears beginning with the highest
gear. Example: press the – button twice to
lock out 6th and 5th gears. Only the
available gears display, and the
transmission automatically shifts between
the available gears. Press the + button to
unlock gears to allow the transmission to
shift to higher gears. The transmission
shifts within the gear range you select.
Automatic Transmission at a stop
(If Equipped)
Your transmission could reduce the load
on the engine when the vehicle stops, and
the gear selector is in drive (D) to reduce
fuel consumption and emissions. The
transmission resumes operation when you
release the brake. This feature activates
when the transmission is sufficiently
warmed, and the vehicle is on a level slope.
Automatic Transmission Adaptive
Learning
This feature may increase durability and
provide consistent shift feel over the life
of your vehicle. A new vehicle or
transmission may have firm shifts, soft
shifts, or both. This is normal and does not
affect function or durability of the
transmission. Over time, the adaptive
learning process fully updates transmission
operation.
Brake-Shift Interlock WARNING: Do not drive your
vehicle until you verify that the
stoplamps are working. WARNING:
When doing this
procedure, you need to take the
transmission out of park (P) which
means your vehicle can roll freely. To
avoid unwanted vehicle movement,
always fully apply the parking brake prior
to doing this procedure. Use wheels
chocks if appropriate. WARNING:
If the parking brake is
fully released, but the brake warning
lamp remains illuminated, the brakes
may not be working properly. Have your
vehicle checked as soon as possible.
Your vehicle has a brake-shift interlock
feature that prevents the gearshift lever
from moving from park (P) when the
ignition is in the 3 (on) position and the
brake pedal is not pressed.
If you cannot move the gearshift lever out
of park (P) position with the ignition in the
3 (on) position and the brake pedal
pressed, a malfunction may have occurred.
It is possible that a fuse has blown or your
vehicle ’s brake lamps are not operating
properly.
See Fuse Specification Chart
(page 155).
98
E-Series (TE4) Canada/United States of America, enUSA, Edition date: 202010, First-Printing Transmission
Page 106 of 300
HILL START ASSIST
WARNING: The system does not
replace the parking brake. When you
leave your vehicle, always apply the
parking brake. WARNING:
You must remain in
your vehicle when the system turns on.
At all times, you are responsible for
controlling your vehicle, supervising the
system and intervening, if required.
Failure to take care may result in the loss
of control of your vehicle, serious
personal injury or death. WARNING:
The system will turn
off if a malfunction is apparent or if you
rev the engine excessively. Failure to take
care may result in the loss of control of
your vehicle, serious personal injury or
death.
The system makes it easier to pull away
when your vehicle is on a slope without the
need to use the parking brake.
When the system is active, your vehicle
remains stationary on the slope for two to
three seconds after you release the brake
pedal. This allows time to move your foot
from the brake to the accelerator pedal.
The system releases the brakes
automatically once the engine has
developed sufficient torque to prevent your
vehicle from rolling down the slope. This
is an advantage when pulling away on a
slope, for example from a car park ramp,
traffic lights or when reversing uphill into
a parking space.
The system activates on any slope that
causes your vehicle to roll.
Note: There is no warning light to indicate
the system is either on or off. Using Hill Start Assist
1. Press the brake pedal to bring your
vehicle to a complete standstill. Keep
the brake pedal pressed and shift into
first gear when facing uphill or reverse
(R) when facing downhill.
2. If the sensors detect that your vehicle is on a slope, the system activates
automatically.
3. When you remove your foot from the brake pedal, your vehicle remains on
the slope without rolling away for
about two to three seconds. This hold
time automatically extends if you are
in the process of driving off.
4. Drive off in the normal manner. The system releases the brakes
automatically.
Note: When you remove your foot from the
brake pedal and press the pedal again when
the system is active, you will experience
significantly reduced brake pedal travel. This
is normal.
Switching the System On and Off
Vehicles with Manual Transmission
You can switch this feature on or off in the
information display. The system
remembers the last setting when you start
your vehicle.
Vehicles with Automatic Transmission
You cannot turn the system on or off.
When you switch the ignition on, the
system automatically turns on.
103
E-Series (TE4) Canada/United States of America, enUSA, Edition date: 202010, First-Printing Brakes
Page 142 of 300
•
When stopped in congested or heavy
traffic during hot weather, place the
gearshift in position P to aid engine and
transmission cooling and to help A/C
performance.
• Switch off the speed control with
heavy loads or in hilly terrain. The
speed control may turn off
automatically when you are towing on
long, steep grades.
• Shift to a lower gear when driving down
a long or steep hill. Do not apply the
brakes continuously, as they may
overheat and become less effective.
• If your transmission is equipped with a
Grade Assist or Tow/Haul feature, use
this feature when towing. This provides
engine braking and helps eliminate
excessive transmission shifting for
optimum fuel economy and
transmission cooling.
• If your vehicle is equipped with
AdvanceTrac with RSC, this system
may turn on during typical cornering
maneuvers with a heavily loaded trailer.
This is normal. Turning the corner at a
slower speed while towing may reduce
this tendency.
• Allow more distance for stopping with
a trailer attached. Anticipate stops and
brake gradually.
• Avoid parking on a grade. However, if
you must park on a grade:
1. Turn the steering wheel to point your vehicle tires away from traffic flow.
2. Set your vehicle parking brake.
3. Place the automatic transmission in position P.
4. Place wheel chocks in front and back of the trailer wheels. (Chocks not
included with vehicle.) Your vehicle may be equipped with a
temporary or conventional spare tire. A
"temporary" spare tire is different in size
(diameter or width), tread-type
(All-Season or All Terrain) or is from a
different manufacturer than the road tires
on your vehicle. Consult information on the
tire label or Safety Compliance label for
limitations when using.
Launching or Retrieving a Boat or
Personal Watercraft (PWC)
Note:
Disconnect the wiring to the trailer
before
backing the trailer into the water.
Note: Reconnect the wiring to the trailer
after
removing the trailer from the water.
When backing down a ramp during boat
launching or retrieval:
• Do not allow the static water level to
rise above the bottom edge of the rear
bumper.
• Do not allow waves to break higher
than
6 in (15 cm) above the bottom
edge of the rear bumper.
Exceeding these limits may allow water to
enter vehicle components:
• Causing internal damage to the
components.
• Affecting driveability, emissions and
reliability.
Replace the rear axle lubricant anytime
the rear axle has been submerged in water.
Water may have contaminated the rear
axle lubricant, which is not normally
checked or changed unless a leak is
suspected or other axle repair is required.
139
E-Series (TE4) Canada/United States of America, enUSA, Edition date: 202010, First-Printing Towing
Page 149 of 300
JUMP STARTING THE VEHICLE
WARNING: Batteries normally
produce explosive gases which can
cause personal injury. Therefore, do not
allow flames, sparks or lighted
substances to come near the battery.
When working near the battery, always
shield your face and protect your eyes.
Always provide correct ventilation. WARNING:
Keep batteries out of
reach of children. Batteries contain
sulfuric acid. Avoid contact with skin,
eyes or clothing. Shield your eyes when
working near the battery to protect
against possible splashing of acid
solution. In case of acid contact with skin
or eyes, flush immediately with water for
a minimum of 15 minutes and get prompt
medical attention. If acid is swallowed,
call a physician immediately. WARNING:
Use only adequately
sized cables with insulated clamps.
Preparing Your Vehicle
Do not attempt to push-start your
automatic transmission vehicle.
Note: Attempting to push-start a vehicle
with an automatic transmission may cause
transmission damage.
Note: Use only a 12-volt supply to start your
vehicle.
Note: Do not disconnect the battery of the
disabled vehicle as this could damage the
vehicle electrical system.
Park the booster vehicle close to the hood
of the disabled vehicle, making sure the
two vehicles do not touch. Connecting the Jumper Cables WARNING:
Do not connect the
negative jumper cable to any other part
of your vehicle. Use the ground point. WARNING:
Make sure that the
cables are clear of any moving parts and
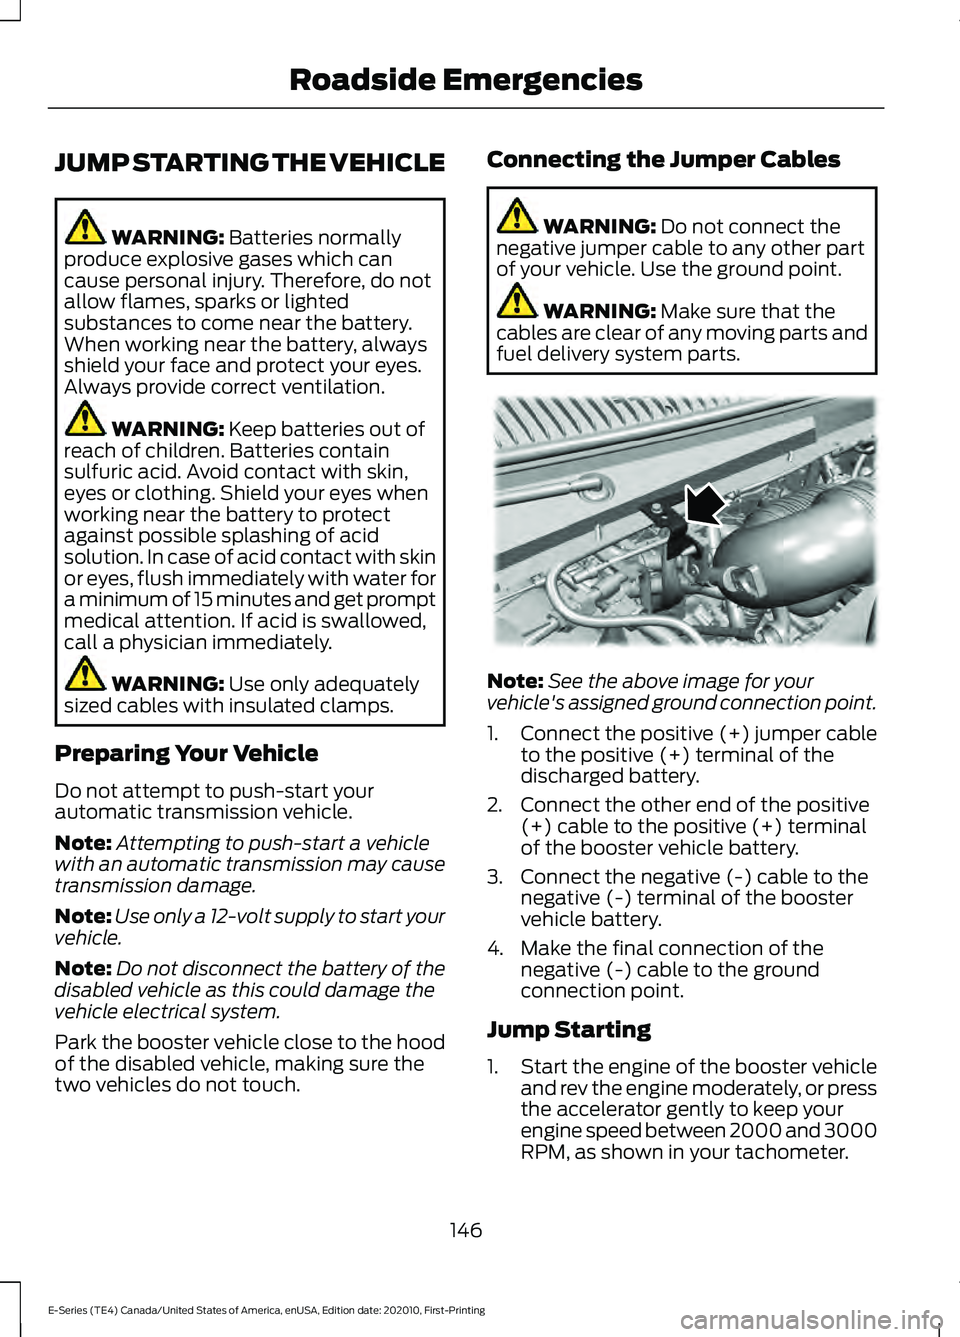
fuel delivery system parts. Note:
See the above image for your
vehicle's assigned ground connection point.
1. Connect the positive (+) jumper cable
to the positive (+) terminal of the
discharged battery.
2. Connect the other end of the positive (+) cable to the positive (+) terminal
of the booster vehicle battery.
3. Connect the negative (-) cable to the negative (-) terminal of the booster
vehicle battery.
4. Make the final connection of the negative (-) cable to the ground
connection point.
Jump Starting
1. Start the engine of the booster vehicle
and rev the engine moderately, or press
the accelerator gently to keep your
engine speed between 2000 and 3000
RPM, as shown in your tachometer.
146
E-Series (TE4) Canada/United States of America, enUSA, Edition date: 202010, First-Printing Roadside EmergenciesE310550