turn FORD E350 2011 Owners Manual
[x] Cancel search | Manufacturer: FORD, Model Year: 2011, Model line: E350, Model: FORD E350 2011Pages: 339, PDF Size: 2.29 MB
Page 217 of 339
FUEL PUMP SHUT-OFF (EXCEPT STRIPPED CHASSIS)
In the event of a moderate to severe collision, this vehicle is equipped
with a fuel pump shut-off feature that stops the flow of fuel to the
engine. Not every impact will cause a shut-off.
Should your vehicle shut off after a collision due to this feature, you may
restart your vehicle by doing the following:
1. Turn the ignition switch to the off position.
2. Turn the ignition switch to the on position.
In some instances the vehicle may not restart the first time you try to
restart and may take one additional attempt.
WARNING:Failure to inspect and if necessary repair fuel leaks
after a collision may increase the risk of fire and serious injury.
Ford Motor Company recommends that the fuel system be inspected
by an authorized dealer after any collision.
FUEL PUMP SHUT-OFF SWITCH (STRIPPED CHASSIS VEHICLES
ONLY)
This device stops the electric fuel pump from sending fuel to the engine
when your vehicle has had a substantial jolt.
After an accident, if the engine cranks but does not start, this switch
may have been activated.
Roadside Emergencies
217
2011 Econoline(eco)
Owners Guide, 3rd Printing
USA(fus)
Page 218 of 339
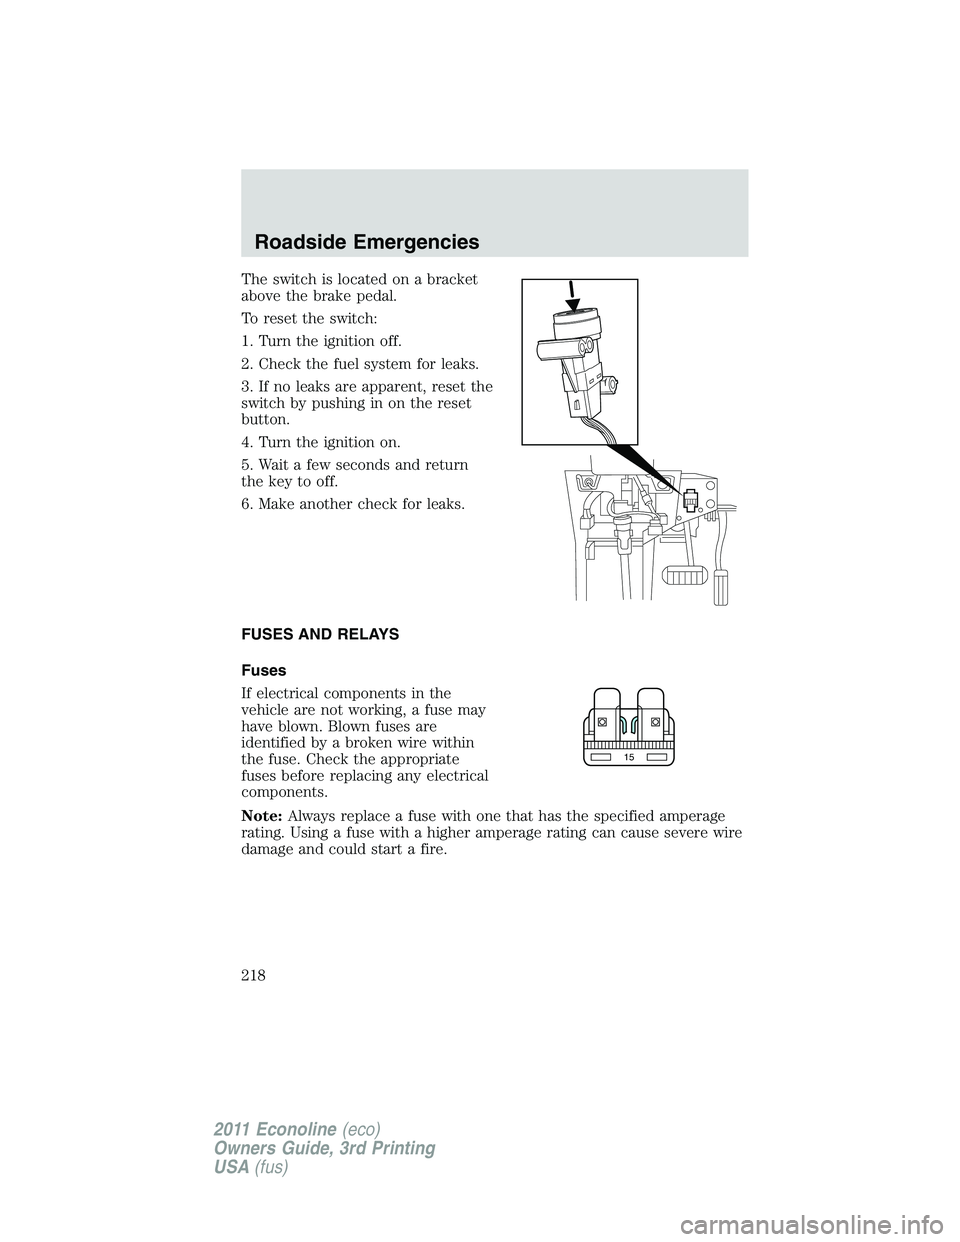
The switch is located on a bracket
above the brake pedal.
To reset the switch:
1. Turn the ignition off.
2. Check the fuel system for leaks.
3. If no leaks are apparent, reset the
switch by pushing in on the reset
button.
4. Turn the ignition on.
5. Wait a few seconds and return
the key to off.
6. Make another check for leaks.
FUSES AND RELAYS
Fuses
If electrical components in the
vehicle are not working, a fuse may
have blown. Blown fuses are
identified by a broken wire within
the fuse. Check the appropriate
fuses before replacing any electrical
components.
Note:Always replace a fuse with one that has the specified amperage
rating. Using a fuse with a higher amperage rating can cause severe wire
damage and could start a fire.
15
Roadside Emergencies
218
2011 Econoline(eco)
Owners Guide, 3rd Printing
USA(fus)
Page 220 of 339
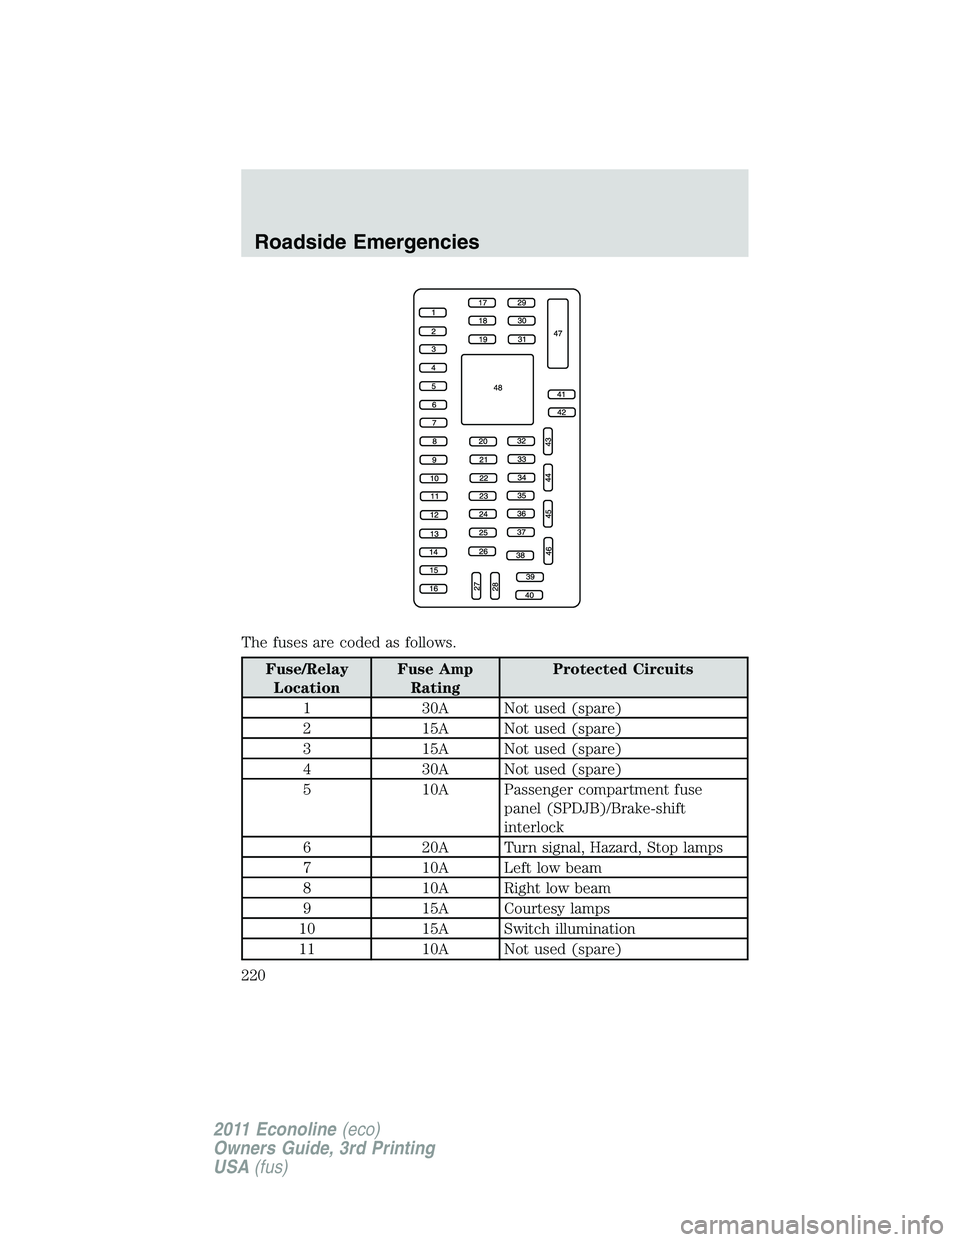
The fuses are coded as follows.
Fuse/Relay
LocationFuse Amp
RatingProtected Circuits
1 30A Not used (spare)
2 15A Not used (spare)
3 15A Not used (spare)
4 30A Not used (spare)
5 10A Passenger compartment fuse
panel (SPDJB)/Brake-shift
interlock
6 20A Turn signal, Hazard, Stop lamps
7 10A Left low beam
8 10A Right low beam
9 15A Courtesy lamps
10 15A Switch illumination
11 10A Not used (spare)
Roadside Emergencies
220
2011 Econoline(eco)
Owners Guide, 3rd Printing
USA(fus)
Page 224 of 339
Fuse/Relay
LocationFuse Amp
RatingProtected Circuits
17 50A** Trailer tow battery charge, Trailer
tow park feed
18 30A** Electric trailer brake, Trailer
brake controller
19 30A** Upfitter #1
20 30A** Upfitter #2
21 — Not used
22 — Not used
23 G8VA relay A/C clutch
24 G8VA relay Horn relay (stripped chassis)
25 HC Micro relay Run/start
26 — Not used
27 — Not used
28 20A* Back up lamp
29 10A* A/C clutch
30 10A* Brake on/off (BOO) switch
31 10A* Cluster battery (stripped chassis)
32 50A** Blower motor
33 40A** Anti-lock brake system (ABS)
pump
34 20A** Stripped chassis horn
35 40A** PCM relay
36 20A** Ignition switch (stripped chassis)
37 G8VA relay Trailer tow stop — left turn signal
38 G8VA relay Trailer tow stop — right turn
signal
39 G8VA relay Back up lamp
40 ISO relay Blower motor
41 — Not used
42 15A* Diagnostic connector (stripped
chassis)
43 20A* Fuel pump
Roadside Emergencies
224
2011 Econoline(eco)
Owners Guide, 3rd Printing
USA(fus)
Page 225 of 339
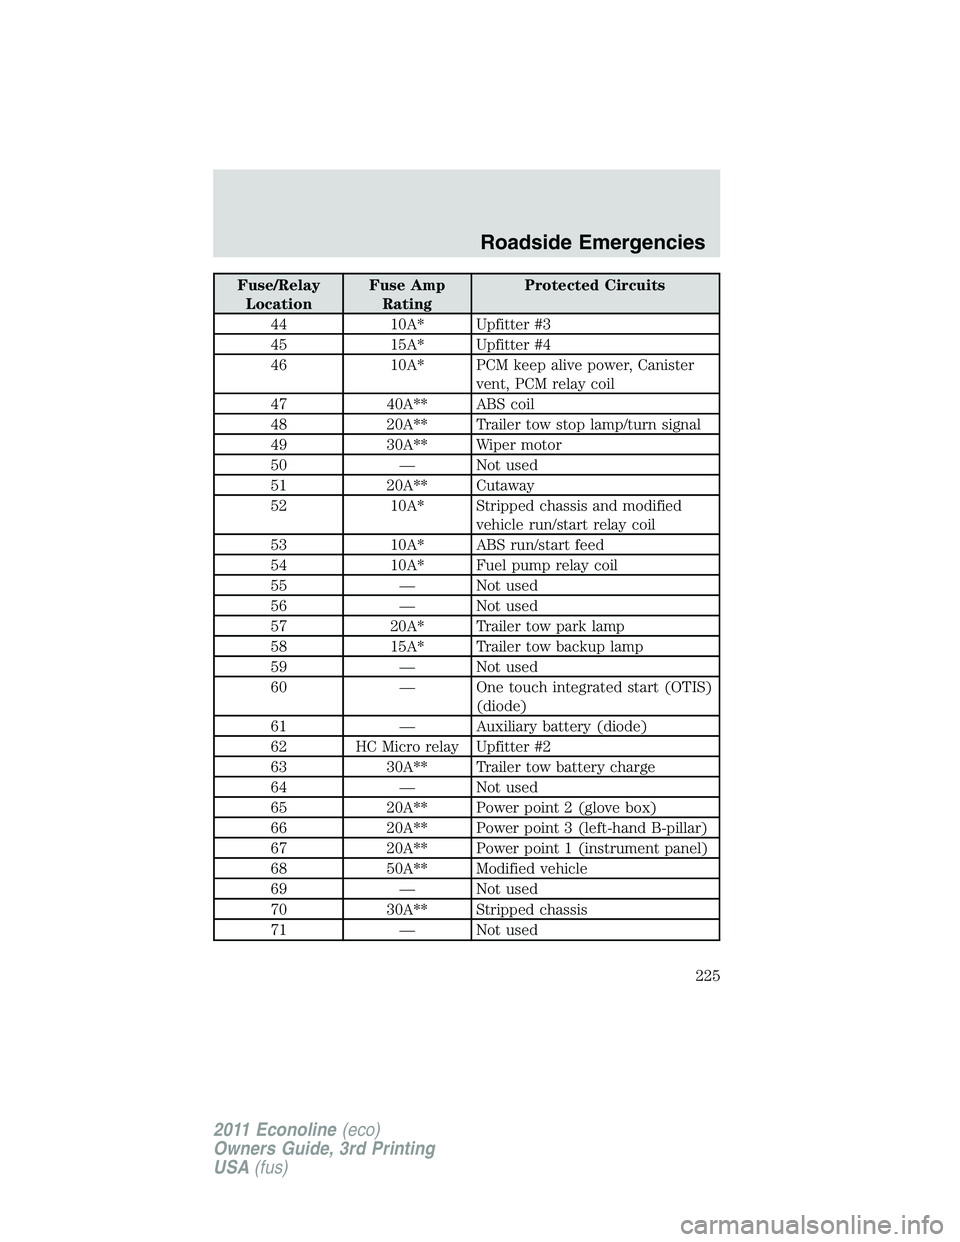
Fuse/Relay
LocationFuse Amp
RatingProtected Circuits
44 10A* Upfitter #3
45 15A* Upfitter #4
46 10A* PCM keep alive power, Canister
vent, PCM relay coil
47 40A** ABS coil
48 20A** Trailer tow stop lamp/turn signal
49 30A** Wiper motor
50 — Not used
51 20A** Cutaway
52 10A* Stripped chassis and modified
vehicle run/start relay coil
53 10A* ABS run/start feed
54 10A* Fuel pump relay coil
55 — Not used
56 — Not used
57 20A* Trailer tow park lamp
58 15A* Trailer tow backup lamp
59 — Not used
60 — One touch integrated start (OTIS)
(diode)
61 — Auxiliary battery (diode)
62 HC Micro relay Upfitter #2
63 30A** Trailer tow battery charge
64 — Not used
65 20A** Power point 2 (glove box)
66 20A** Power point 3 (left-hand B-pillar)
67 20A** Power point 1 (instrument panel)
68 50A** Modified vehicle
69 — Not used
70 30A** Stripped chassis
71 — Not used
Roadside Emergencies
225
2011 Econoline(eco)
Owners Guide, 3rd Printing
USA(fus)
Page 229 of 339
Full-size matching spare tire/wheel information
This spare tire/wheel will match the road tire/wheel. When driving with
the full size matching spare tire/wheel, do not exceed 70 mph
(113 km/h). It is intended for temporary use only. This means if you
need to use it, you should replace it as soon as possible.
Stopping and securing your vehicle
1. Park on a level surface.
2. Activate the warning flashers.
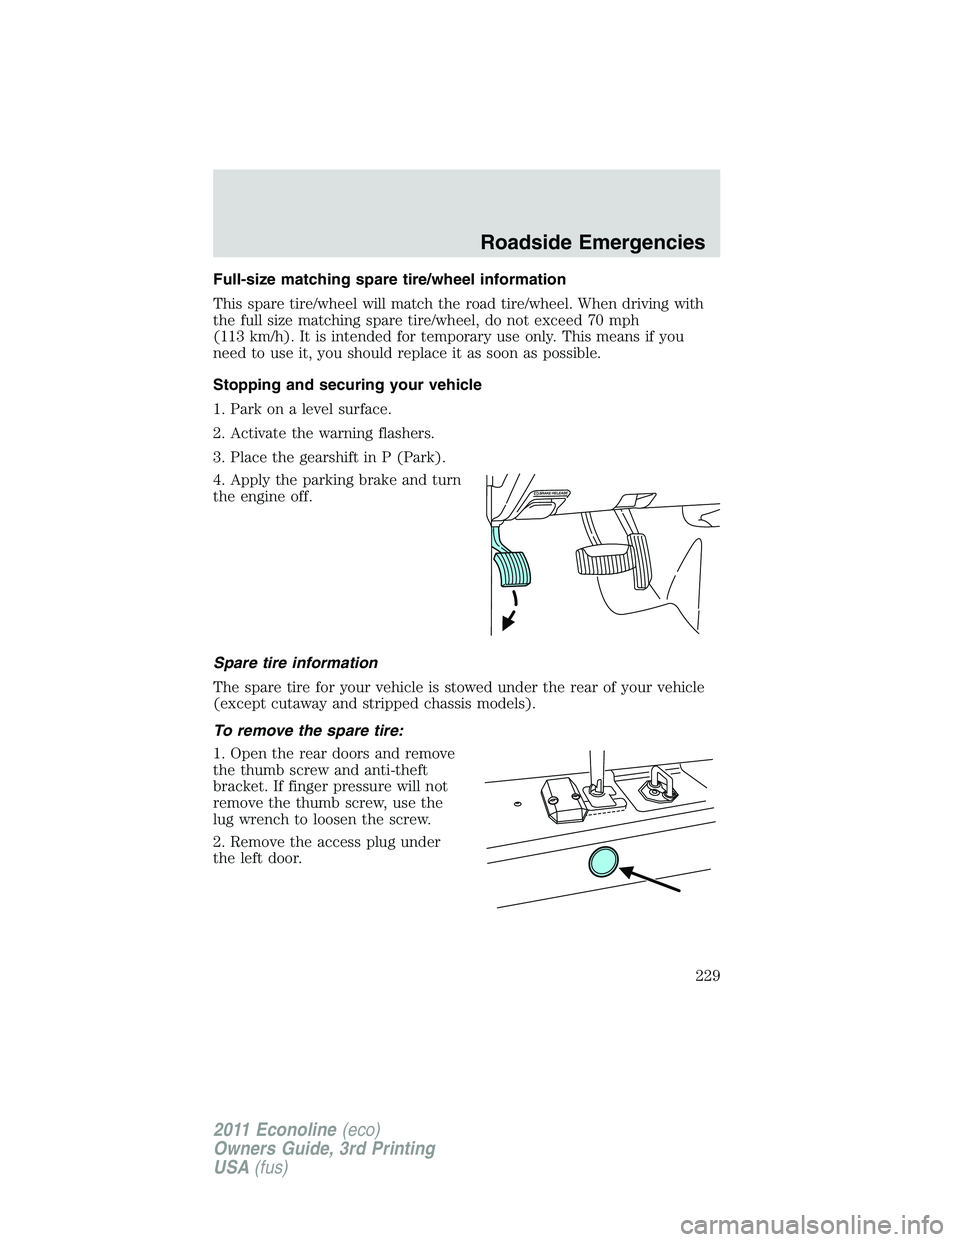
3. Place the gearshift in P (Park).
4. Apply the parking brake and turn
the engine off.
Spare tire information
The spare tire for your vehicle is stowed under the rear of your vehicle
(except cutaway and stripped chassis models).
To remove the spare tire:
1. Open the rear doors and remove
the thumb screw and anti-theft
bracket. If finger pressure will not
remove the thumb screw, use the
lug wrench to loosen the screw.
2. Remove the access plug under
the left door.
Roadside Emergencies
229
2011 Econoline(eco)
Owners Guide, 3rd Printing
USA(fus)
Page 230 of 339
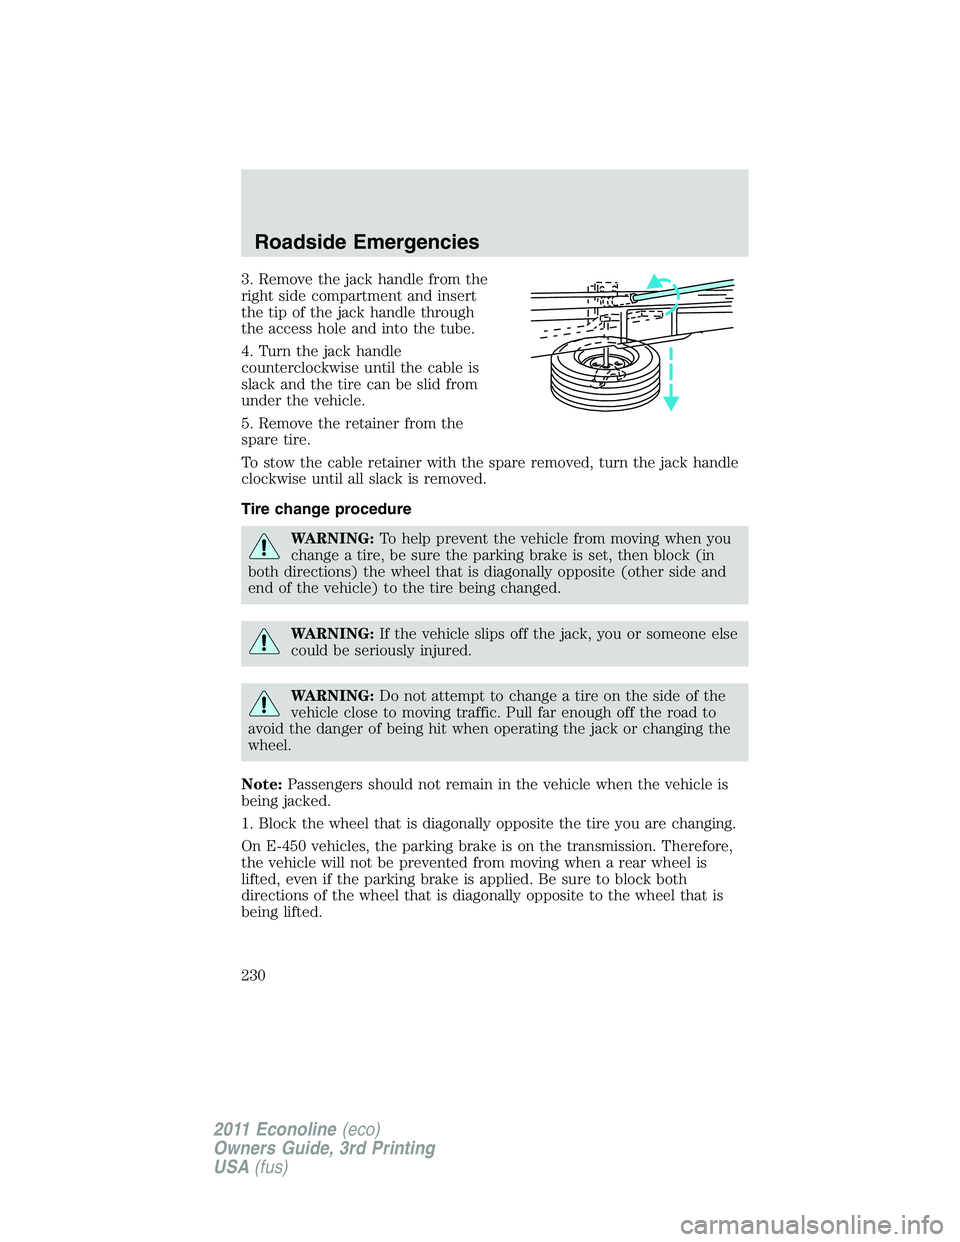
3. Remove the jack handle from the
right side compartment and insert
the tip of the jack handle through
the access hole and into the tube.
4. Turn the jack handle
counterclockwise until the cable is
slack and the tire can be slid from
under the vehicle.
5. Remove the retainer from the
spare tire.
To stow the cable retainer with the spare removed, turn the jack handle
clockwise until all slack is removed.
Tire change procedure
WARNING:To help prevent the vehicle from moving when you
change a tire, be sure the parking brake is set, then block (in
both directions) the wheel that is diagonally opposite (other side and
end of the vehicle) to the tire being changed.
WARNING:If the vehicle slips off the jack, you or someone else
could be seriously injured.
WARNING:Do not attempt to change a tire on the side of the
vehicle close to moving traffic. Pull far enough off the road to
avoid the danger of being hit when operating the jack or changing the
wheel.
Note:Passengers should not remain in the vehicle when the vehicle is
being jacked.
1. Block the wheel that is diagonally opposite the tire you are changing.
On E-450 vehicles, the parking brake is on the transmission. Therefore,
the vehicle will not be prevented from moving when a rear wheel is
lifted, even if the parking brake is applied. Be sure to block both
directions of the wheel that is diagonally opposite to the wheel that is
being lifted.
Roadside Emergencies
230
2011 Econoline(eco)
Owners Guide, 3rd Printing
USA(fus)
Page 231 of 339
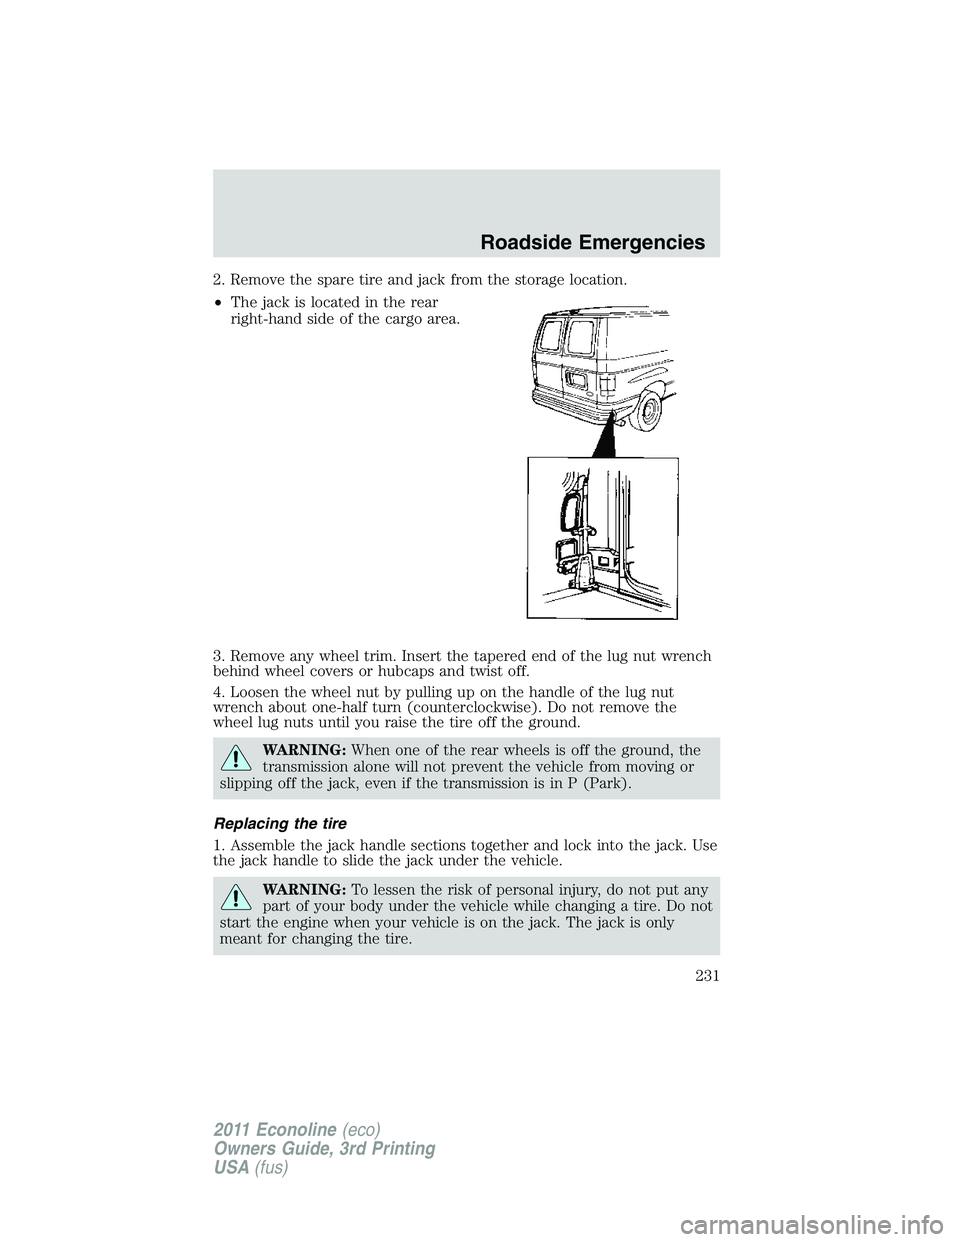
2. Remove the spare tire and jack from the storage location.
•The jack is located in the rear
right-hand side of the cargo area.
3. Remove any wheel trim. Insert the tapered end of the lug nut wrench
behind wheel covers or hubcaps and twist off.
4. Loosen the wheel nut by pulling up on the handle of the lug nut
wrench about one-half turn (counterclockwise). Do not remove the
wheel lug nuts until you raise the tire off the ground.
WARNING:When one of the rear wheels is off the ground, the
transmission alone will not prevent the vehicle from moving or
slipping off the jack, even if the transmission is in P (Park).
Replacing the tire
1. Assemble the jack handle sections together and lock into the jack. Use
the jack handle to slide the jack under the vehicle.
WARNING:To lessen the risk of personal injury, do not put any
part of your body under the vehicle while changing a tire. Do not
start the engine when your vehicle is on the jack. The jack is only
meant for changing the tire.
Roadside Emergencies
231
2011 Econoline(eco)
Owners Guide, 3rd Printing
USA(fus)
Page 233 of 339
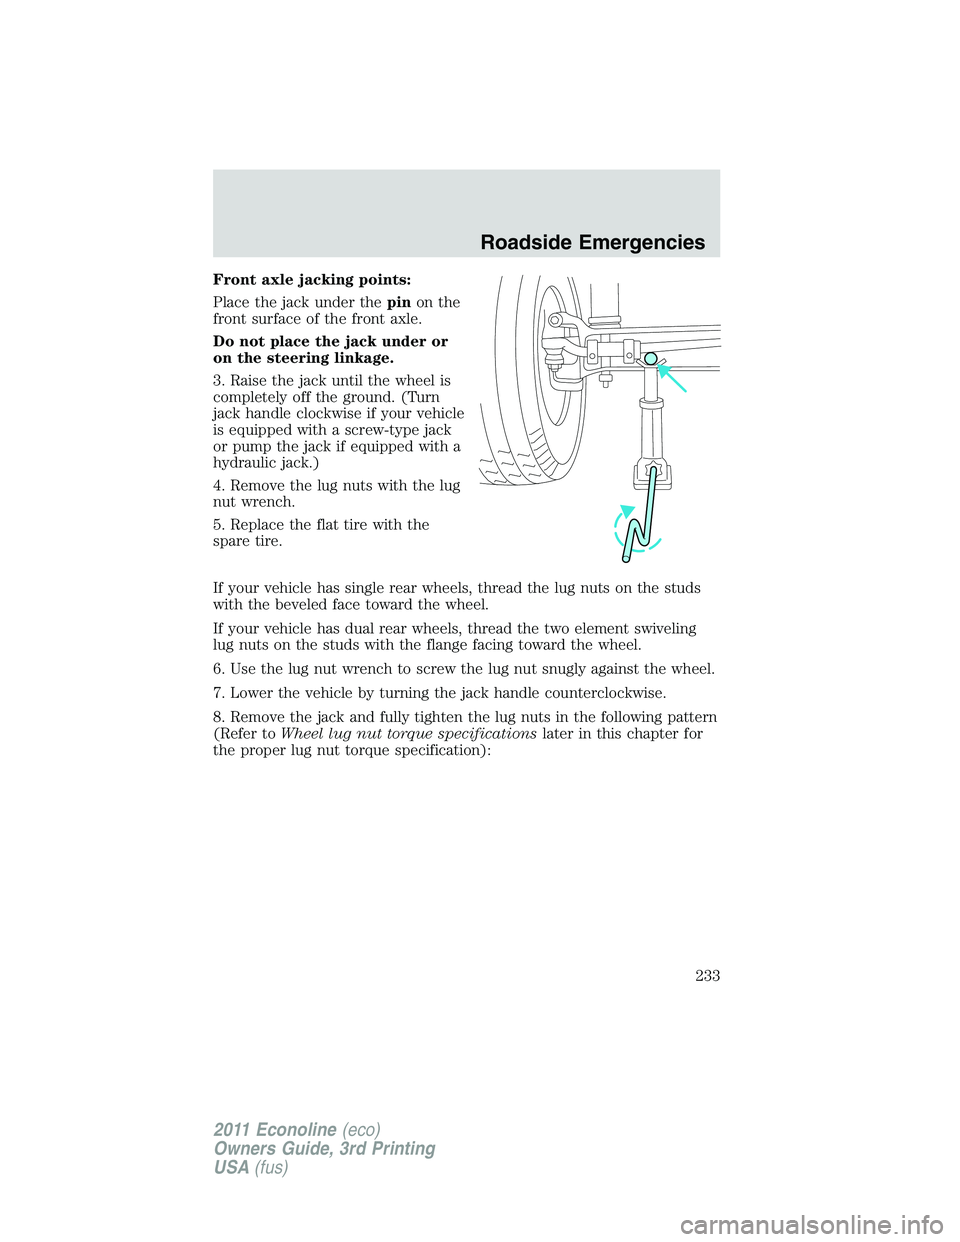
Front axle jacking points:
Place the jack under thepinon the
front surface of the front axle.
Do not place the jack under or
on the steering linkage.
3. Raise the jack until the wheel is
completely off the ground. (Turn
jack handle clockwise if your vehicle
is equipped with a screw-type jack
or pump the jack if equipped with a
hydraulic jack.)
4. Remove the lug nuts with the lug
nut wrench.
5. Replace the flat tire with the
spare tire.
If your vehicle has single rear wheels, thread the lug nuts on the studs
with the beveled face toward the wheel.
If your vehicle has dual rear wheels, thread the two element swiveling
lug nuts on the studs with the flange facing toward the wheel.
6. Use the lug nut wrench to screw the lug nut snugly against the wheel.
7. Lower the vehicle by turning the jack handle counterclockwise.
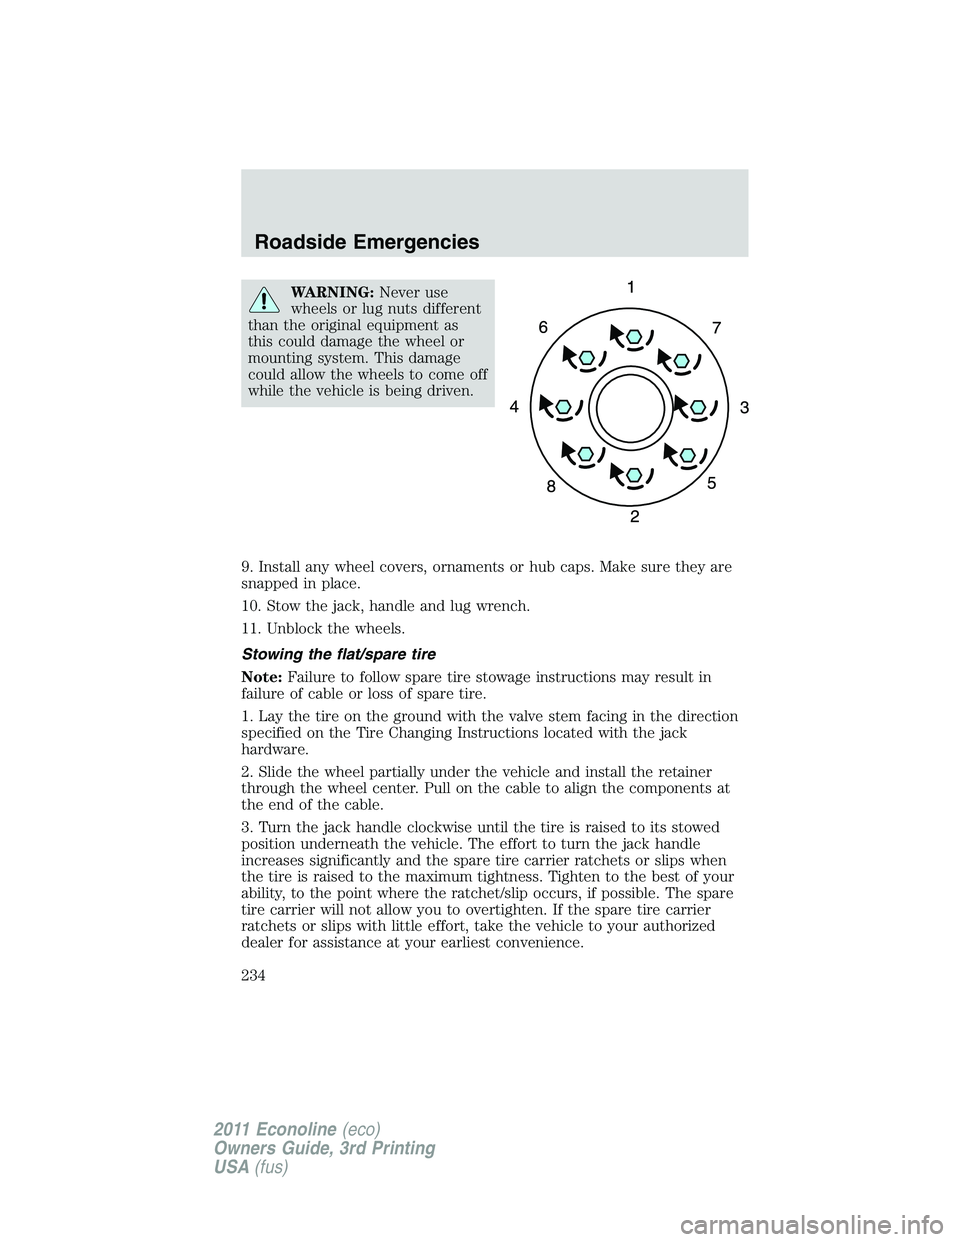
8. Remove the jack and fully tighten the lug nuts in the following pattern
(Refer toWheel lug nut torque specificationslater in this chapter for
the proper lug nut torque specification):
Roadside Emergencies
233
2011 Econoline(eco)
Owners Guide, 3rd Printing
USA(fus)
Page 234 of 339
WARNING:Never use
wheels or lug nuts different
than the original equipment as
this could damage the wheel or
mounting system. This damage
could allow the wheels to come off
while the vehicle is being driven.
9. Install any wheel covers, ornaments or hub caps. Make sure they are
snapped in place.
10. Stow the jack, handle and lug wrench.
11. Unblock the wheels.
Stowing the flat/spare tire
Note:Failure to follow spare tire stowage instructions may result in
failure of cable or loss of spare tire.
1. Lay the tire on the ground with the valve stem facing in the direction
specified on the Tire Changing Instructions located with the jack
hardware.
2. Slide the wheel partially under the vehicle and install the retainer
through the wheel center. Pull on the cable to align the components at
the end of the cable.
3. Turn the jack handle clockwise until the tire is raised to its stowed
position underneath the vehicle. The effort to turn the jack handle
increases significantly and the spare tire carrier ratchets or slips when
the tire is raised to the maximum tightness. Tighten to the best of your
ability, to the point where the ratchet/slip occurs, if possible. The spare
tire carrier will not allow you to overtighten. If the spare tire carrier
ratchets or slips with little effort, take the vehicle to your authorized
dealer for assistance at your earliest convenience.
Roadside Emergencies
234
2011 Econoline(eco)
Owners Guide, 3rd Printing
USA(fus)