fuel FORD E450 2012 Owner's Manual
[x] Cancel search | Manufacturer: FORD, Model Year: 2012, Model line: E450, Model: FORD E450 2012Pages: 335, PDF Size: 2.34 MB
Page 202 of 335
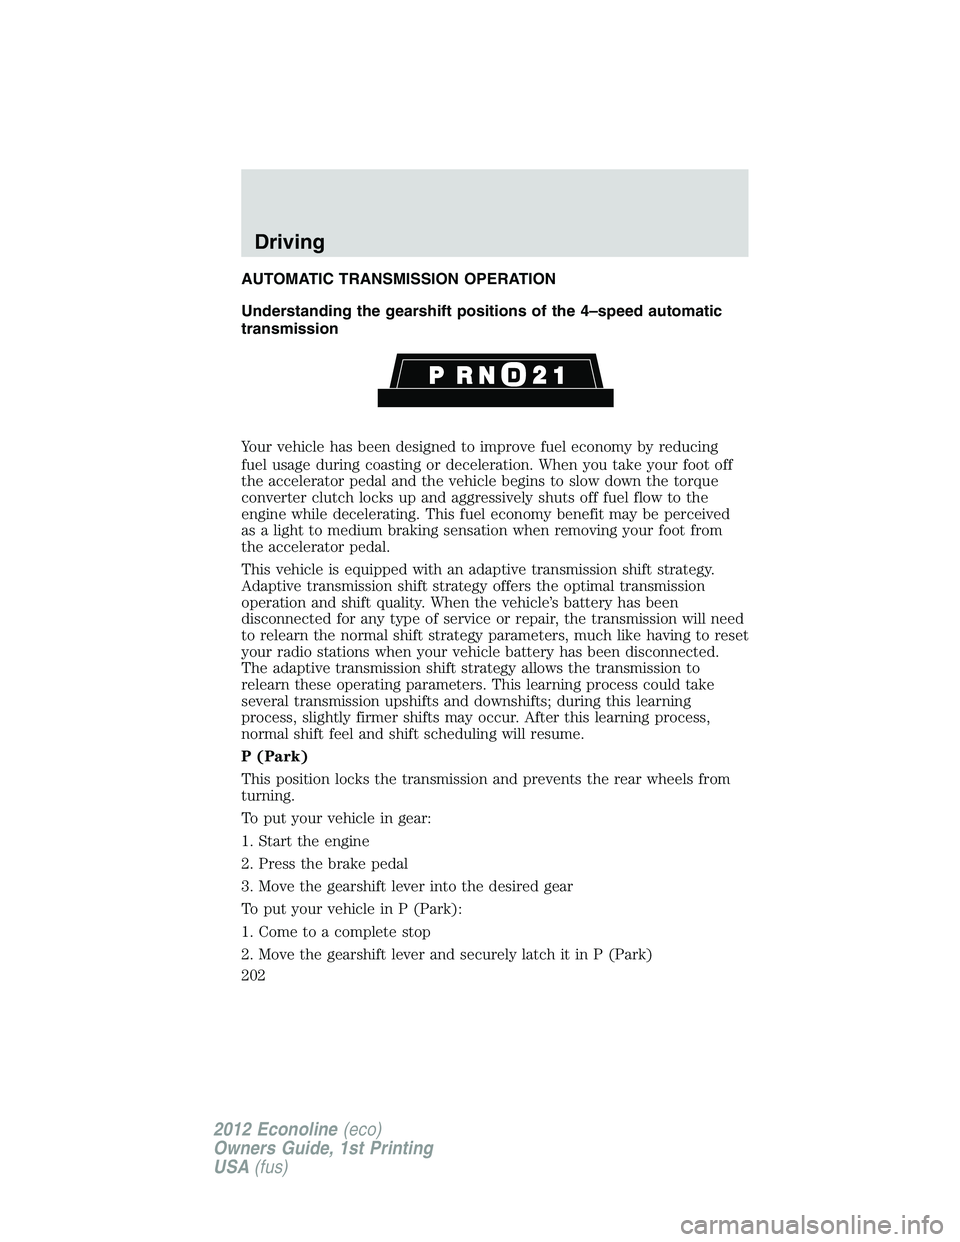
AUTOMATIC TRANSMISSION OPERATION
Understanding the gearshift positions of the 4–speed automatic
transmission
Your vehicle has been designed to improve fuel economy by reducing
fuel usage during coasting or deceleration. When you take your foot off
the accelerator pedal and the vehicle begins to slow down the torque
converter clutch locks up and aggressively shuts off fuel flow to the
engine while decelerating. This fuel economy benefit may be perceived
as a light to medium braking sensation when removing your foot from
the accelerator pedal.
This vehicle is equipped with an adaptive transmission shift strategy.
Adaptive transmission shift strategy offers the optimal transmission
operation and shift quality. When the vehicle’s battery has been
disconnected for any type of service or repair, the transmission will need
to relearn the normal shift strategy parameters, much like having to reset
your radio stations when your vehicle battery has been disconnected.
The adaptive transmission shift strategy allows the transmission to
relearn these operating parameters. This learning process could take
several transmission upshifts and downshifts; during this learning
process, slightly firmer shifts may occur. After this learning process,
normal shift feel and shift scheduling will resume.
P (Park)
This position locks the transmission and prevents the rear wheels from
turning.
To put your vehicle in gear:
1. Start the engine
2. Press the brake pedal
3. Move the gearshift lever into the desired gear
To put your vehicle in P (Park):
1. Come to a complete stop
2. Move the gearshift lever and securely latch it in P (Park)
Driving
202
2012 Econoline(eco)
Owners Guide, 1st Printing
USA(fus)
Page 203 of 335
WARNING:Always set the parking brake fully and make sure
the gearshift is latched in P (Park). Turn the ignition to the lock
position and remove the key whenever you leave your vehicle.
R (Reverse)
With the gearshift lever in R (Reverse), the vehicle will move backward.
Always come to a complete stop before shifting into and out of R
(Reverse).
N (Neutral)
With the gearshift lever in N (Neutral), the vehicle can be started and is
free to roll. Hold the brake pedal down while in this position.
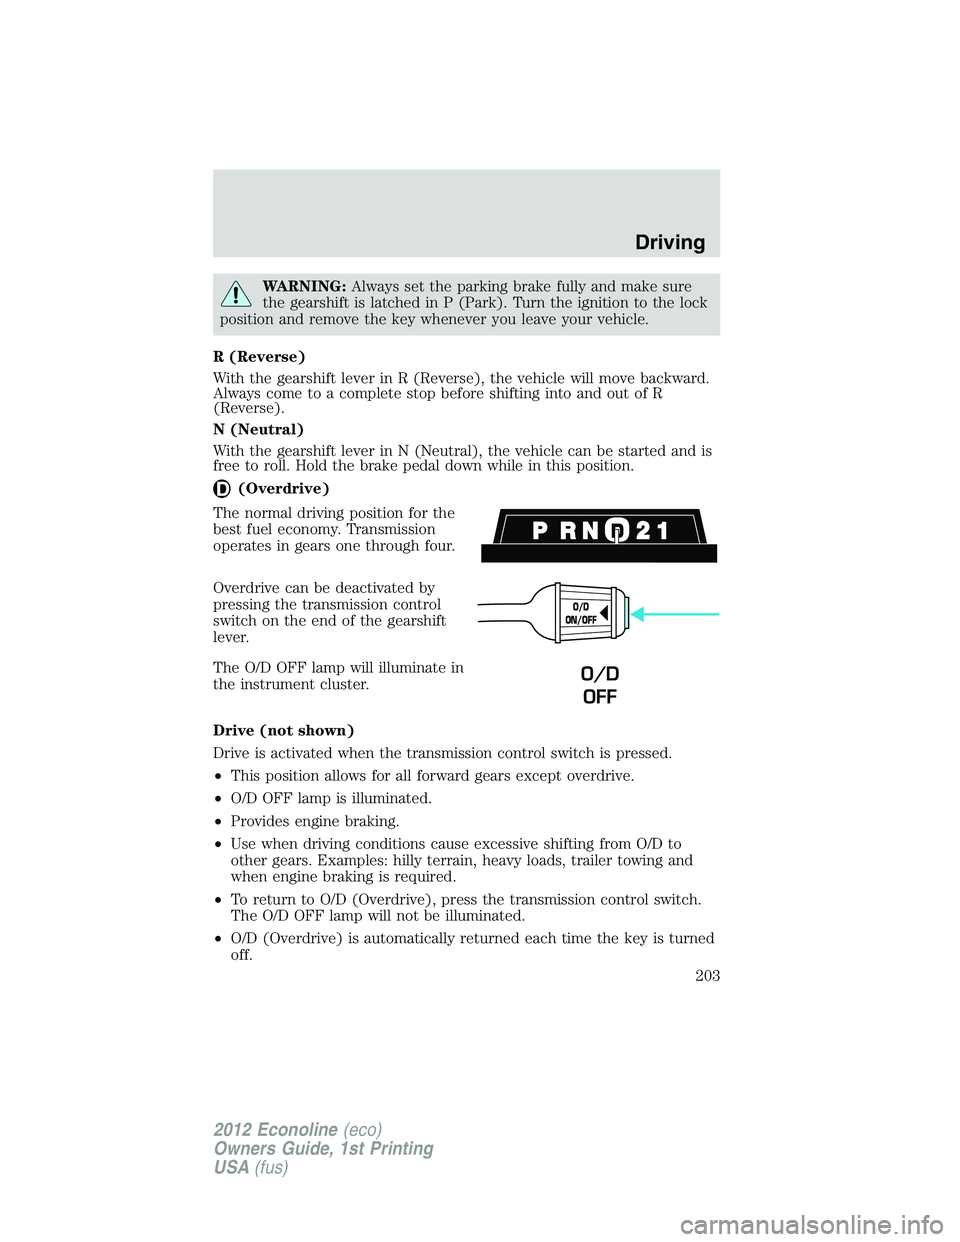
(Overdrive)
The normal driving position for the
best fuel economy. Transmission
operates in gears one through four.
Overdrive can be deactivated by
pressing the transmission control
switch on the end of the gearshift
lever.
The O/D OFF lamp will illuminate in
the instrument cluster.
Drive (not shown)
Drive is activated when the transmission control switch is pressed.
•This position allows for all forward gears except overdrive.
•O/D OFF lamp is illuminated.
•Provides engine braking.
•Use when driving conditions cause excessive shifting from O/D to
other gears. Examples: hilly terrain, heavy loads, trailer towing and
when engine braking is required.
•To return to O/D (Overdrive), press the transmission control switch.
The O/D OFF lamp will not be illuminated.
•O/D (Overdrive) is automatically returned each time the key is turned
off.
O/D
ON/OFF
O/D
OFF
Driving
203
2012 Econoline(eco)
Owners Guide, 1st Printing
USA(fus)
Page 204 of 335
2 (Second)
This position allows for second gear only.
•Provides engine braking.
•Use to start-up on slippery roads.
•To return to
(Overdrive), move the gearshift lever into the
(Overdrive) position.
•Selecting 2 (Second) at higher speeds will cause the transmission to
downshift to second gear at the appropriate vehicle speed.
1 (First)
•Provides maximum engine braking.
•Allows upshifts by moving gearshift lever.
•Will not downshift into 1 (First) at high speeds; allows for 1 (First)
when vehicle reaches slower speeds.
Forced downshifts
•Allowed in
(Overdrive) or Drive.
•Press the accelerator to the floor.
•Allows transmission to select an appropriate gear.
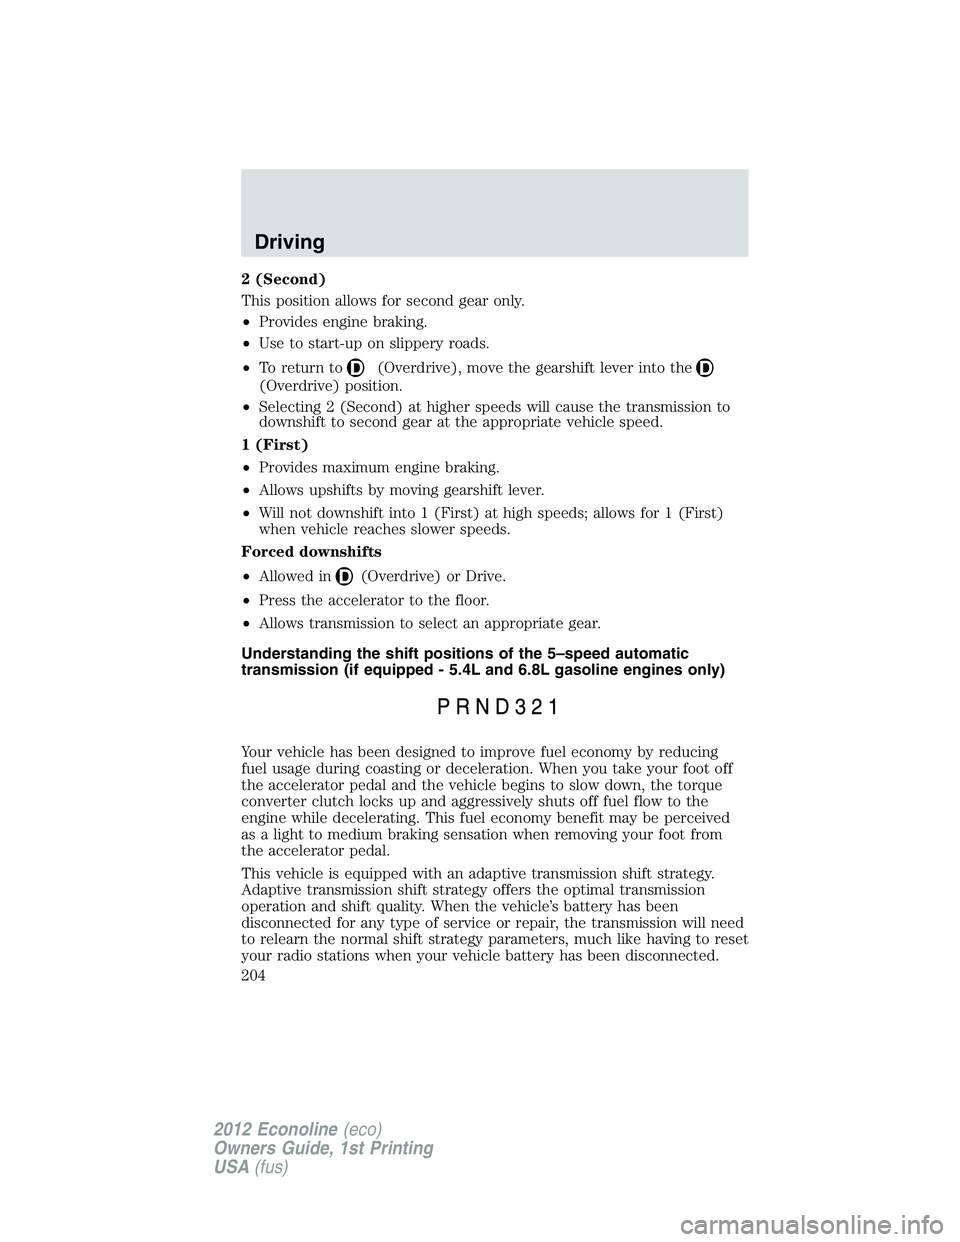
Understanding the shift positions of the 5–speed automatic
transmission (if equipped - 5.4L and 6.8L gasoline engines only)
Your vehicle has been designed to improve fuel economy by reducing
fuel usage during coasting or deceleration. When you take your foot off
the accelerator pedal and the vehicle begins to slow down, the torque
converter clutch locks up and aggressively shuts off fuel flow to the
engine while decelerating. This fuel economy benefit may be perceived
as a light to medium braking sensation when removing your foot from
the accelerator pedal.
This vehicle is equipped with an adaptive transmission shift strategy.
Adaptive transmission shift strategy offers the optimal transmission
operation and shift quality. When the vehicle’s battery has been
disconnected for any type of service or repair, the transmission will need
to relearn the normal shift strategy parameters, much like having to reset
your radio stations when your vehicle battery has been disconnected.
Driving
204
2012 Econoline(eco)
Owners Guide, 1st Printing
USA(fus)
Page 205 of 335
The adaptive transmission shift strategy allows the transmission to
relearn these operating parameters. This learning process could take
several transmission upshifts and downshifts; during this learning
process, slightly firmer shifts may occur. After this learning process,
normal shift feel and shift scheduling will resume.
P (Park)
This position locks the transmission and prevents the rear wheels from
turning.
To put your vehicle in gear:
1. Start the engine
2. Press the brake pedal
3. Move the gearshift lever into the desired gear
To put your vehicle in P (Park):
1. Come to a complete stop
2. Move the gearshift lever and securely latch it in P (Park)
WARNING:Always set the parking brake fully and make sure
the gearshift is latched in P (Park). Turn the ignition to the lock
position and remove the key whenever you leave your vehicle.
R (Reverse)
With the gearshift lever in R (Reverse), the vehicle will move backward.
Always come to a complete stop before shifting into and out of R
(Reverse).
N (Neutral)
With the gearshift lever in N (Neutral), the vehicle can be started and is
free to roll. Hold the brake pedal down while in this position.
D (Overdrive) with Tow/Haul off
D (Overdrive) with tow/haul off is the normal driving position for the
best fuel economy. The overdrive function allows automatic upshifts and
downshifts through gears one through five.
D (Overdrive) with Tow/Haul on
The tow/haul feature improves transmission operation when towing a
trailer or a heavy load. All transmission gear ranges are available when
using tow/haul.
Driving
205
2012 Econoline(eco)
Owners Guide, 1st Printing
USA(fus)
Page 213 of 335
VEHICLE USED AS A STATIONARY POWER SOURCE
Auxiliary equipment called power take-off or PTO, is often added to the
engine or transmission to operate utility equipment. Examples include a
wheel-lift for tow trucks, cranes, tools for construction or tire service and
pumping fluids. PTO applications draw auxiliary horsepower from the
powertrain, often while the vehicle is stationary. In this condition, there
is limited cooling air flow through the radiator and around the vehicle
that normally occurs when a vehicle is moving. The aftermarket PTO
system installer, having the most knowledge of the final application, is
responsible for determining whether additional chassis heat protection or
powertrain cooling is required, and alerting the user to the safe and
proper operation.
Your vehicle is qualified for use as a stationary power source, within
limits detailed in theFord Truck Body Builders Layout Book,found at
www.fleet.ford.com/truckbbas, and through the Ford Truck Body Builders
Advisory Service.
Gas engine vehicles are qualified for up to 10 minutes of continuous
operation as a stationary power source, due to the potential for the
normal venting of fuel vapors. Further consult your aftermarket PTO
installer, since the duration of operation limit for the aftermarket PTO
may be less than the vehicle is capable of.
DRIVING THROUGH WATER
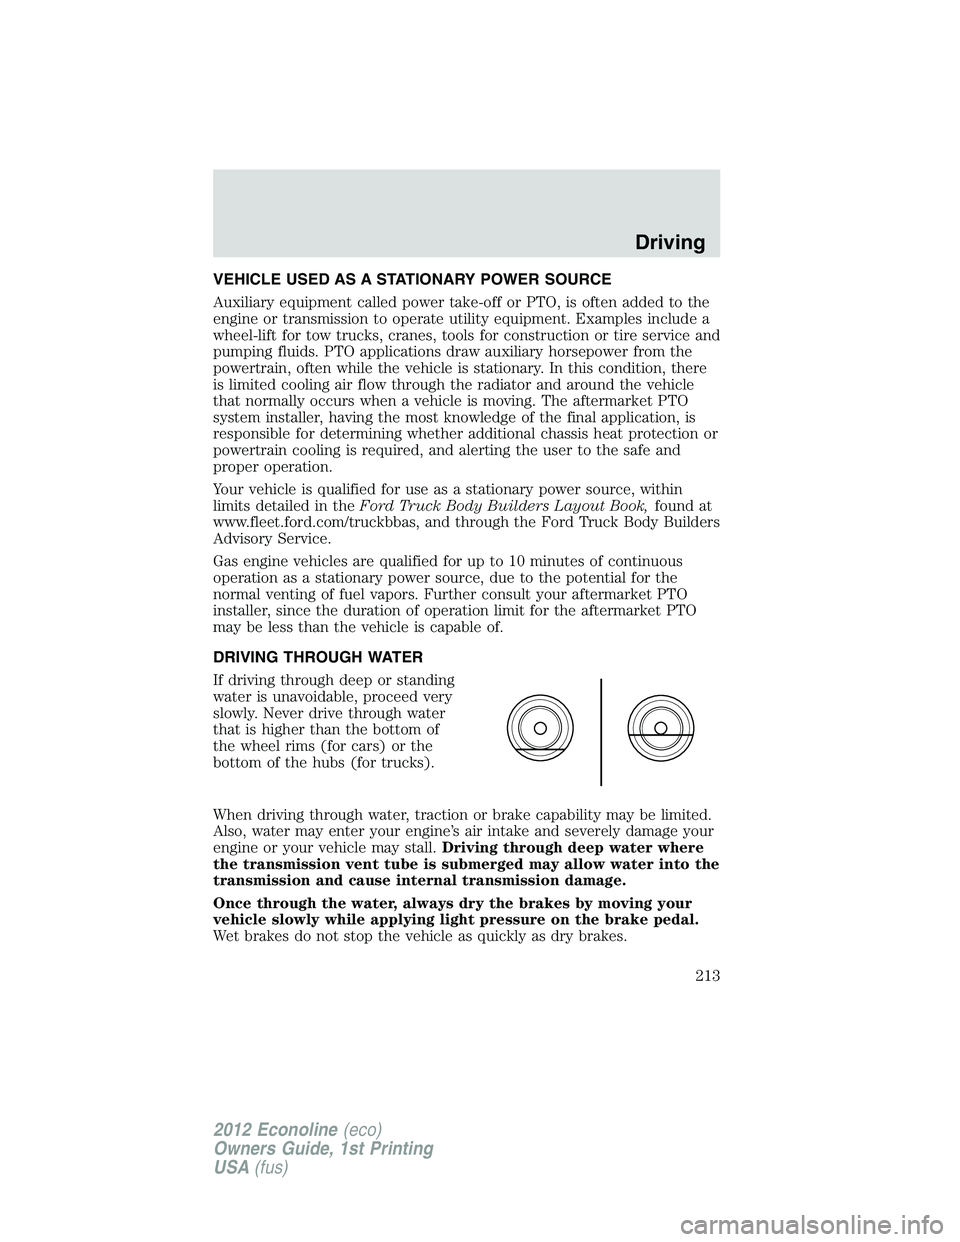
If driving through deep or standing
water is unavoidable, proceed very
slowly. Never drive through water
that is higher than the bottom of
the wheel rims (for cars) or the
bottom of the hubs (for trucks).
When driving through water, traction or brake capability may be limited.
Also, water may enter your engine’s air intake and severely damage your
engine or your vehicle may stall.Driving through deep water where
the transmission vent tube is submerged may allow water into the
transmission and cause internal transmission damage.
Once through the water, always dry the brakes by moving your
vehicle slowly while applying light pressure on the brake pedal.
Wet brakes do not stop the vehicle as quickly as dry brakes.
Driving
213
2012 Econoline(eco)
Owners Guide, 1st Printing
USA(fus)
Page 214 of 335
ROADSIDE ASSISTANCE
Vehicles sold in the U.S. : Getting roadside assistance
To fully assist you should you have a vehicle concern, Ford Motor
Company offers a complimentary roadside assistance program. This
program is separate from the New Vehicle Limited Warranty. The service
is available:
•24-hours, seven days a week
•for the coverage period listed on the Roadside Assistance Card
included in your Owner Guide portfolio.
Roadside assistance will cover:
•a flat tire change with a good spare (except vehicles that have been
supplied with a tire inflation kit)
•battery jump start
•lock-out assistance (key replacement cost is the customer’s
responsibility)
•fuel delivery – Independent Service Contractors, if not prohibited by
state, local or municipal law shall deliver up to 2.0 gallons (7.5L) of
gasoline or 5.0 gallons (18.9L) of diesel fuel to a disabled vehicle. Fuel
delivery service is limited to two no-charge occurrences within a
12-month period.
•winch out – available within 100 feet (30.5 meters) of a paved or
county maintained road, no recoveries.
•towing – Ford and Lincoln eligible vehicles towed to an authorized
dealer within 35 miles (56 km) of the disablement location or to the
nearest authorized dealer. If a member requests to be towed to an
authorized dealer more than 35 miles (56 km) from the disablement
location, the member shall be responsible for any mileage costs in
excess of 35 miles (56 km).
Trailers shall be covered up to $200 if the disabled eligible vehicle
requires service at the nearest authorized dealer. If the trailer is disabled,
but the towing vehicle is operational, the trailer does not qualify for any
roadside services.
Vehicles sold in the U.S. : Using roadside assistance
Complete the roadside assistance identification card and place it in your
wallet for quick reference. This card is found in the Owner’s Guide
portfolio in the glove compartment.
Roadside Emergencies
214
2012 Econoline(eco)
Owners Guide, 1st Printing
USA(fus)
Page 216 of 335
FUEL PUMP SHUT-OFF (EXCEPT STRIPPED CHASSIS)
In the event of a moderate to severe collision, this vehicle is equipped
with a fuel pump shut-off feature that stops the flow of fuel to the
engine. Not every impact will cause a shut-off.
Should your vehicle shut off after a collision due to this feature, you may
restart your vehicle by doing the following:
1. Turn the ignition switch to the off position.
2. Turn the ignition switch to the on position.
In some instances the vehicle may not restart the first time you try to
restart and may take one additional attempt.
WARNING:Failure to inspect and if necessary repair fuel leaks
after a collision may increase the risk of fire and serious injury.
Ford Motor Company recommends that the fuel system be inspected
by an authorized dealer after any collision.
FUEL PUMP SHUT-OFF SWITCH (STRIPPED CHASSIS VEHICLES
ONLY)
This device stops the electric fuel pump from sending fuel to the engine
when your vehicle has had a substantial jolt.
After an accident, if the engine cranks but does not start, this switch
may have been activated.
Roadside Emergencies
216
2012 Econoline(eco)
Owners Guide, 1st Printing
USA(fus)
Page 217 of 335
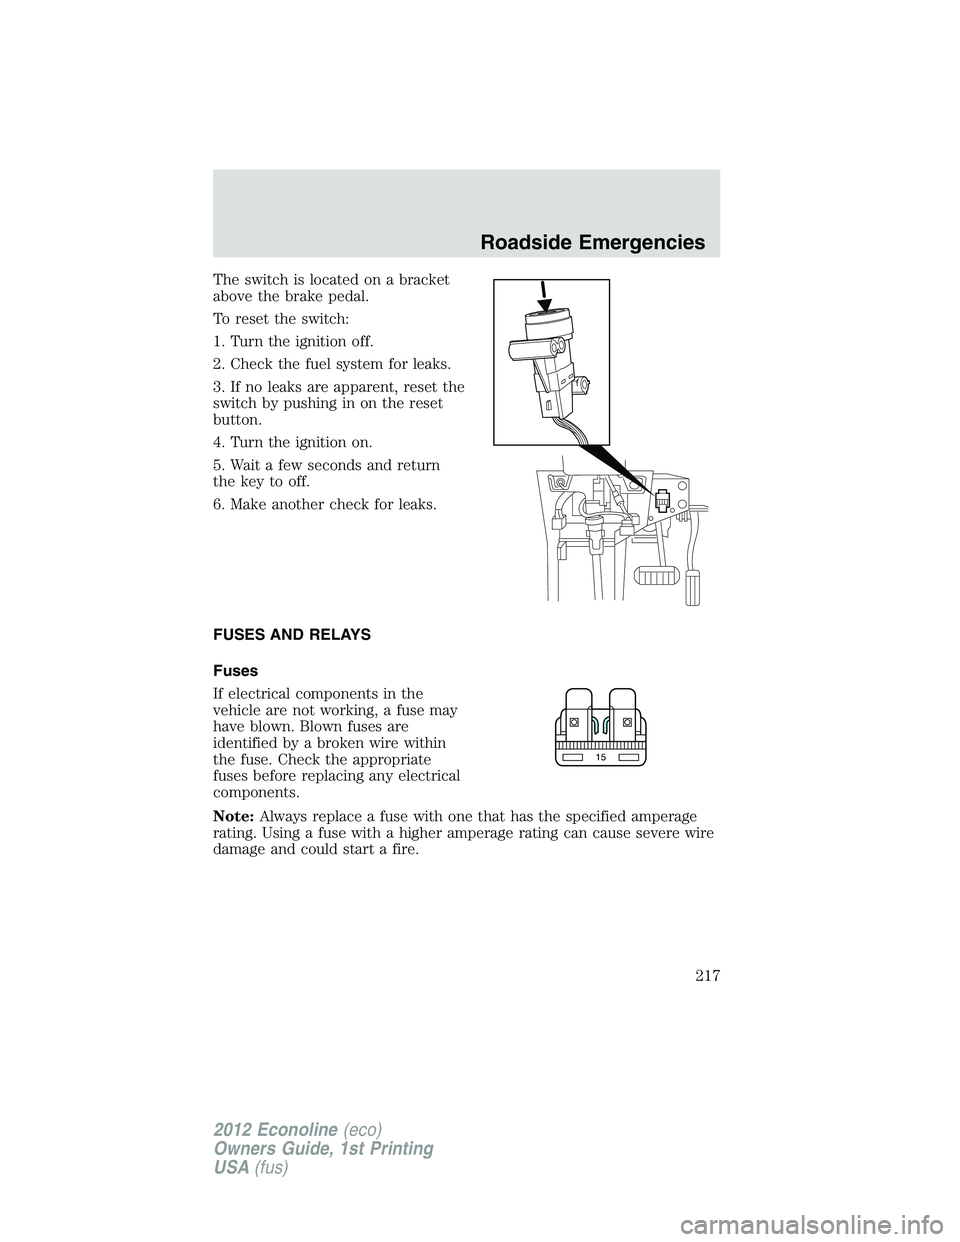
The switch is located on a bracket
above the brake pedal.
To reset the switch:
1. Turn the ignition off.
2. Check the fuel system for leaks.
3. If no leaks are apparent, reset the
switch by pushing in on the reset
button.
4. Turn the ignition on.
5. Wait a few seconds and return
the key to off.
6. Make another check for leaks.
FUSES AND RELAYS
Fuses
If electrical components in the
vehicle are not working, a fuse may
have blown. Blown fuses are
identified by a broken wire within
the fuse. Check the appropriate
fuses before replacing any electrical
components.
Note:Always replace a fuse with one that has the specified amperage
rating. Using a fuse with a higher amperage rating can cause severe wire
damage and could start a fire.
15
Roadside Emergencies
217
2012 Econoline(eco)
Owners Guide, 1st Printing
USA(fus)
Page 222 of 335
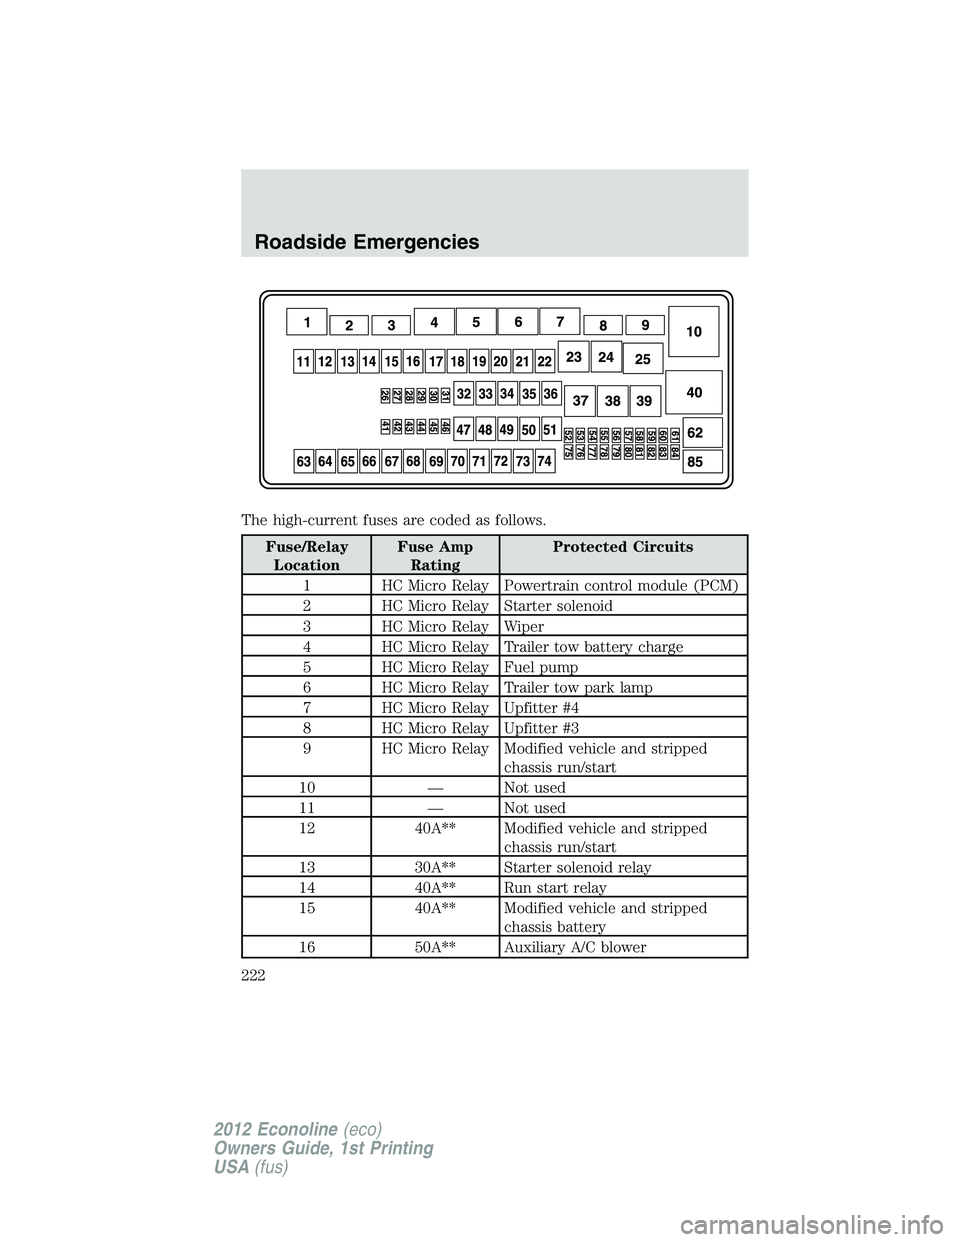
The high-current fuses are coded as follows.
Fuse/Relay
LocationFuse Amp
RatingProtected Circuits
1 HC Micro Relay Powertrain control module (PCM)
2 HC Micro Relay Starter solenoid
3 HC Micro Relay Wiper
4 HC Micro Relay Trailer tow battery charge
5 HC Micro Relay Fuel pump
6 HC Micro Relay Trailer tow park lamp
7 HC Micro Relay Upfitter #4
8 HC Micro Relay Upfitter #3
9 HC Micro Relay Modified vehicle and stripped
chassis run/start
10 — Not used
11 — Not used
12 40A** Modified vehicle and stripped
chassis run/start
13 30A** Starter solenoid relay
14 40A** Run start relay
15 40A** Modified vehicle and stripped
chassis battery
16 50A** Auxiliary A/C blower
Roadside Emergencies
222
2012 Econoline(eco)
Owners Guide, 1st Printing
USA(fus)
Page 223 of 335
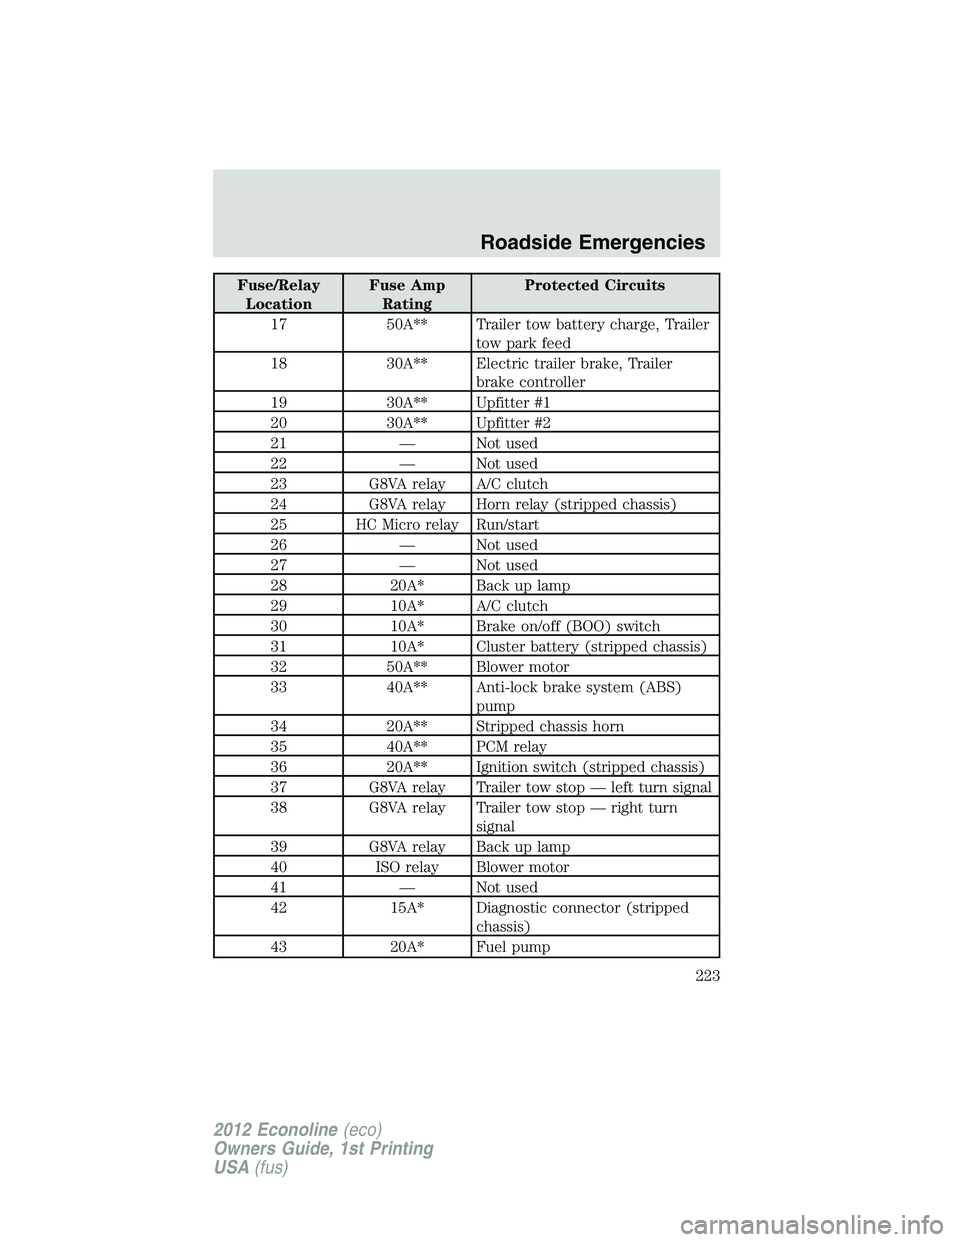
Fuse/Relay
LocationFuse Amp
RatingProtected Circuits
17 50A** Trailer tow battery charge, Trailer
tow park feed
18 30A** Electric trailer brake, Trailer
brake controller
19 30A** Upfitter #1
20 30A** Upfitter #2
21 — Not used
22 — Not used
23 G8VA relay A/C clutch
24 G8VA relay Horn relay (stripped chassis)
25 HC Micro relay Run/start
26 — Not used
27 — Not used
28 20A* Back up lamp
29 10A* A/C clutch
30 10A* Brake on/off (BOO) switch
31 10A* Cluster battery (stripped chassis)
32 50A** Blower motor
33 40A** Anti-lock brake system (ABS)
pump
34 20A** Stripped chassis horn
35 40A** PCM relay
36 20A** Ignition switch (stripped chassis)
37 G8VA relay Trailer tow stop — left turn signal
38 G8VA relay Trailer tow stop — right turn
signal
39 G8VA relay Back up lamp
40 ISO relay Blower motor
41 — Not used
42 15A* Diagnostic connector (stripped
chassis)
43 20A* Fuel pump
Roadside Emergencies
223
2012 Econoline(eco)
Owners Guide, 1st Printing
USA(fus)