remove seats FORD ECOSPORT 2018 Owners Manual
[x] Cancel search | Manufacturer: FORD, Model Year: 2018, Model line: ECOSPORT, Model: FORD ECOSPORT 2018Pages: 452, PDF Size: 17.04 MB
Page 23 of 452
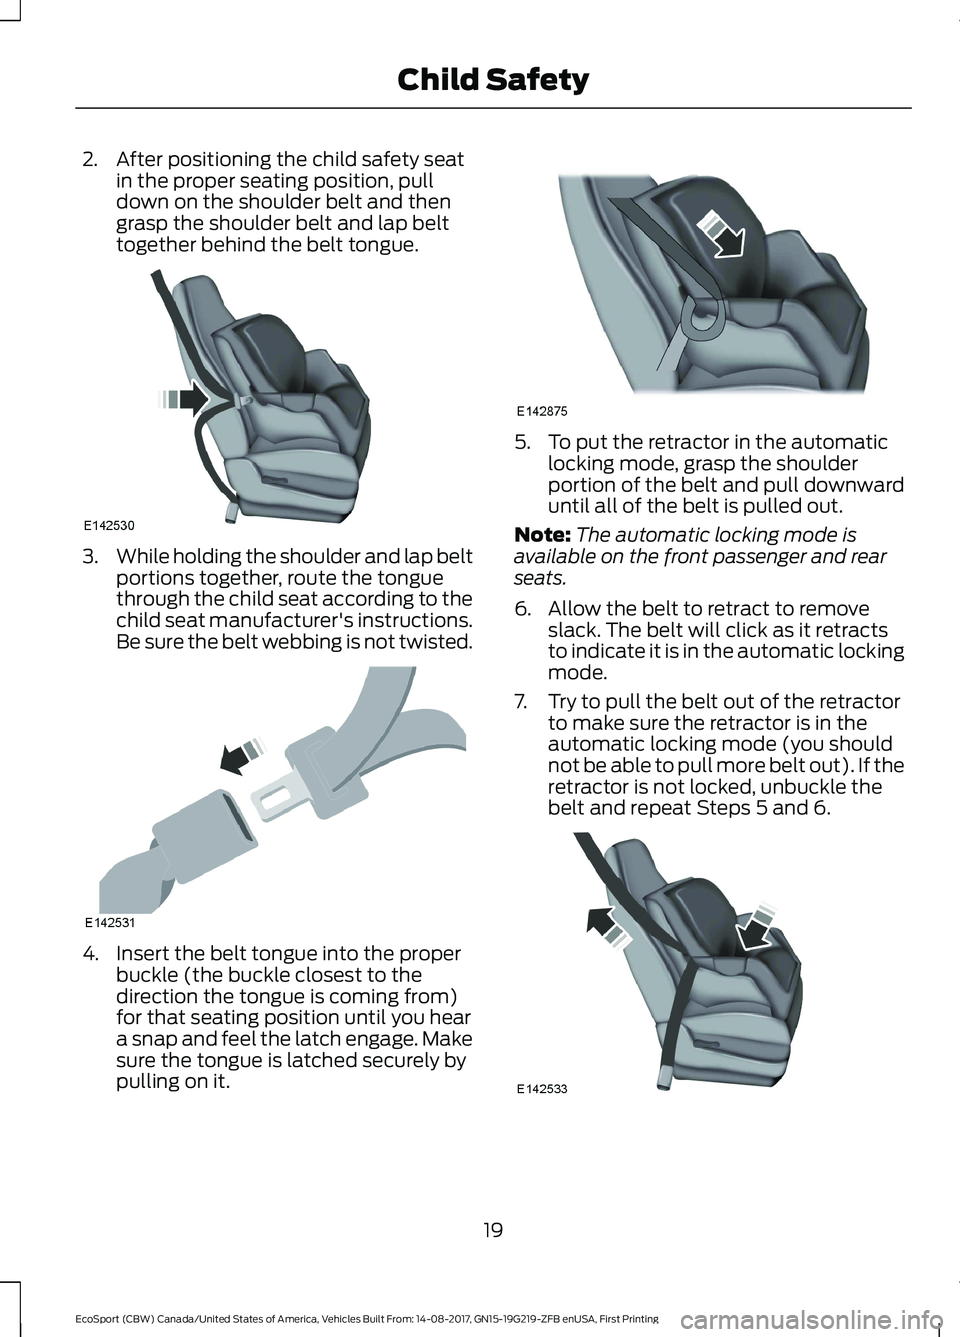
2.After positioning the child safety seatin the proper seating position, pulldown on the shoulder belt and thengrasp the shoulder belt and lap belttogether behind the belt tongue.
3.While holding the shoulder and lap beltportions together, route the tonguethrough the child seat according to thechild seat manufacturer's instructions.Be sure the belt webbing is not twisted.
4.Insert the belt tongue into the properbuckle (the buckle closest to thedirection the tongue is coming from)for that seating position until you heara snap and feel the latch engage. Makesure the tongue is latched securely bypulling on it.
5.To put the retractor in the automaticlocking mode, grasp the shoulderportion of the belt and pull downwarduntil all of the belt is pulled out.
Note:The automatic locking mode isavailable on the front passenger and rearseats.
6.Allow the belt to retract to removeslack. The belt will click as it retractsto indicate it is in the automatic lockingmode.
7.Try to pull the belt out of the retractorto make sure the retractor is in theautomatic locking mode (you shouldnot be able to pull more belt out). If theretractor is not locked, unbuckle thebelt and repeat Steps 5 and 6.
19EcoSport (CBW) Canada/United States of America, Vehicles Built From: 14-08-2017, GN15-19G219-ZFB enUSA, First PrintingChild Safety
Page 24 of 452
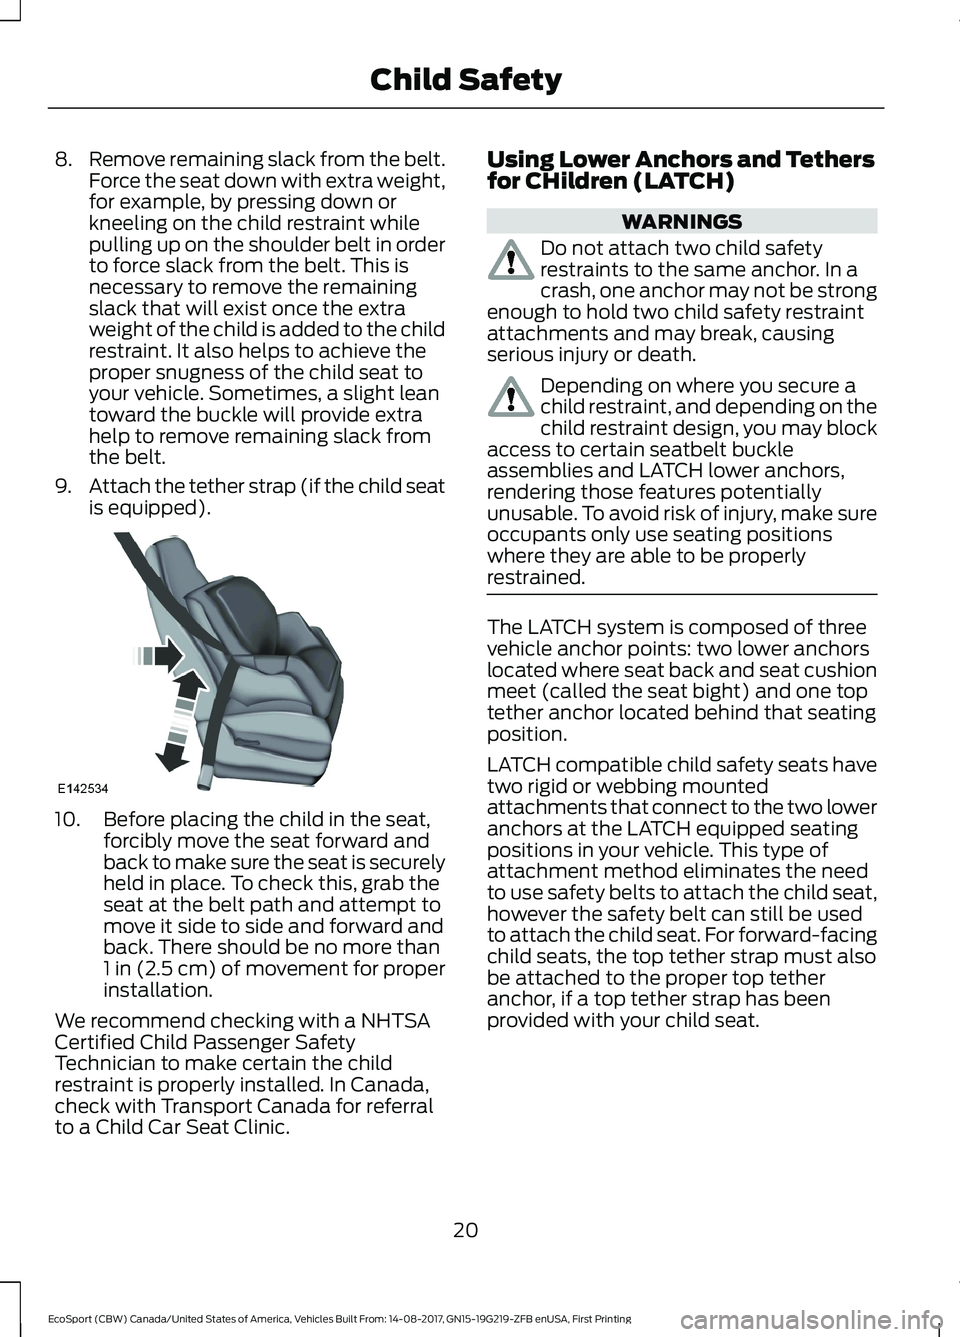
8.Remove remaining slack from the belt.Force the seat down with extra weight,for example, by pressing down orkneeling on the child restraint whilepulling up on the shoulder belt in orderto force slack from the belt. This isnecessary to remove the remainingslack that will exist once the extraweight of the child is added to the childrestraint. It also helps to achieve theproper snugness of the child seat toyour vehicle. Sometimes, a slight leantoward the buckle will provide extrahelp to remove remaining slack fromthe belt.
9.Attach the tether strap (if the child seatis equipped).
10.Before placing the child in the seat,forcibly move the seat forward andback to make sure the seat is securelyheld in place. To check this, grab theseat at the belt path and attempt tomove it side to side and forward andback. There should be no more than1 in (2.5 cm) of movement for properinstallation.
We recommend checking with a NHTSACertified Child Passenger SafetyTechnician to make certain the childrestraint is properly installed. In Canada,check with Transport Canada for referralto a Child Car Seat Clinic.
Using Lower Anchors and Tethersfor CHildren (LATCH)
WARNINGS
Do not attach two child safetyrestraints to the same anchor. In acrash, one anchor may not be strongenough to hold two child safety restraintattachments and may break, causingserious injury or death.
Depending on where you secure achild restraint, and depending on thechild restraint design, you may blockaccess to certain seatbelt buckleassemblies and LATCH lower anchors,rendering those features potentiallyunusable. To avoid risk of injury, make sureoccupants only use seating positionswhere they are able to be properlyrestrained.
The LATCH system is composed of threevehicle anchor points: two lower anchorslocated where seat back and seat cushionmeet (called the seat bight) and one toptether anchor located behind that seatingposition.
LATCH compatible child safety seats havetwo rigid or webbing mountedattachments that connect to the two loweranchors at the LATCH equipped seatingpositions in your vehicle. This type ofattachment method eliminates the needto use safety belts to attach the child seat,however the safety belt can still be usedto attach the child seat. For forward-facingchild seats, the top tether strap must alsobe attached to the proper top tetheranchor, if a top tether strap has beenprovided with your child seat.
20EcoSport (CBW) Canada/United States of America, Vehicles Built From: 14-08-2017, GN15-19G219-ZFB enUSA, First PrintingChild Safety
Page 26 of 452
Combining Safety Belt and LATCHLower Anchors for Attaching ChildSafety Seats
When used in combination, either thesafety belt or the LATCH lower anchorsmay be attached first, provided a properinstallation is achieved. Attach the tetherstrap afterward, if included with the childseat.
Using Tether Straps
Many forward-facing child safetyseats include a tether strapwhich extends from the back ofthe child safety seat and hooks to ananchoring point called the top tetheranchor. Tether straps are available as anaccessory for many older safety seats.
Contact the manufacturer of your childseat for information about ordering atether strap, or to obtain a longer tetherstrap if the tether strap on your safety seatdoes not reach the appropriate top tetheranchor in your vehicle.
Once the child safety seat has beeninstalled using either the safety belt, thelower anchors of the LATCH system, orboth, you can attach the top tether strap.
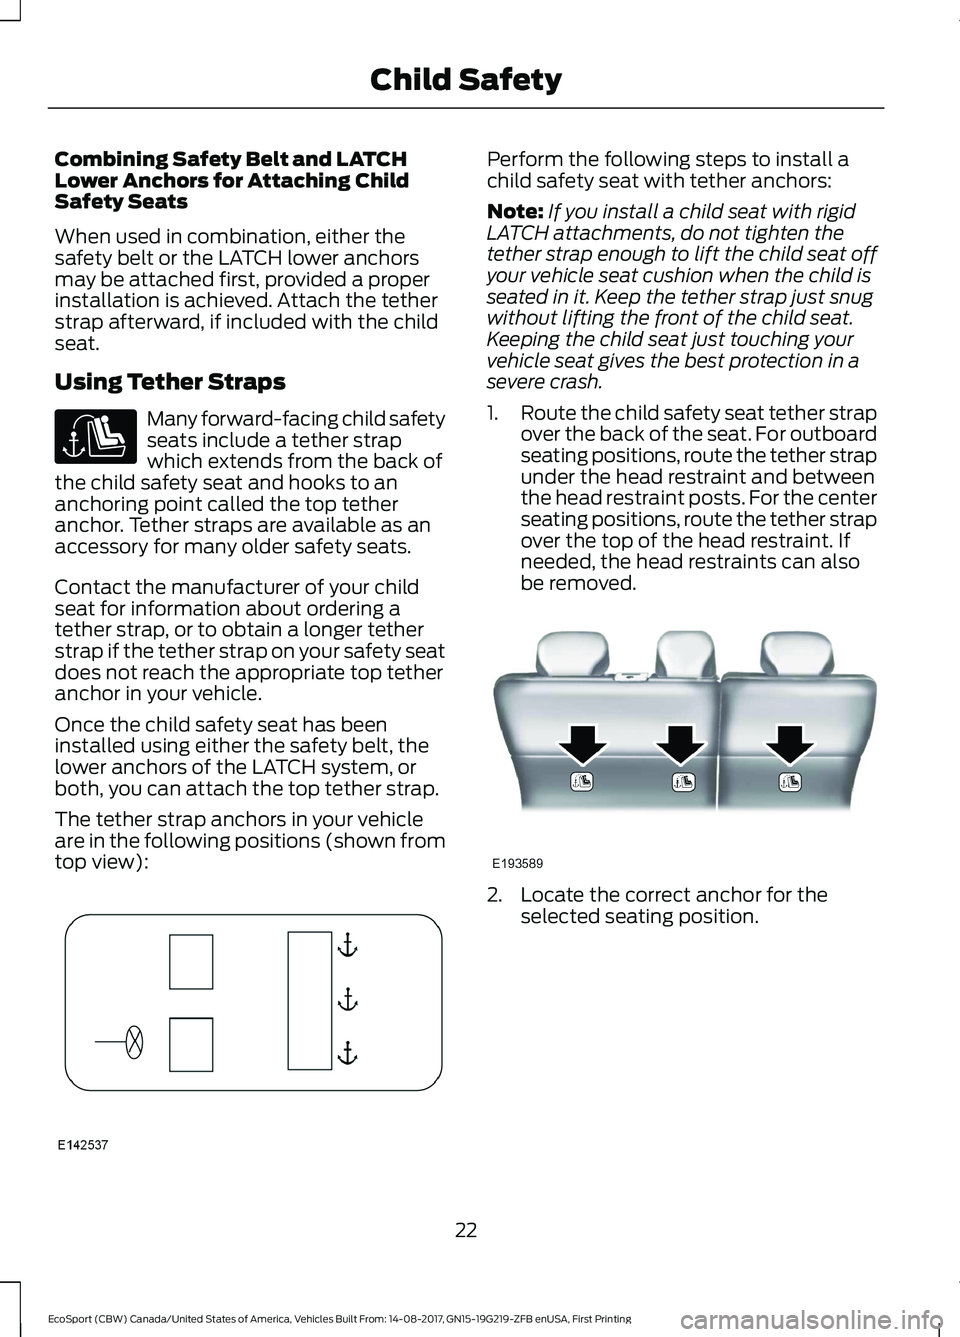
The tether strap anchors in your vehicleare in the following positions (shown fromtop view):
Perform the following steps to install achild safety seat with tether anchors:
Note:If you install a child seat with rigidLATCH attachments, do not tighten thetether strap enough to lift the child seat offyour vehicle seat cushion when the child isseated in it. Keep the tether strap just snugwithout lifting the front of the child seat.Keeping the child seat just touching yourvehicle seat gives the best protection in asevere crash.
1.Route the child safety seat tether strapover the back of the seat. For outboardseating positions, route the tether strapunder the head restraint and betweenthe head restraint posts. For the centerseating positions, route the tether strapover the top of the head restraint. Ifneeded, the head restraints can alsobe removed.
2.Locate the correct anchor for theselected seating position.
22EcoSport (CBW) Canada/United States of America, Vehicles Built From: 14-08-2017, GN15-19G219-ZFB enUSA, First PrintingChild Safety
Page 28 of 452
Types of Booster Seats
•Backless booster seats
If your backless booster seat has aremovable shield, remove the shield. If avehicle seating position has a low seatbackrest or no head restraint, a backlessbooster seat may place your child's head(as measured at the tops of the ears)above the top of the seat. In this case,move the backless booster to anotherseating position with a higher seat backrestor head restraint and lap and shoulderbelts, or consider using a high back boosterseat.
•High back booster seats
If, with a backless booster seat, you cannotfind a seating position that adequatelysupports your child's head, a high backbooster seat would be a better choice.
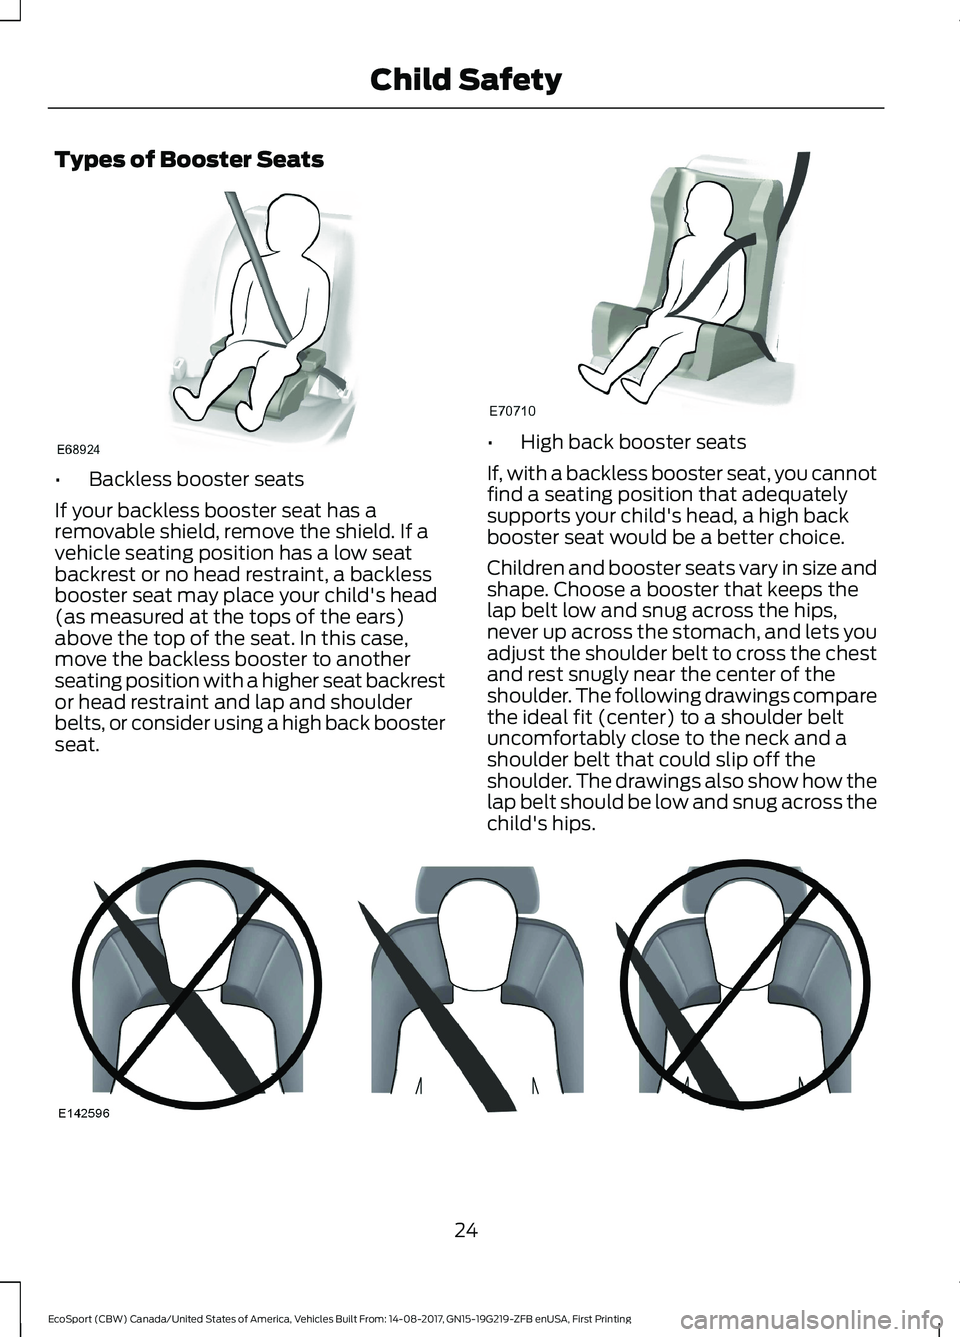
Children and booster seats vary in size andshape. Choose a booster that keeps thelap belt low and snug across the hips,never up across the stomach, and lets youadjust the shoulder belt to cross the chestand rest snugly near the center of theshoulder. The following drawings comparethe ideal fit (center) to a shoulder beltuncomfortably close to the neck and ashoulder belt that could slip off theshoulder. The drawings also show how thelap belt should be low and snug across thechild's hips.
24EcoSport (CBW) Canada/United States of America, Vehicles Built From: 14-08-2017, GN15-19G219-ZFB enUSA, First PrintingChild Safety
Page 30 of 452
WARNINGS
To avoid risk of injury, do not leave
WARNINGS
children or pets unattended in your vehicle.
Recommendations for attaching child safety restraints for children
Use any attachment method as indicated below by X
Combinedweight ofchild andchild seat
RestraintType
Safety beltonlySafety beltand LATCH(loweranchorsand toptetheranchor)
Safety beltand toptetheranchor
LATCH(loweranchorsonly)
LATCH(loweranchorsand toptetheranchor)
XXUp to 65 lb(29.5 kg)Rear facingchild seat
XOver 65 lb(29.5 kg)Rear facingchild seat
XXXUp to 65 lb(29.5 kg)
Forwardfacingchild seat
XXOver 65 lb(29.5 kg)
Forwardfacingchild seat
Note:The child seat must rest tightlyagainst the vehicle seat upon which it isinstalled. It may be necessary to lift orremove the head restraint. See Seats (page104).
CHILD SAFETY LOCKS
WARNING
You cannot open the rear doors frominside if you have put the child safetylocks on.
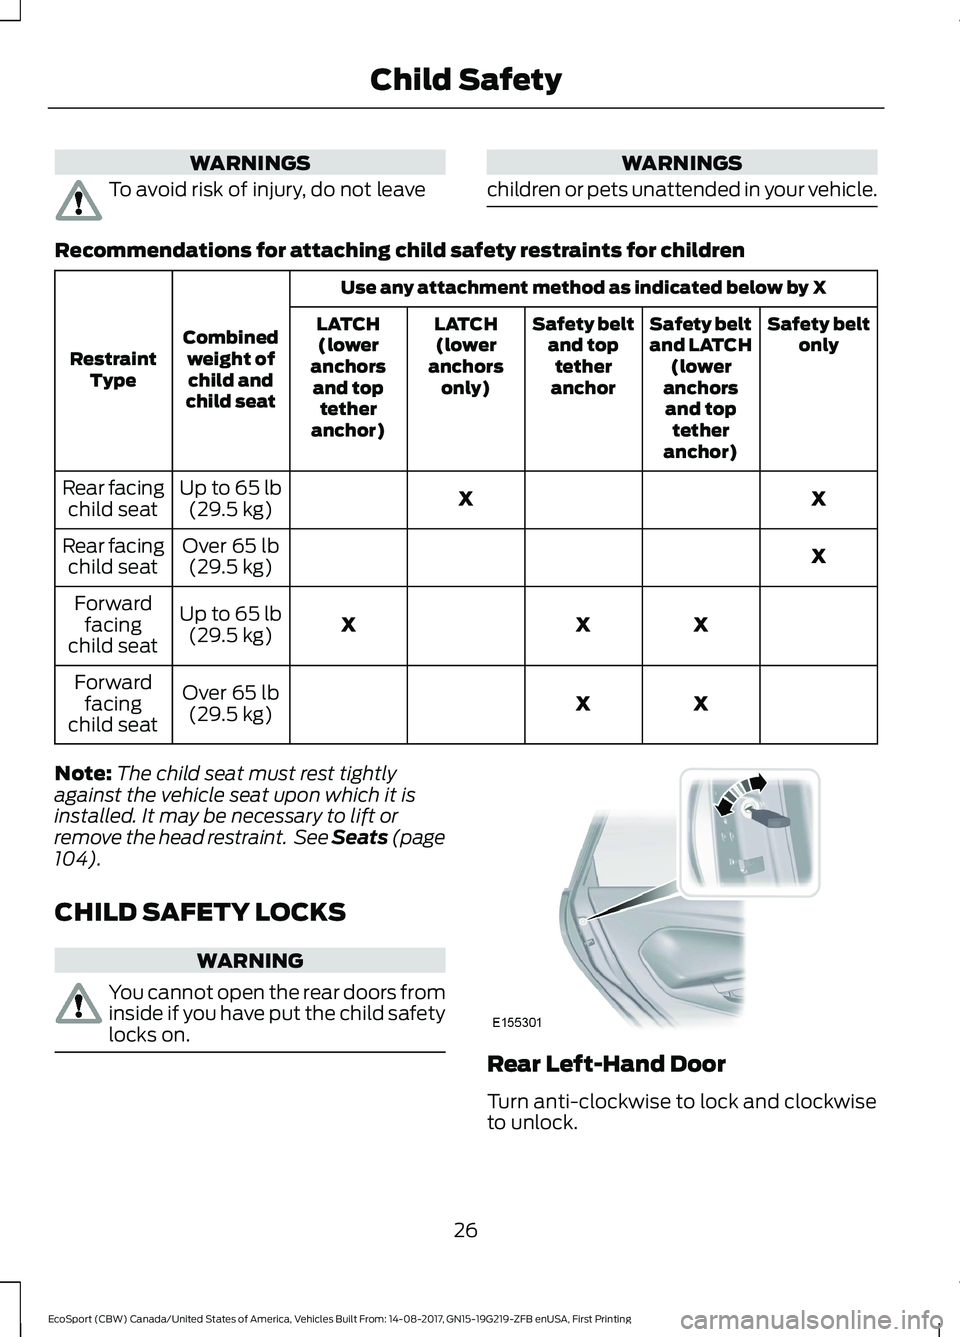
Rear Left-Hand Door
Turn anti-clockwise to lock and clockwiseto unlock.
26EcoSport (CBW) Canada/United States of America, Vehicles Built From: 14-08-2017, GN15-19G219-ZFB enUSA, First PrintingChild Safety
Page 105 of 452
You can adjust the temperature between59.9–85.1°F (15.5–29.5°C) in smallincrements.
When set to low temperatures, the systemswitches to permanent cooling. When setto high temperatures , the system switchesto permanent heating.
HINTS ON CONTROLLING THE
INTERIOR CLIMATE -
VEHICLES WITH: ELECTRONIC
AUTOMATIC TEMPERATURE
CONTROL (EATC)
General Hints
Do not place objects under the front seatsas this may interfere with the airflow to therear seats.
Remove any snow, ice or leaves from theair intake area at the base of thewindshield.
Note:You may feel a small amount of airfrom the footwell air vents regardless of theair distribution setting.
Note:To reduce humidity build-up insideyour vehicle, do not drive with the systemswitched off or with recirculated air alwaysswitched on.
Note:Prolonged use of recirculated air maycause the windows to fog up.
Note: Adjusting the settings when yourvehicle interior is extremely hot or cold isnot necessary. The system automaticallyadjusts to heat or cool the interior to yourselected temperature as quickly as possible.For the system to function efficiently, theinstrument panel and side air vents shouldbe fully open.
Note:When you select automatic modeand the ambient temperature is low and theengine is cold, airflow is directed to thewindshield and side air vents.
Note:When you select automatic modeand the interior and exterior temperaturesare high, the system selects recirculated airto maximize cooling. When the desiredtemperature is reached, recirculated airturns off.
Note:When you switch the system off,outside air is prevented from entering yourvehicle.
Note:When you select maximum defrost,air conditioning turns on and airflow is notdirected to the instrument panel andfootwell air vents.
Quickly Heating the Interior
•Press AUTO.
•Select the highest temperature.
Recommended Settings forHeating
•Press AUTO.
•Select the desired temperature.
Quickly Cooling the Interior
•Press MAX A/C.
Recommended Settings forCooling
•Press AUTO.
•Select the desired temperature.
Defogging the Side Windows inCold Weather
•Select maximum defrost.
101EcoSport (CBW) Canada/United States of America, Vehicles Built From: 14-08-2017, GN15-19G219-ZFB enUSA, First PrintingClimate Control
Page 106 of 452
Maximum Cooling Using theInstrument Panel and Footwell AirVents
•Select the lowest temperature.
•Switch on the air conditioning andrecirculated air.
•Select the highest blower motor speedand then adjust to suit comfort levels.
HINTS ON CONTROLLING THE
INTERIOR CLIMATE -
VEHICLES WITH: ELECTRONIC
MANUAL TEMPERATURE
CONTROL (EMTC)
General Hints
Do not place objects under the front seatsas this may interfere with the airflow to therear seats.
Remove any snow, ice or leaves from theair intake area at the base of thewindshield.
Note:You may feel a small amount of airfrom the footwell air vents regardless of theair distribution setting.
Note:To reduce humidity build-up insideyour vehicle, do not drive with the systemswitched off or with recirculated air alwaysswitched on.
Note:When you switch the system off,outside air is prevented from entering yourvehicle.
Note:To reduce fogging of the windshieldduring humid weather, direct airflow to thewindshield air vents.
Note:Prolonged use of recirculated air maycause the windows to fog up.
Quickly Heating the Interior
•Select the highest blower motor speed.
•Select the highest temperature.
•Direct the airflow to the footwell airvents.
Recommended Settings forHeating
•Select a high blower motor speed.
•Select the desired temperature.
•Direct the airflow to the footwell andwindshield air vents.
Quickly Cooling the Interior
•Select maximum cooling.
Recommended Settings forCooling
•Select the highest blower motor speed.
•Select the desired temperature.
•Direct the airflow to the instrumentpanel air vents.
•Press A/C.
Defogging the Side Windows inCold Weather
•Select maximum defrost.
Maximum Cooling Using theInstrument Panel and Footwell AirVents
•Turn the temperature controlcounterclockwise to the lowest setting.
•Switch on the air conditioning andrecirculated air.
•Select the highest blower motor speedand then adjust to suit comfort levels.
102EcoSport (CBW) Canada/United States of America, Vehicles Built From: 14-08-2017, GN15-19G219-ZFB enUSA, First PrintingClimate Control
Page 109 of 452
Note:Adjust the seatback to an uprightdriving position before adjusting the headrestraint. Adjust the head restraint so thatthe top of it is level with the top of your headand as far forward as possible. Make surethat you remain comfortable. If you areextremely tall, adjust the head restraint toits highest position.
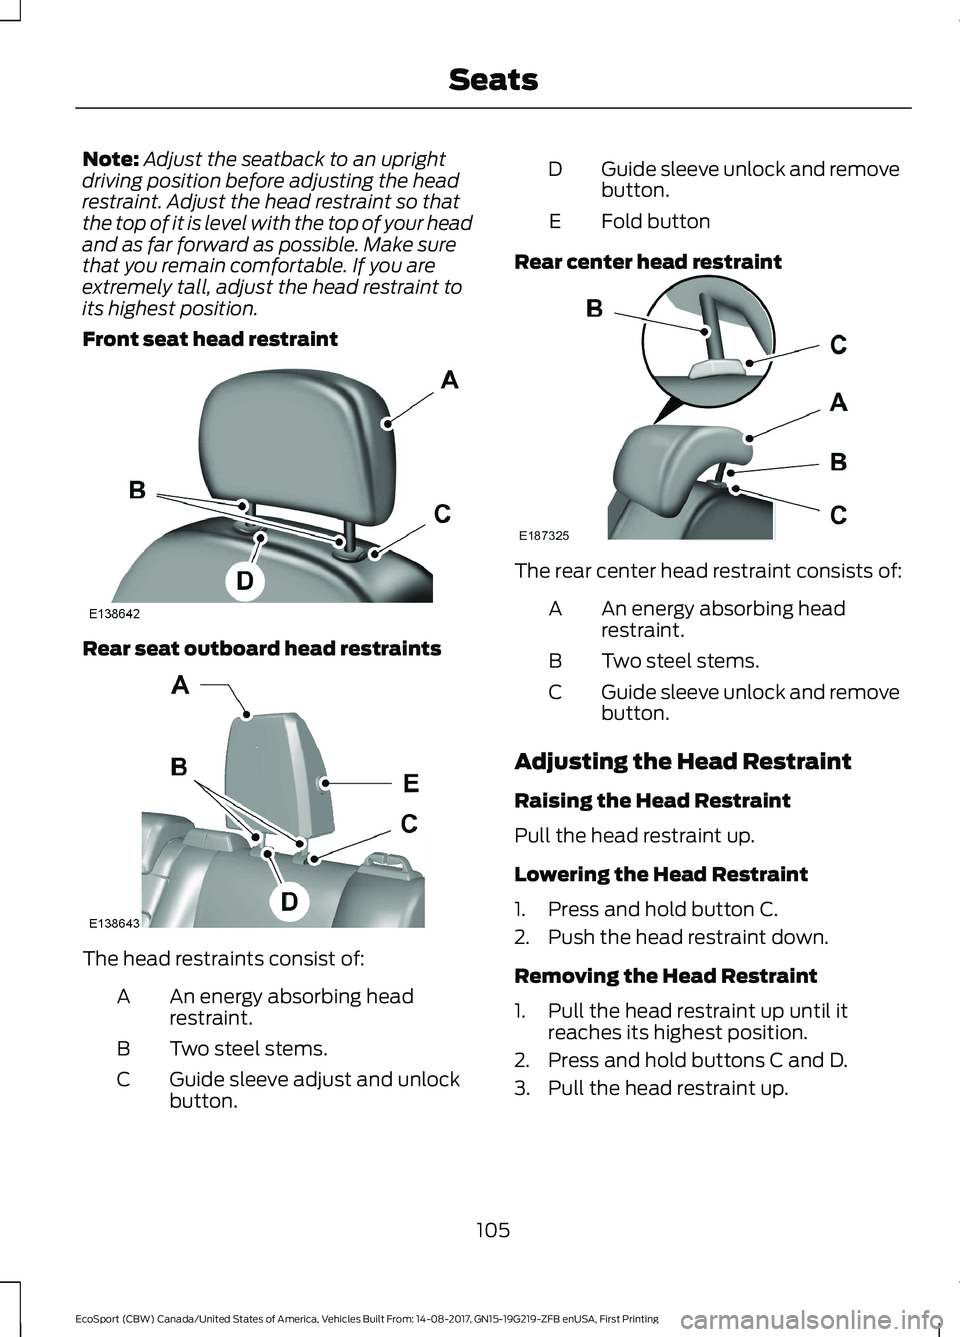
Front seat head restraint
Rear seat outboard head restraints
The head restraints consist of:
An energy absorbing headrestraint.A
Two steel stems.B
Guide sleeve adjust and unlockbutton.C
Guide sleeve unlock and removebutton.D
Fold buttonE
Rear center head restraint
The rear center head restraint consists of:
An energy absorbing headrestraint.A
Two steel stems.B
Guide sleeve unlock and removebutton.C
Adjusting the Head Restraint
Raising the Head Restraint
Pull the head restraint up.
Lowering the Head Restraint
1.Press and hold button C.
2.Push the head restraint down.
Removing the Head Restraint
1.Pull the head restraint up until itreaches its highest position.
2.Press and hold buttons C and D.
3.Pull the head restraint up.
105EcoSport (CBW) Canada/United States of America, Vehicles Built From: 14-08-2017, GN15-19G219-ZFB enUSA, First PrintingSeats
Page 236 of 452
•Spray Motorcraft Engine Shampoo andDegreaser on all parts that requirecleaning and pressure rinse clean. InCanada, use Motorcraft EngineShampoo.
•Never wash or rinse the engine while itis hot or running; water in the runningengine may cause internal damage.
•Never wash or rinse any ignition coil,spark plug wire or spark plug well, orthe area in and around these locations.
•Cover the battery, power distributionbox, and air filter assembly to preventwater damage when cleaning theengine.
CLEANING THE WINDOWS AND
WIPER BLADES
Car wash chemicals and environmentalfallout can result in windshield and wiperblade contamination. Dirty windshield andwipers will result in poor windshield wiperoperation. Keep the windshield and wiperblades clean to maintain windshield wiperperformance.
To clean the windshield and wiper blades:
•Clean the windshield with anon-abrasive glass cleaner. Whencleaning the interior of the windshield,avoid getting any glass cleaner on theinstrument panel or door panels. Wipeany glass cleaner off these surfacesimmediately.
•For windshields contaminated withtree sap, chemicals, wax or bugs, cleanthe entire windshield using steel wool(no greater than 0000 grade) in acircular motion and rinse with water.
•Clean the wiper blades with isopropylrubbing alcohol or windshield washerconcentrate.
Note: Do not use razor blades or othersharp objects to clean or remove decalsfrom the inside of the heated rear window.The vehicle warranty does not coverdamage caused to the heated rear windowgrid lines.
CLEANING THE INTERIOR
WARNINGS
Do not use cleaning solvents, bleachor dye on the vehicle's seatbelts, asthese actions may weaken the beltwebbing.
On vehicles equipped withseat-mounted airbags, do not usechemical solvents or strongdetergents. Such products couldcontaminate the side airbag system andaffect performance of the side airbag in acrash.
For fabric, carpets, cloth seats and seatsequipped with side airbags:
•Remove dust and loose dirt with avacuum cleaner.
•Remove light stains and soil withMotorcraft Professional StrengthCarpet & Upholstery Cleaner.
•If grease or tar is present on thematerial, spot-clean the area first withMotorcraft Spot and Stain Remover. InCanada, use Motorcraft Multi-PurposeCleaner.
•If a ring forms on the fabric after spotcleaning, clean the entire areaimmediately (but do not oversaturate)or the ring will set.
•Do not use household cleaningproducts or glass cleaners, which canstain and discolor the fabric and affectthe flame retardant abilities of the seatmaterials.
232EcoSport (CBW) Canada/United States of America, Vehicles Built From: 14-08-2017, GN15-19G219-ZFB enUSA, First PrintingVehicle Care
Page 237 of 452
CLEANING THE INSTRUMENT
PANEL AND INSTRUMENT
CLUSTER LENS
WARNING
Do not use chemical solvents orstrong detergents when cleaning thesteering wheel or instrument panelto avoid contamination of the airbagsystem.
Note:Follow the same procedure ascleaning leather seats for cleaning leatherinstrument panels and leather interior trimsurfaces. See Cleaning Leather Seats(page 233).
Clean the instrument panel and clusterlens with a clean, damp and soft cloth,then use a clean, dry and soft cloth to drythese areas.
•Avoid cleaners or polishes that increasethe gloss of the upper portion of theinstrument panel. The dull finish in thisarea helps protect you fromundesirable windshield reflection.
•Do not use any household cleaningproducts or glass cleaners as thesemay damage the finish of theinstrument panel, interior trim andcluster lens.
•Wash or wipe your hands clean if youhave been in contact with certainproducts such as insect repellent andsuntan lotion to avoid possible damageto the interior painted surfaces.
•Do not allow air fresheners and handsanitizers to spill onto interior surfaces.If a spill occurs, wipe off immediately.Your warranty may not cover thesedamages.
If a staining liquid like coffee or juice hasbeen spilled on the instrument panel or oninterior trim surfaces:
1.Wipe up spilled liquid using a clean,soft cloth as quickly as possible.
2.Use Motorcraft Premium Leather andVinyl Cleaner or a commerciallyavailable leather cleaning product forautomotive interiors. Test any cleaneror stain remover on an inconspicuousarea.
3.Alternatively, wipe the surface with aclean, soft cloth and a mild soap andwater solution. Dry the area with aclean, soft cloth.
4.If necessary, apply more soap andwater solution or cleaning product toa clean, soft cloth and press it onto thesoiled area. Allow this to set at roomtemperature for 30 minutes.
5.Remove the soaked cloth, then with aclean, damp cloth, use a rubbingmotion for 60 seconds on the soiledarea.
6.Dry the area with a clean, soft cloth.
CLEANING LEATHER SEATS (If
Equipped)
Note:Follow the same procedure ascleaning leather seats for cleaning leatherinstrument panels and leather interior trimsurfaces.
For routine cleaning, wipe the surface witha soft, damp cloth and a mild soap andwater solution. Dry the area with a clean,soft cloth.
For cleaning and removing stains such asdye transfer, use Motorcraft PremiumLeather and Vinyl Cleaner or acommercially available leather cleaningproduct for automotive interiors.
Note:Test any cleaner or stain remover onan inconspicuous area.
233EcoSport (CBW) Canada/United States of America, Vehicles Built From: 14-08-2017, GN15-19G219-ZFB enUSA, First PrintingVehicle Care