check transmission fluid FORD EDGE 2018 Owners Manual
[x] Cancel search | Manufacturer: FORD, Model Year: 2018, Model line: EDGE, Model: FORD EDGE 2018Pages: 557, PDF Size: 7.02 MB
Page 7 of 557
Towing
Towing a Trailer
...........................................238
Trailer Sway Control ..................................
239
Recommended Towing Weights ..........
239
Essential Towing Checks ..........................
241
Towing the Vehicle on Four Wheels - 6-Speed Automatic Transmission -
6F50/6F55 ...............................................
243
Towing the Vehicle on Four Wheels - 6-Speed Automatic Transmission -
6F35 ............................................................
244
Driving Hints
Breaking-In ....................................................
246
Economical Driving ....................................
246
Cold Weather Precautions ......................
246
Driving Through Water ..............................
246
Floor Mats ......................................................
247
Roadside Emergencies
Roadside Assistance .................................
248
Hazard Flashers ..........................................
249
Fuel Shutoff ..................................................
249
Jump Starting the Vehicle .......................
250
Post-Crash Alert System ..........................
251
Transporting the Vehicle ..........................
252
Customer Assistance
Getting the Services You Need ..............
253
In California (U.S. Only) ...........................
254
The Better Business Bureau (BBB) Auto Line Program (U.S. Only) .....................
255
Utilizing the Mediation/Arbitration Program (Canada Only) ......................
256
Getting Assistance Outside the U.S. and Canada .......................................................
256
Ordering Additional Owner's Literature ........................................................................\
258
Reporting Safety Defects (U.S. Only) ........................................................................\
258
Reporting Safety Defects (Canada Only) ........................................................................\
258 Fuses
Fuse Specification Chart
.........................
260
Changing a Fuse ..........................................
270
Maintenance
General Information ...................................
272
Opening and Closing the Hood ..............
272
Under Hood Overview - 2.0L EcoBoost™ ........................................................................\
.
273
Under Hood Overview - 2.7L EcoBoost™ ........................................................................\
274
Under Hood Overview - 3.5L ..................
275
Engine Oil Dipstick - 2.0L EcoBoost™ ........................................................................\
.
277
Engine Oil Dipstick - 2.7L EcoBoost™ ........................................................................\
.
277
Engine Oil Dipstick - 3.5L ..........................
277
Engine Oil Check ..........................................
277
Oil Change Indicator Reset ......................
279
Engine Coolant Check ...............................
279
Automatic Transmission Fluid Check - 2.0L EcoBoost™ .....................................
283
Automatic Transmission Fluid Check - 2.7L EcoBoost™/3.5L ...........................
284
Brake Fluid Check .......................................
286
Power Steering Fluid Check ...................
286
Washer Fluid Check ...................................
286
Fuel Filter .......................................................
287
Changing the 12V Battery ........................
287
Checking the Wiper Blades ....................
288
Changing the Wiper Blades ....................
289
Adjusting the Headlamps .......................
289
Removing a Headlamp ..............................
291
Changing a Bulb ...........................................
291
Bulb Specification Chart ..........................
293
Changing the Engine Air Filter ...............
295
Vehicle Care
General Information ..................................
296
Cleaning Products ......................................
296
4
Edge (CDQ) Canada/United States of America, enUSA, Edition date: 201706, Third-Printing- Table of Contents
Page 189 of 557
GENERAL INFORMATION
Note:
Occasional brake noise is normal. If
a metal-to-metal, continuous grinding or
continuous squeal sound is present, the
brake linings may be worn-out. Have the
system checked by an authorized dealer. If
your vehicle has continuous vibration or
shudder in the steering wheel while braking,
have it checked by an authorized dealer.
Note: Brake dust may accumulate on the
wheels, even under normal driving
conditions. Some dust is inevitable as the
brakes wear and does not contribute to
brake noise. See Cleaning the Wheels
(page 301).
Note: Depending on applicable laws and
regulations in the country for which your
vehicle was originally built, your brake lamps
may flash during heavy braking. Following
this, your hazard lights may also flash when
your vehicle comes to a stop. See
Warning Lamps and
Indicators (page 99).
Wet brakes result in reduced braking
efficiency. Gently press the brake pedal a
few times when driving from a car wash or
standing water to dry the brakes.
Brake Over Accelerator
In the event the accelerator pedal
becomes stuck or entrapped, apply steady
and firm pressure to the brake pedal to
slow the vehicle and reduce engine power.
If you experience this condition, apply the
brakes and bring your vehicle to a safe
stop. Move the transmission to park (P),
switch the engine off and apply the parking
brake. Inspect the accelerator pedal for
any interference. If none are found and the
condition persists, have your vehicle towed
to the nearest authorized dealer. Brake Assist
Brake assist detects when you rapidly
brake by measuring the rate at which you
press the brake pedal. It provides
maximum braking efficiency as long as you
press the pedal. It can also reduce
stopping distances in critical situations.
Anti-lock Brake System
This system helps you maintain steering
control during emergency stops by keeping
the brakes from locking.
If it illuminates when you are
driving, this indicates a
malfunction. Your vehicle
continues to have normal braking without
the anti-lock brake system function. Have
your vehicle checked as soon as possible.
It also momentarily illuminates when you
switch the ignition on to confirm the lamp
is functional. If it does not illuminate when
you switch the ignition on, or begins to
flash at any time, have the system checked
by an authorized dealer. It illuminates when you engage
the parking brake and the
ignition is on.
If it illuminates when your vehicle
is moving, make sure the parking
brake is disengaged. If the
parking brake is disengaged, this indicates
low brake fluid level or a brake system
fault. Have your vehicle checked as soon
as possible.
It also momentarily illuminates when you
switch the ignition on to confirm the lamp
is functional. If it does not illuminate when
you switch the ignition on, or begins to
flash at any time, have the system checked
by an authorized dealer.
186
Edge (CDQ) Canada/United States of America, enUSA, Edition date: 201706, Third-Printing- BrakesE270480 E270480
Page 275 of 557
GENERAL INFORMATION
Have your vehicle serviced regularly to help
maintain its roadworthiness and resale
value. There is a large network of
authorized dealers that are there to help
you with their professional servicing
expertise. We believe that their specially
trained technicians are best qualified to
service your vehicle properly and expertly.
They are supported by a wide range of
highly specialized tools developed
specifically for servicing your vehicle.
If your vehicle requires professional service,
an authorized dealer can provide the
necessary parts and service. Check your
warranty information to find out which
parts and services are covered.
Use only recommended fuels, lubricants,
fluids and service parts conforming to
specifications. Motorcraft® parts are
designed and built to provide the best
performance in your vehicle.
Precautions
•
Do not work on a hot engine.
• Make sure that nothing gets caught in
moving parts.
• Do not work on a vehicle with the
engine running in an enclosed space,
unless you are sure you have enough
ventilation.
• Keep all open flames and other burning
material (such as cigarettes) away
from the battery and all fuel related
parts.
Working with the Engine Off
1. Set the parking brake and shift the transmission to park (P).
2. Switch off the engine.
3. Block the wheels. Working with the Engine On WARNING: To reduce the risk of
vehicle damage and personal burn injuries,
do not start your engine with the air cleaner
removed and do not remove it while the
engine is running.
1. Set the parking brake and shift the transmission to park (P).
2. Block the wheels.
OPENING AND CLOSING THE
HOOD
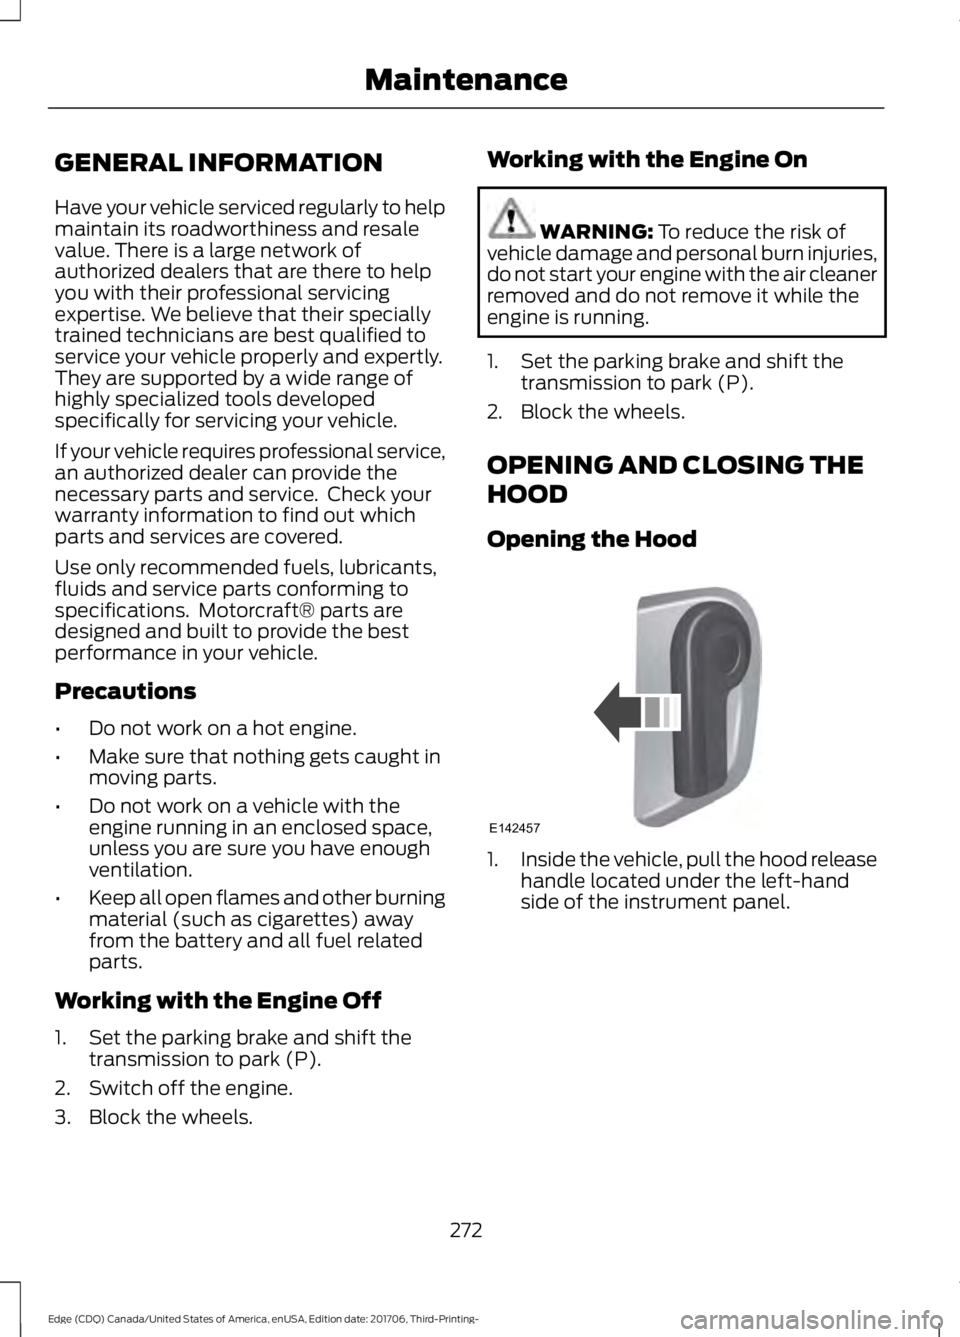
Opening the Hood 1.
Inside the vehicle, pull the hood release
handle located under the left-hand
side of the instrument panel.
272
Edge (CDQ) Canada/United States of America, enUSA, Edition date: 201706, Third-Printing- MaintenanceE142457
Page 278 of 557
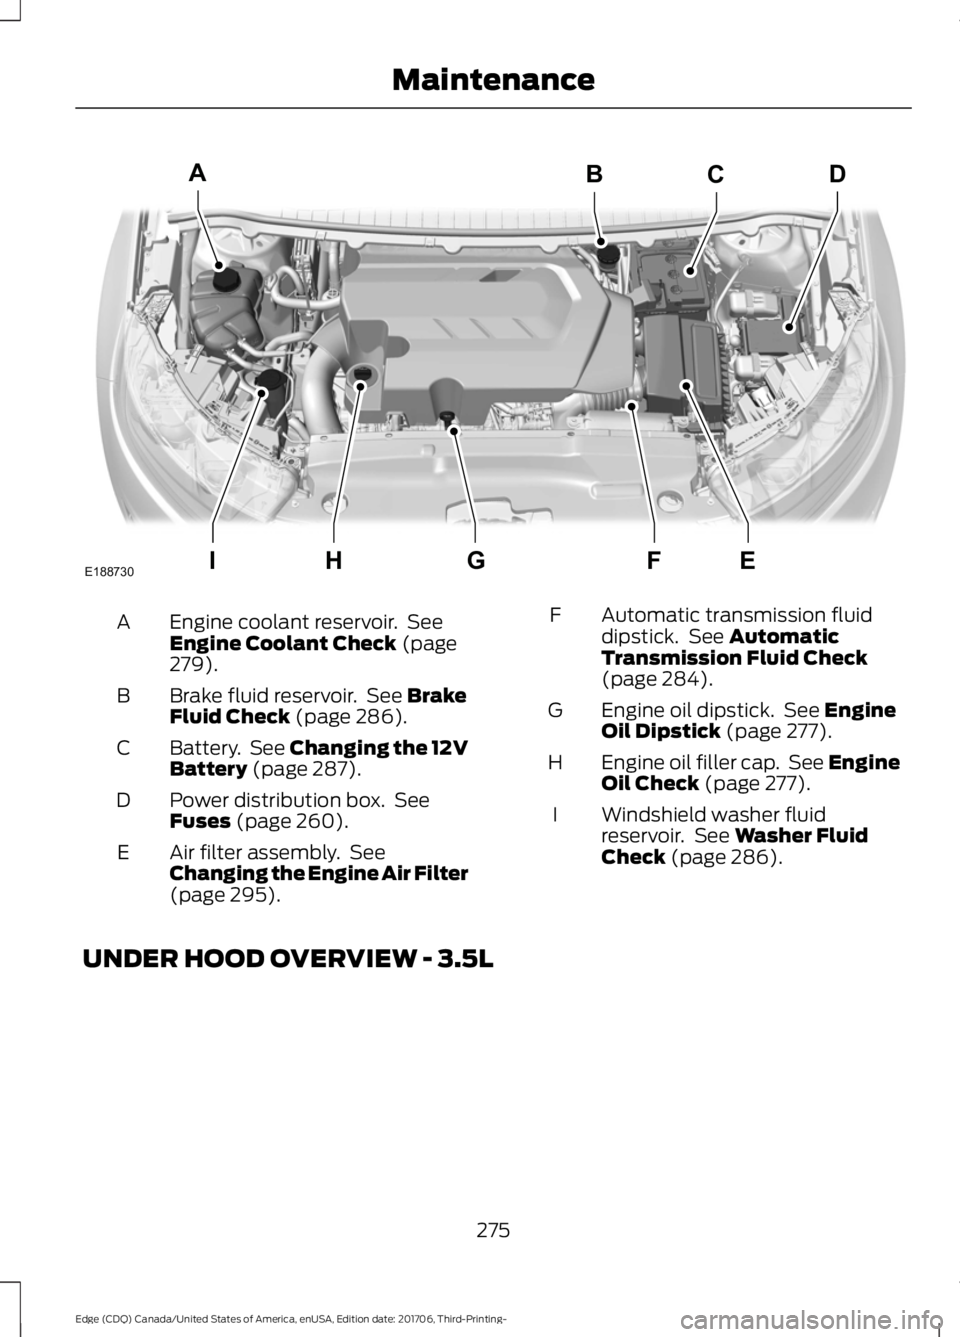
Engine coolant reservoir. See
Engine Coolant Check (page
279).
A
Brake fluid reservoir. See
Brake
Fluid Check (page 286).
B
Battery. See
Changing the 12V
Battery (page 287).
C
Power distribution box. See
Fuses
(page 260).
D
Air filter assembly. See
Changing the Engine Air Filter
(page
295).
E Automatic transmission fluid
dipstick. See
Automatic
Transmission Fluid Check
(page
284).
F
Engine oil dipstick. See
Engine
Oil Dipstick (page 277).
G
Engine oil filler cap. See Engine
Oil Check
(page 277).
H
Windshield washer fluid
reservoir. See
Washer Fluid
Check (page 286).
I
UNDER HOOD OVERVIEW - 3.5L
275
Edge (CDQ) Canada/United States of America, enUSA, Edition date: 201706, Third-Printing- MaintenanceA
IEFGH
BCD
E188730
Page 279 of 557
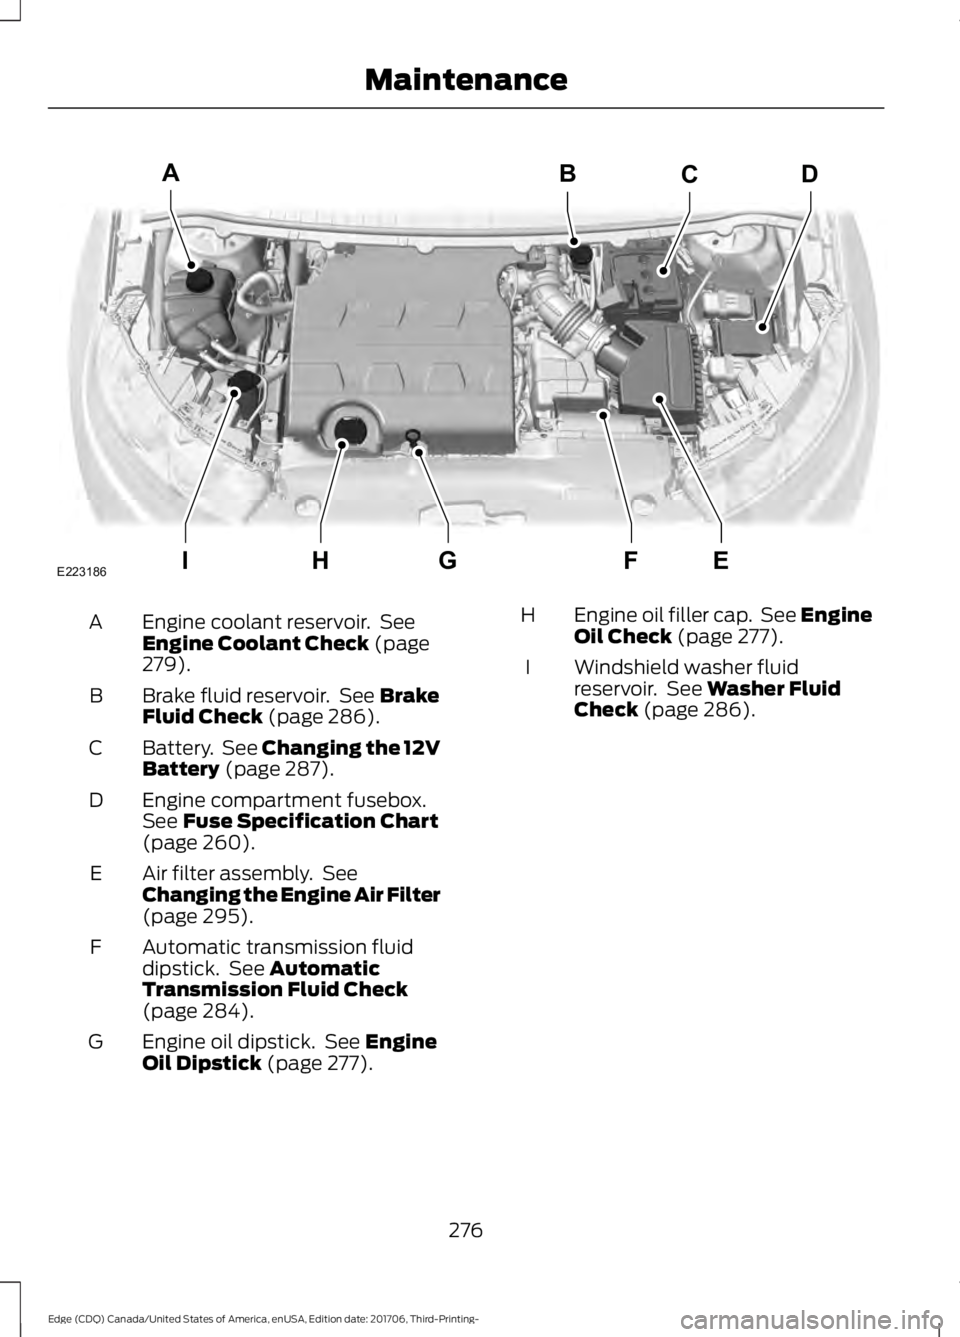
Engine coolant reservoir. See
Engine Coolant Check (page
279).
A
Brake fluid reservoir. See
Brake
Fluid Check (page 286).
B
Battery. See
Changing the 12V
Battery (page 287).
C
Engine compartment fusebox.
See
Fuse Specification Chart
(page 260).
D
Air filter assembly. See
Changing the Engine Air Filter
(page
295).
E
Automatic transmission fluid
dipstick. See
Automatic
Transmission Fluid Check
(page
284).
F
Engine oil dipstick. See
Engine
Oil Dipstick (page 277).
G Engine oil filler cap. See Engine
Oil Check
(page 277).
H
Windshield washer fluid
reservoir. See
Washer Fluid
Check (page 286).
I
276
Edge (CDQ) Canada/United States of America, enUSA, Edition date: 201706, Third-Printing- MaintenanceIEFGH
ABCD
E223186
Page 286 of 557

4. Check the coolant level. If the coolant
level is at or below the minimum mark,
add prediluted coolant immediately.
5. When the engine temperature cools, you can re-start the engine. Have your
vehicle checked as soon as possible to
minimize engine damage.
Note: Driving your vehicle without repair
increases the chance of engine damage.
Engine Coolant Temperature
Management (If Equipped) WARNING:
To reduce the risk of
crash and injury, be prepared that the
vehicle speed may reduce and the vehicle
may not be able to accelerate with full
power until the coolant temperature
reduces.
If you tow a trailer with your vehicle, the
engine may temporarily reach a higher
temperature during severe operating
conditions, for example ascending a long
or steep grade in high ambient
temperatures.
At this time, you may notice the coolant
temperature gauge moves toward the red
zone and a message may appear in the
information display.
You may notice a reduction in vehicle
speed caused by reduced engine power in
order to manage the engine coolant
temperature. Your vehicle may enter this
mode if certain high-temperature and
high-load conditions take place. The
amount of speed reduction depends on
vehicle loading, grade and ambient
temperature. If this occurs, there is no
need to stop your vehicle. You can
continue to drive. The air conditioning may automatically
turn on and off during severe operating
conditions to protect the engine from
overheating. When the coolant
temperature decreases to the normal
operating temperature, the air conditioning
turns on.
If the coolant temperature gauge moves
fully into the red zone, or if the coolant
temperature warning or service engine
soon messages appear in your information
display, do the following:
1. Stop your vehicle as soon as it is safe
to do so. Fully apply the parking brake,
shift into park (P) or neutral (N).
2. Leave the engine running until the coolant temperature gauge needle
returns to the normal position. If the
temperature does not drop after
several minutes, follow the remaining
steps.
3. Switch the engine off and wait for it to
cool. Check the coolant level.
4. If the coolant level is at or below the minimum mark, add prediluted coolant
immediately.
5. If the coolant level is normal, restart the engine and continue.
AUTOMATIC TRANSMISSION
FLUID CHECK - 2.0L
ECOBOOST™
Note: Transmission fluid should be checked
by an authorized dealer. If required, fluid
should be added by an authorized dealer.
283
Edge (CDQ) Canada/United States of America, enUSA, Edition date: 201706, Third-Printing- Maintenance
Page 287 of 557
Have an authorized dealer check and
change the transmission fluid at the
correct service interval. See Maintenance
(page 272). Your transmission does not
consume fluid. However, the fluid level
should be checked if the transmission is
not working properly, (i.e., if the
transmission slips or shifts slowly) or if you
notice some sign of fluid leakage.
Do not use supplemental transmission
fluid additives, treatments or cleaning
agents. The use of these materials may
affect transmission operation and result
in damage to internal transmission
components.
AUTOMATIC TRANSMISSION
FLUID CHECK - 2.7L
ECOBOOST™/3.5L
Do not use supplemental transmission
fluid additives because they are
unnecessary and could lead to
transmission damage that may not be
covered by the vehicle Warranty.
The transmission does not consume fluid.
However, if the transmission slips or shifts
slowly you should check the fluid level. If
you notice a sign of leaking fluid, contact
an authorized dealer.
Checking the Transmission Fluid
Level *
Only check the transmission fluid level
when the engine is at normal operating
temprature 179– 199°F (82–93°C)
. Normal
operating temprature is reached after
driving approximately
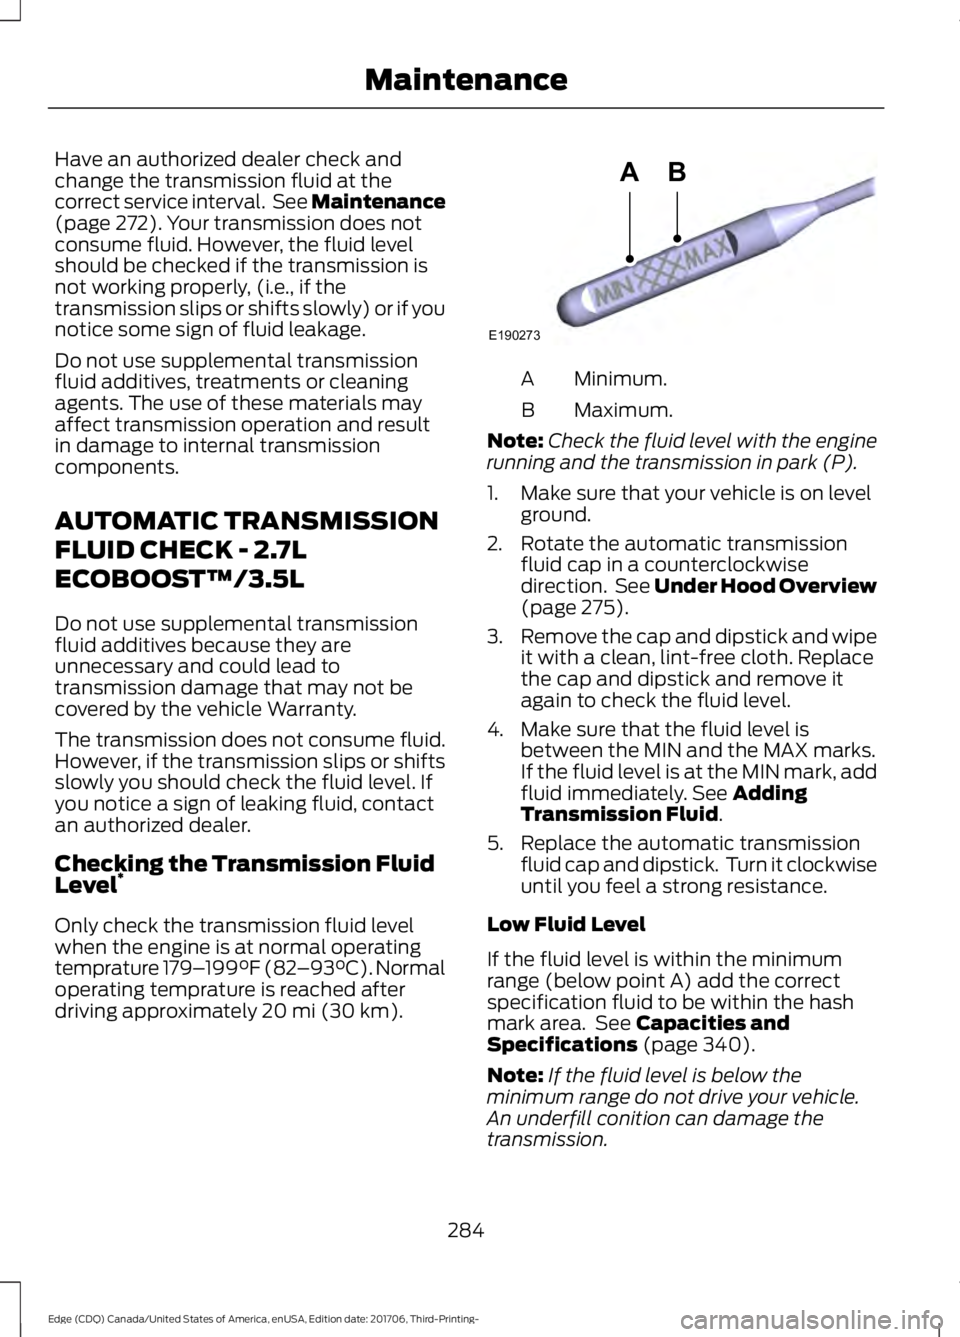
20 mi (30 km). Minimum.
A
Maximum.
B
Note: Check the fluid level with the engine
running and the transmission in park (P).
1. Make sure that your vehicle is on level ground.
2. Rotate the automatic transmission fluid cap in a counterclockwise
direction. See
Under Hood Overview
(page 275).
3. Remove the cap and dipstick and wipe
it with a clean, lint-free cloth. Replace
the cap and dipstick and remove it
again to check the fluid level.
4. Make sure that the fluid level is between the MIN and the MAX marks.
If the fluid level is at the MIN mark, add
fluid immediately. See
Adding
Transmission Fluid.
5. Replace the automatic transmission fluid cap and dipstick. Turn it clockwise
until you feel a strong resistance.
Low Fluid Level
If the fluid level is within the minimum
range (below point A) add the correct
specification fluid to be within the hash
mark area. See
Capacities and
Specifications (page 340).
Note: If the fluid level is below the
minimum range do not drive your vehicle.
An underfill conition can damage the
transmission.
284
Edge (CDQ) Canada/United States of America, enUSA, Edition date: 201706, Third-Printing- MaintenanceE190273
AB
Page 288 of 557
Correct Fluid Level
If the fluid level is within the hash mark
area (between points A and B) do not add
any fluid.
High Fluid Level
If the fluid level is above the maximum
range (above point B) fluid may need to
be removed. High fluid levels may be
caused by a overheating condition. If you
have operated your vehicle at high speeds,
towing a trailer or in city traffic during hot
weather, allow your vehicle to cool for a
minimum of 30 minutes before rechecking
the level.
Note:
An overfill condition can damage the
transmission.
Adding Transmission Fluid*
1. Rotate the automatic transmission fluid cap in a counterclockwise
direction. *
2. Remove the cap and dipstick and wipe
it with a clean, lint-free cloth.
3. Add fluid that meets the Ford specifications. See Capacities and
Specifications (page 351). Pour the
fluid directly into the automatic
transmission fluid cap and dipstick
hole.
4. Replace the cap and dipstick and remove it again to check the fluid level.
5. Make sure that the fluid level is between the MIN and the MAX marks.
6. Replace the automatic transmission fluid cap and dipstick. Turn it clockwise
until you feel a strong resistance. *
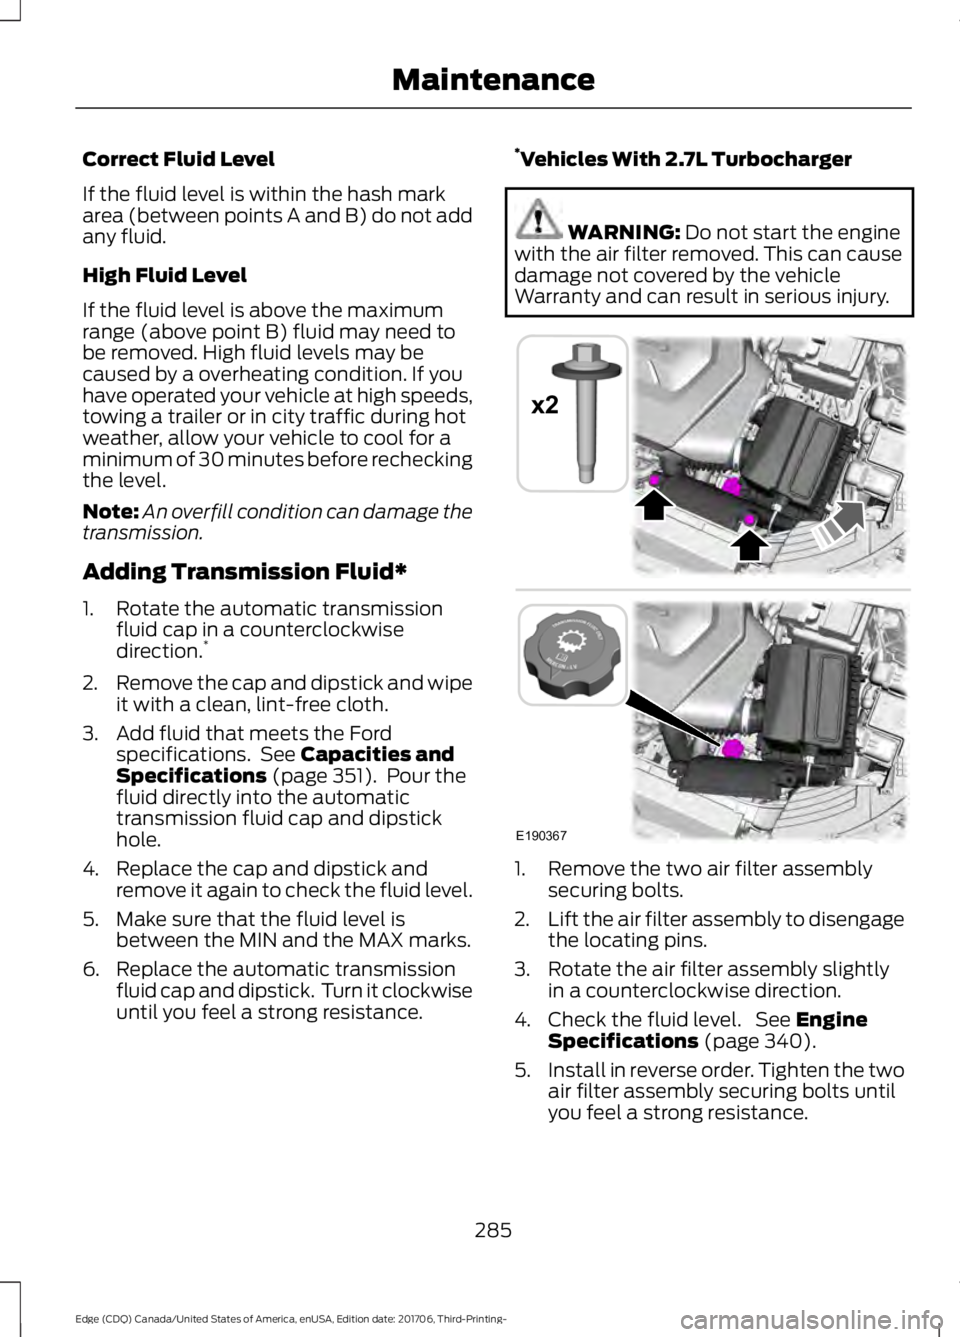
Vehicles With 2.7L Turbocharger WARNING:
Do not start the engine
with the air filter removed. This can cause
damage not covered by the vehicle
Warranty and can result in serious injury. 1. Remove the two air filter assembly
securing bolts.
2. Lift the air filter assembly to disengage
the locating pins.
3. Rotate the air filter assembly slightly in a counterclockwise direction.
4. Check the fluid level. See
Engine
Specifications (page 340).
5. Install in reverse order. Tighten the two
air filter assembly securing bolts until
you feel a strong resistance.
285
Edge (CDQ) Canada/United States of America, enUSA, Edition date: 201706, Third-Printing- MaintenanceE190367
x2
Page 502 of 557
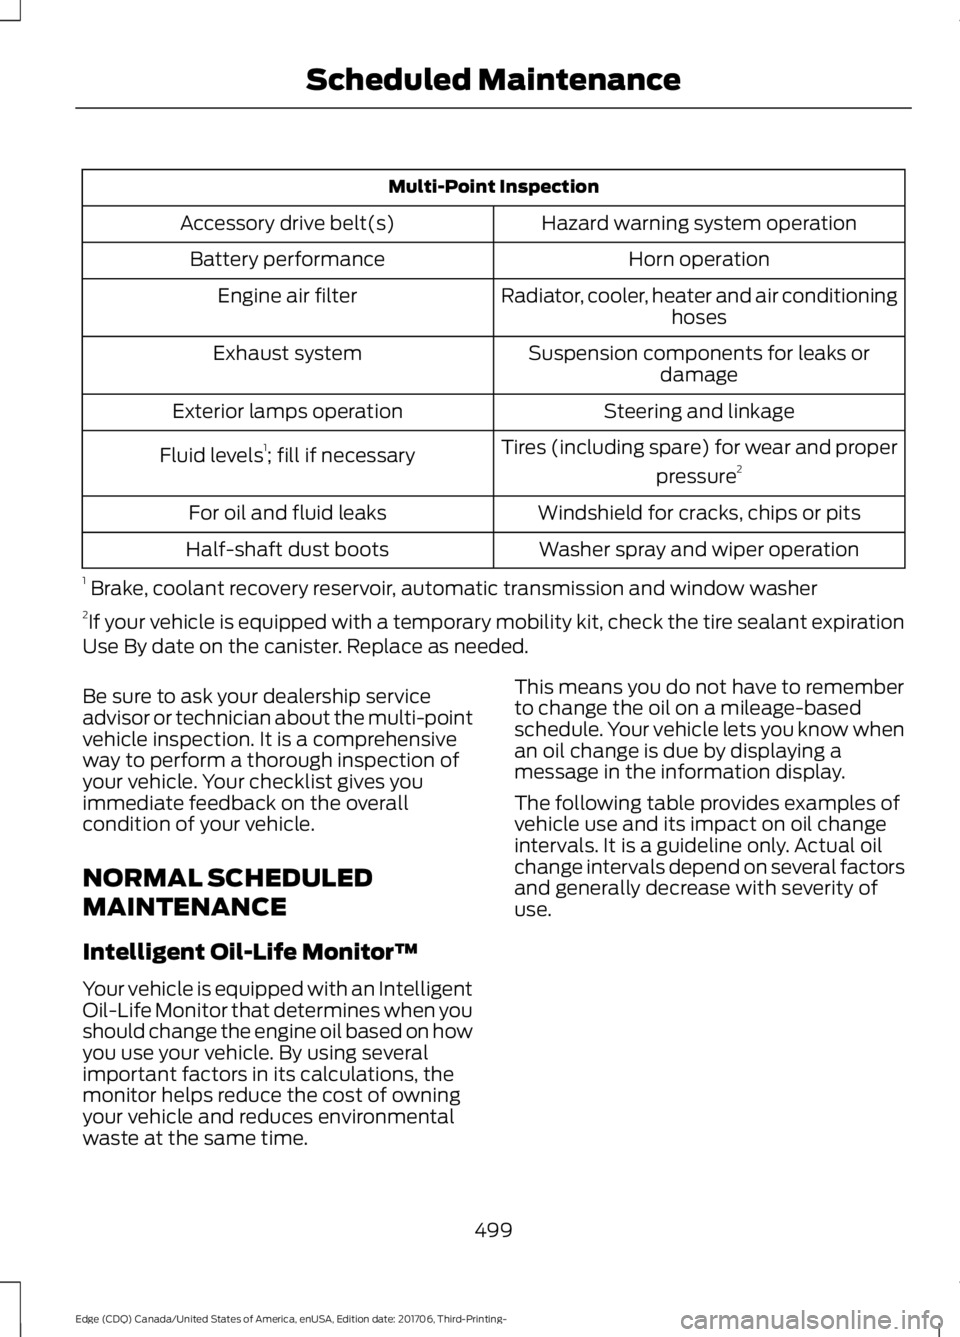
Multi-Point Inspection
Hazard warning system operation
Accessory drive belt(s)
Horn operation
Battery performance
Radiator, cooler, heater and air conditioninghoses
Engine air filter
Suspension components for leaks ordamage
Exhaust system
Steering and linkage
Exterior lamps operation
Tires (including spare) for wear and properpressure2
Fluid levels 1
; fill if necessary
Windshield for cracks, chips or pits
For oil and fluid leaks
Washer spray and wiper operation
Half-shaft dust boots
1 Brake, coolant recovery reservoir, automatic transmission and window washer
2 If your vehicle is equipped with a temporary mobility kit, check the tire sealant expiration
Use By date on the canister. Replace as needed.
Be sure to ask your dealership service
advisor or technician about the multi-point
vehicle inspection. It is a comprehensive
way to perform a thorough inspection of
your vehicle. Your checklist gives you
immediate feedback on the overall
condition of your vehicle.
NORMAL SCHEDULED
MAINTENANCE
Intelligent Oil-Life Monitor™
Your vehicle is equipped with an Intelligent
Oil-Life Monitor that determines when you
should change the engine oil based on how
you use your vehicle. By using several
important factors in its calculations, the
monitor helps reduce the cost of owning
your vehicle and reduces environmental
waste at the same time. This means you do not have to remember
to change the oil on a mileage-based
schedule. Your vehicle lets you know when
an oil change is due by displaying a
message in the information display.
The following table provides examples of
vehicle use and its impact on oil change
intervals. It is a guideline only. Actual oil
change intervals depend on several factors
and generally decrease with severity of
use.
499
Edge (CDQ) Canada/United States of America, enUSA, Edition date: 201706, Third-Printing- Scheduled Maintenance
Page 506 of 557
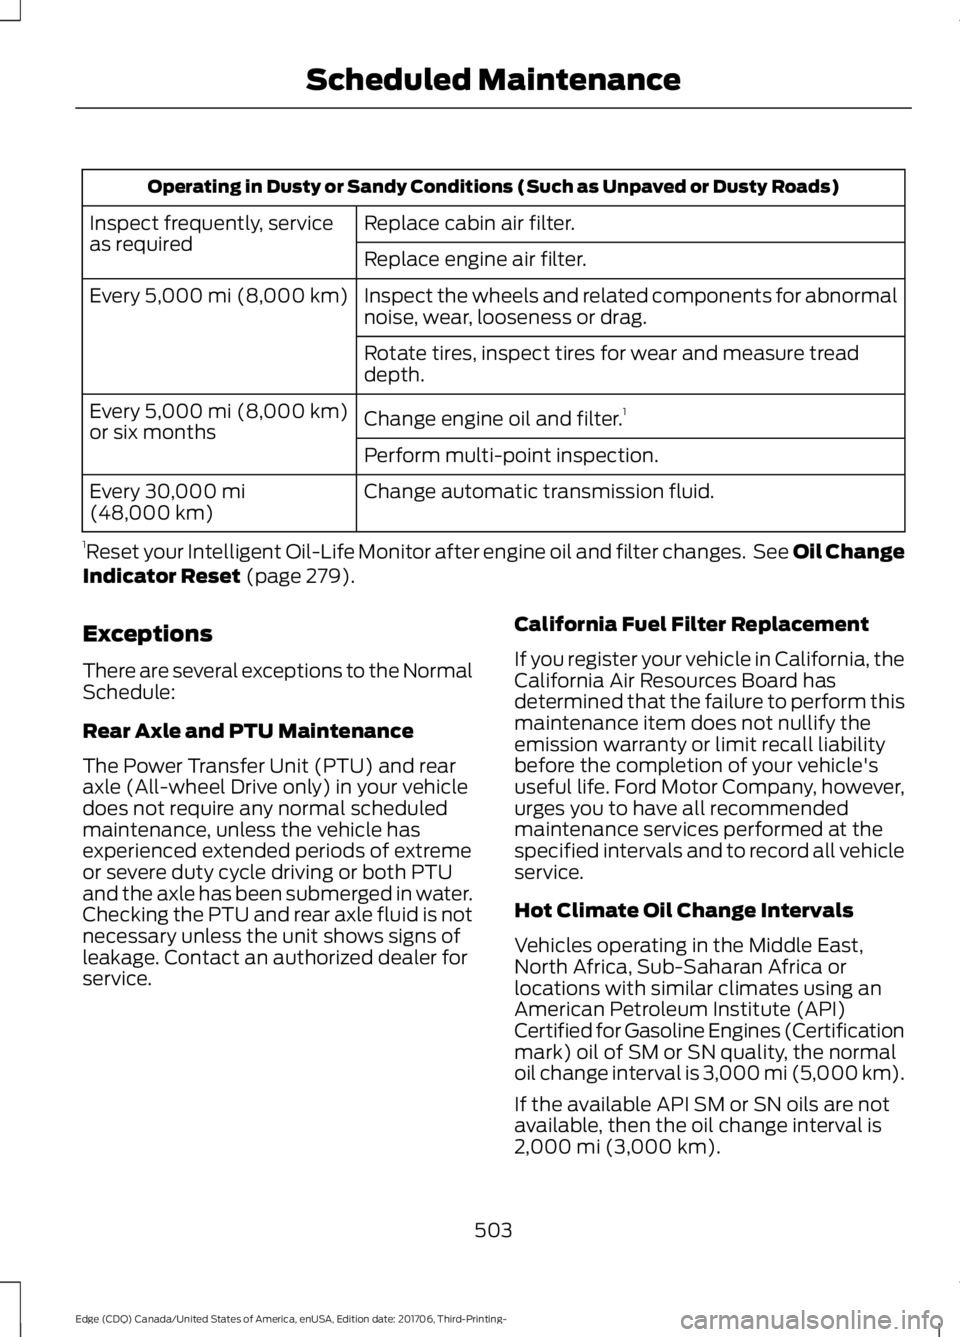
Operating in Dusty or Sandy Conditions (Such as Unpaved or Dusty Roads)
Replace cabin air filter.
Inspect frequently, service
as required
Replace engine air filter.
Inspect the wheels and related components for abnormal
noise, wear, looseness or drag.
Every 5,000 mi (8,000 km)
Rotate tires, inspect tires for wear and measure tread
depth.
Change engine oil and filter. 1
Every
5,000 mi (8,000 km)
or six months
Perform multi-point inspection.
Change automatic transmission fluid.
Every
30,000 mi
(48,000 km)
1 Reset your Intelligent Oil-Life Monitor after engine oil and filter changes. See Oil Change
Indicator Reset
(page 279).
Exceptions
There are several exceptions to the Normal
Schedule:
Rear Axle and PTU Maintenance
The Power Transfer Unit (PTU) and rear
axle (All-wheel Drive only) in your vehicle
does not require any normal scheduled
maintenance, unless the vehicle has
experienced extended periods of extreme
or severe duty cycle driving or both PTU
and the axle has been submerged in water.
Checking the PTU and rear axle fluid is not
necessary unless the unit shows signs of
leakage. Contact an authorized dealer for
service. California Fuel Filter Replacement
If you register your vehicle in California, the
California Air Resources Board has
determined that the failure to perform this
maintenance item does not nullify the
emission warranty or limit recall liability
before the completion of your vehicle's
useful life. Ford Motor Company, however,
urges you to have all recommended
maintenance services performed at the
specified intervals and to record all vehicle
service.
Hot Climate Oil Change Intervals
Vehicles operating in the Middle East,
North Africa, Sub-Saharan Africa or
locations with similar climates using an
American Petroleum Institute (API)
Certified for Gasoline Engines (Certification
mark) oil of SM or SN quality, the normal
oil change interval is 3,000 mi (5,000 km).
If the available API SM or SN oils are not
available, then the oil change interval is
2,000 mi (3,000 km)
.
503
Edge (CDQ) Canada/United States of America, enUSA, Edition date: 201706, Third-Printing- Scheduled Maintenance