ECO mode FORD EDGE 2019 Owner's Guide
[x] Cancel search | Manufacturer: FORD, Model Year: 2019, Model line: EDGE, Model: FORD EDGE 2019Pages: 547, PDF Size: 40.86 MB
Page 182 of 547
USING ALL-WHEEL DRIVE
All-wheel drive uses all four wheels to
power the vehicle. This increases traction,
enabling you to drive over terrain and road
conditions that a conventional two-wheel
drive vehicle cannot. The AWD system
turns on when needed and does not require
input from you.
Note:
The AWD feature gives your vehicle
some limited off-road capabilities in which
driving surfaces are relatively level,
obstruction-free and otherwise similar to
normal on-road driving conditions.
Operating your vehicle under other than
those conditions could subject the vehicle
to excessive stress that might result in
damage that your vehicle warranty does not
cover.
Note: A warning message appears in the
information display when an AWD system
fault is present. See Information
Messages (page 108). An AWD system fault
causes the AWD system to default to
front-wheel drive only mode. When this
warning message displays, have your vehicle
serviced at an authorized dealer
Note: A warning message appears in the
information display if the AWD system has
overheated. See
Information Messages
(page 108). This condition may occur if you
operate the vehicle in extreme conditions
with excessive wheel slip, such as deep
sand. To resume normal AWD function as
soon as possible, stop the vehicle in a safe
location and stop the engine for at least 10
minutes. After you restart the engine and
the AWD system adequately cools, the
warning message turns off and normal AWD
function returns.
Do not use a spare tire of a different size
other than the tire provided. If the
mini-spare tire is installed, the AWD
system may disable automatically and
enter front-wheel drive only mode to
protect driveline components. A warning in the information display appears,
indicating that the system is in front-wheel
drive only mode.
See Information
Messages (page 108). If there is a warning
message in the information display from
using the spare tire, this indicator should
turn off after reinstalling the repaired or
replaced normal road tire and cycling the
ignition off and on. We recommend that
you reinstall the repaired or replaced road
tire as soon as possible. Major dissimilar
tire sizes between the front and rear axles
could cause the AWD system to stop
functioning and default to front-wheel
drive or damage the AWD system.
Driving in Special Conditions with
All-Wheel Drive (AWD)
AWD vehicles are ready to drive on sand,
snow, mud and rough roads and have
operating characteristics that are
somewhat different from conventional
vehicles, both on and off the highway.
Under severe operating conditions, the A/C
may cycle on and off to protect
overheating of the engine.
Basic operating principles in special
conditions
• Drive slower in strong crosswinds which
can affect the normal steering
characteristics of your vehicle.
• Be extremely careful when driving on
pavement made slippery by loose sand,
water, gravel, snow or ice.
179
Edge (CDQ) Canada/United States of America, enUSA, Edition date: 201806, Third-Printing- All-Wheel Drive
(If Equipped)
Page 200 of 547
•
The front bumper, rear bumper or the
side sensors are damaged.
• The correct tire size is not in use on your
vehicle. For example, a mini-spare tire.
Using Active Park Assist
Selecting an Active Park Assist Mode Press the button once to
activate parallel parking. Press
the button a second time to
activate perpendicular parking. If you press
the button again the system switches off.
If your vehicle is parked and after you
switch the ignition on, you can use the
information display to toggle through the
modes. Press the button to switch the
system on and open the system menu in
the information display.
Note: If your vehicle is parked, the default
mode is parallel park out assist. However,
if you did not use active park assist to
parallel park your vehicle, use the
information display to select park out assist.
Note: You can repeatedly press the active
park assist button to toggle through the
modes only after moving your vehicle
approximately 33 ft (10 m).
To toggle through the modes, use the
buttons on the information display to
select the following:
• Parallel parking.
• Perpendicular parking.
• Parallel park out assist.
• Switch the system off.
Note: There is no time limit for toggling
through the modes. Parallel Parking
The system detects available parallel
parking spaces and steers your vehicle into
the space. You control the accelerator,
gearshift and brakes. The system visually
and audibly guides you into a parallel
parking space. Press the button once to search
for a parking space.
Note: You can also switch the system on
after you have already driven partially or
completely past a parking space. Press the
active park assist button and the system
informs you if you have recently passed a
suitable parking space.
When the vehicle speed is less than
22 mph (35 km/h), the system scans both
sides of your vehicle for an available
parking space. A message and a graphic
appear in the information display to
indicate the system is searching for a
parking space. Use the direction indicator
lever to search for a parking space on the
driver or passenger side of your vehicle.
Note: The system scans both sides of your
vehicle and offers parking spaces one side
at a time if you do not use the direction
indicator.
Note: The system defaults to the passenger
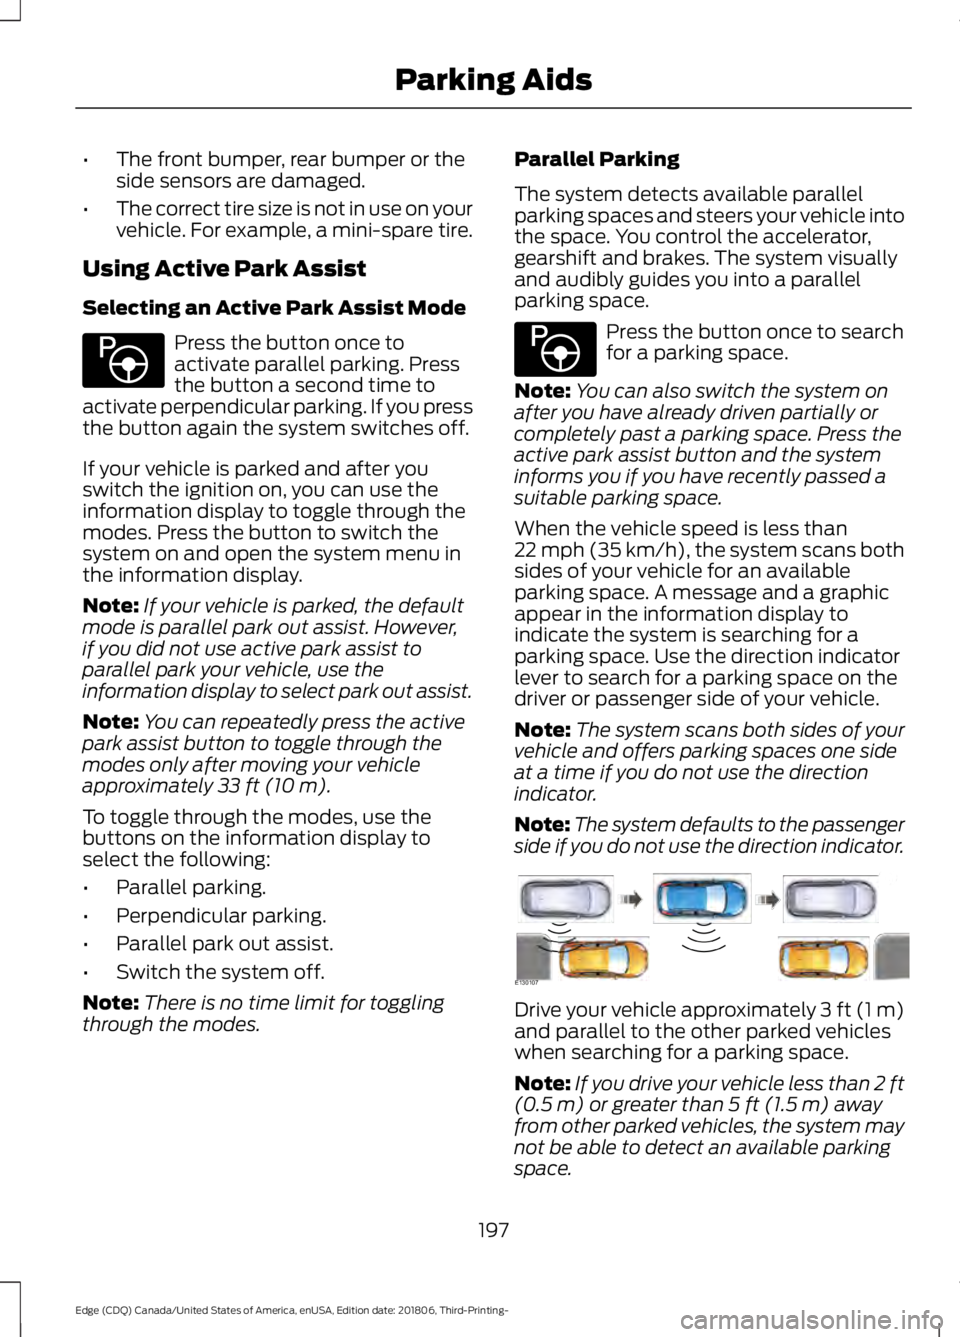
side if you do not use the direction indicator. Drive your vehicle approximately 3 ft (1 m)
and parallel to the other parked vehicles
when searching for a parking space.
Note:
If you drive your vehicle less than 2 ft
(0.5 m)
or greater than 5 ft (1.5 m) away
from other parked vehicles, the system may
not be able to detect an available parking
space.
197
Edge (CDQ) Canada/United States of America, enUSA, Edition date: 201806, Third-Printing- Parking AidsE146186 E146186 E130107
Page 211 of 547
Note:
If you accelerate by pressing only the
accelerator pedal, the set speed does not
change. When you release the accelerator
pedal, your vehicle returns to the speed you
previously set.
Canceling the Set Speed Press and release the button, or
tap the brake pedal to cancel the
set speed.
Note: The system remembers the set
speed.
Resuming the Set Speed Press and release to resume the
set speed.
Switching Cruise Control Off For vehicles without Speed
Limiter, press and release the
button when the system is in
standby mode or switch the ignition off. For vehicles with Speed Limiter,
press and release the button
when the system is in standby
mode or switch the ignition off.
Note: You erase the set speed when you
switch the system off. USING ADAPTIVE CRUISE
CONTROL - VEHICLES WITH:
ADAPTIVE CRUISE CONTROL
WITH STOP AND GO WARNING: Always pay close
attention to changing road conditions
when using adaptive cruise control. The
system does not replace attentive
driving. Failing to pay attention to the
road may result in a crash, serious injury
or death. WARNING:
Do not use the
adaptive cruise control when entering or
leaving a highway, on roads with
intersections or roundabouts or
non-vehicular traffic or roads that are
winding, slippery, unpaved, or steep
slopes. WARNING:
Do not use the system
in poor visibility, for example fog, heavy
rain, spray or snow. WARNING:
Do not use the system
when towing a trailer that has
aftermarket electronic trailer brake
controls. Failure to follow this instruction
could result in the loss of control of your
vehicle, personal injury or death. WARNING:
Do not use tire sizes
other than those recommended because
this can affect the normal operation of
the system. Failure to do so may result
in a loss of vehicle control, which could
result in serious injury. WARNING: Adaptive cruise control
may not detect stationary or slow
moving vehicles below 6 mph (10 km/h).
208
Edge (CDQ) Canada/United States of America, enUSA, Edition date: 201806, Third-Printing- Cruise ControlE265298 E265297 E71340
Page 218 of 547
Keep the front of your vehicle free of dirt,
metal badges or objects. Vehicle front
protectors and aftermarket lights may also
block the sensor.
Due to the nature of radar technology, it is
possible to get a blockage warning with no
actual block. This happens, for example,
when driving in sparse rural or desert
environments. A false blocked condition
either self clears, or clears after you restart
your vehicle.
Switching to Normal Cruise
Control
WARNING: Normal cruise control
will not brake when your vehicle is
approaching slower vehicles. Always be
aware of which mode you have selected
and apply the brakes when necessary. The cruise control indicator light
replaces the adaptive cruise
control indicator light if you
select normal cruise control. The gap
setting does not display, and the system
does not respond to lead vehicles.
Automatic braking remains active to
maintain set speed.
You can change from adaptive cruise
control to normal cruise control through
the information display. USING ADAPTIVE CRUISE
CONTROL - VEHICLES WITH:
ADAPTIVE CRUISE CONTROL
WITH STOP AND GO/LANE
CENTERING WARNING:
Always pay close
attention to changing road conditions
when using the system. It does not
replace attentive driving. Failure to
follow this instruction could result in
personal injury or death. WARNING:
Do not use the system
when entering or leaving a highway, on
roads with intersections or roundabouts
or non-vehicular traffic or roads that are
winding, slippery, unpaved, or steep
slopes. WARNING:
Do not use the system
in poor visibility, for example fog, heavy
rain, spray or snow. WARNING:
Do not use the system
when towing a trailer that has
aftermarket electronic trailer brake
controls. Failure to follow this instruction
could result in the loss of control of your
vehicle, personal injury or death. WARNING:
Do not use tire sizes
other than those recommended because
this can affect the normal operation of
the system. Failure to do so may result
in a loss of vehicle control, which could
result in serious injury. WARNING:
The system may not
detect stationary or slow moving
vehicles below
6 mph (10 km/h).
215
Edge (CDQ) Canada/United States of America, enUSA, Edition date: 201806, Third-Printing- Cruise ControlE71340
Page 255 of 547
TOWING THE VEHICLE ON
FOUR WHEELS - 2.0L
Emergency Towing
WARNING: If your vehicle has a
steering wheel lock make sure the
ignition is in the accessory or on position
when being towed.
If your vehicle becomes inoperable without
access to wheel dollies or a vehicle
transport trailer, it can be flat-towed with
all wheels on the ground, regardless of the
powertrain and transmission configuration,
under the following conditions:
• Your vehicle is facing forward for
towing in a forward direction.
• Refer to the Manual Park Release
procedure. See
Automatic
Transmission (page 173). Failing to
do so may result in damage to the
transmission.
• Maximum speed is 35 mph (56 km/h).
• Maximum distance is
50 mi (80 km).
Recreational Towing
You cannot recreational tow your vehicle
with all wheels on the ground because
vehicle or transmission damage may occur.
We recommend towing your vehicle with
all four wheels off the ground such as
when using a car-hauling trailer. Otherwise,
you cannot recreational tow your vehicle. TOWING THE VEHICLE ON
FOUR WHEELS - 2.7L
Emergency Towing WARNING:
If your vehicle has a
steering wheel lock make sure the
ignition is in the accessory or on position
when being towed.
If your vehicle becomes inoperable without
access to wheel dollies or a vehicle
transport trailer, it can be flat-towed with
all wheels on the ground, regardless of the
powertrain and transmission configuration,
under the following conditions:
• Your vehicle is facing forward for
towing in a forward direction.
• Refer to the Manual Park Release
procedure. See
Automatic
Transmission (page 173). Failing to
do so may result in damage to the
transmission.
• Maximum speed is 35 mph (56 km/h).
• Maximum distance is
50 mi (80 km).
Recreational Towing
Note: Put your climate control system in
recirculated air mode to prevent exhaust
fumes from entering the vehicle. See
Climate Control
(page 124).
Follow these guidelines if you have a need
for recreational towing. An example of
recreational towing would be towing your
vehicle behind a motorhome. We designed
these guidelines to prevent damage to your
transmission.
252
Edge (CDQ) Canada/United States of America, enUSA, Edition date: 201806, Third-Printing- Towing
Page 257 of 547
BREAKING-IN
You need to break in new tires for
approximately 300 mi (480 km). During
this time, your vehicle may exhibit some
unusual driving characteristics.
Avoid driving too fast during the first
1,000 mi (1,600 km)
. Vary your speed
frequently and change up through the
gears early. Do not labor the engine.
Do not tow during the first
1,000 mi
(1,600 km).
ECONOMICAL DRIVING
Fuel economy is affected by several things
such as how you drive, the conditions you
drive under and how you maintain your
vehicle.
There are some things to keep in mind that
may improve your fuel economy:
• Accelerate and slow down in a smooth,
moderate fashion.
• Drive at steady speeds.
• Anticipate stops; slowing down may
eliminate the need to stop.
• Combine errands and minimize
stop-and-go driving (When running
errands, go to the furthest destination
first and then work your way back
home).
• Close the windows for high-speed
driving.
• Drive at reasonable speeds.
• Keep the tires properly inflated and use
only the recommended size.
• Use the recommended engine oil.
• Perform all regularly scheduled
maintenance. There are also some things you may want
to avoid doing because they reduce your
fuel economy:
•
Avoid sudden or hard accelerations.
• Avoid revving the engine before turning
off the car.
• Avoid long idle periods.
• Do not warm up your vehicle on cold
mornings.
• Reduce the use of air conditioning and
heat.
• Avoid using speed control in hilly
terrain.
• Do not rest your foot on the brake
pedal while driving.
• Avoid carrying unnecessary weight.
• Avoid adding particular accessories to
your vehicle (e.g. bug deflectors,
rollbars/light bars, running boards, ski
racks).
• Avoid driving with the wheels out of
alignment.
COLD WEATHER
PRECAUTIONS
The functional operation of some
components and systems can be affected
at temperatures below
-13°F (-25°C).
DRIVING THROUGH WATER WARNING:
Do not drive through
flowing or deep water as you may lose
control of your vehicle.
Note: Driving through standing water can
cause vehicle damage.
Note: Engine damage can occur if water
enters the air filter.
254
Edge (CDQ) Canada/United States of America, enUSA, Edition date: 201806, Third-Printing- Driving Hints
Page 292 of 547
When this occurs, your vehicle still
operates, however:
•
Engine power is limited.
• The air conditioning system turns off.
Continued operation increases the engine
temperature, causing the engine to
completely shut down. Your steering and
braking effort increases in this situation.
When the engine temperature cools, you
can re-start the engine. Have your vehicle
checked as soon as possible to minimize
engine damage.
When Fail-Safe Mode Is Activated WARNING: Fail-safe mode is for
use during emergencies only. Operate
your vehicle in fail-safe mode only as
long as necessary to bring your vehicle
to rest in a safe location and seek
immediate repairs. When in fail-safe
mode, your vehicle will have limited
power, will not be able to maintain
high-speed operation, and may
completely shut down without warning,
potentially losing engine power, power
steering assist, and power brake assist,
which may increase the possibility of a
crash resulting in serious injury. WARNING:
Do not remove the
coolant reservoir cap when the engine is
on or the cooling system is hot. Wait 10
minutes for the cooling system to cool
down. Cover the coolant reservoir cap
with a thick cloth to prevent the
possibility of scalding and slowly remove
the cap. Failure to follow this instruction
could result in personal injury.
Your vehicle has limited engine power
when in the fail-safe mode, drive your
vehicle with caution. Your vehicle does not
maintain high-speed operation and the
engine may operate poorly. Remember that the engine is capable of
automatically shutting down to prevent
engine damage. In this situation:
1. Pull off the road as soon as safely
possible and switch the engine off.
2. If you are a member of a roadside assistance program, we recommend
that you contact your roadside
assistance service provider.
3. If this is not possible, wait for a short period of time for the engine to cool.
4. Check the coolant level. If the coolant level is at or below the minimum mark,
add prediluted coolant immediately.
5. When the engine temperature cools, you can re-start the engine. Have your
vehicle checked as soon as possible to
minimize engine damage.
Note: Driving your vehicle without repair
increases the chance of engine damage.
Engine Coolant Temperature
Management
(If Equipped) WARNING:
To reduce the risk of
crash and injury, be prepared that the
vehicle speed may reduce and the
vehicle may not be able to accelerate
with full power until the coolant
temperature reduces.
If you tow a trailer with your vehicle, the
engine may temporarily reach a higher
temperature during severe operating
conditions, for example ascending a long
or steep grade in high ambient
temperatures.
At this time, you may notice the coolant
temperature gauge moves toward the red
zone and a message may appear in the
information display.
289
Edge (CDQ) Canada/United States of America, enUSA, Edition date: 201806, Third-Printing- Maintenance
Page 293 of 547
You may notice a reduction in vehicle
speed caused by reduced engine power in
order to manage the engine coolant
temperature. Your vehicle may enter this
mode if certain high-temperature and
high-load conditions take place. The
amount of speed reduction depends on
vehicle loading, grade and ambient
temperature. If this occurs, there is no
need to stop your vehicle. You can
continue to drive.
The air conditioning may automatically
turn on and off during severe operating
conditions to protect the engine from
overheating. When the coolant
temperature decreases to the normal
operating temperature, the air conditioning
turns on.
If the coolant temperature gauge moves
fully into the red zone, or if the coolant
temperature warning or service engine
soon messages appear in your information
display, do the following:
1. Stop your vehicle as soon as it is safe
to do so. Fully apply the parking brake,
shift into park (P) or neutral (N).
2. Leave the engine running until the coolant temperature gauge needle
returns to the normal position. If the
temperature does not drop after
several minutes, follow the remaining
steps.
3. Switch the engine off and wait for it to
cool. Check the coolant level.
4. If the coolant level is at or below the minimum mark, add prediluted coolant
immediately.
5. If the coolant level is normal, restart the engine and continue. AUTOMATIC TRANSMISSION
FLUID CHECK - 2.0L
ECOBOOST™/2.7L
ECOBOOST™
Note:
Transmission fluid should be checked
by an authorized dealer. If required, fluid
should be added by an authorized dealer.
Have an authorized dealer check and
change the transmission fluid at the
correct service interval. See Maintenance
(page 280). Your transmission does not
consume fluid. However, the fluid level
should be checked if the transmission is
not working properly, (i.e., if the
transmission slips or shifts slowly) or if you
notice some sign of fluid leakage.
Do not use supplemental transmission
fluid additives, treatments or cleaning
agents. The use of these materials may
affect transmission operation and result
in damage to internal transmission
components.
BRAKE FLUID CHECK WARNING:
Do not use any fluid
other than the recommended brake fluid
as this will reduce brake efficiency. Use
of incorrect fluid could result in the loss
of vehicle control, serious personal injury
or death. WARNING:
Only use brake fluid
from a sealed container. Contamination
with dirt, water, petroleum products or
other materials may result in brake
system damage or failure. Failure to
adhere to this warning could result in the
loss of vehicle control, serious personal
injury or death.
290
Edge (CDQ) Canada/United States of America, enUSA, Edition date: 201806, Third-Printing- Maintenance
Page 309 of 547
•
Check tire pressures and set tire
inflation per the Tire Label.
• Check brake pedal operation. Drive
your vehicle 15 ft (4.5 m) back and
forth to remove rust build-up.
• Check fluid levels (including coolant,
oil and gas) to make sure there are no
leaks, and fluids are at recommended
levels.
• If you remove the battery, clean the
battery cable ends and check for
damage.
Contact an authorized dealer if you have
any concerns or issues.
BODY STYLING KITS
The distance between the underside of
your vehicle and the ground is less than
that of other models. Drive with extreme
care to avoid damage to your vehicle.
306
Edge (CDQ) Canada/United States of America, enUSA, Edition date: 201806, Third-Printing- Vehicle Care
Page 340 of 547
•
To reduce the chances of interference
from another vehicle, perform the
system reset procedure at least 3 ft
(1 m) away from another Ford Motor
Company vehicle undergoing the
system reset procedure at the same
time.
• Do not wait more than two minutes
between resetting each tire sensor or
the system can time-out and you have
to repeat the entire procedure on all
four wheels.
• A double horn sounds indicating the
need to repeat the procedure.
Performing the System Reset Procedure
Read the entire procedure before
attempting.
1. Drive the vehicle above
20 mph
(32 km/h) for at least two minutes,
then park in a safe location where you
can easily get to all four tires and have
access to an air pump.
2. Place the ignition in the off position and
keep the key in the ignition.
3. Cycle the ignition to the on position with the engine off.
4. Turn the hazard flashers on then off three times. You must accomplish this
within 10 seconds. If you successfully
enter the reset mode, the horn sounds
once, the system indicator flashes and
a message shows in the information
display. If this does not occur, please
try again starting at step 2. If after
repeated attempts to enter the reset
mode, the horn does not sound, the
system indicator does not flash and no
message shows in the information
display, seek service from your
authorized dealer. 5. Train the tire pressure monitoring
system sensors in the tires using the
following system reset sequence
starting with the left front tire in the
following clockwise order: Left front -
driver side front tire, Right front -
passenger side front tire, Right rear -
passenger side rear tire, Left rear -
driver side rear tire.
6. Remove the valve cap from the valve stem on the left front tire. Decrease the
air pressure until the horn sounds.
Note: The single horn tone confirms that
the sensor identification code has been
learned by the module for this position. If a
double horn is heard, the reset procedure
was unsuccessful, and you must repeat it.
7. Remove the valve cap from the valve stem on the right front tire. Decrease
the air pressure until the horn sounds.
8. Remove the valve cap from the valve stem on the right rear tire. Decrease the
air pressure until the horn sounds.
9. Remove the valve cap from the valve stem on the left rear tire. Decrease the
air pressure until the horn sounds.
Training is complete after the horn
sounds for the last tire trained, driver
side rear tire, the system indicator
stops flashing, and a message shows
in the information display.
10. Turn the ignition off. If two short horn
beeps are heard, the reset procedure
was unsuccessful and you must
repeat it. If after repeating the
procedure and two short beeps are
heard when the ignition is turned to
off, seek assistance from your
authorized dealer.
337
Edge (CDQ) Canada/United States of America, enUSA, Edition date: 201806, Third-Printing- Wheels and Tires