valve FORD EDGE 2019 Owners Manual
[x] Cancel search | Manufacturer: FORD, Model Year: 2019, Model line: EDGE, Model: FORD EDGE 2019Pages: 547, PDF Size: 40.86 MB
Page 165 of 547
SAFETY PRECAUTIONS
WARNING: Do not overfill the fuel
tank. The pressure in an overfilled tank
may cause leakage and lead to fuel spray
and fire. WARNING:
The fuel system may
be under pressure. If you hear a hissing
sound near the fuel filler inlet, do not
refuel until the sound stops. Otherwise,
fuel may spray out, which could cause
serious personal injury. WARNING:
Fuels can cause
serious injury or death if misused or
mishandled. WARNING:
Fuel may contain
benzene, which is a cancer-causing
agent. WARNING: When refueling always
shut the engine off and never allow
sparks or open flames near the fuel tank
filler valve. Never smoke or use a cell
phone while refueling. Fuel vapor is
extremely hazardous under certain
conditions. Avoid inhaling excess fumes.
Follow these guidelines when refueling:
• Extinguish all smoking materials and
any open flames before refueling your
vehicle.
• Always switch the engine off before
refueling.
• Automotive fuels can be harmful or
fatal if swallowed. Fuel is highly toxic
and if swallowed can cause death or
permanent injury. If fuel is swallowed
immediately call a physician, even if no
symptoms are immediately apparent.
The toxic effects of fuel may not be
apparent for hours. •
Avoid inhaling fuel vapors. Inhaling fuel
vapor can lead to eye and respiratory
tract irritation. In severe cases,
excessive or prolonged breathing of
fuel vapor can cause serious illness and
permanent injury.
• Avoid getting fuel in your eyes. If you
splash fuel in your eyes, immediately
remove contact lenses (if worn), flush
with water for 15 minutes and seek
medical attention. Failure to seek
proper medical attention could lead to
permanent injury.
• Fuels can be harmful if absorbed
through the skin. If you splash fuel on
your skin, clothing or both, promptly
remove contaminated clothing and
thoroughly wash your skin with soap
and water. Repeated or prolonged skin
contact causes skin irritation.
• Be particularly careful if you are taking
Antabuse or other forms of Disulfiram
for the treatment of alcoholism.
Breathing fuel vapors could cause an
adverse reaction, serious personal
injury or sickness. Immediately call a
physician if you experience any adverse
reactions.
FUEL QUALITY
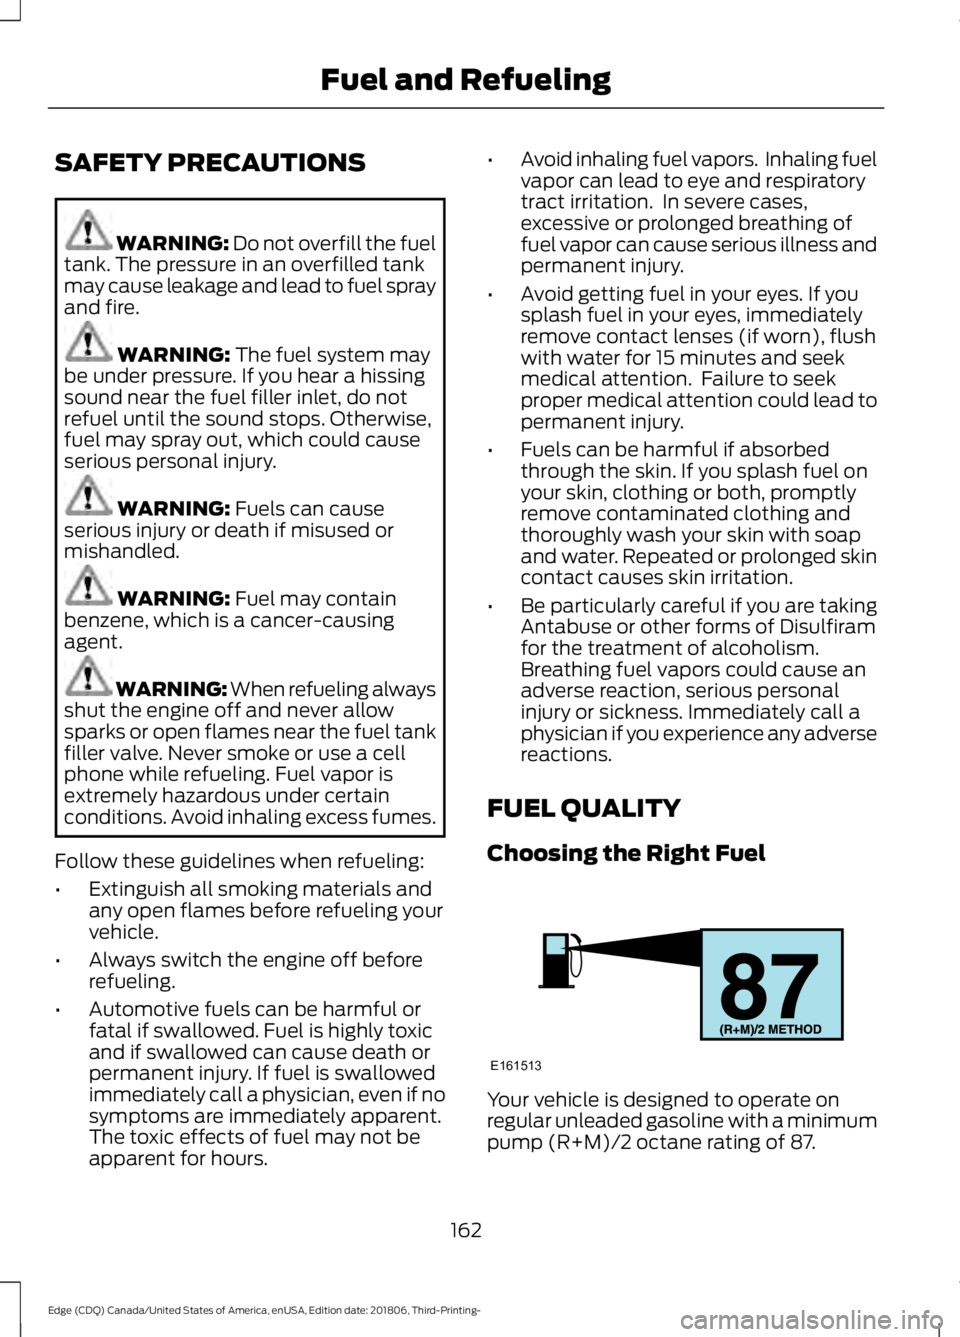
Choosing the Right Fuel Your vehicle is designed to operate on
regular unleaded gasoline with a minimum
pump (R+M)/2 octane rating of 87.
162
Edge (CDQ) Canada/United States of America, enUSA, Edition date: 201806, Third-Printing- Fuel and RefuelingE161513
Page 168 of 547
REFUELING
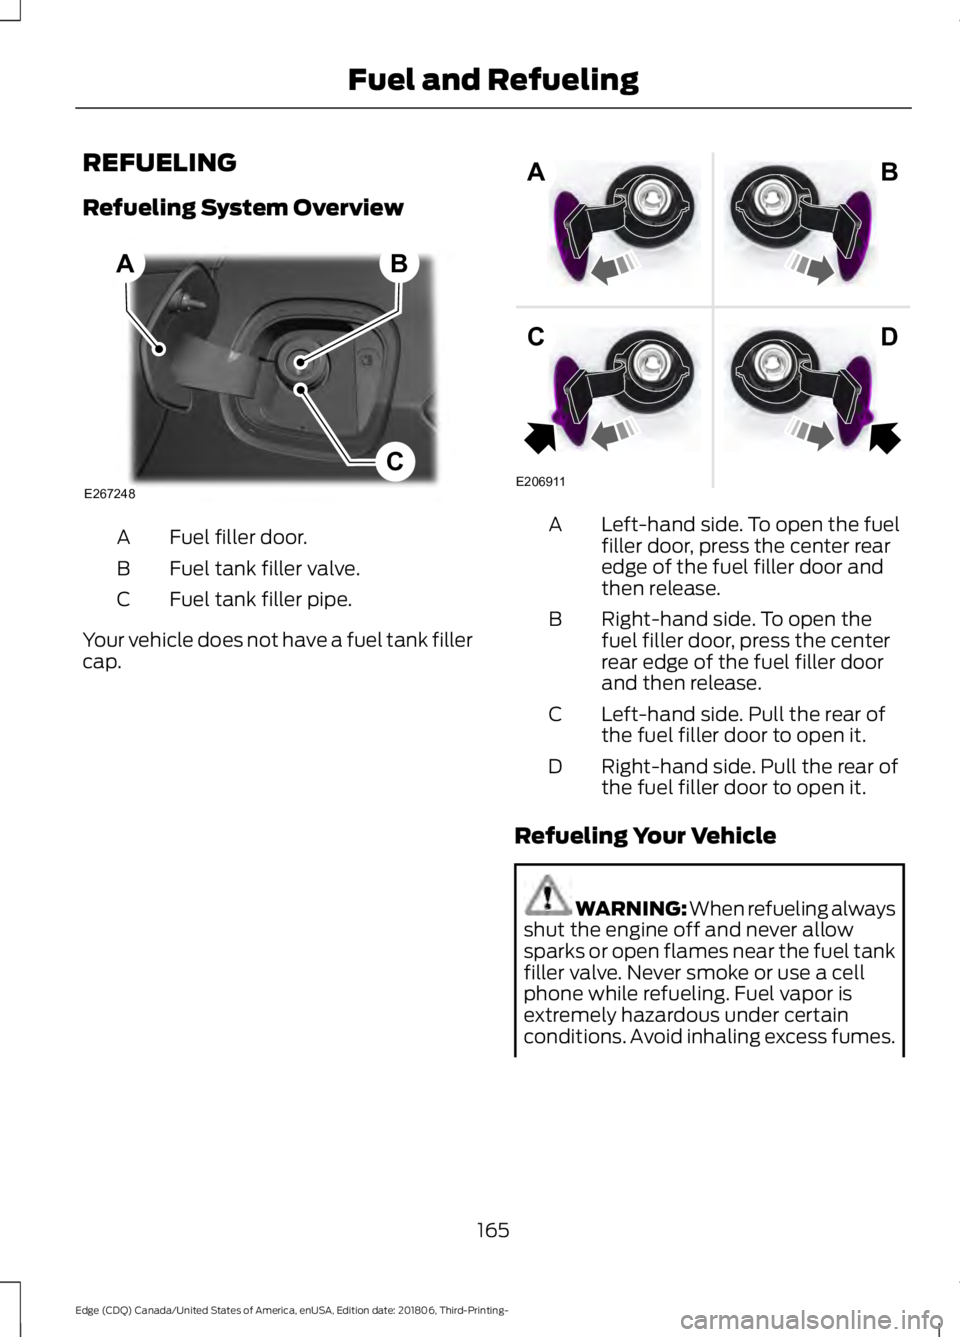
Refueling System Overview
Fuel filler door.
A
Fuel tank filler valve.
B
Fuel tank filler pipe.
C
Your vehicle does not have a fuel tank filler
cap. Left-hand side. To open the fuel
filler door, press the center rear
edge of the fuel filler door and
then release.
A
Right-hand side. To open the
fuel filler door, press the center
rear edge of the fuel filler door
and then release.
B
Left-hand side. Pull the rear of
the fuel filler door to open it.
C
Right-hand side. Pull the rear of
the fuel filler door to open it.
D
Refueling Your Vehicle WARNING: When refueling always
shut the engine off and never allow
sparks or open flames near the fuel tank
filler valve. Never smoke or use a cell
phone while refueling. Fuel vapor is
extremely hazardous under certain
conditions. Avoid inhaling excess fumes.
165
Edge (CDQ) Canada/United States of America, enUSA, Edition date: 201806, Third-Printing- Fuel and RefuelingE267248
B
C
A E206911
AB
CD
Page 169 of 547
WARNING: The fuel system may
be under pressure. If you hear a hissing
sound near the fuel filler inlet, do not
refuel until the sound stops. Otherwise,
fuel may spray out, which could cause
serious personal injury. WARNING:
Do not pry open the
fuel tank filler valve. This could damage
the fuel system. Failure to follow this
instruction could result in fire, personal
injury or death. WARNING: Do not remove the fuel
pump nozzle from its fully inserted
position when refueling. WARNING:
Stop refueling when
the fuel pump nozzle automatically
shuts off for the first time. Failure to
follow this will fill the expansion space
in the fuel tank and could lead to fuel
overflowing. WARNING:
Do not overfill the fuel
tank. The pressure in an overfilled tank
may cause leakage and lead to fuel spray
and fire. WARNING:
Wait at least five
seconds before removing the fuel pump
nozzle to allow any residual fuel to drain
into the fuel tank.
1. Fully open the fuel filler door.
2. Select the correct fuel pump nozzle for
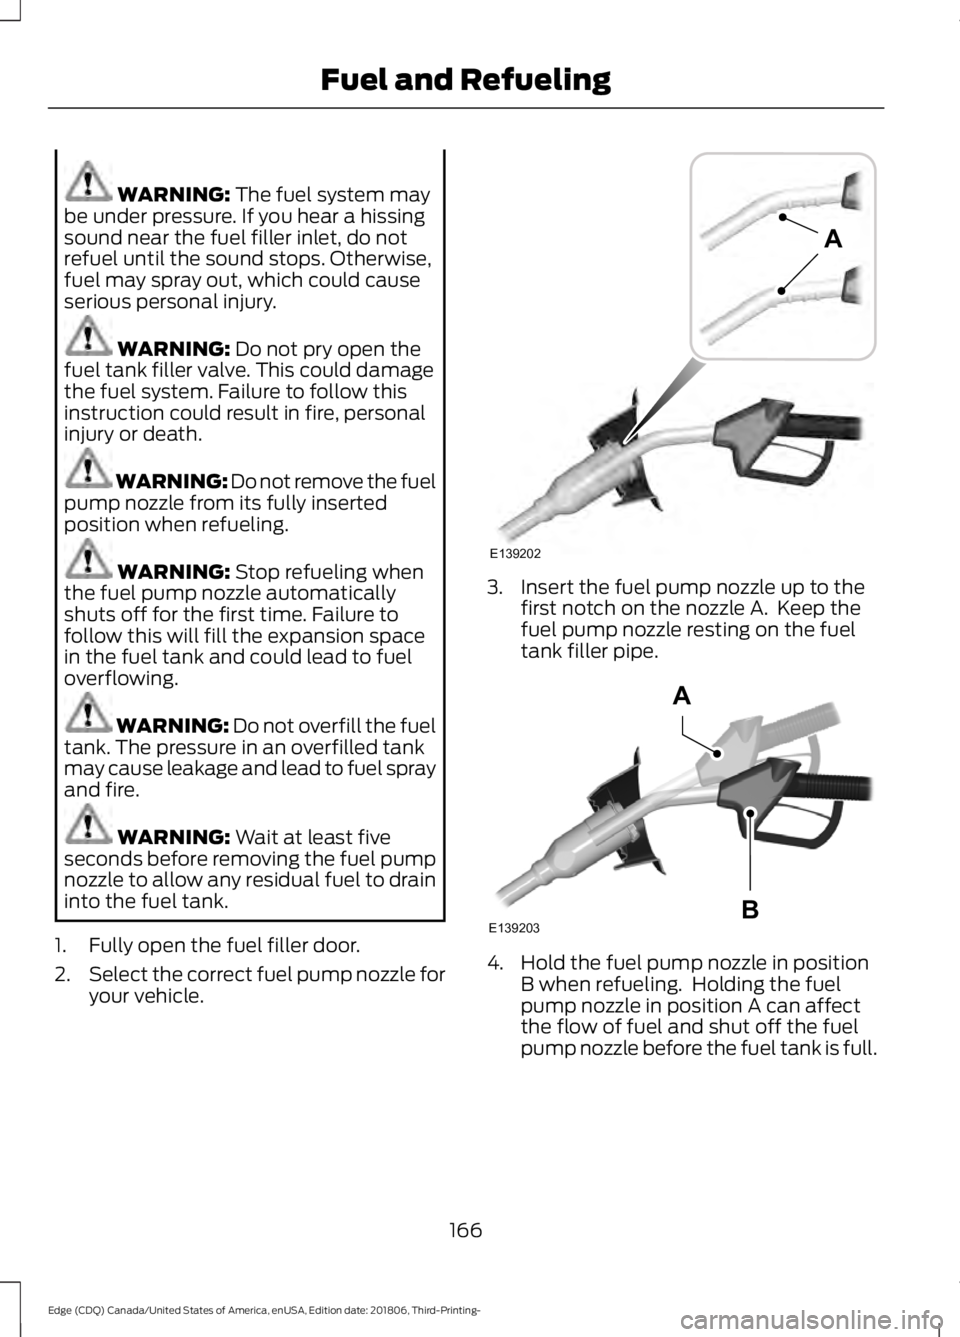
your vehicle. 3. Insert the fuel pump nozzle up to the
first notch on the nozzle A. Keep the
fuel pump nozzle resting on the fuel
tank filler pipe. 4. Hold the fuel pump nozzle in position
B when refueling. Holding the fuel
pump nozzle in position A can affect
the flow of fuel and shut off the fuel
pump nozzle before the fuel tank is full.
166
Edge (CDQ) Canada/United States of America, enUSA, Edition date: 201806, Third-Printing- Fuel and RefuelingE139202
A E139203
A
B
Page 170 of 547
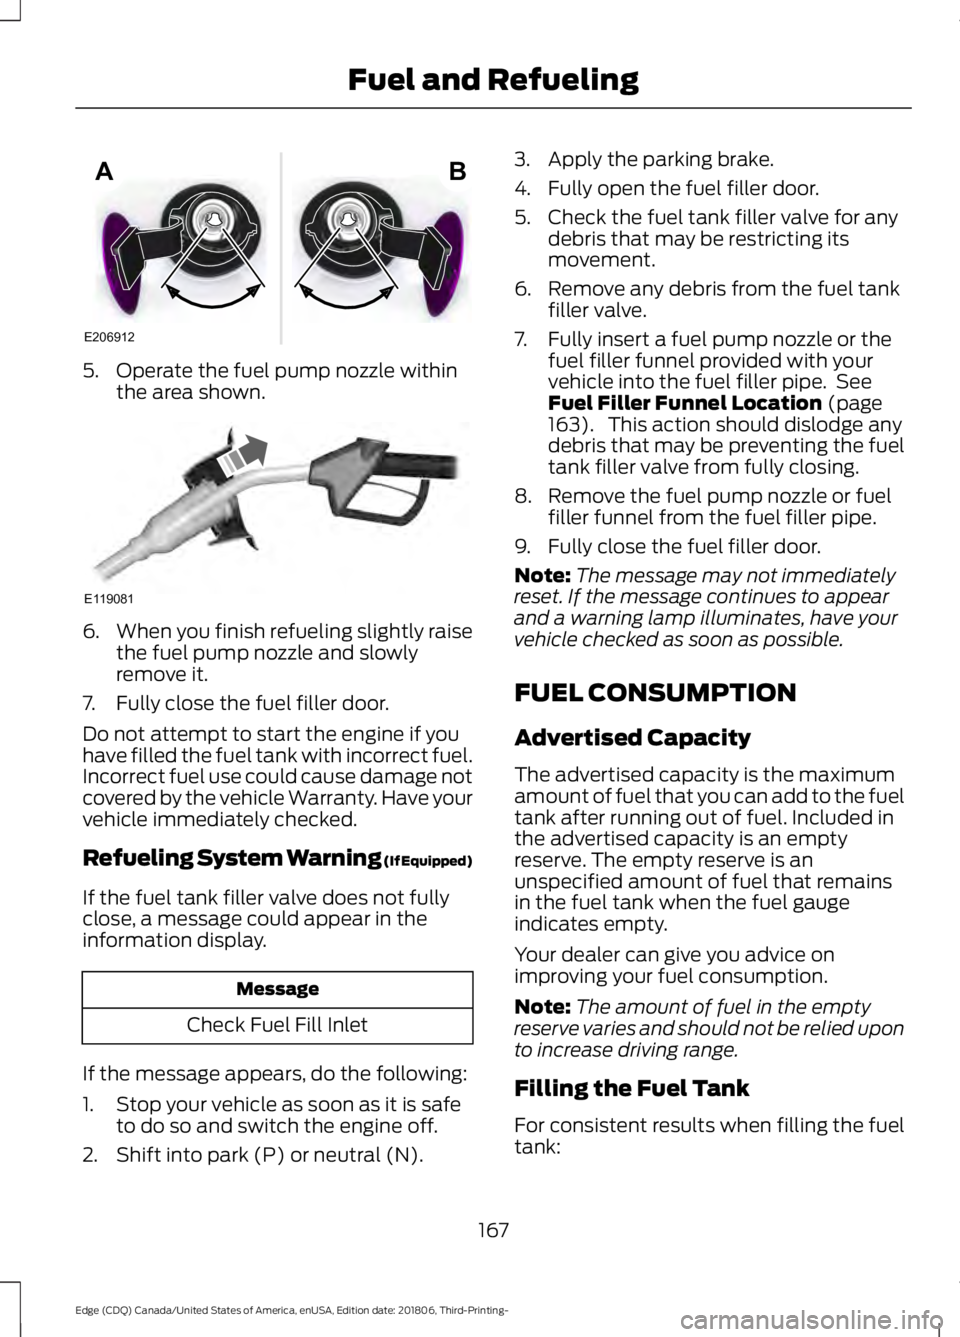
5. Operate the fuel pump nozzle within
the area shown. 6.
When you finish refueling slightly raise
the fuel pump nozzle and slowly
remove it.
7. Fully close the fuel filler door.
Do not attempt to start the engine if you
have filled the fuel tank with incorrect fuel.
Incorrect fuel use could cause damage not
covered by the vehicle Warranty. Have your
vehicle immediately checked.
Refueling System Warning (If Equipped)
If the fuel tank filler valve does not fully
close, a message could appear in the
information display. Message
Check Fuel Fill Inlet
If the message appears, do the following:
1. Stop your vehicle as soon as it is safe to do so and switch the engine off.
2. Shift into park (P) or neutral (N). 3. Apply the parking brake.
4. Fully open the fuel filler door.
5. Check the fuel tank filler valve for any
debris that may be restricting its
movement.
6. Remove any debris from the fuel tank filler valve.
7. Fully insert a fuel pump nozzle or the fuel filler funnel provided with your
vehicle into the fuel filler pipe. See
Fuel Filler Funnel Location (page
163). This action should dislodge any
debris that may be preventing the fuel
tank filler valve from fully closing.
8. Remove the fuel pump nozzle or fuel filler funnel from the fuel filler pipe.
9. Fully close the fuel filler door.
Note: The message may not immediately
reset. If the message continues to appear
and a warning lamp illuminates, have your
vehicle checked as soon as possible.
FUEL CONSUMPTION
Advertised Capacity
The advertised capacity is the maximum
amount of fuel that you can add to the fuel
tank after running out of fuel. Included in
the advertised capacity is an empty
reserve. The empty reserve is an
unspecified amount of fuel that remains
in the fuel tank when the fuel gauge
indicates empty.
Your dealer can give you advice on
improving your fuel consumption.
Note: The amount of fuel in the empty
reserve varies and should not be relied upon
to increase driving range.
Filling the Fuel Tank
For consistent results when filling the fuel
tank:
167
Edge (CDQ) Canada/United States of America, enUSA, Edition date: 201806, Third-Printing- Fuel and RefuelingE206912
AB E119081
Page 276 of 547
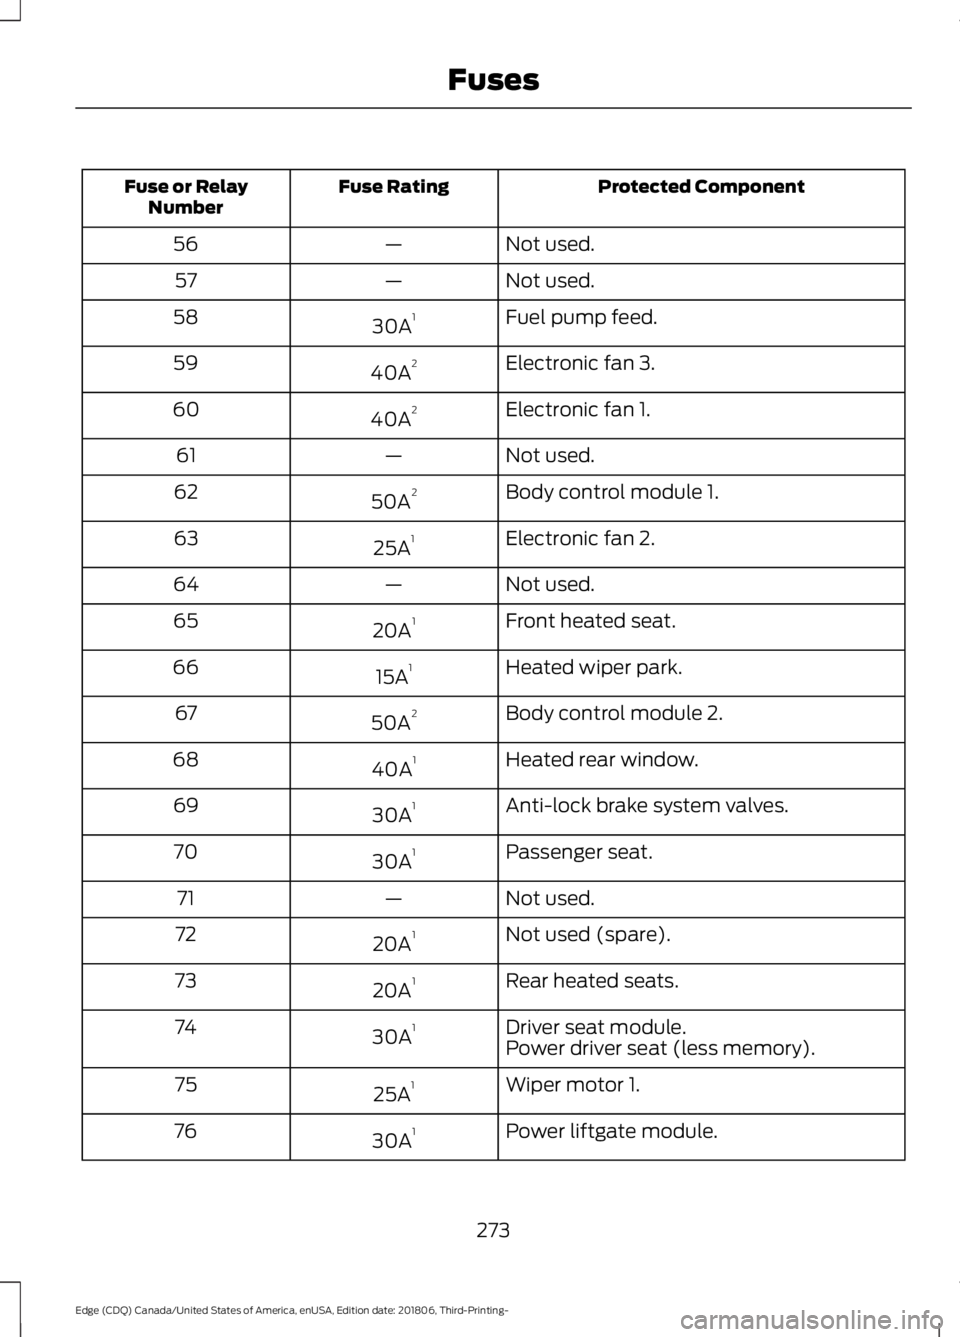
Protected Component
Fuse Rating
Fuse or Relay
Number
Not used.
—
56
Not used.
—
57
Fuel pump feed.
30A 1
58
Electronic fan 3.
40A 2
59
Electronic fan 1.
40A 2
60
Not used.
—
61
Body control module 1.
50A 2
62
Electronic fan 2.
25A 1
63
Not used.
—
64
Front heated seat.
20A 1
65
Heated wiper park.
15A 1
66
Body control module 2.
50A 2
67
Heated rear window.
40A 1
68
Anti-lock brake system valves.
30A 1
69
Passenger seat.
30A 1
70
Not used.
—
71
Not used (spare).
20A 1
72
Rear heated seats.
20A 1
73
Driver seat module.
30A 1
74
Power driver seat (less memory).
Wiper motor 1.
25A 1
75
Power liftgate module.
30A 1
76
273
Edge (CDQ) Canada/United States of America, enUSA, Edition date: 201806, Third-Printing- Fuses
Page 312 of 547
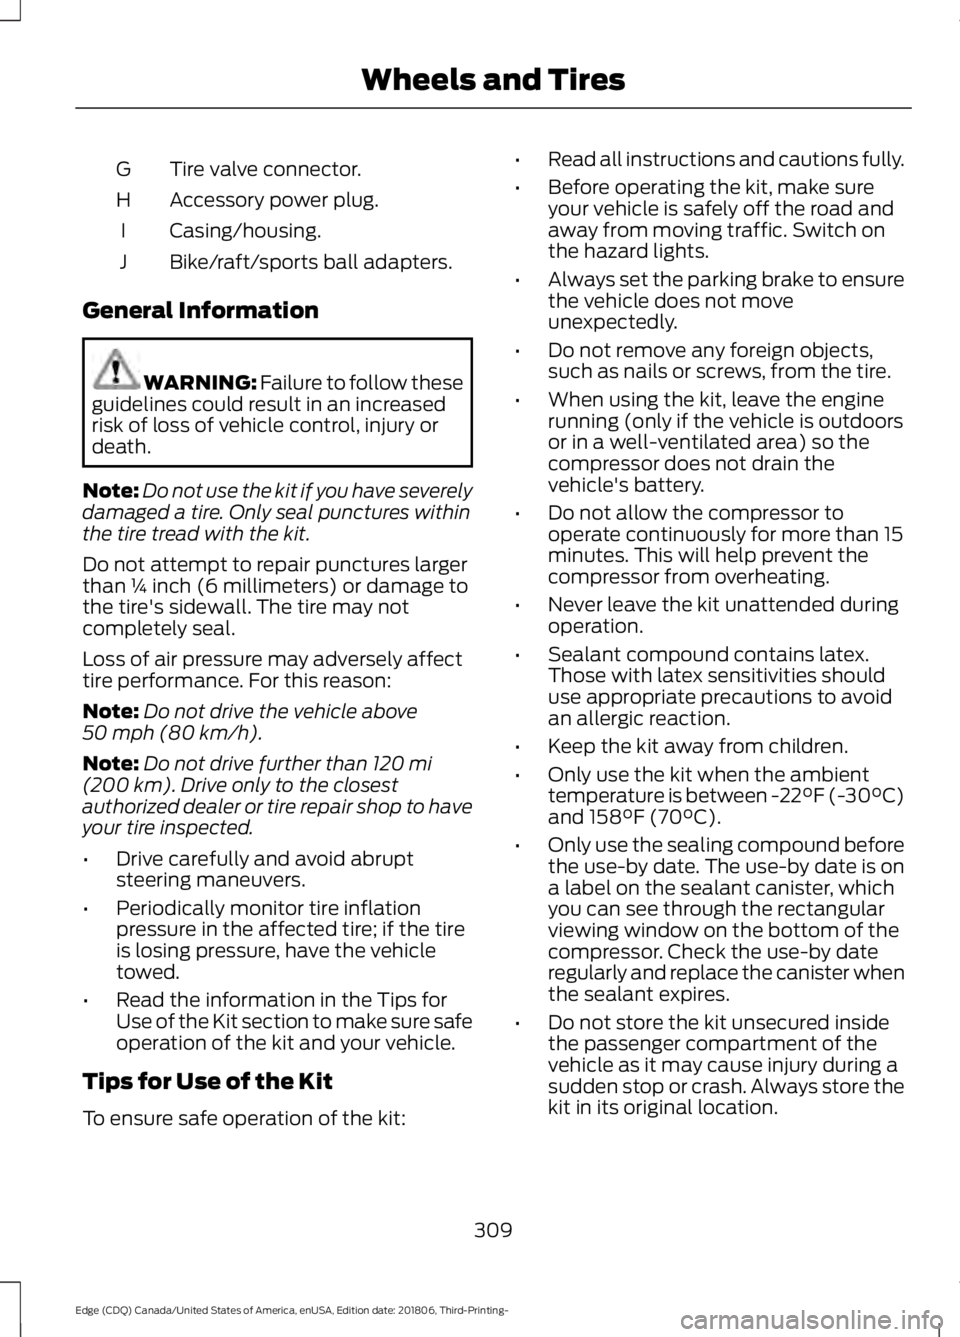
Tire valve connector.
G
Accessory power plug.
H
Casing/housing.
I
Bike/raft/sports ball adapters.
J
General Information WARNING: Failure to follow these
guidelines could result in an increased
risk of loss of vehicle control, injury or
death.
Note: Do not use the kit if you have severely
damaged a tire. Only seal punctures within
the tire tread with the kit.
Do not attempt to repair punctures larger
than ¼ inch (6 millimeters) or damage to
the tire's sidewall. The tire may not
completely seal.
Loss of air pressure may adversely affect
tire performance. For this reason:
Note: Do not drive the vehicle above
50 mph (80 km/h)
.
Note: Do not drive further than
120 mi
(200 km). Drive only to the closest
authorized dealer or tire repair shop to have
your tire inspected.
• Drive carefully and avoid abrupt
steering maneuvers.
• Periodically monitor tire inflation
pressure in the affected tire; if the tire
is losing pressure, have the vehicle
towed.
• Read the information in the Tips for
Use of the Kit section to make sure safe
operation of the kit and your vehicle.
Tips for Use of the Kit
To ensure safe operation of the kit: •
Read all instructions and cautions fully.
• Before operating the kit, make sure
your vehicle is safely off the road and
away from moving traffic. Switch on
the hazard lights.
• Always set the parking brake to ensure
the vehicle does not move
unexpectedly.
• Do not remove any foreign objects,
such as nails or screws, from the tire.
• When using the kit, leave the engine
running (only if the vehicle is outdoors
or in a well-ventilated area) so the
compressor does not drain the
vehicle's battery.
• Do not allow the compressor to
operate continuously for more than 15
minutes. This will help prevent the
compressor from overheating.
• Never leave the kit unattended during
operation.
• Sealant compound contains latex.
Those with latex sensitivities should
use appropriate precautions to avoid
an allergic reaction.
• Keep the kit away from children.
• Only use the kit when the ambient
temperature is between -22°F (-30°C)
and
158°F (70°C).
• Only use the sealing compound before
the use-by date. The use-by date is on
a label on the sealant canister, which
you can see through the rectangular
viewing window on the bottom of the
compressor. Check the use-by date
regularly and replace the canister when
the sealant expires.
• Do not store the kit unsecured inside
the passenger compartment of the
vehicle as it may cause injury during a
sudden stop or crash. Always store the
kit in its original location.
309
Edge (CDQ) Canada/United States of America, enUSA, Edition date: 201806, Third-Printing- Wheels and Tires
Page 313 of 547
•
After sealant use, an authorized dealer
must replace the tire pressure
monitoring system sensor and valve
stem on the wheel.
• Operating the kit could cause an
electrical disturbance in radio, CD and
DVD player operation. * When inflation only is required
for a tire or other objects, the
selector must be in the Air
position.
What to do When a Tire Is
Punctured
You can repair a tire puncture within the
tire's tread area in two stages with the kit.
• In the first stage, inflate the tire with a
sealing compound and air. After you
inflate the tire, you will need to drive
the vehicle a short distance 4 mi
(6 km) to distribute the sealant in the
tire.
• In the second stage, check the tire
pressure and adjust, if necessary, to the
vehicle's specified tire inflation
pressure.
First Stage: Inflating the Tire with
Sealing Compound and Air WARNING:
Do not stand directly
over the kit while inflating the tire. If you
notice any unusual bulges or
deformations in the tire's sidewall during
inflation, stop and call roadside
assistance. WARNING:
If the tire does not
inflate to the recommended tire pressure
within 15 minutes, stop and call roadside
assistance. WARNING: Do not run the engine
when operating the air compressor
unless the vehicle is outdoors or in a
well-ventilated area.
Preparation: Park the vehicle in a safe, level
and secure area, away from moving traffic.
Switch the hazard lights on. Apply the
parking brake and switch the engine off.
Inspect the flat tire for visible damage.
Sealant compound contains latex. Use
appropriate precautions to avoid any
allergic reactions.
Do not remove any foreign object that has
pierced the tire. If a puncture is in the tire
sidewall, stop and call roadside assistance.
1. Remove the valve cap from the tire valve.
2. Unwrap the dual purpose hose (black tube) from the back of the compressor
housing.
3. Fasten the hose to the tire valve by turning the connector clockwise.
Tighten the connection securely.
310
Edge (CDQ) Canada/United States of America, enUSA, Edition date: 201806, Third-Printing- Wheels and TiresE175978
Page 315 of 547
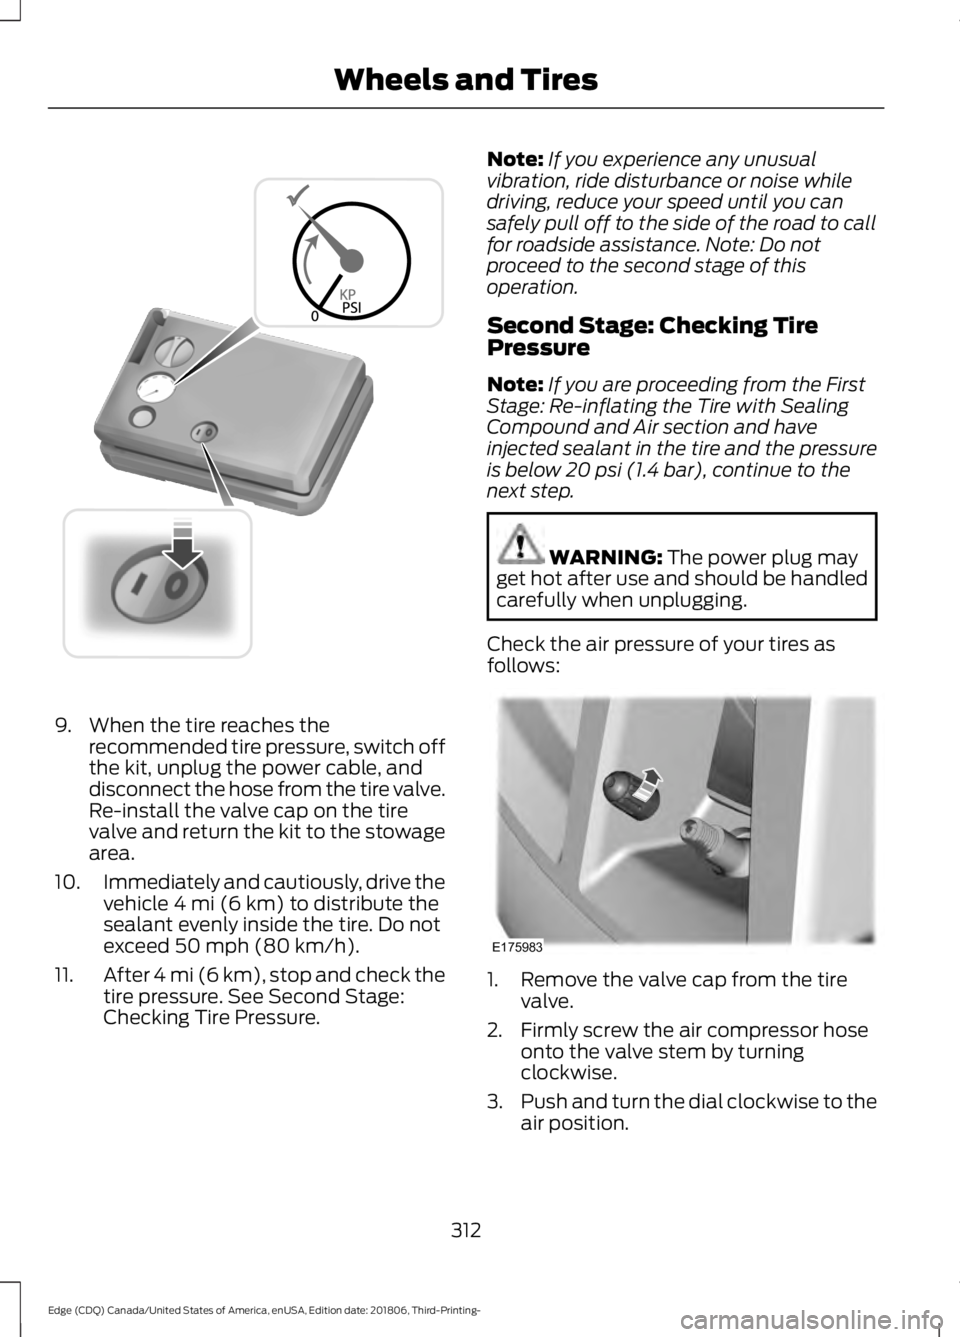
9. When the tire reaches the
recommended tire pressure, switch off
the kit, unplug the power cable, and
disconnect the hose from the tire valve.
Re-install the valve cap on the tire
valve and return the kit to the stowage
area.
10. Immediately and cautiously, drive the
vehicle 4 mi (6 km) to distribute the
sealant evenly inside the tire. Do not
exceed
50 mph (80 km/h).
11. After 4 mi (6 km), stop and check the
tire pressure. See Second Stage:
Checking Tire Pressure. Note:
If you experience any unusual
vibration, ride disturbance or noise while
driving, reduce your speed until you can
safely pull off to the side of the road to call
for roadside assistance. Note: Do not
proceed to the second stage of this
operation.
Second Stage: Checking Tire
Pressure
Note: If you are proceeding from the First
Stage: Re-inflating the Tire with Sealing
Compound and Air section and have
injected sealant in the tire and the pressure
is below
20 psi (1.4 bar), continue to the
next step. WARNING:
The power plug may
get hot after use and should be handled
carefully when unplugging.
Check the air pressure of your tires as
follows: 1. Remove the valve cap from the tire
valve.
2. Firmly screw the air compressor hose onto the valve stem by turning
clockwise.
3. Push and turn the dial clockwise to the
air position.
312
Edge (CDQ) Canada/United States of America, enUSA, Edition date: 201806, Third-Printing- Wheels and TiresE175982 E175983
Page 316 of 547
4. If required, switch on the compressor
and adjust the tire to the
recommended inflation pressure
shown on the tire label on the driver's
door or door jamb area. You should
check the tire pressure with the
compressor turned OFF in order to get
an accurate pressure reading.
5. Unplug the hoses, re-install the valve cap on the tire and return the kit to the
stowage area.
What to Do After the Tire Has Been
Sealed
After using the kit to seal your tire, you will
need to replace the sealant canister. You
can obtain sealant canisters and spare
parts at an authorized dealer. You can
dispose of empty sealant canisters at
home. However, you should dispose of
canisters still containing liquid sealant
through your local authorized dealer or tire
dealer, or in accordance with local waste
disposal regulation.
Note: After you use the sealing compound,
the maximum vehicle speed is 50 mph
(80 km/h) and the maximum driving
distance is 120 mi (200 km). You should
inspect the sealed tire immediately.
You can check the tire pressure any time
within the 120 mi (200 km) by performing
the steps listed previously in the Second
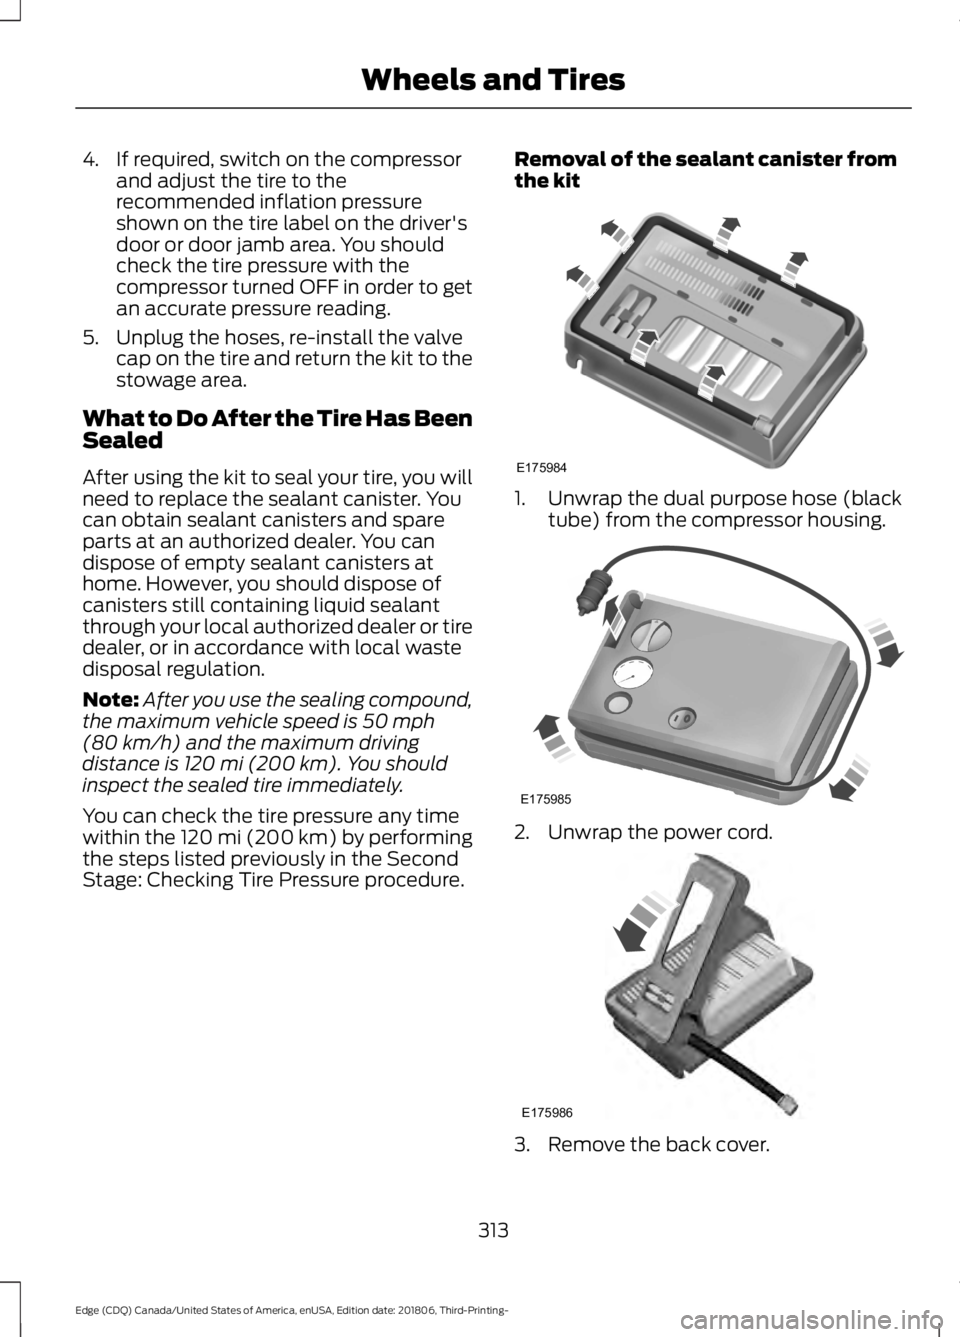
Stage: Checking Tire Pressure procedure. Removal of the sealant canister from
the kit 1. Unwrap the dual purpose hose (black
tube) from the compressor housing. 2. Unwrap the power cord.
3. Remove the back cover.
313
Edge (CDQ) Canada/United States of America, enUSA, Edition date: 201806, Third-Printing- Wheels and TiresE175984 E175985 E175986
Page 328 of 547
When weather temperature
changes occur, tire inflation
pressures also change. A 10°F
(6°C) temperature drop can
cause a corresponding drop of
1 psi (7 kPa) in inflation pressure.
Check your tire pressures
frequently and adjust them to the
proper pressure which can be
found on the Safety Compliance
Certification Label or Tire Label.
To check the pressure in your
tire(s):
1. Make sure the tires are cool,
meaning they are not hot from
driving even a mile.
Note: If you are checking tire
pressure when the tire is hot, (for
example, driven more than
1.0 mi
(1.6 km), never bleed or reduce air
pressure. The tires are hot from
driving and it is normal for
pressures to increase above
recommended cold pressures. A
hot tire at or below recommended
cold inflation pressure could be
significantly under-inflated.
Note: If you have to drive a
distance to get air for your tire(s),
check and record the tire pressure
first and add the appropriate air
pressure when you get to the
pump. It is normal for tires to heat
up and the air pressure inside to go
up as you drive.
2. Remove the cap from the valve
on one tire, then firmly press the
tire gauge onto the valve and
measure the pressure. 3. Add enough air to reach the
recommended air pressure.
Note:
If you overfill the tire, release
air by pressing on the metal stem
in the center of the valve. Then
recheck the pressure with your tire
gauge.
4. Replace the valve cap.
5. Repeat this procedure for each
tire, including the spare.
Note: Some spare tires operate at
a higher inflation pressure than the
other tires. For T type mini-spare
tires, see the Dissimilar Spare
Wheel and Tire Assembly section.
Store and maintain at
60 psi
(4.15 bar). For full-size and
dissimilar spare tires, see the
Dissimilar Spare Wheel and Tire
Assembly Information section.
Store and maintain at the higher of
the front and rear inflation pressure
as shown on the Tire Label.
6. Visually inspect the tires to
make sure there are no nails or
other objects embedded that
could poke a hole in the tire and
cause an air leak.
7. Check the sidewalls to make
sure there are no gouges, cuts or
bulges.
325
Edge (CDQ) Canada/United States of America, enUSA, Edition date: 201806, Third-Printing- Wheels and Tires