headlamp FORD EDGE 2020 User Guide
[x] Cancel search | Manufacturer: FORD, Model Year: 2020, Model line: EDGE, Model: FORD EDGE 2020Pages: 495, PDF Size: 6.38 MB
Page 104 of 495
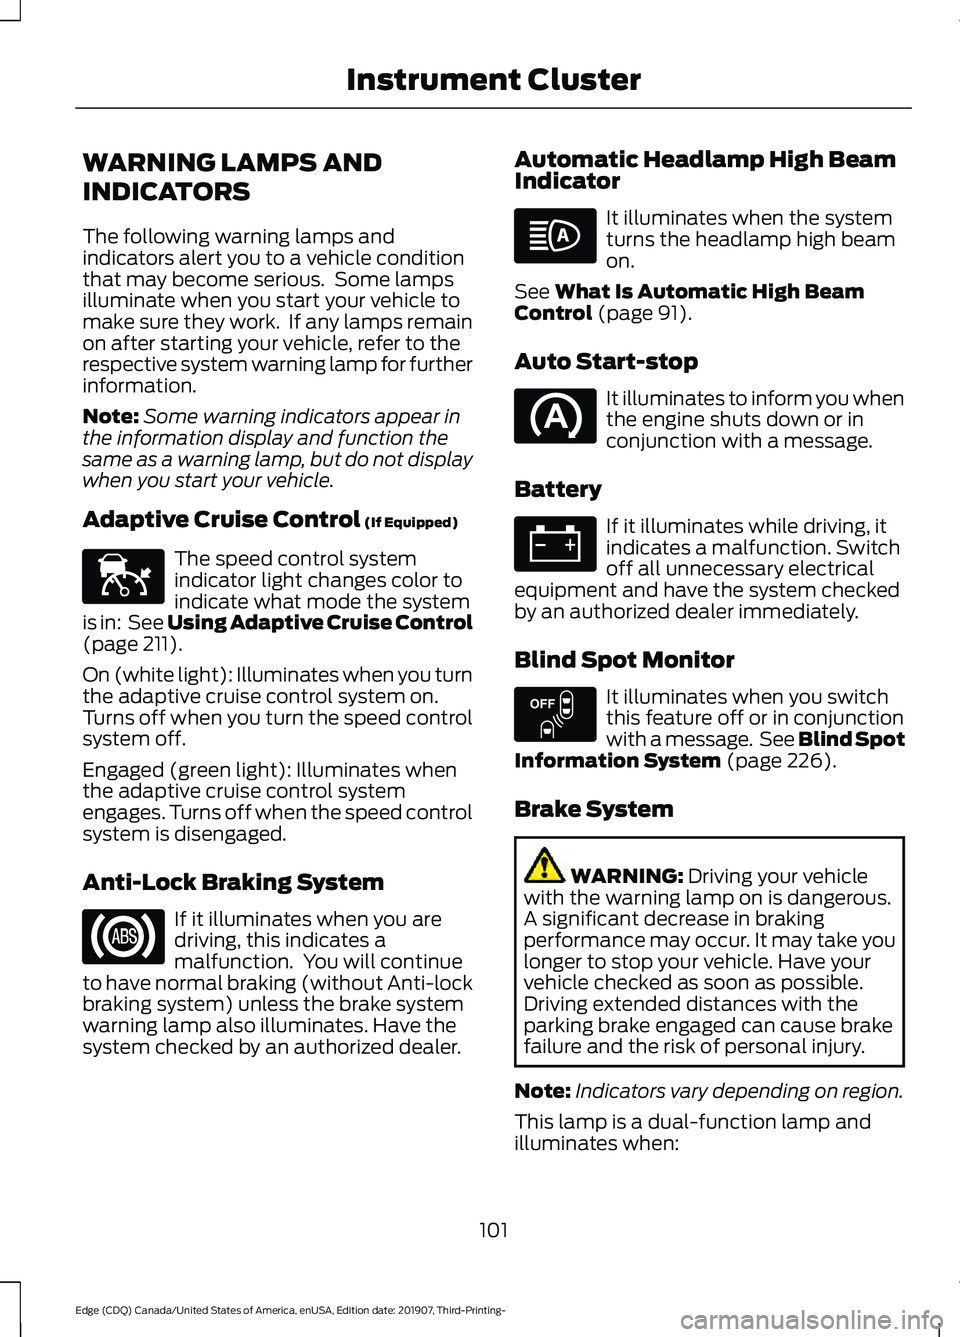
WARNING LAMPS AND
INDICATORS
The following warning lamps and
indicators alert you to a vehicle condition
that may become serious. Some lamps
illuminate when you start your vehicle to
make sure they work. If any lamps remain
on after starting your vehicle, refer to the
respective system warning lamp for further
information.
Note:
Some warning indicators appear in
the information display and function the
same as a warning lamp, but do not display
when you start your vehicle.
Adaptive Cruise Control (If Equipped) The speed control system
indicator light changes color to
indicate what mode the system
is in: See Using Adaptive Cruise Control
(page
211).
On (white light): Illuminates when you turn
the adaptive cruise control system on.
Turns off when you turn the speed control
system off.
Engaged (green light): Illuminates when
the adaptive cruise control system
engages. Turns off when the speed control
system is disengaged.
Anti-Lock Braking System If it illuminates when you are
driving, this indicates a
malfunction. You will continue
to have normal braking (without Anti-lock
braking system) unless the brake system
warning lamp also illuminates. Have the
system checked by an authorized dealer. Automatic Headlamp High Beam
Indicator It illuminates when the system
turns the headlamp high beam
on.
See
What Is Automatic High Beam
Control (page 91).
Auto Start-stop It illuminates to inform you when
the engine shuts down or in
conjunction with a message.
Battery If it illuminates while driving, it
indicates a malfunction. Switch
off all unnecessary electrical
equipment and have the system checked
by an authorized dealer immediately.
Blind Spot Monitor It illuminates when you switch
this feature off or in conjunction
with a message. See Blind Spot
Information System
(page 226).
Brake System WARNING:
Driving your vehicle
with the warning lamp on is dangerous.
A significant decrease in braking
performance may occur. It may take you
longer to stop your vehicle. Have your
vehicle checked as soon as possible.
Driving extended distances with the
parking brake engaged can cause brake
failure and the risk of personal injury.
Note: Indicators vary depending on region.
This lamp is a dual-function lamp and
illuminates when:
101
Edge (CDQ) Canada/United States of America, enUSA, Edition date: 201907, Third-Printing- Instrument ClusterE144524 E151262
Page 105 of 495
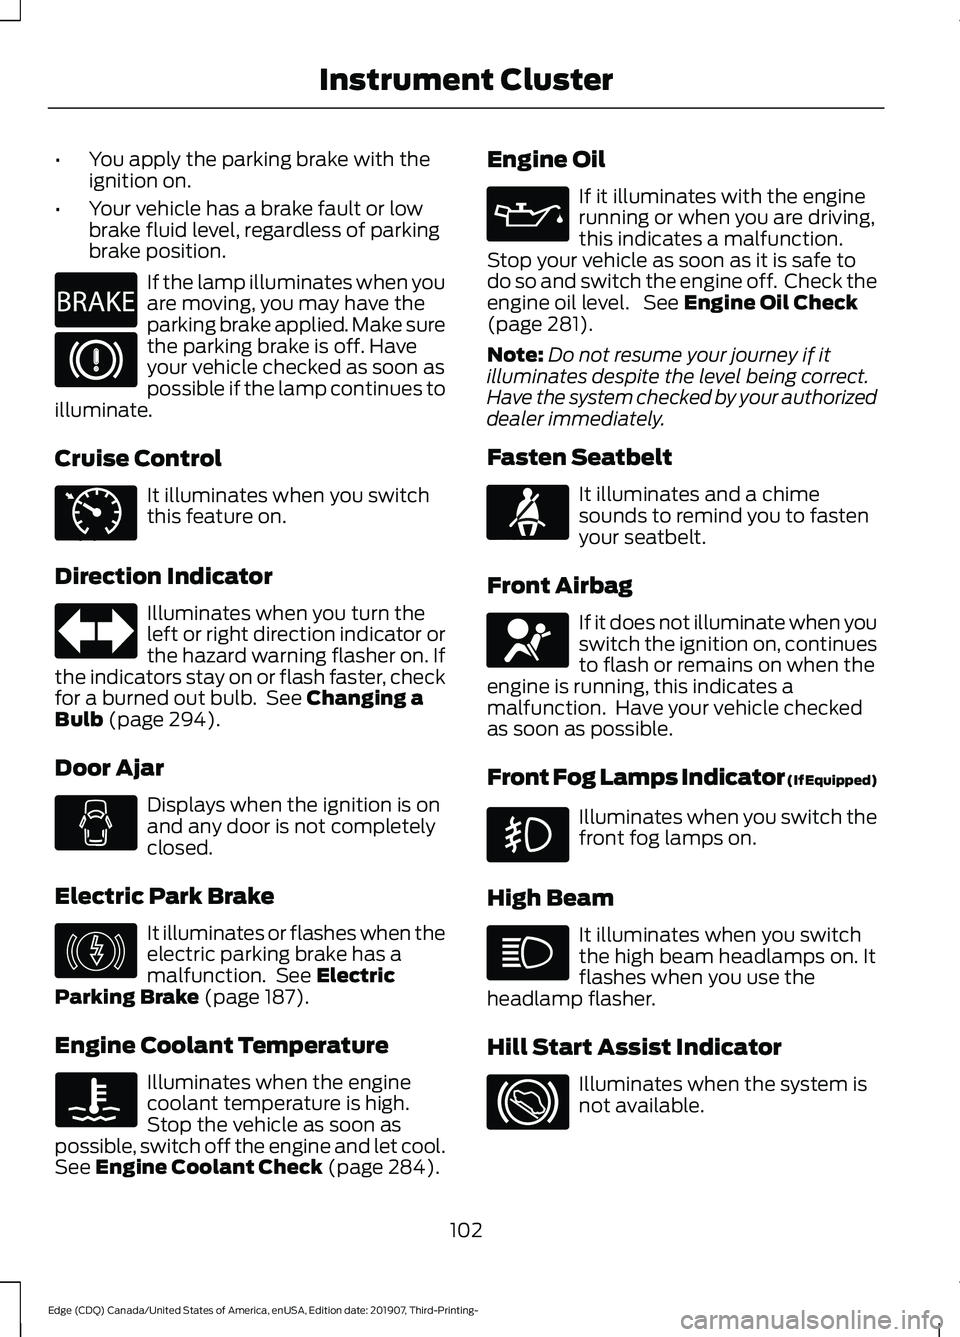
•
You apply the parking brake with the
ignition on.
• Your vehicle has a brake fault or low
brake fluid level, regardless of parking
brake position. If the lamp illuminates when you
are moving, you may have the
parking brake applied. Make sure
the parking brake is off. Have
your vehicle checked as soon as
possible if the lamp continues to
illuminate.
Cruise Control It illuminates when you switch
this feature on.
Direction Indicator Illuminates when you turn the
left or right direction indicator or
the hazard warning flasher on. If
the indicators stay on or flash faster, check
for a burned out bulb. See Changing a
Bulb (page 294).
Door Ajar Displays when the ignition is on
and any door is not completely
closed.
Electric Park Brake It illuminates or flashes when the
electric parking brake has a
malfunction. See
Electric
Parking Brake (page 187).
Engine Coolant Temperature Illuminates when the engine
coolant temperature is high.
Stop the vehicle as soon as
possible, switch off the engine and let cool.
See
Engine Coolant Check (page 284). Engine Oil If it illuminates with the engine
running or when you are driving,
this indicates a malfunction.
Stop your vehicle as soon as it is safe to
do so and switch the engine off. Check the
engine oil level. See
Engine Oil Check
(page 281).
Note: Do not resume your journey if it
illuminates despite the level being correct.
Have the system checked by your authorized
dealer immediately.
Fasten Seatbelt It illuminates and a chime
sounds to remind you to fasten
your seatbelt.
Front Airbag If it does not illuminate when you
switch the ignition on, continues
to flash or remains on when the
engine is running, this indicates a
malfunction. Have your vehicle checked
as soon as possible.
Front Fog Lamps Indicator (If Equipped) Illuminates when you switch the
front fog lamps on.
High Beam It illuminates when you switch
the high beam headlamps on. It
flashes when you use the
headlamp flasher.
Hill Start Assist Indicator Illuminates when the system is
not available.
102
Edge (CDQ) Canada/United States of America, enUSA, Edition date: 201907, Third-Printing- Instrument ClusterE270480 E71340 E146190 E71880 E67017
Page 107 of 495
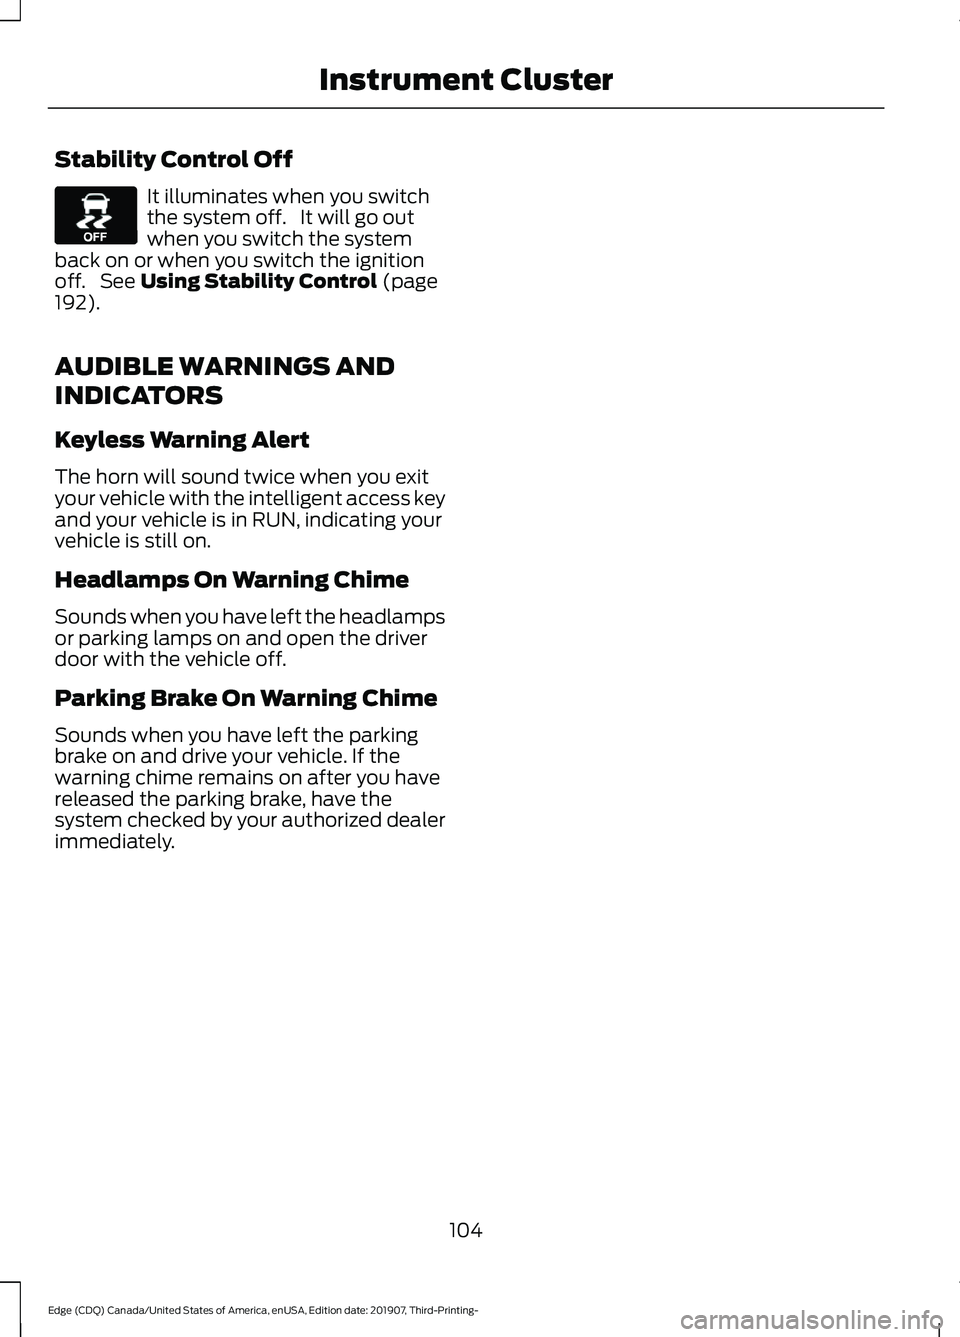
Stability Control Off
It illuminates when you switch
the system off. It will go out
when you switch the system
back on or when you switch the ignition
off. See Using Stability Control (page
192).
AUDIBLE WARNINGS AND
INDICATORS
Keyless Warning Alert
The horn will sound twice when you exit
your vehicle with the intelligent access key
and your vehicle is in RUN, indicating your
vehicle is still on.
Headlamps On Warning Chime
Sounds when you have left the headlamps
or parking lamps on and open the driver
door with the vehicle off.
Parking Brake On Warning Chime
Sounds when you have left the parking
brake on and drive your vehicle. If the
warning chime remains on after you have
released the parking brake, have the
system checked by your authorized dealer
immediately.
104
Edge (CDQ) Canada/United States of America, enUSA, Edition date: 201907, Third-Printing- Instrument ClusterE130458
Page 116 of 495
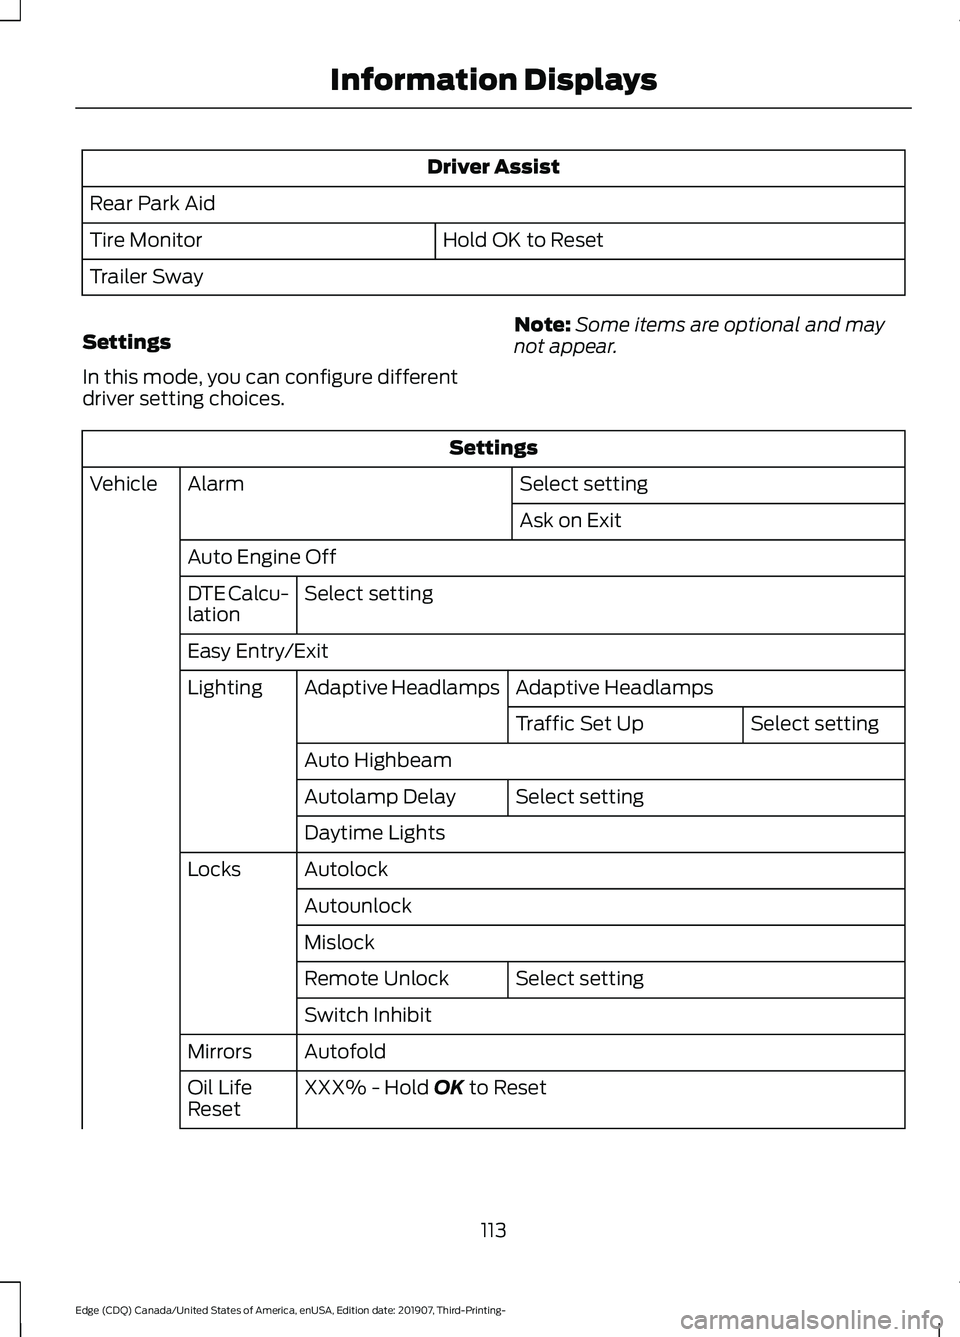
Driver Assist
Rear Park Aid Hold OK to Reset
Tire Monitor
Trailer Sway
Settings
In this mode, you can configure different
driver setting choices. Note:
Some items are optional and may
not appear. Settings
Select setting
Alarm
Vehicle
Ask on Exit
Auto Engine Off Select setting
DTE Calcu-
lation
Easy Entry/Exit
Adaptive Headlamps
Adaptive Headlamps
Lighting
Select setting
Traffic Set Up
Auto Highbeam Select setting
Autolamp Delay
Daytime Lights
Autolock
Locks
Autounlock
Mislock Select setting
Remote Unlock
Switch Inhibit
Autofold
Mirrors
XXX% - Hold OK to Reset
Oil Life
Reset
113
Edge (CDQ) Canada/United States of America, enUSA, Edition date: 201907, Third-Printing- Information Displays
Page 161 of 495
STARTING A GASOLINE
ENGINE
When you start the engine, the idle speed
increases. This helps to warm up the
engine. If the engine idle speed does not
slow down automatically, have your
vehicle checked by an authorized dealer.
Note:
You can crank the engine for a total
of 60 seconds without the engine starting
before the starting system temporarily
disables. The 60 seconds does not have to
be all at once. For example, if you crank the
engine three times for 20 seconds each
time, without the engine starting, you
reached the 60-second time limit. A
message appears in the information display
alerting you that you exceeded the cranking
time. You cannot attempt to start the
engine for at least 15 minutes. After 15
minutes, you are limited to a 15-second
engine cranking time. You need to wait 60
minutes before you can crank the engine for
60 seconds again.
Before starting the engine check the
following:
• Make sure all occupants have fastened
their seatbelts.
• Make sure the headlamps and
electrical accessories are off.
• Make sure the parking brake is on.
• Make sure the transmission is in park
(P) or neutral.
Note: Do not touch the accelerator pedal.
Note: A valid passive key must be located
inside your vehicle to switch the power on
and start your vehicle.
1. Press the brake pedal.
2. Briefly press the push button ignition switch. The system does not function if:
•
The passive key frequencies are
jammed.
• The key battery has no charge.
If you are unable to start the engine, do the
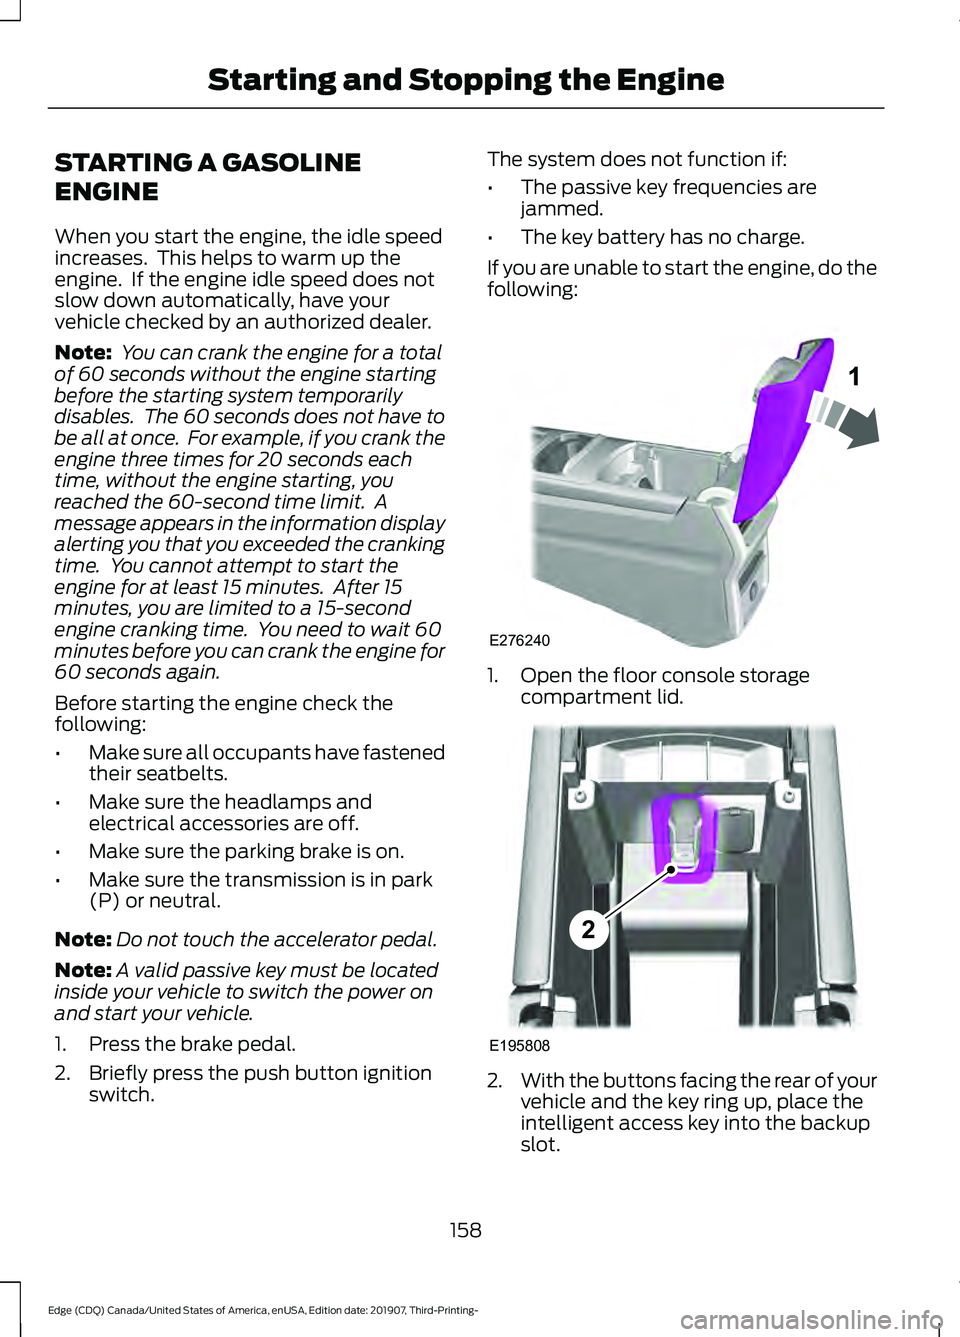
following: 1. Open the floor console storage
compartment lid. 2.
With the buttons facing the rear of your
vehicle and the key ring up, place the
intelligent access key into the backup
slot.
158
Edge (CDQ) Canada/United States of America, enUSA, Edition date: 201907, Third-Printing- Starting and Stopping the EngineE276240 E195808
2
Page 228 of 495
•
The road has no or poor lane markings
in the camera field-of-view.
• The camera is obscured or unable to
detect the lane markings due to
environmental, traffic or vehicle
conditions. For example, significant sun
angles, shadows, snow, heavy rain or
fog, following a large vehicle that is
blocking or shadowing the lane or poor
headlamp illumination.
See Troubleshooting for additional
information.
Green: Indicates that the system is
available or ready to provide a warning or
intervention on the indicated side. Yellow: Indicates that the system is
providing or has just provided a lane
keeping aid intervention.
Red: Indicates that the system is providing
or has just provided a lane keeping alert
warning.
The system can be temporarily suppressed
at any time by the following:
•
Quick braking.
• Fast acceleration.
• Using the turn signal indicator.
• Evasive steering maneuver.
• Driving too close to the lane markings.
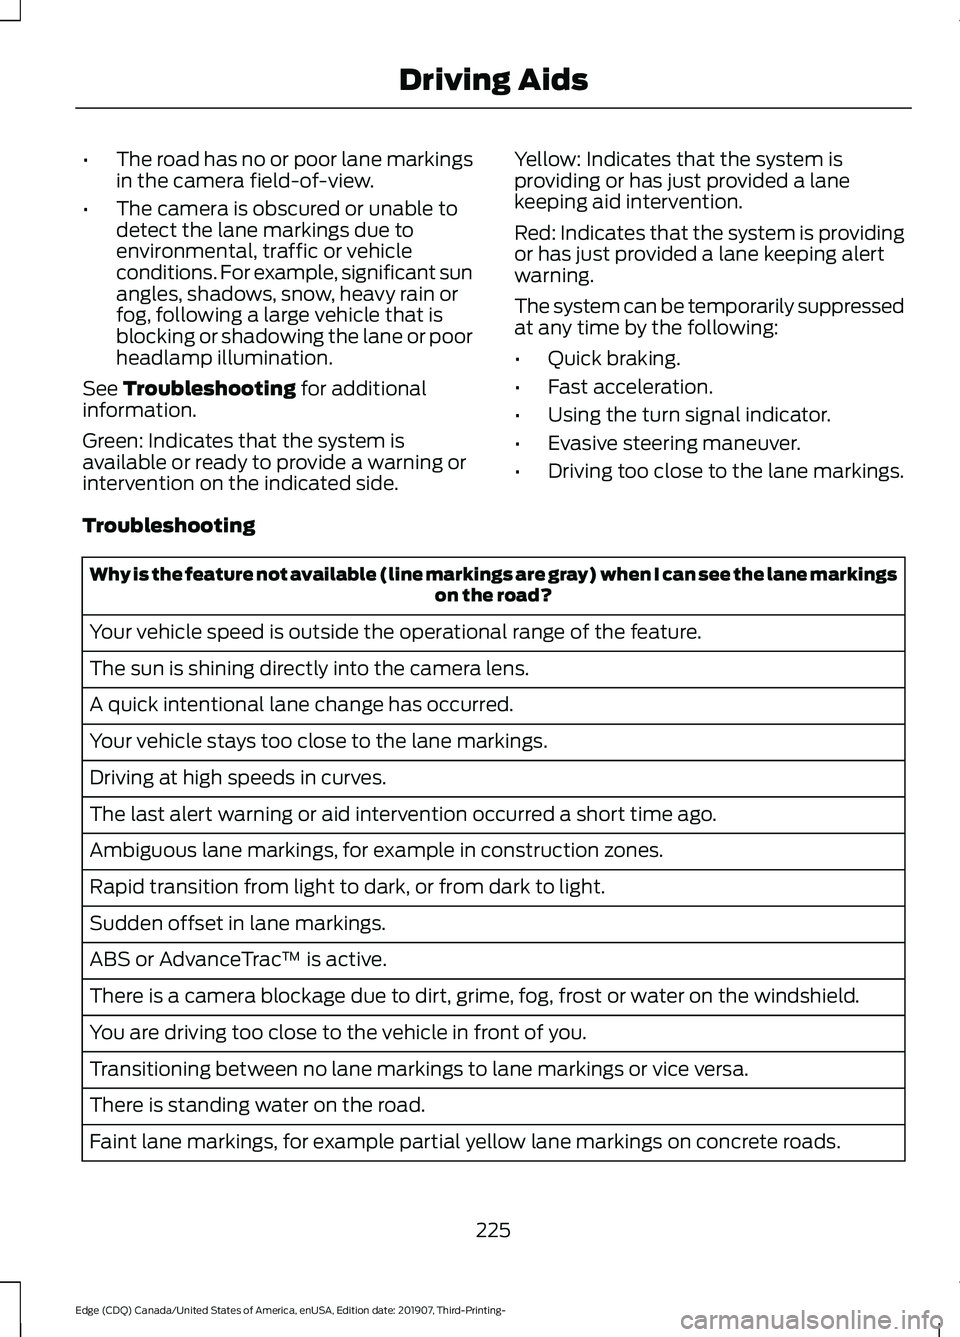
Troubleshooting Why is the feature not available (line markings are gray) when I can see the lane markings
on the road?
Your vehicle speed is outside the operational range of the feature.
The sun is shining directly into the camera lens.
A quick intentional lane change has occurred.
Your vehicle stays too close to the lane markings.
Driving at high speeds in curves.
The last alert warning or aid intervention occurred a short time ago.
Ambiguous lane markings, for example in construction zones.
Rapid transition from light to dark, or from dark to light.
Sudden offset in lane markings.
ABS or AdvanceTrac ™ is active.
There is a camera blockage due to dirt, grime, fog, frost or water on the windshield.
You are driving too close to the vehicle in front of you.
Transitioning between no lane markings to lane markings or vice versa.
There is standing water on the road.
Faint lane markings, for example partial yellow lane markings on concrete roads.
225
Edge (CDQ) Canada/United States of America, enUSA, Edition date: 201907, Third-Printing- Driving Aids
Page 259 of 495
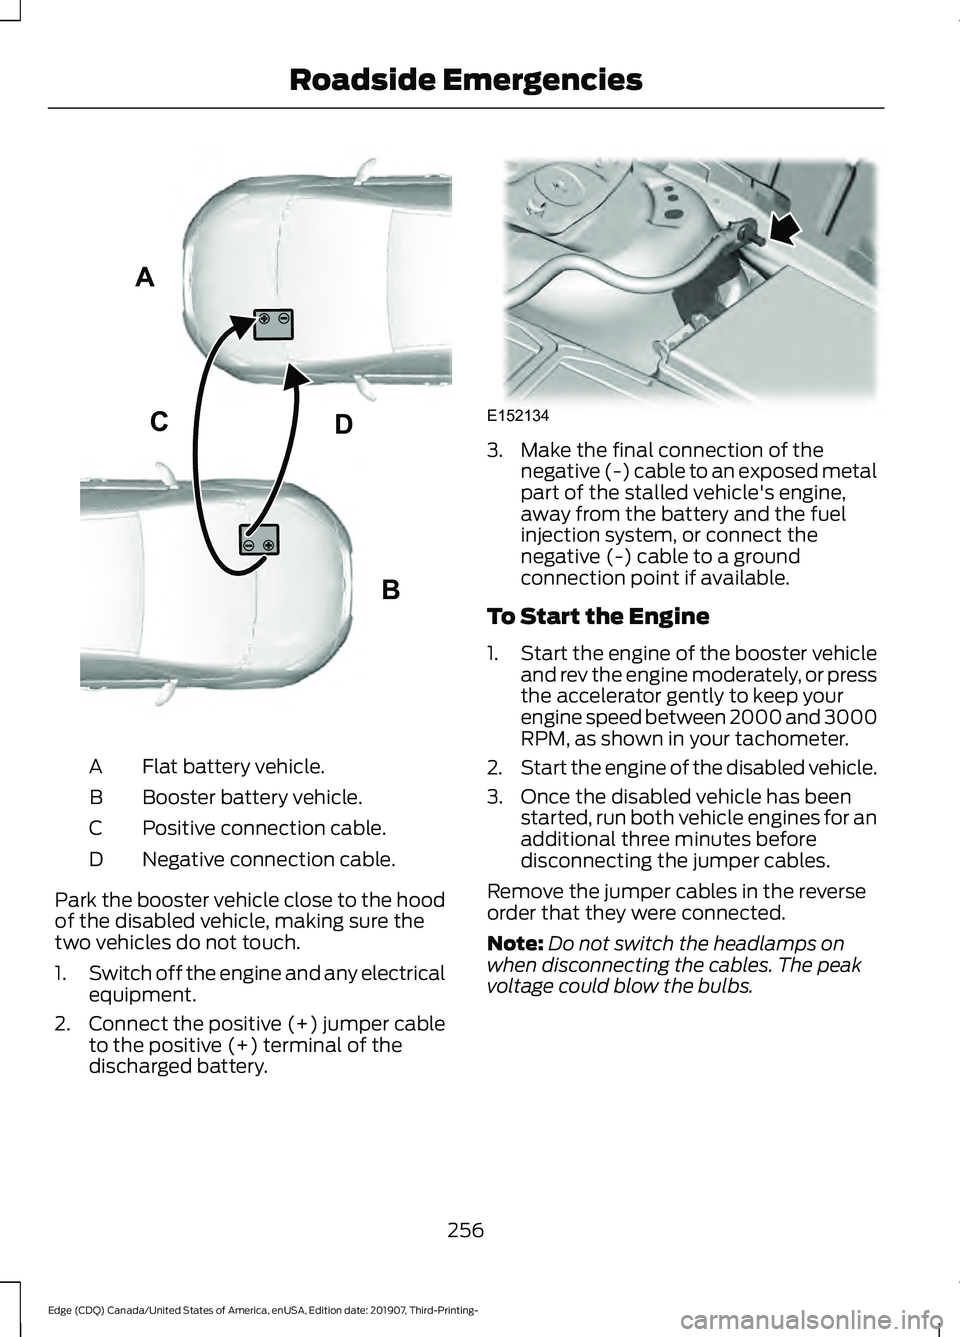
Flat battery vehicle.
A
Booster battery vehicle.
B
Positive connection cable.
C
Negative connection cable.
D
Park the booster vehicle close to the hood
of the disabled vehicle, making sure the
two vehicles do not touch.
1. Switch off the engine and any electrical
equipment.
2. Connect the positive (+) jumper cable
to the positive (+) terminal of the
discharged battery. 3. Make the final connection of the
negative (-) cable to an exposed metal
part of the stalled vehicle's engine,
away from the battery and the fuel
injection system, or connect the
negative (-) cable to a ground
connection point if available.
To Start the Engine
1. Start the engine of the booster vehicle
and rev the engine moderately, or press
the accelerator gently to keep your
engine speed between 2000 and 3000
RPM, as shown in your tachometer.
2. Start the engine of the disabled vehicle.
3. Once the disabled vehicle has been started, run both vehicle engines for an
additional three minutes before
disconnecting the jumper cables.
Remove the jumper cables in the reverse
order that they were connected.
Note: Do not switch the headlamps on
when disconnecting the cables. The peak
voltage could blow the bulbs.
256
Edge (CDQ) Canada/United States of America, enUSA, Edition date: 201907, Third-Printing- Roadside EmergenciesA
B
CDE102925 E152134
Page 270 of 495
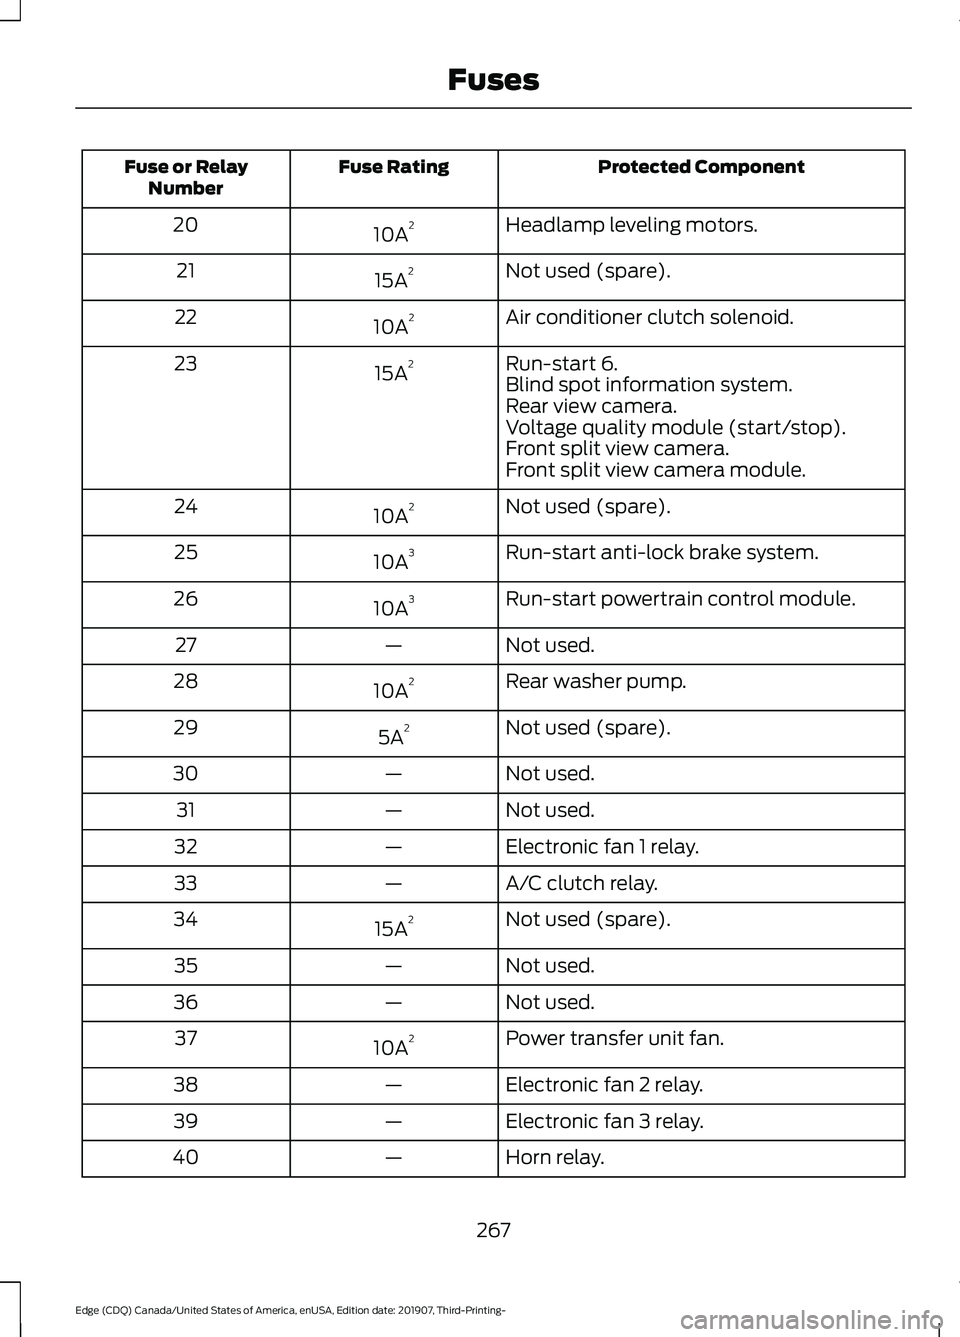
Protected Component
Fuse Rating
Fuse or Relay
Number
Headlamp leveling motors.
10A 2
20
Not used (spare).
15A 2
21
Air conditioner clutch solenoid.
10A 2
22
Run-start 6.
15A 2
23
Blind spot information system.
Rear view camera.
Voltage quality module (start/stop).
Front split view camera.
Front split view camera module.
Not used (spare).
10A 2
24
Run-start anti-lock brake system.
10A 3
25
Run-start powertrain control module.
10A 3
26
Not used.
—
27
Rear washer pump.
10A 2
28
Not used (spare).
5A 2
29
Not used.
—
30
Not used.
—
31
Electronic fan 1 relay.
—
32
A/C clutch relay.
—
33
Not used (spare).
15A 2
34
Not used.
—
35
Not used.
—
36
Power transfer unit fan.
10A 2
37
Electronic fan 2 relay.
—
38
Electronic fan 3 relay.
—
39
Horn relay.
—
40
267
Edge (CDQ) Canada/United States of America, enUSA, Edition date: 201907, Third-Printing- Fuses
Page 294 of 495
7. While the engine is running, press the
brake pedal and shift into neutral (N).
8. Allow the engine to run for at least one
minute by pressing on the accelerator
pedal.
9. Drive the vehicle at least 12 mi (20 km)
to completely relearn the idle and fuel
trim strategy.
Note: If you do not allow the engine to
relearn the idle and fuel trim strategy, the
idle quality of your vehicle may be adversely
affected until the engine computer
eventually relearns the idle trim and fuel
trim strategy.
Make sure that you dispose of old batteries
in an environmentally friendly way. Seek
advice from your local authority about
recycling old batteries.
ADJUSTING THE HEADLAMPS
Vertical Aim Adjustment
The headlamps on your vehicle are
properly aimed at the assembly plant. If
your vehicle has been involved in a crash,
have the aim of the headlamp beam
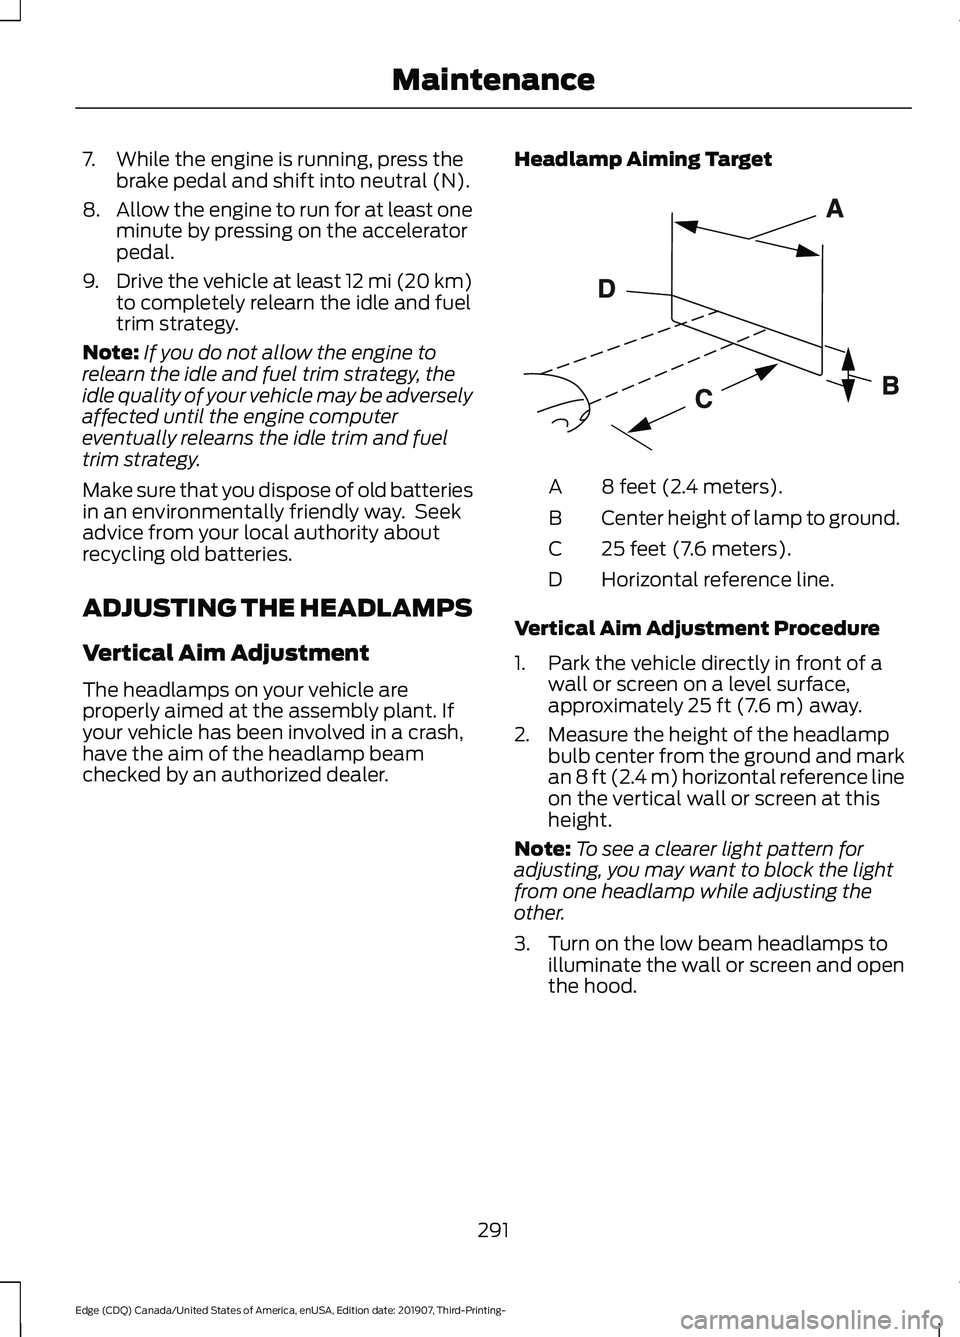
checked by an authorized dealer. Headlamp Aiming Target 8 feet (2.4 meters).
A
Center height of lamp to ground.
B
25 feet (7.6 meters).
C
Horizontal reference line.
D
Vertical Aim Adjustment Procedure
1. Park the vehicle directly in front of a wall or screen on a level surface,
approximately 25 ft (7.6 m) away.
2. Measure the height of the headlamp bulb center from the ground and mark
an
8 ft (2.4 m) horizontal reference line
on the vertical wall or screen at this
height.
Note: To see a clearer light pattern for
adjusting, you may want to block the light
from one headlamp while adjusting the
other.
3. Turn on the low beam headlamps to illuminate the wall or screen and open
the hood.
291
Edge (CDQ) Canada/United States of America, enUSA, Edition date: 201907, Third-Printing- MaintenanceE142592
Page 295 of 495
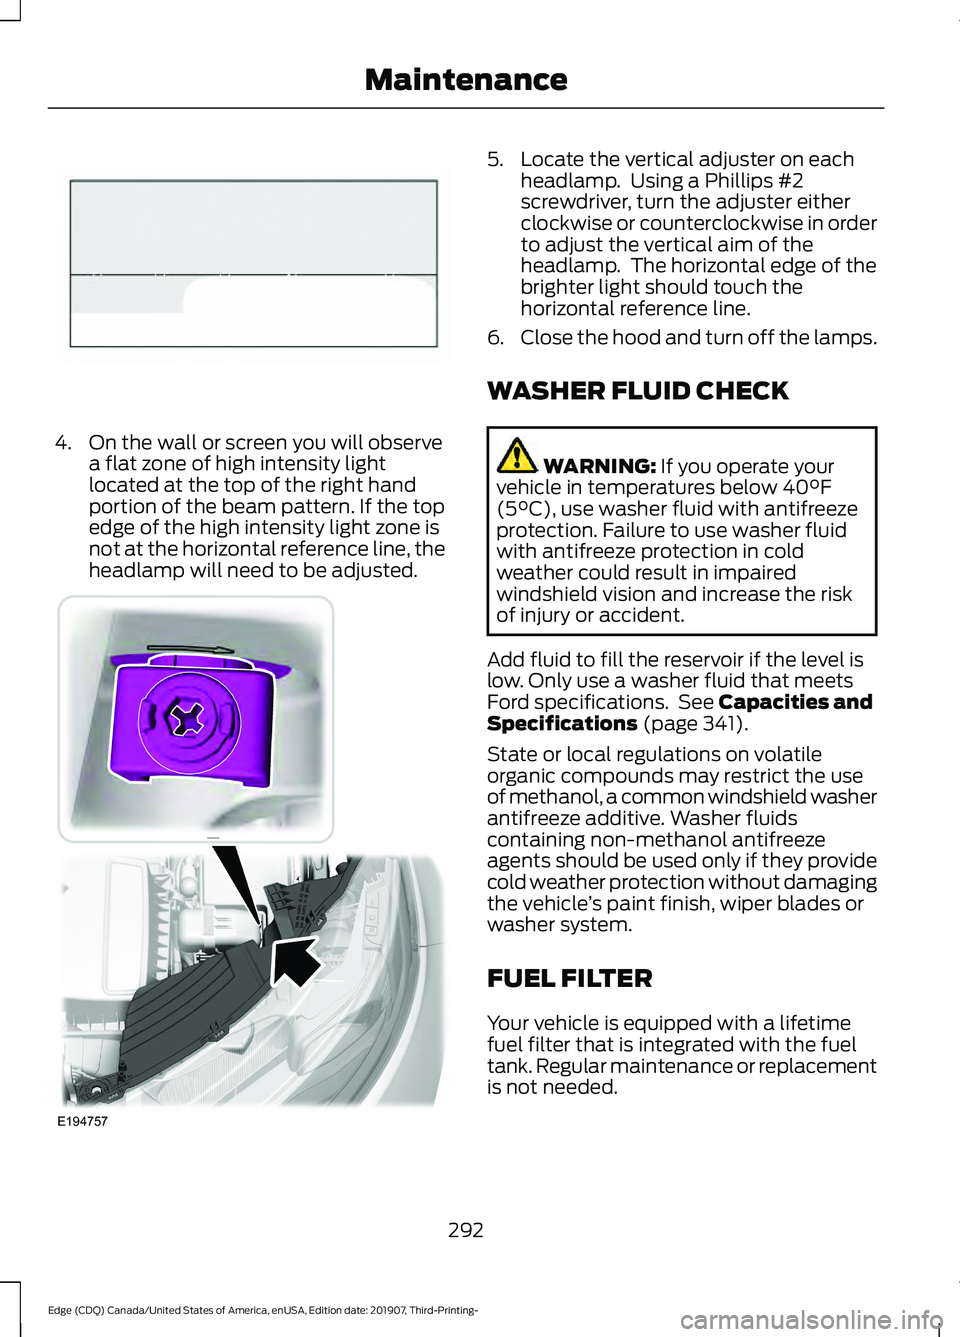
4. On the wall or screen you will observe
a flat zone of high intensity light
located at the top of the right hand
portion of the beam pattern. If the top
edge of the high intensity light zone is
not at the horizontal reference line, the
headlamp will need to be adjusted. 5. Locate the vertical adjuster on each
headlamp. Using a Phillips #2
screwdriver, turn the adjuster either
clockwise or counterclockwise in order
to adjust the vertical aim of the
headlamp. The horizontal edge of the
brighter light should touch the
horizontal reference line.
6. Close the hood and turn off the lamps.
WASHER FLUID CHECK WARNING: If you operate your
vehicle in temperatures below 40°F
(5°C), use washer fluid with antifreeze
protection. Failure to use washer fluid
with antifreeze protection in cold
weather could result in impaired
windshield vision and increase the risk
of injury or accident.
Add fluid to fill the reservoir if the level is
low. Only use a washer fluid that meets
Ford specifications. See
Capacities and
Specifications (page 341).
State or local regulations on volatile
organic compounds may restrict the use
of methanol, a common windshield washer
antifreeze additive. Washer fluids
containing non-methanol antifreeze
agents should be used only if they provide
cold weather protection without damaging
the vehicle ’s paint finish, wiper blades or
washer system.
FUEL FILTER
Your vehicle is equipped with a lifetime
fuel filter that is integrated with the fuel
tank. Regular maintenance or replacement
is not needed.
292
Edge (CDQ) Canada/United States of America, enUSA, Edition date: 201907, Third-Printing- MaintenanceE142465 E194757