service indicator FORD EDGE 2020 User Guide
[x] Cancel search | Manufacturer: FORD, Model Year: 2020, Model line: EDGE, Model: FORD EDGE 2020Pages: 495, PDF Size: 6.38 MB
Page 193 of 495
PRINCIPLE OF OPERATION
The traction control system helps avoid
drive wheel spin and loss of traction.
If your vehicle begins to slide, the system
applies the brakes to individual wheels
and, when needed, reduces engine power
at the same time. If the wheels spin when
accelerating on slippery or loose surfaces,
the system reduces engine power in order
to increase traction.
USING TRACTION CONTROL
WARNING: The stability and
traction control light illuminates steadily
if the system detects a failure. Make sure
you did not manually disable the traction
control system using the information
display controls or the switch. If the
stability control and traction control light
is still illuminating steadily, have the
system serviced by an authorized dealer
immediately. Operating your vehicle with
the traction control disabled could lead
to an increased risk of loss of vehicle
control, vehicle rollover, personal injury
and death.
The system automatically turns on each
time you switch the ignition on.
If your vehicle is stuck in mud or snow,
switching traction control off may be
beneficial as this allows the wheels to spin.
Note: When you switch traction control off,
stability control remains fully active.
Switching the System Off
When you switch the system off or on, a
message appears in the information
display showing system status.
You can switch the system off with the
traction control switch. Using a Switch
Use the traction control switch on the
instrument panel to switch the system off
or on.
System Indicator Lights and
Messages
The stability and traction control
light:
• Temporarily illuminates on engine
start-up.
• Flashes when a driving condition
activates either of the systems.
• Illuminates if a problem occurs in either
of the systems. The stability and traction control
off light temporarily illuminates
on engine start-up and stays on
when you switch the traction control
system off.
190
Edge (CDQ) Canada/United States of America, enUSA, Edition date: 201907, Third-Printing- Traction ControlE138639 E130458
Page 257 of 495
Vehicles Sold in Canada: Getting
Roadside Assistance
To fully assist you should you have a
vehicle concern, Ford Motor Company of
Canada, Limited offers a complimentary
roadside assistance program. This program
is eligible within Canada or the continental
United States.
The service is available 24 hours a day,
seven days a week.
This program is separate from the New
Vehicle Limited Warranty, but the coverage
is concurrent with the powertrain coverage
period of your vehicle. Canadian roadside
coverage and benefits may differ from the
U.S. coverage.
If you require more information, please call
us in Canada at 1-800-665-2006, or visit
our website at www.ford.ca.
HAZARD FLASHERS
Note:
The hazard flashers operate when
the ignition is in any position, or if the key is
not in the ignition. If used when the vehicle
is not running, the battery loses charge. As
a result, there may be insufficient power to
restart your vehicle. The flasher control is on the
instrument panel. Use your
hazard flashers when your
vehicle is creating a safety hazard for other
motorists.
• Press the flasher control and all front
and rear direction indicators flash.
• Press the button again to switch them
off. FUEL SHUTOFF WARNING: If your vehicle has been
involved in a crash, have the fuel system
checked. Failure to follow this instruction
could result in fire, personal injury or
death.
Note: When you try to restart your vehicle
after a fuel shutoff, the vehicle makes sure
that various systems are safe to restart.
Once the vehicle determines the systems
are safe, then the vehicle allows you to
restart.
Note: In the event that your vehicle does
not restart after your third attempt, contact
a qualified technician.
The fuel pump shutoff stops the flow of
fuel to the engine in the event of a
moderate to severe crash. Not every
impact causes a shutoff.
Should your vehicle shut off after a crash,
you may restart your vehicle.
1. Press START/STOP to switch off your
vehicle.
2. Press the brake pedal and START/STOP
to switch on your
vehicle.
3. Remove your foot from the brake pedal
and press
START/STOP to switch off
your vehicle.
4. You can attempt to start the vehicle by pressing the brake pedal and
START/STOP
, or press START/STOP
without pressing the brake pedal.
5. If the vehicle does not start, repeat steps 1 through 4.
254
Edge (CDQ) Canada/United States of America, enUSA, Edition date: 201907, Third-Printing- Roadside Emergencies
Page 260 of 495
POST-CRASH ALERT SYSTEM
The system flashes the direction indicators
and sounds the horn (intermittently) in the
event of a serious impact that deploys an
airbag (front, side, side curtain or Safety
Canopy) or the seatbelt pretensioners.
The horn and indicators turn off when:
•
You press the hazard control button.
• You press the panic button on the
remote entry transmitter (if equipped).
• Your vehicle runs out of power.
• Sounding of the horn is only enabled
in specific markets.
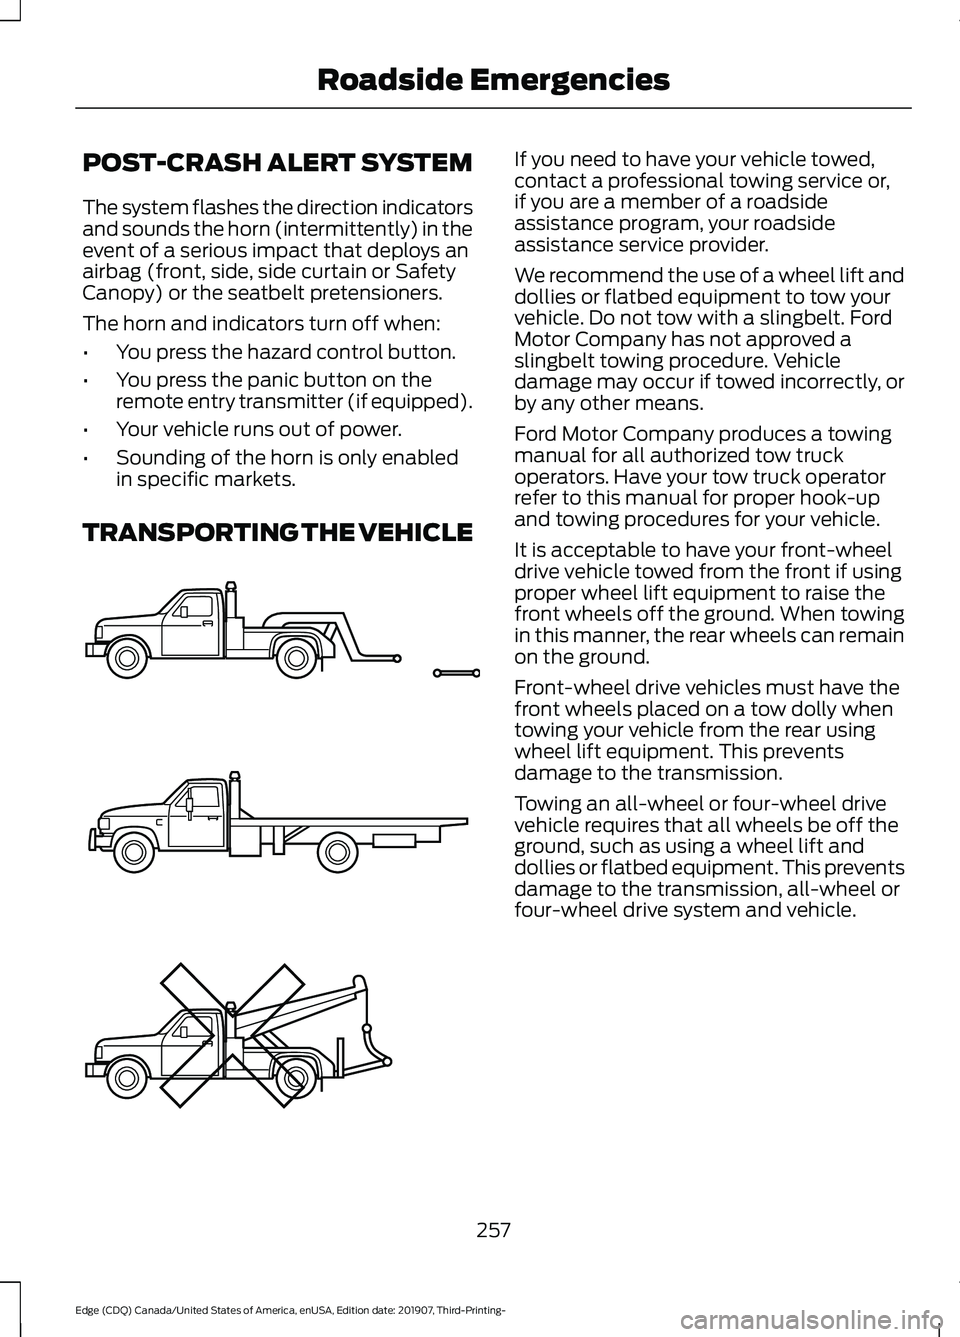
TRANSPORTING THE VEHICLE If you need to have your vehicle towed,
contact a professional towing service or,
if you are a member of a roadside
assistance program, your roadside
assistance service provider.
We recommend the use of a wheel lift and
dollies or flatbed equipment to tow your
vehicle. Do not tow with a slingbelt. Ford
Motor Company has not approved a
slingbelt towing procedure. Vehicle
damage may occur if towed incorrectly, or
by any other means.
Ford Motor Company produces a towing
manual for all authorized tow truck
operators. Have your tow truck operator
refer to this manual for proper hook-up
and towing procedures for your vehicle.
It is acceptable to have your front-wheel
drive vehicle towed from the front if using
proper wheel lift equipment to raise the
front wheels off the ground. When towing
in this manner, the rear wheels can remain
on the ground.
Front-wheel drive vehicles must have the
front wheels placed on a tow dolly when
towing your vehicle from the rear using
wheel lift equipment. This prevents
damage to the transmission.
Towing an all-wheel or four-wheel drive
vehicle requires that all wheels be off the
ground, such as using a wheel lift and
dollies or flatbed equipment. This prevents
damage to the transmission, all-wheel or
four-wheel drive system and vehicle.
257
Edge (CDQ) Canada/United States of America, enUSA, Edition date: 201907, Third-Printing- Roadside EmergenciesE143886
Page 298 of 495
Headlamp
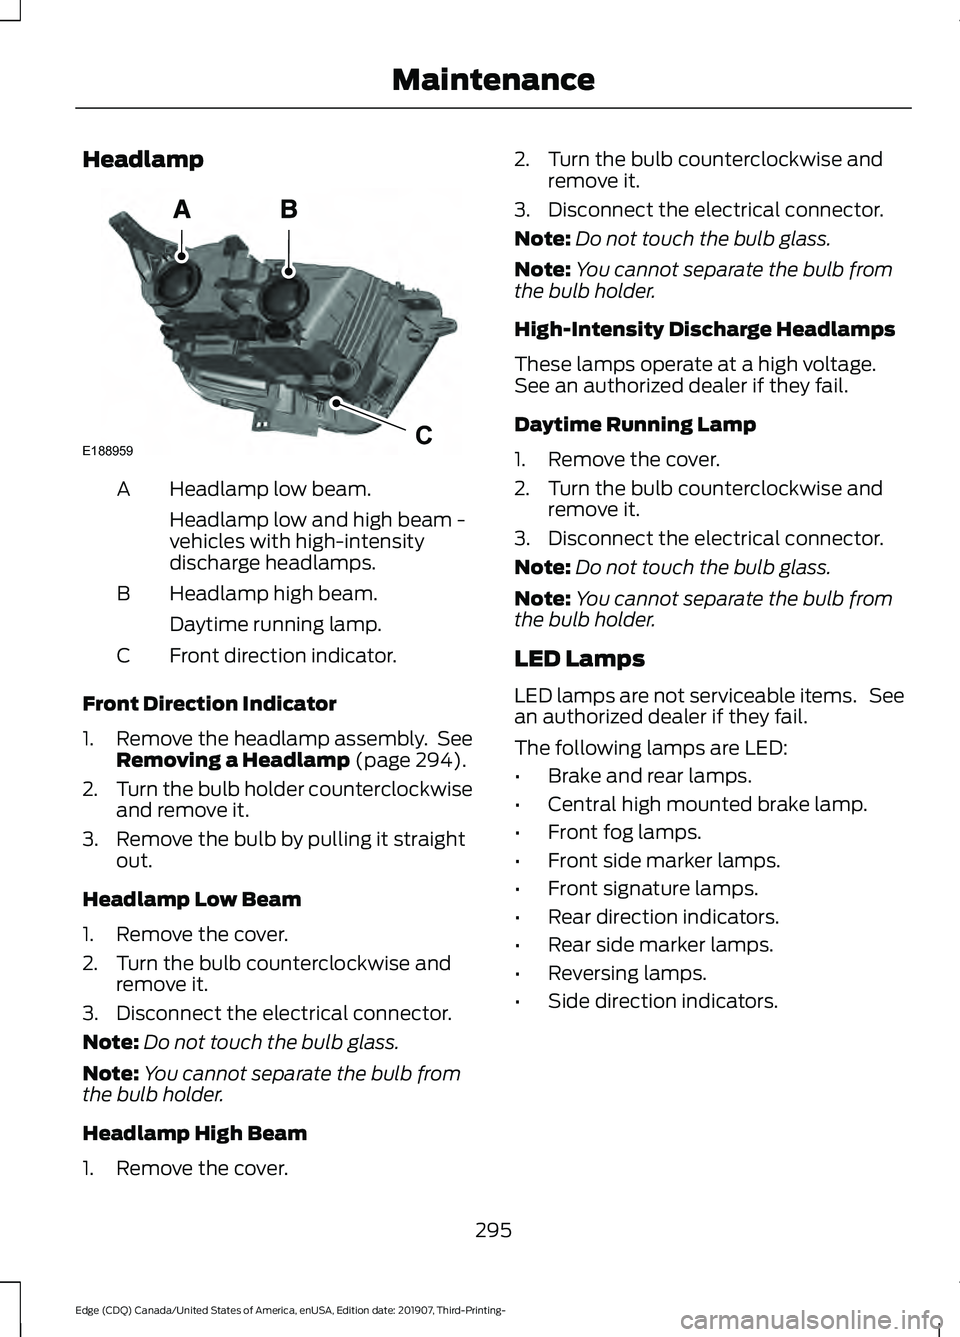
Headlamp low beam.
A
Headlamp low and high beam -
vehicles with high-intensity
discharge headlamps.
Headlamp high beam.
B
Daytime running lamp.
Front direction indicator.
C
Front Direction Indicator
1. Remove the headlamp assembly. See
Removing a Headlamp (page 294).
2. Turn the bulb holder counterclockwise
and remove it.
3. Remove the bulb by pulling it straight out.
Headlamp Low Beam
1. Remove the cover.
2. Turn the bulb counterclockwise and remove it.
3. Disconnect the electrical connector.
Note: Do not touch the bulb glass.
Note: You cannot separate the bulb from
the bulb holder.
Headlamp High Beam
1. Remove the cover. 2. Turn the bulb counterclockwise and
remove it.
3. Disconnect the electrical connector.
Note: Do not touch the bulb glass.
Note: You cannot separate the bulb from
the bulb holder.
High-Intensity Discharge Headlamps
These lamps operate at a high voltage.
See an authorized dealer if they fail.
Daytime Running Lamp
1. Remove the cover.
2. Turn the bulb counterclockwise and remove it.
3. Disconnect the electrical connector.
Note: Do not touch the bulb glass.
Note: You cannot separate the bulb from
the bulb holder.
LED Lamps
LED lamps are not serviceable items. See
an authorized dealer if they fail.
The following lamps are LED:
• Brake and rear lamps.
• Central high mounted brake lamp.
• Front fog lamps.
• Front side marker lamps.
• Front signature lamps.
• Rear direction indicators.
• Rear side marker lamps.
• Reversing lamps.
• Side direction indicators.
295
Edge (CDQ) Canada/United States of America, enUSA, Edition date: 201907, Third-Printing- MaintenanceE188959C
Page 336 of 495
When Inflating Your Tires
WARNING: Do not use the tire
pressure displayed in the information
display as a tire pressure gauge. Failure
to follow this instruction could result in
personal injury or death.
When putting air into your tires (such as at
a gas station or in your garage), the tire
pressure monitoring system may not
respond immediately to the air added to
your tires.
It may take up to two minutes of driving
over 20 mph (32 km/h) for the light to turn
off after you have filled your tires to the
recommended inflation pressure.
How Temperature Affects Your Tire
Pressure
The tire pressure monitoring system
monitors tire pressure in each pneumatic
tire. While driving in a normal manner, a
typical passenger tire inflation pressure
may increase about
2 –4 psi (14– 28 kPa)
from a cold start situation. If the vehicle is
stationary overnight with the outside
temperature significantly lower than the
daytime temperature, the tire pressure may
decrease about 3 psi (21 kPa) for a drop of
30°F (17°C) in ambient temperature. This
lower pressure value may be detected by
the tire pressure monitoring system as
being significantly lower than the
recommended inflation pressure and
activate the system warning light for low
tire pressure. If the low tire pressure
warning light is on, visually check each tire
to verify that no tire is flat. If one or more
tires are flat, repair as necessary. Check
the air pressure in the road tires. If any tire
is under-inflated, carefully drive the vehicle
to the nearest location where air can be
added to the tires. Inflate all the tires to
the recommended inflation pressure. CHANGING A ROAD WHEEL WARNING:
If the tire pressure
monitor sensor becomes damaged it
may not function.
Note: The use of tire sealant may damage
your tire pressure monitoring system and
should only be used in roadside
emergencies. If you must use a sealant, use
the Tire Mobility Kit sealant. Replace the tire
pressure monitoring system sensor and
valve stem on the wheel by an authorized
dealer after use of the sealant.
Note: The tire pressure monitoring system
indicator light will illuminate when the spare
tire is in use. To restore the full function of
the monitoring system, all road wheels
equipped with tire pressure monitoring
sensors must be mounted on the vehicle.
If you get a flat tire while driving, do not
apply the brake heavily. Instead, gradually
decrease your speed. Hold the steering
wheel firmly and slowly move to a safe
place on the side of the road.
Have a flat serviced by an authorized
dealer in order to prevent damage to the
tire pressure monitoring system sensors.
See
Tire Pressure Monitoring System
(page 330). Replace the spare tire with a
road tire as soon as possible. During
repairing or replacing of the flat tire, have
an authorized dealer inspect the tire
pressure monitoring system sensor for
damage.
Dissimilar Spare Wheel and Tire
Assembly Information WARNING:
Failure to follow these
guidelines could result in an increased
risk of loss of vehicle control, injury or
death.
333
Edge (CDQ) Canada/United States of America, enUSA, Edition date: 201907, Third-Printing- Wheels and Tires
Page 370 of 495
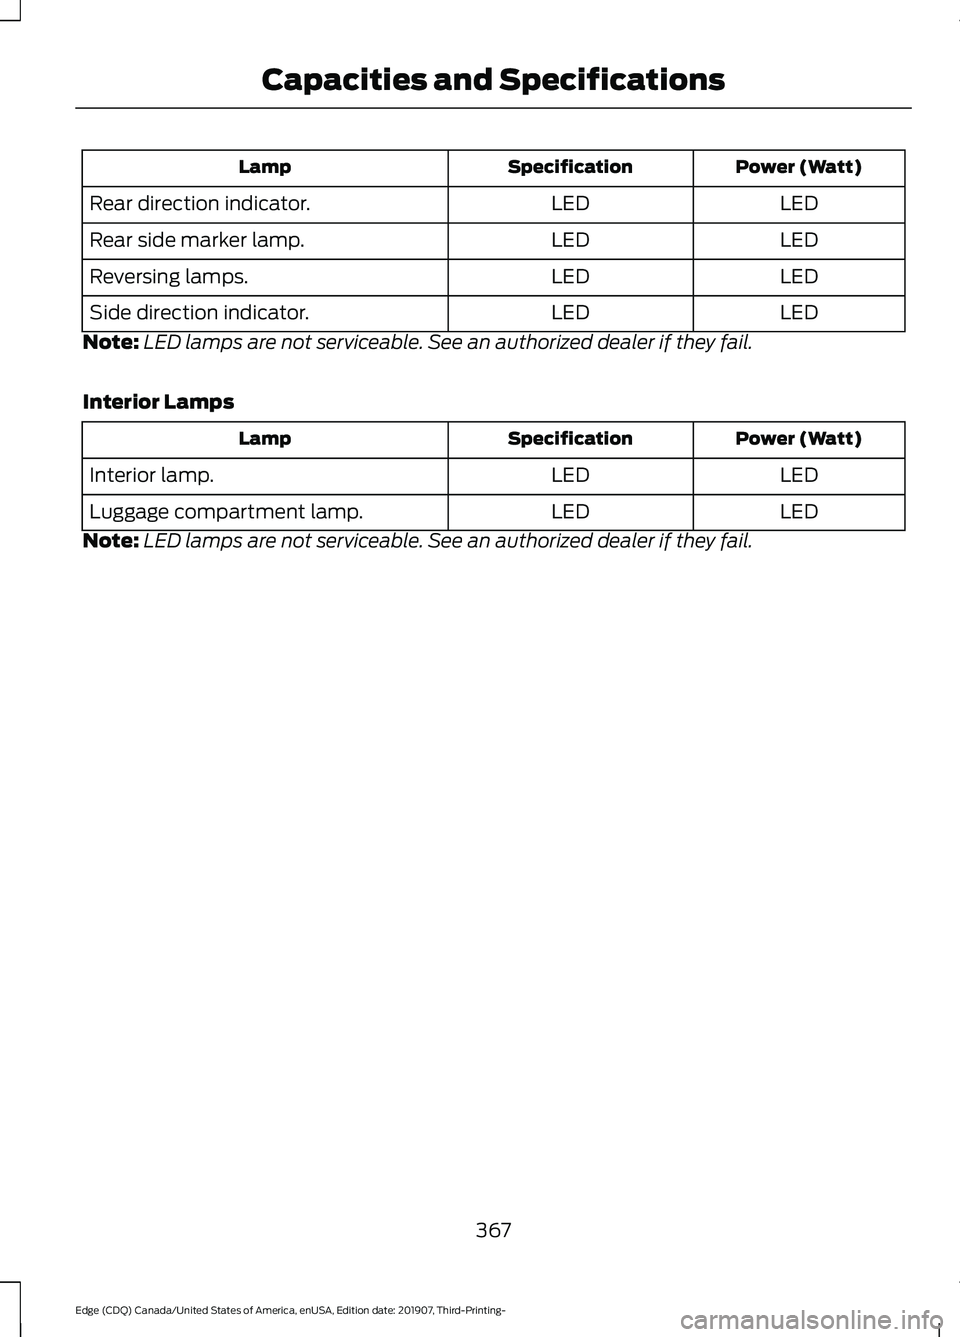
Power (Watt)
Specification
Lamp
LED
LED
Rear direction indicator.
LED
LED
Rear side marker lamp.
LED
LED
Reversing lamps.
LED
LED
Side direction indicator.
Note: LED lamps are not serviceable. See an authorized dealer if they fail.
Interior Lamps Power (Watt)
Specification
Lamp
LED
LED
Interior lamp.
LED
LED
Luggage compartment lamp.
Note: LED lamps are not serviceable. See an authorized dealer if they fail.
367
Edge (CDQ) Canada/United States of America, enUSA, Edition date: 201907, Third-Printing- Capacities and Specifications
Page 433 of 495
When the oil change message appears in
the information display, it is time for an oil
change. Make sure you perform the oil
change within two weeks or 500 mi
(800 km) of the message appearing. Make
sure you reset the Intelligent Oil-Life
Monitor after each oil change. See
Oil
Change Indicator Reset (page 282).
If your information display resets
prematurely or becomes inoperative, you
should perform the oil change interval at
six months or
5,000 mi (8,000 km) from
your last oil change. Never exceed one year
or
10,000 mi (16,000 km) between oil
change intervals,
Your vehicle is very sophisticated and built
with multiple, complex, performance
systems. Every manufacturer develops
these systems using different
specifications and performance features.
That is why it is important to rely upon your
dealership to properly diagnose and repair
your vehicle.
We have recommended maintenance
intervals for various parts and component
systems based upon engineering testing.
We rely upon this testing to determine the
most appropriate mileage for replacement
of oils and fluids to protect your vehicle at
the lowest overall cost to you and
recommends against maintenance
schedules that deviate from the scheduled
maintenance information.
We strongly recommend the use of only
genuine Ford, Motorcraft or
Ford-authorized re-manufactured
replacement parts engineered for your
vehicle. Additives and Chemicals
This owner's manual and the our
Workshop Manual list the recommended
additives and chemicals for your vehicle.
We do not recommend using chemicals or
additives not approved by us as part of
your vehicle
’s normal maintenance. Please
consult your warranty information.
Oils, Fluids and Flushing
In many cases, fluid discoloration is a
normal operating characteristic and, by
itself, does not necessarily indicate a
concern or that the fluid needs to be
changed. However, a qualified expert, such
as the factory-trained technicians at your
dealership, should inspect discolored fluids
that also show signs of overheating or
foreign material contamination
immediately.
Make sure to change your vehicle ’s oils and
fluids at the specified intervals or in
conjunction with a repair. Flushing is a
viable way to change fluid for many vehicle
sub-systems during scheduled
maintenance. It is critical that systems are
flushed only with new fluid that is the same
as that required to fill and operate the
system or using a Ford-approved flushing
chemical.
Owner Checks and Services
Make sure you perform the following basic
maintenance checks and inspections every
month or at six-month intervals. Check Every Month
Engine oil level.
Function of all interior and exterior lights.
Tires (including spare) for wear and proper pressure.
430
Edge (CDQ) Canada/United States of America, enUSA, Edition date: 201907, Third-Printing- Scheduled Maintenance
Page 437 of 495
At Every Oil Change Interval as Indicated by the Information Display
1
Inspect the tires, tire wear and measure the tread depth.
Inspect the wheels and related components for abnormal noise, wear, looseness or
drag.
1 Do not exceed one year or 10,000 mi (16,000 km) between service intervals.
2 Reset the Intelligent Oil-Life Monitor after engine oil and filter changes. See Oil Change
Indicator Reset
(page 282). Other Maintenance Items
1
Replace the cabin air filter.
Every
20,000 mi
(32,000 km)
Replace the engine air filter.
Every
30,000 mi
(48,000 km)
Replace the spark plugs.
Every
100,000 mi
(160,000 km) Inspect the accessory drive belt(s). 2
Change the automatic transmission fluid.
Every
150,000 mi
(240,000 km) Replace the accessory drive belt(s). 3
Change the engine coolant. 4
At
200,000 mi
(320,000 km)
1 Perform these maintenance items within 3,000 mi (4,800 km) of the last engine oil and
filter change. Do not exceed the designated distance for the interval.
2 After initial inspection, inspect every other oil change until replaced.
3 If not replaced within the last
100,000 mi (160,000 km).
4 Initial replacement at 10 years or
200,000 mi (320,000 km), then every five years or
100,000 mi (160,000 km). Brake Fluid Maintenance
1
Change the brake fluid. 2
Every 3 Years
1 Perform this maintenance item every 3 years. Do not exceed the designated time for
the interval.
2 Brake fluid servicing requires special equipment available at your authorized dealer.
434
Edge (CDQ) Canada/United States of America, enUSA, Edition date: 201907, Third-Printing- Scheduled Maintenance
Page 439 of 495
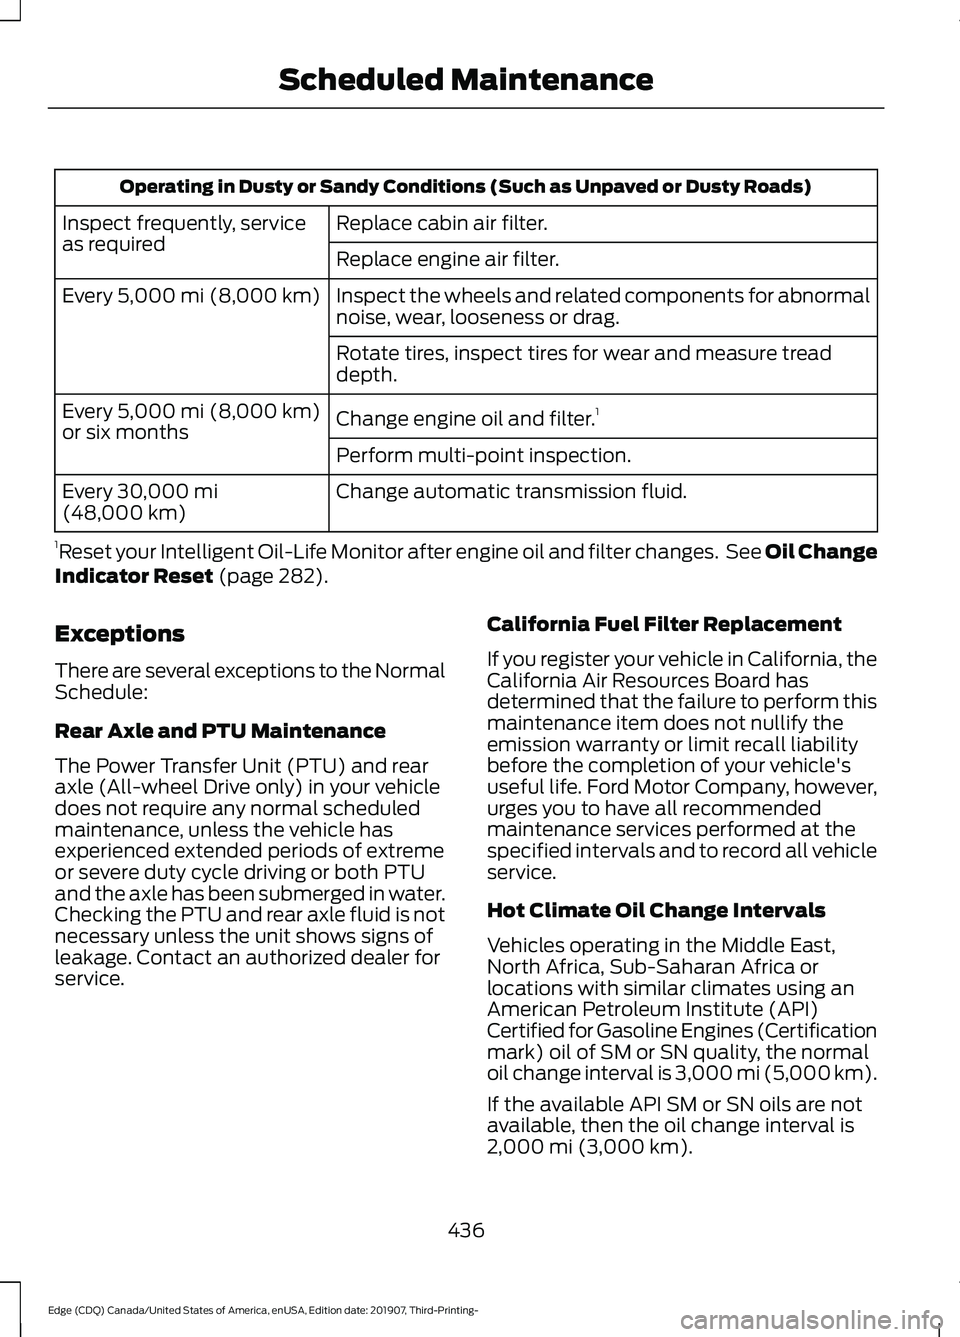
Operating in Dusty or Sandy Conditions (Such as Unpaved or Dusty Roads)
Replace cabin air filter.
Inspect frequently, service
as required
Replace engine air filter.
Inspect the wheels and related components for abnormal
noise, wear, looseness or drag.
Every 5,000 mi (8,000 km)
Rotate tires, inspect tires for wear and measure tread
depth.
Change engine oil and filter. 1
Every
5,000 mi (8,000 km)
or six months
Perform multi-point inspection.
Change automatic transmission fluid.
Every
30,000 mi
(48,000 km)
1 Reset your Intelligent Oil-Life Monitor after engine oil and filter changes. See Oil Change
Indicator Reset
(page 282).
Exceptions
There are several exceptions to the Normal
Schedule:
Rear Axle and PTU Maintenance
The Power Transfer Unit (PTU) and rear
axle (All-wheel Drive only) in your vehicle
does not require any normal scheduled
maintenance, unless the vehicle has
experienced extended periods of extreme
or severe duty cycle driving or both PTU
and the axle has been submerged in water.
Checking the PTU and rear axle fluid is not
necessary unless the unit shows signs of
leakage. Contact an authorized dealer for
service. California Fuel Filter Replacement
If you register your vehicle in California, the
California Air Resources Board has
determined that the failure to perform this
maintenance item does not nullify the
emission warranty or limit recall liability
before the completion of your vehicle's
useful life. Ford Motor Company, however,
urges you to have all recommended
maintenance services performed at the
specified intervals and to record all vehicle
service.
Hot Climate Oil Change Intervals
Vehicles operating in the Middle East,
North Africa, Sub-Saharan Africa or
locations with similar climates using an
American Petroleum Institute (API)
Certified for Gasoline Engines (Certification
mark) oil of SM or SN quality, the normal
oil change interval is 3,000 mi (5,000 km).
If the available API SM or SN oils are not
available, then the oil change interval is
2,000 mi (3,000 km)
.
436
Edge (CDQ) Canada/United States of America, enUSA, Edition date: 201907, Third-Printing- Scheduled Maintenance
Page 483 of 495
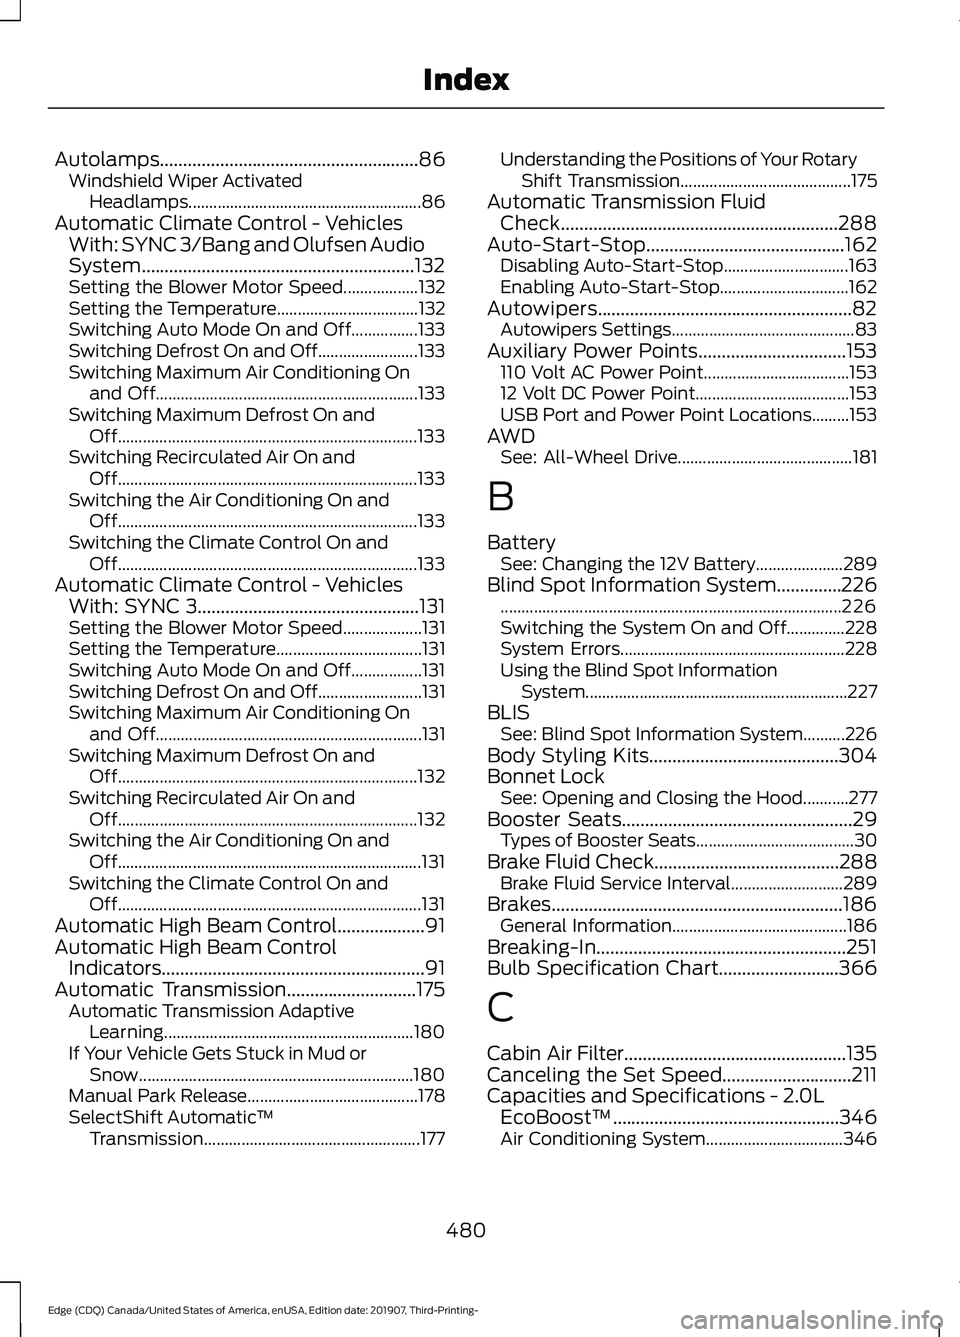
Autolamps........................................................86
Windshield Wiper Activated
Headlamps........................................................ 86
Automatic Climate Control - Vehicles With: SYNC 3/Bang and Olufsen Audio
System...........................................................132
Setting the Blower Motor Speed.................. 132
Setting the Temperature.................................. 132
Switching Auto Mode On and Off................133
Switching Defrost On and Off........................ 133
Switching Maximum Air Conditioning On and Off............................................................... 133
Switching Maximum Defrost On and Off........................................................................\
133
Switching Recirculated Air On and Off........................................................................\
133
Switching the Air Conditioning On and Off........................................................................\
133
Switching the Climate Control On and Off........................................................................\
133
Automatic Climate Control - Vehicles With: SYNC 3................................................131
Setting the Blower Motor Speed................... 131
Setting the Temperature................................... 131
Switching Auto Mode On and Off.................131
Switching Defrost On and Off......................... 131
Switching Maximum Air Conditioning On and Off................................................................ 131
Switching Maximum Defrost On and Off........................................................................\
132
Switching Recirculated Air On and Off........................................................................\
132
Switching the Air Conditioning On and Off........................................................................\
. 131
Switching the Climate Control On and Off........................................................................\
. 131
Automatic High Beam Control...................91
Automatic High Beam Control Indicators.........................................................91
Automatic Transmission............................175 Automatic Transmission Adaptive
Learning............................................................ 180
If Your Vehicle Gets Stuck in Mud or Snow.................................................................. 180
Manual Park Release......................................... 178
SelectShift Automatic ™
Transmission.................................................... 177Understanding the Positions of Your Rotary
Shift Transmission......................................... 175
Automatic Transmission Fluid Check............................................................288
Auto-Start-Stop...........................................162 Disabling Auto-Start-Stop.............................. 163
Enabling Auto-Start-Stop............................... 162
Autowipers.......................................................82 Autowipers Settings............................................ 83
Auxiliary Power Points
................................153
110 Volt AC Power Point................................... 153
12 Volt DC Power Point..................................... 153
USB Port and Power Point Locations.........153
AWD See: All-Wheel Drive.......................................... 181
B
Battery See: Changing the 12V Battery..................... 289
Blind Spot Information System..............226 ........................................................................\
.......... 226
Switching the System On and Off..............228
System Errors...................................................... 228
Using the Blind Spot Information System............................................................... 227
BLIS See: Blind Spot Information System..........226
Body Styling Kits.........................................304
Bonnet Lock See: Opening and Closing the Hood...........277
Booster Seats
..................................................29
Types of Booster Seats...................................... 30
Brake Fluid Check........................................288 Brake Fluid Service Interval........................... 289
Brakes...............................................................186 General Information.......................................... 186
Breaking-In......................................................251
Bulb Specification Chart..........................366
C
Cabin Air Filter................................................135
Canceling the Set Speed............................211
Capacities and Specifications - 2.0L EcoBoost™.................................................346
Air Conditioning System................................. 346
480
Edge (CDQ) Canada/United States of America, enUSA, Edition date: 201907, Third-Printing- Index