tow FORD EDGE 2020 User Guide
[x] Cancel search | Manufacturer: FORD, Model Year: 2020, Model line: EDGE, Model: FORD EDGE 2020Pages: 495, PDF Size: 6.38 MB
Page 78 of 495
PASSIVE ANTI-THEFT
SYSTEM
Note:
The system is not compatible with
non-Ford aftermarket remote start systems.
Use of these systems may result in engine
starting problems and a loss of security
protection.
Note: Metallic objects, electronic devices
or a second coded key on the same key
chain may result in vehicle starting
problems, especially if they are too close to
the key when starting your vehicle. Prevent
these objects from touching the coded key
when starting your vehicle. Switch the
ignition off, move all objects on the key
chain away from the coded key and restart
your vehicle if a problem occurs.
Note: Do not leave a duplicate coded key
in your vehicle. Always take your keys and
lock all doors when leaving your vehicle.
SecuriLock®
The system helps prevent the engine from
starting unless you use a coded key
programmed to your vehicle. Using the
wrong key may prevent your vehicle from
starting. A message may appear in the
information display.
If you are unable to start your vehicle with
a coded key, it is not operating correctly.
A message may appear in the information
display.
Automatic Arming
The system arms when you switch the
ignition off.
Automatic Disarming
The system disarms when you switch the
ignition on with a coded key.
Replacement Keys
Note: Your vehicle comes with two keys. The intelligent access key functions as a
programmed key that operates the driver
door lock and turns on the intelligent
access with push button start system, as
well as a remote control.
If your programmed transmitters are lost
or stolen and you do not have an extra
coded key, you will need to have your
vehicle towed to an authorized dealer. You
need to erase the key codes from your
vehicle and program new coded keys.
Store a spare intelligent access key away
from your vehicle in a safe place. You can
purchase replacement keys or remote
controls from an authorized dealer.
Programming a Spare Intelligent
Access Key
Note:
You can program a maximum of four
keys to your vehicle.
You must have two previously
programmed intelligent access keys inside
your vehicle and the new unprogrammed
intelligent access key readily accessible.
You can purchase replacement keys or
remote controls from an authorized dealer.
Make sure that the ignition is switched off
before beginning this procedure. Make sure
that you close all the doors before
beginning and that they remain closed
throughout the procedure. Carry out all
steps within 30 seconds of starting the
sequence. Stop and wait for at least one
minute before starting again if you carry
out any steps out of sequence.
Read and understand the entire procedure
before you begin.
1. Remove the key blade from the transmitter.
75
Edge (CDQ) Canada/United States of America, enUSA, Edition date: 201907, Third-Printing- Security
Page 85 of 495
WINDSHIELD WIPERS
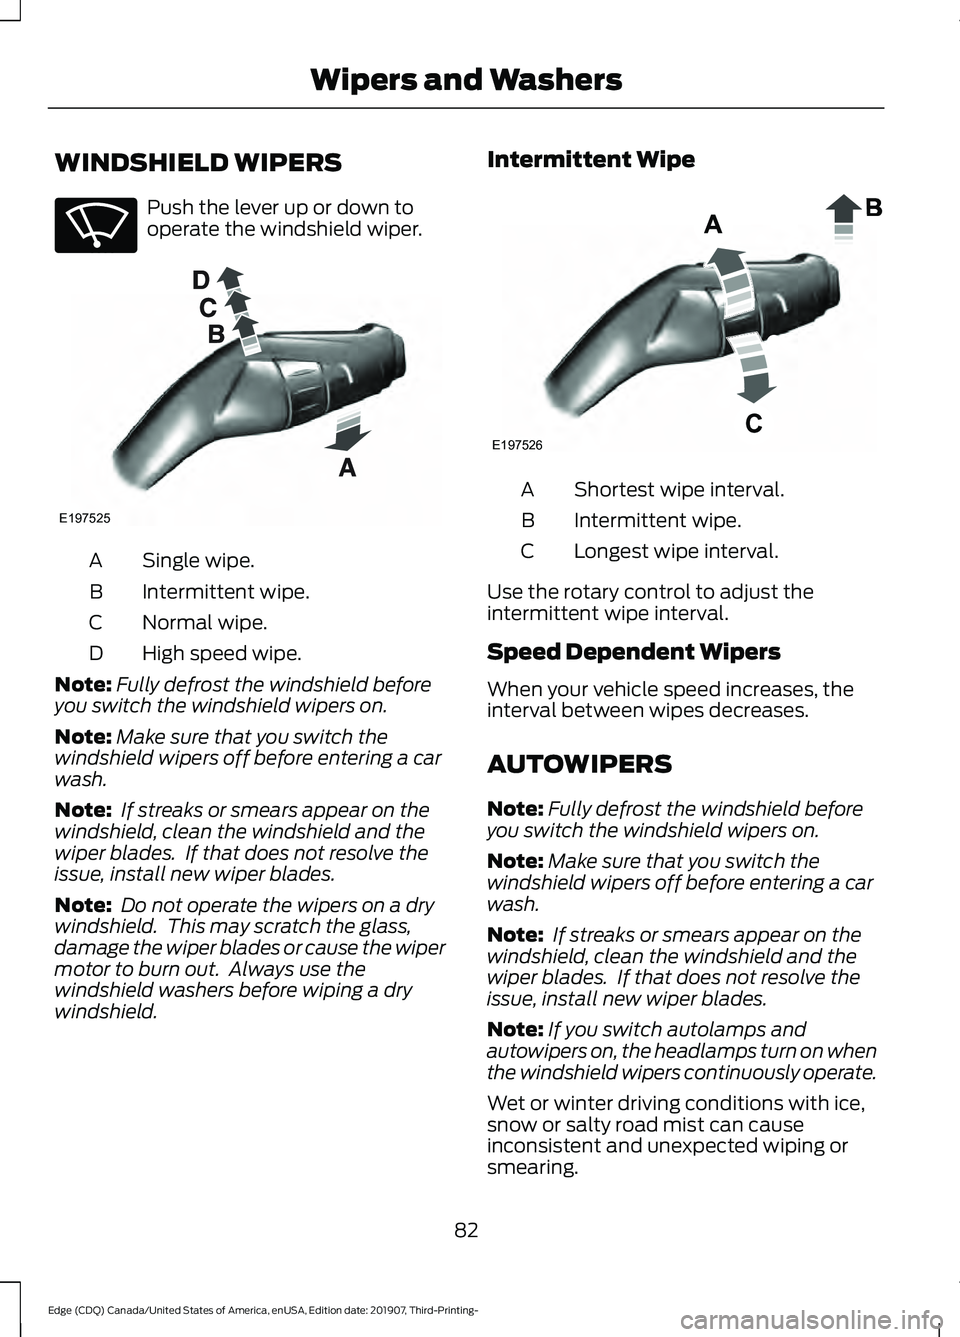
Push the lever up or down to
operate the windshield wiper.
Single wipe.
A
Intermittent wipe.
B
Normal wipe.
C
High speed wipe.
D
Note: Fully defrost the windshield before
you switch the windshield wipers on.
Note: Make sure that you switch the
windshield wipers off before entering a car
wash.
Note: If streaks or smears appear on the
windshield, clean the windshield and the
wiper blades. If that does not resolve the
issue, install new wiper blades.
Note: Do not operate the wipers on a dry
windshield. This may scratch the glass,
damage the wiper blades or cause the wiper
motor to burn out. Always use the
windshield washers before wiping a dry
windshield. Intermittent Wipe
Shortest wipe interval.
A
Intermittent wipe.
B
Longest wipe interval.
C
Use the rotary control to adjust the
intermittent wipe interval.
Speed Dependent Wipers
When your vehicle speed increases, the
interval between wipes decreases.
AUTOWIPERS
Note: Fully defrost the windshield before
you switch the windshield wipers on.
Note: Make sure that you switch the
windshield wipers off before entering a car
wash.
Note: If streaks or smears appear on the
windshield, clean the windshield and the
wiper blades. If that does not resolve the
issue, install new wiper blades.
Note: If you switch autolamps and
autowipers on, the headlamps turn on when
the windshield wipers continuously operate.
Wet or winter driving conditions with ice,
snow or salty road mist can cause
inconsistent and unexpected wiping or
smearing.
82
Edge (CDQ) Canada/United States of America, enUSA, Edition date: 201907, Third-Printing- Wipers and WashersE270969 E197525 E197526
Page 86 of 495
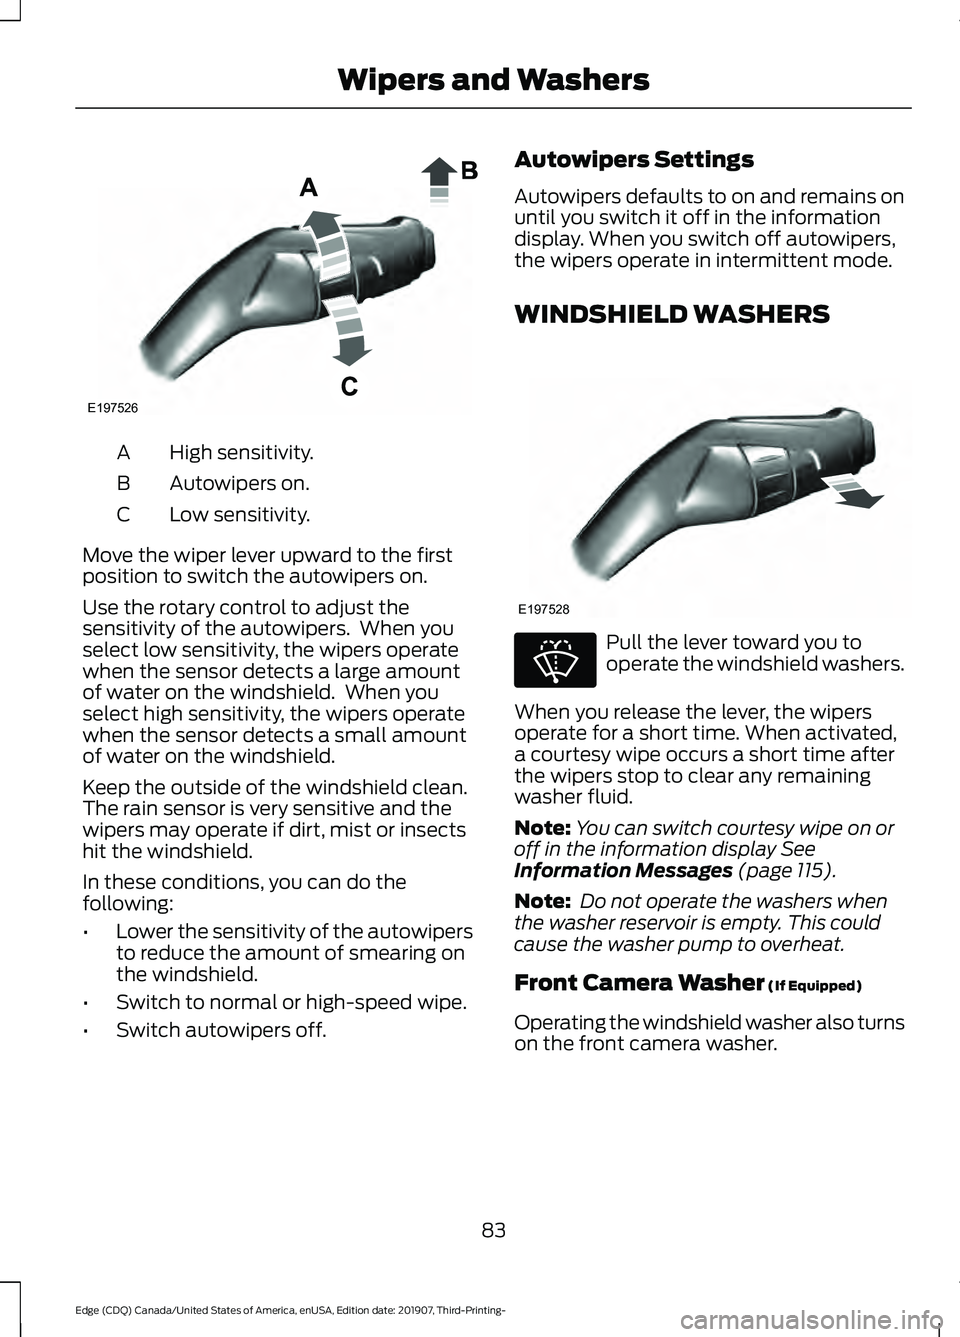
High sensitivity.
A
Autowipers on.
B
Low sensitivity.
C
Move the wiper lever upward to the first
position to switch the autowipers on.
Use the rotary control to adjust the
sensitivity of the autowipers. When you
select low sensitivity, the wipers operate
when the sensor detects a large amount
of water on the windshield. When you
select high sensitivity, the wipers operate
when the sensor detects a small amount
of water on the windshield.
Keep the outside of the windshield clean.
The rain sensor is very sensitive and the
wipers may operate if dirt, mist or insects
hit the windshield.
In these conditions, you can do the
following:
• Lower the sensitivity of the autowipers
to reduce the amount of smearing on
the windshield.
• Switch to normal or high-speed wipe.
• Switch autowipers off. Autowipers Settings
Autowipers defaults to on and remains on
until you switch it off in the information
display. When you switch off autowipers,
the wipers operate in intermittent mode.
WINDSHIELD WASHERS
Pull the lever toward you to
operate the windshield washers.
When you release the lever, the wipers
operate for a short time. When activated,
a courtesy wipe occurs a short time after
the wipers stop to clear any remaining
washer fluid.
Note: You can switch courtesy wipe on or
off in the information display See
Information Messages (page 115).
Note: Do not operate the washers when
the washer reservoir is empty. This could
cause the washer pump to overheat.
Front Camera Washer
(If Equipped)
Operating the windshield washer also turns
on the front camera washer.
83
Edge (CDQ) Canada/United States of America, enUSA, Edition date: 201907, Third-Printing- Wipers and WashersE197526 E197528 E270967
Page 88 of 495
GENERAL INFORMATION
Condensation in the Exterior Front
Lamps and Rear Lamps
Exterior front lamps and rear lamps have
vents to accommodate normal changes
in air pressure.
Condensation can be a natural by-product
of this design. When moist air enters the
lamp assembly through the vents, there is
a possibility that condensation can occur
when the temperature is cold. When
normal condensation occurs, a fine mist
can form on the interior of the lens. The
fine mist eventually clears and exits
through the vents during normal operation.
Clearing time may take as long as 48 hours
under dry weather conditions.
Examples of acceptable condensation are:
•
The presence of a fine mist (no streaks,
drip marks or large droplets).
• A fine mist covers less than 50% of the
lens.
Examples of unacceptable condensation
are:
• A water puddle inside the lamp.
• Streaks, drip marks or large droplets
present on the interior of the lens.
If you see any unacceptable condensation,
have your vehicle checked by an authorized
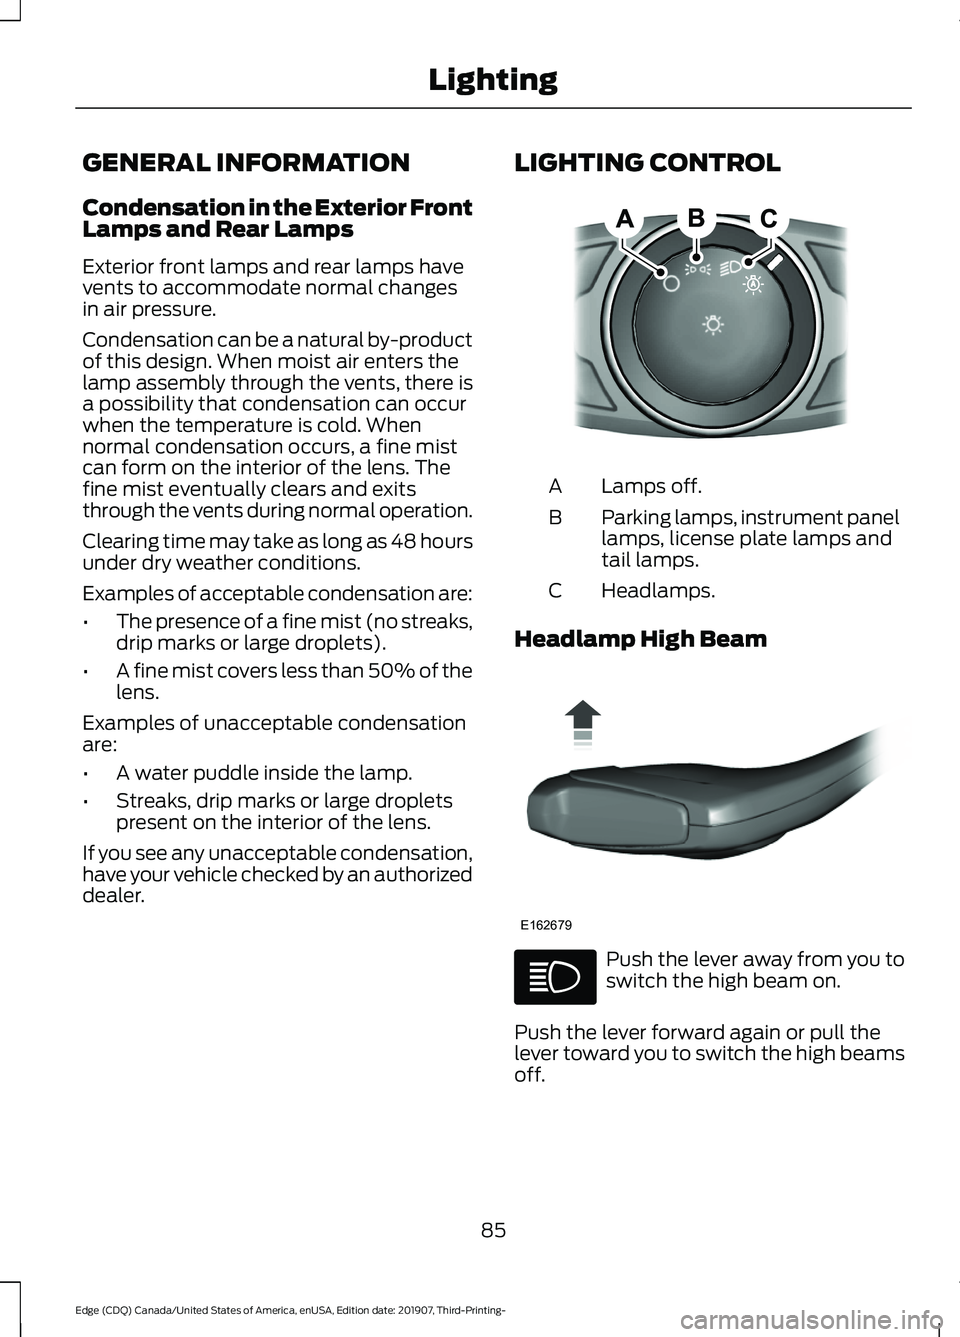
dealer. LIGHTING CONTROL Lamps off.
A
Parking lamps, instrument panel
lamps, license plate lamps and
tail lamps.
B
Headlamps.
C
Headlamp High Beam Push the lever away from you to
switch the high beam on.
Push the lever forward again or pull the
lever toward you to switch the high beams
off.
85
Edge (CDQ) Canada/United States of America, enUSA, Edition date: 201907, Third-Printing- LightingE142449 E162679
Page 89 of 495

Flashing the Headlamp High Beam
Slightly pull the lever toward you and
release it to flash the headlamps.
AUTOLAMPS
WARNING: The system does not
relieve you of your responsibility to drive
with due care and attention. You may
need to override the system if it does not
turn the headlamps on in low visibility
conditions, for example daytime fog.
Autolamps turn the headlamps on in low
light situations or when the wipers operate. Switch the lighting control to the
autolamps position.
The headlamps remain on for a period of
time after you switch the ignition off. Use
the information display controls to adjust
the period of time that the headlamps
remain on.
Note: If you switch the autolamps on, you
cannot switch the high beams on until the
system turns the low beams on. Windshield Wiper Activated
Headlamps
When you switch the autolamps on, the
headlamps turn on within 10 seconds of
switching the wipers on. They turn off
approximately 60 seconds after you switch
the windshield wipers off.
The headlamps do not turn on with the
wipers:
•
During a single wipe.
• When using the windshield washers.
• If the wipers are in intermittent mode.
Note: If you switch the autolamps and the
autowipers on, the headlamps turn on when
the windshield wipers continuously operate.
INSTRUMENT LIGHTING
DIMMER
The instrument lighting dimmer buttons
are on the lighting control. Repeatedly press one of the
buttons to adjust the brightness.
HEADLAMP EXIT DELAY
After you switch the ignition off, you can
switch the headlamps on by pulling the
direction indicator lever toward you. You
will hear a short tone. The headlamps will
switch off automatically after three
minutes with any door open or 30 seconds
after the last door has been closed. You
can cancel this feature by pulling the
direction indicator lever toward you again
or switching the ignition on.
86
Edge (CDQ) Canada/United States of America, enUSA, Edition date: 201907, Third-Printing- LightingE162680 E291299 E291298
Page 97 of 495
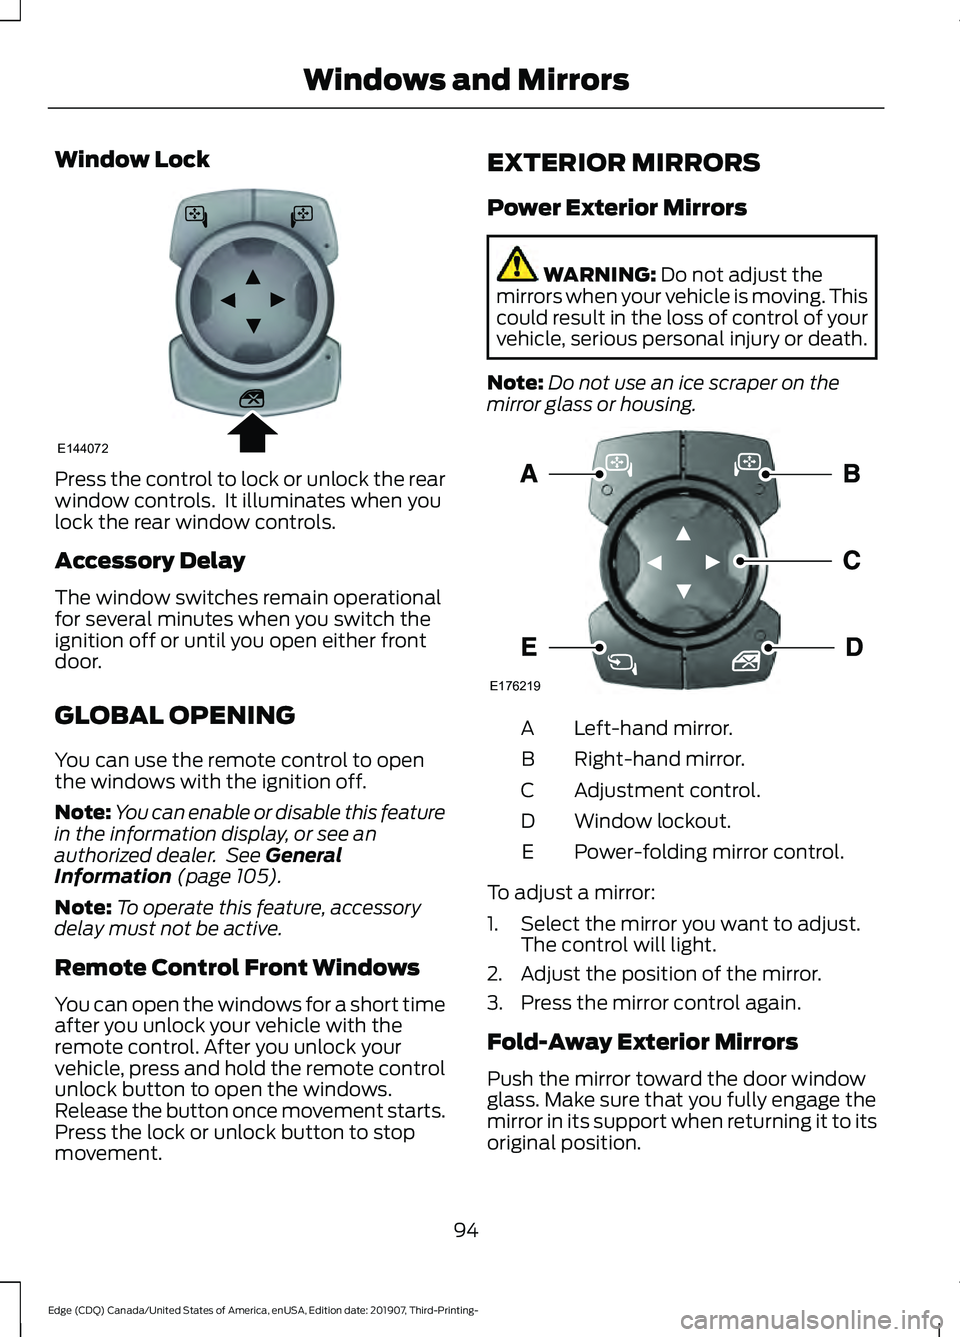
Window Lock
Press the control to lock or unlock the rear
window controls. It illuminates when you
lock the rear window controls.
Accessory Delay
The window switches remain operational
for several minutes when you switch the
ignition off or until you open either front
door.
GLOBAL OPENING
You can use the remote control to open
the windows with the ignition off.
Note:
You can enable or disable this feature
in the information display, or see an
authorized dealer. See General
Information (page 105).
Note: To operate this feature, accessory
delay must not be active.
Remote Control Front Windows
You can open the windows for a short time
after you unlock your vehicle with the
remote control. After you unlock your
vehicle, press and hold the remote control
unlock button to open the windows.
Release the button once movement starts.
Press the lock or unlock button to stop
movement. EXTERIOR MIRRORS
Power Exterior Mirrors WARNING:
Do not adjust the
mirrors when your vehicle is moving. This
could result in the loss of control of your
vehicle, serious personal injury or death.
Note: Do not use an ice scraper on the
mirror glass or housing. Left-hand mirror.
A
Right-hand mirror.
B
Adjustment control.
C
Window lockout.
D
Power-folding mirror control.
E
To adjust a mirror:
1. Select the mirror you want to adjust. The control will light.
2. Adjust the position of the mirror.
3. Press the mirror control again.
Fold-Away Exterior Mirrors
Push the mirror toward the door window
glass. Make sure that you fully engage the
mirror in its support when returning it to its
original position.
94
Edge (CDQ) Canada/United States of America, enUSA, Edition date: 201907, Third-Printing- Windows and MirrorsE144072 E176219
Page 98 of 495
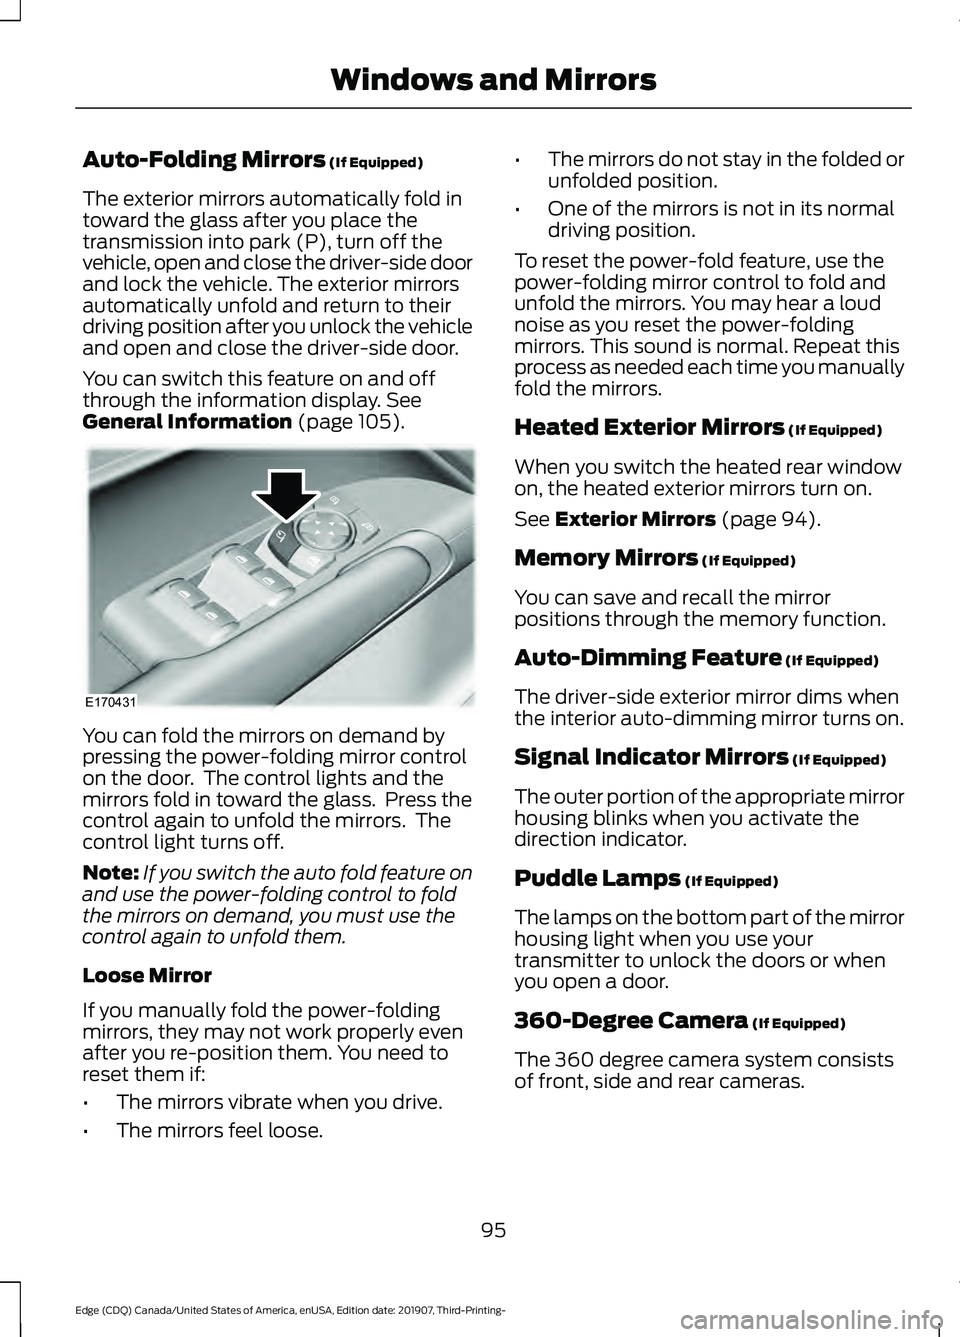
Auto-Folding Mirrors (If Equipped)
The exterior mirrors automatically fold in
toward the glass after you place the
transmission into park (P), turn off the
vehicle, open and close the driver-side door
and lock the vehicle. The exterior mirrors
automatically unfold and return to their
driving position after you unlock the vehicle
and open and close the driver-side door.
You can switch this feature on and off
through the information display.
See
General Information (page 105). You can fold the mirrors on demand by
pressing the power-folding mirror control
on the door. The control lights and the
mirrors fold in toward the glass. Press the
control again to unfold the mirrors. The
control light turns off.
Note:
If you switch the auto fold feature on
and use the power-folding control to fold
the mirrors on demand, you must use the
control again to unfold them.
Loose Mirror
If you manually fold the power-folding
mirrors, they may not work properly even
after you re-position them. You need to
reset them if:
• The mirrors vibrate when you drive.
• The mirrors feel loose. •
The mirrors do not stay in the folded or
unfolded position.
• One of the mirrors is not in its normal
driving position.
To reset the power-fold feature, use the
power-folding mirror control to fold and
unfold the mirrors. You may hear a loud
noise as you reset the power-folding
mirrors. This sound is normal. Repeat this
process as needed each time you manually
fold the mirrors.
Heated Exterior Mirrors (If Equipped)
When you switch the heated rear window
on, the heated exterior mirrors turn on.
See
Exterior Mirrors (page 94).
Memory Mirrors
(If Equipped)
You can save and recall the mirror
positions through the memory function.
Auto-Dimming Feature
(If Equipped)
The driver-side exterior mirror dims when
the interior auto-dimming mirror turns on.
Signal Indicator Mirrors
(If Equipped)
The outer portion of the appropriate mirror
housing blinks when you activate the
direction indicator.
Puddle Lamps
(If Equipped)
The lamps on the bottom part of the mirror
housing light when you use your
transmitter to unlock the doors or when
you open a door.
360-Degree Camera
(If Equipped)
The 360 degree camera system consists
of front, side and rear cameras.
95
Edge (CDQ) Canada/United States of America, enUSA, Edition date: 201907, Third-Printing- Windows and MirrorsE170431
Page 99 of 495
Blind Spot Monitor
The design of the system is to detect
vehicles that could enter the blind spot
zone.
See Blind Spot Information System
(page 226).
INTERIOR MIRROR WARNING:
Do not adjust the
mirrors when your vehicle is moving. This
could result in the loss of control of your
vehicle, serious personal injury or death.
Note: Do not clean the mirror housing or
glass with harsh abrasives, fuel or other
petroleum-based cleaning products.
You can adjust the interior mirror to your
preference. Some mirrors also have a
second pivot point. This lets you move the
mirror head up or down and from side to
side.
Manual Dimming Mirror
Pull the tab below the mirror toward you
to reduce the effect of bright light from
behind.
Automatic Dimming Mirror (If Equipped)
Note: Do not block the sensors on the front
and back of the mirror. A rear center
passenger or raised rear center head
restraint may also block light from reaching
the sensor.
The mirror dims to reduce the effect of
bright light from behind. It returns to
normal when the bright light from behind
is no longer present or if you shift into
reverse (R). SUN VISORS
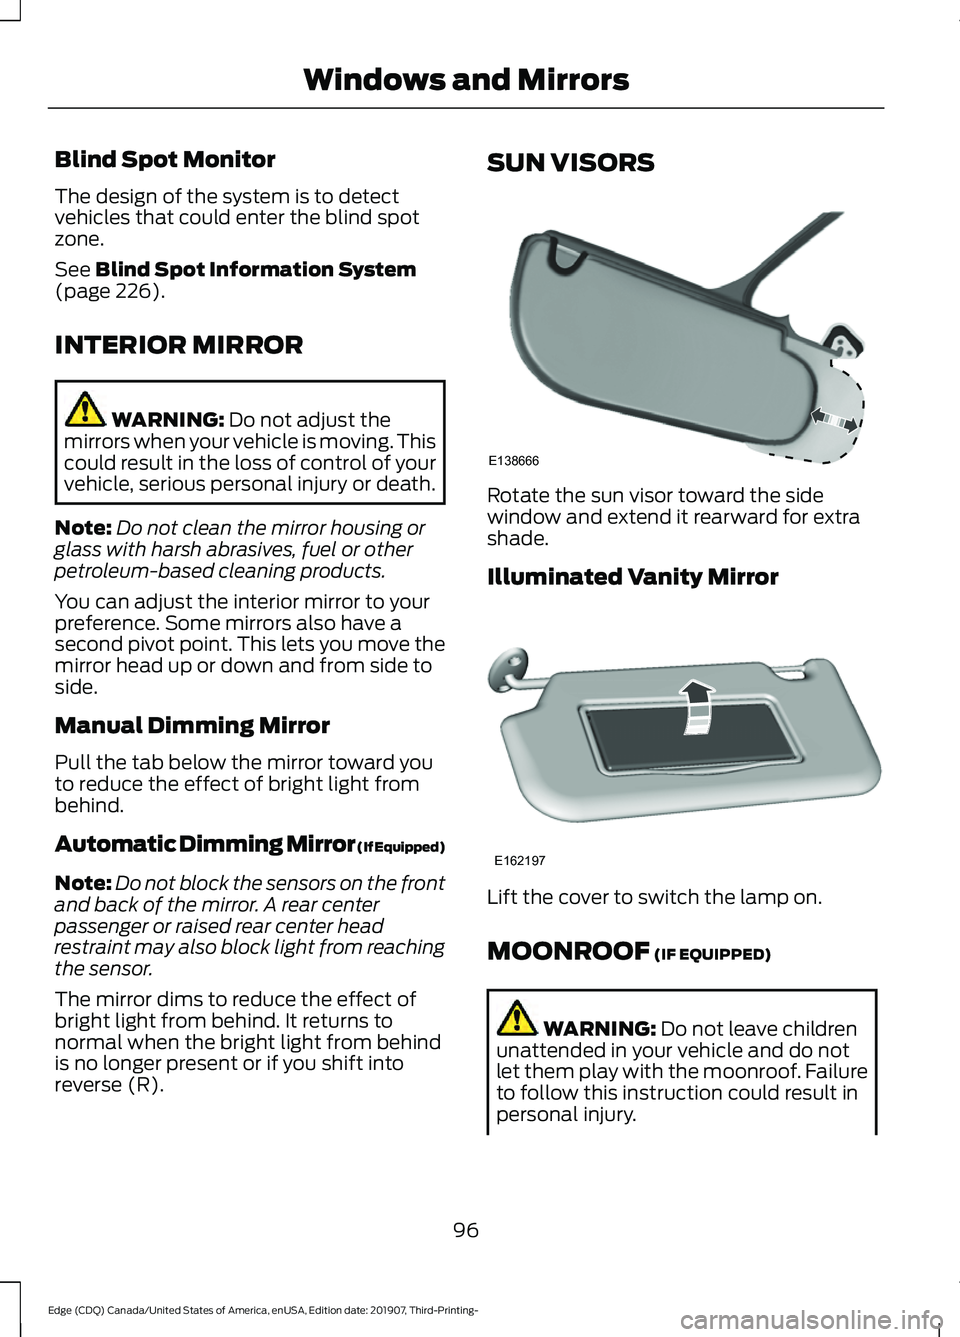
Rotate the sun visor toward the side
window and extend it rearward for extra
shade.
Illuminated Vanity Mirror
Lift the cover to switch the lamp on.
MOONROOF
(IF EQUIPPED)
WARNING:
Do not leave children
unattended in your vehicle and do not
let them play with the moonroof. Failure
to follow this instruction could result in
personal injury.
96
Edge (CDQ) Canada/United States of America, enUSA, Edition date: 201907, Third-Printing- Windows and MirrorsE138666 E162197
Page 131 of 495
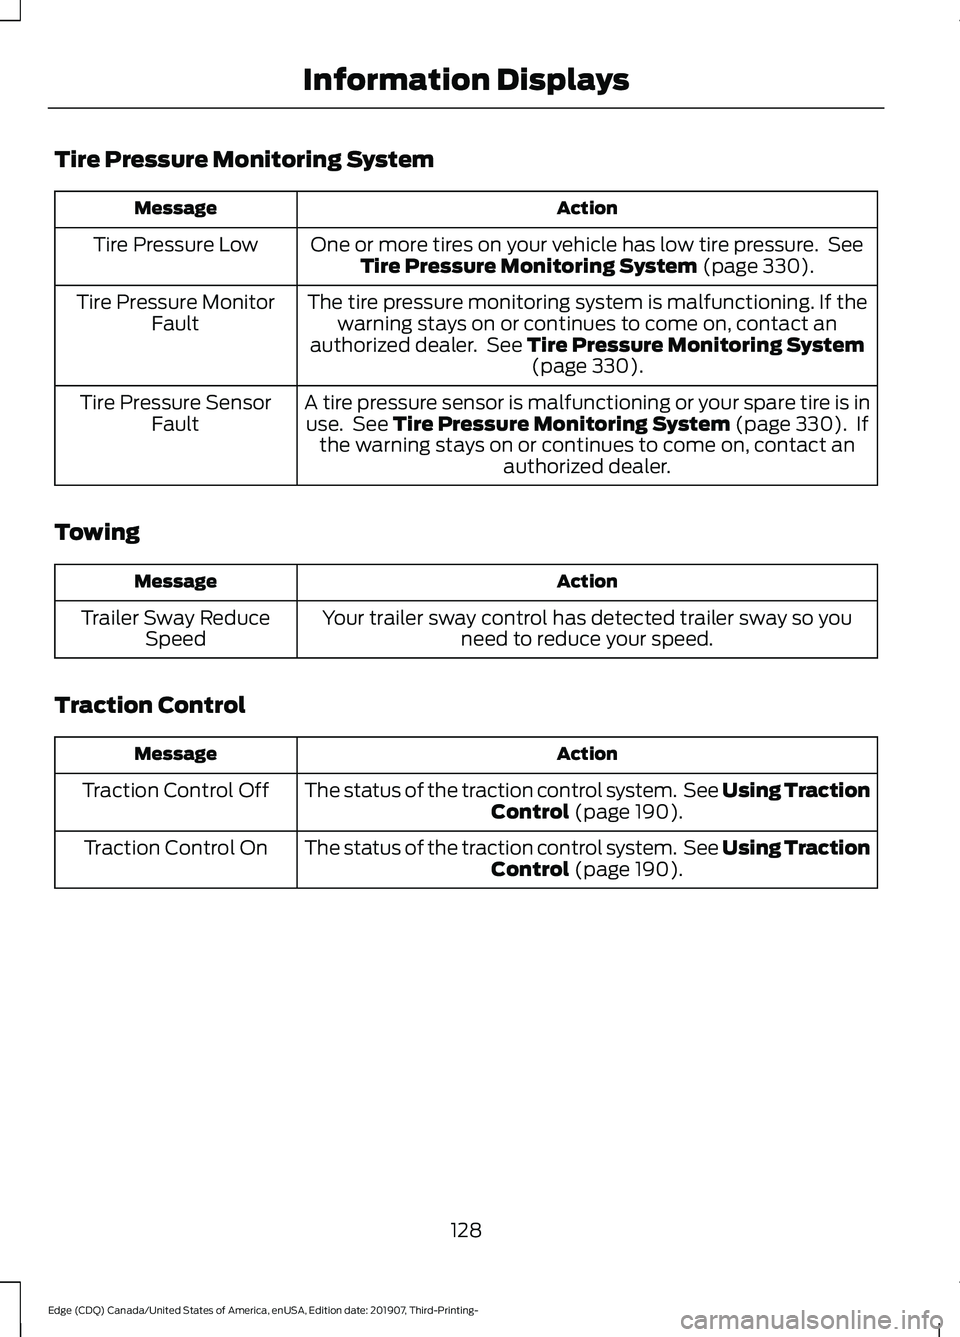
Tire Pressure Monitoring System
Action
Message
One or more tires on your vehicle has low tire pressure. SeeTire Pressure Monitoring System (page 330).
Tire Pressure Low
The tire pressure monitoring system is malfunctioning. If thewarning stays on or continues to come on, contact an
authorized dealer. See
Tire Pressure Monitoring System (page 330).
Tire Pressure Monitor
Fault
A tire pressure sensor is malfunctioning or your spare tire is inuse. See
Tire Pressure Monitoring System (page 330). If
the warning stays on or continues to come on, contact an authorized dealer.
Tire Pressure Sensor
Fault
Towing Action
Message
Your trailer sway control has detected trailer sway so youneed to reduce your speed.
Trailer Sway Reduce
Speed
Traction Control Action
Message
The status of the traction control system. See
Using Traction
Control (page 190).
Traction Control Off
The status of the traction control system. See
Using Traction
Control (page 190).
Traction Control On
128
Edge (CDQ) Canada/United States of America, enUSA, Edition date: 201907, Third-Printing- Information Displays
Page 142 of 495
1. Adjust the seat backrest to an upright
driving or riding position.
2. Pivot the head restraint forward toward
your head to the desired position.
After the head restraint reaches the
forward-most tilt position, pivoting it
forward again will then release it to the
rearward, un-tilted position.
MANUAL SEATS WARNING: Do not adjust the driver
seat or seat backrest when your vehicle
is moving. This may result in sudden seat
movement, causing the loss of control
of your vehicle. WARNING: Make sure the seat fully
locks into place by rocking it backward
and forward. Not securing the seat into
the locked position can be dangerous in
a crash and could cause serious personal
injury or death. WARNING: Reclining the seatback
can cause an occupant to slide under the
seat's seatbelt, resulting in severe
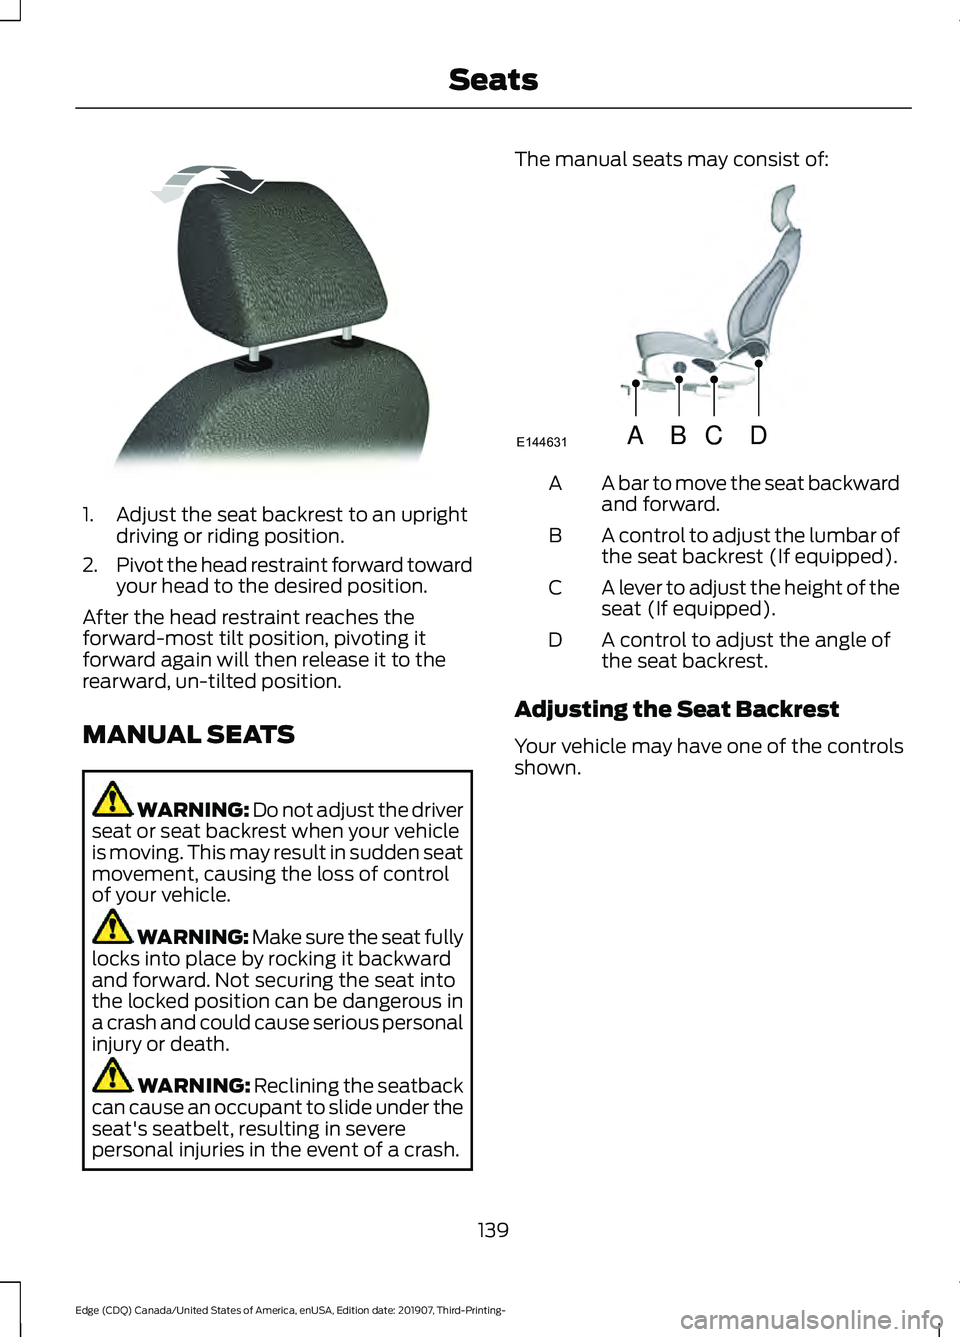
personal injuries in the event of a crash. The manual seats may consist of:
A bar to move the seat backward
and forward.
A
A control to adjust the lumbar of
the seat backrest (If equipped).
B
A lever to adjust the height of the
seat (If equipped).
C
A control to adjust the angle of
the seat backrest.
D
Adjusting the Seat Backrest
Your vehicle may have one of the controls
shown.
139
Edge (CDQ) Canada/United States of America, enUSA, Edition date: 201907, Third-Printing- SeatsE144727 ABCD
E144631