engine FORD EDGE 2020 Manual PDF
[x] Cancel search | Manufacturer: FORD, Model Year: 2020, Model line: EDGE, Model: FORD EDGE 2020Pages: 495, PDF Size: 6.38 MB
Page 259 of 495
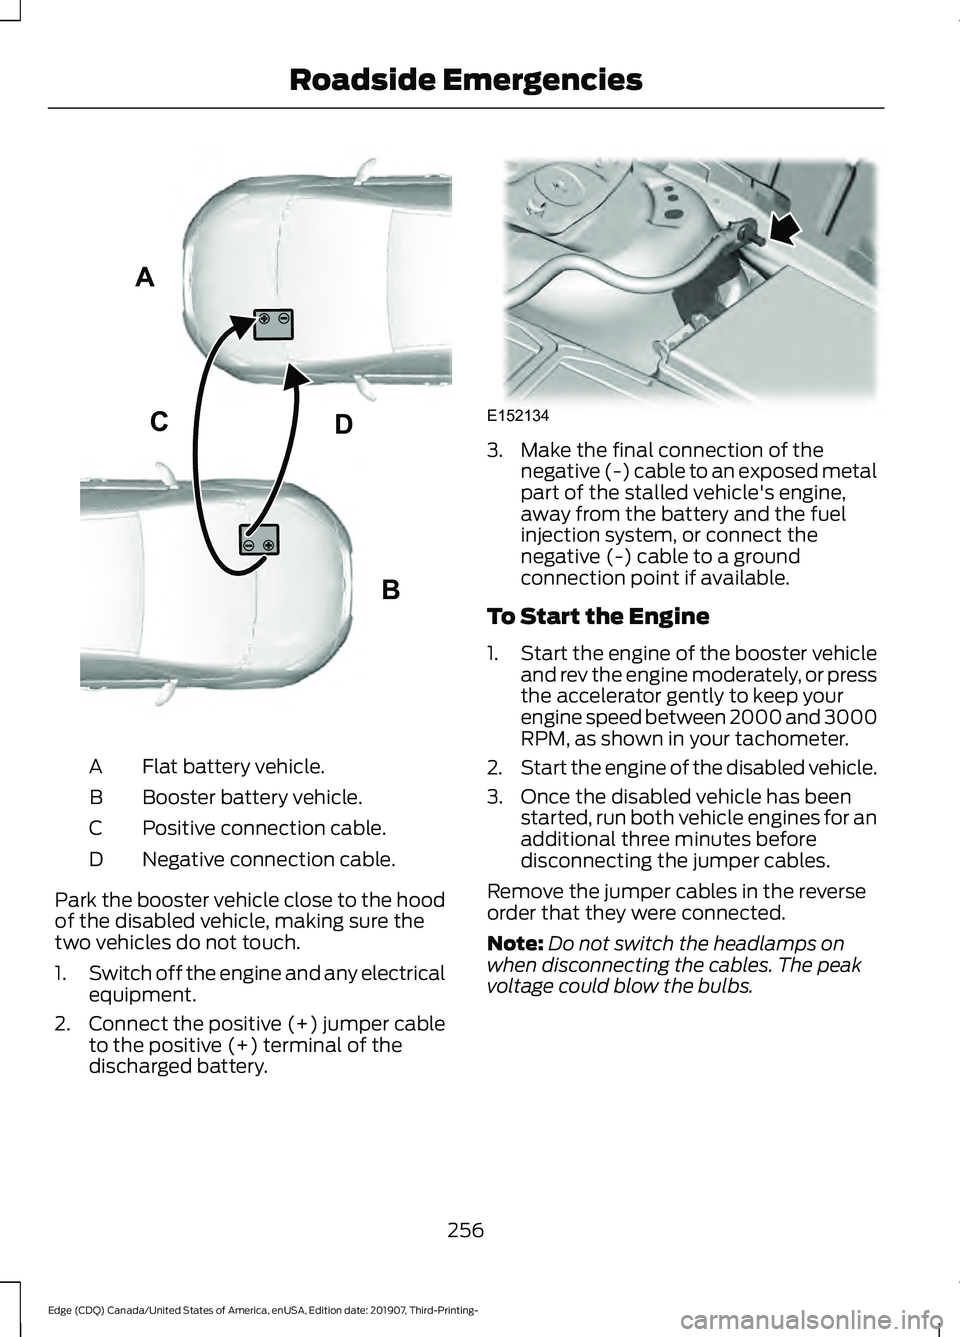
Flat battery vehicle.
A
Booster battery vehicle.
B
Positive connection cable.
C
Negative connection cable.
D
Park the booster vehicle close to the hood
of the disabled vehicle, making sure the
two vehicles do not touch.
1. Switch off the engine and any electrical
equipment.
2. Connect the positive (+) jumper cable
to the positive (+) terminal of the
discharged battery. 3. Make the final connection of the
negative (-) cable to an exposed metal
part of the stalled vehicle's engine,
away from the battery and the fuel
injection system, or connect the
negative (-) cable to a ground
connection point if available.
To Start the Engine
1. Start the engine of the booster vehicle
and rev the engine moderately, or press
the accelerator gently to keep your
engine speed between 2000 and 3000
RPM, as shown in your tachometer.
2. Start the engine of the disabled vehicle.
3. Once the disabled vehicle has been started, run both vehicle engines for an
additional three minutes before
disconnecting the jumper cables.
Remove the jumper cables in the reverse
order that they were connected.
Note: Do not switch the headlamps on
when disconnecting the cables. The peak
voltage could blow the bulbs.
256
Edge (CDQ) Canada/United States of America, enUSA, Edition date: 201907, Third-Printing- Roadside EmergenciesA
B
CDE102925 E152134
Page 264 of 495
UTILIZING THE
MEDIATION/ARBITRATION
PROGRAM (CANADA ONLY)
For vehicles delivered to authorized
Canadian dealers. In those cases where
you continue to feel that the efforts by Ford
of Canada and the authorized dealer to
resolve a factory-related vehicle service
concern have been unsatisfactory, Ford of
Canada participates in an impartial third
party mediation/arbitration program
administered by the Canadian Motor
Vehicle Arbitration Plan (CAMVAP).
The CAMVAP program is a straight forward
and relatively speedy alternative to resolve
a disagreement when all other efforts to
produce a settlement have failed. This
procedure is without cost to you and is
designed to eliminate the need for lengthy
and expensive legal proceedings.
In the CAMVAP program, impartial
third-party arbitrators conduct hearings at
mutually convenient times and places in
an informal environment. These impartial
arbitrators review the positions of the
parties, make decisions and, when
appropriate, render awards to resolve
disputes. CAMVAP decisions are fast, fair,
and final as the arbitrator
’s award is
binding on both you and Ford of Canada.
CAMVAP services are available in all
Canadian territories and provinces. For
more information, without charge or
obligation, call your CAMVAP Provincial
Administrator directly at 1-800-207-0685
or visit www.camvap.ca. GETTING ASSISTANCE
OUTSIDE THE U.S. AND
CANADA
Before exporting your vehicle to a foreign
country, contact the appropriate foreign
embassy or consulate. These officials can
inform you of local vehicle registration
regulations and where to find unleaded
fuel or petrol/gas engines or the proper
sulfur fuel for diesel engines.
If you cannot find the proper fuel
recommended for your vehicle, contact
our Customer Relationship Center.
The use of improper fuels in your vehicle
without proper conversion may damage
the effectiveness of your emission control
system and may cause engine knocking or
serious engine damage. Ford Motor
Company or Ford of Canada is not
responsible for any damage caused by use
of improper fuel. Using improper fuels may
also result in difficulty importing your
vehicle back into the United States.
If your vehicle must be serviced while you
are traveling or living in Asia-Pacific Region,
Sub-Saharan Africa, U.S. Virgin Islands
and/or Puerto Rico, Central America, the
Caribbean, and Israel and the Middle East,
contact the nearest authorized dealer. If
the authorized dealer cannot help you,
contact the corresponding Ford Customer
Assistance Center:
FORD MOTOR COMPANY
Customer Relationship Centers in:
261
Edge (CDQ) Canada/United States of America, enUSA, Edition date: 201907, Third-Printing- Customer Assistance
Page 268 of 495
FUSE SPECIFICATION CHART
Power Distribution Box
WARNING: Always disconnect the
battery before servicing high current
fuses. WARNING:
To reduce risk of
electrical shock, always replace the
cover to the power distribution box
before reconnecting the battery or
refilling fluid reservoirs. Note:
There is a 40A fuse on the cowl side
engine harness that controls the all wheel
drive module. If this fuse requires service,
see an authorized dealer.
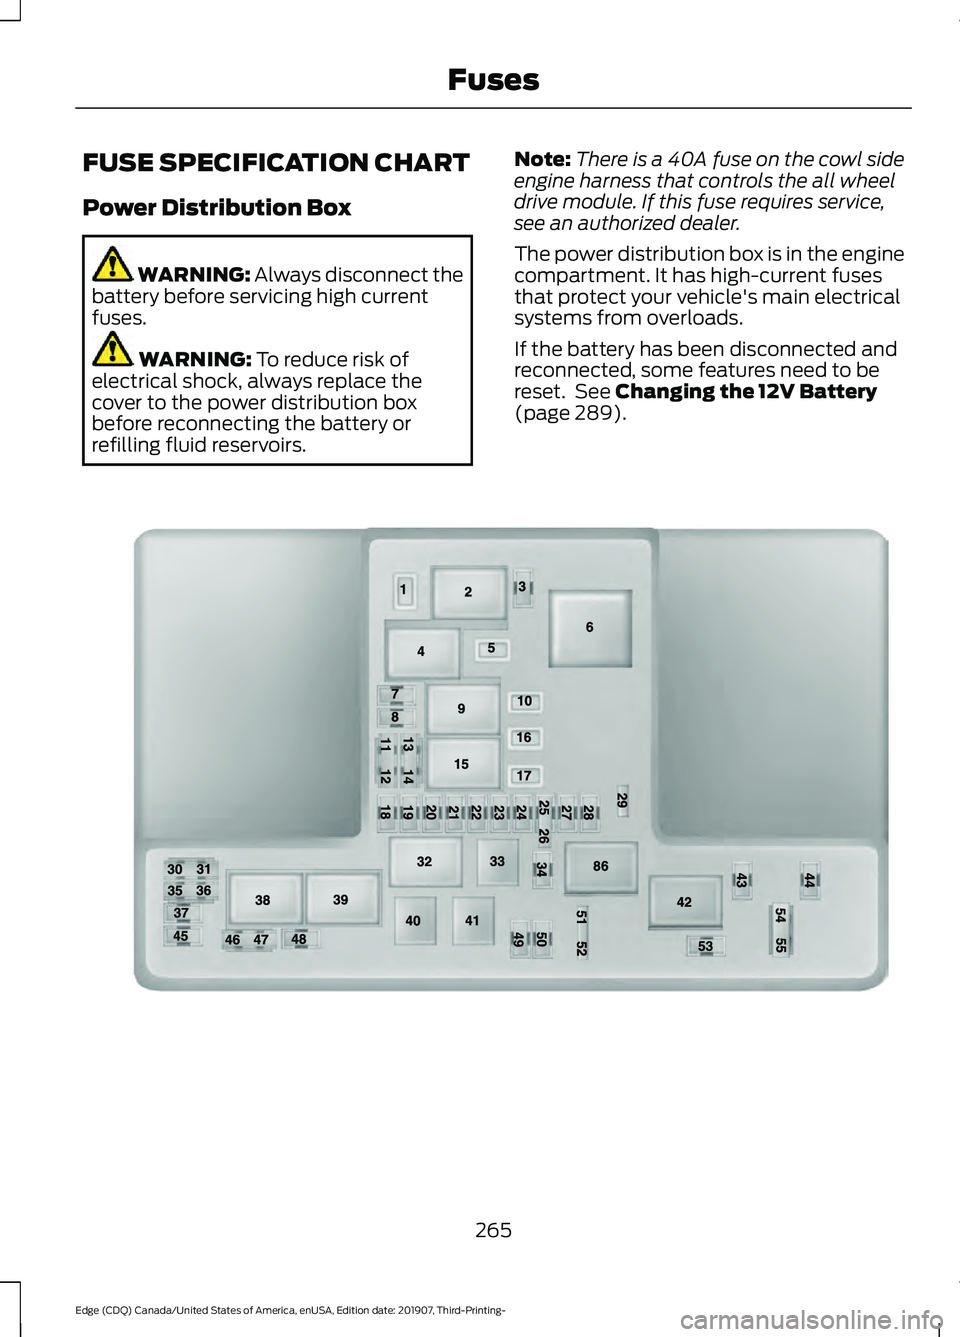
The power distribution box is in the engine
compartment. It has high-current fuses
that protect your vehicle's main electrical
systems from overloads.
If the battery has been disconnected and
reconnected, some features need to be
reset. See
Changing the 12V Battery
(page 289). 265
Edge (CDQ) Canada/United States of America, enUSA, Edition date: 201907, Third-Printing- FusesE190797
Page 272 of 495
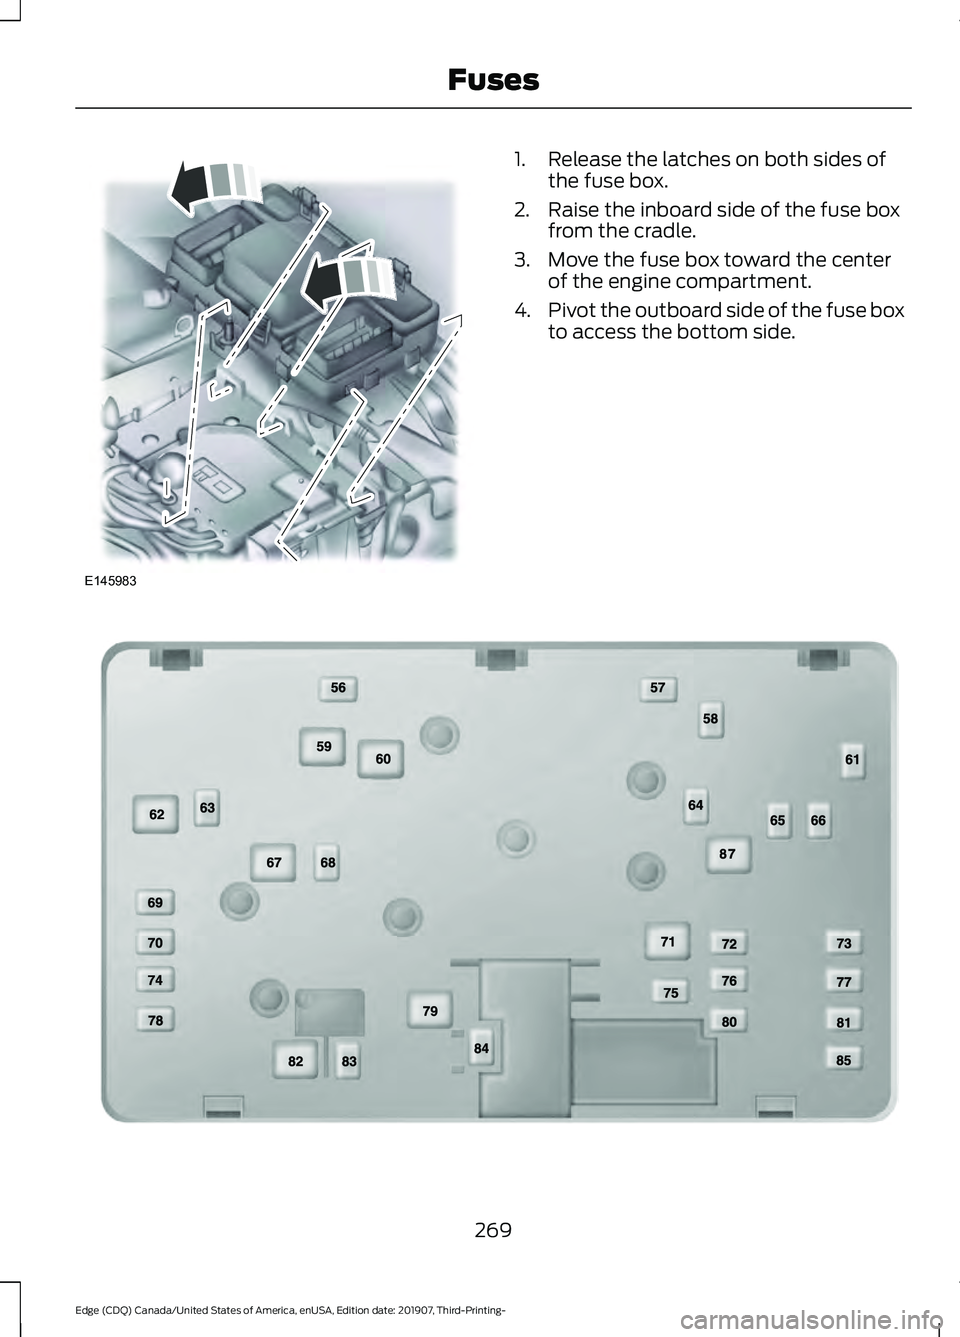
1. Release the latches on both sides of
the fuse box.
2. Raise the inboard side of the fuse box from the cradle.
3. Move the fuse box toward the center of the engine compartment.
4. Pivot the outboard side of the fuse box
to access the bottom side. 269
Edge (CDQ) Canada/United States of America, enUSA, Edition date: 201907, Third-Printing- FusesE145983 E190798
Page 280 of 495
GENERAL INFORMATION
Have your vehicle serviced regularly to help
maintain its roadworthiness and resale
value. There is a large network of
authorized dealers that are there to help
you with their professional servicing
expertise. We believe that their specially
trained technicians are best qualified to
service your vehicle properly and expertly.
They are supported by a wide range of
highly specialized tools developed
specifically for servicing your vehicle.
If your vehicle requires professional service,
an authorized dealer can provide the
necessary parts and service. Check your
warranty information to find out which
parts and services are covered.
Use only recommended fuels, lubricants,
fluids and service parts conforming to
specifications. Motorcraft® parts are
designed and built to provide the best
performance in your vehicle.
Precautions
•
Do not work on a hot engine.
• Make sure that nothing gets caught in
moving parts.
• Do not work on a vehicle with the
engine running in an enclosed space,
unless you are sure you have enough
ventilation.
• Keep all open flames and other burning
material (such as cigarettes) away
from the battery and all fuel related
parts.
Working with the Engine Off
1. Set the parking brake and shift the transmission to park (P).
2. Switch off the engine.
3. Block the wheels. Working with the Engine On WARNING: To reduce the risk of
vehicle damage and personal burn
injuries, do not start your engine with the
air cleaner removed and do not remove
it while the engine is running.
1. Set the parking brake and shift the transmission to park (P).
2. Block the wheels.
OPENING AND CLOSING THE
HOOD
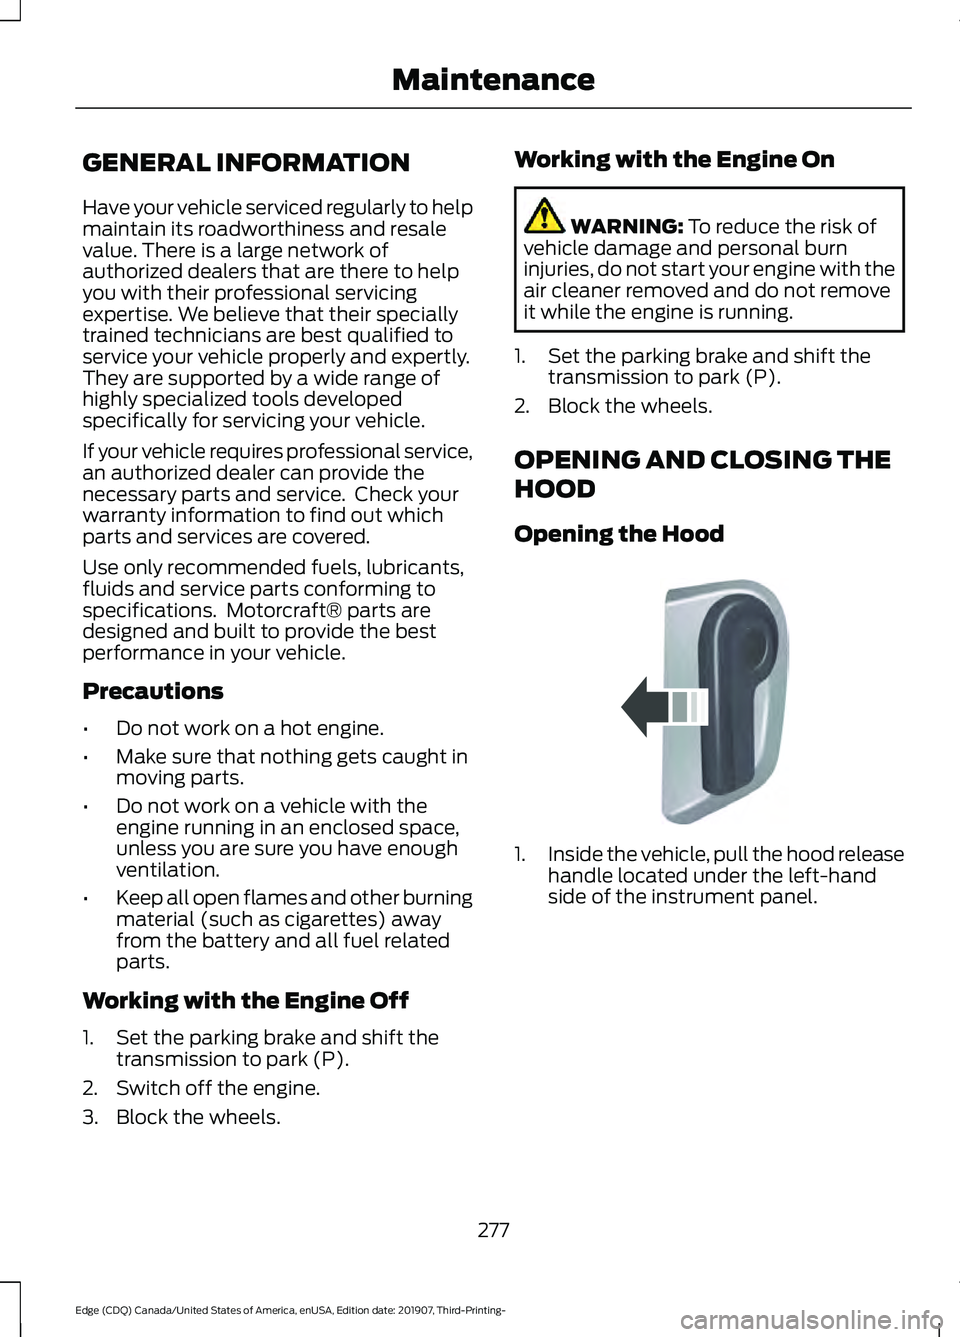
Opening the Hood 1.
Inside the vehicle, pull the hood release
handle located under the left-hand
side of the instrument panel.
277
Edge (CDQ) Canada/United States of America, enUSA, Edition date: 201907, Third-Printing- MaintenanceE142457
Page 282 of 495
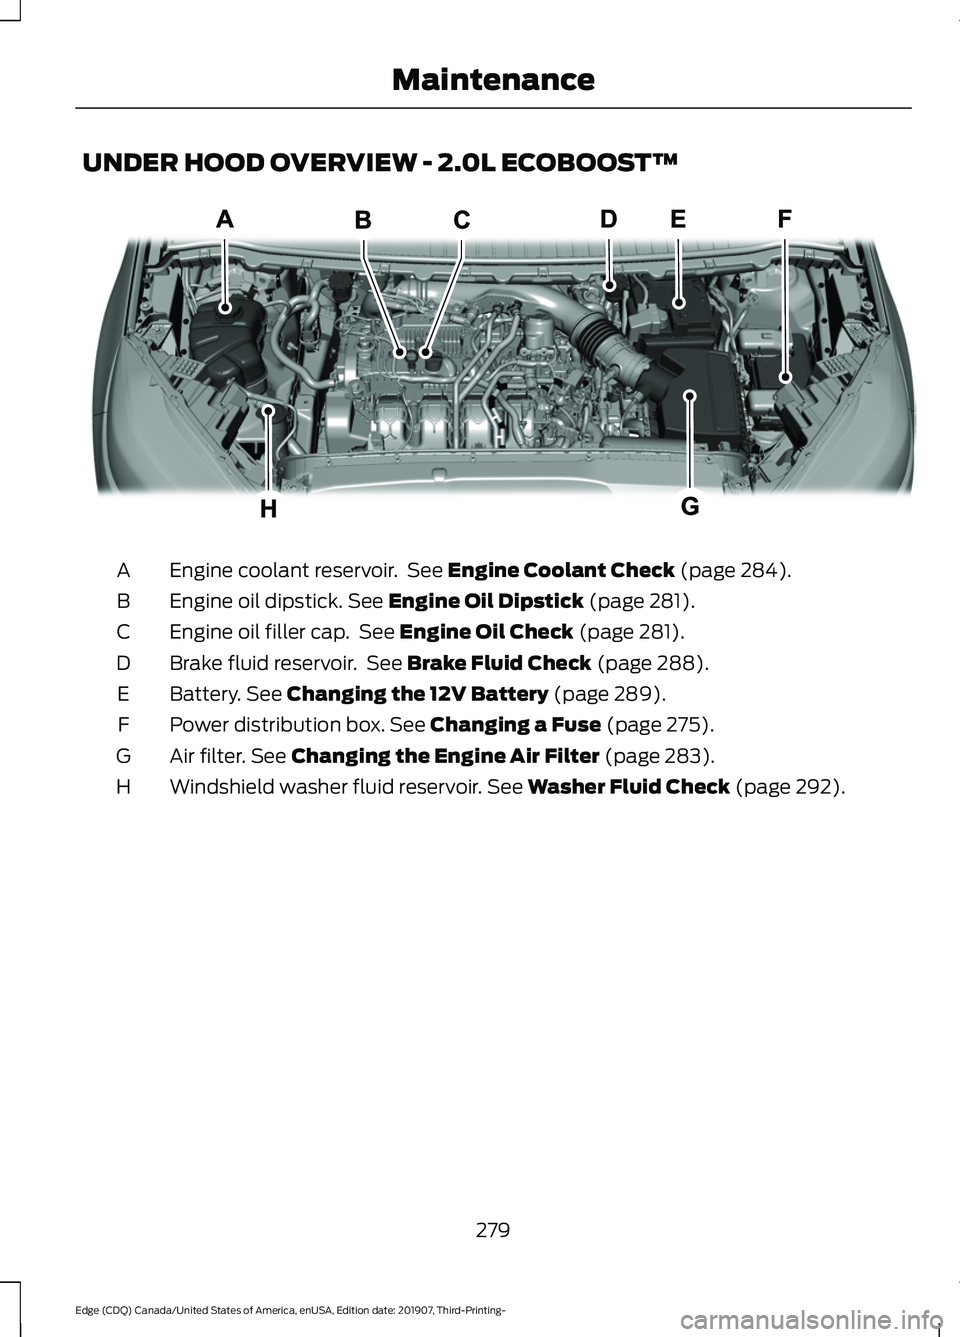
UNDER HOOD OVERVIEW - 2.0L ECOBOOST™
Engine coolant reservoir. See Engine Coolant Check (page 284).
A
Engine oil dipstick.
See Engine Oil Dipstick (page 281).
B
Engine oil filler cap. See
Engine Oil Check (page 281).
C
Brake fluid reservoir. See
Brake Fluid Check (page 288).
D
Battery.
See Changing the 12V Battery (page 289).
E
Power distribution box.
See Changing a Fuse (page 275).
F
Air filter.
See Changing the Engine Air Filter (page 283).
G
Windshield washer fluid reservoir.
See Washer Fluid Check (page 292).
H
279
Edge (CDQ) Canada/United States of America, enUSA, Edition date: 201907, Third-Printing- MaintenanceE294775
Page 283 of 495
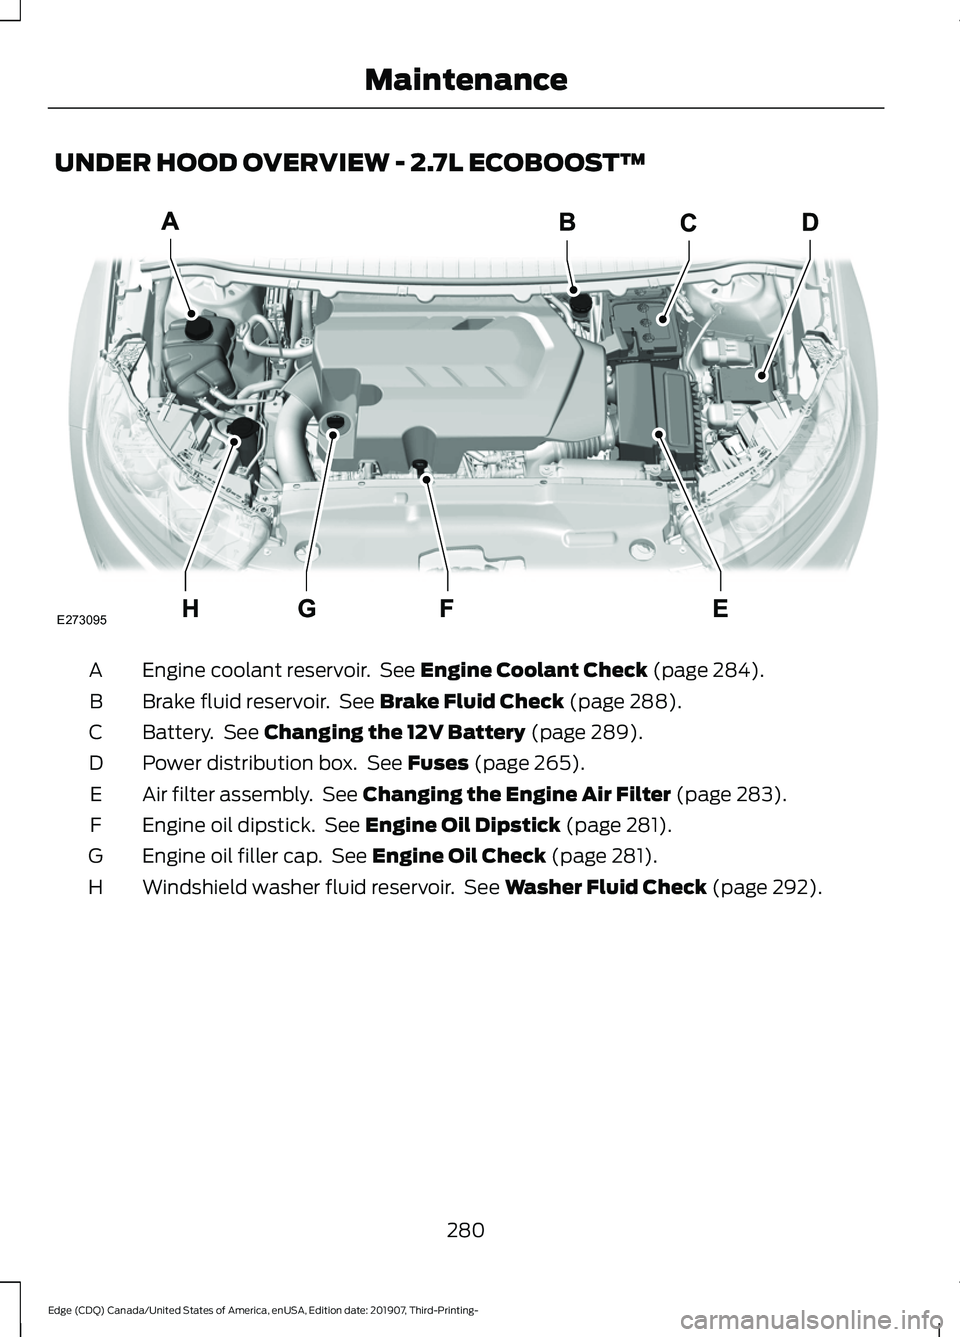
UNDER HOOD OVERVIEW - 2.7L ECOBOOST™
Engine coolant reservoir. See Engine Coolant Check (page 284).
A
Brake fluid reservoir. See
Brake Fluid Check (page 288).
B
Battery. See
Changing the 12V Battery (page 289).
C
Power distribution box. See
Fuses (page 265).
D
Air filter assembly. See
Changing the Engine Air Filter (page 283).
E
Engine oil dipstick. See
Engine Oil Dipstick (page 281).
F
Engine oil filler cap. See
Engine Oil Check (page 281).
G
Windshield washer fluid reservoir. See
Washer Fluid Check (page 292).
H
280
Edge (CDQ) Canada/United States of America, enUSA, Edition date: 201907, Third-Printing- MaintenanceE273095
Page 284 of 495
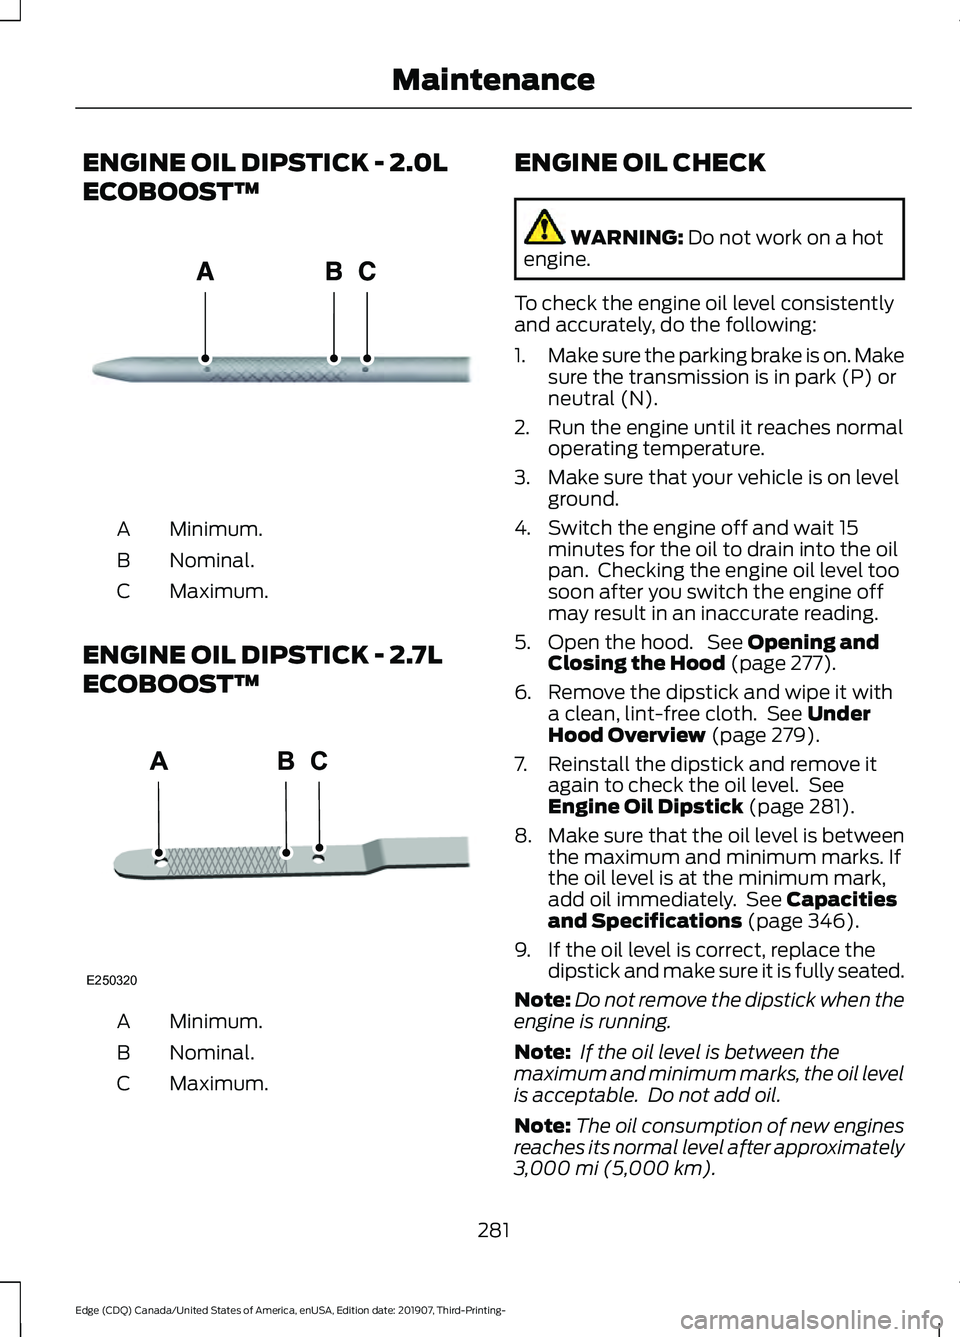
ENGINE OIL DIPSTICK - 2.0L
ECOBOOST™
Minimum.
A
Nominal.
B
Maximum.
C
ENGINE OIL DIPSTICK - 2.7L
ECOBOOST™ Minimum.
A
Nominal.
B
Maximum.
C ENGINE OIL CHECK WARNING: Do not work on a hot
engine.
To check the engine oil level consistently
and accurately, do the following:
1. Make sure the parking brake is on. Make
sure the transmission is in park (P) or
neutral (N).
2. Run the engine until it reaches normal operating temperature.
3. Make sure that your vehicle is on level ground.
4. Switch the engine off and wait 15 minutes for the oil to drain into the oil
pan. Checking the engine oil level too
soon after you switch the engine off
may result in an inaccurate reading.
5. Open the hood. See
Opening and
Closing the Hood (page 277).
6. Remove the dipstick and wipe it with a clean, lint-free cloth. See
Under
Hood Overview (page 279).
7. Reinstall the dipstick and remove it again to check the oil level. See
Engine Oil Dipstick
(page 281).
8. Make sure that the oil level is between
the maximum and minimum marks. If
the oil level is at the minimum mark,
add oil immediately. See
Capacities
and Specifications (page 346).
9. If the oil level is correct, replace the dipstick and make sure it is fully seated.
Note: Do not remove the dipstick when the
engine is running.
Note: If the oil level is between the
maximum and minimum marks, the oil level
is acceptable. Do not add oil.
Note: The oil consumption of new engines
reaches its normal level after approximately
3,000 mi (5,000 km)
.
281
Edge (CDQ) Canada/United States of America, enUSA, Edition date: 201907, Third-Printing- MaintenanceE270482 E250320
Page 285 of 495
Adding Engine Oil
WARNING: Do not remove the filler
cap when the engine is running. WARNING: Do not add engine oil
when the engine is hot. Failure to follow
this instruction could result in personal
injury.
Do not use supplemental engine oil
additives because they are unnecessary
and could lead to engine damage that may
not be covered by the vehicle Warranty. Only use oils certified for gasoline engines
by the American Petroleum Institute (API).
An oil with this trademark symbol
conforms to the current engine and
emission system protection standards and
fuel economy requirements of the
International Lubricants Specification
Advisory Committee (ILSAC).
To top up the engine oil level do the
following:
1. Clean the area surrounding the engine
oil filler cap before you remove it.
2. Remove the engine oil filler cap. See Under Hood Overview
(page 279).
Turn it counterclockwise and remove
it. 3. Add engine oil that meets our
specifications.
See Capacities and
Specifications (page 346). You may
have to use a funnel to pour the engine
oil into the opening.
4. Recheck the oil level.
5. If the oil level is correct, replace the dipstick and make sure it is fully seated.
6. Replace the engine oil filler cap. Turn it clockwise until you feel a strong
resistance.
Note: Do not add oil further than the
maximum mark. Oil levels above the
maximum mark may cause engine damage.
Note: Make sure you install the oil filler cap
correctly.
Note: Soak up any spillage with an
absorbent cloth immediately.
OIL CHANGE INDICATOR
RESET
Use the information display controls on
the steering wheel to reset the oil change
indicator.
From the main menu scroll to: Action and description
Message
Press the right arrow button,
then from this menu scroll
to the following message.
Settings
Press the right arrow button,
then from this menu scroll
to the following message.
Vehicle
Press the right arrow button,
then from this menu scroll
to the following message.
Oil Life
Press and hold the
OK
button until the instrument
cluster displays the
following message.
Hold OK to
Reset
282
Edge (CDQ) Canada/United States of America, enUSA, Edition date: 201907, Third-Printing- MaintenanceE142732
Page 286 of 495
Action and description
Message
Reset Successful
When the oil change indic-
ator resets the instrument
cluster displays 100%.
Remaining Life
{00}%
If the instrument cluster
displays one of the following
messages, repeat the
process.
Not Reset
Reset Cancelled
CHANGING THE ENGINE AIR
FILTER WARNING: To reduce the risk of
vehicle damage and personal burn
injuries, do not start your engine with the
air cleaner removed and do not remove
it while the engine is running.
When changing the air filter element, use
only the air filter element listed. See
Capacities and Specifications
(page
341).
For turbocharged equipped vehicles: When
servicing the air cleaner, it is important that
no foreign material enter the air induction
system. The engine and turbocharger are
susceptible to damage from even small
particles.
Change the air filter element at the proper
interval. See
Scheduled Maintenance
(page 429). Note:
Failure to use the correct air filter
element may result in severe engine
damage. The customer warranty may be
void for any damage to the engine if the
correct air filter element is not used. 1.
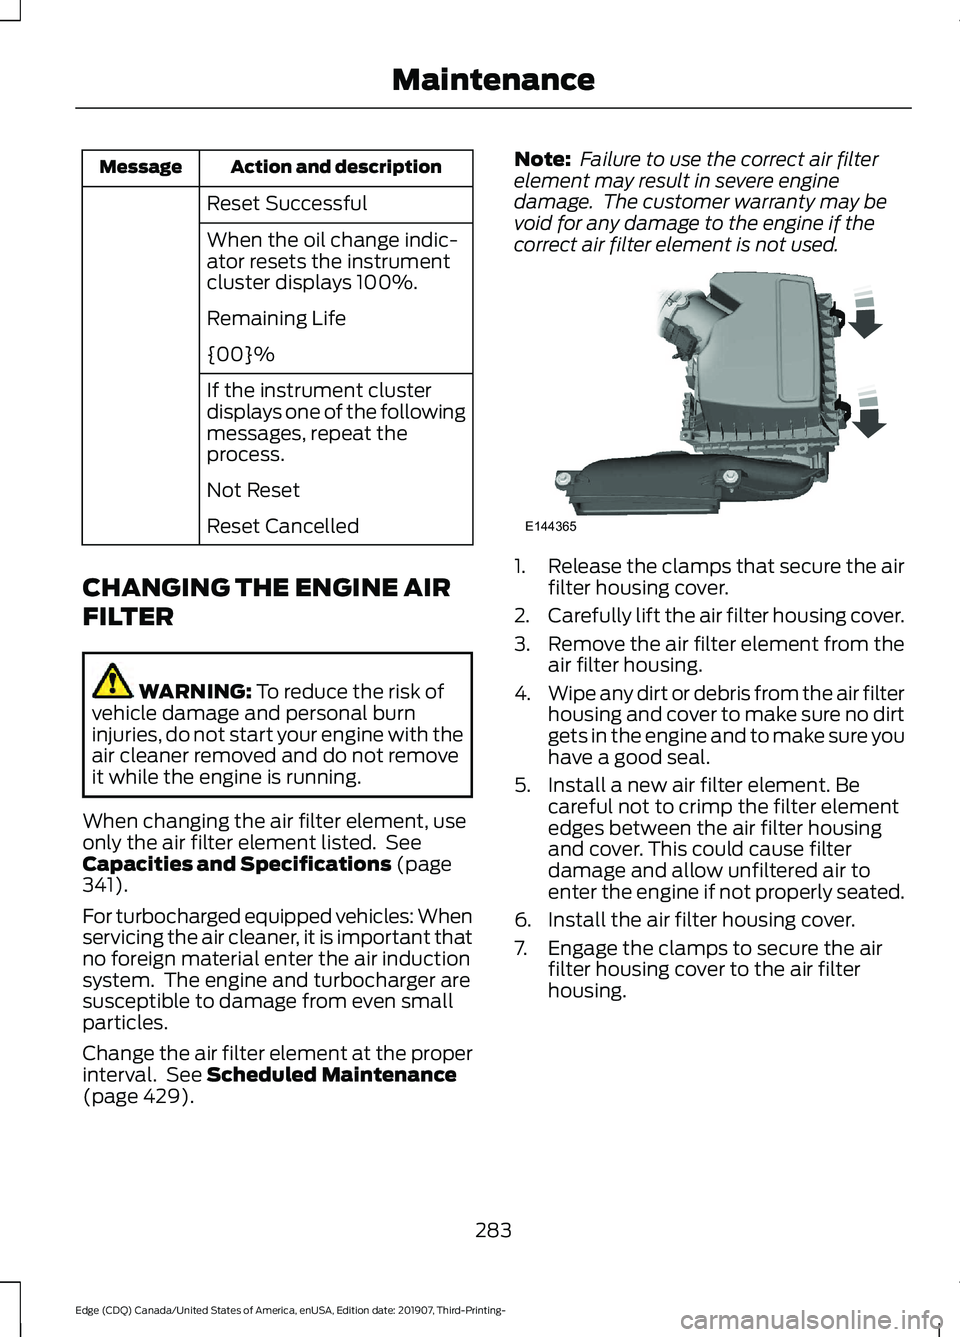
Release the clamps that secure the air
filter housing cover.
2. Carefully lift the air filter housing cover.
3. Remove the air filter element from the
air filter housing.
4. Wipe any dirt or debris from the air filter
housing and cover to make sure no dirt
gets in the engine and to make sure you
have a good seal.
5. Install a new air filter element. Be careful not to crimp the filter element
edges between the air filter housing
and cover. This could cause filter
damage and allow unfiltered air to
enter the engine if not properly seated.
6. Install the air filter housing cover.
7. Engage the clamps to secure the air filter housing cover to the air filter
housing.
283
Edge (CDQ) Canada/United States of America, enUSA, Edition date: 201907, Third-Printing- MaintenanceE144365