lock FORD EDGE 2021 Owners Manual
[x] Cancel search | Manufacturer: FORD, Model Year: 2021, Model line: EDGE, Model: FORD EDGE 2021Pages: 500, PDF Size: 8.52 MB
Page 338 of 500
Second Stage: Checking the tire
pressure with the inflator kit
WARNING: If the tire does not
inflate to the recommended tire pressure
within 15 minutes, stop and call roadside
assistance. WARNING:
The power plug may
get hot after use and should be handled
carefully when unplugging.
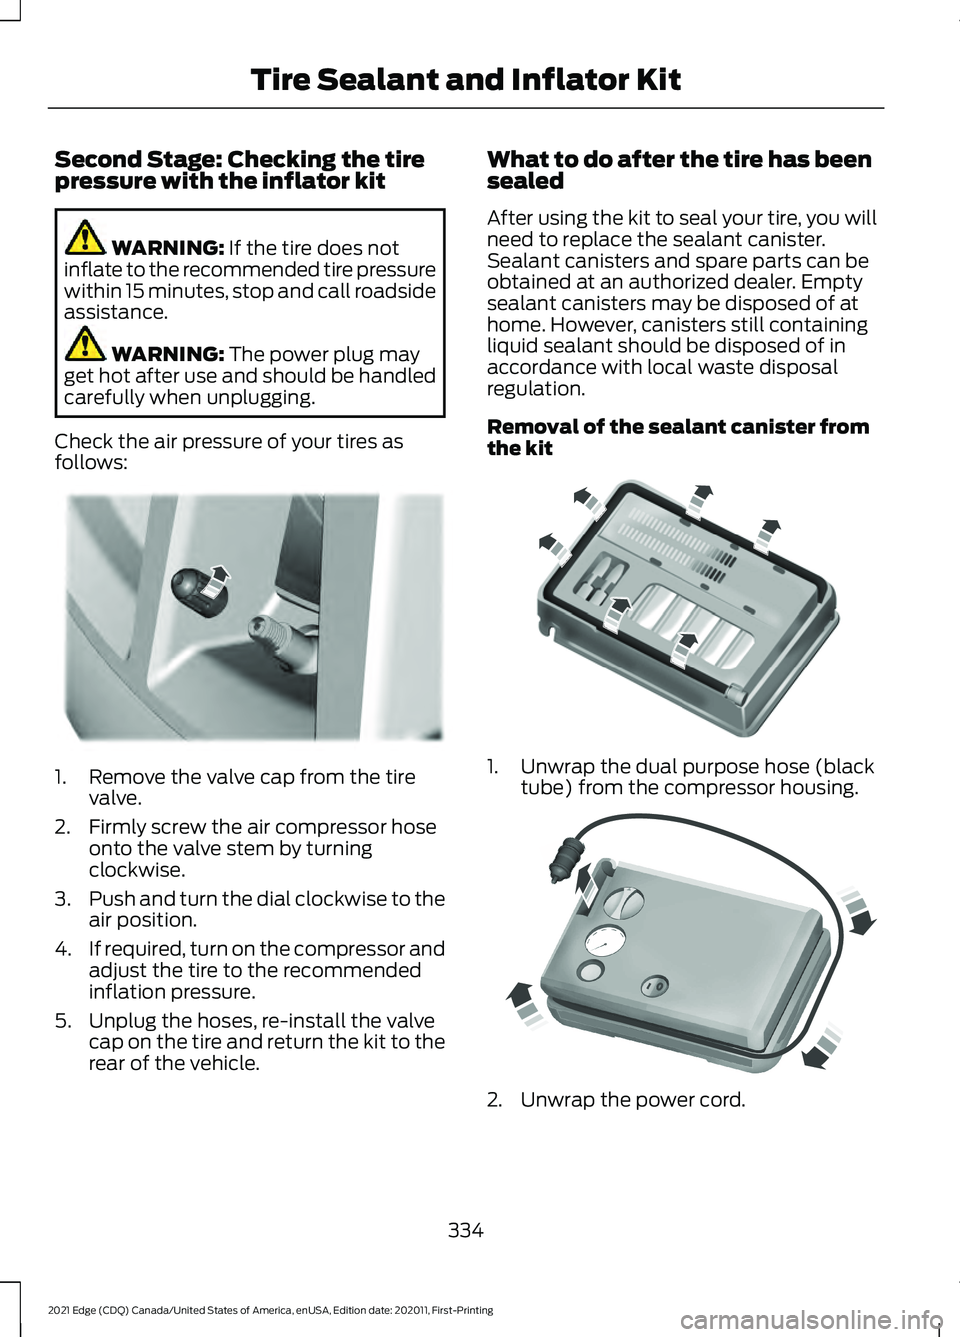
Check the air pressure of your tires as
follows: 1. Remove the valve cap from the tire
valve.
2. Firmly screw the air compressor hose onto the valve stem by turning
clockwise.
3. Push and turn the dial clockwise to the
air position.
4. If required, turn on the compressor and
adjust the tire to the recommended
inflation pressure.
5. Unplug the hoses, re-install the valve cap on the tire and return the kit to the
rear of the vehicle. What to do after the tire has been
sealed
After using the kit to seal your tire, you will
need to replace the sealant canister.
Sealant canisters and spare parts can be
obtained at an authorized dealer. Empty
sealant canisters may be disposed of at
home. However, canisters still containing
liquid sealant should be disposed of in
accordance with local waste disposal
regulation.
Removal of the sealant canister from
the kit
1. Unwrap the dual purpose hose (black
tube) from the compressor housing. 2. Unwrap the power cord.
334
2021 Edge (CDQ) Canada/United States of America, enUSA, Edition date: 202011, First-Printing Tire Sealant and Inflator KitE175983 E175984 E175985
Page 346 of 500
Use of one of the dissimilar spare tires
listed above at any one wheel location can
lead to impairment of the following:
•
Handling, stability and braking
performance.
• Comfort and noise.
• Ground clearance and parking at curbs.
• Winter weather driving capability.
• Wet weather driving capability.
• All-wheel driving capability, if
applicable.
3. Full-size dissimilar spare without
label on wheel
When driving with the full-size dissimilar
spare wheel and tire assembly, do not:
• Exceed 70 mph (113 km/h).
• Use more than one dissimilar spare
wheel and tire assembly at a time.
• Use commercial car washing
equipment.
• Use snow chains on the end of the
vehicle with the dissimilar spare wheel
and tire assembly.
The usage of a full-size dissimilar spare
wheel and tire assembly can lead to
impairment of the following:
• Handling, stability and braking
performance.
• Comfort and noise.
• Ground clearance and parking at curbs.
• Winter weather driving capability.
• Wet weather driving capability.
• All-wheel driving capability. When driving with the full-size dissimilar
spare wheel and tire assembly additional
caution should be given to:
•
Towing a trailer.
• Driving vehicles equipped with a
camper body.
• Driving vehicles with a load on the
cargo rack.
Drive cautiously when using a full-size
dissimilar spare wheel and tire assembly
and seek service as soon as possible.
Tire Change Procedure WARNING:
Do not work on your
vehicle when the jack is the only support
as your vehicle could slip off the jack.
Failure to follow this instruction could
result in personal injury or death. WARNING:
To help prevent your
vehicle from moving when changing a
wheel, shift the transmission into park
(P), set the parking brake and use an
appropriate block or wheel chock to
secure the wheel diagonally opposite to
the wheel being changed. For example,
when changing the front left wheel,
place an appropriate block or wheel
chock on the right rear wheel. WARNING:
Never place anything
between the vehicle jack and your
vehicle. WARNING:
Never place anything
between the vehicle jack and the ground. WARNING:
Park your vehicle so
that you do not obstruct the flow of
traffic or place yourself in any danger and
set up a warning triangle.
342
2021 Edge (CDQ) Canada/United States of America, enUSA, Edition date: 202011, First-Printing Changing a Road Wheel
(If Equipped)
Page 347 of 500
WARNING: Do not get under a
vehicle that is only supported by a
vehicle jack. WARNING:
Do not attempt to
change a tire on the side of the vehicle
close to moving traffic. Pull far enough
off the road to avoid the danger of being
hit when operating the jack or changing
the wheel. WARNING:
Use only the specified
jacking points. If you use other positions,
you may damage the body, steering,
suspension, engine, braking system or
the fuel lines. WARNING:
Always use the jack
provided as original equipment with your
vehicle. If using a jack other than the one
provided, make sure the jack capacity is
adequate for the vehicle weight,
including any vehicle cargo or
modifications. If you are unsure if the jack
capacity is adequate, contact the
authorized dealer. WARNING:
The jack supplied with
this vehicle is only intended for changing
wheels. Do not use the vehicle jack other
than when you are changing a wheel in
an emergency. WARNING:
Make sure there is no
grease or oil on the threads or the
surface between the wheel lugs and
nuts. This can cause the lug nuts to
loosen while driving. Note:
The jack does not require
maintenance or additional lubrication over
the service life of your vehicle.
Note: Passengers should not remain in your
vehicle when the vehicle is being jacked.
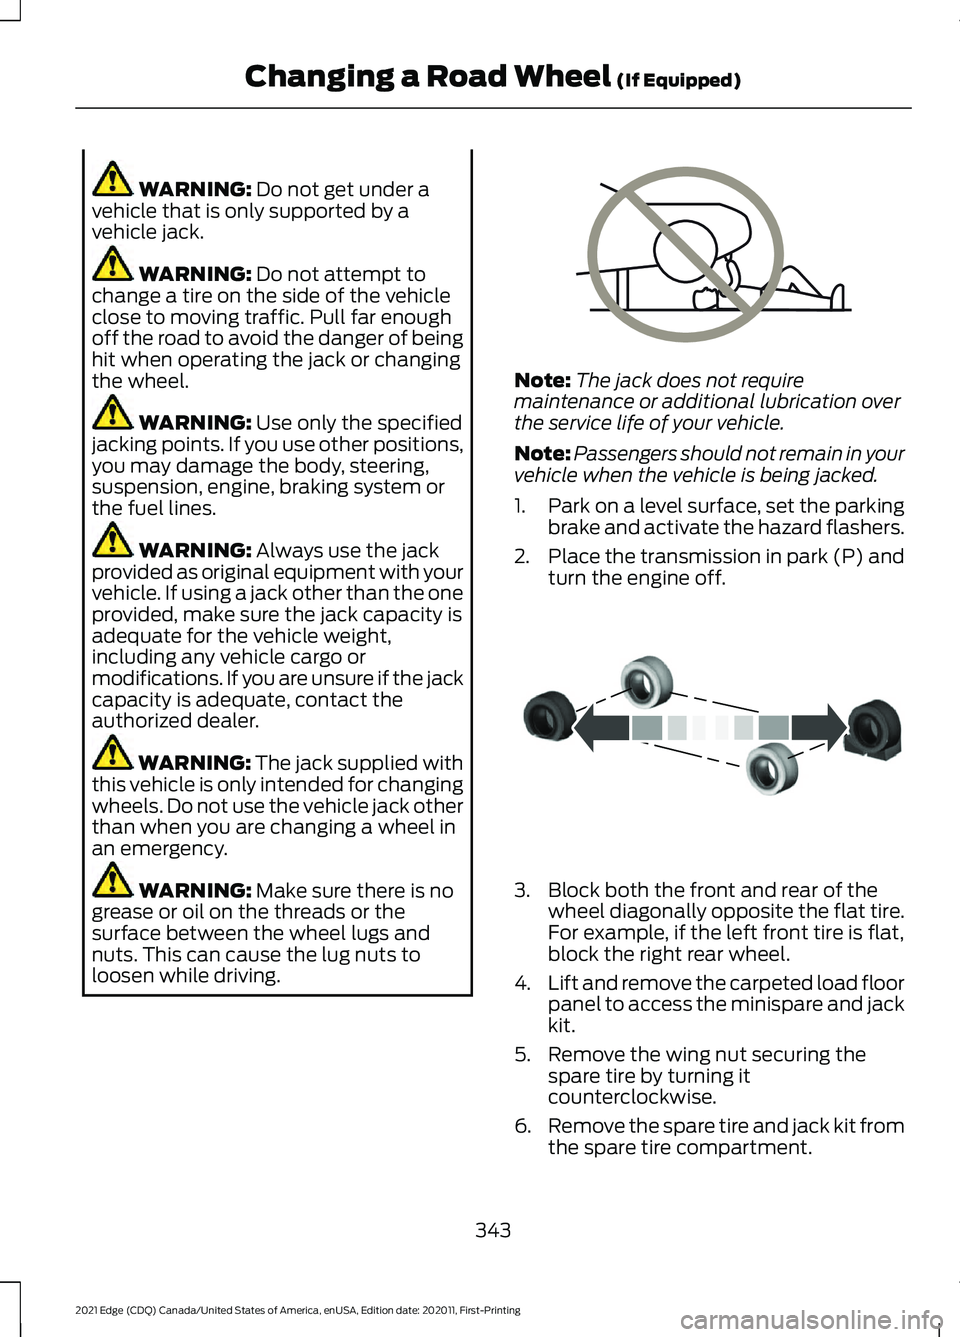
1. Park on a level surface, set the parking
brake and activate the hazard flashers.
2. Place the transmission in park (P) and
turn the engine off. 3. Block both the front and rear of the
wheel diagonally opposite the flat tire.
For example, if the left front tire is flat,
block the right rear wheel.
4. Lift and remove the carpeted load floor
panel to access the minispare and jack
kit.
5. Remove the wing nut securing the spare tire by turning it
counterclockwise.
6. Remove the spare tire and jack kit from
the spare tire compartment.
343
2021 Edge (CDQ) Canada/United States of America, enUSA, Edition date: 202011, First-Printing Changing a Road Wheel
(If Equipped)E166722 E175447
Page 348 of 500
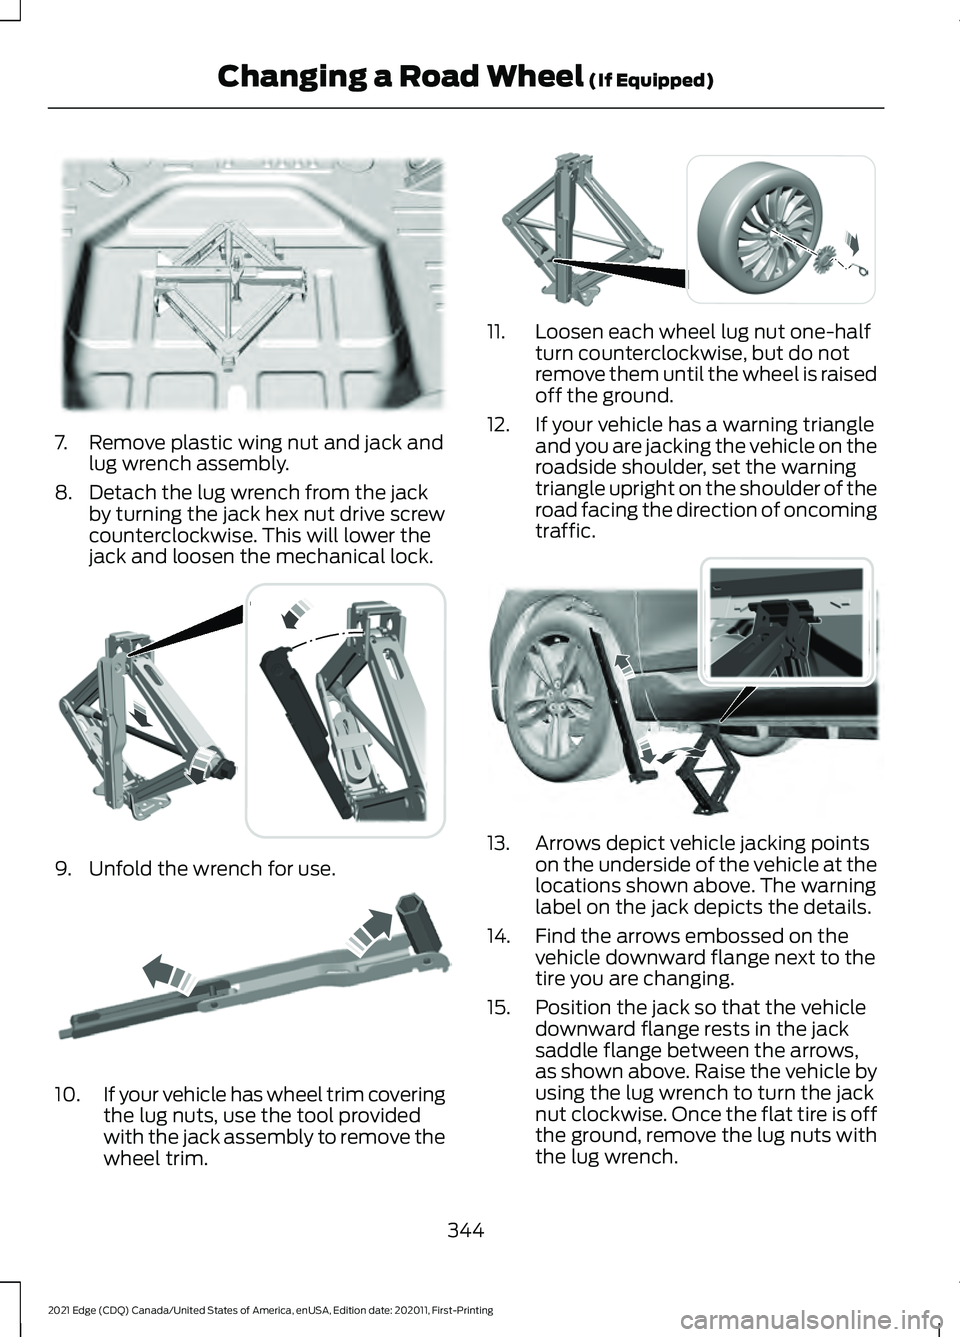
7. Remove plastic wing nut and jack and
lug wrench assembly.
8. Detach the lug wrench from the jack by turning the jack hex nut drive screw
counterclockwise. This will lower the
jack and loosen the mechanical lock. 9. Unfold the wrench for use.
10.
If your vehicle has wheel trim covering
the lug nuts, use the tool provided
with the jack assembly to remove the
wheel trim. 11. Loosen each wheel lug nut one-half
turn counterclockwise, but do not
remove them until the wheel is raised
off the ground.
12. If your vehicle has a warning triangle and you are jacking the vehicle on the
roadside shoulder, set the warning
triangle upright on the shoulder of the
road facing the direction of oncoming
traffic. 13. Arrows depict vehicle jacking points
on the underside of the vehicle at the
locations shown above. The warning
label on the jack depicts the details.
14. Find the arrows embossed on the vehicle downward flange next to the
tire you are changing.
15. Position the jack so that the vehicle downward flange rests in the jack
saddle flange between the arrows,
as shown above. Raise the vehicle by
using the lug wrench to turn the jack
nut clockwise. Once the flat tire is off
the ground, remove the lug nuts with
the lug wrench.
344
2021 Edge (CDQ) Canada/United States of America, enUSA, Edition date: 202011, First-Printing Changing a Road Wheel (If Equipped)E178186 E294117 E181744 E294584 E336095
Page 349 of 500
16. Replace the flat tire with the spare
tire, making sure the valve stem is
facing outward. Reinstall the lug nuts
until the wheel is snug against the
hub. Do not fully tighten the lug nuts
until the wheel has been lowered.
17. Lower the wheel by turning the jack handle counterclockwise.
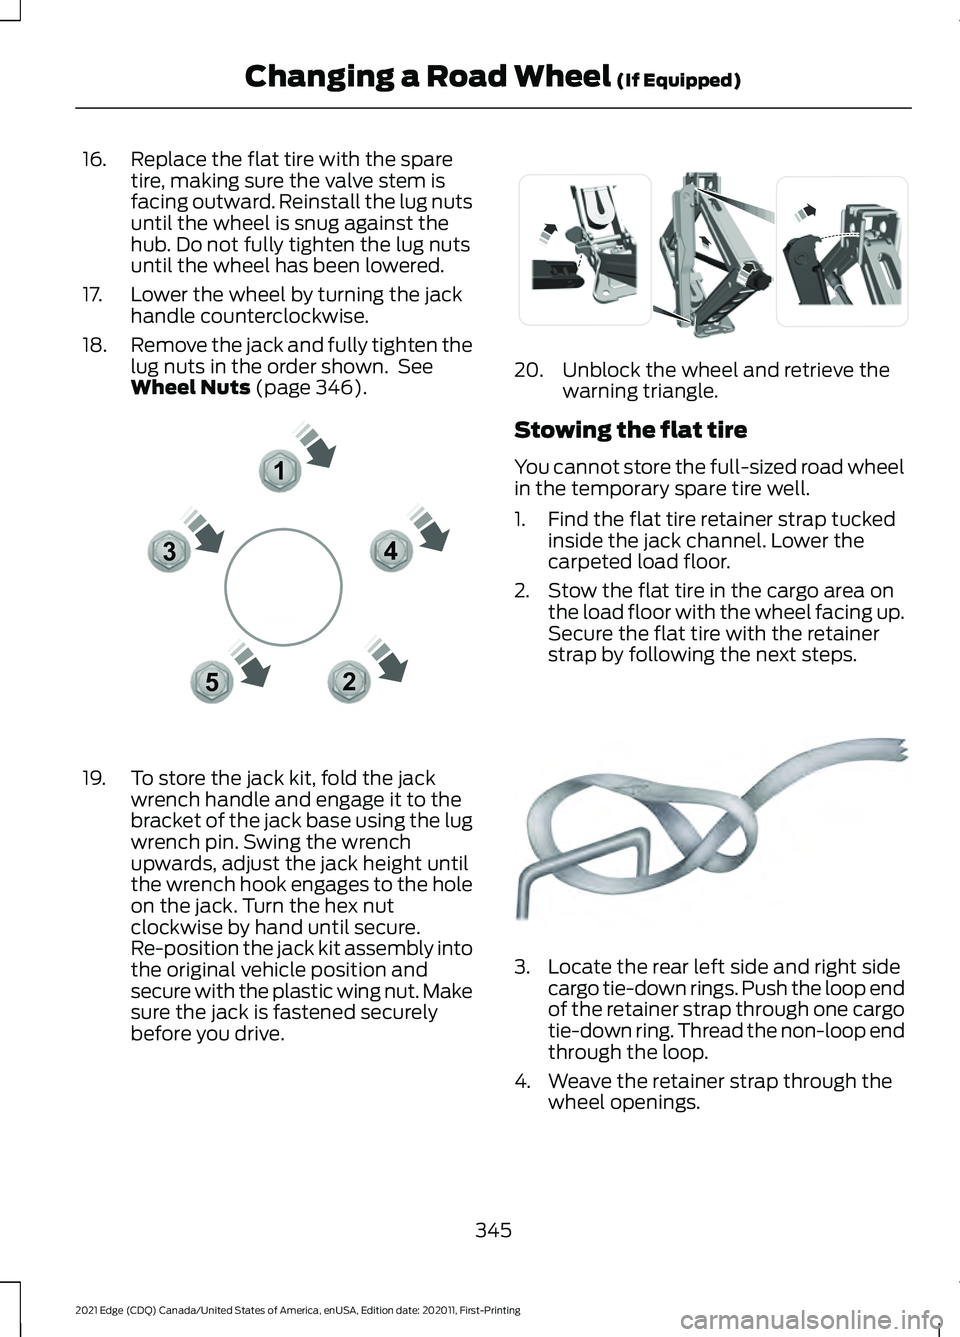
18. Remove the jack and fully tighten the
lug nuts in the order shown. See
Wheel Nuts (page 346). 19. To store the jack kit, fold the jack
wrench handle and engage it to the
bracket of the jack base using the lug
wrench pin. Swing the wrench
upwards, adjust the jack height until
the wrench hook engages to the hole
on the jack. Turn the hex nut
clockwise by hand until secure.
Re-position the jack kit assembly into
the original vehicle position and
secure with the plastic wing nut. Make
sure the jack is fastened securely
before you drive. 20. Unblock the wheel and retrieve the
warning triangle.
Stowing the flat tire
You cannot store the full-sized road wheel
in the temporary spare tire well.
1. Find the flat tire retainer strap tucked inside the jack channel. Lower the
carpeted load floor.
2. Stow the flat tire in the cargo area on the load floor with the wheel facing up.
Secure the flat tire with the retainer
strap by following the next steps. 3. Locate the rear left side and right side
cargo tie-down rings. Push the loop end
of the retainer strap through one cargo
tie-down ring. Thread the non-loop end
through the loop.
4. Weave the retainer strap through the wheel openings.
345
2021 Edge (CDQ) Canada/United States of America, enUSA, Edition date: 202011, First-Printing Changing a Road Wheel
(If Equipped)12
3
4
5E306781 E294121 E142906
Page 366 of 500
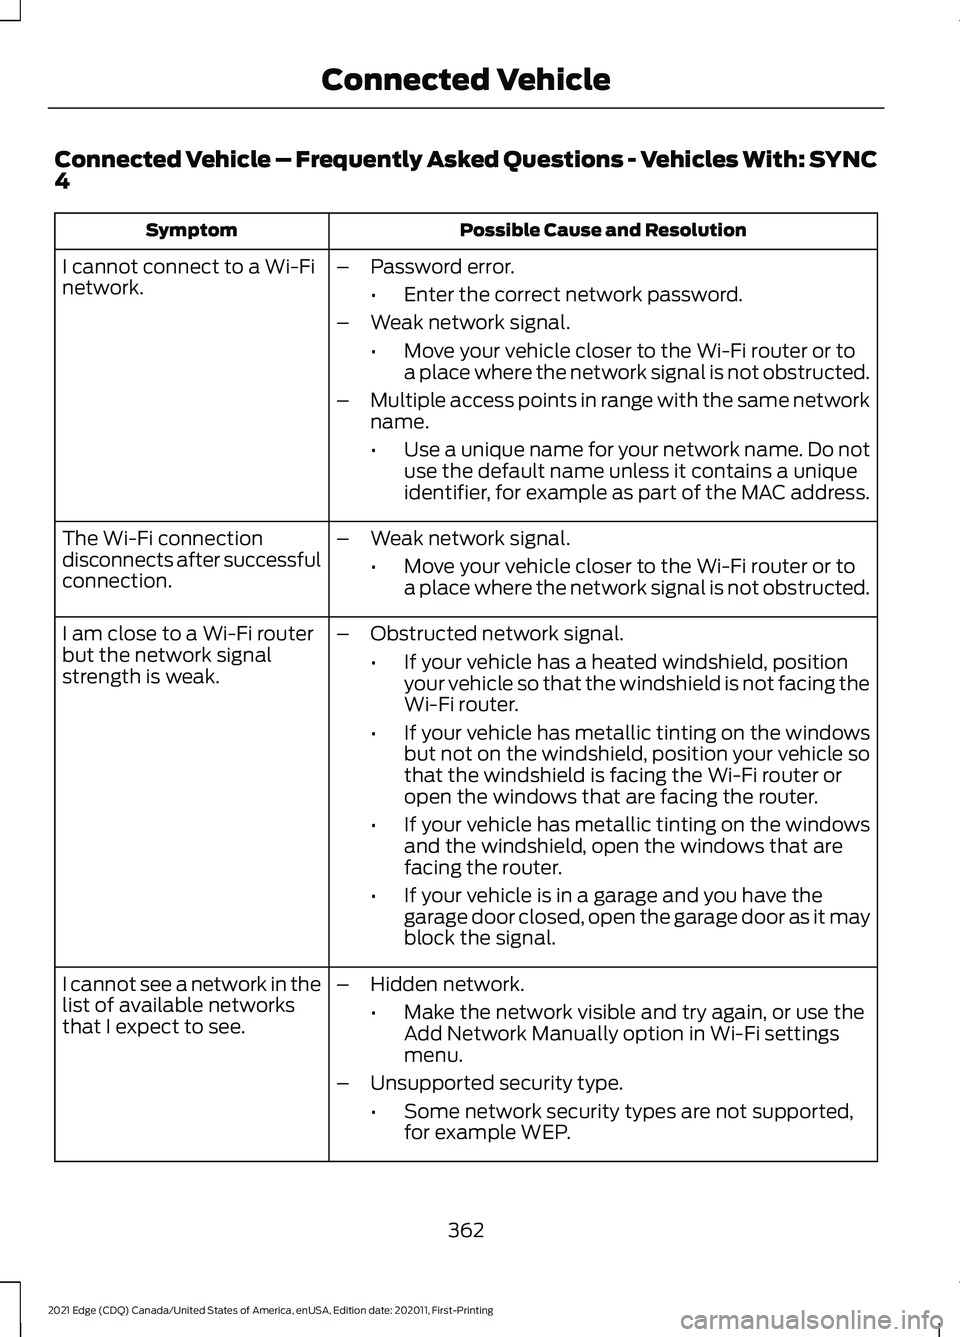
Connected Vehicle – Frequently Asked Questions - Vehicles With: SYNC
4
Possible Cause and Resolution
Symptom
I cannot connect to a Wi-Fi
network. –
Password error.
•Enter the correct network password.
– Weak network signal.
•Move your vehicle closer to the Wi-Fi router or to
a place where the network signal is not obstructed.
– Multiple access points in range with the same network
name.
•Use a unique name for your network name. Do not
use the default name unless it contains a unique
identifier, for example as part of the MAC address.
The Wi-Fi connection
disconnects after successful
connection. –
Weak network signal.
•Move your vehicle closer to the Wi-Fi router or to
a place where the network signal is not obstructed.
I am close to a Wi-Fi router
but the network signal
strength is weak. –
Obstructed network signal.
•If your vehicle has a heated windshield, position
your vehicle so that the windshield is not facing the
Wi-Fi router.
• If your vehicle has metallic tinting on the windows
but not on the windshield, position your vehicle so
that the windshield is facing the Wi-Fi router or
open the windows that are facing the router.
• If your vehicle has metallic tinting on the windows
and the windshield, open the windows that are
facing the router.
• If your vehicle is in a garage and you have the
garage door closed, open the garage door as it may
block the signal.
– Hidden network.
•Make the network visible and try again, or use the
Add Network Manually option in Wi-Fi settings
menu.
– Unsupported security type.
•Some network security types are not supported,
for example WEP.
I cannot see a network in the
list of available networks
that I expect to see.
362
2021 Edge (CDQ) Canada/United States of America, enUSA, Edition date: 202011, First-Printing Connected Vehicle
Page 371 of 500
SWITCHING REPEAT MODE ON
AND OFF
Press the button on the
touchscreen to switch repeat
mode on or off.
Note: Not all sources have repeat mode.
SETTING A MEMORY PRESET
1. Select a station or channel.
2. Press and hold a memory preset button
on the touchscreen.
Note: The audio mutes briefly while the
system saves the preset and returns once it
is stored.
Note: You can save presets from multiple
sources to the memory preset bar.
MUTING THE AUDIO Press the button on the steering
wheel to mute the audio.
Press to mute the signal. Press
again to restore the signal.
ADJUSTING THE SOUND
SETTINGS
Balance and Fade (If Equipped)
1. Access the vehicle drawer on the touchscreen.
2. Press
SETTINGS.
3. Press
Sound.
4. Press
Balance / Fade.
5. Press the arrows to adjust the settings. Tone Settings
1. Access the vehicle drawer on the
touchscreen.
2. Press
SETTINGS.
3. Press
Sound.
4. Press
Tone Settings.
5. Use the slider bar to adjust the settings.
Speed Compensated Volume
1. Access the vehicle drawer on the touchscreen.
2. Press
SETTINGS.
3. Press
Sound.
4. Press
Speed Compensated Volume.
5. Press a setting.
Occupancy Mode
(If Equipped)
1. Access the vehicle drawer on the touchscreen.
2. Press
SETTINGS.
3. Press
Sound.
4. Press
Occupancy Mode.
5. Press a setting.
Sound Mode
(If Equipped)
1. Access the vehicle drawer on the touchscreen.
2. Press
SETTINGS.
3. Press
Sound.
4. Press
Sound Mode.
5. Press a setting.
SETTING THE CLOCK AND
DATE
1. Access the vehicle drawer on the touchscreen.
2. Press
SETTINGS.
367
2021 Edge (CDQ) Canada/United States of America, enUSA, Edition date: 202011, First-Printing Audio System
Page 372 of 500
3. Press Clock.
4. Set the time.
Note: The
AM and PM options are not
available if 24-hour mode is on.
5. Press the arrows to adjust the settings.
Switching Automatic Time
Updates On and Off
1. Access the vehicle drawer on the touchscreen.
2. Press
SETTINGS.
3. Press
Clock.
4. Switch
Automatic time zone update
on or off.
AM/FM RADIO
AM/FM Radio Limitations
The further you travel from an AM or FM
station, the weaker the signal and the
weaker the reception.
Hills, mountains, tall buildings, bridges,
tunnels, freeway overpasses, parking
garages, dense tree foliage and
thunderstorms can interfere with the
reception.
When you pass a ground-based broadcast
repeating tower, a stronger signal may
overtake a weaker one and result in the
audio system muting. Selecting a Radio Station
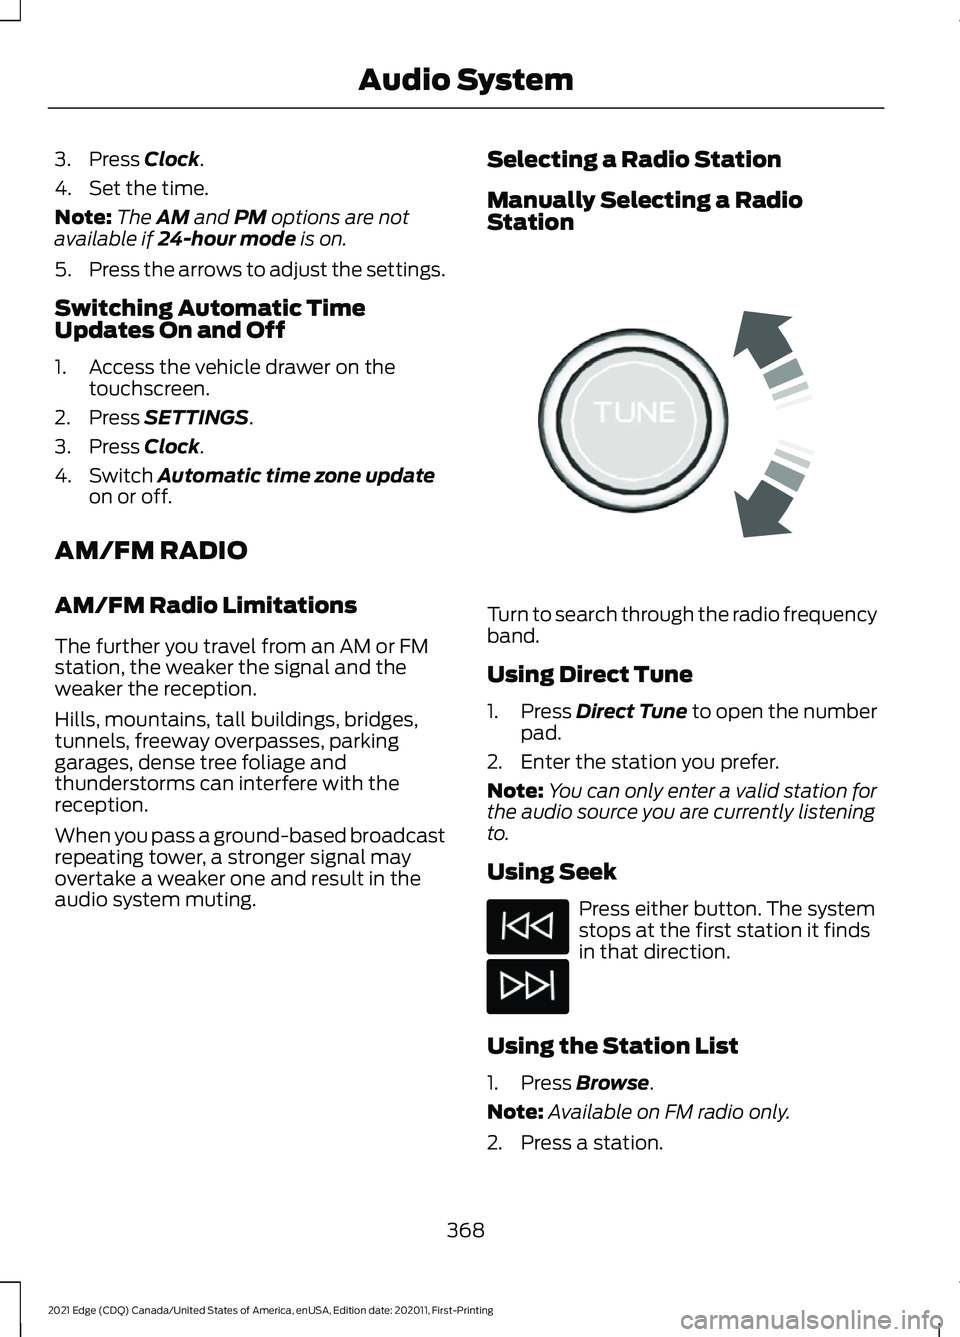
Manually Selecting a Radio
Station
Turn to search through the radio frequency
band.
Using Direct Tune
1.
Press
Direct Tune to open the number
pad.
2. Enter the station you prefer.
Note: You can only enter a valid station for
the audio source you are currently listening
to.
Using Seek Press either button. The system
stops at the first station it finds
in that direction.
Using the Station List
1. Press
Browse.
Note: Available on FM radio only.
2. Press a station.
368
2021 Edge (CDQ) Canada/United States of America, enUSA, Edition date: 202011, First-Printing Audio SystemE270235
Page 386 of 500
APP PRECAUTIONS
WARNING: Driving while distracted
can result in loss of vehicle control, crash
and injury. We strongly recommend that
you use extreme caution when using any
device that may take your focus off the
road. Your primary responsibility is the
safe operation of your vehicle. We
recommend against the use of any
hand-held device while driving and
encourage the use of voice-operated
systems when possible. Make sure you
are aware of all applicable local laws
that may affect the use of electronic
devices while driving.
APP REQUIREMENTS
When you start an app through the system
for the first time, you could be asked to
grant certain permissions. You can review
and change the permissions that you have
granted at any time when your vehicle is
not moving. We recommend that you
check your data plan before using your
apps through the system. Using them
could result in additional charges. We also
recommend that you check the app
provider's terms and conditions and
privacy policy before using their app. Make
sure that you have an active account for
apps that you want to use through the
system. Some apps will work with no
setup. Others require you to configure
some personal settings before you can use
them.
ACCESSING APPS Press the button to open the
application drawer. ENABLING APPS ON AN IOS
DEVICE Select the apps option in the
feature drawer.
1. If your device is connected via USB, switch Apple CarPlay off.
2. Connect your device to a USB port or pair and connect using Bluetooth.
3. If prompted to enable CarPlay, select Disable.
4. Start the apps on your device that you want to use through SYNC.
Note: If you close the apps on your device,
you will not be able to use them through the
system.
5. Select the app that you want to use on
the touchscreen.
Note: Connect your device to a USB port if
you want to use a navigation app. When
using a navigation app, keep your device
unlocked and the app open.
ENABLING APPS ON AN
ANDROID DEVICE Select the apps option in the
feature drawer.
1. If your device is connected via USB, switch Android Auto off.
2. Pair your device.
3. Start the apps on your device that you want to use through SYNC.
Note: If you close the apps on your device,
you will not be able to use them through the
system.
4. Select Find Mobile Apps.
Note: The system searches and connects
to compatible apps that are running on your
device.
382
2021 Edge (CDQ) Canada/United States of America, enUSA, Edition date: 202011, First-Printing Apps
Page 390 of 500
UPDATING THE VEHICLE
SYSTEMS WIRELESSLY
Over the air system updates
allow you to update your vehicle
system software wirelessly. To
make sure you receive all updates, set a
recurring schedule and connect to Wi-Fi.
Updates may take longer if not connected
to Wi-Fi, or may not download at all. See
Connected Vehicle (page 360).
Note: Additional over the air update icons
may appear in the status bar. See
Status
Bar (page 373).
Over the Air System Update
Requirements
Before updating, reference this list to make
sure your vehicle is ready be updated. If
these requirements are not met during a
scheduled update, the update will be
canceled and you can reschedule.
• Your vehicle is not running.
• Your vehicle is stopped.
• Your vehicle is parked.
• The hazard indicators are switched off.
• The alarm is not sounding.
• The doors are closed.
• The parking lights are switched off.
• You are not pressing the brake pedal.
• An emergency call is not in progress.
• Your vehicle is not in limp mode.
Scheduling an Over the Air System
Update
Make sure Vehicle Connectivity and
Automatic Updates are switched on.
Using the Settings Menu
1. Open the application drawer.
2. Press the
System Updates button. 3. Press
Schedule Update.
4. Use the controls to set the time and day of the update.
5. Save the schedule.
Note: You can set the updates to occur
every seven days.
Using the Status Bar Icon When an update is available, tap
the notification icon and follow
the prompts on the screen.
Applying an Over the Air System
Update
You can schedule a convenient time for
the update to complete. During scheduled
updates you may not be able to use your
vehicle.
Note: Updates may take up to 30 minutes
to complete.
You can see the progress of the update on
the touchscreen. An update cannot be
canceled once it has been started.
During an update you will not be able to
drive your vehicle, start the vehicle, use
remote controls to lock and unlock the
vehicle. The alarm, central locks, and door
tones are disabled. The electronic door
lock will not function during an update. You
can open the doors using the mechanical
latch if child locks are not on. Pull the
handle until it stops to use the mechanical
latch.
Note: Double locking is switched off and
central locking is switched on during and
after an update.
Note: If your vehicle is plugged in, charging
will stop during an update and resume when
the update is complete.
386
2021 Edge (CDQ) Canada/United States of America, enUSA, Edition date: 202011, First-Printing Vehicle System UpdatesE327789 E327785