warning FORD EDGE 2021 Owners Manual
[x] Cancel search | Manufacturer: FORD, Model Year: 2021, Model line: EDGE, Model: FORD EDGE 2021Pages: 500, PDF Size: 8.52 MB
Page 305 of 500
Note:
Before reconnecting the battery,
make sure the ignition remains switched off.
Note: Make sure the battery cable terminals
are fully tightened.
Note: After cleaning or replacing the
battery, make sure you reinstall the battery
cover or shield.
If you disconnect or replace the vehicle
battery, you must reset the following
features:
• Window bounce-back. See Windows
(page 108).
• Clock Settings.
• Pre-set radio stations.
• Steering Angle Sensor.
Note: To calibrate the steering angle
sensor, drive the vehicle above
30 mph
(50 km/h) for a minimum of 1.2 mi (2 km).
Make sure to drive straight ahead for a
minimum of 30 seconds. Several vehicle
functions are disabled and a warning light
could appear until the sensor is calibrated.
Battery Management System
The battery management system monitors
battery conditions and takes actions to
extend battery life. If excessive battery
drain is detected, the system temporarily
disables some of the following features:
• Heated rear window.
• Heated seats.
• Climate control.
• Heated steering wheel.
• Audio unit.
• Navigation system.
A message may appear in the information
display to alert you that battery protection
actions are active. After battery replacement, or in some
cases after charging the battery with an
external charger, the battery management
system requires eight hours of vehicle sleep
time to relearn the battery state of charge.
During this time your vehicle must remain
fully locked with the ignition off.
Note:
If you add electrical accessories or
components to the vehicle, it may adversely
affect battery performance and durability.
This may also affect the performance of
other electrical systems in the vehicle.
Battery Disposal Make sure that you dispose of
old batteries in an
environmentally friendly way.
Seek advice from your local authority
about recycling old batteries.
ADJUSTING THE HEADLAMPS
Vertical Aim Adjustment
The headlamps on your vehicle are
properly aimed at the assembly plant. If
your vehicle has been involved in a crash,
have the aim of the headlamp beam
checked by an authorized dealer.
301
2021 Edge (CDQ) Canada/United States of America, enUSA, Edition date: 202011, First-Printing MaintenanceE107998
Page 308 of 500
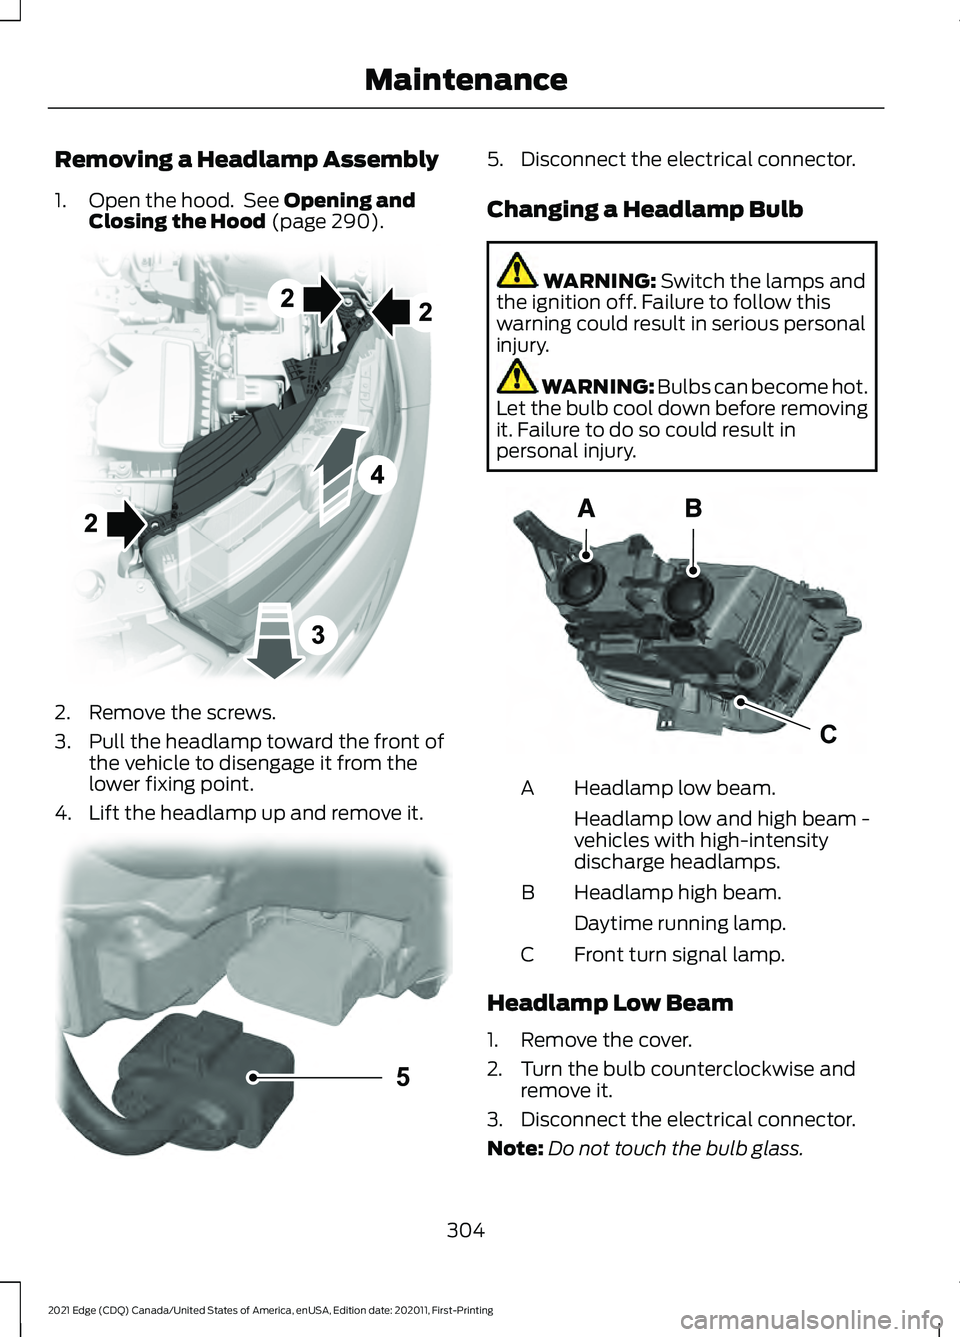
Removing a Headlamp Assembly
1. Open the hood. See Opening and
Closing the Hood (page 290). 2. Remove the screws.
3. Pull the headlamp toward the front of
the vehicle to disengage it from the
lower fixing point.
4. Lift the headlamp up and remove it. 5. Disconnect the electrical connector.
Changing a Headlamp Bulb
WARNING:
Switch the lamps and
the ignition off. Failure to follow this
warning could result in serious personal
injury. WARNING: Bulbs can become hot.
Let the bulb cool down before removing
it. Failure to do so could result in
personal injury. Headlamp low beam.
A
Headlamp low and high beam -
vehicles with high-intensity
discharge headlamps.
Headlamp high beam.
B
Daytime running lamp.
Front turn signal lamp.
C
Headlamp Low Beam
1. Remove the cover.
2. Turn the bulb counterclockwise and remove it.
3. Disconnect the electrical connector.
Note: Do not touch the bulb glass.
304
2021 Edge (CDQ) Canada/United States of America, enUSA, Edition date: 202011, First-Printing Maintenance E194758 5E133750 CE188959
Page 313 of 500
Note:
If your vehicle has an engine cover
remove the cover before application of
shampoo and degreaser.
• Spray an approved engine shampoo
and degreaser on all parts that require
cleaning and rinse with water.
Cleaning Stripes or Graphics
It is recommended to wash your vehicle by
hand however, pressure washing may be
used under the following conditions:
• Use a spray with a 40° wide spray
angle pattern.
• Keep the nozzle at a
12 in (305 mm)
distance and 90° angle to your
vehicle's surface.
• Do not use water pressure higher than
2,000 psi (14,000 kPa)
.
• Do not use water hotter than
179°F
(82°C).
Note: Holding the pressure washer nozzle
at an angle to the vehicle's surface may
damage graphics and cause the edges to
peel away from the vehicle's surface.
Cleaning Camera Lenses and
Sensors
We recommend that you only use
lukewarm or cold water and a soft cloth
to clean the camera lens and sensors.
Note: Do not pressure wash camera lens
and sensors.
Cleaning the Underbody
Flush the complete underside of your
vehicle frequently. Keep body and door
drain holes free from packed dirt. Rear suspension components may require
regular cleaning with a power washer or a
thorough rinse with a strong stream of
water if the vehicle is operated in dusty or
muddy environments. Rear leaf springs or
other suspension components may emit
squeaking or popping noises while
operating the vehicle if particles, such as
dirt, rocks, or other debris, are present in
the components.
CLEANING THE INTERIOR
Cleaning the Instrument Panel
WARNING:
Do not use chemical
solvents or strong detergents when
cleaning the steering wheel or
instrument panel to avoid contamination
of the airbag system.
We recommend that you only clean the
instrument panel and cluster lens with a
damp soft cloth. Dry the area with a clean,
soft cloth.
For additional information and assistance,
we recommend that you contact an
authorized dealer.
Note: Avoid cleaners or polishes that
increase the gloss of the upper portion of
the instrument panel. The dull finish in this
area helps protect you from undesirable
windshield reflection.
Cleaning Plastic
We recommend that you only use a mild
soap and water solution on a soft cloth.
Dry the area with a clean, soft cloth.
309
2021 Edge (CDQ) Canada/United States of America, enUSA, Edition date: 202011, First-Printing Vehicle Care
Page 314 of 500
Cleaning Displays and Screens
We recommend that you only use a
microfiber cloth in a circular motion to
clean off the fingerprint or dust.
If dirt or fingerprints are still on the screen,
apply a small amount of alcohol to the
cloth and try to clean it again.
Note:
Do not pour or spray alcohol onto the
touchscreen.
Note: Do not use detergent or any type of
solvent to clean the touchscreen.
Cleaning Leather and Vinyl
We recommend that you only clean the
leather and vinyl surfaces in the following
way:
1. Remove dust and loose dirt with a vacuum cleaner.
2. Wipe the surface with a soft, damp cloth and a mild soap and water
solution. Dry the area with a clean, soft
cloth.
3. Make sure the leather is dry, then apply
a small amount of conditioner to a
clean, dry cloth.
4. Rub the conditioner into the leather until it disappears. Allow the
conditioner to dry, then repeat the
process for the entire interior. If a film
appears, wipe it off with a dry, clean
cloth.
5. For additional information and assistance, we recommend that you
contact an authorized dealer. Cleaning Fabric Seats and
Headliners WARNING: On vehicles equipped
with seat-mounted airbags, do not use
chemical solvents or strong detergents.
Such products could contaminate the
side airbag system and affect
performance of the side airbag in a crash.
We recommend that you only clean the
fabric seats and headliners in the following
way:
1. Remove dust and loose dirt with a vacuum cleaner.
2. Wipe the surface with a soft, damp cloth and a mild soap and water
solution. Dry the area with a clean, soft
cloth.
3. For additional information and assistance, we recommend that you
contact an authorized dealer.
For heavy stains, spot clean the area. If a
ring forms on the fabric, clean the entire
area immediately, but do not oversaturate
or the ring could set.
Cleaning Carpets and Floor Mats
We recommend that you only clean your
carpets in the following way:
1. Remove dust and loose dirt with a vacuum cleaner.
2. Wipe the surface with a soft, damp cloth and a mild soap and water
solution. Dry the area with a clean, soft
cloth.
3. For additional information and assistance, we recommend that you
contact an authorized dealer.
310
2021 Edge (CDQ) Canada/United States of America, enUSA, Edition date: 202011, First-Printing Vehicle Care
Page 315 of 500
For heavy stains, spot clean the area. If a
ring forms on the fabric, clean the entire
area immediately, but do not oversaturate
or the ring could set.
We recommend that you only clean your
floor mats in the following way:
1. Remove dust and loose dirt with a
vacuum cleaner.
2. Wash rubber floor mats using mild soap and lukewarm or cold water.
3. Completely dry the floor mat before placing them back in your vehicle.
Cleaning Seatbelts WARNING: Do not use cleaning
solvents, bleach or dye on the vehicle's
seatbelts, as these actions may weaken
the belt webbing.
1. Wipe the surface with a soft, damp cloth and a mild soap and water
solution. Dry the area with a clean, soft
cloth.
Cleaning Storage Compartments
1. Remove dust and loose dirt with a vacuum cleaner.
2. Wipe the surface with a soft, damp cloth and a mild soap and water
solution. Dry the area with a clean, soft
cloth.
Cleaning Moonroof Tracks
1. Remove debris from the tracks with a vacuum cleaner.
2. Wipe the bulb seal and mating painted
roof metal surface with a soft, damp
cloth and a mild soap and water
solution. REPAIRING MINOR PAINT
DAMAGE
Authorized dealers have touch-up paint to
match your vehicle
’s color. Your vehicle
color code is printed on a sticker on the
front, left-hand side door jamb. Take your
color code to your authorized dealer to
make sure you get the correct color.
Before repairing minor paint damage, use
a cleaner to remove particles such as bird
droppings, tree sap, insect deposits, tar
spots, road salt and industrial fallout.
Read the instructions before using cleaning
products.
WAXING YOUR VEHICLE
Wax the high-gloss painted surface of your
prewashed vehicle once or twice a year.
We recommend that you only use an
approved quality wax that does not
contain abrasives. Follow the
manufacturer's instructions to apply and
remove the wax. For additional information
and assistance, we recommend that you
contact an authorized dealer.
When washing and waxing, park your
vehicle in a shaded area out of direct
sunlight.
Note: Avoid waxing unpainted or low-gloss
black colored parts, they discolor over time.
311
2021 Edge (CDQ) Canada/United States of America, enUSA, Edition date: 202011, First-Printing Vehicle Care
Page 320 of 500
Traction AA A B C
WARNING: The traction
grade assigned to this tire is
based on straight-ahead braking
traction tests, and does not
include acceleration, cornering,
hydroplaning or peak traction
characteristics.
The traction grades, from highest
to lowest are AA, A, B, and C. The
grades represent the tire ’s ability
to stop on wet pavement as
measured under controlled
conditions on specified
government test surfaces of
asphalt and concrete. A tire
marked C may have poor traction
performance.
Temperature A B C WARNING:
The
temperature grade for this tire is
established for a tire that is
properly inflated and not
overloaded. Excessive speed,
underinflation, or excessive
loading, either separately or in
combination, can cause heat
buildup and possible tire failure.
The temperature grades are A
(the highest), B and C,
representing the tire ’s resistance
to the generation of heat and its
ability to dissipate heat when
tested under controlled conditions
on a specified indoor laboratory test wheel. Sustained high
temperature can cause the
material of the tire to degenerate
and reduce tire life, and excessive
temperature can lead to sudden
tire failure. The grade C
corresponds to a level of
performance which all passenger
car tires must meet under the
Federal Motor Vehicle Safety
Standard No. 139. Grades B and A
represent higher levels of
performance on the laboratory
test wheel than the minimum
required by law.
INFORMATION ON THE TIRE
SIDEWALL
Both United States and Canada
Federal regulations require tire
manufacturers to place
standardized information on the
sidewall of all tires. This
information identifies and
describes the fundamental
characteristics of the tire and also
provides a U.S. DOT Tire
Identification Number for safety
standard certification and in case
of a recall.
316
2021 Edge (CDQ) Canada/United States of America, enUSA, Edition date: 202011, First-Printing Wheel and Tire Information
Page 323 of 500
*Treadwear The treadwear grade
is a comparative rating based on
the wear rate of the tire when
tested under controlled conditions
on a specified government test
course. For example, a tire graded
150 would wear one and one-half
times as well on the government
course as a tire graded 100.
*Traction: The traction grades,
from highest to lowest are AA, A,
B, and C. The grades represent the
tire's ability to stop on wet
pavement as measured under
controlled conditions on specified
government test surfaces of
asphalt and concrete. A tire
marked C may have poor traction
performance.
*
Temperature: The temperature
grades are A (the highest), B and
C, representing the tire's
resistance to the generation of
heat and its ability to dissipate
heat when tested under controlled
conditions on a specified indoor
laboratory test wheel.
M. Maximum Inflation
Pressure:
Indicates the tire
manufacturers' maximum
permissible pressure or the
pressure at which the maximum
load can be carried by the tire. This
pressure is normally higher than
the vehicle manufacturer's
recommended cold inflation
pressure which can be found on
the Safety Compliance
Certification Label (affixed to
either the door hinge pillar,
door-latch post, or the door edge that meets the door-latch post,
next to the driver's seating
position), or Tire Label which is
located on the B-Pillar or the edge
of the driver
’s door. The cold
inflation pressure should never be
set lower than the recommended
pressure on the vehicle label.
The tire suppliers may have
additional markings, notes or
warnings such as standard load
or radial tubeless.
Additional Information
Contained on the Tire Sidewall
for LT Type Tires
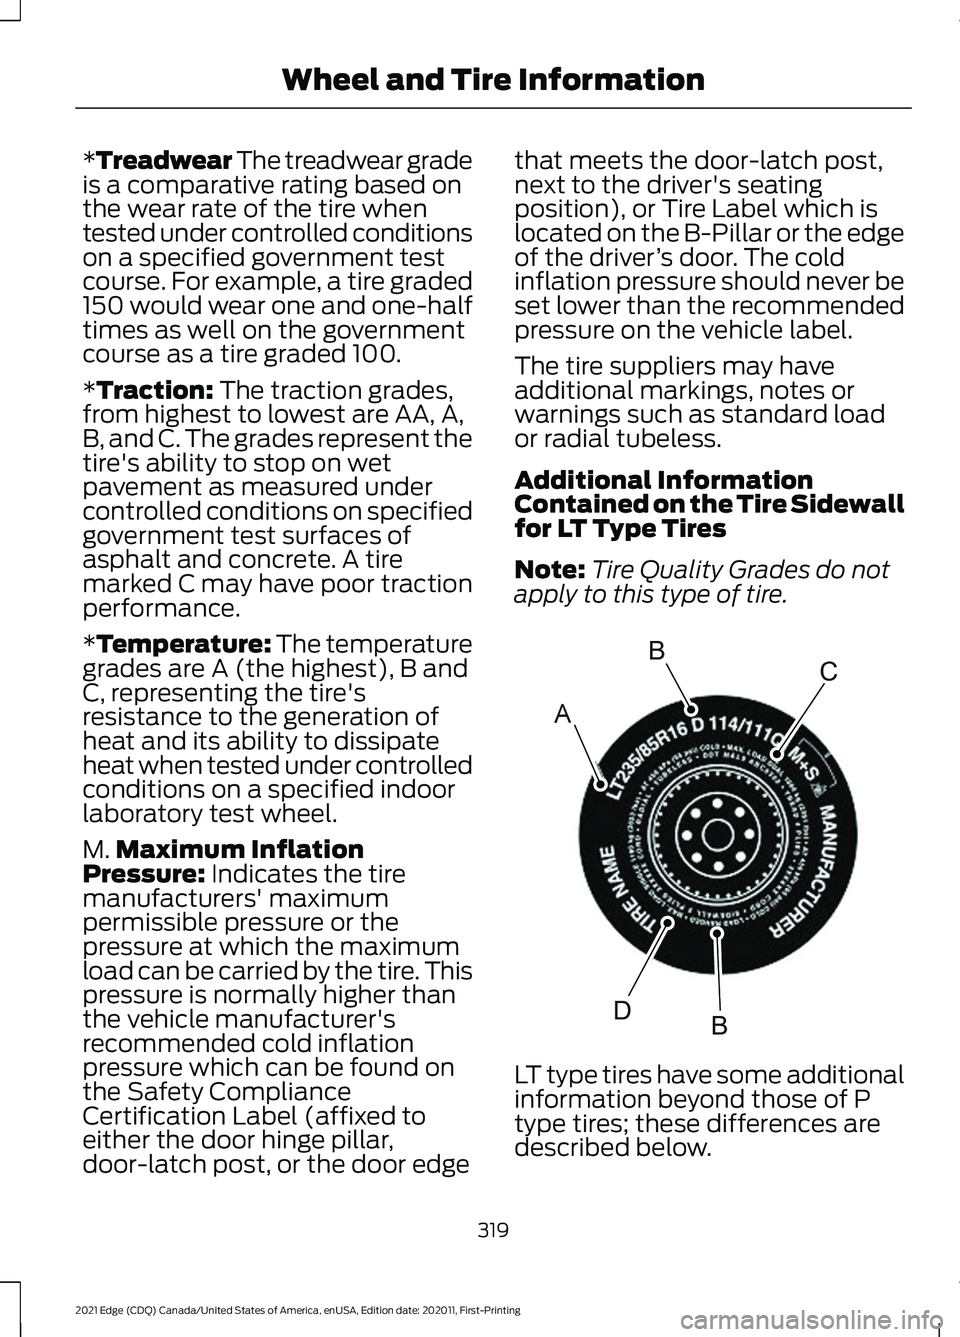
Note: Tire Quality Grades do not
apply to this type of tire. LT type tires have some additional
information beyond those of P
type tires; these differences are
described below.
319
2021 Edge (CDQ) Canada/United States of America, enUSA, Edition date: 202011, First-Printing Wheel and Tire InformationA
BC
BDE142544
Page 326 of 500
*Tread area of the tire: Area of
the perimeter of the tire that
contacts the road when mounted
on the vehicle.
*Rim: The metal support (wheel)
for a tire or a tire and tube
assembly upon which the tire
beads are seated.
TIRE REPLACEMENT
REQUIREMENTS
Your vehicle is equipped with tires
designed to provide a safe ride
and handling capability. WARNING:
Only use
replacement tires and wheels
that are the same size, load
index, speed rating and type
(such as P-metric versus
LT-metric or all-season versus
all-terrain) as those originally
provided by Ford. The
recommended tire and wheel
size may be found on either the
Safety Compliance Certification
Label (affixed to either the door
hinge pillar, door-latch post, or
the door edge that meets the
door-latch post, next to the
driver's seating position), or the
Tire Label which is located on
the B-Pillar or edge of the
driver's door. If this information
is not found on these labels, then
you should contact your
authorized dealer as soon as
possible. Use of any tire or wheel
not recommended by Ford can affect the safety and
performance of your vehicle,
which could result in an
increased risk of loss of vehicle
control, vehicle rollover, personal
injury and death.
WARNING:
To reduce the
risk of serious injury, when
mounting replacement tires and
wheels, you should not exceed
the maximum pressure indicated
on the sidewall of the tire to set
the beads without additional
precautions listed below. If the
beads do not seat at the
maximum pressure indicated,
re-lubricate and try again. WARNING: For a mounting
pressure more than
20 psi
(1.38 bar) greater than the
maximum pressure, a Ford
dealer or other tire service
professional should do the
mounting. WARNING:
Always inflate
steel carcass tires with a remote
air fill with the person inflating
standing at a minimum of
12 ft
(3.66 m) away from the wheel
and tire assembly.
322
2021 Edge (CDQ) Canada/United States of America, enUSA, Edition date: 202011, First-Printing Wheel and Tire Information
Page 327 of 500
WARNING: When inflating
the tire for mounting pressures
up to
20 psi (1.38 bar) greater
than the maximum pressure on
the tire sidewall, the following
precautions must be taken to
protect the person mounting the
tire:
• Make sure that you have the
correct tire and wheel size.
• Lubricate the tire bead and
wheel bead seat area again.
• Stand at a minimum of
12 ft
(3.66 m) away from the wheel
and tire assembly.
• Use both eye and ear
protection.
Important: Remember to replace
the wheel valve stems when the
road tires are replaced on your
vehicle.
It is recommended that the two
front tires or two rear tires
generally be replaced as a pair if
the worn tires still have usable
depth.
To avoid potential All-Wheel Drive
(AWD) malfunction or (AWD)
system damage, it is
recommended to replace all four
tires rather than mixing
significantly worn tires with new
tires.
The tire pressure sensors mounted
in the wheels (originally installed
on your vehicle) are not designed
to be used in aftermarket wheels. The use of wheels or tires not
recommended may affect the
operation of your tire pressure
monitoring system.
If the tire pressure monitoring
system indicator is flashing, your
system is malfunctioning. Your
replacement tire might be
incompatible with your tire
pressure monitoring system, or
some component of the system
may be damaged.
Age
WARNING:
Tires degrade
over time depending on many
factors such as weather, storage
conditions, and conditions of use
(load, speed, inflation pressure)
the tires experience throughout
their lives.
In general, tires should be
replaced after six years
regardless of tread wear.
However, heat caused by hot
climates or frequent high loading
conditions can accelerate the
aging process and may require
tires to be replaced more
frequently.
You should replace your spare
tire when you replace the road
tires or after six years due to
aging even if it has not been
used.
323
2021 Edge (CDQ) Canada/United States of America, enUSA, Edition date: 202011, First-Printing Wheel and Tire Information
Page 328 of 500

U.S. DOT Tire Identification
Number
Both United States and Canada
Federal regulations require tire
manufacturers to place
standardized information on the
sidewall of all tires. This
information identifies and
describes the fundamental
characteristics of the tire and also
provides a U.S. DOT Tire
Identification Number for safety
standard certification and in case
of a recall.
This begins with the letters DOT
and indicates that the tire meets
all federal standards. The next
two numbers or letters are the
plant code designating where it
was manufactured, the next two
are the tire size code and the last
four numbers represent the week
and year the tire was built. For
example, the numbers 317 mean
the 31st week of 1997. After 2000,
the numbers go to four digits. For
example, 2501 means the 25th
week of 2001. The numbers in
between are identification codes
used for traceability. This
information is used to contact
customers if a tire defect requires
a recall.
USING SNOW CHAINS WARNING: Do not exceed 30 mph
(50 km/h). Failure to follow this
instruction could result in the loss of
control of your vehicle, personal injury or
death. WARNING:
Do not use snow chains
on snow-free roads. WARNING:
Only fit snow chains to
specified tires. WARNING:
If your vehicle is fitted
with wheel trims, remove them before
fitting snow chains. WARNING:
Wheels and tires must
be the same size, load index and speed
rating as those originally fitted on the
vehicle. Use of any other tire or wheel
can affect the safety and performance
of your vehicle. Additionally, the use of
non-recommended tires and wheels can
cause steering, suspension, axle, transfer
case or power transfer unit failure.
Follow the recommended tire inflation
pressures found on the Safety
Compliance Certification label, or the
Tire Label on the B-Pillar or the edge of
the driver door. Failure to follow this
instruction could result in loss of vehicle
control, vehicle rollover, or personal injury
or death.
Only use snow chains on the front wheels.
Install snow chains in pairs. Do not use
self-tensioning snow chains.
Only use snow chains on the following
specified tire size:
• 235/60R18 all season tires.
•Only use ultra low profile snow
chains that are 10 mm or less.
324
2021 Edge (CDQ) Canada/United States of America, enUSA, Edition date: 202011, First-Printing Wheel and Tire Information