rear window FORD ESCAPE 2001 1.G Owners Manual
[x] Cancel search | Manufacturer: FORD, Model Year: 2001, Model line: ESCAPE, Model: FORD ESCAPE 2001 1.GPages: 280, PDF Size: 2.65 MB
Page 6 of 280
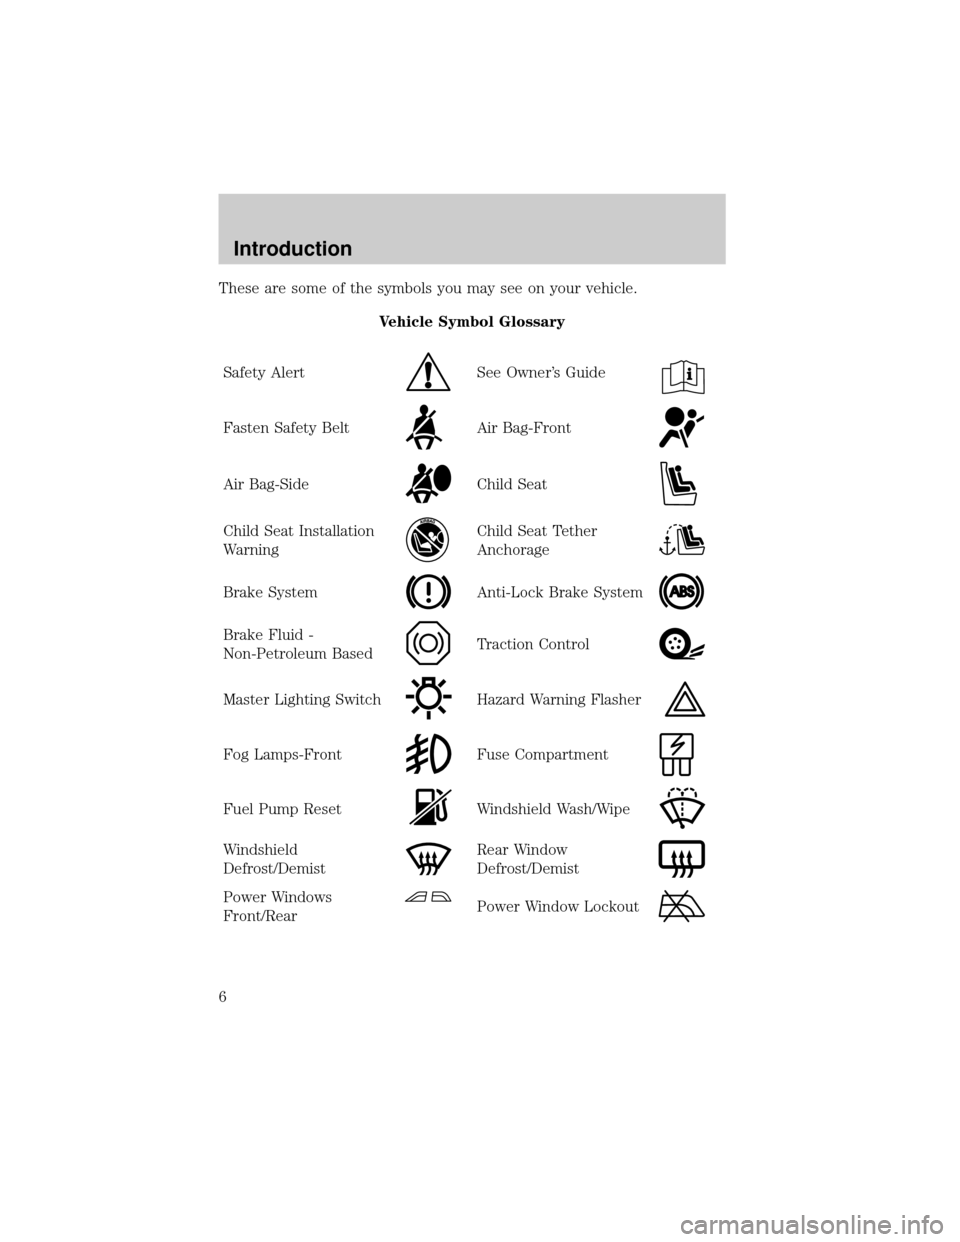
These are some of the symbols you may see on your vehicle.
Vehicle Symbol Glossary
Safety Alert
See Owner's Guide
Fasten Safety BeltAir Bag-Front
Air Bag-SideChild Seat
Child Seat Installation
WarningChild Seat Tether
Anchorage
Brake SystemAnti-Lock Brake System
Brake Fluid -
Non-Petroleum BasedTraction Control
Master Lighting SwitchHazard Warning Flasher
Fog Lamps-FrontFuse Compartment
Fuel Pump ResetWindshield Wash/Wipe
Windshield
Defrost/DemistRear Window
Defrost/Demist
Power Windows
Front/RearPower Window Lockout
Introduction
6
Page 9 of 280
A/C
MAX
A/C1
2
3
4
AC4X4
AUTO
ON
SHUFFLE CD CD
BASS
CDTREB BAL FADESCN
AUTO
SET AM
FM
VOL - PUSH ON
SEEK
EJ
COMP DISC
TUNE
12 3456
FM1ST
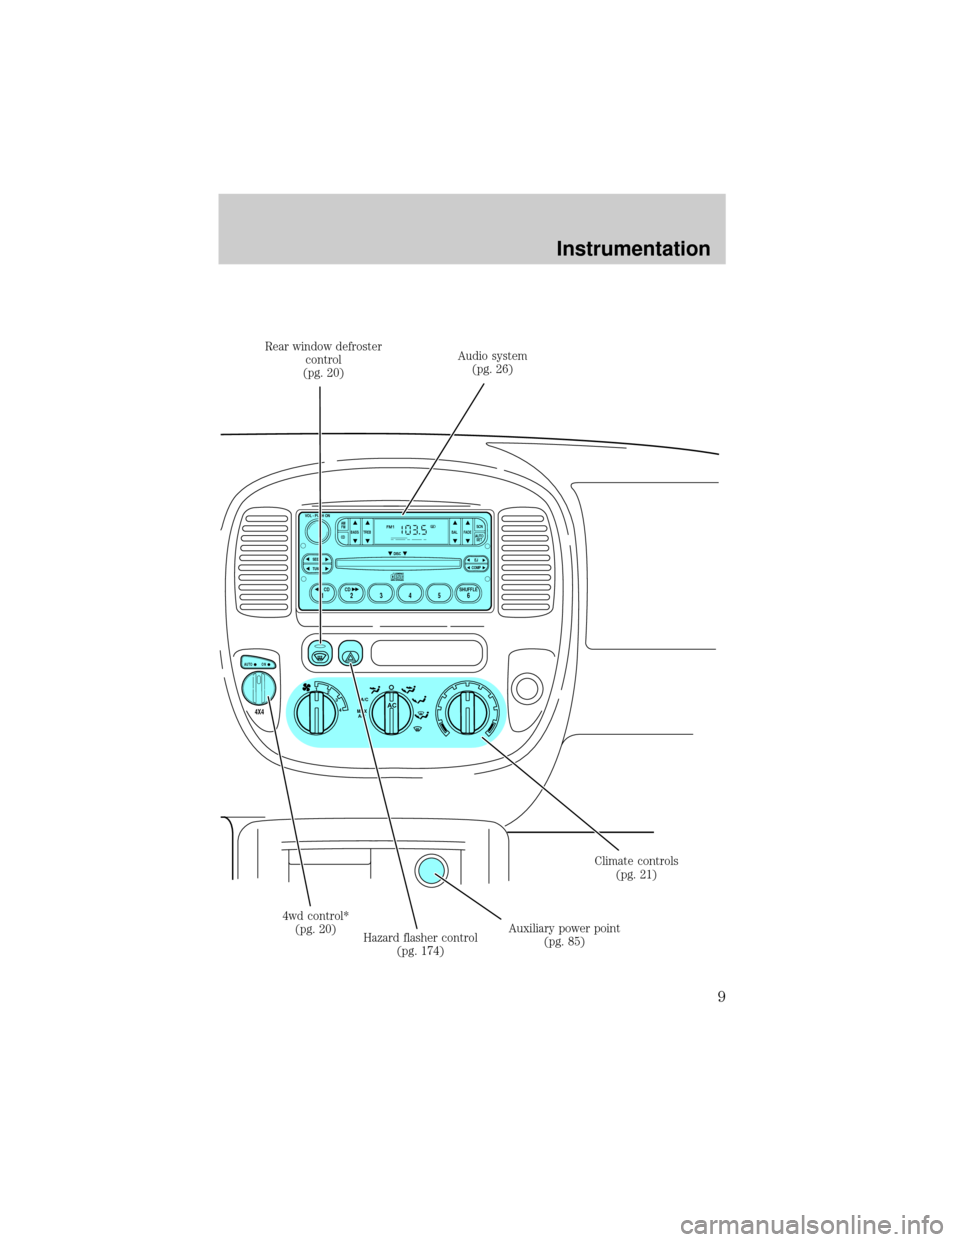
Audio system
(pg. 26)
Hazard flasher control
(pg. 174) Rear window defroster
control
(pg. 20)
Climate controls
(pg. 21)
4wd control*
(pg. 20)Auxiliary power point
(pg. 85)
Instrumentation
9
Page 20 of 280
3. Return to the center position to lock mirrors in place.
Fold-away mirrors
Pull the side mirrors in carefully
when driving through a narrow
space, like an automatic car wash.
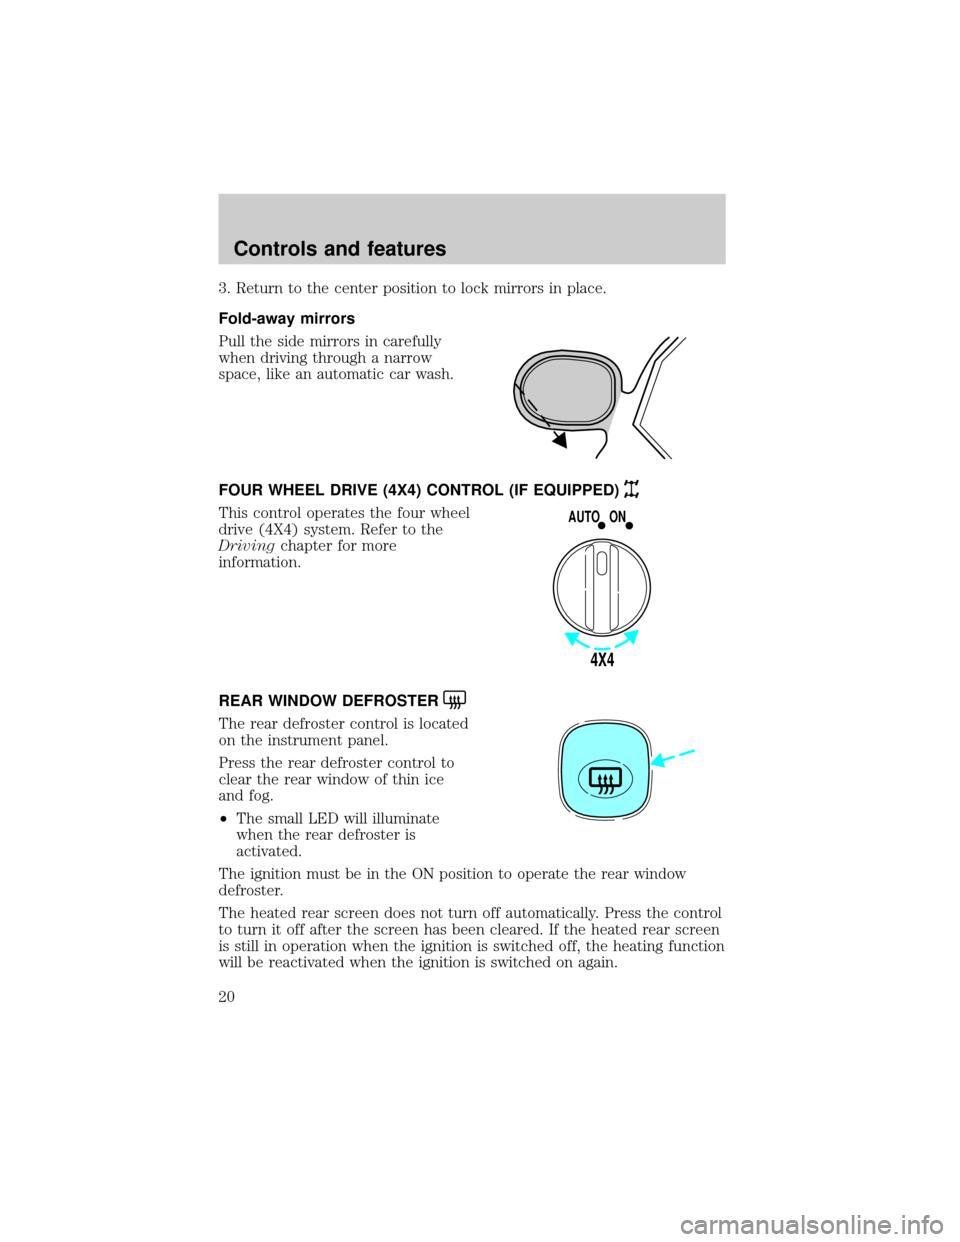
FOUR WHEEL DRIVE (4X4) CONTROL (IF EQUIPPED)
This control operates the four wheel
drive (4X4) system. Refer to the
Drivingchapter for more
information.
REAR WINDOW DEFROSTER
The rear defroster control is located
on the instrument panel.
Press the rear defroster control to
clear the rear window of thin ice
and fog.
²The small LED will illuminate
when the rear defroster is
activated.
The ignition must be in the ON position to operate the rear window
defroster.
The heated rear screen does not turn off automatically. Press the control
to turn it off after the screen has been cleared. If the heated rear screen
is still in operation when the ignition is switched off, the heating function
will be reactivated when the ignition is switched on again.
4X4
AUTO ON
Controls and features
20
Page 77 of 280
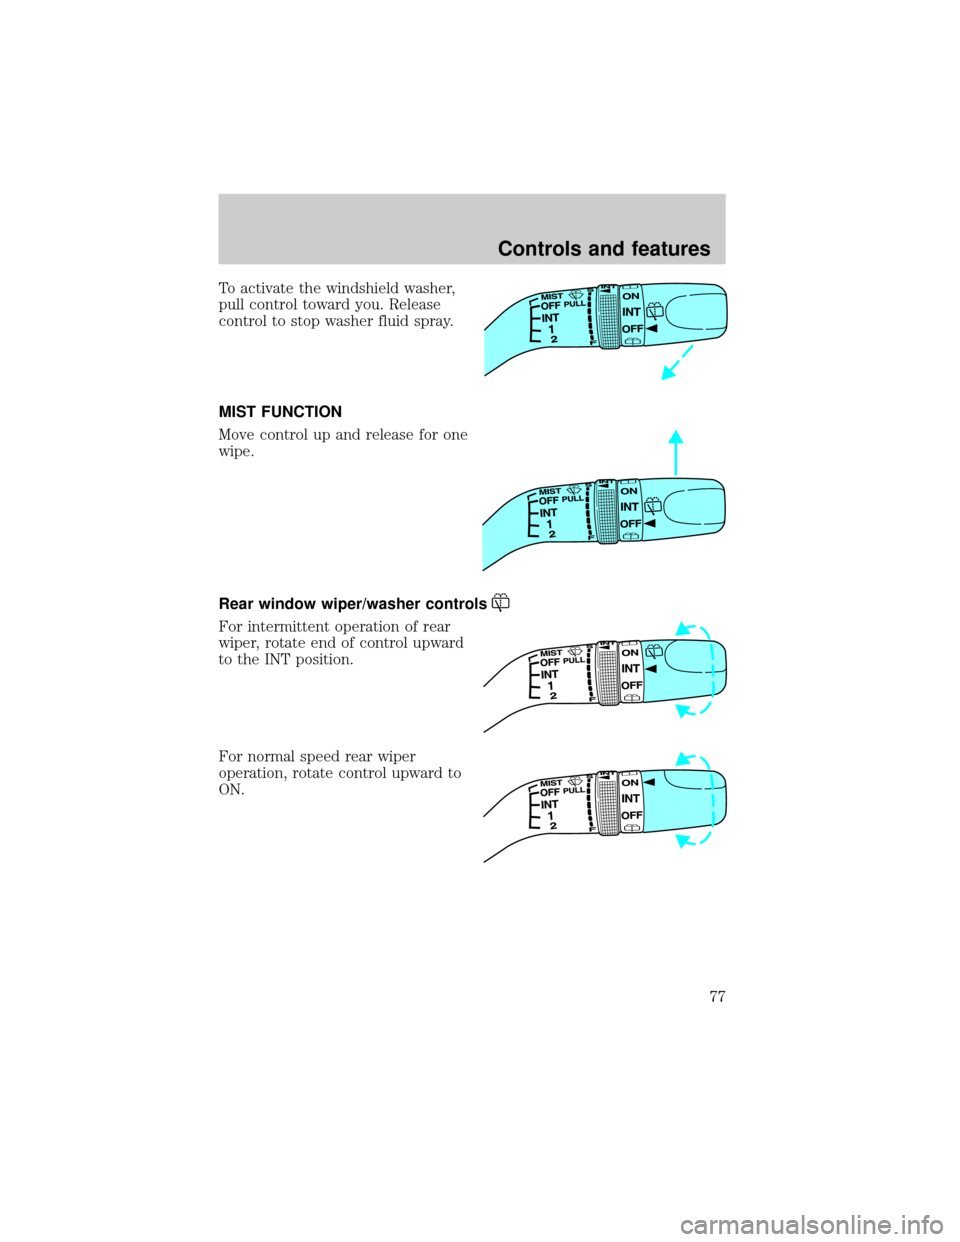
To activate the windshield washer,
pull control toward you. Release
control to stop washer fluid spray.
MIST FUNCTION
Move control up and release for one
wipe.
Rear window wiper/washer controls
For intermittent operation of rear
wiper, rotate end of control upward
to the INT position.
For normal speed rear wiper
operation, rotate control upward to
ON.
Controls and features
77
Page 84 of 280
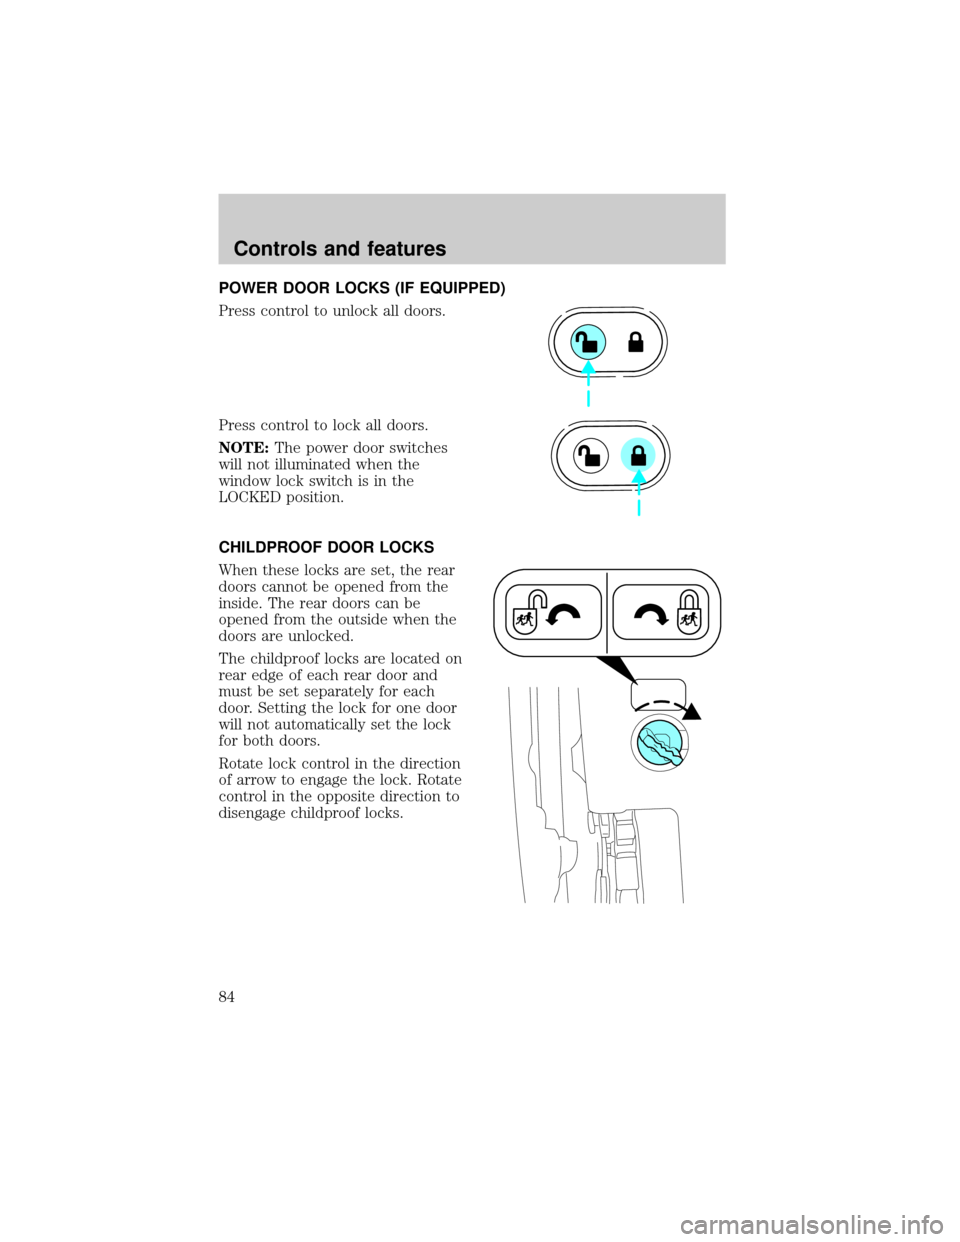
POWER DOOR LOCKS (IF EQUIPPED)
Press control to unlock all doors.
Press control to lock all doors.
NOTE:The power door switches
will not illuminated when the
window lock switch is in the
LOCKED position.
CHILDPROOF DOOR LOCKS
When these locks are set, the rear
doors cannot be opened from the
inside. The rear doors can be
opened from the outside when the
doors are unlocked.
The childproof locks are located on
rear edge of each rear door and
must be set separately for each
door. Setting the lock for one door
will not automatically set the lock
for both doors.
Rotate lock control in the direction
of arrow to engage the lock. Rotate
control in the opposite direction to
disengage childproof locks.
Controls and features
84
Page 89 of 280
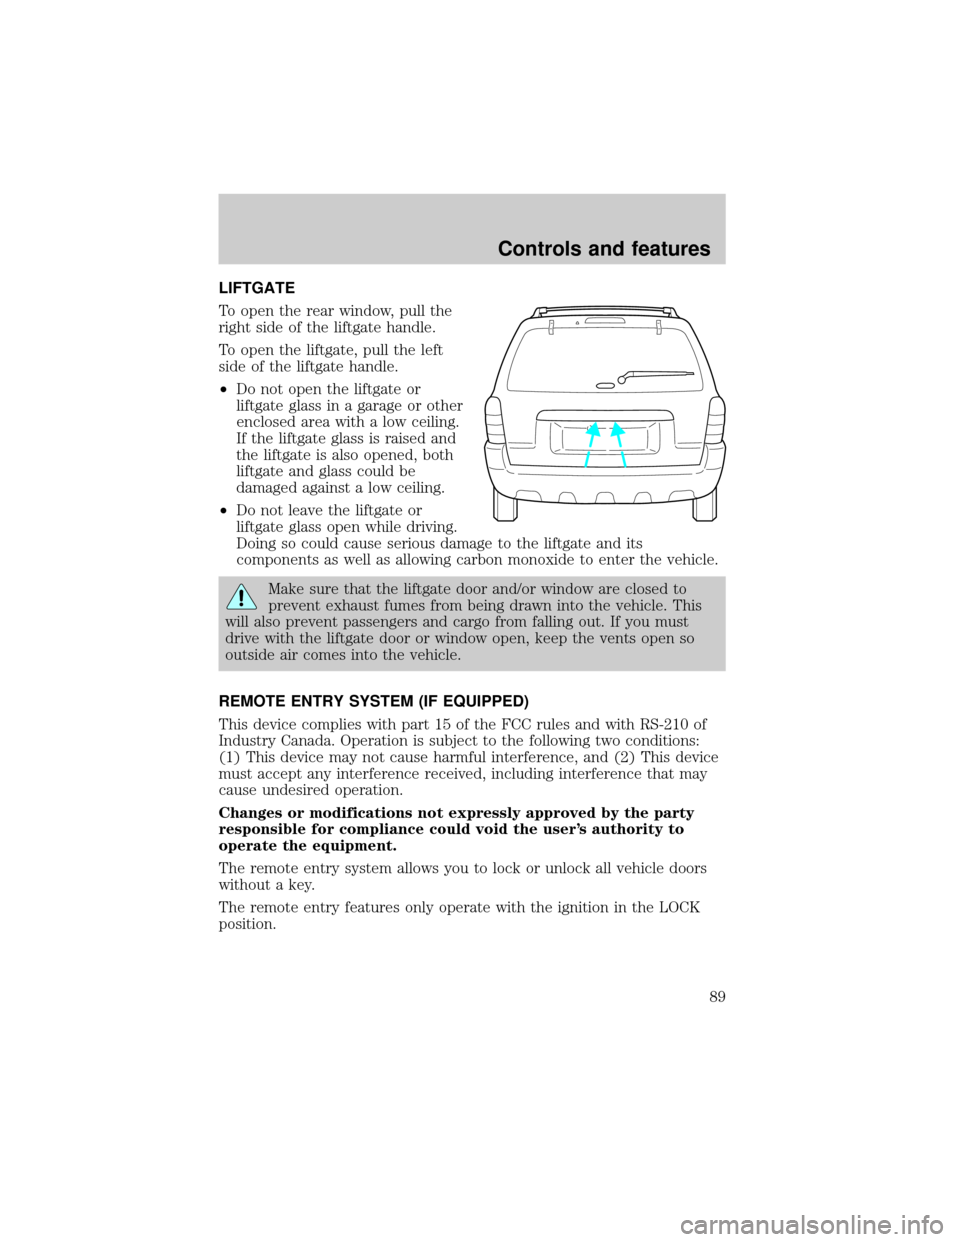
LIFTGATE
To open the rear window, pull the
right side of the liftgate handle.
To open the liftgate, pull the left
side of the liftgate handle.
²Do not open the liftgate or
liftgate glass in a garage or other
enclosed area with a low ceiling.
If the liftgate glass is raised and
the liftgate is also opened, both
liftgate and glass could be
damaged against a low ceiling.
²Do not leave the liftgate or
liftgate glass open while driving.
Doing so could cause serious damage to the liftgate and its
components as well as allowing carbon monoxide to enter the vehicle.
Make sure that the liftgate door and/or window are closed to
prevent exhaust fumes from being drawn into the vehicle. This
will also prevent passengers and cargo from falling out. If you must
drive with the liftgate door or window open, keep the vents open so
outside air comes into the vehicle.
REMOTE ENTRY SYSTEM (IF EQUIPPED)
This device complies with part 15 of the FCC rules and with RS-210 of
Industry Canada. Operation is subject to the following two conditions:
(1) This device may not cause harmful interference, and (2) This device
must accept any interference received, including interference that may
cause undesired operation.
Changes or modifications not expressly approved by the party
responsible for compliance could void the user's authority to
operate the equipment.
The remote entry system allows you to lock or unlock all vehicle doors
without a key.
The remote entry features only operate with the ignition in the LOCK
position.
Controls and features
89
Page 171 of 280
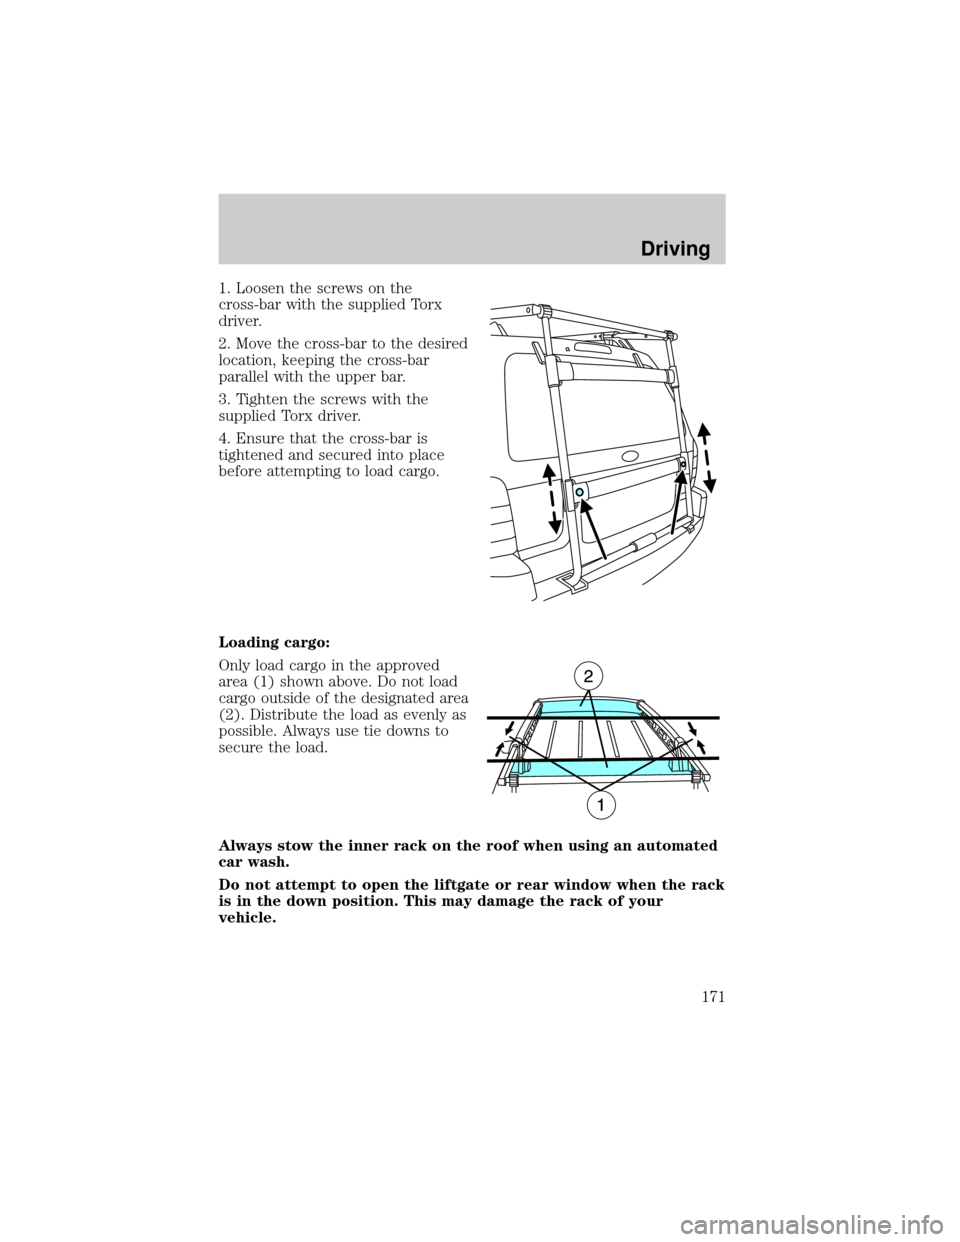
1. Loosen the screws on the
cross-bar with the supplied Torx
driver.
2. Move the cross-bar to the desired
location, keeping the cross-bar
parallel with the upper bar.
3. Tighten the screws with the
supplied Torx driver.
4. Ensure that the cross-bar is
tightened and secured into place
before attempting to load cargo.
Loading cargo:
Only load cargo in the approved
area (1) shown above. Do not load
cargo outside of the designated area
(2). Distribute the load as evenly as
possible. Always use tie downs to
secure the load.
Always stow the inner rack on the roof when using an automated
car wash.
Do not attempt to open the liftgate or rear window when the rack
is in the down position. This may damage the rack of your
vehicle.
Driving
171
Page 179 of 280
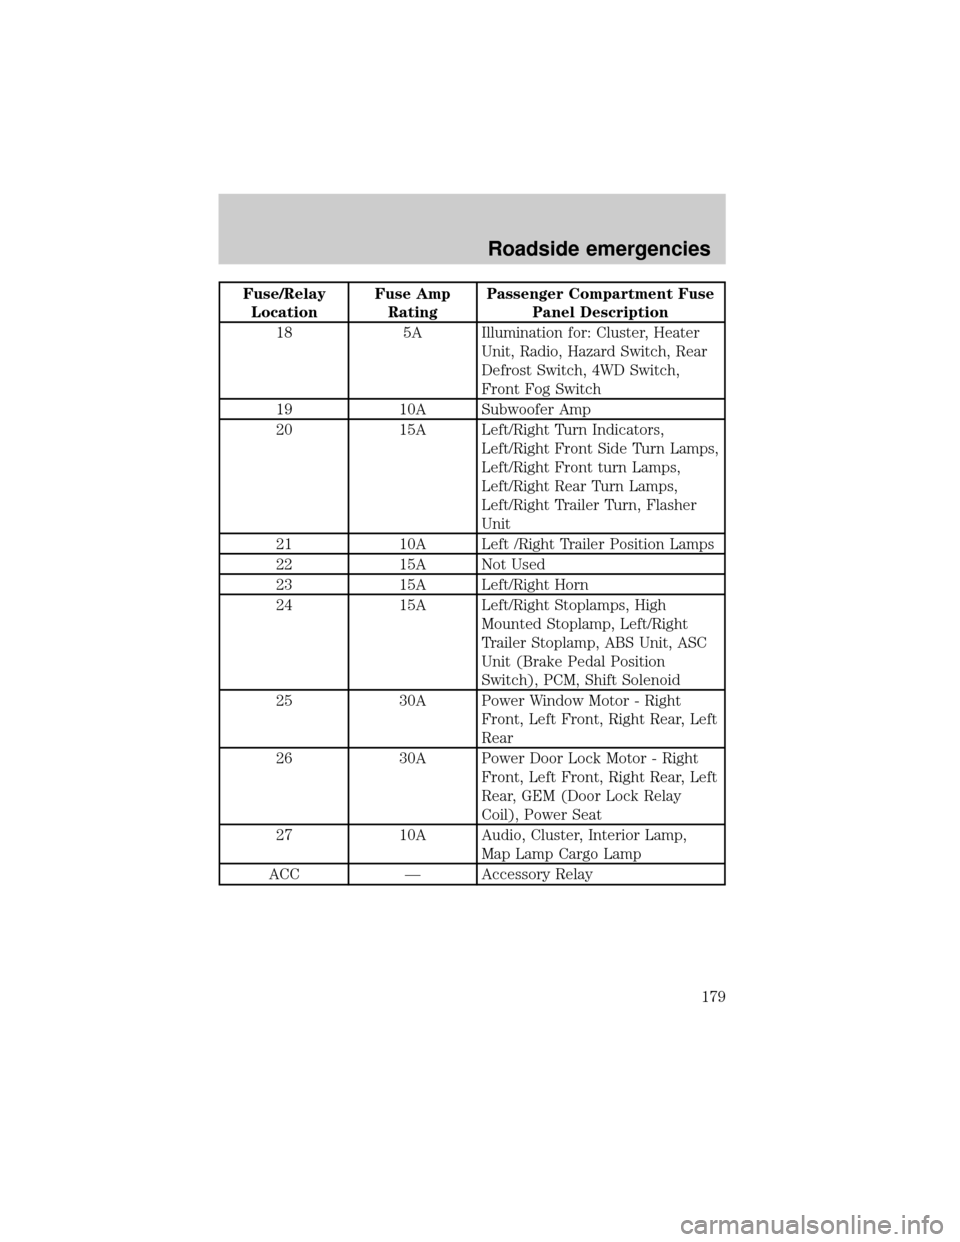
Fuse/Relay
LocationFuse Amp
RatingPassenger Compartment Fuse
Panel Description
18 5A Illumination for: Cluster, Heater
Unit, Radio, Hazard Switch, Rear
Defrost Switch, 4WD Switch,
Front Fog Switch
19 10A Subwoofer Amp
20 15A Left/Right Turn Indicators,
Left/Right Front Side Turn Lamps,
Left/Right Front turn Lamps,
Left/Right Rear Turn Lamps,
Left/Right Trailer Turn, Flasher
Unit
21 10A Left /Right Trailer Position Lamps
22 15A Not Used
23 15A Left/Right Horn
24 15A Left/Right Stoplamps, High
Mounted Stoplamp, Left/Right
Trailer Stoplamp, ABS Unit, ASC
Unit (Brake Pedal Position
Switch), PCM, Shift Solenoid
25 30A Power Window Motor - Right
Front, Left Front, Right Rear, Left
Rear
26 30A Power Door Lock Motor - Right
Front, Left Front, Right Rear, Left
Rear, GEM (Door Lock Relay
Coil), Power Seat
27 10A Audio, Cluster, Interior Lamp,
Map Lamp Cargo Lamp
ACC Ð Accessory Relay
Roadside emergencies
179
Page 219 of 280
Checking the wiper blades
If the wiper blades do not wipe properly, clean both the windshield and
wiper blades using undiluted windshield wiper solution or a mild
detergent. Rinse thoroughly with clean water. To avoid damaging the
blades, do not use fuel, kerosene, paint thinner or other solvents.
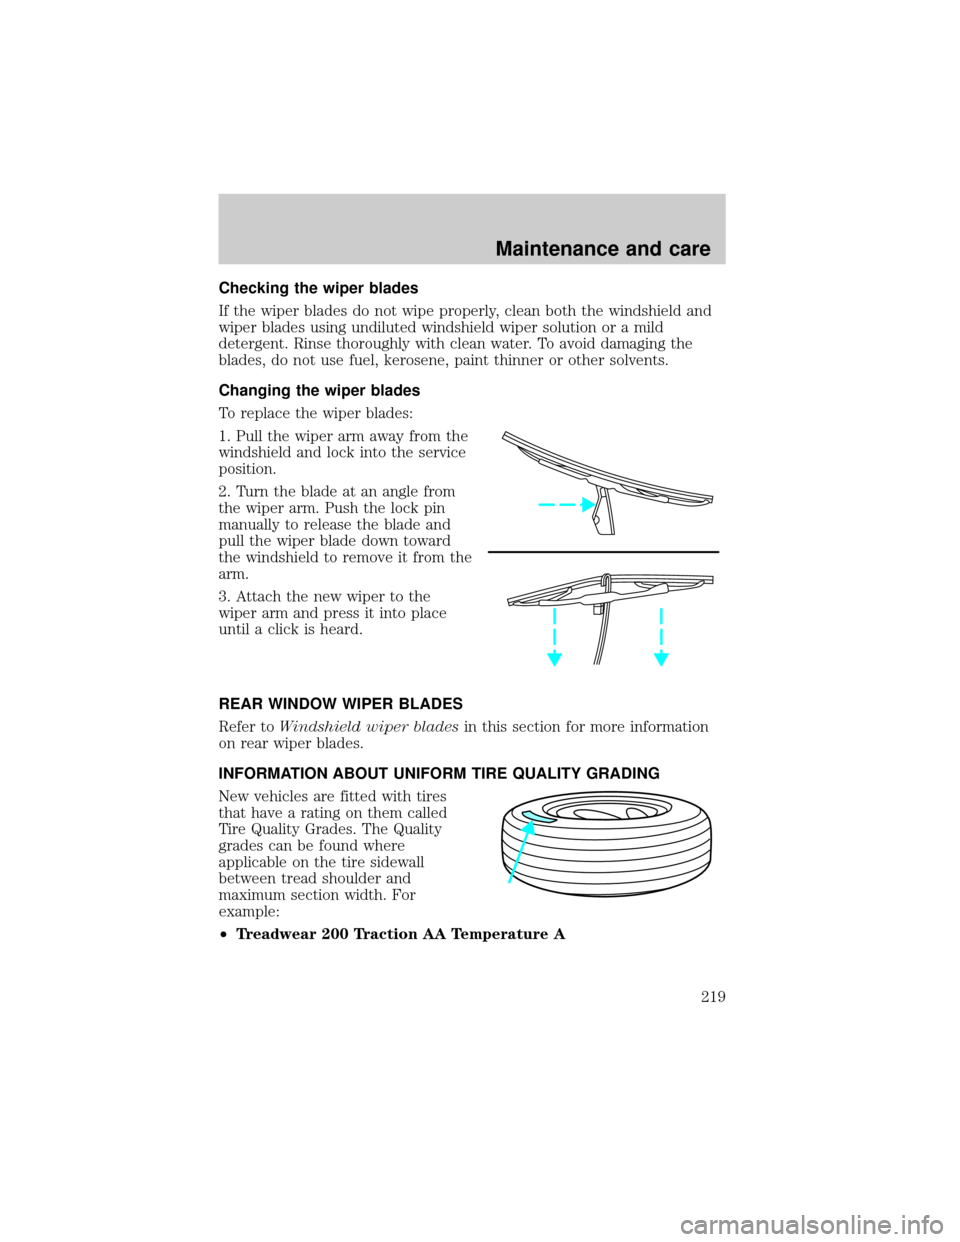
Changing the wiper blades
To replace the wiper blades:
1. Pull the wiper arm away from the
windshield and lock into the service
position.
2. Turn the blade at an angle from
the wiper arm. Push the lock pin
manually to release the blade and
pull the wiper blade down toward
the windshield to remove it from the
arm.
3. Attach the new wiper to the
wiper arm and press it into place
until a click is heard.
REAR WINDOW WIPER BLADES
Refer toWindshield wiper bladesin this section for more information
on rear wiper blades.
INFORMATION ABOUT UNIFORM TIRE QUALITY GRADING
New vehicles are fitted with tires
that have a rating on them called
Tire Quality Grades. The Quality
grades can be found where
applicable on the tire sidewall
between tread shoulder and
maximum section width. For
example:
²Treadwear 200 Traction AA Temperature A
Maintenance and care
219
Page 245 of 280
To avoid scratching the lamps, do not use a dry paper towel, chemical
solvents or abrasive cleaners.
Cleaning the windshield, wiper blades and rear window
If the wiper blades do not wipe properly, clean the wiper blade rubber
element with undiluted windshield washer solution or a mild detergent.
To avoid damaging the blades, do not use fuel, kerosene, paint thinner or
other solvents.
If the wiper still does not wipe properly, this could be caused by
substances on the windshield or rear window such as tree sap and some
hot wax treatments used by commercial car washes. Clean the outside of
the windshield or rear window with a non-abrasive cleaner such as Ford
Ultra-Clear Spray Glass Cleaner, (E4AZ-19C507±AA), available from your
Ford Dealer.Do notuse abrasive cleansers on glass as they may cause
scratches. The windshield or rear window is clean if beads do not form
when you rinse it with water. The windshield, rear window and wiper
blades should be cleaned on a regular basis, and blades or rubber
elements replaced when worn.
Cleaning seats equipped with side air bags
Remove dust and loose dirt with a whisk broom or a vacuum cleaner.
Remove fresh spots immediately. Follow the directions that come with
the cleaner. Do not saturate the seat cover with upholstery cleaner.
Do not use chemical solvents or strong detergents when cleaning
the seat mounted side air bag. Such products could contaminate
the side air bag system and affect performance of the side air bag in a
collision.
Cleaning the instrument panel
Clean with a damp cloth, then dry with a dry cloth.
Avoid cleaner or polish that increases the gloss of the upper portion of
the instrument panel. The dull finish in this area helps protect the driver
from undesirable windshield reflection.
Do not use chemical solvents or strong detergents when cleaning
the steering wheel or instrument panel to avoid contamination of
the air bag system.
Maintenance and care
245