stop start FORD ESCAPE 2014 3.G Owner's Manual
[x] Cancel search | Manufacturer: FORD, Model Year: 2014, Model line: ESCAPE, Model: FORD ESCAPE 2014 3.GPages: 428, PDF Size: 16.6 MB
Page 180 of 428
TRAILER SWAY CONTROL (IF
EQUIPPED)
WARNING
Turning off trailer sway control
increases the risk of loss of vehicle
control, serious injury or death. Ford
does not recommend disabling this feature
except in situations where speed reduction
may be detrimental (such as hill climbing),
the driver has significant trailer towing
experience, and can control trailer sway
and maintain safe operation.
Note:This feature does not prevent trailer
sway, but reduces it once it begins.
Note:This feature cannot stop all trailers
from swaying.
Note:In some cases, if vehicle speed is too
high, the system may activate multiple
times, gradually reducing vehicle speed.
This feature applies the vehicle brakes at
individual wheels and, if necessary, reduces
engine power. If the trailer begins to sway,
the stability control light flashes. The first
thing to do is slow the vehicle down, then
pull safely to the side of the road and
check for proper tongue load and trailer
load distribution. See Load Carrying
(page 166).
RECOMMENDED TOWING
WEIGHTS
Note:Do not exceed the trailer
weight for your vehicle
configuration listed in the chart
below.Note:Be sure to take into
consideration trailer frontal area.
Do not exceed 20 feet
2 (1.86
meters2) if your vehicle is not
equipped with a towing package or
30 feet
2 (2.79 meters2) if your
vehicle is equipped with a towing
package.
Note:For high altitude operation,
reduce the gross combined weight
by 2% per 1000 feet (300 meters)
starting at the 1000 foot (300
meter) elevation point.
Note:Certain states require
electric trailer brakes for trailers
over a specified weight. Be sure to
check state regulations for this
specified weight. The maximum
trailer weights listed may be limited
to this specified weight, as the
vehicle’s electrical system may not
include the wiring connector
needed to activate electric trailer
brakes.
Your vehicle may tow a Class I or
II trailer provided the maximum
trailer weight is less than or equal
to the maximum trailer weight
listed for your vehicle
configuration on the following
chart.
177
Towing
Page 183 of 428
Before Towing a Trailer
Practice turning, stopping and backing up
to get the feel of your vehicle-trailer
combination before starting on a trip.
When turning, make wider turns so the
trailer wheels clear curbs and other
obstacles.
When Towing a Trailer
• Do not drive faster than 70 mph (113
km/h) during the first 500 miles (800
kilometers).
• Do not make full-throttle starts.
• Check your hitch, electrical connections
and trailer wheel lug nuts thoroughly
after you have traveled 50 miles (80
kilometers).
• When stopped in congested or heavy
traffic during hot weather, place the
gearshift in position P to aid engine and
transmission cooling and to help A/C
performance.
• Turn off the speed control with heavy
loads or in hilly terrain. The speed
control may turn off automatically
when you are towing on long, steep
grades.
• Shift to a lower gear when driving down
a long or steep hill. Do not apply the
brakes continuously, as they may
overheat and become less effective.
• If your transmission is equipped with a
Grade Assist or Tow/Haul feature, use
this feature when towing. This provides
engine braking and helps eliminate
excessive transmission shifting for
optimum fuel economy and
transmission cooling.• Allow more distance for stopping with
a trailer attached. Anticipate stops and
brake gradually.
• Avoid parking on a grade. However, if
you must park on a grade:
• Turn the steering wheel to point
your vehicle tires away from traffic
flow.
• Set your vehicle parking brake.
• Place the automatic transmission
in position P.
• Place wheel chocks in front and
back of the trailer wheels. (Chocks
not included with vehicle.)
Launching or Retrieving a Boat or
Personal Watercraft (PWC)
Note:Disconnect the wiring to the trailer
before backing the trailer into the water.
Note:Reconnect the wiring to the trailer
after the trailer is removed from the water.
When backing down a ramp during boat
launching or retrieval:
• Do not allow the static water level to
rise above the bottom edge of the rear
bumper.
• Do not allow waves to break higher
than 6 inches (15 centimeters) above
the bottom edge of the rear bumper.
Exceeding these limits may allow water to
enter vehicle components:
• Causing internal damage to the
components.
• Affecting driveability, emissions, and
reliability.
Replace the rear axle lubricant anytime
the rear axle has been submerged in water.
Water may have contaminated the rear
axle lubricant, which is not normally
checked or changed unless a leak is
suspected or other axle repair is required.
180
Towing
Page 190 of 428
HAZARD WARNING FLASHERS
Note:If used when the vehicle is not
running, the battery will lose charge. There
may be insufficient power to restart your
vehicle.
The hazard warning button is
located on the instrument panel.
Use it when your vehicle is
creating a safety hazard for other
motorists.
• Press the button to turn on the hazard
warning function, and the front and
rear direction indicators will flash.
• Press the button again to turn them
off.
FUEL SHUTOFF
WARNING
Failure to inspect and, if necessary,
repair fuel leaks after a collision may
increase the risk of fire and serious
injury. Ford Motor Company recommends
that the fuel system be inspected by an
authorized dealer after any collision.
In the event of a moderate to severe
collision, this vehicle is equipped with a
fuel pump shut-off feature that stops the
flow of fuel to the engine. Not every impact
will cause a shut-off.
Should your vehicle shut off after a
collision, you may restart your vehicle by
doing the following:
1. Turn the ignition off.
2. Turn the ignition to crank.
3. Turn the ignition off.
4. Turn the ignition on again to re-enable
the fuel pump.
For vehicles equipped with a push button
start system:1. Press the START/STOP button to
turn the ignition off.
2. Press the brake pedal and press the
START/STOP button (crank
attempt).
3. Remove your foot from the brake pedal
and press the START/STOP button
(ignition off).
4. Press the START/STOP button again
to re-enable the fuel system.
JUMP-STARTING THE VEHICLE
WARNINGS
The gases around the battery can
explode if exposed to flames, sparks,
or lit cigarettes. An explosion could
result in injury or vehicle damage.
Batteries contain sulfuric acid which
can burn skin, eyes and clothing, if
contacted.
Use only an adequate-sized cable
with insulated clamps.
Preparing Your Vehicle
Note:Do not attempt to push-start your
automatic transmission vehicle. Automatic
transmissions do not have push-start
capability. Attempting to push-start a
vehicle with an automatic transmission may
cause transmission damage.
Note:Use only a 12-volt supply to start your
vehicle.
Note:Do not disconnect the battery of the
disabled vehicle as this could damage the
vehicle's electrical system.
Park the booster vehicle close to the hood
of the disabled vehicle, making sure the
two vehicles do not touch. Turn all
accessories off.
187
Roadside Emergencies
Page 201 of 428
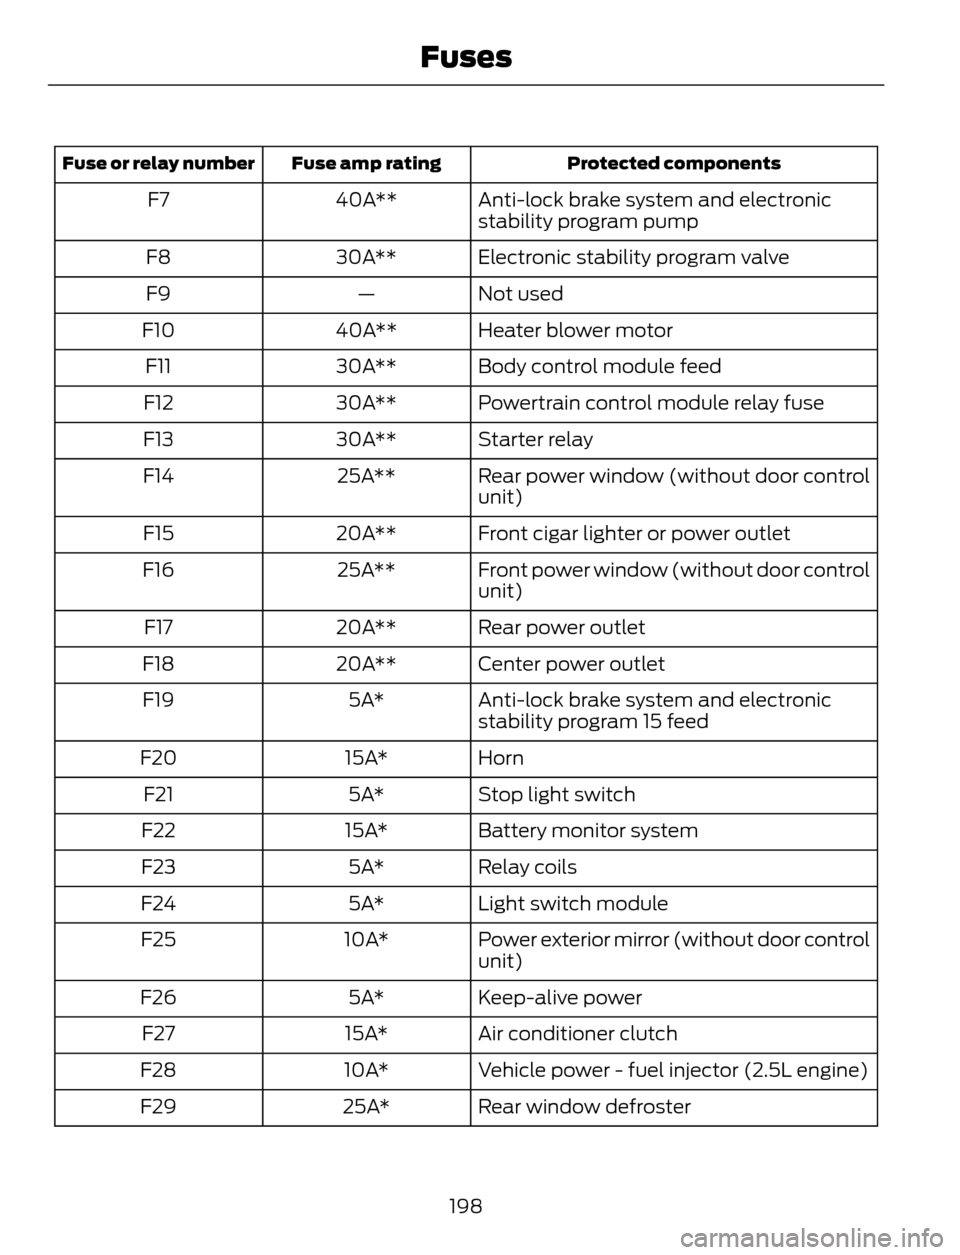
Protected components Fuse amp rating Fuse or relay number
Anti-lock brake system and electronic
stability program pump 40A** F7
Electronic stability program valve 30A** F8
Not used — F9
Heater blower motor 40A** F10
Body control module feed 30A** F11
Powertrain control module relay fuse 30A** F12
Starter relay 30A** F13
Rear power window (without door control
unit) 25A** F14
Front cigar lighter or power outlet 20A** F15
Front power window (without door control
unit) 25A** F16
Rear power outlet 20A** F17
Center power outlet 20A** F18
Anti-lock brake system and electronic
stability program 15 feed 5A* F19
Horn 15A* F20
Stop light switch 5A* F21
Battery monitor system 15A* F22
Relay coils 5A* F23
Light switch module 5A* F24
Power exterior mirror (without door control
unit) 10A* F25
Keep-alive power 5A* F26
Air conditioner clutch 15A* F27
Vehicle power - fuel injector (2.5L engine) 10A* F28
Rear window defroster 25A* F29
198
Fuses
Page 220 of 428
When a low voltage battery replacement
is necessary, see an authorized dealer to
replace the low voltage battery with a Ford
recommended replacement low voltage
battery that matches the electrical
requirements of the vehicle
To ensure proper operation of the battery
management system (BMS), do not allow
a technician to connect any electrical
device ground connection directly to the
low voltage battery negative post. A
connection at the low voltage battery
negative post can cause inaccurate
measurements of the battery condition
and potential incorrect system operation.
Note:If a person adds electrical or
electronic accessories or components to the
vehicle, the accessories or components may
adversely affect the low voltage battery
performance and durability and may also
affect the performance of other electrical
systems in the vehicle.
For longer, trouble-free operation, keep the
top of the battery clean and dry. Also,
make certain the battery cables are always
tightly fastened to the battery terminals.
If you see any corrosion on the battery or
terminals, remove the cables from the
terminals and clean with a wire brush. You
can neutralize the acid with a solution of
baking soda and water.
When a battery replacement is required,
the battery should only be replaced with
a Ford recommended replacement battery
that matches the electrical requirements
of the vehicle.
Because your vehicle’s engine is
electronically-controlled by a computer,
some engine control settings are
maintained by power from the low voltage
battery. Some engine computer settings,
like the idle trim and fuel trim strategy,
optimize the driveability and performance
of the engine. Some other computer
settings, like the clock and radio stationpresets, are also maintained in memory by
power from the low voltage battery. When
a technician disconnects and connects the
low voltage battery, these settings are
erased. Complete the following procedure
in order to restore the settings:
1. With the vehicle at a complete stop,
set the parking brake.
2. Shift the transmission into P.
3. Turn off all accessories.
4. Step on the brake pedal and start the
vehicle.
5. Run the engine until it reaches normal
operating temperature. While the
engine is warming up, complete the
following: Reset the clock. See Audio
System (page 267). Reset the power
windows bounce-back feature. See
Windows and Mirrors (page 78).
Reset the radio station presets. See
Audio System (page 267).
6. Allow the engine to idle for at least one
minute. If the engine turns off, step on
the accelerator to start the engine.
7. While the engine is running, step on the
brake pedal and shift the transmission
to N.
8. Allow the engine to run for at least one
minute by pressing on the accelerator
pedal.
9. Drive the vehicle at least 10 miles (16
kilometers) to completely relearn the
idle and fuel trim strategy.
Note:If you do not allow the engine to
relearn the idle and fuel trim strategy, the
idle quality of your vehicle may be adversely
affected until the engine computer
eventually relearns the idle trim and fuel
trim strategy.
217
Maintenance
Page 252 of 428
Driving habits have a great deal
to do with your tire mileage and
safety.
*Observe posted speed limits
*Avoid fast starts, stops and turns
*Avoid potholes and objects on
the road
*Do not run over curbs or hit the
tire against a curb when parking
Highway Hazards
No matter how carefully you drive
there’s always the possibility that
you may eventually have a flat tire
on the highway. Drive slowly to the
closest safe area out of traffic.
This may further damage the flat
tire, but your safety is more
important.
If you feel a sudden vibration or
ride disturbance while driving, or
you suspect your tire or vehicle
has been damaged, immediately
reduce your speed. Drive with
caution until you can safely pull
off the road. Stop and inspect the
tires for damage. If a tire is
under-inflated or damaged,
deflate it, remove wheel and
replace it with your spare tire and
wheel. If you cannot detect a
cause, have the vehicle towed to
the nearest repair facility or tire
dealer to have the vehicle
inspected.Tire and Wheel Alignment
A bad jolt from hitting a curb or
pothole can cause the front end
of your vehicle to become
misaligned or cause damage to
your tires. If your vehicle seems to
pull to one side when you’re
driving, the wheels may be out of
alignment. Have an authorized
dealer check the wheel alignment
periodically.
Wheel misalignment in the front
or the rear can cause uneven and
rapid treadwear of your tires and
should be corrected by an
authorized dealer. Front-wheel
drive vehicles and those with an
independent rear suspension (if
equipped) may require alignment
of all four wheels.
The tires should also be balanced
periodically. An unbalanced tire
and wheel assembly may result in
irregular tire wear.
Tire Rotation
Note:If your tires show uneven
wear ask an authorized dealer to
check for and correct any wheel
misalignment, tire imbalance or
mechanical problem involved
before tire rotation.
249
Wheels and Tires
Page 352 of 428
This feature allows you to plug in media
playing devices, memory sticks, flash drives
or thumb drives, and charge devices if they
support this feature.
In order to playback video from your iPod
or iPhone, you must have a special
combination USB/RCA composite video
cable (which you can buy from Apple).
When you connect the cable to your iPod
or iPhone, plug the other end into both the
RCA jacks and the USB port.
Playing Music from Your Device
E142611
Insert your device and select the
SD Card or USB tab once the
system recognizes it. You can
then select from the following options:
Repeat
This feature replays the currently playing
song or album.
Shuffle
Touch this button to play music on the
selected album or folder in random order.
Similar Music
This feature allows you to choose music
similar to what is currently playing.
More Info
Touch this button to see disc information
such as current track, artist name, album
and genre.
Options
Touch this button to view and adjust
various media settings.
Sound Settings allows you to adjust
settings for:
•Bass
• Midrange
• Treble• Balance and Fade
• DSP (Digital Signal processing)
• Occupancy Mode
• Speed Compensated Volume.
Note:Your vehicle may not have all these
sound settings.
Media Player Settings allows you to
select more settings, which is under Media
Player. See Settings (page 327).
Device Information displays software
and firmware information about the
currently connected media device.
Update Media Index indexes your device
when you connect it for the first time and
each time the content changes (such as
adding or removing tracks) to make sure
you have the latest voice commands
available for all media on the device.
Browse
This feature allows you to view the
contents of the device. It also allows you
to search by categories, such as genre,
artist or album.
If you want to view song information such
as Title, Artist, File, Folder, Album, and
Genre, touch the on-screen album art.
You can also touch What’s Playing to
hear how the system pronounces the
current band and song. This can be helpful
when using voice commands to make sure
the system correctly plays your request.
Playing Video from Your Device
To access and play video from your device,
your vehicle's transmission must be in
position P with the ignition in accessory
mode. See Starting and Stopping the
Engine (page 123).
349
MyFord Touch™ (If Equipped)
Page 425 of 428
Safety Belts......................................................26Principle of Operation........................................26Safety Belt Warning Lamp and Indicator
Chime..............................................................30
Conditions of operation.....................................30Safety Canopy™.............................................41
Safety Precautions.......................................128
Satellite Radio...............................................281
Satellite Radio Electronic Serial Number
(ESN).................................................................282
Satellite Radio Reception Factors...............282
SIRIUS® Satellite Radio Service..................282
Troubleshooting.................................................283
Scheduled Maintenance Record..........408
Scheduled Maintenance..........................400
Seats.................................................................109
Security..............................................................64
Settings............................................................327
Clock.......................................................................328
Display...................................................................328
Settings.................................................................329
Sound.....................................................................329
Vehicle...................................................................329
Side Airbags.....................................................40
Sitting in the Correct Position.................109
Snow Chains
See: Using Snow Chains.................................250Special Notices................................................12New Vehicle Limited Warranty.........................12
Notice to Owners of Pickup Trucks and
Utility Type Vehicles........................................12
Special Instructions..............................................12
Using Your Vehicle as an Ambulance............12
Using Your Vehicle With a Snowplow............12
Special Operating Conditions Scheduled
Maintenance..............................................406
Speed Control
See: Cruise Control............................................159Stability Control............................................148Principle of Operation.......................................148Starter SwitchSee: Ignition Switch............................................123
Starting a Gasoline Engine........................124Failure to Start.....................................................125
Guarding Against Exhaust Fumes................126
Important Ventilating Information...............126
Stopping the Engine When Your Vehicle is
Moving................................................................126
Stopping the Engine When Your Vehicle is
Stationary.........................................................125
Vehicles with an Ignition Key..........................124
Vehicles with Keyless Start.............................124
Starting and Stopping the Engine..........123General Information...........................................123Steering............................................................164Electric Power Steering....................................164Steering Wheel...............................................66
Storage Compartments.............................122
Sunroof
See: Moonroof........................................................81Sun Visors..........................................................81Illuminated Vanity Mirror....................................81Supplementary Restraints System.........35Principle of Operation.........................................35Symbols Glossary.............................................7
SYNC™ Applications and Services.......301
911 Assist................................................................301
SYNC Services: Traffic, Directions &
Information (TDI).........................................304
Vehicle Health Report......................................303
SYNC™...........................................................286General Information.........................................286SYNC™ Troubleshooting..........................314
T
Technical SpecificationsSee: Capacities and Specifications.............261The Better Business Bureau (BBB) Auto
Line Program (U.S. Only)........................192
Tire Care..........................................................236
Glossary of Tire Terminology.........................237
Information About Uniform Tire Quality
Grading.............................................................236
Information Contained on the Tire
Sidewall............................................................238
Temperature A B C.............................................237
Traction AA A B C...............................................236
Treadwear............................................................236
422
Index