headlamp FORD ESCAPE 2020 User Guide
[x] Cancel search | Manufacturer: FORD, Model Year: 2020, Model line: ESCAPE, Model: FORD ESCAPE 2020Pages: 553, PDF Size: 7.73 MB
Page 112 of 553
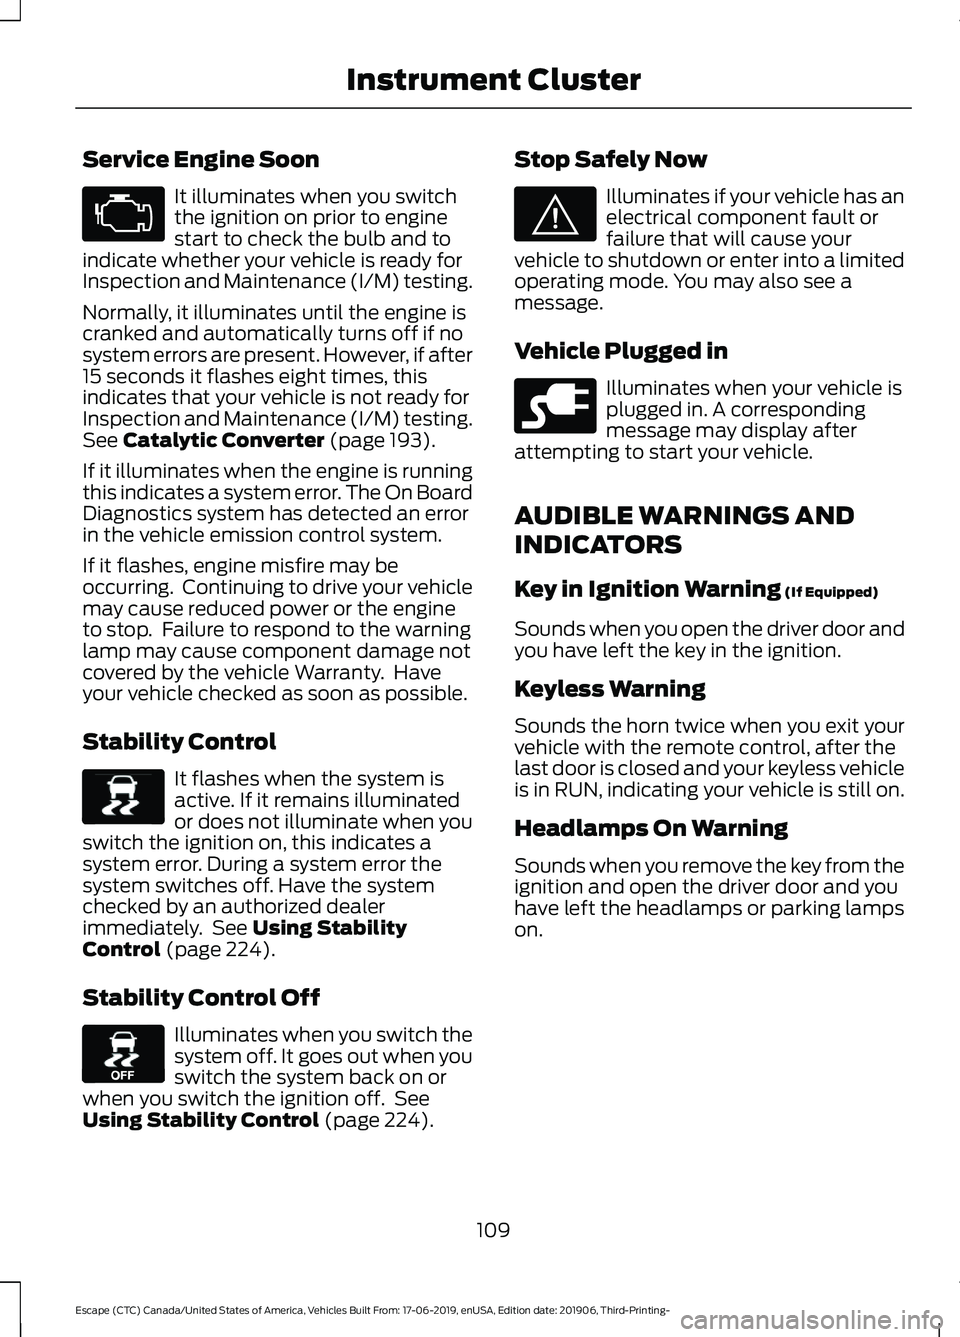
Service Engine Soon
It illuminates when you switch
the ignition on prior to engine
start to check the bulb and to
indicate whether your vehicle is ready for
Inspection and Maintenance (I/M) testing.
Normally, it illuminates until the engine is
cranked and automatically turns off if no
system errors are present. However, if after
15 seconds it flashes eight times, this
indicates that your vehicle is not ready for
Inspection and Maintenance (I/M) testing.
See Catalytic Converter (page 193).
If it illuminates when the engine is running
this indicates a system error. The On Board
Diagnostics system has detected an error
in the vehicle emission control system.
If it flashes, engine misfire may be
occurring. Continuing to drive your vehicle
may cause reduced power or the engine
to stop. Failure to respond to the warning
lamp may cause component damage not
covered by the vehicle Warranty. Have
your vehicle checked as soon as possible.
Stability Control It flashes when the system is
active. If it remains illuminated
or does not illuminate when you
switch the ignition on, this indicates a
system error. During a system error the
system switches off. Have the system
checked by an authorized dealer
immediately. See
Using Stability
Control (page 224).
Stability Control Off Illuminates when you switch the
system off. It goes out when you
switch the system back on or
when you switch the ignition off. See
Using Stability Control
(page 224). Stop Safely Now Illuminates if your vehicle has an
electrical component fault or
failure that will cause your
vehicle to shutdown or enter into a limited
operating mode. You may also see a
message.
Vehicle Plugged in Illuminates when your vehicle is
plugged in. A corresponding
message may display after
attempting to start your vehicle.
AUDIBLE WARNINGS AND
INDICATORS
Key in Ignition Warning
(If Equipped)
Sounds when you open the driver door and
you have left the key in the ignition.
Keyless Warning
Sounds the horn twice when you exit your
vehicle with the remote control, after the
last door is closed and your keyless vehicle
is in RUN, indicating your vehicle is still on.
Headlamps On Warning
Sounds when you remove the key from the
ignition and open the driver door and you
have left the headlamps or parking lamps
on.
109
Escape (CTC) Canada/United States of America, Vehicles Built From: 17-06-2019, enUSA, Edition date: 201906, Third-Printing- Instrument Cluster E138639 E130458 E144693 E228962
Page 171 of 553
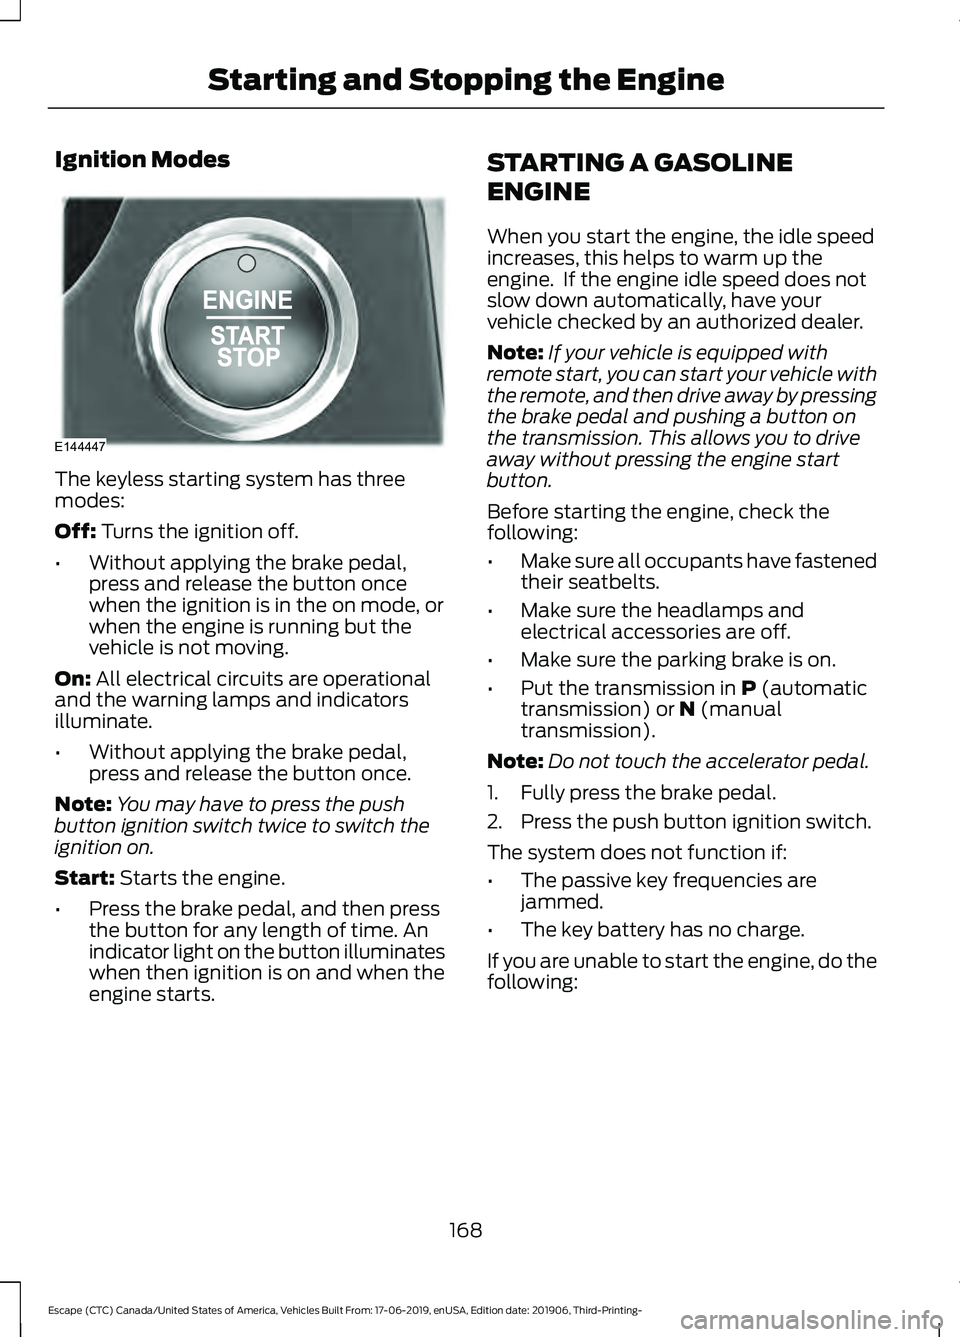
Ignition Modes
The keyless starting system has three
modes:
Off: Turns the ignition off.
• Without applying the brake pedal,
press and release the button once
when the ignition is in the on mode, or
when the engine is running but the
vehicle is not moving.
On:
All electrical circuits are operational
and the warning lamps and indicators
illuminate.
• Without applying the brake pedal,
press and release the button once.
Note: You may have to press the push
button ignition switch twice to switch the
ignition on.
Start:
Starts the engine.
• Press the brake pedal, and then press
the button for any length of time. An
indicator light on the button illuminates
when then ignition is on and when the
engine starts. STARTING A GASOLINE
ENGINE
When you start the engine, the idle speed
increases, this helps to warm up the
engine. If the engine idle speed does not
slow down automatically, have your
vehicle checked by an authorized dealer.
Note:
If your vehicle is equipped with
remote start, you can start your vehicle with
the remote, and then drive away by pressing
the brake pedal and pushing a button on
the transmission. This allows you to drive
away without pressing the engine start
button.
Before starting the engine, check the
following:
• Make sure all occupants have fastened
their seatbelts.
• Make sure the headlamps and
electrical accessories are off.
• Make sure the parking brake is on.
• Put the transmission in
P (automatic
transmission) or N (manual
transmission).
Note: Do not touch the accelerator pedal.
1. Fully press the brake pedal.
2. Press the push button ignition switch.
The system does not function if:
• The passive key frequencies are
jammed.
• The key battery has no charge.
If you are unable to start the engine, do the
following:
168
Escape (CTC) Canada/United States of America, Vehicles Built From: 17-06-2019, enUSA, Edition date: 201906, Third-Printing- Starting and Stopping the EngineE144447
Page 174 of 553
•
Open the windows at least 1 in
(2.5 cm).
• Set your climate control to outside air.
STARTING A HYBRID
ELECTRIC VEHICLE SYSTEM
Before starting your vehicle, check the
following:
• Make sure all occupants fasten their
seatbelt.
• Make sure the headlamps and
electrical accessories are off.
• Make sure the parking brake is on.
• Make sure the transmission is in park
(P).
Note: Do not touch the accelerator pedal.
1. Fully press the brake pedal.
2. Press the push button ignition switch.
Note: The green ready indicator illuminates
letting you know that your vehicle is ready
for driving. Since your vehicle has a silent
key start, the engine may not start when
your vehicle starts. See
Hybrid Vehicle
Operation (page 176).
When the engine starts for the first time
on your drive, the idle speed increases, this
helps to warm up the engine. If the engine
idle speed does not slow down, see an
authorized dealer.
The system does not function if:
• The passive key frequencies are
jammed.
• The key battery has no charge.
If you are unable to start your vehicle, do
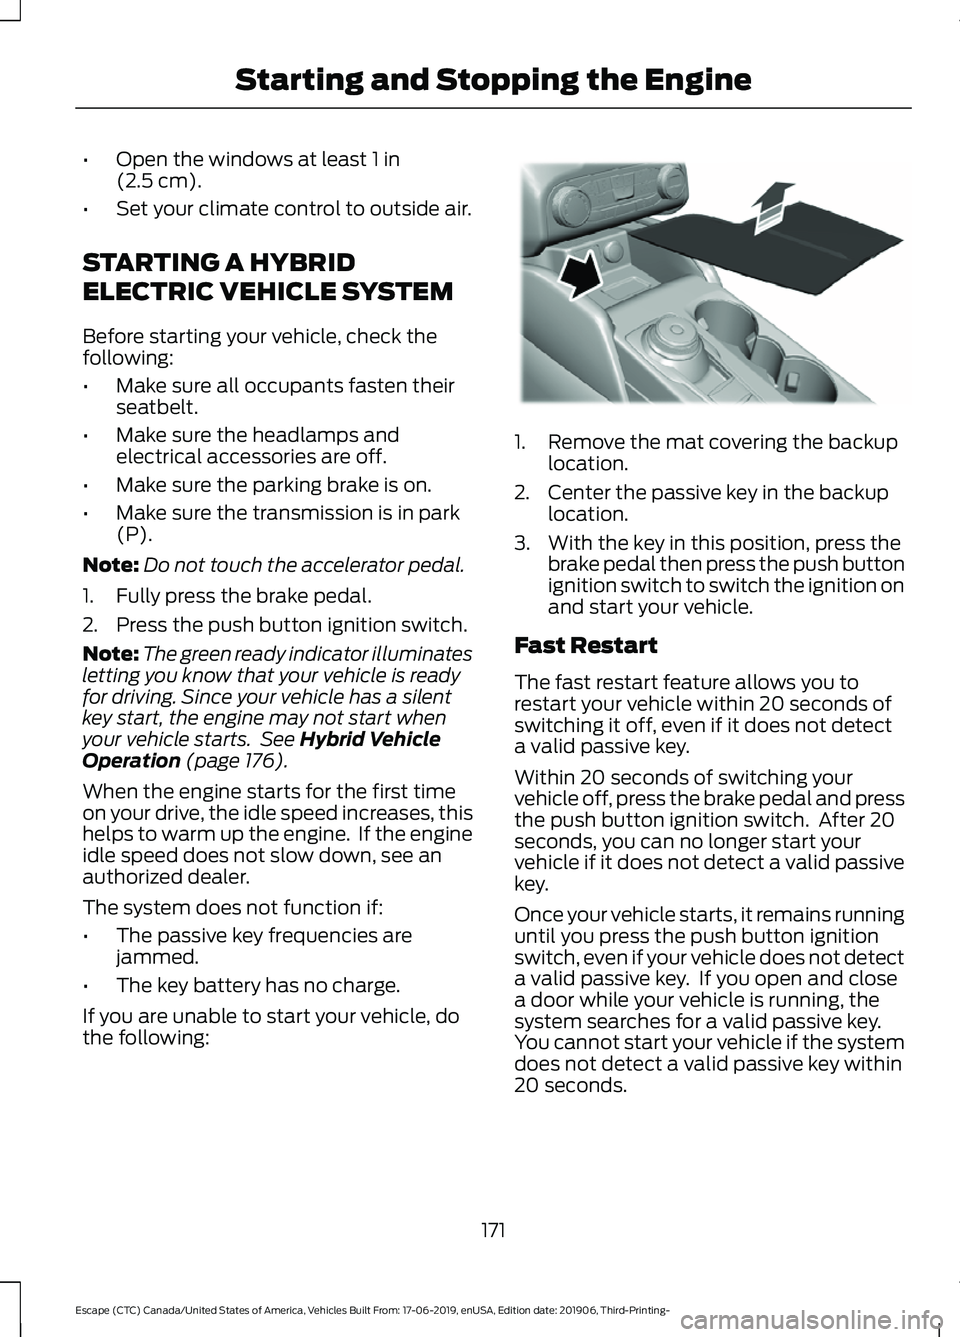
the following: 1. Remove the mat covering the backup
location.
2. Center the passive key in the backup location.
3. With the key in this position, press the brake pedal then press the push button
ignition switch to switch the ignition on
and start your vehicle.
Fast Restart
The fast restart feature allows you to
restart your vehicle within 20 seconds of
switching it off, even if it does not detect
a valid passive key.
Within 20 seconds of switching your
vehicle off, press the brake pedal and press
the push button ignition switch. After 20
seconds, you can no longer start your
vehicle if it does not detect a valid passive
key.
Once your vehicle starts, it remains running
until you press the push button ignition
switch, even if your vehicle does not detect
a valid passive key. If you open and close
a door while your vehicle is running, the
system searches for a valid passive key.
You cannot start your vehicle if the system
does not detect a valid passive key within
20 seconds.
171
Escape (CTC) Canada/United States of America, Vehicles Built From: 17-06-2019, enUSA, Edition date: 201906, Third-Printing- Starting and Stopping the EngineE306769
Page 257 of 553
•
Your vehicle is under the activation
speed.
• The direction indicator is active.
• Your vehicle is in a dynamic maneuver.
• The road has no or poor lane markings
in the camera field-of-view.
• The camera is obscured or unable to
detect the lane markings due to
environmental, traffic or vehicle
conditions. For example, significant sun
angles, shadows, snow, heavy rain or
fog, following a large vehicle that is
blocking or shadowing the lane or poor
headlamp illumination.
See Troubleshooting for additional
information.
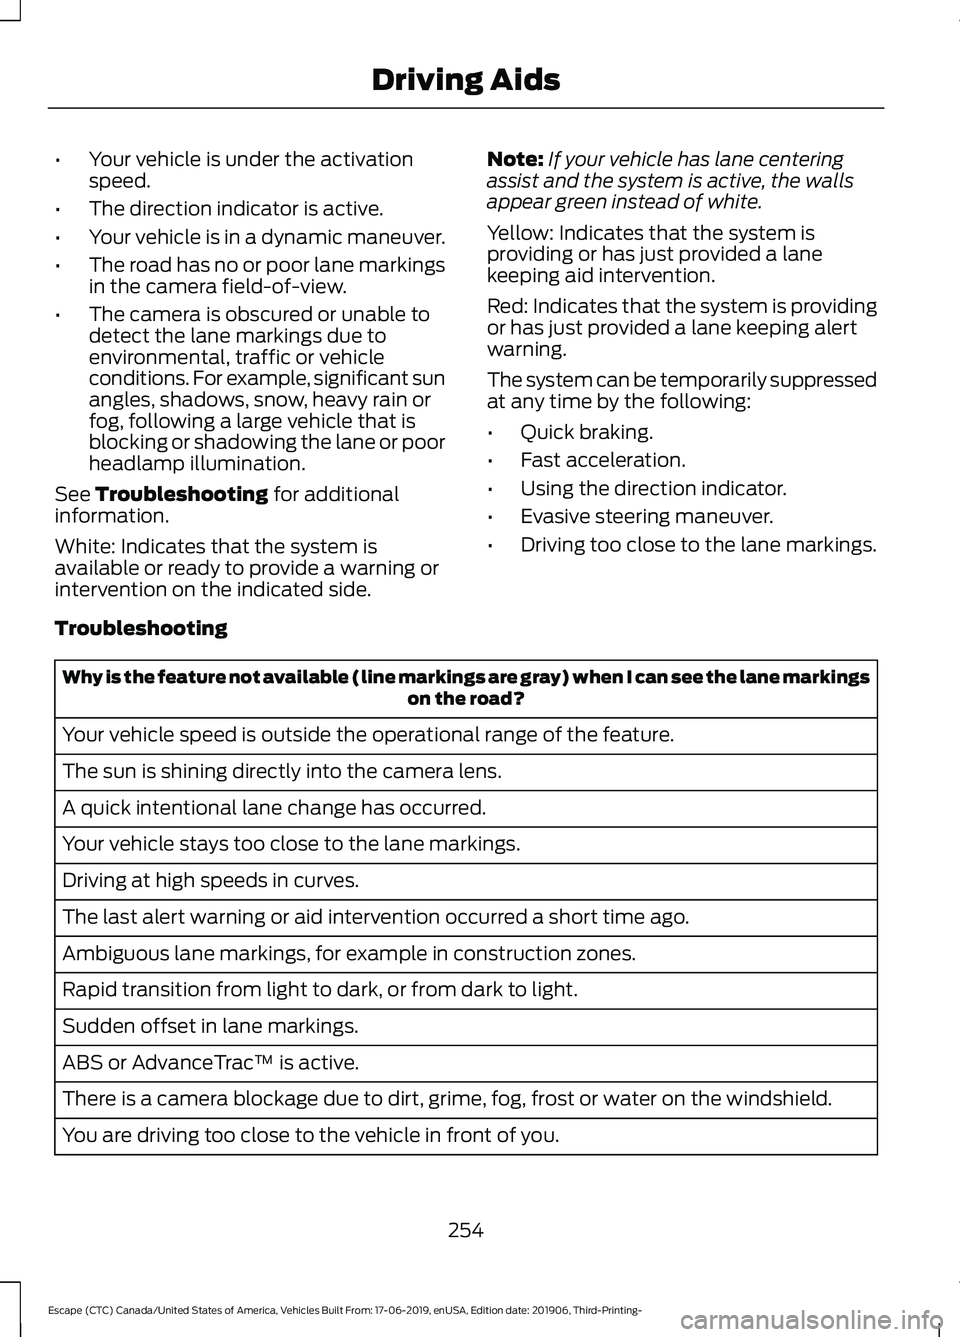
White: Indicates that the system is
available or ready to provide a warning or
intervention on the indicated side. Note:
If your vehicle has lane centering
assist and the system is active, the walls
appear green instead of white.
Yellow: Indicates that the system is
providing or has just provided a lane
keeping aid intervention.
Red: Indicates that the system is providing
or has just provided a lane keeping alert
warning.
The system can be temporarily suppressed
at any time by the following:
• Quick braking.
• Fast acceleration.
• Using the direction indicator.
• Evasive steering maneuver.
• Driving too close to the lane markings.
Troubleshooting Why is the feature not available (line markings are gray) when I can see the lane markings
on the road?
Your vehicle speed is outside the operational range of the feature.
The sun is shining directly into the camera lens.
A quick intentional lane change has occurred.
Your vehicle stays too close to the lane markings.
Driving at high speeds in curves.
The last alert warning or aid intervention occurred a short time ago.
Ambiguous lane markings, for example in construction zones.
Rapid transition from light to dark, or from dark to light.
Sudden offset in lane markings.
ABS or AdvanceTrac ™ is active.
There is a camera blockage due to dirt, grime, fog, frost or water on the windshield.
You are driving too close to the vehicle in front of you.
254
Escape (CTC) Canada/United States of America, Vehicles Built From: 17-06-2019, enUSA, Edition date: 201906, Third-Printing- Driving Aids
Page 312 of 553
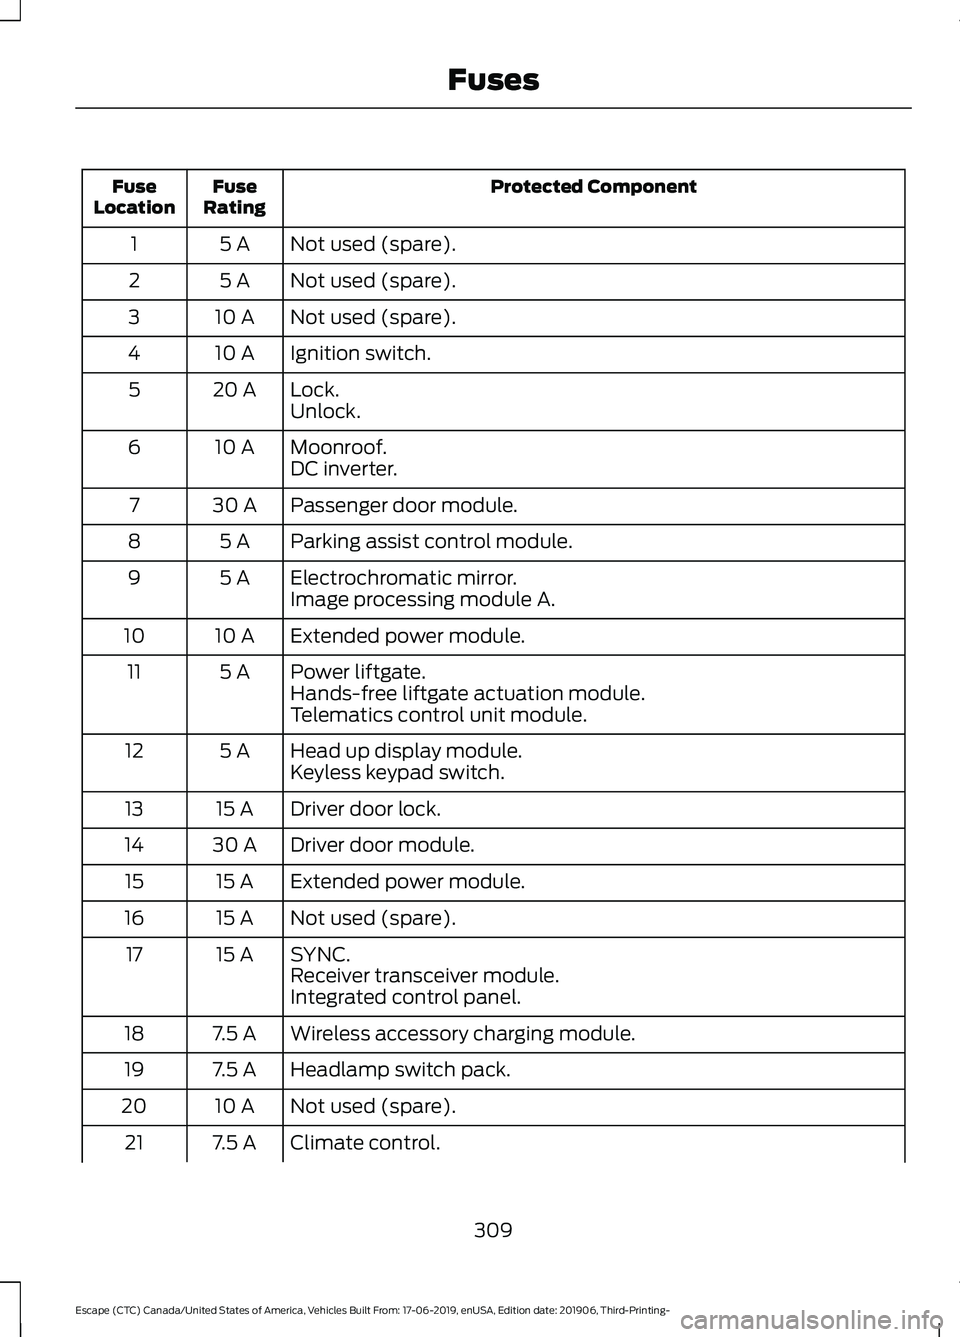
Protected Component
Fuse
Rating
Fuse
Location
Not used (spare).
5 A
1
Not used (spare).
5 A
2
Not used (spare).
10 A
3
Ignition switch.
10 A
4
Lock.
20 A
5
Unlock.
Moonroof.
10 A
6
DC inverter.
Passenger door module.
30 A
7
Parking assist control module.
5 A
8
Electrochromatic mirror.
5 A
9
Image processing module A.
Extended power module.
10 A
10
Power liftgate.
5 A
11
Hands-free liftgate actuation module.
Telematics control unit module.
Head up display module.
5 A
12
Keyless keypad switch.
Driver door lock.
15 A
13
Driver door module.
30 A
14
Extended power module.
15 A
15
Not used (spare).
15 A
16
SYNC.
15 A
17
Receiver transceiver module.
Integrated control panel.
Wireless accessory charging module.
7.5 A
18
Headlamp switch pack.
7.5 A
19
Not used (spare).
10 A
20
Climate control.
7.5 A
21
309
Escape (CTC) Canada/United States of America, Vehicles Built From: 17-06-2019, enUSA, Edition date: 201906, Third-Printing- Fuses
Page 331 of 553
4. Disconnect the negative battery cable
terminal.
5. Disconnect the positive battery cable terminal.
6. Remove the battery securing clamp.
7. Remove the battery.
8. To install, reverse the removal procedure.
Note: Before reconnecting the battery,
make sure the ignition remains switched off.
Note: Make sure the battery cable terminals
are fully tightened.
If you disconnect or replace the vehicle
battery, you must reset the following
features:
• Window bounce-back. See Windows
and Mirrors (page 93).
• Clock Settings.
• Pre-set radio stations.
• Steering Angle Sensor.
Note: To calibrate the steering angle
sensor, drive the vehicle above
30 mph
(50 km/h) for a minimum of 1.2 mi (2 km).
Make sure to drive straight ahead for a
minimum of 30 seconds. Several vehicle
functions are disabled and a warning light
could appear until the sensor is calibrated.
Note: For flexible fuel vehicles, if you are
operating on E85, you could experience poor
starts or an inability to start the engine, and
driveability problems until the fuel trim and
ethanol content have been relearned. Drive
the vehicle at least
10 mi (16 km) to
completely relearn the idle trim and fuel
trim strategy.
Battery Disposal Make sure that you dispose of
old batteries in an
environmentally friendly way.
Seek advice from your local authority
about recycling old batteries. ADJUSTING THE HEADLAMPS
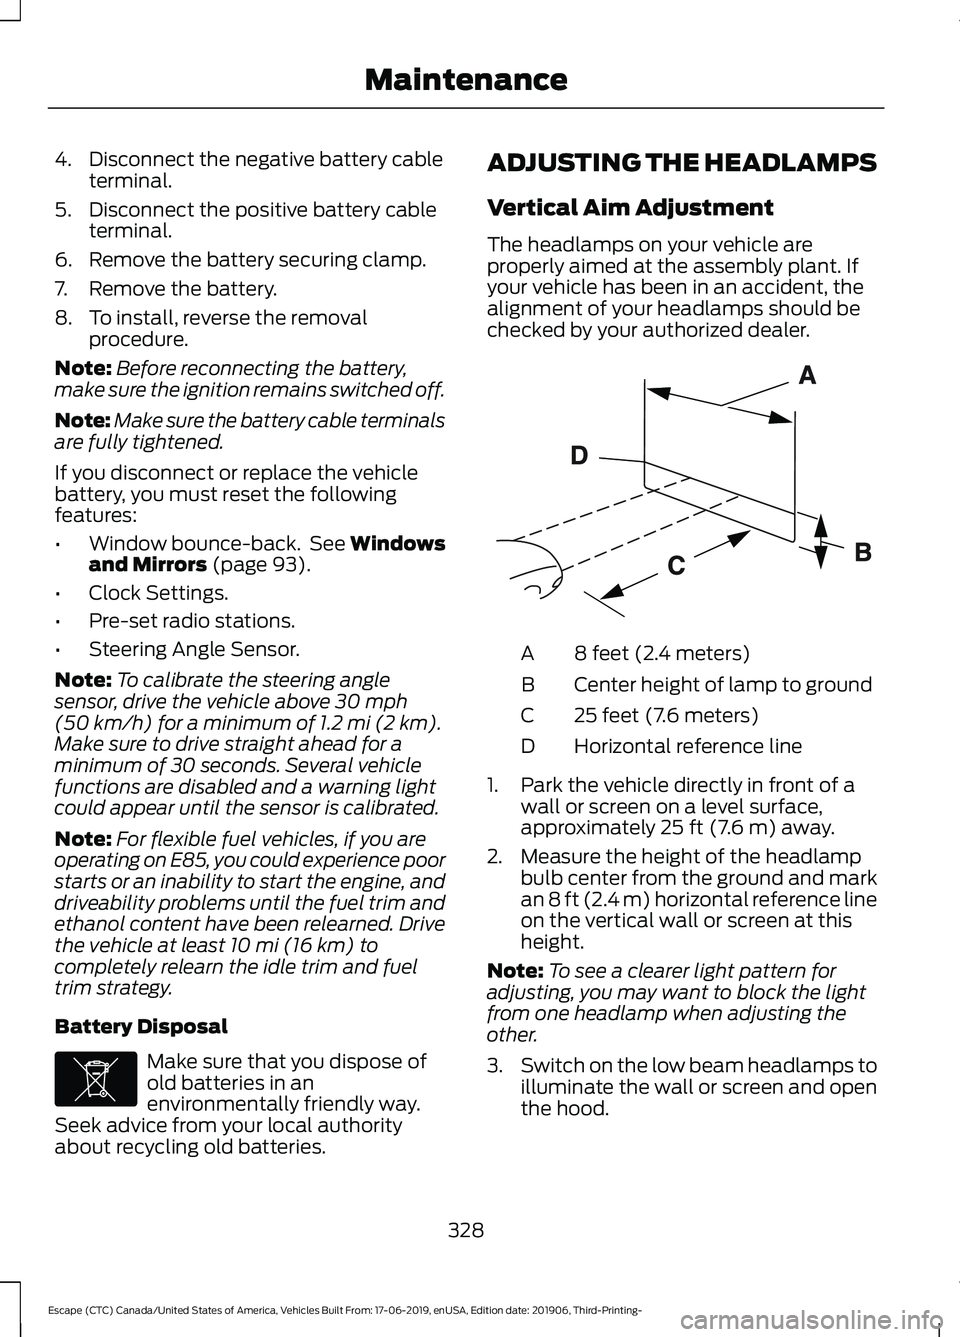
Vertical Aim Adjustment
The headlamps on your vehicle are
properly aimed at the assembly plant. If
your vehicle has been in an accident, the
alignment of your headlamps should be
checked by your authorized dealer.
8 feet (2.4 meters)
A
Center height of lamp to ground
B
25 feet (7.6 meters)
C
Horizontal reference line
D
1. Park the vehicle directly in front of a wall or screen on a level surface,
approximately
25 ft (7.6 m) away.
2. Measure the height of the headlamp bulb center from the ground and mark
an
8 ft (2.4 m) horizontal reference line
on the vertical wall or screen at this
height.
Note: To see a clearer light pattern for
adjusting, you may want to block the light
from one headlamp when adjusting the
other.
3. Switch on the low beam headlamps to
illuminate the wall or screen and open
the hood.
328
Escape (CTC) Canada/United States of America, Vehicles Built From: 17-06-2019, enUSA, Edition date: 201906, Third-Printing- MaintenanceE107998 E142592
Page 332 of 553
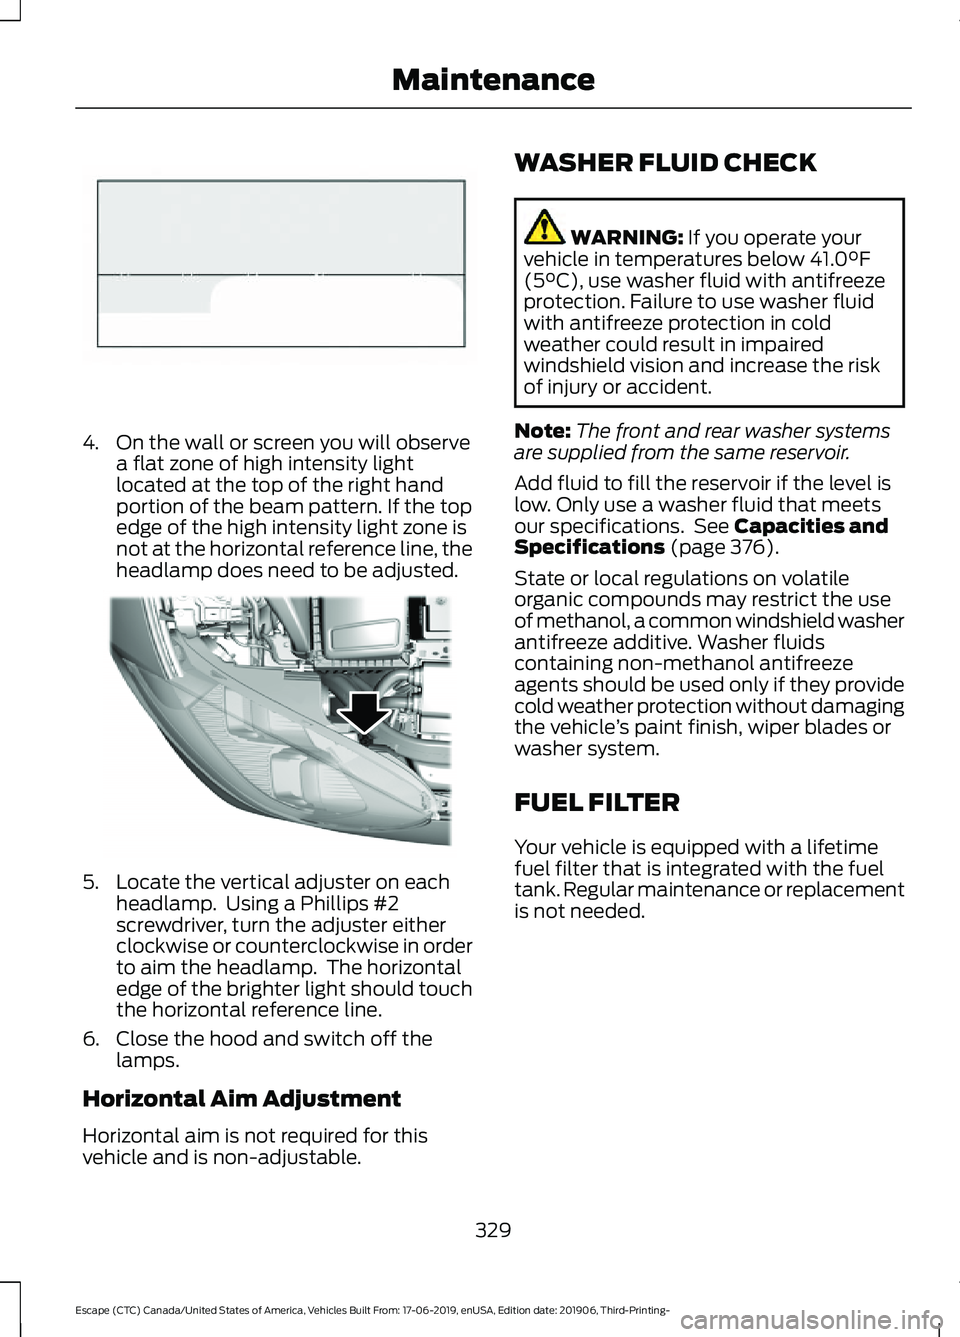
4. On the wall or screen you will observe
a flat zone of high intensity light
located at the top of the right hand
portion of the beam pattern. If the top
edge of the high intensity light zone is
not at the horizontal reference line, the
headlamp does need to be adjusted. 5. Locate the vertical adjuster on each
headlamp. Using a Phillips #2
screwdriver, turn the adjuster either
clockwise or counterclockwise in order
to aim the headlamp. The horizontal
edge of the brighter light should touch
the horizontal reference line.
6. Close the hood and switch off the lamps.
Horizontal Aim Adjustment
Horizontal aim is not required for this
vehicle and is non-adjustable. WASHER FLUID CHECK WARNING: If you operate your
vehicle in temperatures below 41.0°F
(5°C), use washer fluid with antifreeze
protection. Failure to use washer fluid
with antifreeze protection in cold
weather could result in impaired
windshield vision and increase the risk
of injury or accident.
Note: The front and rear washer systems
are supplied from the same reservoir.
Add fluid to fill the reservoir if the level is
low. Only use a washer fluid that meets
our specifications. See
Capacities and
Specifications (page 376).
State or local regulations on volatile
organic compounds may restrict the use
of methanol, a common windshield washer
antifreeze additive. Washer fluids
containing non-methanol antifreeze
agents should be used only if they provide
cold weather protection without damaging
the vehicle ’s paint finish, wiper blades or
washer system.
FUEL FILTER
Your vehicle is equipped with a lifetime
fuel filter that is integrated with the fuel
tank. Regular maintenance or replacement
is not needed.
329
Escape (CTC) Canada/United States of America, Vehicles Built From: 17-06-2019, enUSA, Edition date: 201906, Third-Printing- MaintenanceE142465 E307889
Page 334 of 553
CHANGING A BULB
Replacing Headlamp Bulbs
WARNING: Make sure the bulbs
have cooled down before removing
them. Failure to follow this warning could
result in serious personal injury.
Note: Handle a halogen headlamp bulb
carefully and keep out of children ’s reach.
Grasp the bulb by only its plastic base and
do not touch the glass. The oil from your
hand could cause the bulb to break the next
time you operate the headlamps.
Note: If you accidentally touch the bulb,
clean it with rubbing alcohol before using it.
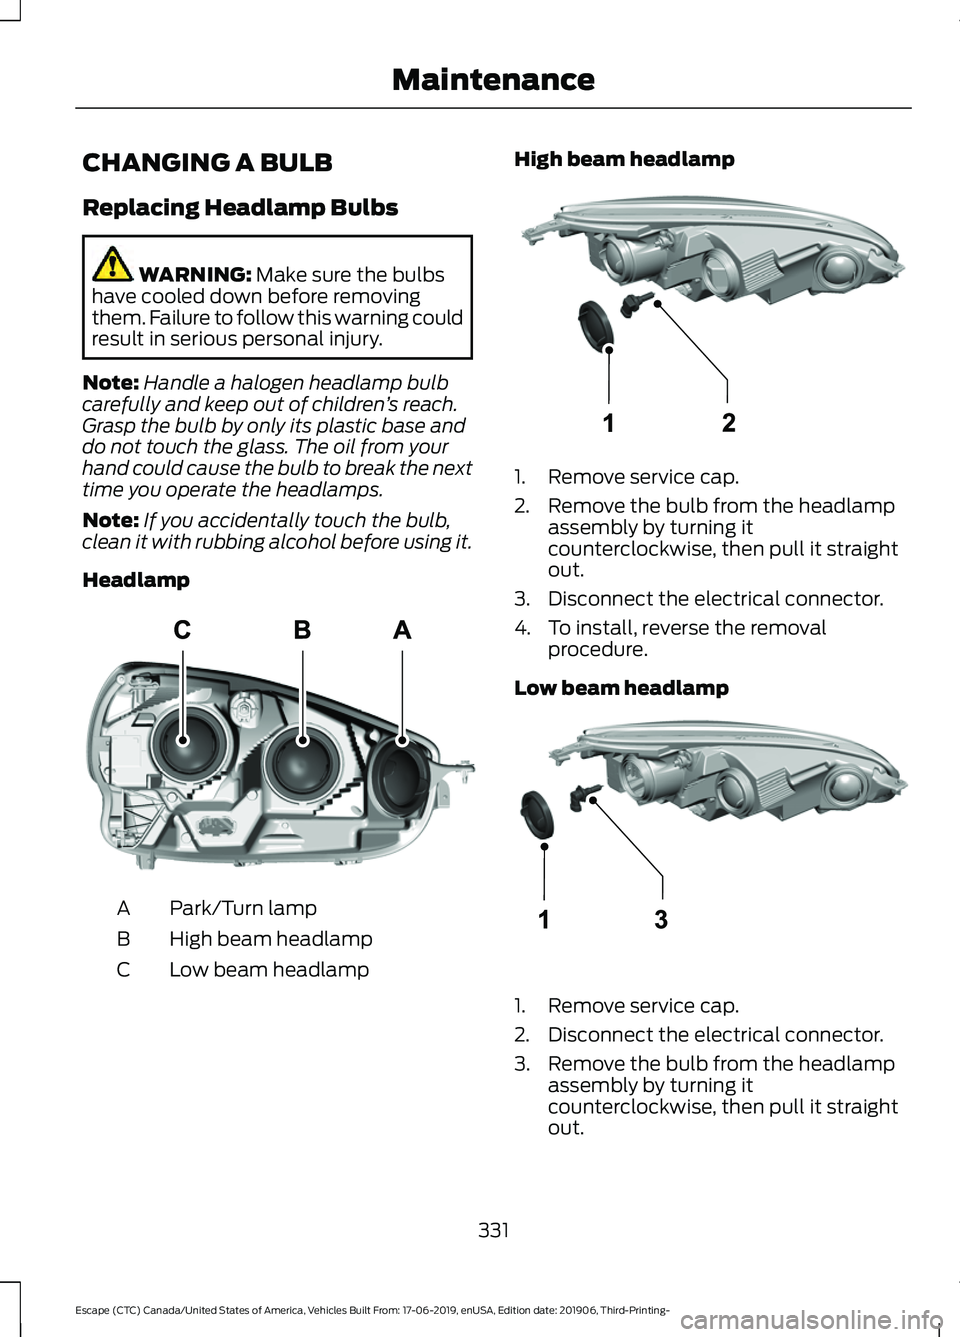
Headlamp Park/Turn lamp
A
High beam headlamp
B
Low beam headlamp
C High beam headlamp
1. Remove service cap.
2. Remove the bulb from the headlamp
assembly by turning it
counterclockwise, then pull it straight
out.
3. Disconnect the electrical connector.
4. To install, reverse the removal procedure.
Low beam headlamp 1. Remove service cap.
2. Disconnect the electrical connector.
3. Remove the bulb from the headlamp
assembly by turning it
counterclockwise, then pull it straight
out.
331
Escape (CTC) Canada/United States of America, Vehicles Built From: 17-06-2019, enUSA, Edition date: 201906, Third-Printing- MaintenanceE307881 E307882 E307883
Page 335 of 553
4. To install, reverse the removal
procedure.
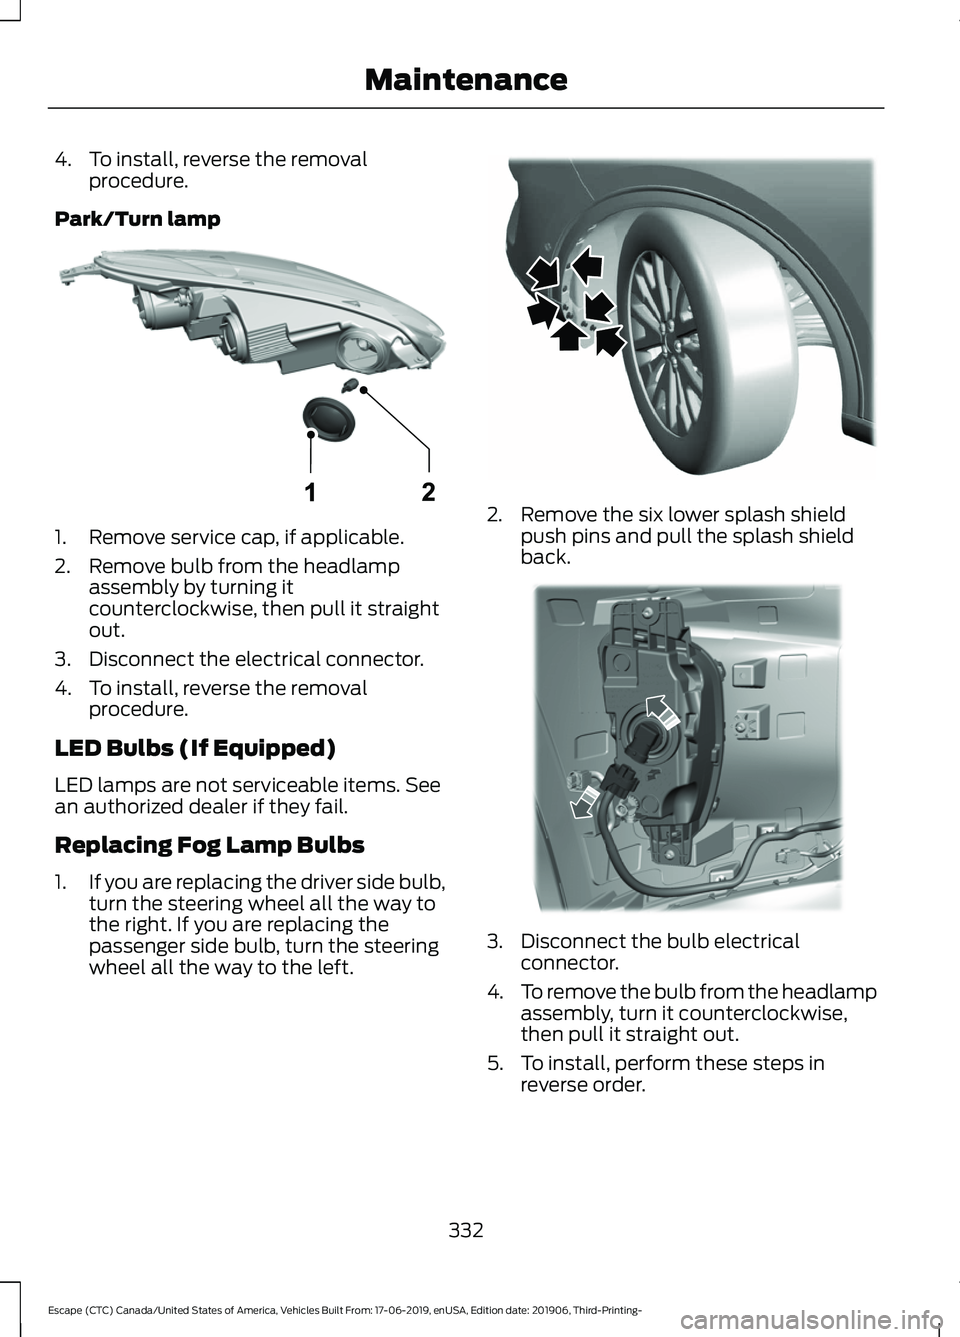
Park/Turn lamp 1. Remove service cap, if applicable.
2. Remove bulb from the headlamp
assembly by turning it
counterclockwise, then pull it straight
out.
3. Disconnect the electrical connector.
4. To install, reverse the removal procedure.
LED Bulbs (If Equipped)
LED lamps are not serviceable items. See
an authorized dealer if they fail.
Replacing Fog Lamp Bulbs
1. If you are replacing the driver side bulb,
turn the steering wheel all the way to
the right. If you are replacing the
passenger side bulb, turn the steering
wheel all the way to the left. 2. Remove the six lower splash shield
push pins and pull the splash shield
back. 3. Disconnect the bulb electrical
connector.
4. To remove the bulb from the headlamp
assembly, turn it counterclockwise,
then pull it straight out.
5. To install, perform these steps in reverse order.
332
Escape (CTC) Canada/United States of America, Vehicles Built From: 17-06-2019, enUSA, Edition date: 201906, Third-Printing- MaintenanceE307884 E311716 E311715
Page 336 of 553
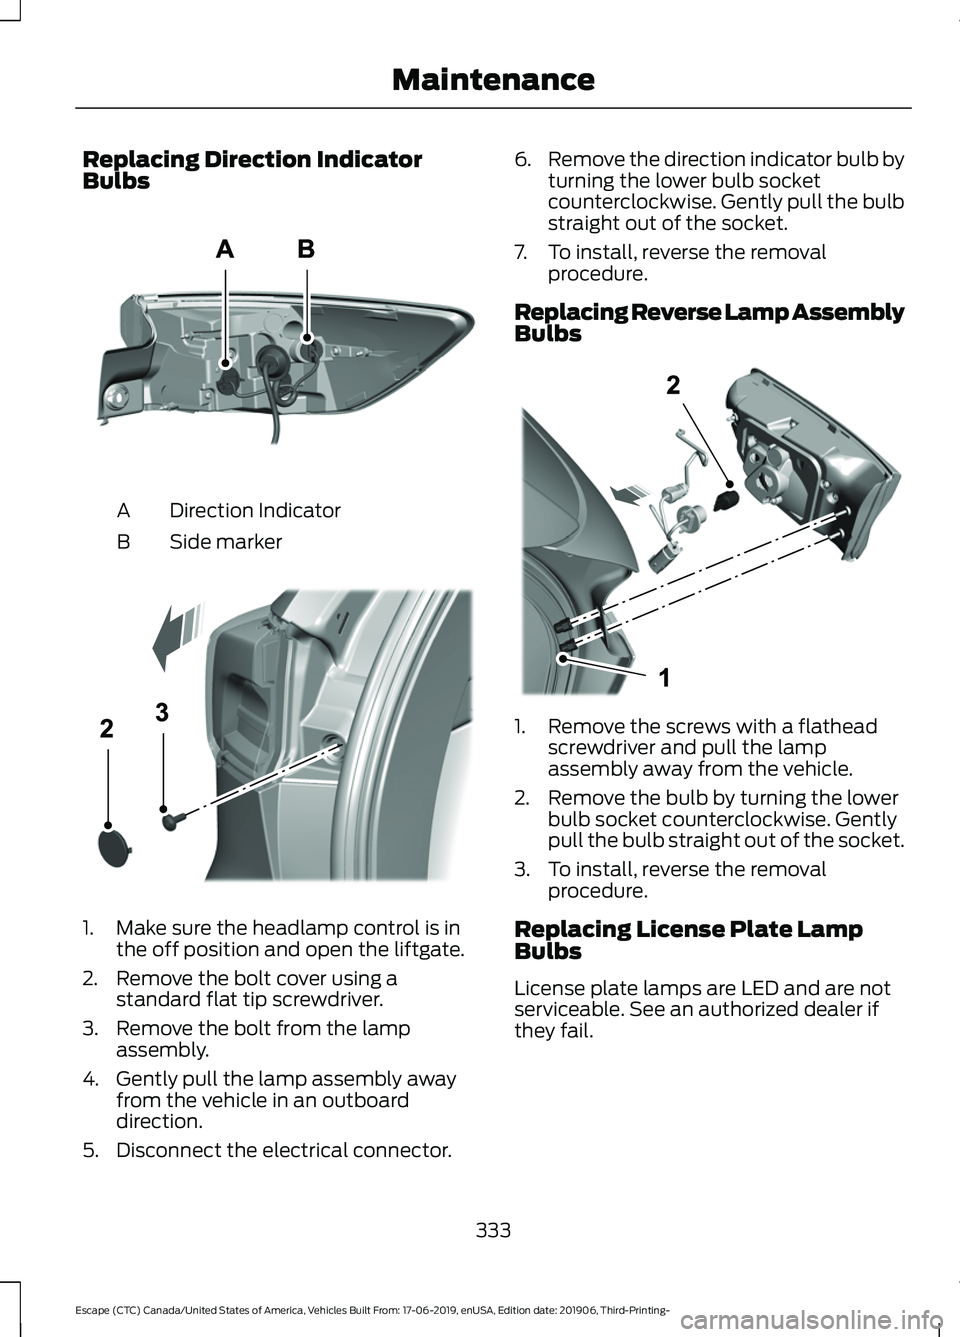
Replacing Direction Indicator
Bulbs
Direction Indicator
A
Side marker
B 1. Make sure the headlamp control is in
the off position and open the liftgate.
2. Remove the bolt cover using a standard flat tip screwdriver.
3. Remove the bolt from the lamp assembly.
4. Gently pull the lamp assembly away from the vehicle in an outboard
direction.
5. Disconnect the electrical connector. 6.
Remove the direction indicator bulb by
turning the lower bulb socket
counterclockwise. Gently pull the bulb
straight out of the socket.
7. To install, reverse the removal procedure.
Replacing Reverse Lamp Assembly
Bulbs 1. Remove the screws with a flathead
screwdriver and pull the lamp
assembly away from the vehicle.
2. Remove the bulb by turning the lower bulb socket counterclockwise. Gently
pull the bulb straight out of the socket.
3. To install, reverse the removal procedure.
Replacing License Plate Lamp
Bulbs
License plate lamps are LED and are not
serviceable. See an authorized dealer if
they fail.
333
Escape (CTC) Canada/United States of America, Vehicles Built From: 17-06-2019, enUSA, Edition date: 201906, Third-Printing- MaintenanceE307885 E307886 E307887