FORD ESCAPE 2020 Owners Manual
Manufacturer: FORD, Model Year: 2020, Model line: ESCAPE, Model: FORD ESCAPE 2020Pages: 553, PDF Size: 7.73 MB
Page 201 of 553
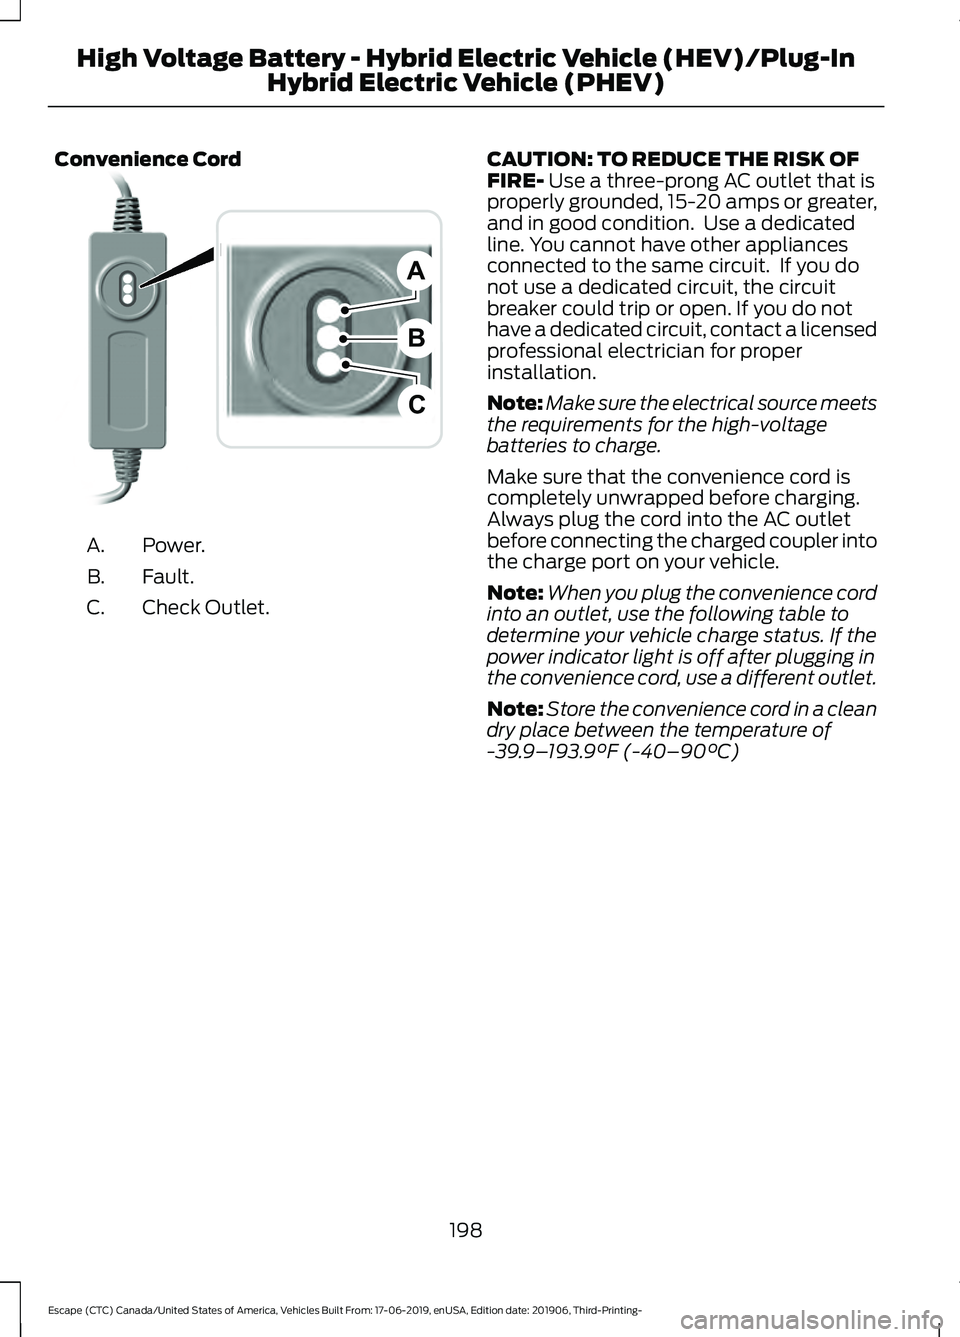
Convenience Cord
Power.
A.
Fault.
B.
Check Outlet.
C. CAUTION: TO REDUCE THE RISK OF
FIRE- Use a three-prong AC outlet that is
properly grounded, 15-20 amps or greater,
and in good condition. Use a dedicated
line. You cannot have other appliances
connected to the same circuit. If you do
not use a dedicated circuit, the circuit
breaker could trip or open. If you do not
have a dedicated circuit, contact a licensed
professional electrician for proper
installation.
Note: Make sure the electrical source meets
the requirements for the high-voltage
batteries to charge.
Make sure that the convenience cord is
completely unwrapped before charging.
Always plug the cord into the AC outlet
before connecting the charged coupler into
the charge port on your vehicle.
Note: When you plug the convenience cord
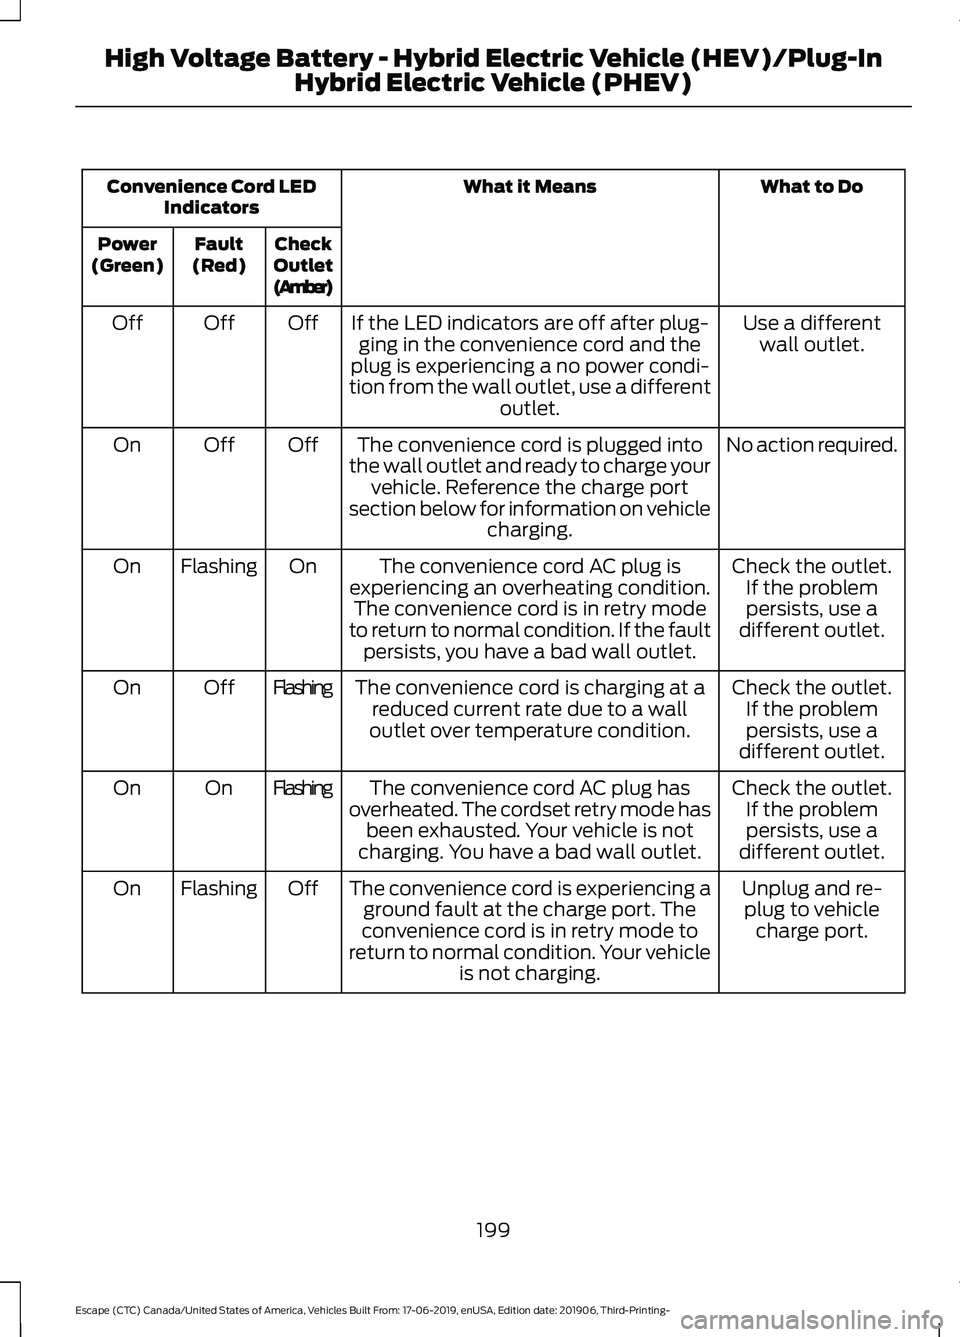
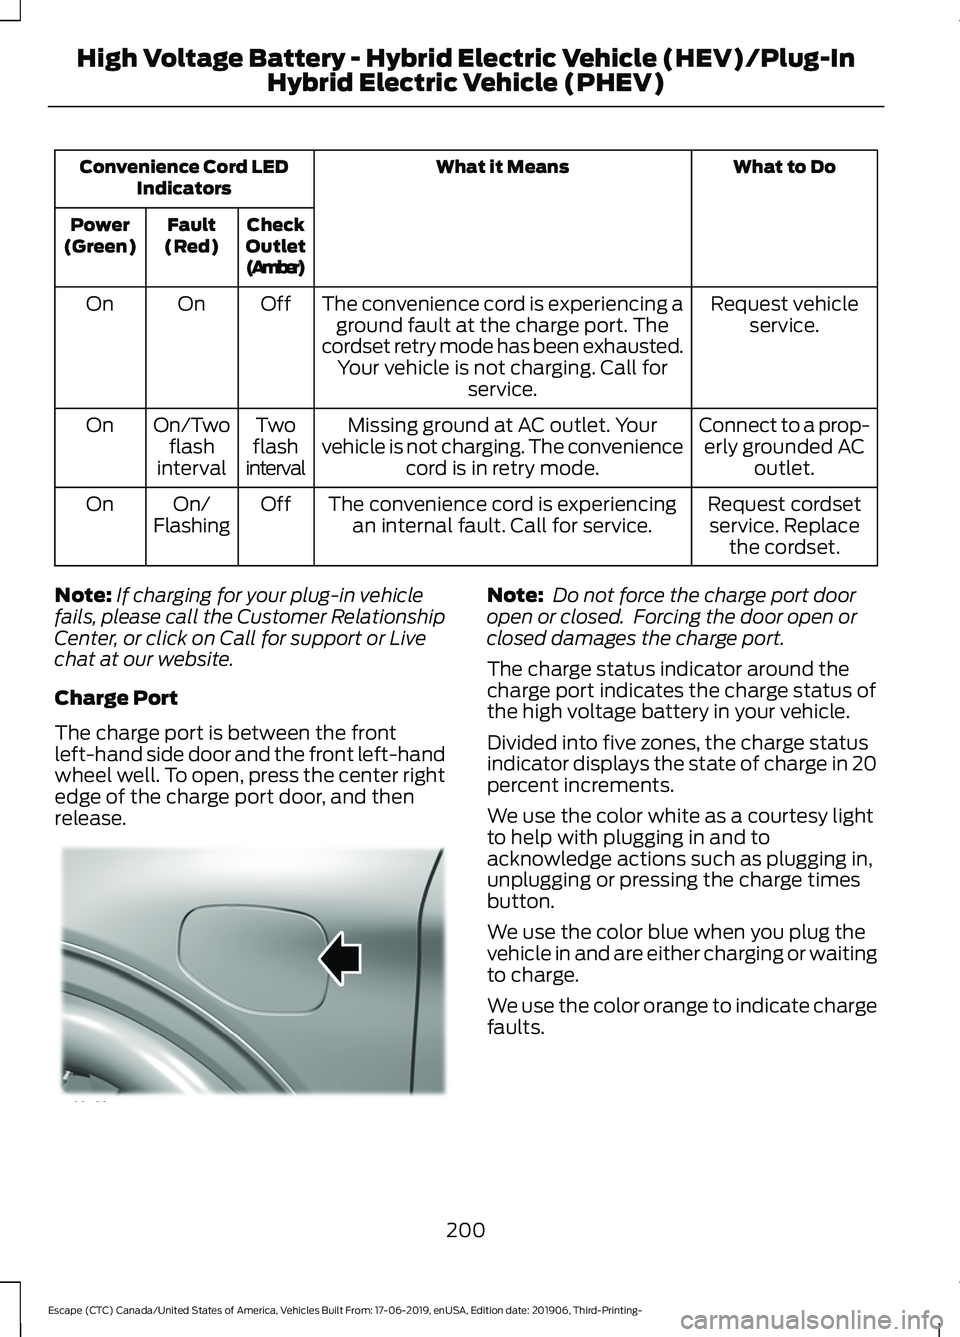
into an outlet, use the following table to
determine your vehicle charge status. If the
power indicator light is off after plugging in
the convenience cord, use a different outlet.
Note: Store the convenience cord in a clean
dry place between the temperature of
-39.9– 193.9°F (-40–90°C)
198
Escape (CTC) Canada/United States of America, Vehicles Built From: 17-06-2019, enUSA, Edition date: 201906, Third-Printing- High Voltage Battery - Hybrid Electric Vehicle (HEV)/Plug-In
Hybrid Electric Vehicle (PHEV)B
A
CE299688
Page 202 of 553
What to Do
What it Means
Convenience Cord LED
Indicators
Check
Outlet
(Amber)
Fault
(Red)
Power
(Green)
Use a differentwall outlet.
If the LED indicators are off after plug-
ging in the convenience cord and the
plug is experiencing a no power condi-
tion from the wall outlet, use a different outlet.
Off
Off
Off
No action required.
The convenience cord is plugged into
the wall outlet and ready to charge your vehicle. Reference the charge port
section below for information on vehicle charging.
Off
Off
On
Check the outlet.If the problempersists, use a
different outlet.
The convenience cord AC plug is
experiencing an overheating condition. The convenience cord is in retry mode
to return to normal condition. If the fault persists, you have a bad wall outlet.
On
Flashing
On
Check the outlet.If the problempersists, use a
different outlet.
The convenience cord is charging at a
reduced current rate due to a wall
outlet over temperature condition.
Flashing
Off
On
Check the outlet.If the problempersists, use a
different outlet.
The convenience cord AC plug has
overheated. The cordset retry mode has been exhausted. Your vehicle is not
charging. You have a bad wall outlet.
Flashing
On
On
Unplug and re-plug to vehicle charge port.
The convenience cord is experiencing a
ground fault at the charge port. The
convenience cord is in retry mode to
return to normal condition. Your vehicle is not charging.
Off
Flashing
On
199
Escape (CTC) Canada/United States of America, Vehicles Built From: 17-06-2019, enUSA, Edition date: 201906, Third-Printing- High Voltage Battery - Hybrid Electric Vehicle (HEV)/Plug-In
Hybrid Electric Vehicle (PHEV)
Page 203 of 553
What to Do
What it Means
Convenience Cord LED
Indicators
Check
Outlet
(Amber)
Fault
(Red)
Power
(Green)
Request vehicleservice.
The convenience cord is experiencing a
ground fault at the charge port. The
cordset retry mode has been exhausted. Your vehicle is not charging. Call for service.
Off
On
On
Connect to a prop-erly grounded AC outlet.
Missing ground at AC outlet. Your
vehicle is not charging. The convenience cord is in retry mode.
Two
flash
interval
On/Two
flash
interval
On
Request cordsetservice. Replace the cordset.
The convenience cord is experiencing
an internal fault. Call for service.
Off
On/
Flashing
On
Note: If charging for your plug-in vehicle
fails, please call the Customer Relationship
Center, or click on Call for support or Live
chat at our website.
Charge Port
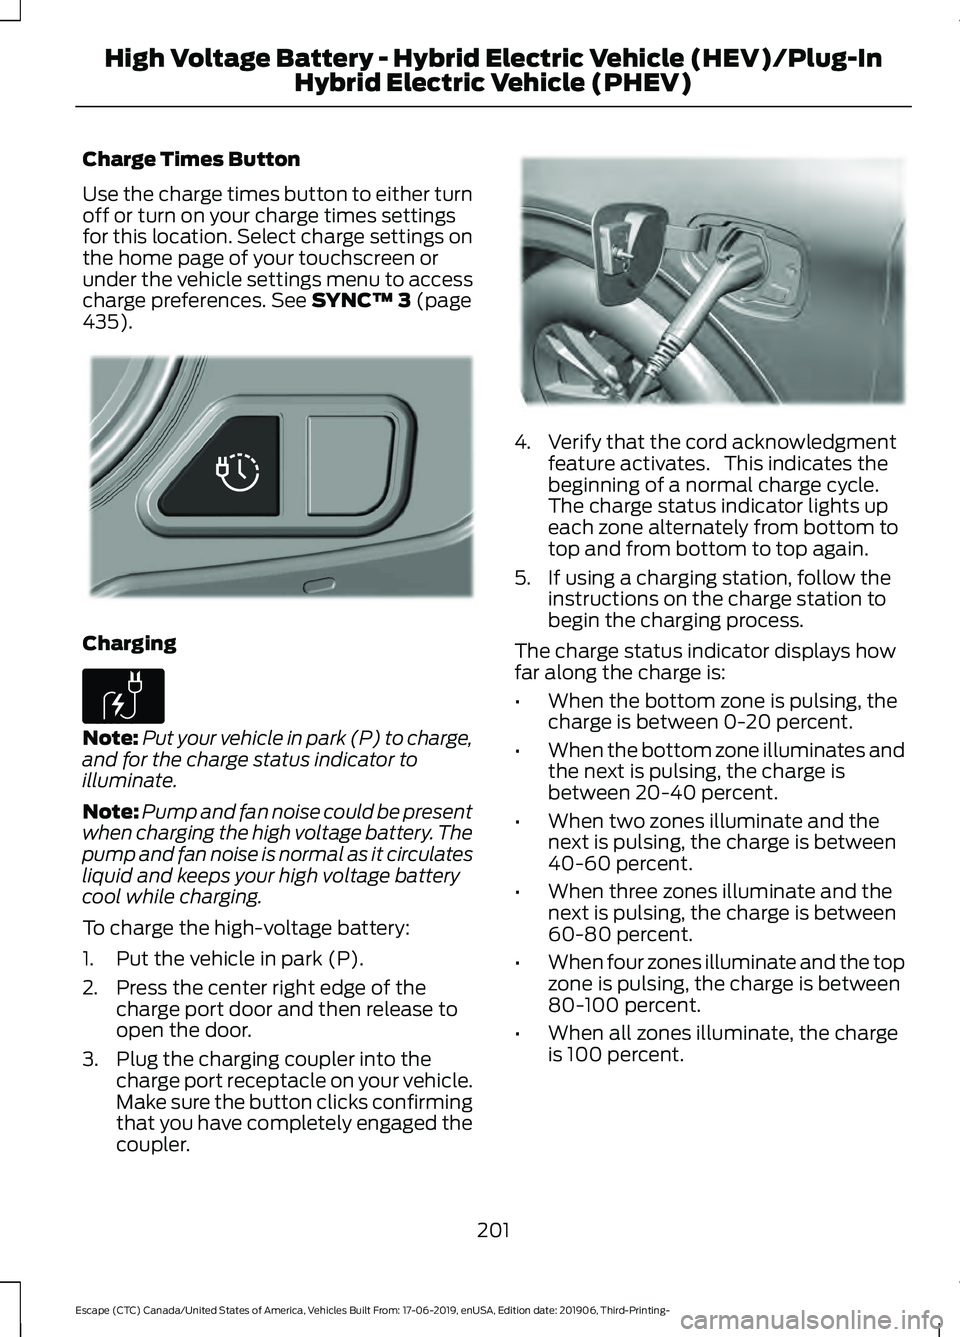
The charge port is between the front
left-hand side door and the front left-hand
wheel well. To open, press the center right
edge of the charge port door, and then
release. Note:
Do not force the charge port door
open or closed. Forcing the door open or
closed damages the charge port.
The charge status indicator around the
charge port indicates the charge status of
the high voltage battery in your vehicle.
Divided into five zones, the charge status
indicator displays the state of charge in 20
percent increments.
We use the color white as a courtesy light
to help with plugging in and to
acknowledge actions such as plugging in,
unplugging or pressing the charge times
button.
We use the color blue when you plug the
vehicle in and are either charging or waiting
to charge.
We use the color orange to indicate charge
faults.
200
Escape (CTC) Canada/United States of America, Vehicles Built From: 17-06-2019, enUSA, Edition date: 201906, Third-Printing- High Voltage Battery - Hybrid Electric Vehicle (HEV)/Plug-In
Hybrid Electric Vehicle (PHEV)E295258
Page 204 of 553
Charge Times Button
Use the charge times button to either turn
off or turn on your charge times settings
for this location. Select charge settings on
the home page of your touchscreen or
under the vehicle settings menu to access
charge preferences. See SYNC™ 3 (page
435). Charging
Note:
Put your vehicle in park (P) to charge,
and for the charge status indicator to
illuminate.
Note: Pump and fan noise could be present
when charging the high voltage battery. The
pump and fan noise is normal as it circulates
liquid and keeps your high voltage battery
cool while charging.
To charge the high-voltage battery:
1. Put the vehicle in park (P).
2. Press the center right edge of the charge port door and then release to
open the door.
3. Plug the charging coupler into the charge port receptacle on your vehicle.
Make sure the button clicks confirming
that you have completely engaged the
coupler. 4. Verify that the cord acknowledgment
feature activates. This indicates the
beginning of a normal charge cycle.
The charge status indicator lights up
each zone alternately from bottom to
top and from bottom to top again.
5. If using a charging station, follow the instructions on the charge station to
begin the charging process.
The charge status indicator displays how
far along the charge is:
• When the bottom zone is pulsing, the
charge is between 0-20 percent.
• When the bottom zone illuminates and
the next is pulsing, the charge is
between 20-40 percent.
• When two zones illuminate and the
next is pulsing, the charge is between
40-60 percent.
• When three zones illuminate and the
next is pulsing, the charge is between
60-80 percent.
• When four zones illuminate and the top
zone is pulsing, the charge is between
80-100 percent.
• When all zones illuminate, the charge
is 100 percent.
201
Escape (CTC) Canada/United States of America, Vehicles Built From: 17-06-2019, enUSA, Edition date: 201906, Third-Printing- High Voltage Battery - Hybrid Electric Vehicle (HEV)/Plug-In
Hybrid Electric Vehicle (PHEV)E301111 E306676 E295257
Page 205 of 553
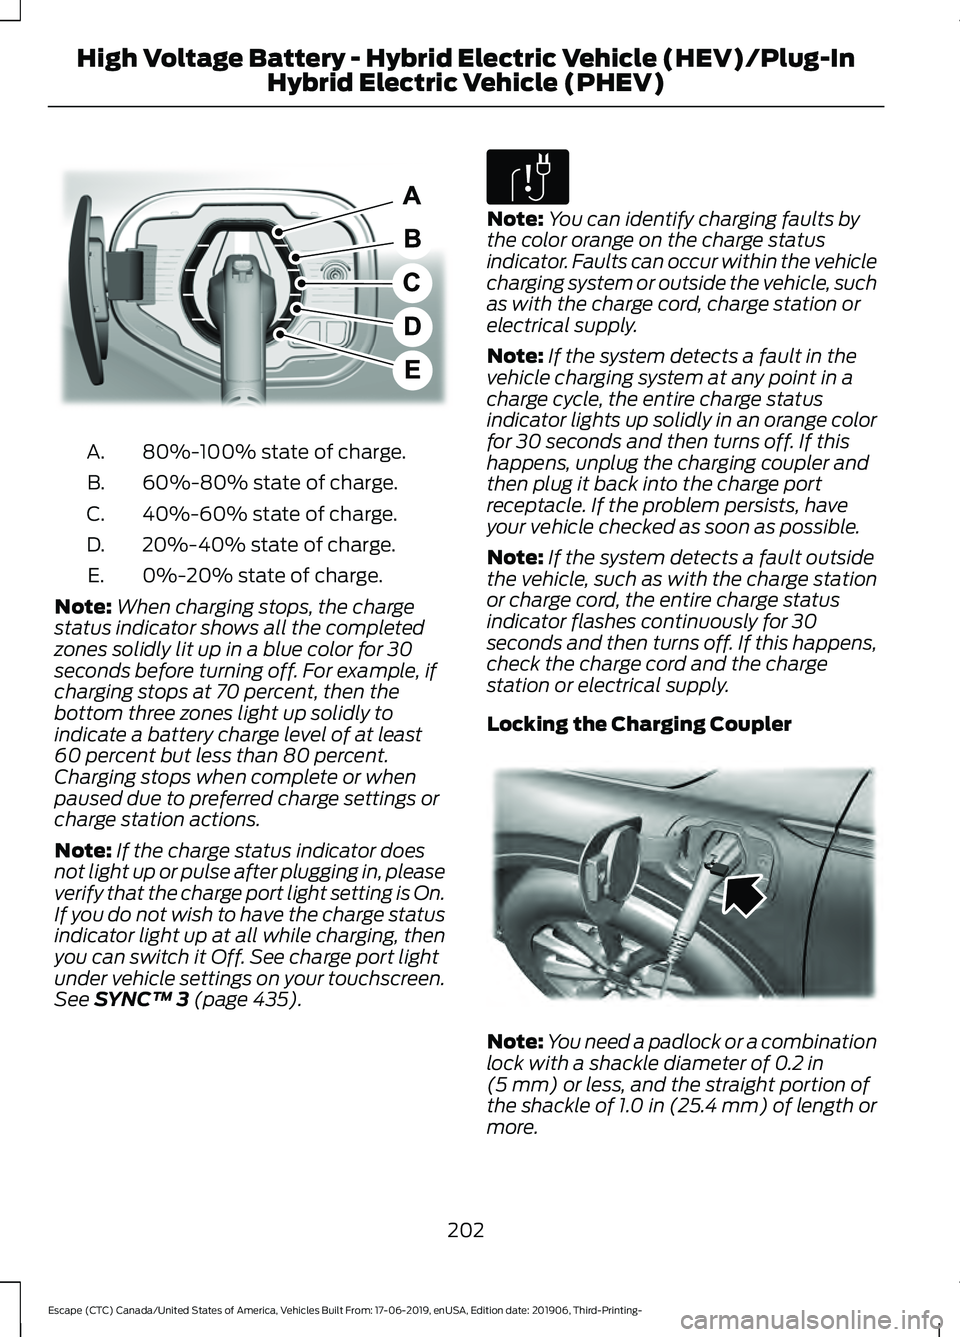
80%-100% state of charge.
A.
60%-80% state of charge.
B.
40%-60% state of charge.
C.
20%-40% state of charge.
D.
0%-20% state of charge.
E.
Note: When charging stops, the charge
status indicator shows all the completed
zones solidly lit up in a blue color for 30
seconds before turning off. For example, if
charging stops at 70 percent, then the
bottom three zones light up solidly to
indicate a battery charge level of at least
60 percent but less than 80 percent.
Charging stops when complete or when
paused due to preferred charge settings or
charge station actions.
Note: If the charge status indicator does
not light up or pulse after plugging in, please
verify that the charge port light setting is On.
If you do not wish to have the charge status
indicator light up at all while charging, then
you can switch it Off. See charge port light
under vehicle settings on your touchscreen.
See SYNC™ 3 (page 435). Note:
You can identify charging faults by
the color orange on the charge status
indicator. Faults can occur within the vehicle
charging system or outside the vehicle, such
as with the charge cord, charge station or
electrical supply.
Note: If the system detects a fault in the
vehicle charging system at any point in a
charge cycle, the entire charge status
indicator lights up solidly in an orange color
for 30 seconds and then turns off. If this
happens, unplug the charging coupler and
then plug it back into the charge port
receptacle. If the problem persists, have
your vehicle checked as soon as possible.
Note: If the system detects a fault outside
the vehicle, such as with the charge station
or charge cord, the entire charge status
indicator flashes continuously for 30
seconds and then turns off. If this happens,
check the charge cord and the charge
station or electrical supply.
Locking the Charging Coupler Note:
You need a padlock or a combination
lock with a shackle diameter of
0.2 in
(5 mm) or less, and the straight portion of
the shackle of 1.0 in (25.4 mm) of length or
more.
202
Escape (CTC) Canada/United States of America, Vehicles Built From: 17-06-2019, enUSA, Edition date: 201906, Third-Printing- High Voltage Battery - Hybrid Electric Vehicle (HEV)/Plug-In
Hybrid Electric Vehicle (PHEV)E301197 E306677 E295451
Page 206 of 553
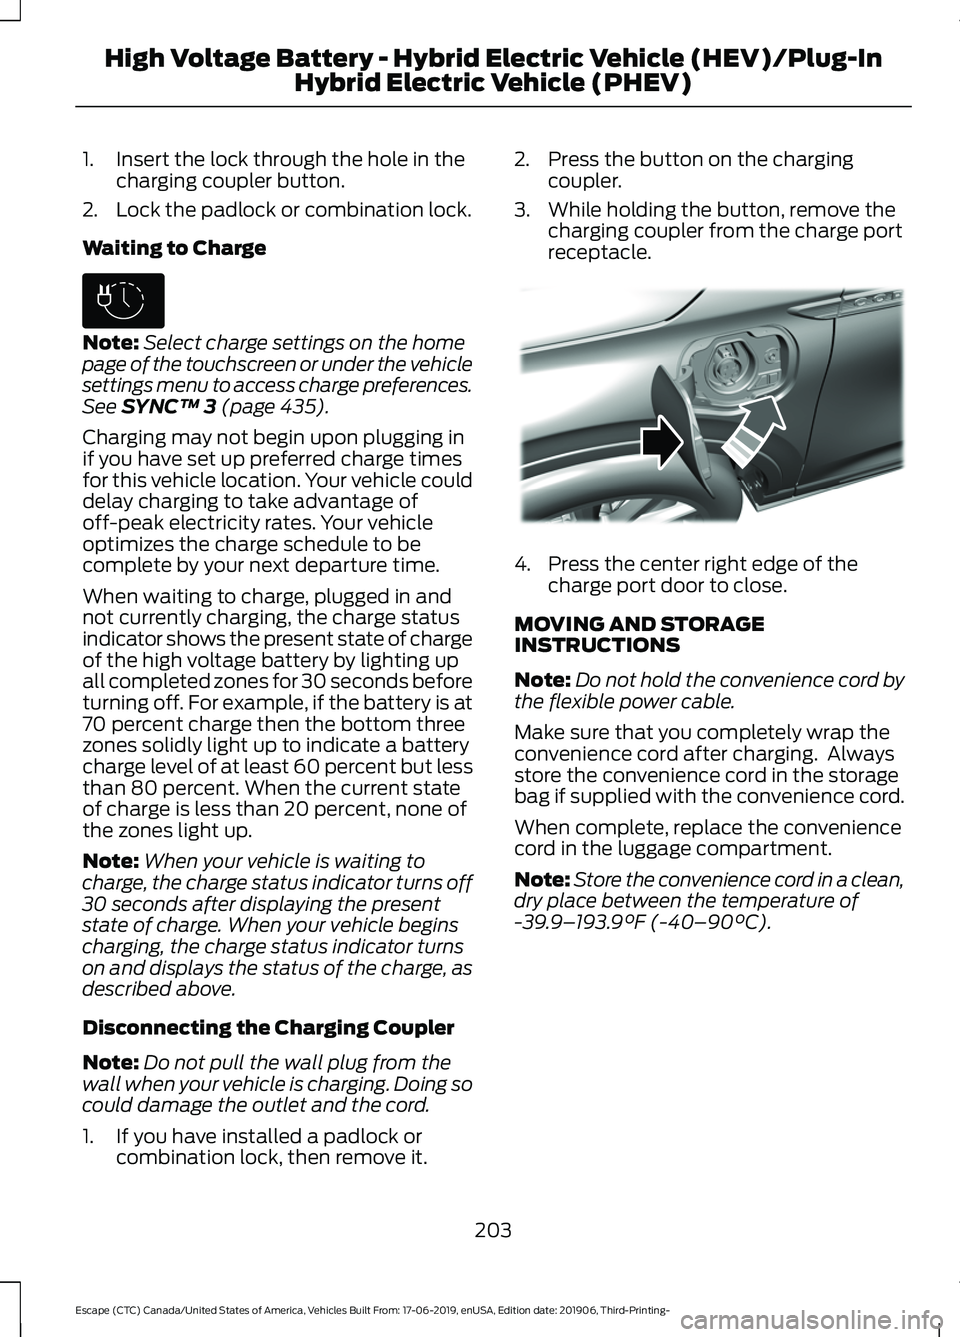
1. Insert the lock through the hole in the
charging coupler button.
2. Lock the padlock or combination lock.
Waiting to Charge Note:
Select charge settings on the home
page of the touchscreen or under the vehicle
settings menu to access charge preferences.
See SYNC™ 3 (page 435).
Charging may not begin upon plugging in
if you have set up preferred charge times
for this vehicle location. Your vehicle could
delay charging to take advantage of
off-peak electricity rates. Your vehicle
optimizes the charge schedule to be
complete by your next departure time.
When waiting to charge, plugged in and
not currently charging, the charge status
indicator shows the present state of charge
of the high voltage battery by lighting up
all completed zones for 30 seconds before
turning off. For example, if the battery is at
70 percent charge then the bottom three
zones solidly light up to indicate a battery
charge level of at least 60 percent but less
than 80 percent. When the current state
of charge is less than 20 percent, none of
the zones light up.
Note: When your vehicle is waiting to
charge, the charge status indicator turns off
30 seconds after displaying the present
state of charge. When your vehicle begins
charging, the charge status indicator turns
on and displays the status of the charge, as
described above.
Disconnecting the Charging Coupler
Note: Do not pull the wall plug from the
wall when your vehicle is charging. Doing so
could damage the outlet and the cord.
1. If you have installed a padlock or combination lock, then remove it. 2. Press the button on the charging
coupler.
3. While holding the button, remove the charging coupler from the charge port
receptacle. 4. Press the center right edge of the
charge port door to close.
MOVING AND STORAGE
INSTRUCTIONS
Note: Do not hold the convenience cord by
the flexible power cable.
Make sure that you completely wrap the
convenience cord after charging. Always
store the convenience cord in the storage
bag if supplied with the convenience cord.
When complete, replace the convenience
cord in the luggage compartment.
Note: Store the convenience cord in a clean,
dry place between the temperature of
-39.9– 193.9°F (-40–90°C)
.
203
Escape (CTC) Canada/United States of America, Vehicles Built From: 17-06-2019, enUSA, Edition date: 201906, Third-Printing- High Voltage Battery - Hybrid Electric Vehicle (HEV)/Plug-In
Hybrid Electric Vehicle (PHEV)E306678 E295444
Page 207 of 553
AUTOMATIC TRANSMISSION
- EXCLUDING: PLUG-IN
HYBRID ELECTRIC VEHICLE
(PHEV)
WARNING: Always fully apply the
parking brake and make sure you shift
into park (P). Failure to follow this
instruction could result in personal injury
or death. WARNING:
Do not apply the brake
pedal and accelerator pedal
simultaneously. Applying both pedals
simultaneously for more than a few
seconds will limit engine performance,
which may result in difficulty maintaining
speed in traffic and could lead to serious
injury. WARNING:
When your vehicle is
stationary, keep the brake pedal fully
pressed when shifting gears. Failure to
follow this instruction could result in
personal injury, death or property
damage.
Note: You may not be able to shift out of
park (P) unless the remote control is inside
your vehicle. Understanding the Shift Positions
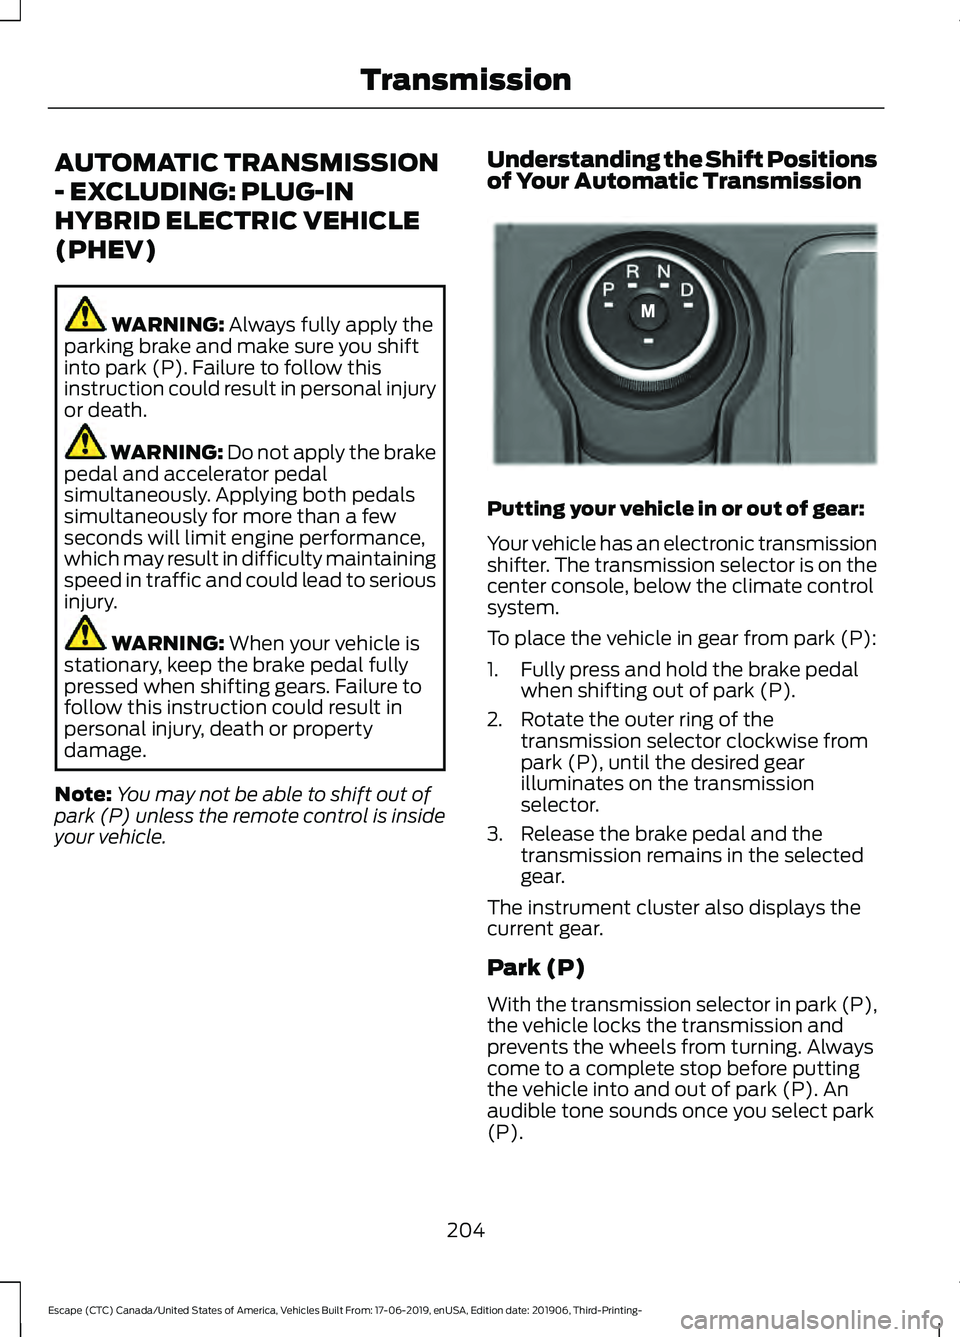
of Your Automatic Transmission Putting your vehicle in or out of gear:
Your vehicle has an electronic transmission
shifter. The transmission selector is on the
center console, below the climate control
system.
To place the vehicle in gear from park (P):
1. Fully press and hold the brake pedal
when shifting out of park (P).
2. Rotate the outer ring of the transmission selector clockwise from
park (P), until the desired gear
illuminates on the transmission
selector.
3. Release the brake pedal and the transmission remains in the selected
gear.
The instrument cluster also displays the
current gear.
Park (P)
With the transmission selector in park (P),
the vehicle locks the transmission and
prevents the wheels from turning. Always
come to a complete stop before putting
the vehicle into and out of park (P). An
audible tone sounds once you select park
(P).
204
Escape (CTC) Canada/United States of America, Vehicles Built From: 17-06-2019, enUSA, Edition date: 201906, Third-Printing- TransmissionE303655
Page 208 of 553
The electric parking brake may apply when
you shift to Park (P) without the brake
pedal fully depressed. The electric parking
brake applies when you shift to Park (P)
on large slopes, and releases with the drive
away release function.
Reverse (R)
With the transmission selector in reverse
(R), your vehicle moves backward. Always
come to a complete stop before shifting
into and out of reverse (R).
Neutral (N)
With the transmission selector in neutral
(N), you can start your vehicle and it is free
to roll. Hold the brake pedal down when in
this position.
WARNING: In neutral (N) your
vehicle has the ability to roll freely. If you
intend to leave your vehicle, make sure
you apply the parking brake.
Drive (D)
Drive (D) is the normal driving position for
the best fuel economy.
Low (L)
• Provides maximum engine braking.
• Shift the transmission into low (L) at
any vehicle speed.
• The intent is not for use under
extended or normal driving conditions
and results in lower fuel economy.
Manual (M)
(If Equipped)
In manual (M), you can upshift or
downshift using the paddle shifters.
With your vehicle in drive (D), press the
manual (M) button to activate manual
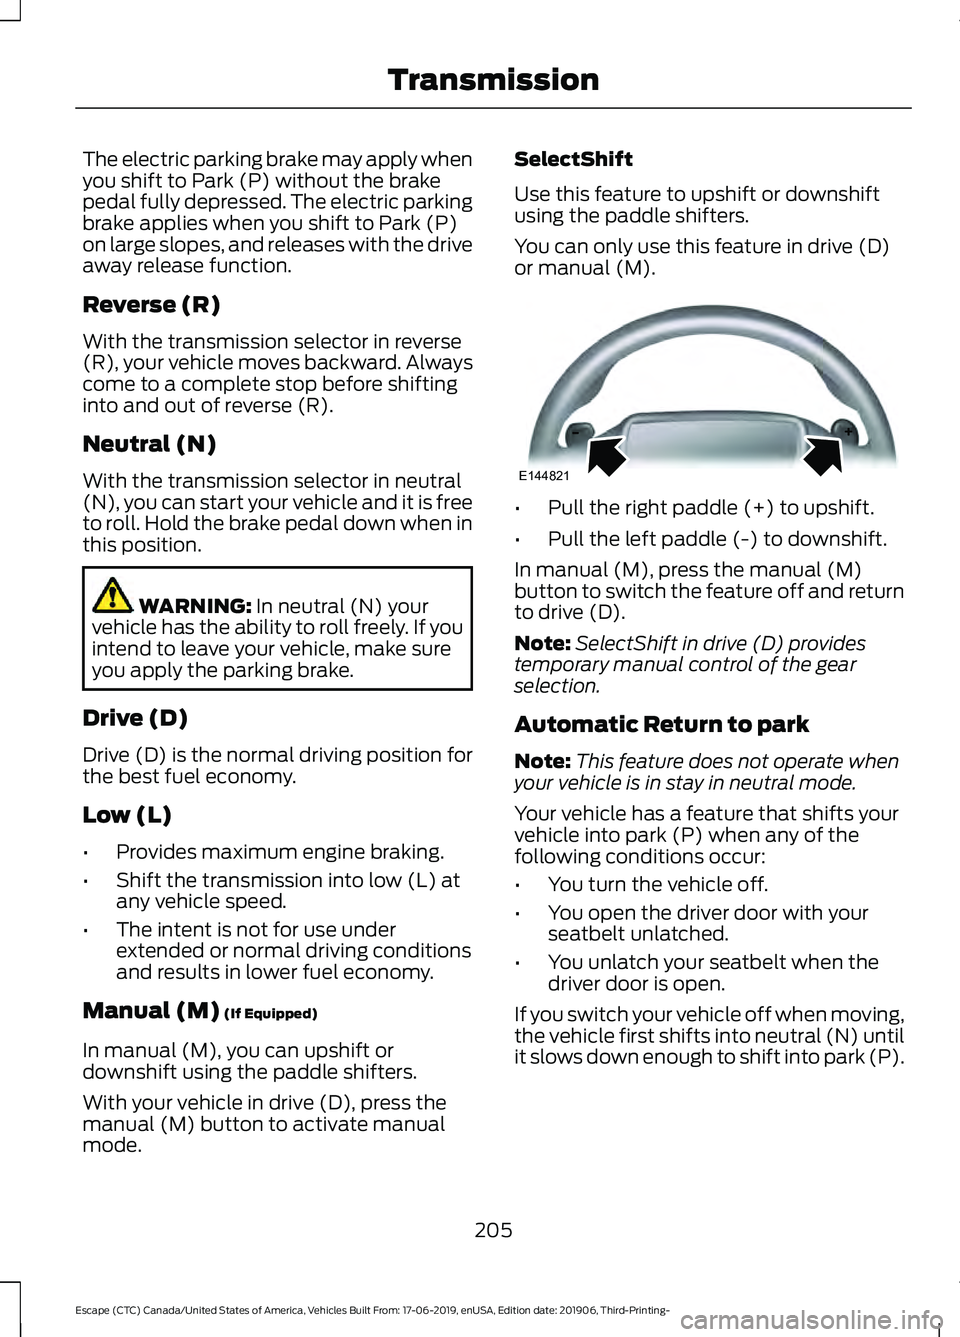
mode. SelectShift
Use this feature to upshift or downshift
using the paddle shifters.
You can only use this feature in drive (D)
or manual (M).
•
Pull the right paddle (+) to upshift.
• Pull the left paddle (-) to downshift.
In manual (M), press the manual (M)
button to switch the feature off and return
to drive (D).
Note: SelectShift in drive (D) provides
temporary manual control of the gear
selection.
Automatic Return to park
Note: This feature does not operate when
your vehicle is in stay in neutral mode.
Your vehicle has a feature that shifts your
vehicle into park (P) when any of the
following conditions occur:
• You turn the vehicle off.
• You open the driver door with your
seatbelt unlatched.
• You unlatch your seatbelt when the
driver door is open.
If you switch your vehicle off when moving,
the vehicle first shifts into neutral (N) until
it slows down enough to shift into park (P).
205
Escape (CTC) Canada/United States of America, Vehicles Built From: 17-06-2019, enUSA, Edition date: 201906, Third-Printing- TransmissionE144821
Page 209 of 553
Note:
If you have waited for more than two
minutes before switching the ignition on,
unfastening your seatbelt causes this
feature to activate, even with the driver door
closed.
Note: This feature may not work properly
if the door ajar switch is malfunctioning. If
your door ajar indicator does not illuminate
when you open the driver door or the
indicator illuminates with the driver door
closed, see your authorized dealer.
Stay in Neutral Mode
Note: Stay in neutral is a temporary vehicle
state with the ignition off. Once in this
mode, sufficient battery voltage must be
maintained or your vehicle will return to
park. Failure to follow this instruction could
result in vehicle damage not covered by the
vehicle warranty.
Note: When entering an automatic car
wash, always shift to neutral (N). If you are
exiting the vehicle before the car wash, stay
in neutral mode is available.
Stay in neutral mode allows your vehicle
to stay in neutral when you exit your
vehicle. Your vehicle must be stationary to
enter this mode.
Note: Failure to follow this instruction could
result in vehicle damage not covered by the
vehicle warranty.
Do not tow your vehicle in this mode.
To enter stay in neutral mode
1. Switch your vehicle on but do not start
the engine. See Keyless Starting
(page 167).
2. Place your foot on the brake pedal and
rotate the transmission selector to
neutral (N).
Note: When in neutral (N), a message
appears in the display screen informing you
how to access stay in neutral mode. 3. Press the manual (M) or Low (L)
button in the middle of the
transmission selector to enter stay in
neutral mode.
A message appears in the display screen
confirming your vehicle is in stay in neutral
mode. The neutral (N) indicator light on
the transmission selector also flashes.
To exit stay in neutral mode, place your
foot on the brake pedal and rotate the
transmission selector to park (P).
Manual Park Release WARNING:
When doing this
procedure, you need to take the
transmission out of park (P) which
means your vehicle can roll freely. To
avoid unwanted vehicle movement,
always fully apply the parking brake prior
to doing this procedure. Use wheels
chocks if appropriate. WARNING:
If the parking brake is
fully released, but the brake warning
lamp remains illuminated, the brakes
may not be working properly. Have your
vehicle checked as soon as possible. WARNING:
Do not drive your
vehicle until you verify that the
stoplamps are working.
Use the manual park release to move your
transmission from the park (P) position in
the event of an electrical malfunction or
emergency.
Activating the Manual Park Release
Cable
1. Apply the parking brake. See Electric
Parking Brake
(page 218).
206
Escape (CTC) Canada/United States of America, Vehicles Built From: 17-06-2019, enUSA, Edition date: 201906, Third-Printing- Transmission
Page 210 of 553
Note:
If vehicle battery is dead, for example,
no electrical power is available, you could
use an external power to apply the parking
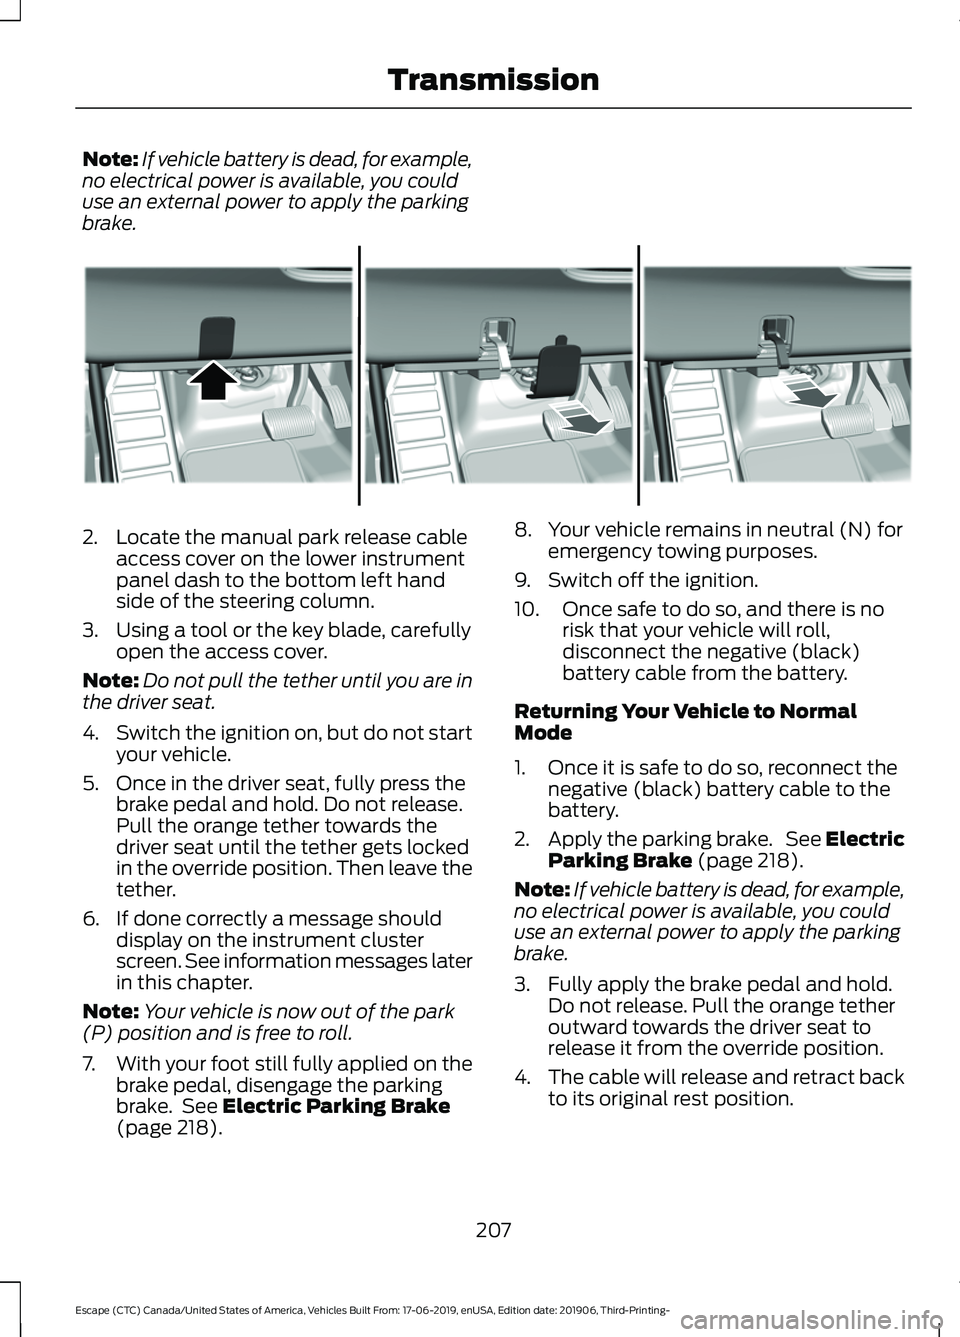
brake. 2. Locate the manual park release cable
access cover on the lower instrument
panel dash to the bottom left hand
side of the steering column.
3. Using a tool or the key blade, carefully open the access cover.
Note: Do not pull the tether until you are in
the driver seat.
4. Switch the ignition on, but do not start
your vehicle.
5. Once in the driver seat, fully press the brake pedal and hold. Do not release.
Pull the orange tether towards the
driver seat until the tether gets locked
in the override position. Then leave the
tether.
6. If done correctly a message should display on the instrument cluster
screen. See information messages later
in this chapter.
Note: Your vehicle is now out of the park
(P) position and is free to roll.
7. With your foot still fully applied on the
brake pedal, disengage the parking
brake. See Electric Parking Brake
(page 218). 8. Your vehicle remains in neutral (N) for
emergency towing purposes.
9. Switch off the ignition.
10. Once safe to do so, and there is no risk that your vehicle will roll,
disconnect the negative (black)
battery cable from the battery.
Returning Your Vehicle to Normal
Mode
1. Once it is safe to do so, reconnect the negative (black) battery cable to the
battery.
2. Apply the parking brake. See Electric
Parking Brake
(page 218).
Note: If vehicle battery is dead, for example,
no electrical power is available, you could
use an external power to apply the parking
brake.
3. Fully apply the brake pedal and hold. Do not release. Pull the orange tether
outward towards the driver seat to
release it from the override position.
4. The cable will release and retract back
to its original rest position.
207
Escape (CTC) Canada/United States of America, Vehicles Built From: 17-06-2019, enUSA, Edition date: 201906, Third-Printing- TransmissionE307867