headlamp FORD ESCAPE 2021 User Guide
[x] Cancel search | Manufacturer: FORD, Model Year: 2021, Model line: ESCAPE, Model: FORD ESCAPE 2021Pages: 589, PDF Size: 9.2 MB
Page 176 of 589
Starting the Engine
Turn the key to position III. Release the
key when the engine starts.
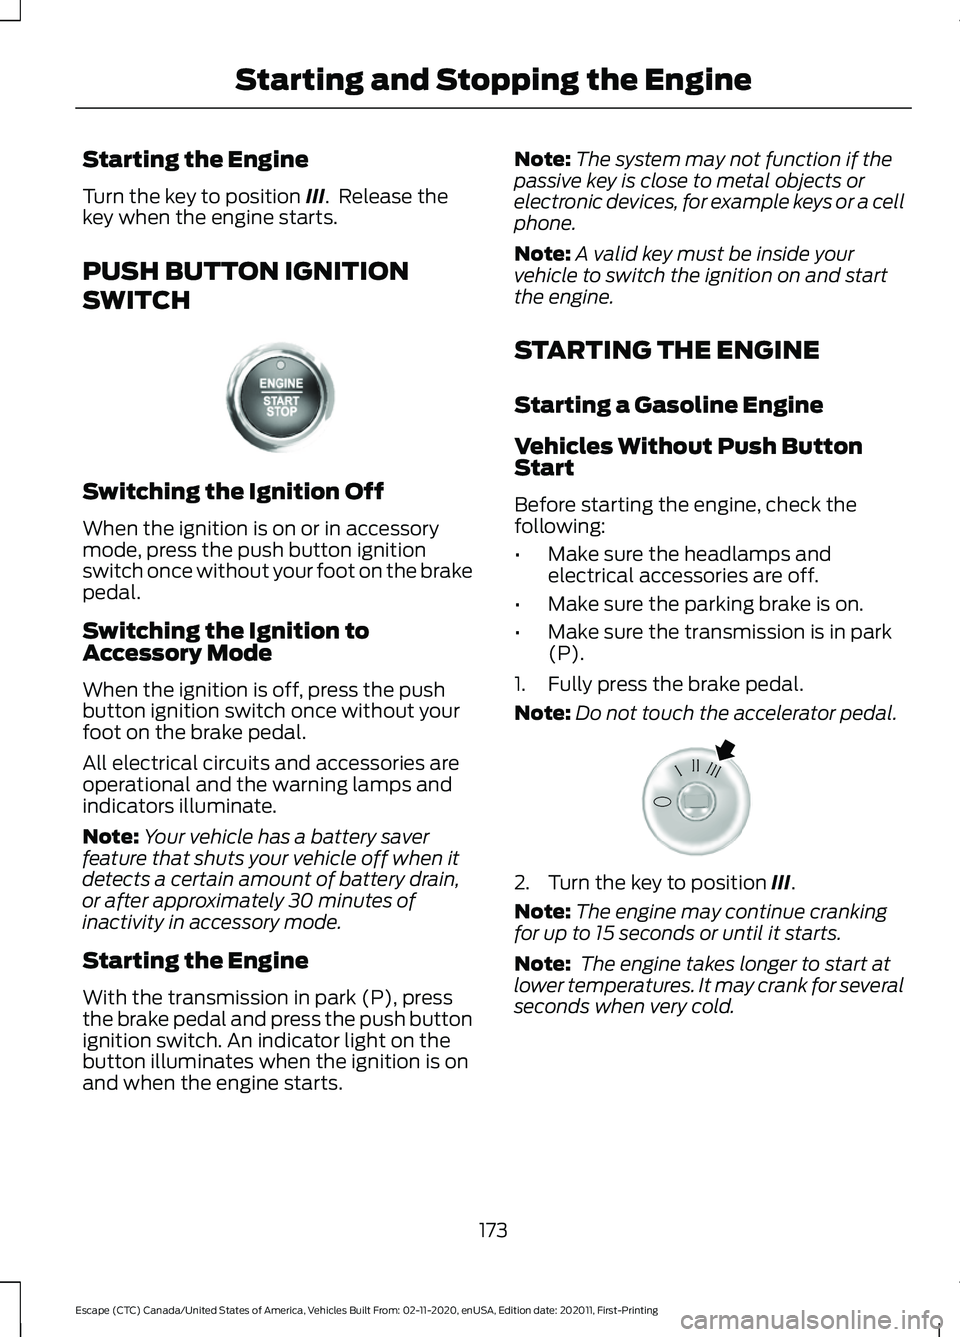
PUSH BUTTON IGNITION
SWITCH Switching the Ignition Off
When the ignition is on or in accessory
mode, press the push button ignition
switch once without your foot on the brake
pedal.
Switching the Ignition to
Accessory Mode
When the ignition is off, press the push
button ignition switch once without your
foot on the brake pedal.
All electrical circuits and accessories are
operational and the warning lamps and
indicators illuminate.
Note:
Your vehicle has a battery saver
feature that shuts your vehicle off when it
detects a certain amount of battery drain,
or after approximately 30 minutes of
inactivity in accessory mode.
Starting the Engine
With the transmission in park (P), press
the brake pedal and press the push button
ignition switch. An indicator light on the
button illuminates when the ignition is on
and when the engine starts. Note:
The system may not function if the
passive key is close to metal objects or
electronic devices, for example keys or a cell
phone.
Note: A valid key must be inside your
vehicle to switch the ignition on and start
the engine.
STARTING THE ENGINE
Starting a Gasoline Engine
Vehicles Without Push Button
Start
Before starting the engine, check the
following:
• Make sure the headlamps and
electrical accessories are off.
• Make sure the parking brake is on.
• Make sure the transmission is in park
(P).
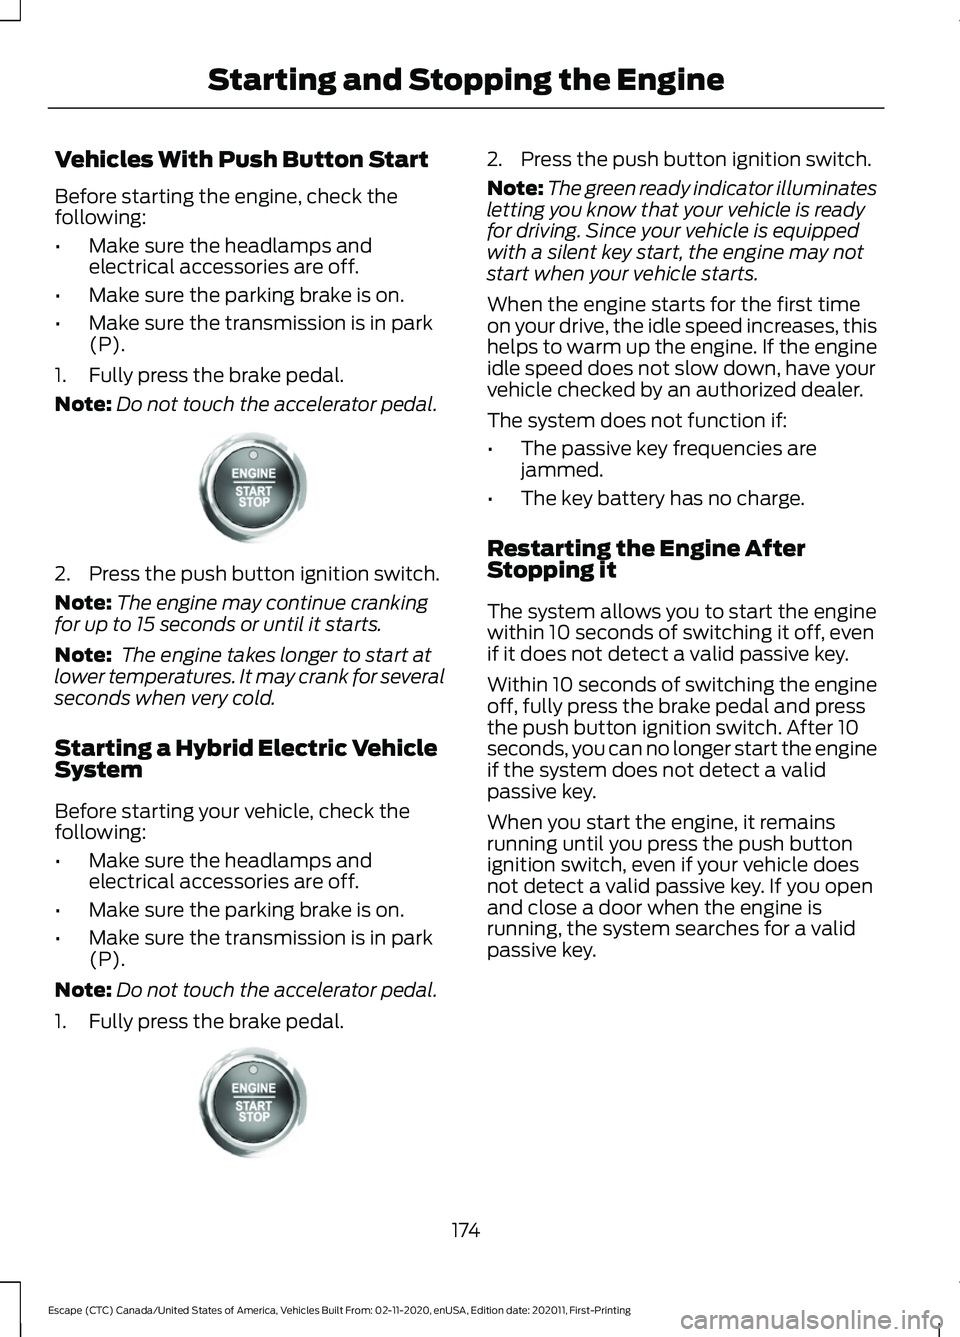
1. Fully press the brake pedal.
Note: Do not touch the accelerator pedal. 2. Turn the key to position
III.
Note: The engine may continue cranking
for up to 15 seconds or until it starts.
Note: The engine takes longer to start at
lower temperatures. It may crank for several
seconds when very cold.
173
Escape (CTC) Canada/United States of America, Vehicles Built From: 02-11-2020, enUSA, Edition date: 202011, First-Printing Starting and Stopping the EngineE321258 E322354
Page 177 of 589
Vehicles With Push Button Start
Before starting the engine, check the
following:
•
Make sure the headlamps and
electrical accessories are off.
• Make sure the parking brake is on.
• Make sure the transmission is in park
(P).
1. Fully press the brake pedal.
Note: Do not touch the accelerator pedal.2. Press the push button ignition switch.
Note:
The engine may continue cranking
for up to 15 seconds or until it starts.
Note: The engine takes longer to start at
lower temperatures. It may crank for several
seconds when very cold.
Starting a Hybrid Electric Vehicle
System
Before starting your vehicle, check the
following:
• Make sure the headlamps and
electrical accessories are off.
• Make sure the parking brake is on.
• Make sure the transmission is in park
(P).
Note: Do not touch the accelerator pedal.
1. Fully press the brake pedal. 2. Press the push button ignition switch.
Note:
The green ready indicator illuminates
letting you know that your vehicle is ready
for driving. Since your vehicle is equipped
with a silent key start, the engine may not
start when your vehicle starts.
When the engine starts for the first time
on your drive, the idle speed increases, this
helps to warm up the engine. If the engine
idle speed does not slow down, have your
vehicle checked by an authorized dealer.
The system does not function if:
• The passive key frequencies are
jammed.
• The key battery has no charge.
Restarting the Engine After
Stopping it
The system allows you to start the engine
within 10 seconds of switching it off, even
if it does not detect a valid passive key.
Within 10 seconds of switching the engine
off, fully press the brake pedal and press
the push button ignition switch. After 10
seconds, you can no longer start the engine
if the system does not detect a valid
passive key.
When you start the engine, it remains
running until you press the push button
ignition switch, even if your vehicle does
not detect a valid passive key. If you open
and close a door when the engine is
running, the system searches for a valid
passive key.
174
Escape (CTC) Canada/United States of America, Vehicles Built From: 02-11-2020, enUSA, Edition date: 202011, First-Printing Starting and Stopping the EngineE321258 E321258
Page 197 of 589
WARNING: The fuel system may
be under pressure. If you hear a hissing
sound near the fuel filler inlet, do not
refuel until the sound stops. Otherwise,
fuel may spray out, which could cause
serious personal injury. WARNING:
Do not pry open the
fuel tank filler valve. This could damage
the fuel system. Failure to follow this
instruction could result in fire, personal
injury or death. WARNING: Do not remove the fuel
pump nozzle from its fully inserted
position when refueling. WARNING:
Stop refueling when
the fuel pump nozzle automatically
shuts off for the first time. Failure to
follow this will fill the expansion space
in the fuel tank and could lead to fuel
overflowing. WARNING:
Do not overfill the fuel
tank. The pressure in an overfilled tank
may cause leakage and lead to fuel spray
and fire. WARNING:
Wait at least five
seconds before removing the fuel pump
nozzle to allow any residual fuel to drain
into the fuel tank. WARNING: Read and follow all the
instructions on the pump island.
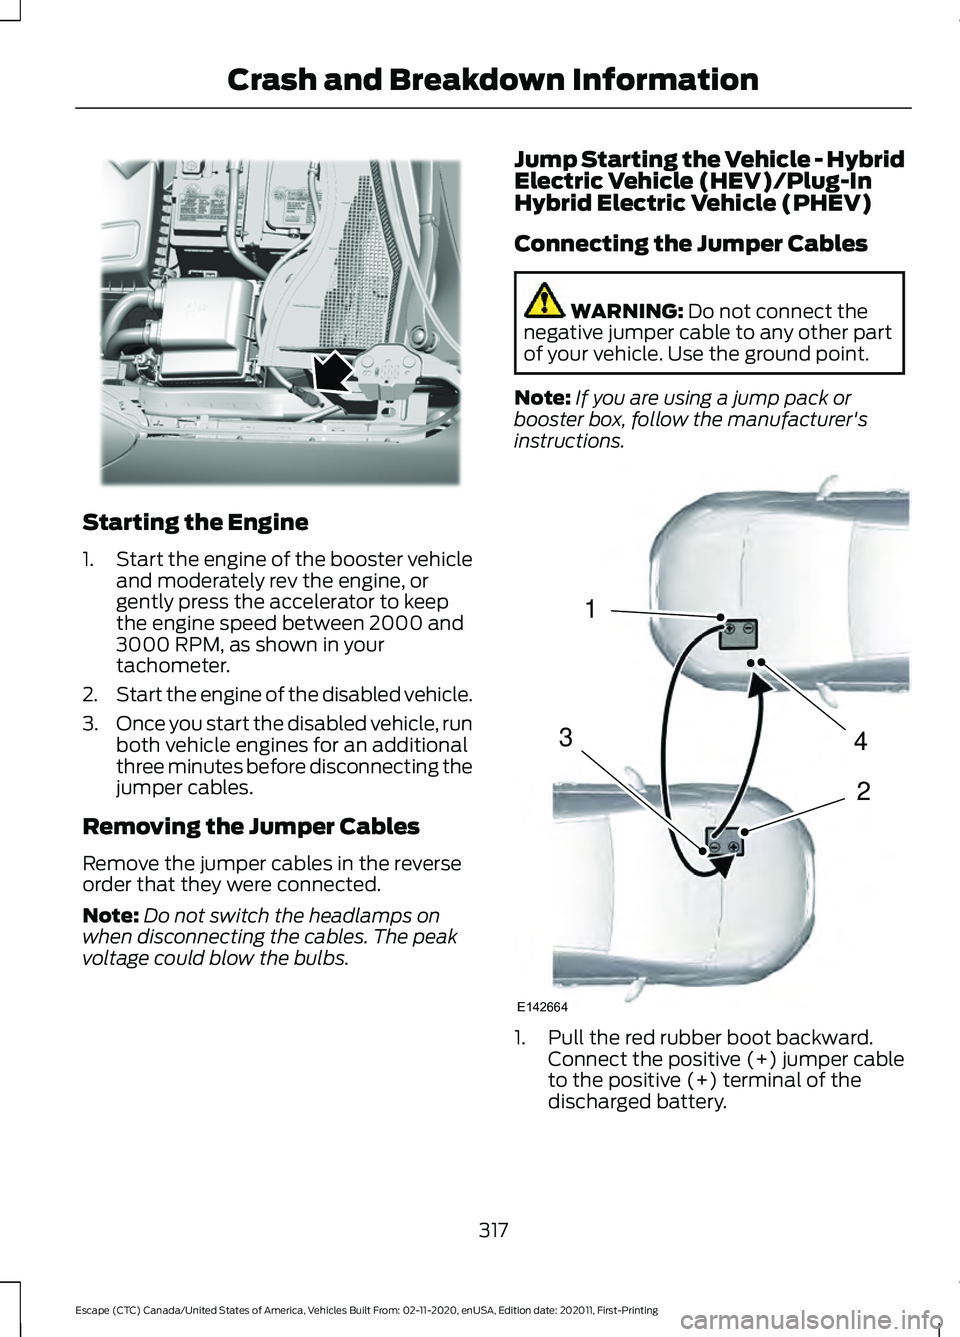
1. When you stop your vehicle, shift into park (P) and switch the ignition off. 2.
Press the button on the left side of the
instrument panel next to the headlamp
switch to open the fuel filler door. The
fuel filler door can take up to 15
seconds to open before you can insert
a fuel filler nozzle. 3. Insert the fuel pump nozzle up to the
first notch on the nozzle A. Keep it
resting on the cover of the fuel tank
filler pipe opening.
194
Escape (CTC) Canada/United States of America, Vehicles Built From: 02-11-2020, enUSA, Edition date: 202011, First-Printing Fuel and RefuelingE293006 E139202
Page 292 of 589

WHAT IS SPEED SIGN
RECOGNITION
Speed sign recognition detects speed limit
signs to inform you of the current speed
limit. Detected speed signs appear in the
information display.
HOW DOES SPEED SIGN
RECOGNITION WORK
Speed sign recognition uses a sensor
behind the interior mirror to detect speed
signs.
If your vehicle has speed sign recognition
with navigation, stored speed sign data
may influence the indicated speed limit
value.
SPEED SIGN RECOGNITION
PRECAUTIONS
WARNING: You are responsible for
controlling your vehicle at all times. The
system is designed to be an aid and does
not relieve you of your responsibility to
drive with due care and attention. Failure
to follow this instruction could result in
the loss of control of your vehicle,
personal injury or death. WARNING: In cold and severe
weather conditions the system may not
function. Rain, snow and spray can all
limit sensor performance. WARNING:
The system may not
operate properly if the sensor is blocked.
Keep the windshield free from
obstruction. Note:
Do not carry out windshield repairs
in the immediate area surrounding the
sensor.
Note: If your vehicle has a suspension kit
not approved by us, the system may not
correctly function.
Note: The system may not detect all speed
signs and may incorrectly read signs.
Note: Always fit our original parts when
replacing headlamp bulbs. Other bulbs may
reduce system performance.
SPEED SIGN RECOGNITION
LIMITATIONS
Speed sign recognition may not operate
correctly due to:
• Outdated map data.
• Incorrect recognition of speed limits by
the sensor of signs on parallel roads or
exit ramps.
• Missed recognition of faded, dirty, or
distorted signs.
SPEED SIGN RECOGNITION
INDICATORS When the system detects a speed limit
sign, it appears in the information display.
289
Escape (CTC) Canada/United States of America, Vehicles Built From: 02-11-2020, enUSA, Edition date: 202011, First-Printing Speed Sign Recognition
(If Equipped)E317824
Page 320 of 589
Starting the Engine
1.
Start the engine of the booster vehicle
and moderately rev the engine, or
gently press the accelerator to keep
the engine speed between 2000 and
3000 RPM, as shown in your
tachometer.
2. Start the engine of the disabled vehicle.
3. Once you start the disabled vehicle, run
both vehicle engines for an additional
three minutes before disconnecting the
jumper cables.
Removing the Jumper Cables
Remove the jumper cables in the reverse
order that they were connected.
Note: Do not switch the headlamps on
when disconnecting the cables. The peak
voltage could blow the bulbs. Jump Starting the Vehicle - Hybrid
Electric Vehicle (HEV)/Plug-In
Hybrid Electric Vehicle (PHEV)
Connecting the Jumper Cables WARNING: Do not connect the
negative jumper cable to any other part
of your vehicle. Use the ground point.
Note: If you are using a jump pack or
booster box, follow the manufacturer's
instructions. 1. Pull the red rubber boot backward.
Connect the positive (+) jumper cable
to the positive (+) terminal of the
discharged battery.
317
Escape (CTC) Canada/United States of America, Vehicles Built From: 02-11-2020, enUSA, Edition date: 202011, First-Printing Crash and Breakdown InformationE338624 4
2
1
3
E142664
Page 321 of 589

2. Connect the other end of the positive
(+) jumper cable to the positive (+)
terminal of the booster vehicle battery.
3. Connect the negative (-) jumper cable
to the negative (-) terminal of the
booster vehicle battery.
4. Make the final connection of the negative (-) jumper cable to an
exposed metal part of the disabled
vehicle's engine, as shown in the
following illustration, away from the
battery and fuel injection system, or
connect the negative (-) jumper cable
to a ground connection point if
available. Starting the Engine
1.
Start the engine of the booster vehicle
and moderately rev the engine, or
gently press the accelerator to keep
the engine speed between 2000 and
3000 RPM, as shown in your
tachometer.
2. Start the engine of the disabled vehicle.
3. Once you start the disabled vehicle, run
both vehicle engines for an additional
three minutes before disconnecting the
jumper cables.
Removing the Jumper Cables
Remove the jumper cables in the reverse
order that they were connected. Note:
Do not switch the headlamps on
when disconnecting the cables. The peak
voltage could blow the bulbs.
POST-CRASH ALERT SYSTEM
What Is the Post-Crash Alert
System
The system helps draw attention to your
vehicle in the event of a serious impact.
How Does the Post-Crash Alert
System Work
The system is designed to turn the hazard
flashers on and to intermittently sound the
horn in the event of a serious impact that
deploys an airbag or the seatbelt
pretensioners.
Post-Crash Alert System
Limitations
Depending on applicable laws in the
country your vehicle was built for, the horn
does not sound in the event of a serious
impact.
Switching the Post-Crash Alert
System Off
Press the hazard flasher switch or the
unlock button on the remote control to
switch the system off.
Note: The alert turns off when the vehicle
battery runs out of charge.
318
Escape (CTC) Canada/United States of America, Vehicles Built From: 02-11-2020, enUSA, Edition date: 202011, First-Printing Crash and Breakdown InformationE338715
Page 334 of 589
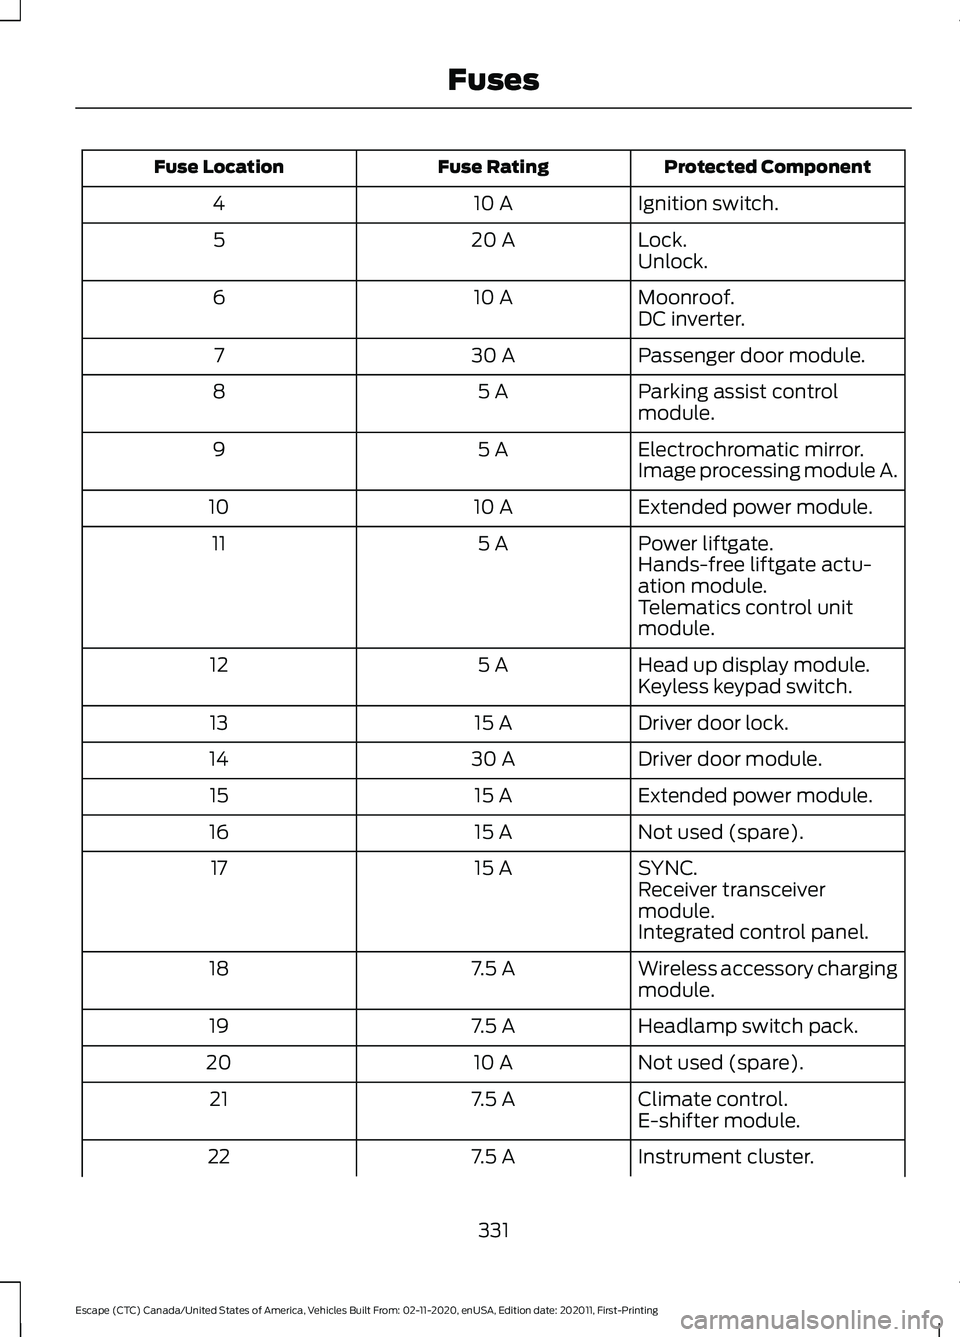
Protected Component
Fuse Rating
Fuse Location
Ignition switch.
10 A
4
Lock.
20 A
5
Unlock.
Moonroof.
10 A
6
DC inverter.
Passenger door module.
30 A
7
Parking assist control
module.
5 A
8
Electrochromatic mirror.
5 A
9
Image processing module A.
Extended power module.
10 A
10
Power liftgate.
5 A
11
Hands-free liftgate actu-
ation module.
Telematics control unit
module.
Head up display module.
5 A
12
Keyless keypad switch.
Driver door lock.
15 A
13
Driver door module.
30 A
14
Extended power module.
15 A
15
Not used (spare).
15 A
16
SYNC.
15 A
17
Receiver transceiver
module.
Integrated control panel.
Wireless accessory charging
module.
7.5 A
18
Headlamp switch pack.
7.5 A
19
Not used (spare).
10 A
20
Climate control.
7.5 A
21
E-shifter module.
Instrument cluster.
7.5 A
22
331
Escape (CTC) Canada/United States of America, Vehicles Built From: 02-11-2020, enUSA, Edition date: 202011, First-Printing Fuses
Page 351 of 589
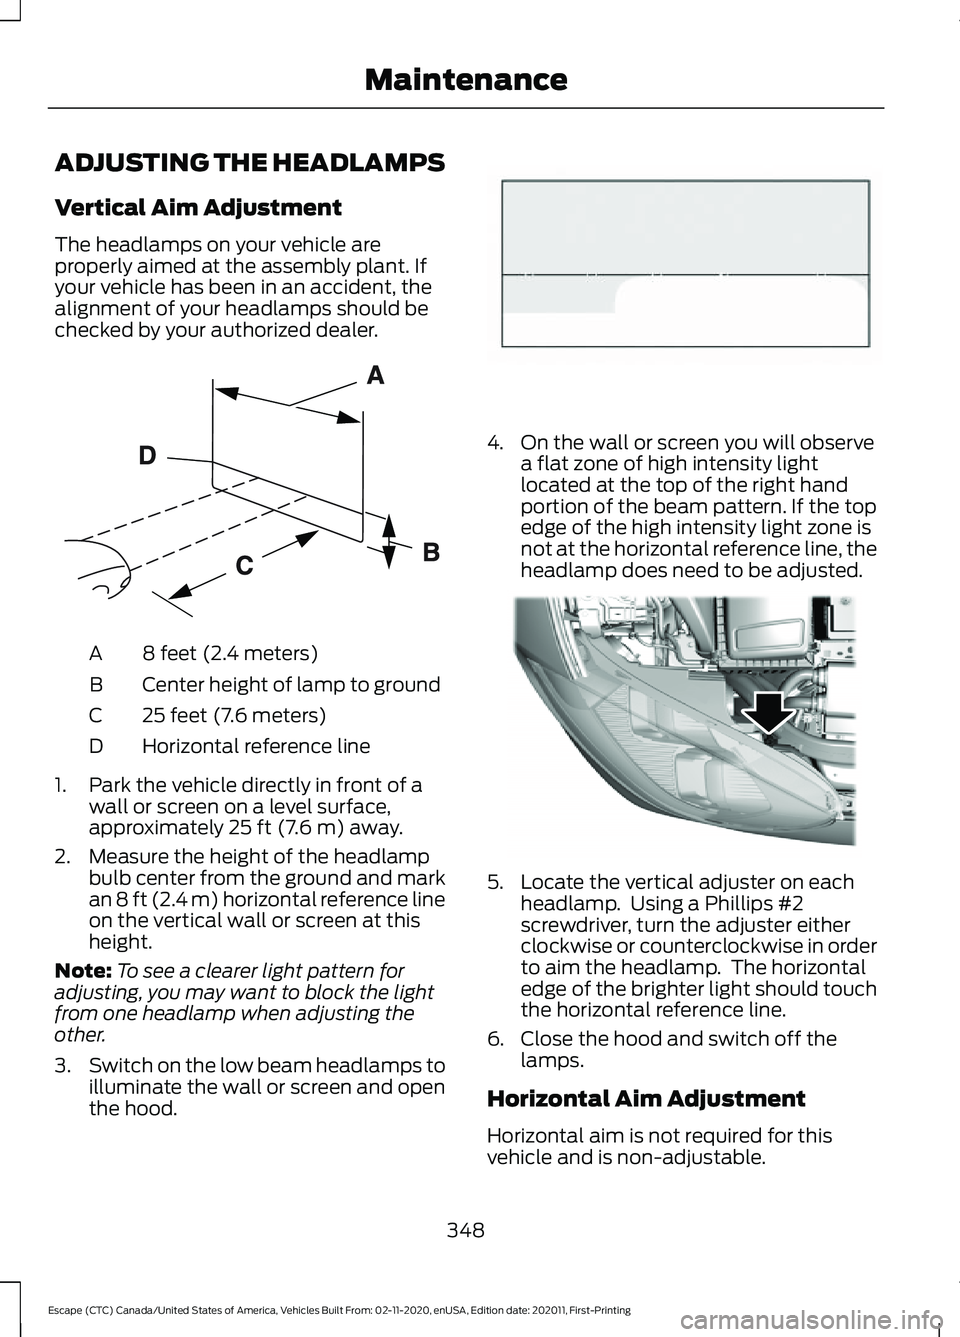
ADJUSTING THE HEADLAMPS
Vertical Aim Adjustment
The headlamps on your vehicle are
properly aimed at the assembly plant. If
your vehicle has been in an accident, the
alignment of your headlamps should be
checked by your authorized dealer.
8 feet (2.4 meters)
A
Center height of lamp to ground
B
25 feet (7.6 meters)
C
Horizontal reference line
D
1. Park the vehicle directly in front of a wall or screen on a level surface,
approximately 25 ft (7.6 m) away.
2. Measure the height of the headlamp bulb center from the ground and mark
an
8 ft (2.4 m) horizontal reference line
on the vertical wall or screen at this
height.
Note: To see a clearer light pattern for
adjusting, you may want to block the light
from one headlamp when adjusting the
other.
3. Switch on the low beam headlamps to
illuminate the wall or screen and open
the hood. 4. On the wall or screen you will observe
a flat zone of high intensity light
located at the top of the right hand
portion of the beam pattern. If the top
edge of the high intensity light zone is
not at the horizontal reference line, the
headlamp does need to be adjusted. 5. Locate the vertical adjuster on each
headlamp. Using a Phillips #2
screwdriver, turn the adjuster either
clockwise or counterclockwise in order
to aim the headlamp. The horizontal
edge of the brighter light should touch
the horizontal reference line.
6. Close the hood and switch off the lamps.
Horizontal Aim Adjustment
Horizontal aim is not required for this
vehicle and is non-adjustable.
348
Escape (CTC) Canada/United States of America, Vehicles Built From: 02-11-2020, enUSA, Edition date: 202011, First-Printing MaintenanceE142592 E142465 E307889
Page 352 of 589
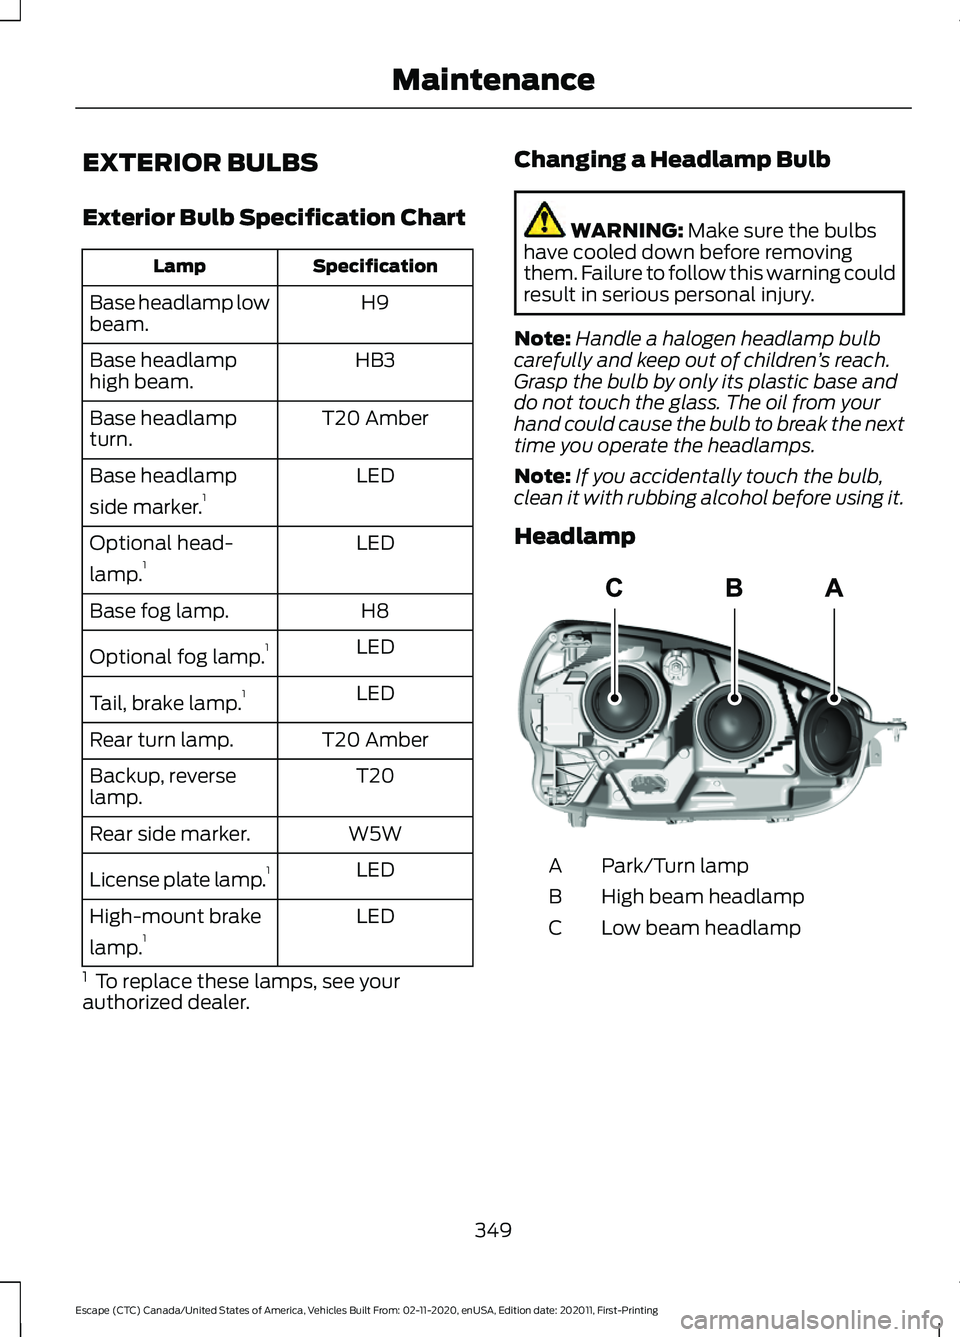
EXTERIOR BULBS
Exterior Bulb Specification Chart
Specification
Lamp
H9
Base headlamp low
beam.
HB3
Base headlamp
high beam.
T20 Amber
Base headlamp
turn.
LED
Base headlamp
side marker. 1
LED
Optional head-
lamp. 1
H8
Base fog lamp.
LED
Optional fog lamp. 1
LED
Tail, brake lamp. 1
T20 Amber
Rear turn lamp.
T20
Backup, reverse
lamp.
W5W
Rear side marker.
LED
License plate lamp. 1
LED
High-mount brake
lamp. 1
1 To replace these lamps, see your
authorized dealer. Changing a Headlamp Bulb WARNING: Make sure the bulbs
have cooled down before removing
them. Failure to follow this warning could
result in serious personal injury.
Note: Handle a halogen headlamp bulb
carefully and keep out of children ’s reach.
Grasp the bulb by only its plastic base and
do not touch the glass. The oil from your
hand could cause the bulb to break the next
time you operate the headlamps.
Note: If you accidentally touch the bulb,
clean it with rubbing alcohol before using it.
Headlamp Park/Turn lamp
A
High beam headlamp
B
Low beam headlamp
C
349
Escape (CTC) Canada/United States of America, Vehicles Built From: 02-11-2020, enUSA, Edition date: 202011, First-Printing MaintenanceE307881
Page 353 of 589
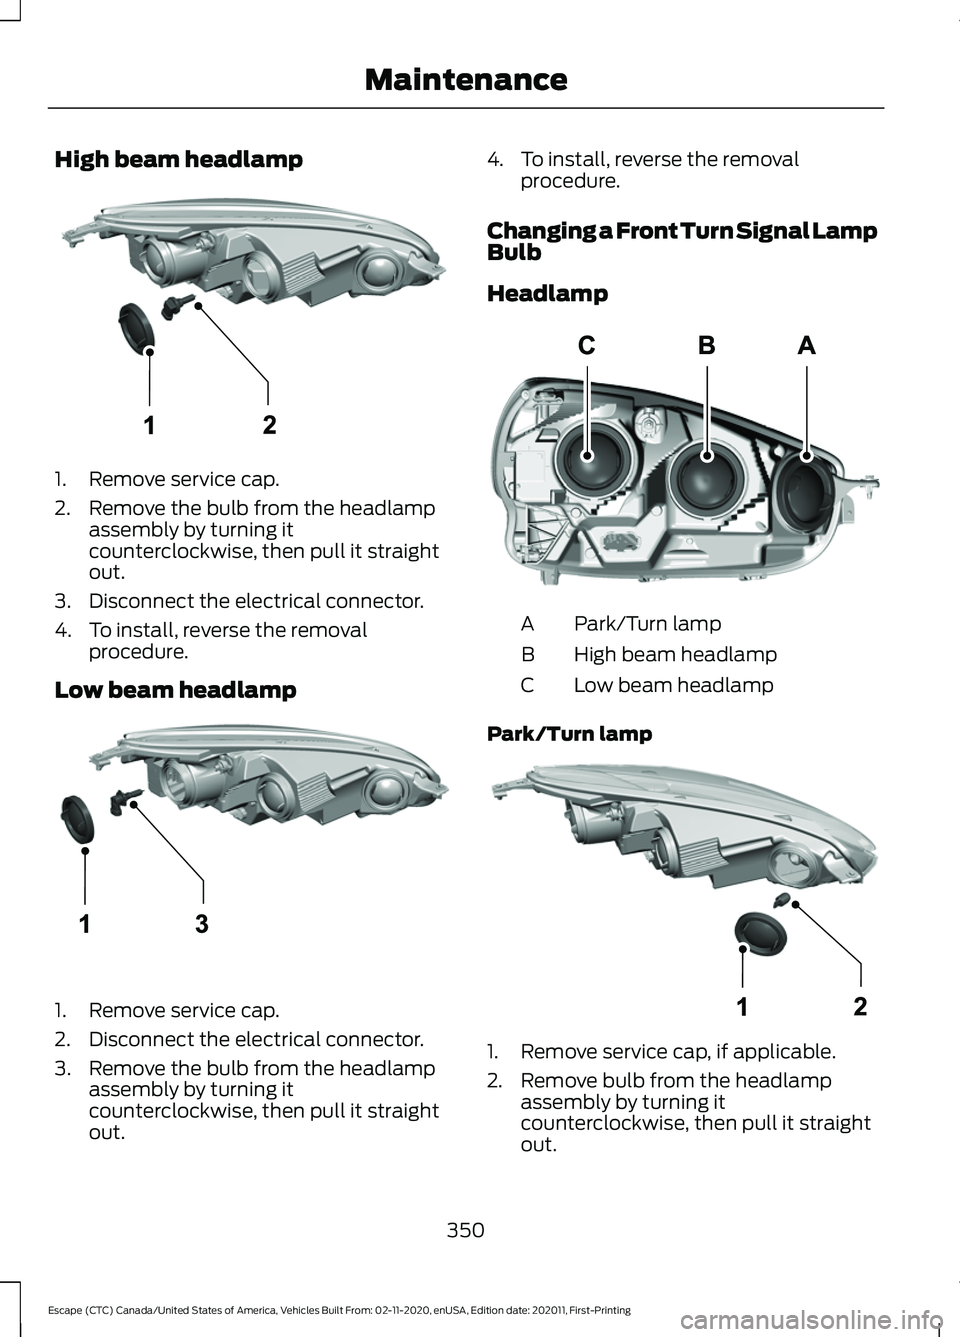
High beam headlamp
1. Remove service cap.
2. Remove the bulb from the headlamp
assembly by turning it
counterclockwise, then pull it straight
out.
3. Disconnect the electrical connector.
4. To install, reverse the removal procedure.
Low beam headlamp 1. Remove service cap.
2. Disconnect the electrical connector.
3. Remove the bulb from the headlamp
assembly by turning it
counterclockwise, then pull it straight
out. 4. To install, reverse the removal
procedure.
Changing a Front Turn Signal Lamp
Bulb
Headlamp Park/Turn lamp
A
High beam headlamp
B
Low beam headlamp
C
Park/Turn lamp 1. Remove service cap, if applicable.
2. Remove bulb from the headlamp
assembly by turning it
counterclockwise, then pull it straight
out.
350
Escape (CTC) Canada/United States of America, Vehicles Built From: 02-11-2020, enUSA, Edition date: 202011, First-Printing MaintenanceE307882 E307883 E307881 E307884