tow FORD ESCAPE 2021 Repair Manual
[x] Cancel search | Manufacturer: FORD, Model Year: 2021, Model line: ESCAPE, Model: FORD ESCAPE 2021Pages: 589, PDF Size: 9.2 MB
Page 326 of 589
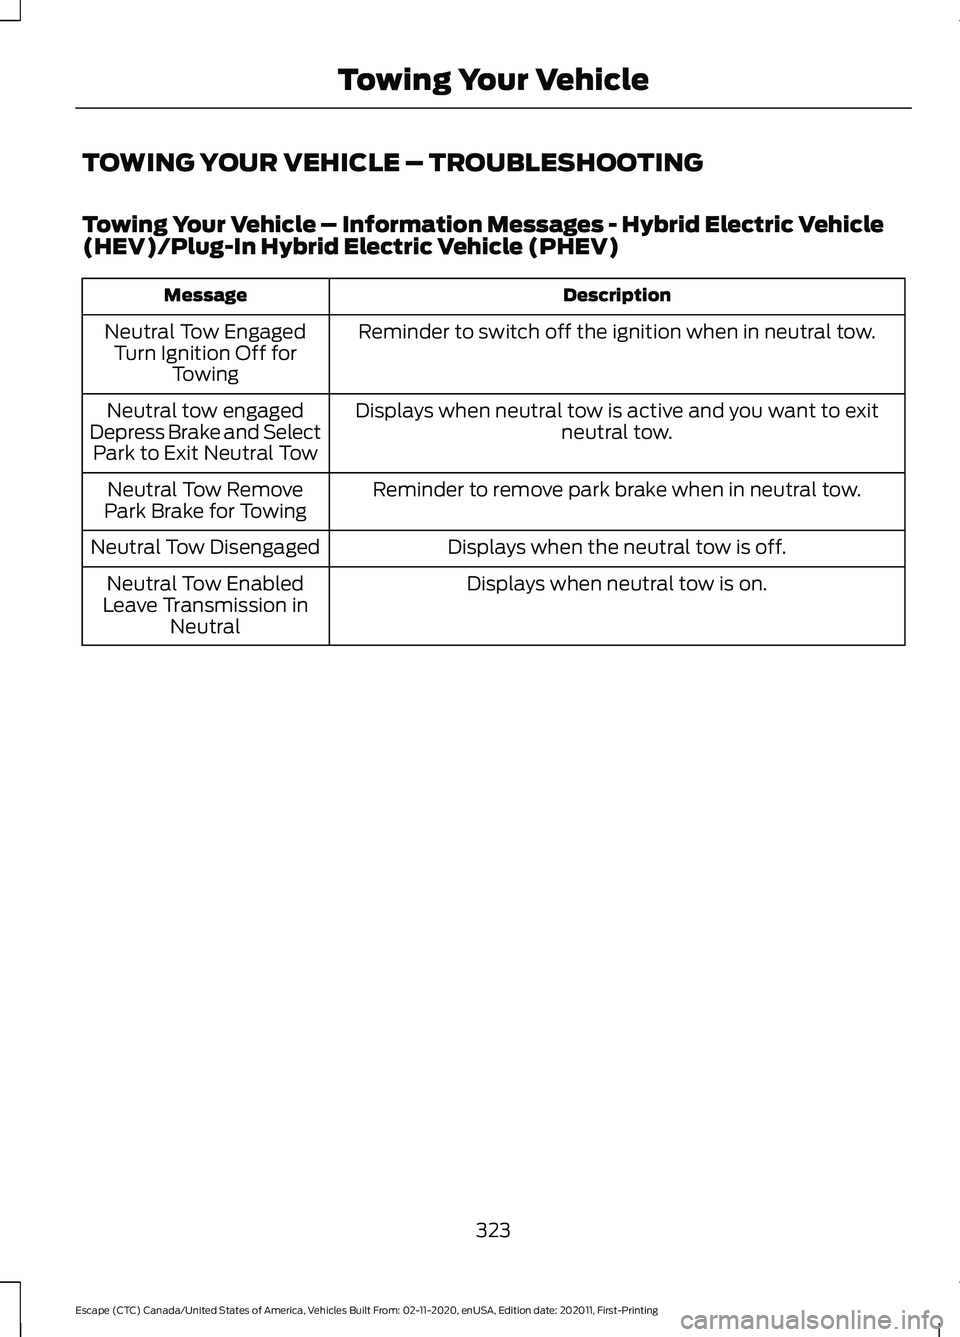
TOWING YOUR VEHICLE – TROUBLESHOOTING
Towing Your Vehicle – Information Messages - Hybrid Electric Vehicle
(HEV)/Plug-In Hybrid Electric Vehicle (PHEV)
Description
Message
Reminder to switch off the ignition when in neutral tow.
Neutral Tow Engaged
Turn Ignition Off for Towing
Displays when neutral tow is active and you want to exit neutral tow.
Neutral tow engaged
Depress Brake and Select Park to Exit Neutral Tow
Reminder to remove park brake when in neutral tow.
Neutral Tow Remove
Park Brake for Towing
Displays when the neutral tow is off.
Neutral Tow Disengaged
Displays when neutral tow is on.
Neutral Tow Enabled
Leave Transmission in Neutral
323
Escape (CTC) Canada/United States of America, Vehicles Built From: 02-11-2020, enUSA, Edition date: 202011, First-Printing Towing Your Vehicle
Page 327 of 589
FUSE PRECAUTIONS
WARNING: Always disconnect the
battery before servicing high current
fuses. WARNING:
To reduce risk of
electrical shock, always replace the
cover to the power distribution box
before reconnecting the battery or
refilling fluid reservoirs. WARNING:
Always replace a fuse
with one that has the specified
amperage rating. Using a fuse with a
higher amperage rating can cause severe
wire damage and could start a fire.
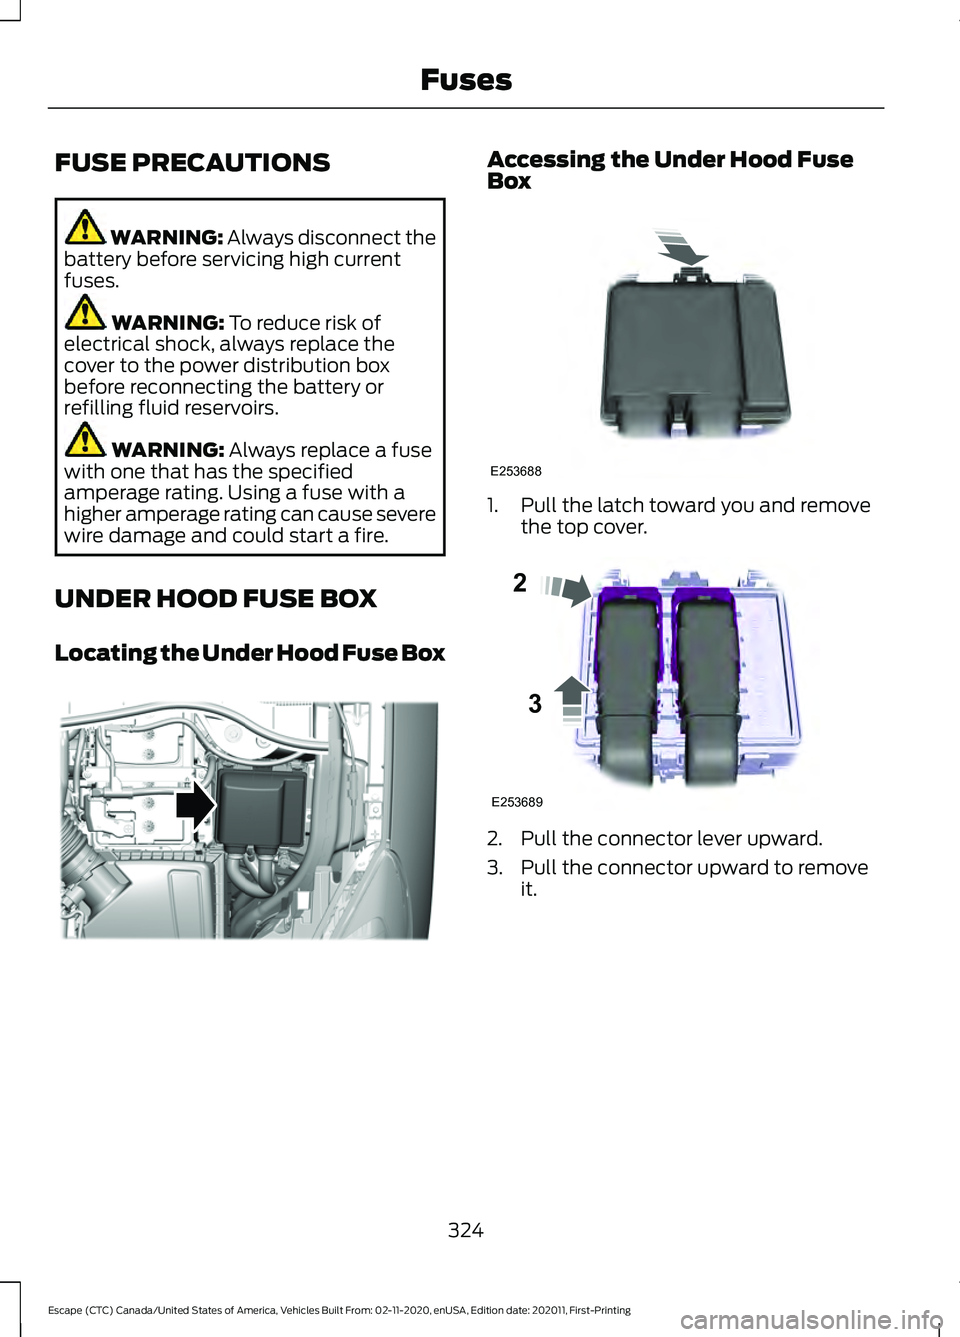
UNDER HOOD FUSE BOX
Locating the Under Hood Fuse Box Accessing the Under Hood Fuse
Box
1. Pull the latch toward you and remove
the top cover. 2. Pull the connector lever upward.
3. Pull the connector upward to remove
it.
324
Escape (CTC) Canada/United States of America, Vehicles Built From: 02-11-2020, enUSA, Edition date: 202011, First-Printing FusesE334436 E253688 E253689
2
3
Page 328 of 589
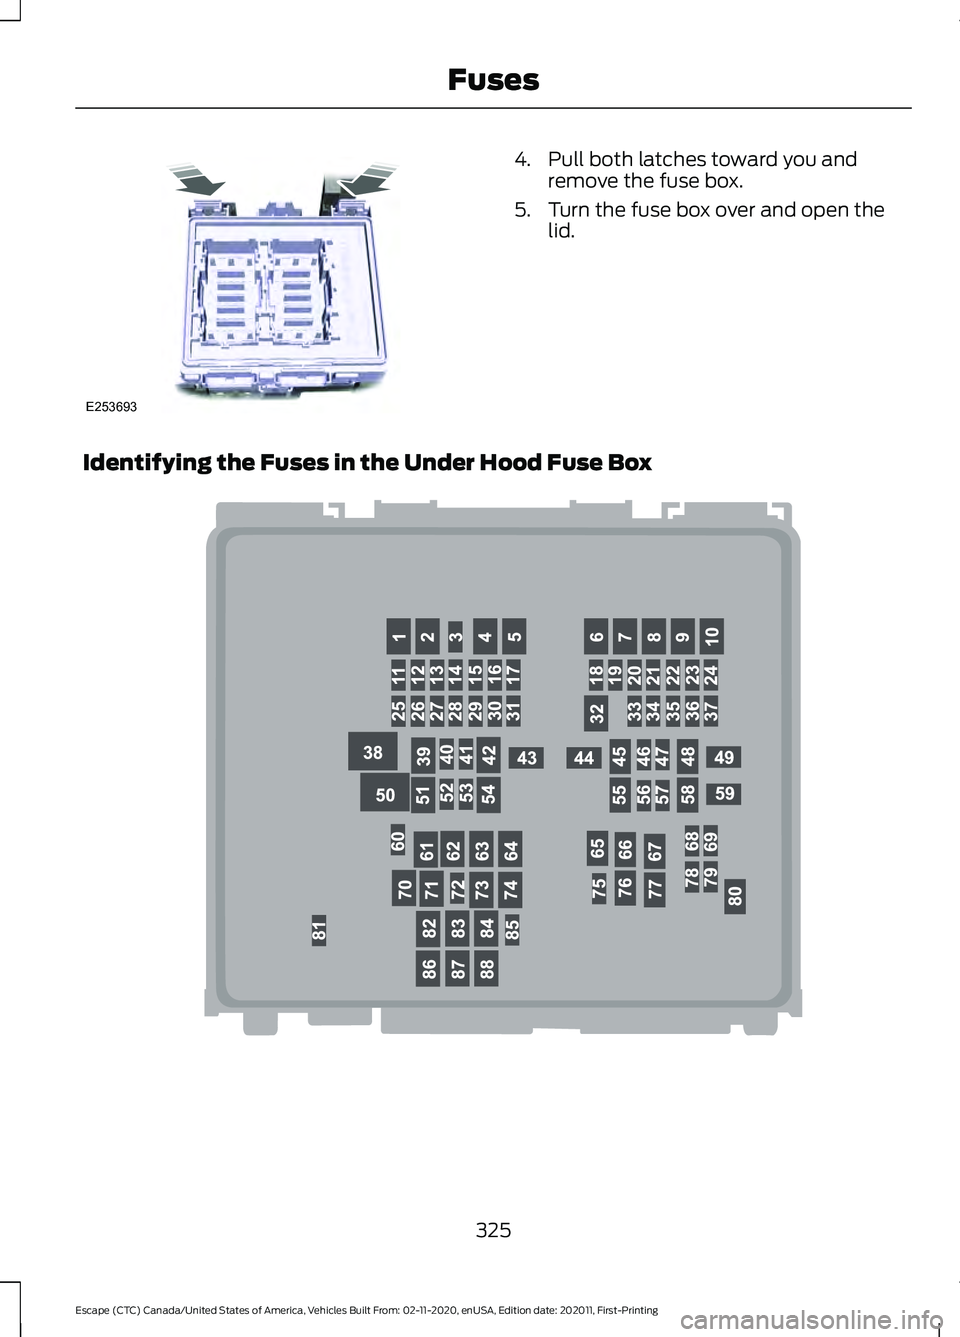
4. Pull both latches toward you and
remove the fuse box.
5. Turn the fuse box over and open the lid.
Identifying the Fuses in the Under Hood Fuse Box 325
Escape (CTC) Canada/United States of America, Vehicles Built From: 02-11-2020, enUSA, Edition date: 202011, First-Printing FusesE253693 E292669
Page 330 of 589
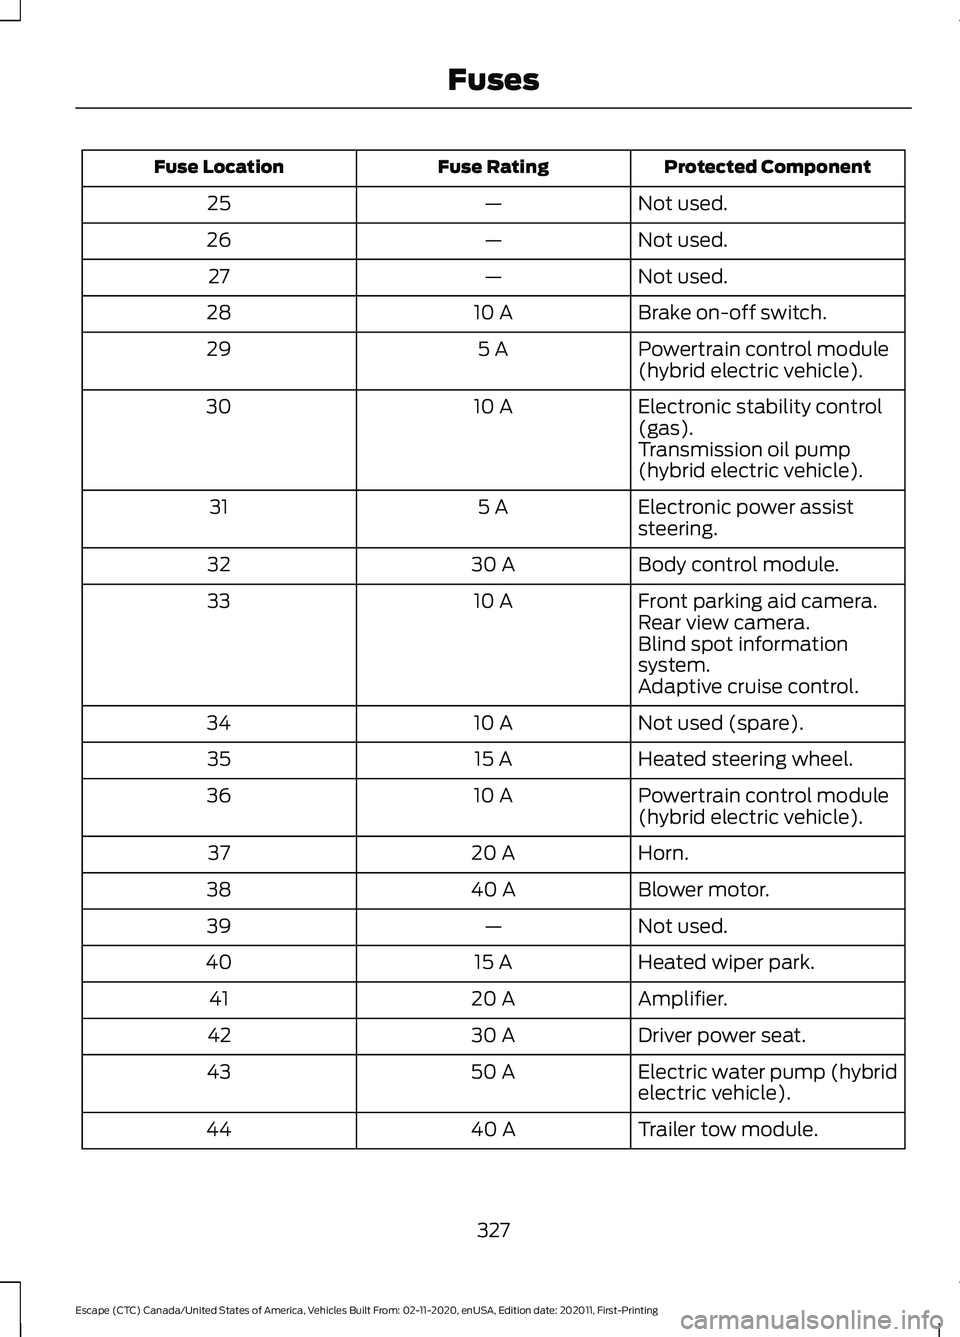
Protected Component
Fuse Rating
Fuse Location
Not used.
—
25
Not used.
—
26
Not used.
—
27
Brake on-off switch.
10 A
28
Powertrain control module
(hybrid electric vehicle).
5 A
29
Electronic stability control
(gas).
10 A
30
Transmission oil pump
(hybrid electric vehicle).
Electronic power assist
steering.
5 A
31
Body control module.
30 A
32
Front parking aid camera.
10 A
33
Rear view camera.
Blind spot information
system.
Adaptive cruise control.
Not used (spare).
10 A
34
Heated steering wheel.
15 A
35
Powertrain control module
(hybrid electric vehicle).
10 A
36
Horn.
20 A
37
Blower motor.
40 A
38
Not used.
—
39
Heated wiper park.
15 A
40
Amplifier.
20 A
41
Driver power seat.
30 A
42
Electric water pump (hybrid
electric vehicle).
50 A
43
Trailer tow module.
40 A
44
327
Escape (CTC) Canada/United States of America, Vehicles Built From: 02-11-2020, enUSA, Edition date: 202011, First-Printing Fuses
Page 344 of 589
Note:
Coolant concentrations below 40%
decrease the freeze and corrosion protection
characteristics of the coolant and could
cause engine damage.
Coolant Change
Change the coolant at specific mileage
intervals. Refer to the scheduled
maintenance information. See Normal
Scheduled Maintenance (page 490).
Note: Dispose of used coolant in the
appropriate manner.
Follow your community's regulations and
standards for recycling and disposing of
automotive fluids.
Fail-Safe Cooling
Fail-safe cooling allows you to temporarily
drive your vehicle before any incremental
component damage occurs. The fail-safe
distance depends on ambient
temperature, vehicle load and terrain.
How Fail-Safe Cooling Works If the engine begins to overheat,
the coolant temperature gauge
moves toward the red zone:
A warning lamp illuminates and
a message may appear in the
information display.
If the engine reaches a preset
over-temperature condition, the engine
automatically switches to alternating
cylinder operation. Each disabled cylinder
acts as an air pump and cools the engine.
When this occurs, your vehicle still
operates, however:
• Engine power is limited.
• The air conditioning system turns off. Continued operation increases the engine
temperature, causing the engine to
completely shut down. Your steering and
braking effort increases in this situation.
When the engine temperature cools, you
can re-start the engine. Have your vehicle
checked as soon as possible to minimize
engine damage.
When Fail-Safe Mode Is Activated
WARNING:
Fail-safe mode is for
use during emergencies only. Operate
your vehicle in fail-safe mode only as
long as necessary to bring your vehicle
to rest in a safe location and seek
immediate repairs. When in fail-safe
mode, your vehicle will have limited
power, will not be able to maintain
high-speed operation, and may
completely shut down without warning,
potentially losing engine power, power
steering assist, and power brake assist,
which may increase the possibility of a
crash resulting in serious injury. WARNING:
Do not remove the
coolant reservoir cap when the engine is
on or the cooling system is hot. Wait 10
minutes for the cooling system to cool
down. Cover the coolant reservoir cap
with a thick cloth to prevent the
possibility of scalding and slowly remove
the cap. Failure to follow this instruction
could result in personal injury.
Your vehicle has limited engine power
when in the fail-safe mode, drive your
vehicle with caution. Your vehicle does not
maintain high-speed operation and the
engine could operate poorly.
Remember that the engine is capable of
automatically shutting down to prevent
engine damage. In this situation:
1. Pull off the road as soon as safely possible and switch the engine off.
341
Escape (CTC) Canada/United States of America, Vehicles Built From: 02-11-2020, enUSA, Edition date: 202011, First-Printing Maintenance
Page 345 of 589
2. If you are a member of a roadside
assistance program, we recommend
that you contact your roadside
assistance service provider.
3. If this is not possible, wait for a short period of time for the engine to cool.
4. Check the coolant level. If the coolant level is at or below the minimum mark,
add prediluted coolant immediately.
5. When the engine temperature cools, you can re-start the engine. Have your
vehicle checked as soon as possible to
minimize engine damage.
Note: Driving your vehicle without repair
increases the chance of engine damage.
Engine Coolant Temperature
Management (If Equipped) WARNING:
To reduce the risk of
crash and injury, be prepared that the
vehicle speed may reduce and the
vehicle may not be able to accelerate
with full power until the coolant
temperature reduces.
If you tow a trailer with your vehicle, the
engine may temporarily reach a higher
temperature during severe operating
conditions, for example ascending a long
or steep grade in high ambient
temperatures.
At this time, you may notice the coolant
temperature gauge moves toward the red
zone and a message may appear in the
information display. You may notice a reduction in vehicle
speed caused by reduced engine power in
order to manage the engine coolant
temperature. Your vehicle may enter this
mode if certain high-temperature and
high-load conditions take place. The
amount of speed reduction depends on
vehicle loading, grade and ambient
temperature. If this occurs, there is no
need to stop your vehicle. You can
continue to drive.
The air conditioning may automatically
turn on and off during severe operating
conditions to protect the engine from
overheating. When the coolant
temperature decreases to the normal
operating temperature, the air conditioning
turns on.
If the coolant temperature gauge moves
fully into the red zone, or if the coolant
temperature warning or service engine
soon messages appear in your information
display, do the following:
1. Stop your vehicle as soon as it is safe
to do so. Fully apply the parking brake,
shift into park (P) or neutral (N).
2. Leave the engine running until the coolant temperature gauge needle
returns to the normal position. If the
temperature does not drop after
several minutes, follow the remaining
steps.
3. Switch the engine off and wait for it to
cool. Check the coolant level.
4. If the coolant level is at or below the minimum mark, add prediluted coolant
immediately.
5. If the coolant level is normal, restart the engine and continue.
342
Escape (CTC) Canada/United States of America, Vehicles Built From: 02-11-2020, enUSA, Edition date: 202011, First-Printing Maintenance
Page 377 of 589
Highway Hazards
No matter how carefully you drive,
there is always the possibility that
you could eventually have a flat
tire on the highway. Drive slowly
to the closest safe area out of
traffic. This could further damage
the flat tire, but your safety is
more important.
If you feel a sudden vibration or
ride disturbance while driving, or
you suspect your tire or vehicle
has been damaged, immediately
reduce your speed. Drive with
caution until you can safely pull
off the road. Stop and inspect the
tires for damage. If a tire is
under-inflated or damaged,
deflate it, remove the wheel and
replace it with your spare tire and
wheel. If you cannot detect a
cause, have the vehicle towed to
the nearest repair facility or tire
dealer to have the vehicle
inspected.
Tire and Wheel Alignment
A bad jolt from hitting a curb or
pothole can cause the front end
of your vehicle to become
misaligned or cause damage to
your tires. If your vehicle seems to
pull to one side when you are
driving, the wheels could be out of
alignment. Have an authorized
dealer check the wheel alignment
periodically.
Wheel misalignment in the front
or the rear can cause uneven and
rapid treadwear of your tires and
should be corrected by an
authorized dealer.
INSPECTING THE WHEEL
VALVE STEMS
Check the valve stems for holes,
cracks, or cuts that could permit
air leakage.
TIRE ROTATION
WARNING: If the tire label
shows different tire pressures for
the front and rear tires and the
vehicle has a tire pressure
monitoring system, then you
need to update the settings for
the system sensors. Always
perform the system reset
procedure after tire rotation. If
you do not reset the system, it
may not provide a low tire
pressure warning when
necessary.
Rotating your tires at the
recommended interval will help
your tires wear more evenly,
providing better tire performance
and longer tire life.
Note: If your tires show any uneven
wear have the alignment checked
by an authorized dealer before
rotating tires.
374
Escape (CTC) Canada/United States of America, Vehicles Built From: 02-11-2020, enUSA, Edition date: 202011, First-Printing Tire Care
Page 379 of 589
WHAT IS THE TIRE SEALANT
AND INFLATOR KIT
The kit consists of an air compressor to
re-inflate the tire and a canister of sealing
compound that will effectively seal most
punctures. This kit will provide a temporary
tire repair allowing you to drive your vehicle
up to 120 mi (200 km) at a maximum
speed of 50 mph (80 km/h) to reach a tire
service location.
Note: The temporary mobility kit contains
enough sealant compound in the canister
for one tire repair only. See an authorized
dealer for replacement sealant canisters.
TIRE SEALANT AND INFLATOR
KIT PRECAUTIONS WARNING:
Failure to follow these
guidelines could result in an increased
risk of loss of vehicle control, injury or
death. WARNING:
Do not run the engine
when operating the air compressor
unless the vehicle is outdoors or in a
well-ventilated area.
Note: Do not use the kit if a tire has become
severely damaged. Only punctures located
within the tire tread can be sealed with the
kit.
Do not attempt to repair punctures larger
than 0.24 in (6 mm) or damage to the tire's
sidewall. The tire may not completely seal. •
Drive carefully and avoid abrupt
steering maneuvers.
• Periodically monitor tire inflation
pressure in the affected tire; if the tire
is losing pressure, have the vehicle
towed.
• Read the information in the Tips for
Use of the Kit section to make sure safe
operation of the kit and your vehicle.
LOCATING THE TIRE SEALANT
AND INFLATOR KIT
The kit is located under the load floor in
the rear of the vehicle.
376
Escape (CTC) Canada/United States of America, Vehicles Built From: 02-11-2020, enUSA, Edition date: 202011, First-Printing Tire Sealant and Inflator Kit
(If Equipped)
Page 384 of 589
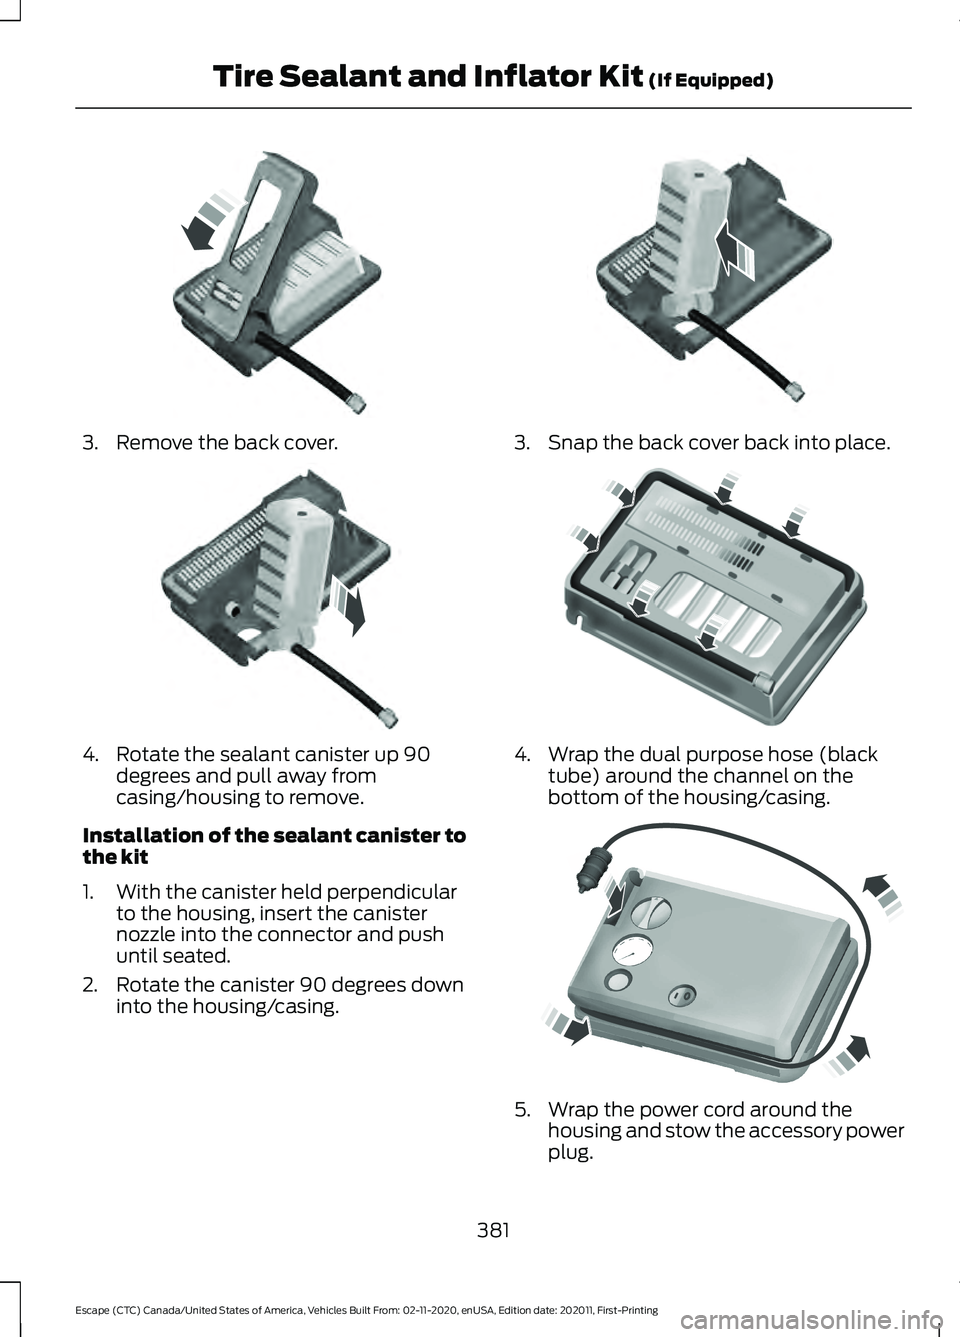
3. Remove the back cover.
4. Rotate the sealant canister up 90
degrees and pull away from
casing/housing to remove.
Installation of the sealant canister to
the kit
1. With the canister held perpendicular to the housing, insert the canister
nozzle into the connector and push
until seated.
2. Rotate the canister 90 degrees down into the housing/casing. 3. Snap the back cover back into place.
4. Wrap the dual purpose hose (black
tube) around the channel on the
bottom of the housing/casing. 5. Wrap the power cord around the
housing and stow the accessory power
plug.
381
Escape (CTC) Canada/United States of America, Vehicles Built From: 02-11-2020, enUSA, Edition date: 202011, First-Printing Tire Sealant and Inflator Kit (If Equipped)E175986 E175987 E175988 E175989 E175990
Page 391 of 589
Note:
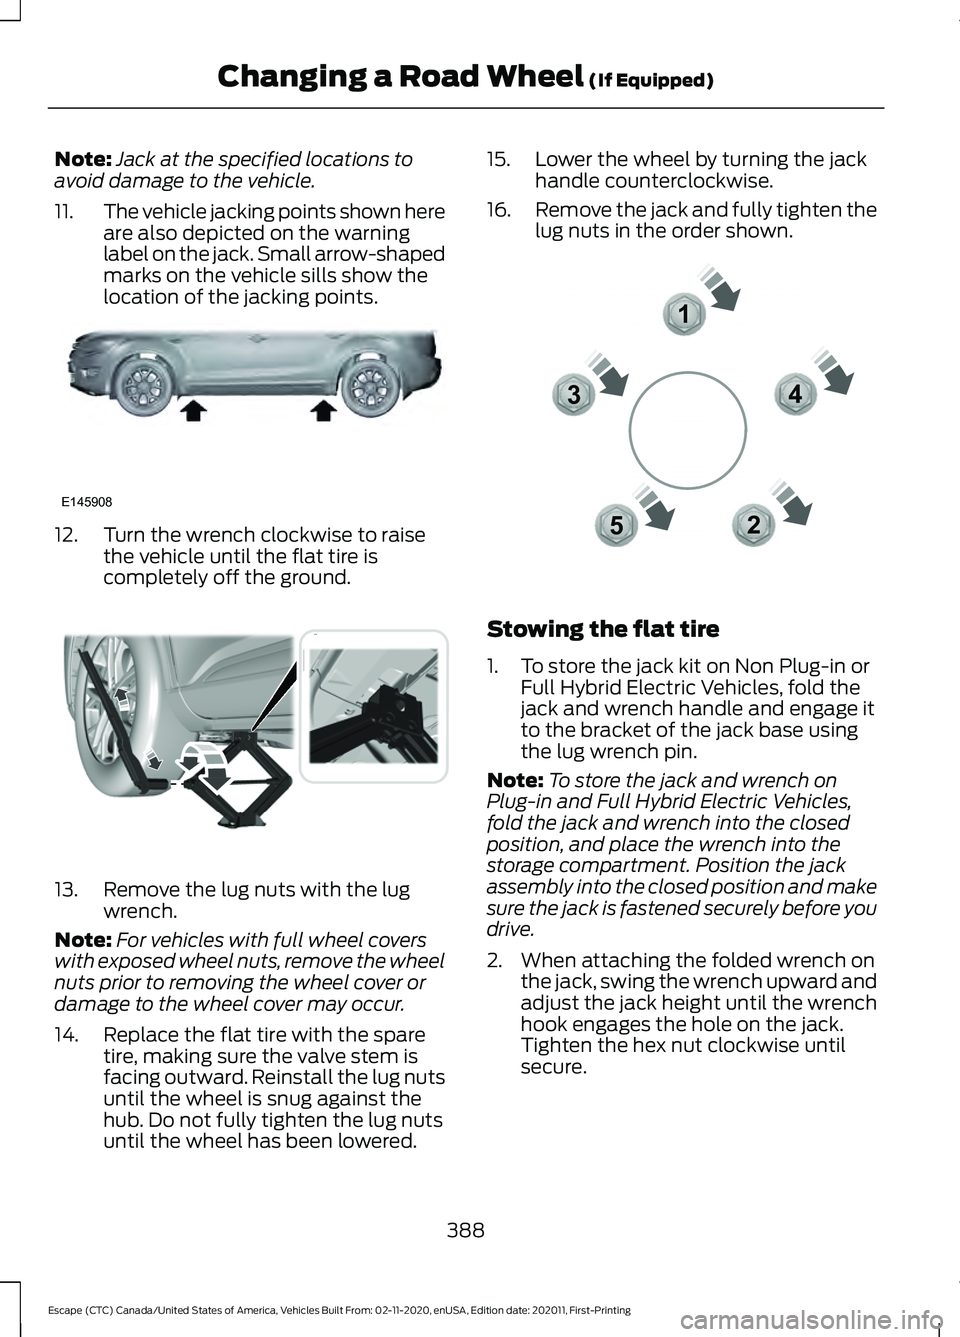
Jack at the specified locations to
avoid damage to the vehicle.
11. The vehicle jacking points shown here
are also depicted on the warning
label on the jack. Small arrow-shaped
marks on the vehicle sills show the
location of the jacking points.12. Turn the wrench clockwise to raise
the vehicle until the flat tire is
completely off the ground.13. Remove the lug nuts with the lug
wrench.
Note: For vehicles with full wheel covers
with exposed wheel nuts, remove the wheel
nuts prior to removing the wheel cover or
damage to the wheel cover may occur.
14. Replace the flat tire with the spare tire, making sure the valve stem is
facing outward. Reinstall the lug nuts
until the wheel is snug against the
hub. Do not fully tighten the lug nuts
until the wheel has been lowered. 15. Lower the wheel by turning the jack
handle counterclockwise.
16. Remove the jack and fully tighten the
lug nuts in the order shown. Stowing the flat tire
1. To store the jack kit on Non Plug-in or
Full Hybrid Electric Vehicles, fold the
jack and wrench handle and engage it
to the bracket of the jack base using
the lug wrench pin.
Note: To store the jack and wrench on
Plug-in and Full Hybrid Electric Vehicles,
fold the jack and wrench into the closed
position, and place the wrench into the
storage compartment. Position the jack
assembly into the closed position and make
sure the jack is fastened securely before you
drive.
2. When attaching the folded wrench on the jack, swing the wrench upward and
adjust the jack height until the wrench
hook engages the hole on the jack.
Tighten the hex nut clockwise until
secure.
388
Escape (CTC) Canada/United States of America, Vehicles Built From: 02-11-2020, enUSA, Edition date: 202011, First-Printing Changing a Road Wheel (If Equipped)E145908 E338668 12
3
4
5E306781