headlamp FORD ESCORT 1998 6.G Owners Manual
[x] Cancel search | Manufacturer: FORD, Model Year: 1998, Model line: ESCORT, Model: FORD ESCORT 1998 6.GPages: 191, PDF Size: 1.51 MB
Page 4 of 191
THEFT
LOW
FUEL5060 70
FUEL
FILLEF
CH1
2 /RPMx10001234
5
6
7
8304080
90
1006080100120
140
160000113
MIRROR
L
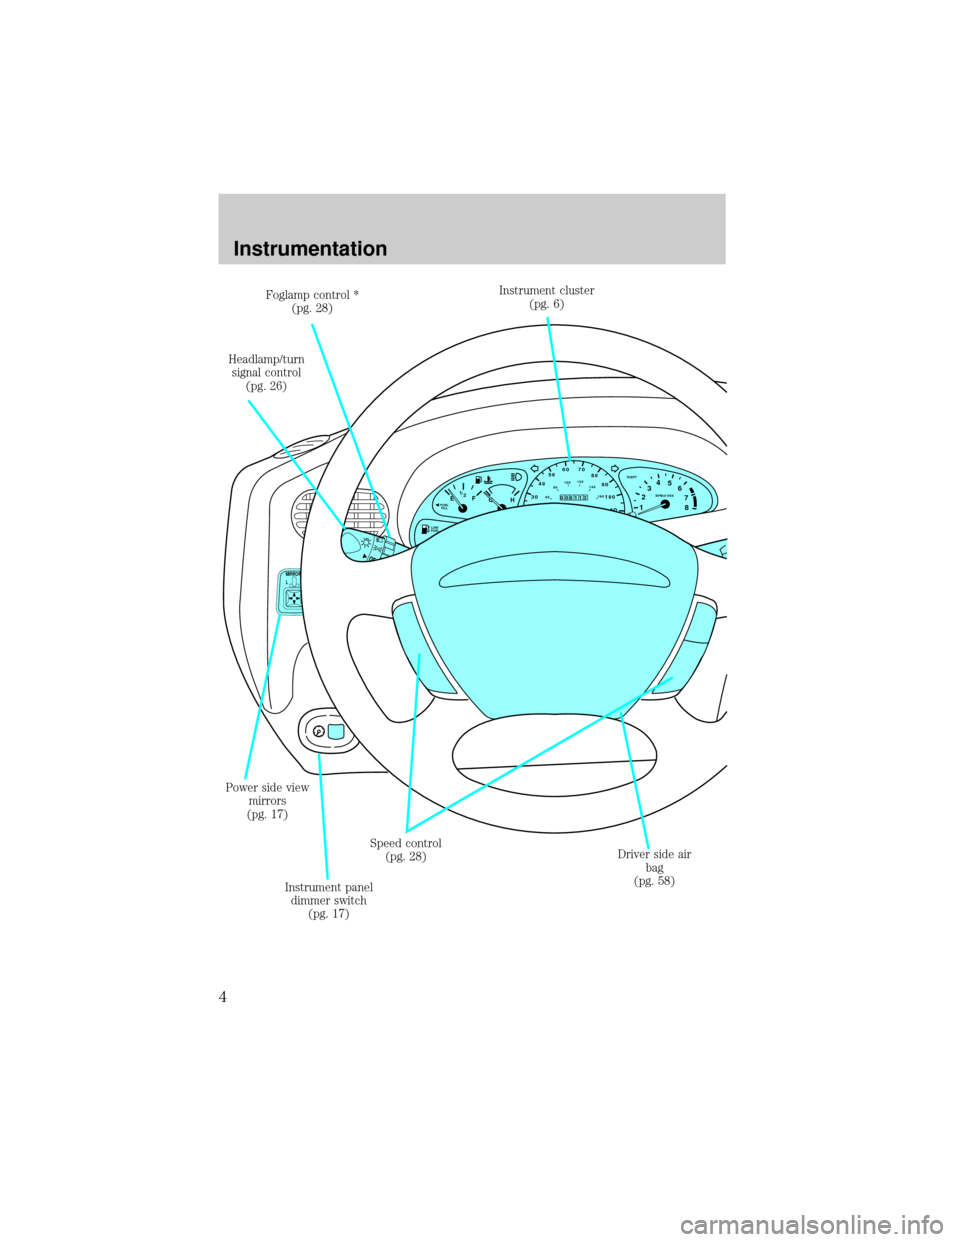
Power side view
mirrors
(pg. 17)Instrument cluster
(pg. 6)
Headlamp/turn
signal control
(pg. 26)Foglamp control *
(pg. 28)
Driver side air
bag
(pg. 58) Speed control
(pg. 28)
Instrument panel
dimmer switch
(pg. 17)
Instrumentation
4
Page 10 of 191

Brake system warning
Momentarily illuminates when the
ignition is turned ON and the
engine is off. Also illuminates when
the parking brake is engaged.
Illumination after releasing the
parking brake indicates low brake
fluid level.
Anti-lock brake system (ABS)
(If equipped)
Momentarily illuminates when the
ignition is turned on and the
engine is off. If the light remains
on or continues to flash, the ABS
needs to be serviced.
Turn signal
Illuminates when the left or right
turn signal or the hazard lights are
turned on. If one or both of the
indicators stay on continuously or
flash faster, check for a burned-out
turn signal bulb. Refer toExterior
bulbsin theMaintenance and
carechapter.
High beams
Illuminates when the high beam
headlamps are turned on.
Anti-theft system (if equipped)
Refer toAnti-theft systemin the
Controls and featureschapter.
P!
BRAKE
ABS
THEFT
Instrumentation
10
Page 12 of 191

For information on the safety belt
warning chime, refer to the
Seating and safety restraints
chapter.
Supplemental restraint system
(SRS) warning chime
For information on the SRS
warning chime, refer to the
Seating and safety restraints
chapter.
Key-in-ignition warning chime
Sounds when the key is left in the
ignition in the OFF/LOCK or ACC
position and either front door is
opened.
Headlamps on warning chime
Sounds when the headlamps or
parking lamps are on, the ignition
is off (and the key is not in the
ignition) and either front door is
opened.
Instrumentation
12
Page 26 of 191
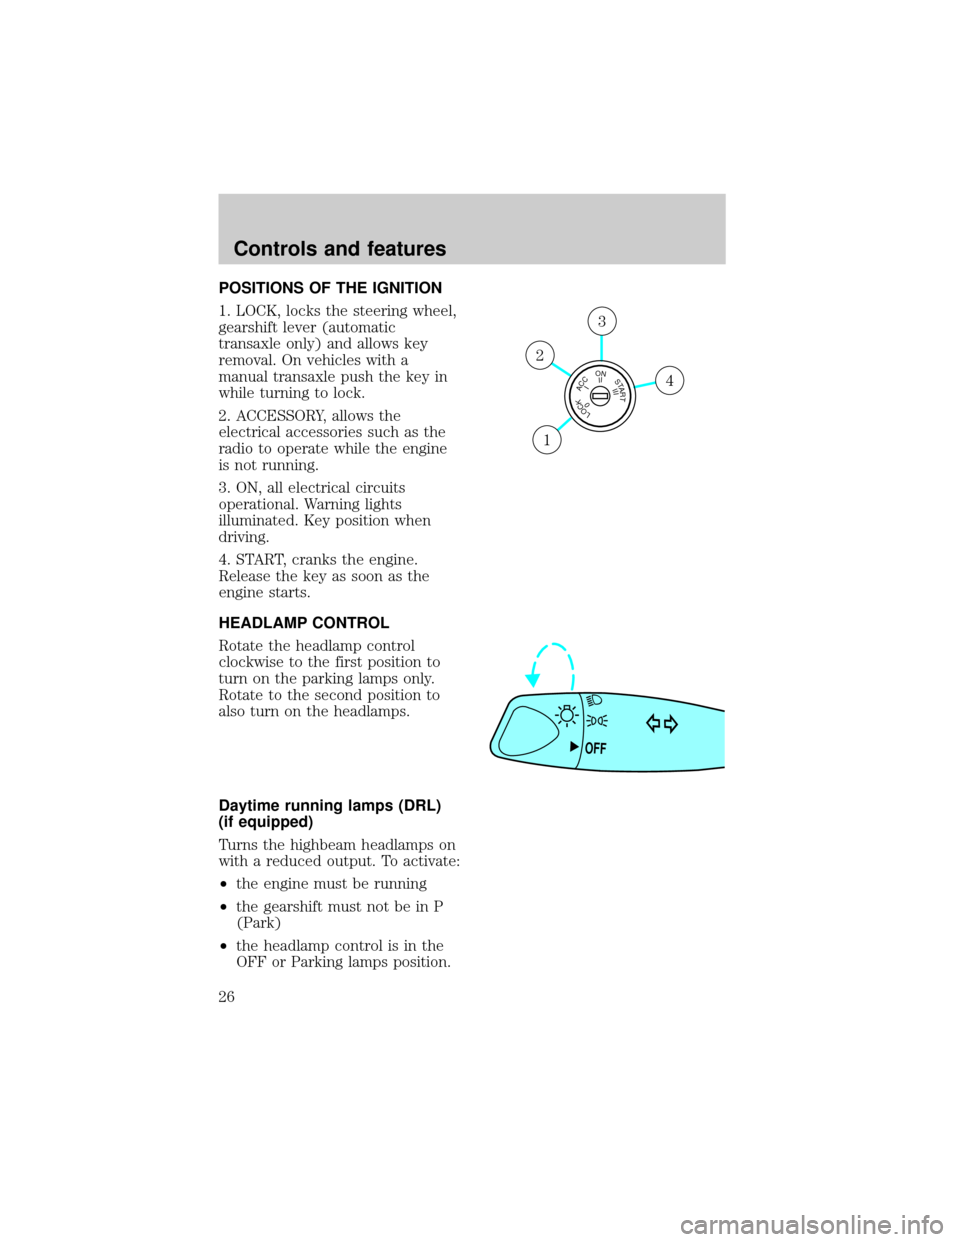
POSITIONS OF THE IGNITION
1. LOCK, locks the steering wheel,
gearshift lever (automatic
transaxle only) and allows key
removal. On vehicles with a
manual transaxle push the key in
while turning to lock.
2. ACCESSORY, allows the
electrical accessories such as the
radio to operate while the engine
is not running.
3. ON, all electrical circuits
operational. Warning lights
illuminated. Key position when
driving.
4. START, cranks the engine.
Release the key as soon as the
engine starts.
HEADLAMP CONTROL
Rotate the headlamp control
clockwise to the first position to
turn on the parking lamps only.
Rotate to the second position to
also turn on the headlamps.
Daytime running lamps (DRL)
(if equipped)
Turns the highbeam headlamps on
with a reduced output. To activate:
²the engine must be running
²the gearshift must not be in P
(Park)
²the headlamp control is in the
OFF or Parking lamps position.
LOCKACCONSTART0IIIIII4
3
2
1
OFF
Controls and features
26
Page 27 of 191
The Daytime Running
Light (DRL) system will
not illuminate the tail lamps and
parking lamps. Turn on your
headlamps at dusk. Failure to do
so may result in a collision.
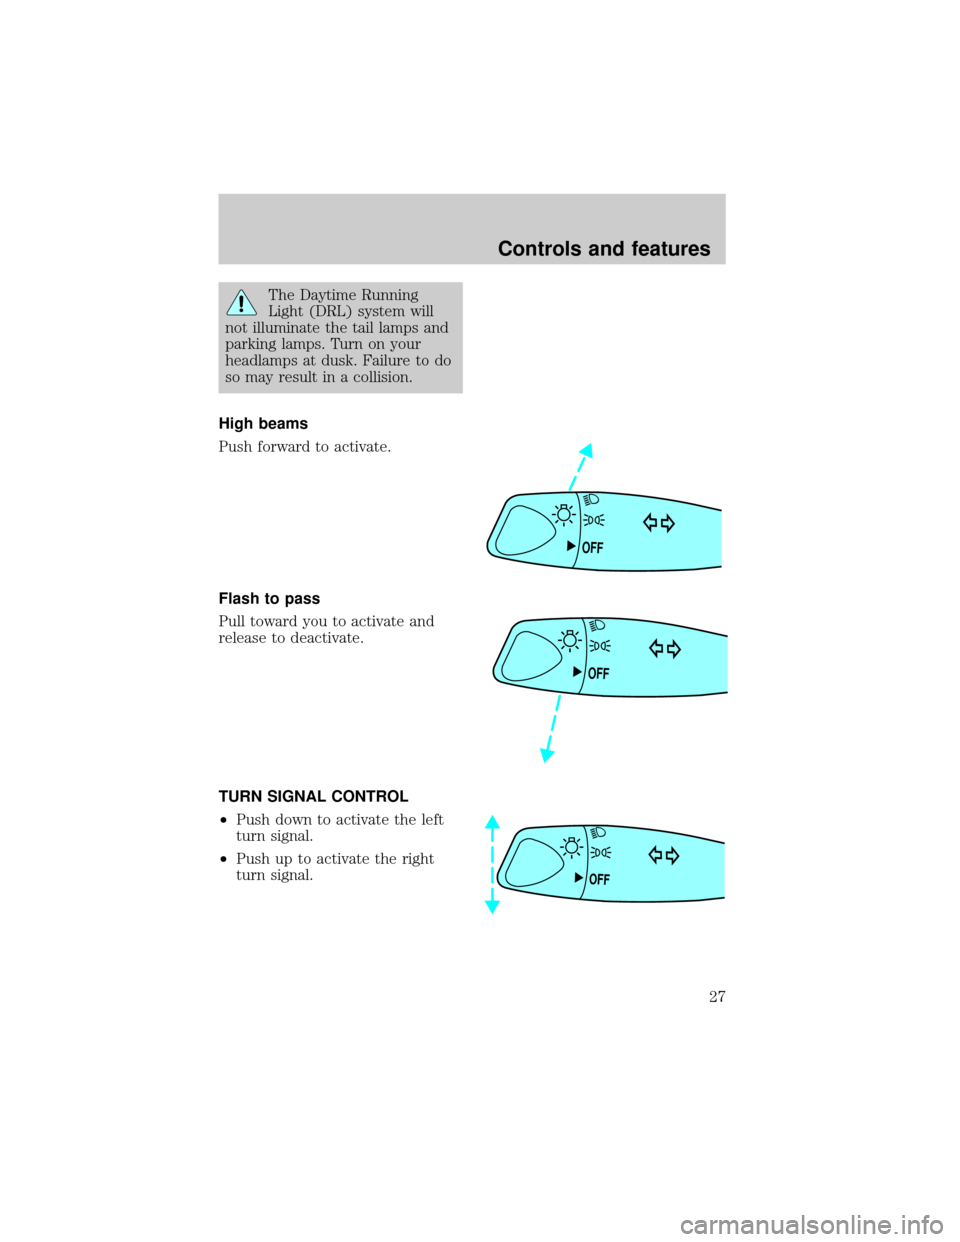
High beams
Push forward to activate.
Flash to pass
Pull toward you to activate and
release to deactivate.
TURN SIGNAL CONTROL
²Push down to activate the left
turn signal.
²Push up to activate the right
turn signal.
OFF
OFF
OFF
Controls and features
27
Page 81 of 191
Do not start your vehicle
in a closed garage or in
other enclosed areas. Exhaust
fumes can be toxic. Always open
the garage door before you start
the engine. SeeGuarding
against exhaust fumesin this
chapter for more instructions.
If you smell exhaust fumes
inside your vehicle, have
your dealer inspect your vehicle
immediately. Do not drive if you
smell exhaust fumes.
Important safety precautions
A computer system controls the
engine's idle revolutions per
minute (RPM). When the engine
starts, the idle RPM runs faster to
warm the engine. If the engine idle
speed does not slow down
automatically, have the vehicle
checked. Do not allow the vehicle
to idle for more than ten minutes.
Before starting the vehicle:
1. Make sure all vehicle occupants
have buckled their safety belts. For
more information on safety belts
and their proper usage, refer to
theSeating and safety restraints
chapter.
2. Make sure the headlamps and
vehicle accessories are off.
If starting a vehicle with an
automatic transaxle:
Starting
81
Page 111 of 191
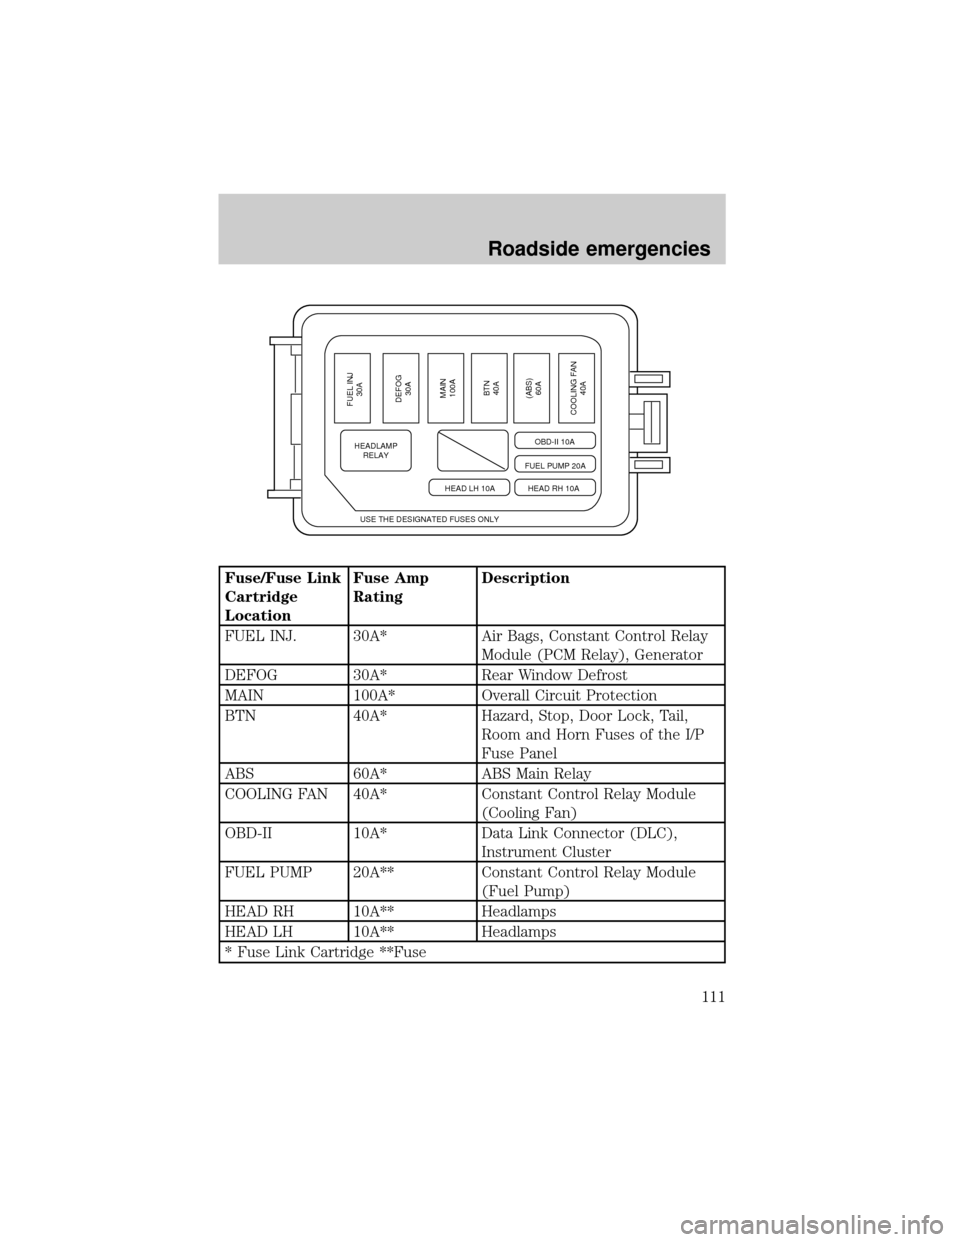
Fuse/Fuse Link
Cartridge
LocationFuse Amp
RatingDescription
FUEL INJ. 30A* Air Bags, Constant Control Relay
Module (PCM Relay), Generator
DEFOG 30A* Rear Window Defrost
MAIN 100A* Overall Circuit Protection
BTN 40A* Hazard, Stop, Door Lock, Tail,
Room and Horn Fuses of the I/P
Fuse Panel
ABS 60A* ABS Main Relay
COOLING FAN 40A* Constant Control Relay Module
(Cooling Fan)
OBD-II 10A* Data Link Connector (DLC),
Instrument Cluster
FUEL PUMP 20A** Constant Control Relay Module
(Fuel Pump)
HEAD RH 10A** Headlamps
HEAD LH 10A** Headlamps
* Fuse Link Cartridge **Fuse
USE THE DESIGNATED FUSES ONLY
FUEL INJ
30A
DEFOG
30A
MAIN
100A
COOLING FAN
40A (ABS)
60A BTN
40A
HEADLAMP
RELAY
FUEL PUMP 20AOBD-II 10A
HEAD RH 10A HEAD LH 10A
Roadside emergencies
111
Page 112 of 191
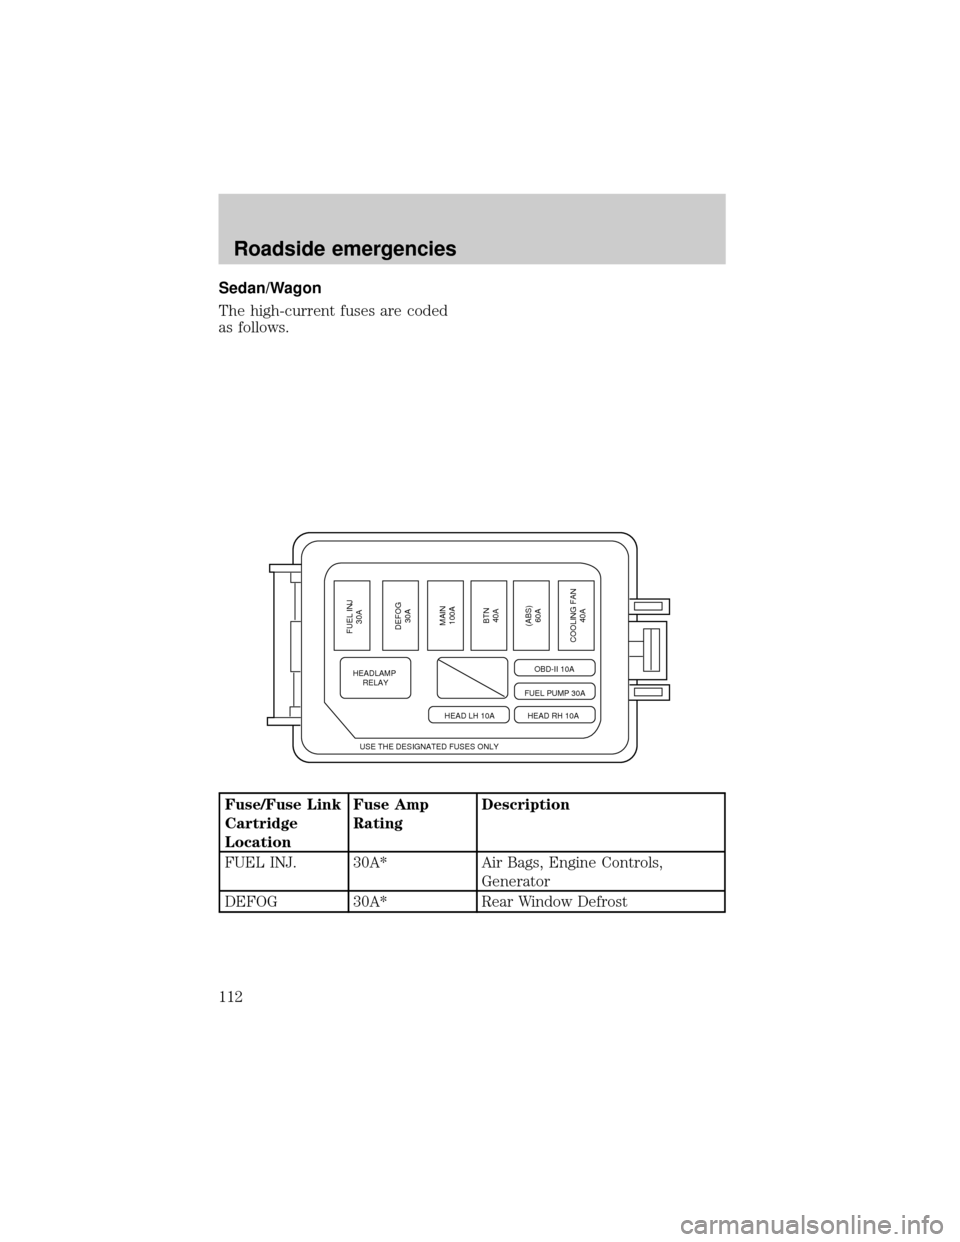
Sedan/Wagon
The high-current fuses are coded
as follows.
Fuse/Fuse Link
Cartridge
LocationFuse Amp
RatingDescription
FUEL INJ. 30A* Air Bags, Engine Controls,
Generator
DEFOG 30A* Rear Window Defrost
USE THE DESIGNATED FUSES ONLY
FUEL INJ
30A
DEFOG
30A
MAIN
100A
COOLING FAN
40A (ABS)
60A BTN
40A
HEADLAMP
RELAY
FUEL PUMP 30AOBD-II 10A
HEAD RH 10A HEAD LH 10A
Roadside emergencies
112
Page 113 of 191

Fuse/Fuse Link
Cartridge
LocationFuse Amp
RatingDescription
MAIN 100A* Charging System, BTN, Cooling
Fan, Fuel Pump, OBD-II, ABS
Fuses, Ignition Switch, Headlamps
BTN 40A* Hazard
ABS 60A* ABS Main Relay
COOLING FAN 40A* Constant Control Relay Module
OBD-II 10A** Data Link Connector (DLC),
Instrument Cluster
FUEL PUMP 30A** Engine Controls
HEAD RH 10A** Headlamps
HEAD LH 10A** Headlamps
* Fuse Link Cartridge ** Fuse
Relays
Relays are located in the power
distribution box and should be
replaced by qualified technicians.
CHANGING THE TIRES
If you get a flat tire while driving,
do not apply the brake heavily.
Instead, gradually decrease your
speed. Hold the steering wheel
firmly and slowly move to a safe
place on the side of the road.
Roadside emergencies
113
Page 163 of 191

Once started, do not turn off the
engine until the above driving
cycle is complete.
EXTERIOR BULBS
It is a good idea to check the
operation of the following lights
frequently:
²Headlamps
²Turn signals
²Foglamps (if equipped)
Coupe
Sedan/wagon
²High-mount brake lamp
²Tail lamps
²Brake lamps
²Backup lamps
²License plate lamp
Maintenance and care
163