headlamp FORD ESCORT 2001 7.G User Guide
[x] Cancel search | Manufacturer: FORD, Model Year: 2001, Model line: ESCORT, Model: FORD ESCORT 2001 7.GPages: 216, PDF Size: 1.78 MB
Page 176 of 216
Allow the vehicle to sit for at least eight hours without starting the
engine. Then, start the engine and complete the above driving cycle. The
engine must warm up to its normal operating temperature. Once started,
do not turn off the engine until the above driving cycle is complete.
BULBS
Replacing exterior bulbs
It is a good idea to check the operation of the following lights frequently:
²Headlamps
²Turn signals
²Foglamps (if equipped)
²High-mount brakelamp
²Tail lamps
²Brakelamps
²Backup lamps
²License plate lamp
²Hazard flashers
Do not remove lamp bulbs unless they will be replaced immediately. If a
bulb is removed for an extended period of time, contaminants may enter
the lamp housings and affect performance.
Replacing headlamp bulbs
1. Make sure that the headlamps are turned OFF.
2. Open the hood and disconnect the headlamp wiring socket from the
in-line connector. This will make it easier to change the bulb.
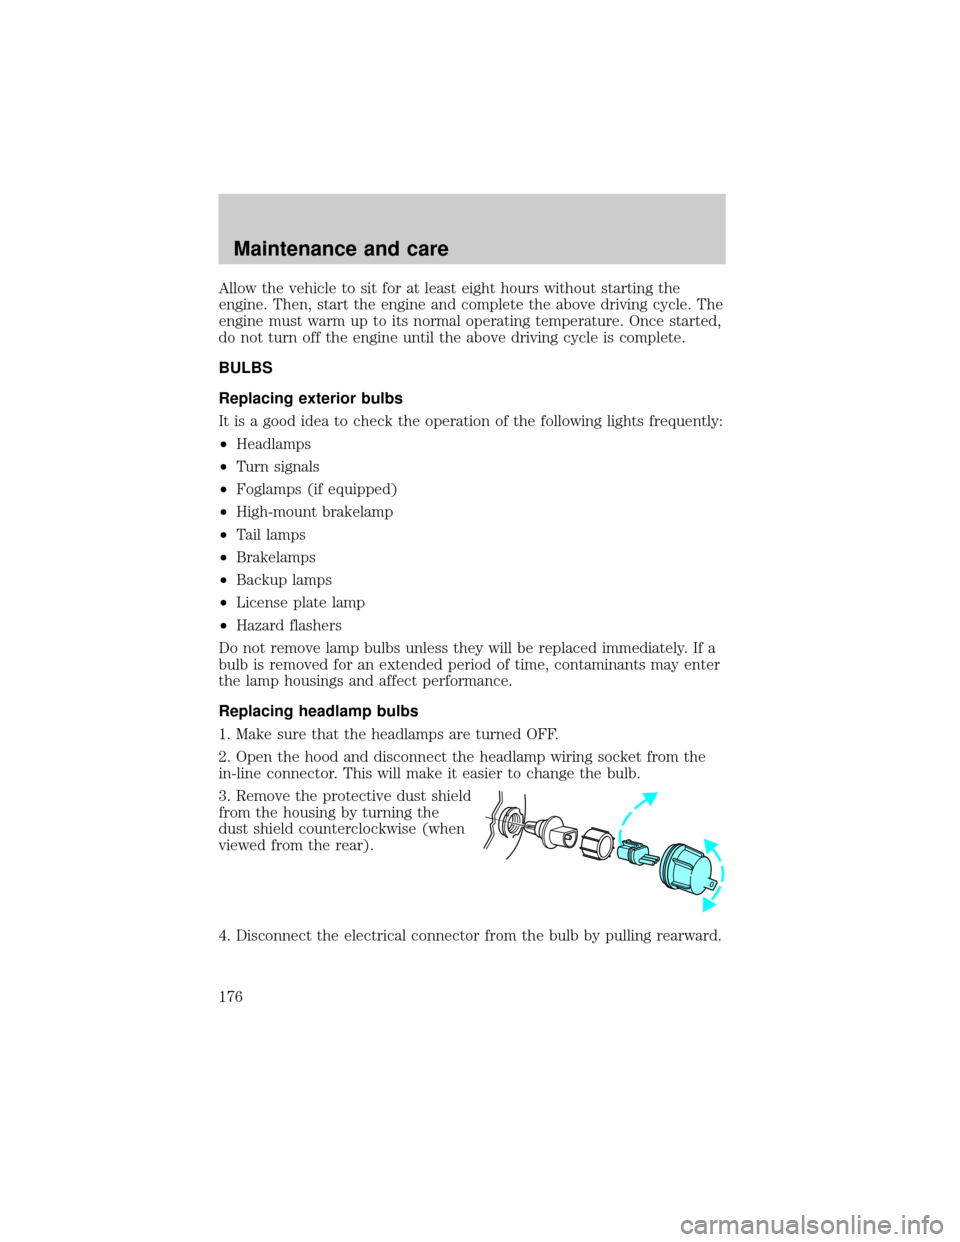
3. Remove the protective dust shield
from the housing by turning the
dust shield counterclockwise (when
viewed from the rear).
4. Disconnect the electrical connector from the bulb by pulling rearward.
Maintenance and care
176
Page 177 of 216
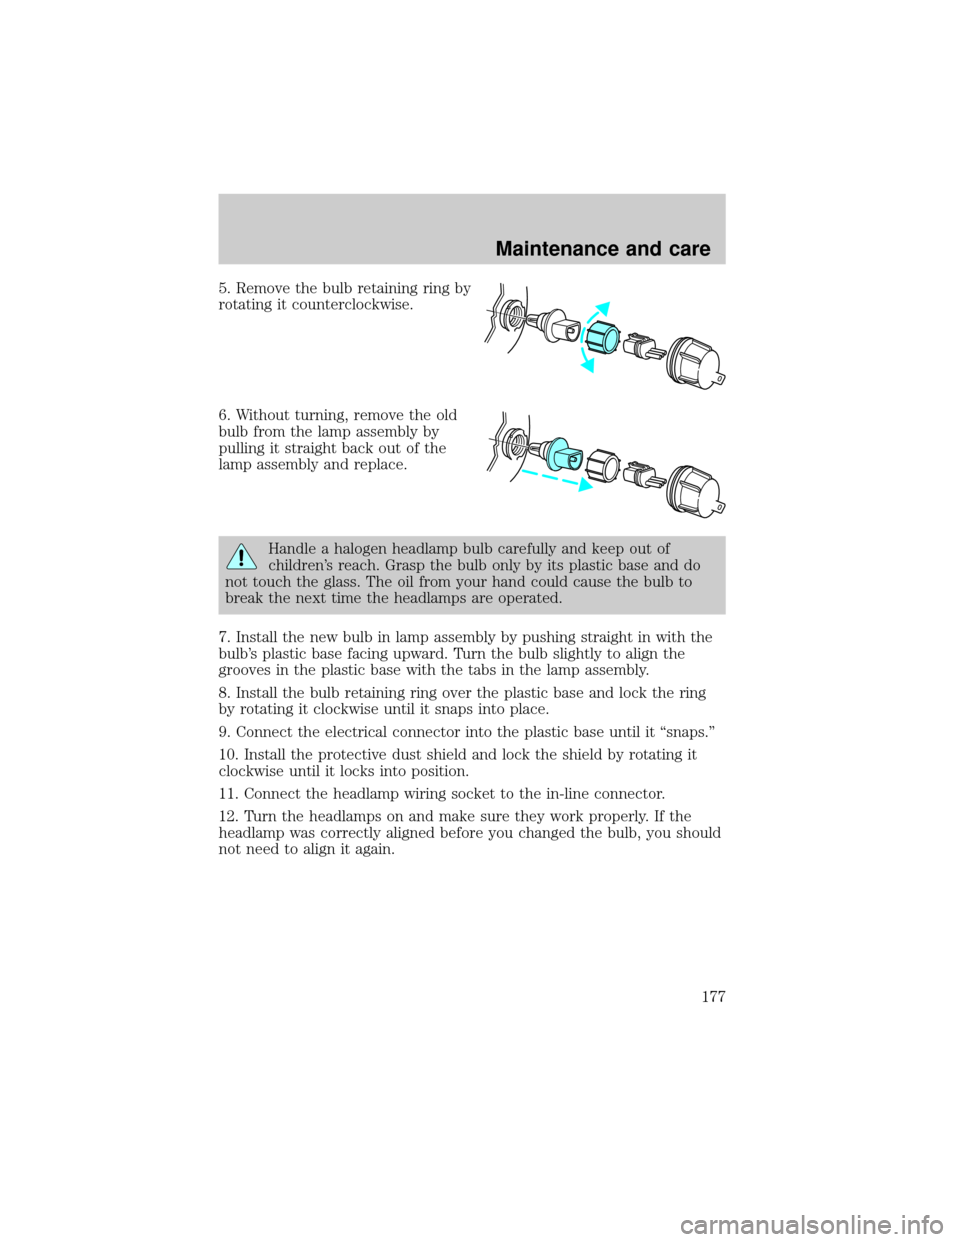
5. Remove the bulb retaining ring by
rotating it counterclockwise.
6. Without turning, remove the old
bulb from the lamp assembly by
pulling it straight back out of the
lamp assembly and replace.
Handle a halogen headlamp bulb carefully and keep out of
children's reach. Grasp the bulb only by its plastic base and do
not touch the glass. The oil from your hand could cause the bulb to
break the next time the headlamps are operated.
7. Install the new bulb in lamp assembly by pushing straight in with the
bulb's plastic base facing upward. Turn the bulb slightly to align the
grooves in the plastic base with the tabs in the lamp assembly.
8. Install the bulb retaining ring over the plastic base and lock the ring
by rotating it clockwise until it snaps into place.
9. Connect the electrical connector into the plastic base until it ªsnaps.º
10. Install the protective dust shield and lock the shield by rotating it
clockwise until it locks into position.
11. Connect the headlamp wiring socket to the in-line connector.
12. Turn the headlamps on and make sure they work properly. If the
headlamp was correctly aligned before you changed the bulb, you should
not need to align it again.
Maintenance and care
177
Page 181 of 216
Using the right bulbs
Replacement bulbs are specified in the chart below. Headlamp bulbs
must be marked with an authorized ªD.O.T.º for North America and an
ªEº for Europe to assure lamp performance, light brightness and pattern
and safe visibility. The correct bulbs will not damage the lamp assembly
or void the lamp assembly warranty and will provide quality bulb burn
time.
Function Trade Number
Front park/turn lamps 3457 AK (amber)
Foglamps (if equipped) 881
Headlamps-aero high and low beam 9007
Rear license plate lamps 168
High-mount brake lamp 921
Backup lamps 3156K
Brake lamps 3157K
Interior overhead lamp 12V/10W
All replacement bulbs are clear in color except where noted.
To replace all instrument panel lights - see your dealer
AIMING THE HEADLAMPS
Your vehicle is equipped with a Vehicle Headlamp Aim Device (VHAD)
on each headlamp. Each headlamp may be properly aimed in the vertical
(up/down) and the horizontal (left/right) directions using your VHAD
system. The headlamps on your vehicle are properly aimed at the
assembly plant.
A bubble (vertical indicator) that is not centered between the two red
lines does not necessarily indicate out-of-aim headlamps. If your vehicle
is not positioned on a level surface, the slope will be included in the
vertical indication. Therefore, vertical and horizontal headlamp
adjustment should be performed only when the beam direction appears
to be incorrect.
You will need one 4 mm wrench or socket to make the adjustments.
If the vehicle has been in an accident, the vehicle's front structure
should be properly aligned before aiming the headlamps.
Maintenance and care
181
Page 182 of 216
Horizontal aim adjustment
1. Park the vehicle on a level
surface.
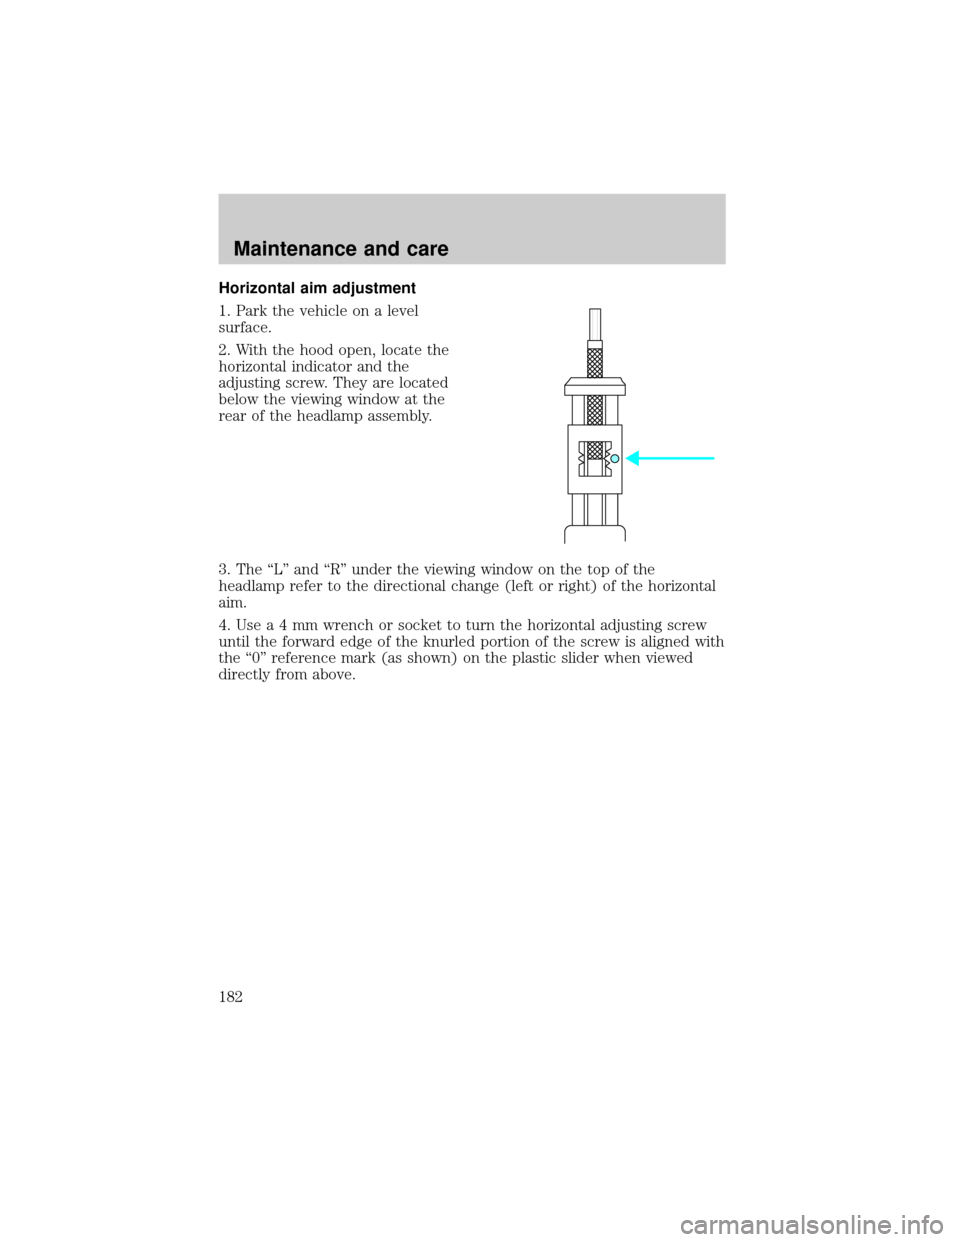
2. With the hood open, locate the
horizontal indicator and the
adjusting screw. They are located
below the viewing window at the
rear of the headlamp assembly.
3. The ªLº and ªRº under the viewing window on the top of the
headlamp refer to the directional change (left or right) of the horizontal
aim.
4.Usea4mmwrench or socket to turn the horizontal adjusting screw
until the forward edge of the knurled portion of the screw is aligned with
the ª0º reference mark (as shown) on the plastic slider when viewed
directly from above.
Maintenance and care
182
Page 183 of 216
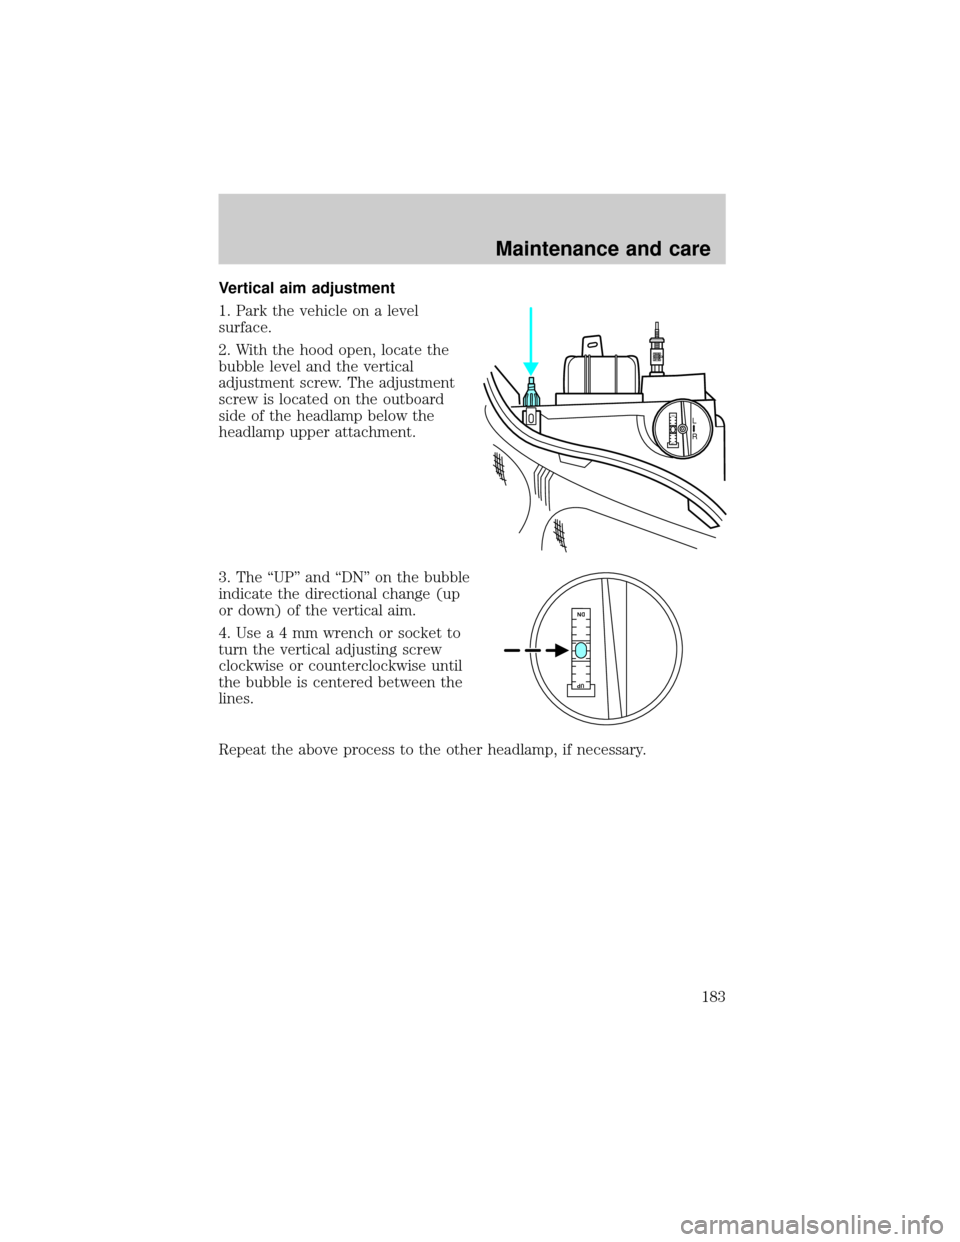
Vertical aim adjustment
1. Park the vehicle on a level
surface.
2. With the hood open, locate the
bubble level and the vertical
adjustment screw. The adjustment
screw is located on the outboard
side of the headlamp below the
headlamp upper attachment.
3. The ªUPº and ªDNº on the bubble
indicate the directional change (up
or down) of the vertical aim.
4.Usea4mmwrench or socket to
turn the vertical adjusting screw
clockwise or counterclockwise until
the bubble is centered between the
lines.
Repeat the above process to the other headlamp, if necessary.
L
R
UP
DN
DNUP
Maintenance and care
183
Page 205 of 216
Comfort and convenience
Air conditioner
Cargo net
Cargo organizer
Engine block heater
Travel equipment
Auto headlamps with daytime running lights (DRL)
Console armrest
Daytime running lights (DRL)
Electrochromic inside mirror with compass
Electrochromic inside mirror with compass and temperature display
Highway safety kit
First aid kit
Removable luggage rack
Removable luggage rack adapters (bike, ski and snowboard)
Speed control
Protection and appearance equipment
Air bag anti-theft locks
Car cover
Cargo liner
Cargo shade
Carpet floor mats
Flat splash guards
Front end covers (full)
Molded splash guards
Rear decklid spoilers
Side window deflector
Styled hood deflector
Universal floor mats
Customer assistance
205
Page 211 of 216
specifications ..................191±192
Exhaust fumes ............................97
F
Floor mats ...................................56
Fluid capacities .........................190
Foglamps .....................................45
Fuel ............................................166
calculating fuel economy .......171
cap .....................................12, 168
capacity ...................................190
choosing the right fuel ...........169
comparisons with EPA fuel
economy estimates .................174
detergent in fuel .....................170
filling your vehicle
with fuel ..................166, 168, 171
filter, specifications ........171, 189
fuel pump shut-off switch .....115
gauge .........................................14
improving fuel economy ........171
low fuel warning light ................8
octane rating ...........169, 192±193
quality ......................................170
running out of fuel .................170
safety information relating to
automotive fuels .....................166
Fuses ..................................117, 119
G
Gas cap (see Fuel cap) ......12, 168
Gas mileage (see Fuel
economy) ...................................171
Gauges .........................................13
engine coolant temperature
gauge .........................................14
fuel gauge ..................................14odometer ...................................15
speedometer .............................15
tachometer ................................16
trip odometer ............................16
GAWR (Gross Axle Weight
Rating) .......................................109
definition .................................109
driving with a heavy load ......109
location ....................................109
GVWR (Gross Vehicle Weight
Rating) .......................................109
calculating ...............................109
definition .................................109
driving with a heavy load ......109
location ....................................109
H
Hazard flashers .........................115
Head restraints ...........................65
Headlamps ...................................44
aiming ..............................181±183
bulb specifications ..................181
daytime running lights .............44
flash to pass ..............................45
high beam ...........................11, 45
replacing bulbs .......................176
turning on and off ....................44
warning chime ..........................13
Heating ........................................38
heater only system ...................38
heating and air conditioning
system .......................................40
Hood ..........................................138
I
Ignition .........................44, 192±193
Infant seats (see Safety seats) ..86
Index
211
Page 212 of 216
Inspection/maintenance (I/M)
testing ........................................175
Instrument panel ..........................8
cleaning ...................................187
cluster ..................................8, 187
lighting up panel and
interior .......................................17
location of components ..............8
J
Jack ............................................125
positioning ...............................125
storage .....................................125
Jump-starting your vehicle ......129
K
Keys
key in ignition chime ...............13
positions of the ignition ...........44
L
Lamps
bulb replacement
specifications chart ................181
cargo lamps ...............................17
daytime running light ...............44
fog lamps ...................................45
headlamps .........................44, 176
headlamps, flash to pass ..........45
instrument panel, dimming .....17
interior lamps ...................53, 180
replacing bulbs .......176, 178±180
Lane change indicator (see
Turn signal) .................................46
Lights, warning and indicator ......8
air bag ........................................10
anti-lock brakes (ABS) ......11, 99anti-theft ...................................11
brake ..........................................10
charging system ........................11
fuel cap light .............................12
high beam .................................11
low fuel ........................................8
oil pressure ...............................12
safety belt .................................10
service engine soon ....................9
turn signal indicator .................11
Load limits .................................109
GAWR ......................................109
GVWR ......................................109
trailer towing ..........................109
Locks
childproof ..................................54
Lubricant specifications ...191±192
M
Manual transaxle
fluid capacities ........................190
lubricant specifications ..........192
reverse .....................................108
Mirrors
cleaning ...................................185
side view mirrors (power) .......18
Moon roof ....................................52
Motorcraft parts ................171, 189
O
Octane rating ............................169
Odometer .....................................15
Oil (see Engine oil) ..................142
Index
212