oil FORD ESCORT 2003 7.G Owners Manual
[x] Cancel search | Manufacturer: FORD, Model Year: 2003, Model line: ESCORT, Model: FORD ESCORT 2003 7.GPages: 184, PDF Size: 1.28 MB
Page 3 of 184
Maintenance and Specifications 136
Engine compartment 140
Engine oil 141
Battery 144
Fuel information 151
Air filter(s) 165
Part numbers 169
Refill capacities 170
Lubricant specifications 171
Accessories 176
Index 179
All rights reserved. Reproduction by any means, electronic or mechanical
including photocopying, recording or by any information storage and retrieval
systemor translation in whole or part is not permitted without written
authorization from Ford Motor Company. Ford may change the contents without
notice and without incurring obligation.
Copyright © 2002 Ford Motor Company
Table of Contents
3
Page 6 of 184
BREAKING-IN YOUR VEHICLE
Your vehicle does not need an extensive break-in. Try not to drive
continuously at the same speed for the first 1,600 km (1,000 miles) of
new vehicle operation. Vary your speed to allow parts to adjust
themselves to other parts.
Drive your new vehicle at least 800 km(500 miles) before towing a
trailer.
Do not add friction modifier compounds or special break-in oils during
the first few thousand kilometers (miles) of operation, since these
additives may prevent piston ring seating. SeeEngine oilin the
Maintenance and carechapter for more information on oil usage.
SPECIAL NOTICES
Emission warranty
The New Vehicle Limited Warranty includes Bumper-to-Bumper
Coverage, Safety Restraint Coverage, Corrosion Coverage, and 7.3L
Power Stroke Diesel Engine Coverage. In addition, your vehicle is eligible
for Emissions Defect and Emissions Performance Warranties. For a
detailed description of what is covered and what is not covered, refer to
theWarranty Guidethat is provided to you along with your Owner’s
Guide.
Special instructions
For your added safety, your vehicle is fitted with sophisticated electronic
controls.
Please read the sectionAir bagin theSeating and safety
restraintschapter. Failure to follow the specific warnings and
instructions could result in personal injury.
Front seat mounted rear facing child or infant seats should
NEVERbe used in front of a passenger side air bag unless the
air bag can be and is turned OFF.
Introduction
6
Page 9 of 184
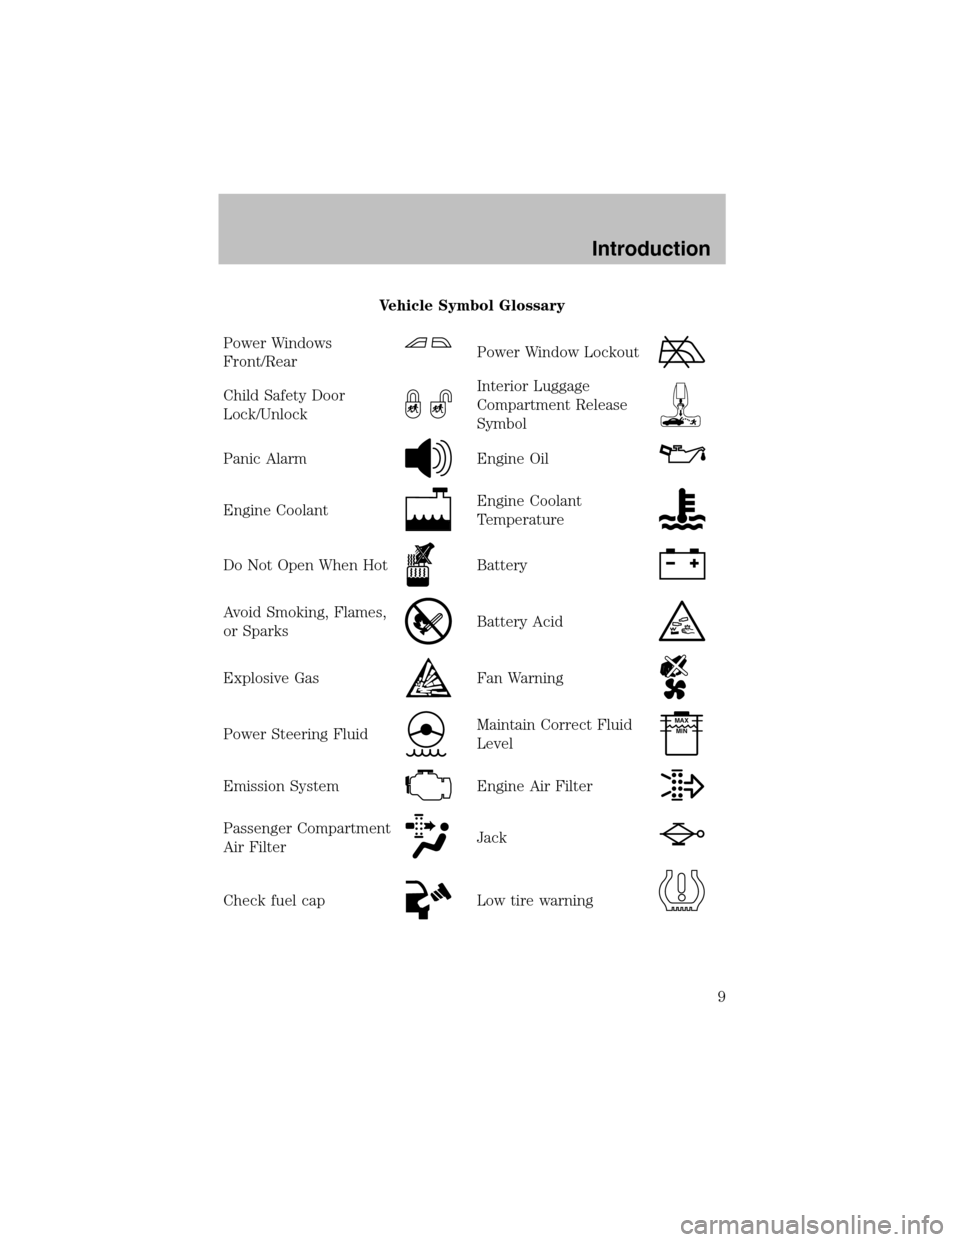
Vehicle Symbol Glossary
Power Windows
Front/Rear
Power Window Lockout
Child Safety Door
Lock/UnlockInterior Luggage
Compartment Release
Symbol
Panic AlarmEngine Oil
Engine CoolantEngine Coolant
Temperature
Do Not Open When HotBattery
Avoid Smoking, Flames,
or SparksBattery Acid
Explosive GasFan Warning
Power Steering FluidMaintain Correct Fluid
LevelMAX
MIN
Emission SystemEngine Air Filter
Passenger Compartment
Air FilterJack
Check fuel capLow tire warning
Introduction
9
Page 11 of 184
Driving a vehicle with the brake systemwarning light on is
dangerous. A significant decrease in braking performance may
occur. It will take you longer to stop the vehicle. Have the vehicle
checked by your dealer immediately.
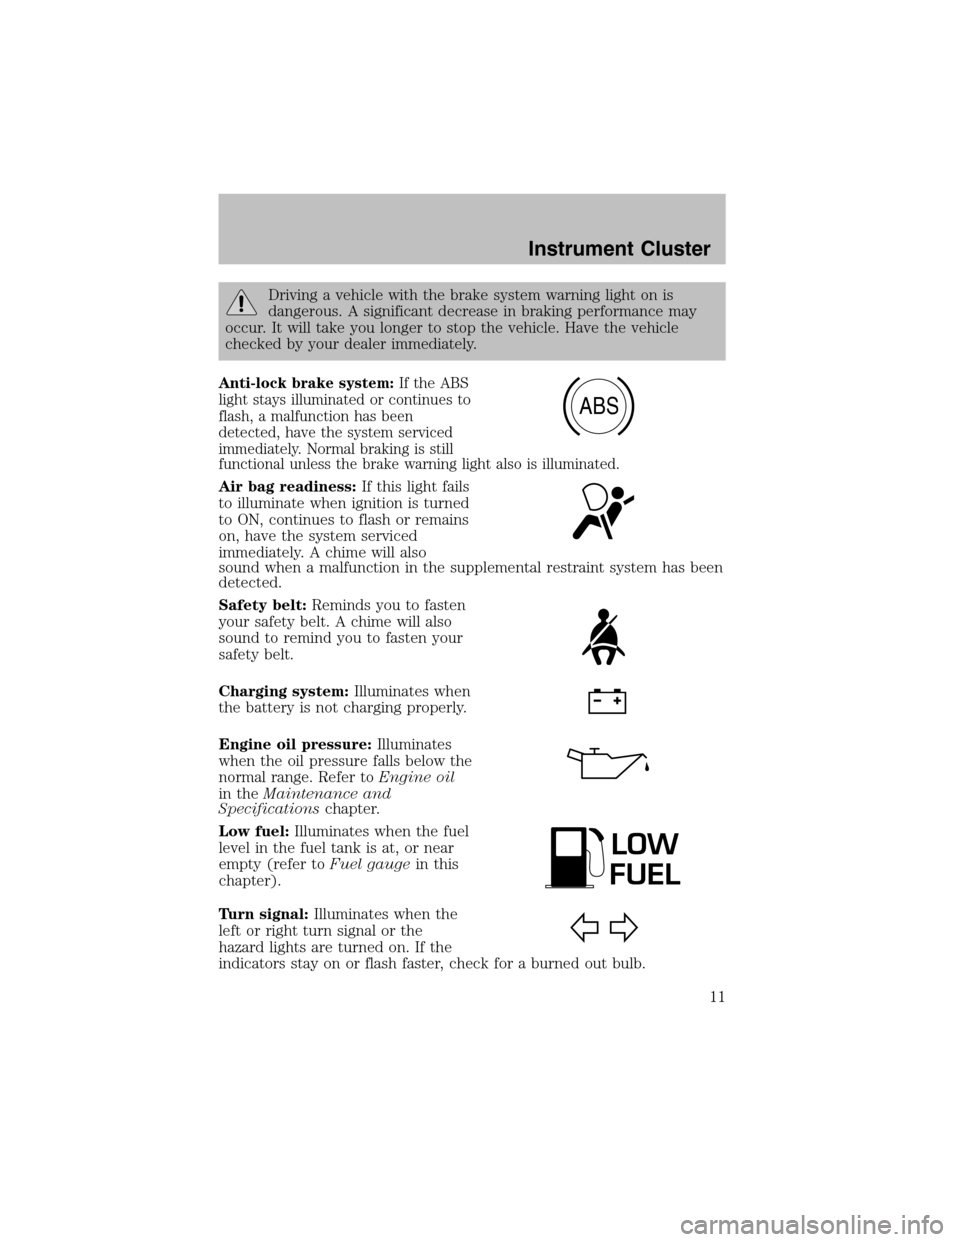
Anti-lock brake system:If the ABS
light stays illuminated or continues to
flash, a malfunction has been
detected, have the systemserviced
immediately. Normal braking is still
functional unless the brake warning light also is illuminated.
Air bag readiness:If this light fails
to illuminate when ignition is turned
to ON, continues to flash or remains
on, have the systemserviced
immediately. A chime will also
sound when a malfunction in the supplemental restraint system has been
detected.
Safety belt:Reminds you to fasten
your safety belt. A chime will also
sound to remind you to fasten your
safety belt.
Charging system:Illuminates when
the battery is not charging properly.
Engine oil pressure:Illuminates
when the oil pressure falls below the
normal range. Refer toEngine oil
in theMaintenance and
Specificationschapter.
Low fuel:Illuminates when the fuel
level in the fuel tank is at, or near
empty (refer toFuel gaugein this
chapter).
Turn signal:Illuminates when the
left or right turn signal or the
hazard lights are turned on. If the
indicators stay on or flash faster, check for a burned out bulb.
ABS
LOW
FUEL
Instrument Cluster
11
Page 39 of 184
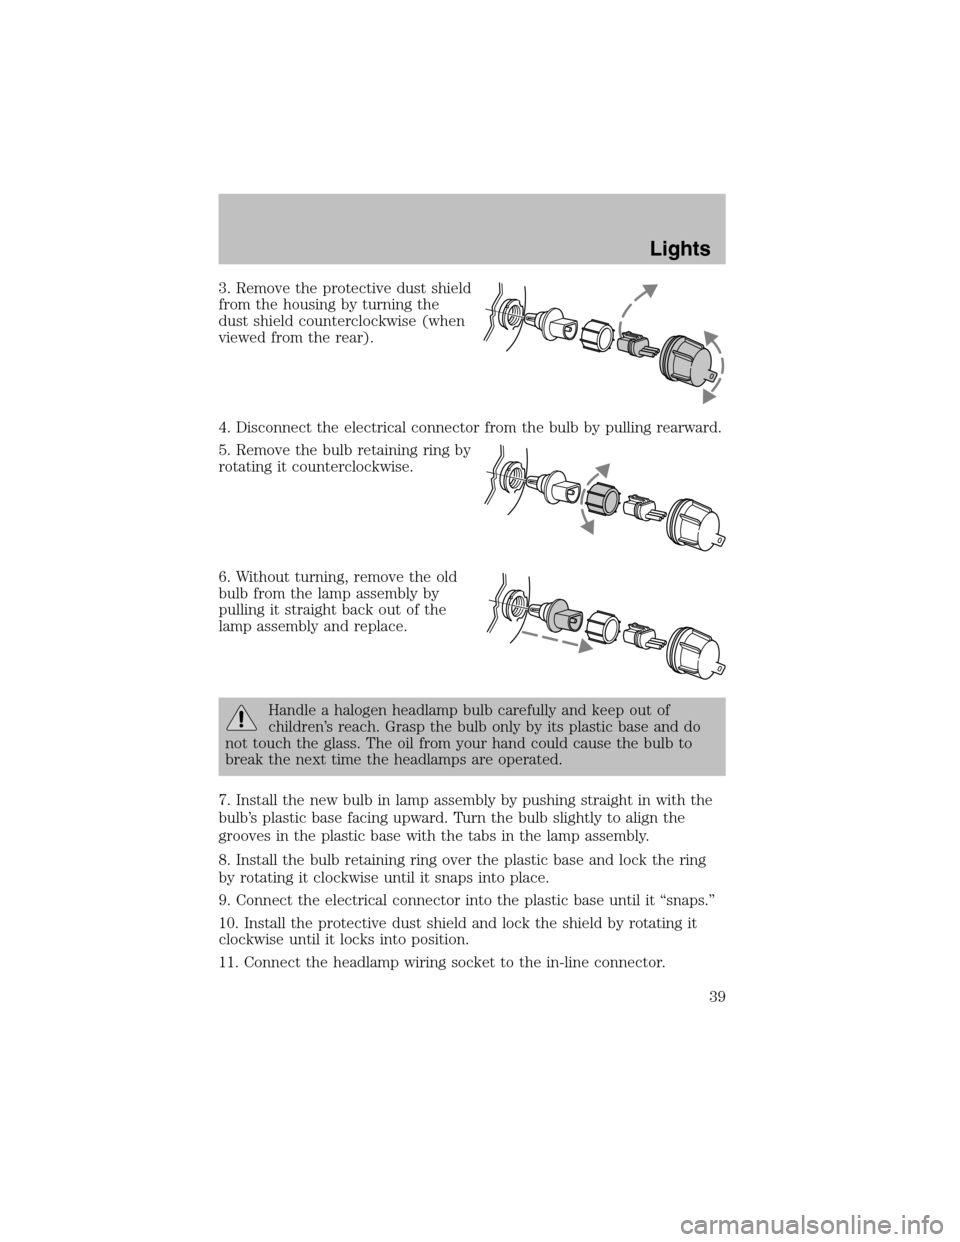
3. Remove the protective dust shield
fromthe housing by turning the
dust shield counterclockwise (when
viewed fromthe rear).
4. Disconnect the electrical connector fromthe bulb by pulling rearward.
5. Remove the bulb retaining ring by
rotating it counterclockwise.
6. Without turning, remove the old
bulb from the lamp assembly by
pulling it straight back out of the
lamp assembly and replace.
Handle a halogen headlamp bulb carefully and keep out of
children’s reach. Grasp the bulb only by its plastic base and do
not touch the glass. The oil fromyour hand could cause the bulb to
break the next time the headlamps are operated.
7. Install the new bulb in lamp assembly by pushing straight in with the
bulb’s plastic base facing upward. Turn the bulb slightly to align the
grooves in the plastic base with the tabs in the lamp assembly.
8. Install the bulb retaining ring over the plastic base and lock the ring
by rotating it clockwise until it snaps into place.
9. Connect the electrical connector into the plastic base until it “snaps.”
10. Install the protective dust shield and lock the shield by rotating it
clockwise until it locks into position.
11. Connect the headlamp wiring socket to the in-line connector.
Lights
39
Page 131 of 184

PAINTCHIPS
Your dealer has touch-up paint and sprays to match your vehicle’s color.
Take your color code (printed on a sticker in the driver’s door jam) to
your dealer to ensure you get the correct color.
•Remove particles such as bird droppings, tree sap, insect deposits, tar
spots, road salt and industrial fallout before repairing paint chips.
•Always read the instructions before using the products.
ALUMINUM WHEELS AND WHEEL COVERS
Aluminum wheels and wheel covers are coated with a clearcoat paint
finish. In order to maintain their shine:
•Clean weekly with Motorcraft Wheel and Tire Cleaner (ZC-37–A),
which is available fromyour dealer. Heavy dirt and brake dust
accumulation may require agitation with a sponge. Rinse thoroughly
with a strong streamof water.
•Never apply any cleaning chemical to hot or warm wheel rims or
covers.
•Some automatic car washes may cause damage to the finish on your
wheel rims or covers. Chemical-strength cleaners, or cleaning
chemicals, in combination with brush agitation to remove brake dust
and dirt, could wear away the clearcoat finish over time.
•Do not use hydrofluoric acid-based or high caustic-based wheel
cleaners, steel wool, fuels or strong household detergent.
•To remove tar and grease, use Ford Extra Strength Tar and Road Oil
Removal (B7A-19520–AA), available from your dealer.
ENGINE
Engines are more efficient when they are clean because grease and dirt
buildup keep the engine warmer than normal. When washing:
•Take care when using a power washer to clean the engine. The
high-pressure fluid could penetrate the sealed parts and cause
damage.
•Do not spray a hot engine with cold water to avoid cracking the
engine block or other engine components.
•Spray Motorcraft Engine Shampoo and Degreaser (ZC-20) on all parts
that require cleaning and pressure rinse clean.
Cleaning
131
Page 132 of 184
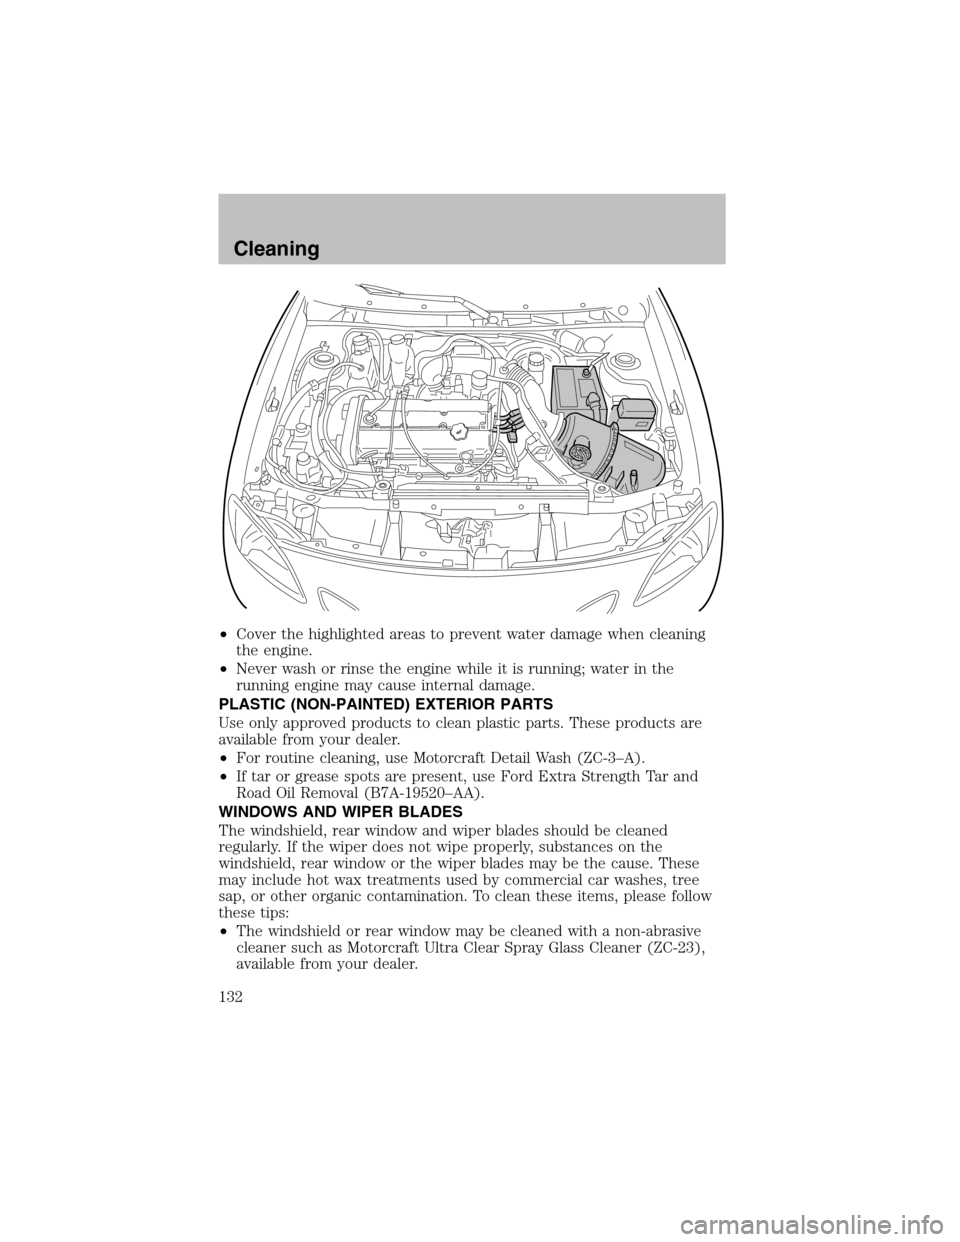
•Cover the highlighted areas to prevent water damage when cleaning
the engine.
•Never wash or rinse the engine while it is running; water in the
running engine may cause internal damage.
PLASTIC (NON-PAINTED) EXTERIOR PARTS
Use only approved products to clean plastic parts. These products are
available fromyour dealer.
•For routine cleaning, use Motorcraft Detail Wash (ZC-3–A).
•If tar or grease spots are present, use Ford Extra Strength Tar and
Road Oil Removal (B7A-19520–AA).
WINDOWS AND WIPER BLADES
The windshield, rear window and wiper blades should be cleaned
regularly. If the wiper does not wipe properly, substances on the
windshield, rear window or the wiper blades may be the cause. These
may include hot wax treatments used by commercial car washes, tree
sap, or other organic contamination. To clean these items, please follow
these tips:
•The windshield or rear window may be cleaned with a non-abrasive
cleaner such as Motorcraft Ultra Clear Spray Glass Cleaner (ZC-23),
available fromyour dealer.
Cleaning
132
Page 133 of 184
•Do not use abrasives, as they may cause scratches.
•Do not use fuel, kerosene, or paint thinner to clean any parts.
•Wiper blades can be cleaned with isopropyl (rubbing) alcohol or
windshield washer solution. Be sure to replace wiper blades when they
appear worn or do not function properly.
INSTRUMENT PANEL AND CLUSTER LENS
Clean the instrument panel with a damp cloth, then dry with a dry cloth.
•Avoid cleaners or polish that increase the gloss of the upper portion of
the instrument panel. The dull finish in this area helps protect the
driver fromundesirable windshield reflection.
Do not use chemical solvents or strong detergents when cleaning
the steering wheel or instrument panel to avoid contamination of
the air bag system.
•Be certain to wash or wipe your hands clean if you have been in
contact with certain products such as insect repellent and suntan
lotion in order to avoid possible damage to the painted surfaces.
INTERIOR
For fabric, carpets, cloth seats and safety belts:
•Remove dust and loose dirt with a vacuum cleaner.
•Remove light stains and soil with Ford Extra Strength Upholstery
Cleaner (E8AZ-19523–AA).
•If grease or tar is present on the material, spot-clean the area first
with Motorcraft Spot and Stain Remover (ZC-14).
•Never saturate the seat covers with cleaning solution.
•Do not use household cleaning products or glass cleaners, which can
stain and discolor the fabric and affect the flame retardant abilities of
the seat materials.
Do not use cleaning solvents, bleach or dye on the vehicle’s
seatbelts, as these actions may weaken the belt webbing.
Cleaning
133
Page 134 of 184

LEATHER SEATS (IF EQUIPPED)
Your leather seating surfaces have a clear, protective coating over the
leather.
•To clean, use a soft cloth with Motorcraft Deluxe Leather and Vinyl
Cleaner (ZC-11–A). Dry the area with a soft cloth.
•To help maintain its resiliency and color, use the Motorcraft Deluxe
Leather Care Kit (ZC-11–D), available fromyour authorized dealer.
•Do not use household cleaning products, alcohol solutions, solvents or
cleaners intended for rubber, vinyl and plastics, or oil/petroleum-based
leather conditioners. These products may cause premature wearing of
the clear, protective coating.
UNDERBODY
Flush the complete underside of your vehicle frequently. Keep body and
door drain holes free frompacked dirt.
FORD, LINCOLN AND MERCURY CAR CARE PRODUCTS
Your Ford, Lincoln or Mercury dealer has many quality products available
to clean your vehicle and protect its finishes. These quality products
have been specifically engineered to fulfill your automotive needs; they
are custom designed to complement the style and appearance of your
vehicle. Each product is made from high quality materials that meet or
exceed rigid specifications. For best results, use the following products
or products of equivalent quality:
Motorcraft CustomClearcoat Polish (ZC–8–A)
Ford CustomVinyl Protectant* (not available in Canada)
(F2AZ—19530–A)
Motorcraft Vinyl Cleaner (Canada only) (CXC-93)
Motorcraft Vinyl Conditioner (Canada only) (CXC-94)
Motorcraft Deluxe Leather and Vinyl Cleaner (not available in Canada)
(ZC-11–A)
Ford Extra Strength Tar and Road Oil Remover* (not available in
Canada) (B7A-19520–AA)
Ford Extra Strength Upholstery Cleaner (not available in Canada)
(E8AZ-19523–AA)
Motorcraft CustomBright Metal Cleaner (ZC-15)
Motorcraft Wheel and Tire Cleaner (ZC-37–A)
Cleaning
134
Page 140 of 184
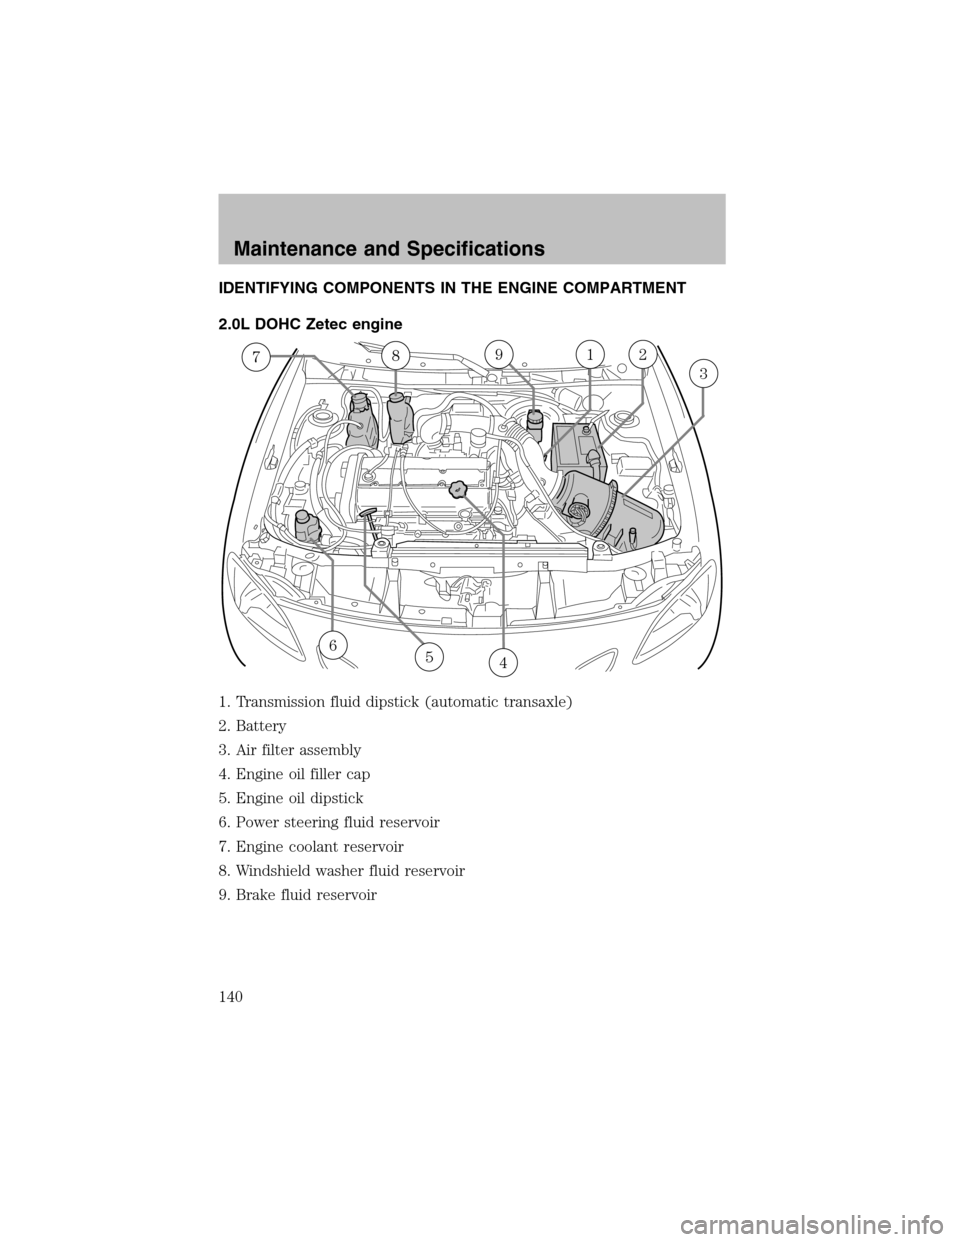
IDENTIFYING COMPONENTS IN THE ENGINE COMPARTMENT
2.0L DOHC Zetec engine
1. Transmission fluid dipstick (automatic transaxle)
2. Battery
3. Air filter assembly
4. Engine oil filler cap
5. Engine oil dipstick
6. Power steering fluid reservoir
7. Engine coolant reservoir
8. Windshield washer fluid reservoir
9. Brake fluid reservoir
98712
3
4
65
Maintenance and Specifications
140