AUX FORD EXCURSION 2002 1.G Owners Manual
[x] Cancel search | Manufacturer: FORD, Model Year: 2002, Model line: EXCURSION, Model: FORD EXCURSION 2002 1.GPages: 272, PDF Size: 5.06 MB
Page 42 of 272
20815.psp Ford O/G 2002 Excursion English 4th Print 2C3J-19A321-HB 04/24/2003 09:14:57 21 B
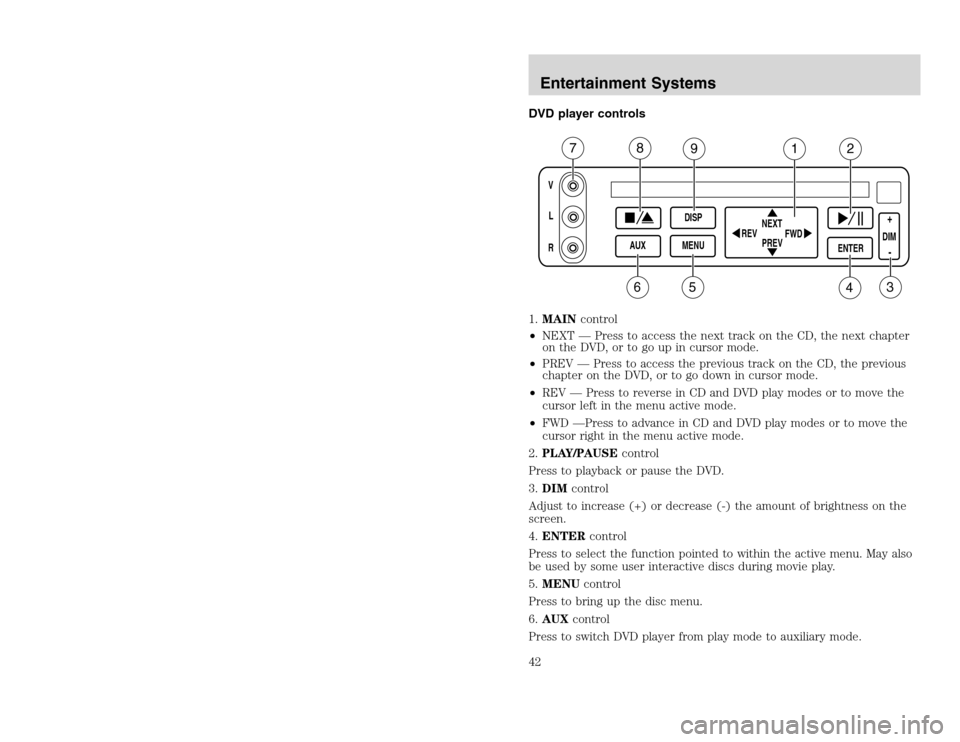
DVD player controls
1.MAINcontrol
•NEXT — Press to access the next track on the CD, the next chapter
on the DVD, or to go up in cursor mode.
•PREV — Press to access the previous track on the CD, the previous
chapter on the DVD, or to go down in cursor mode.
•REV — Press to reverse in CD and DVD play modes or to move the
cursor left in the menu active mode.
•FWD —Press to advance in CD and DVD play modes or to move the
cursor right in the menu active mode.
2.PLAY/PAUSEcontrol
Press to playback or pause the DVD.
3.DIMcontrol
Adjust to increase (+) or decrease (-) the amount of brightness on the
screen.
4.ENTERcontrol
Press to select the function pointed to within the active menu. May also
be used by some user interactive discs during movie play.
5.MENUcontrol
Press to bring up the disc menu.
6.AUXcontrol
Press to switch DVD player from play mode to auxiliary mode.
VL
R
AUXDISP
MENUNEXT
PREV REV
FWD
ENTER
DIM+
-
7
8
9
1
2
3
4
5
6
Entertainment Systems42
Page 43 of 272
20815.psp Ford O/G 2002 Excursion English 4th Print 2C3J-19A321-HB 04/24/2003 09:14:57 22 A
7.Auxiliary jacks
Insert lines for standard video game players.
8.STOP/EJECTcontrol
Press once to stop DVD play. Press again to eject the DVD.
9.DISPLAY (DISP)control
Press to enable on screen display of player menu and user display
adjustments.
DVD control features
Menu control
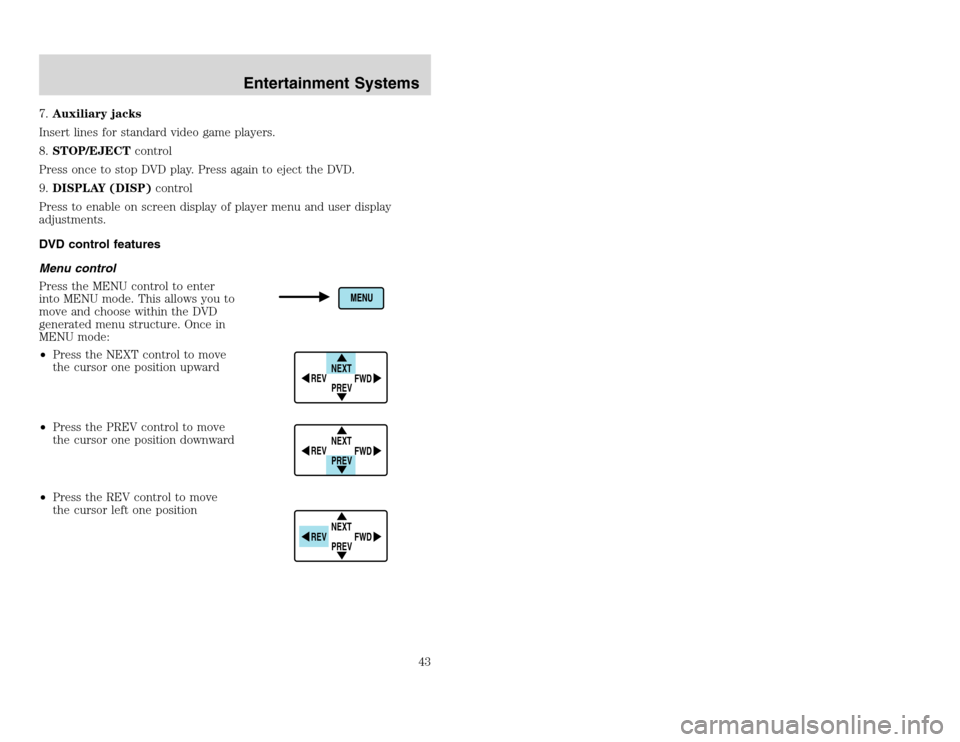
Press the MENU control to enter
into MENU mode. This allows you to
move and choose within the DVD
generated menu structure. Once in
MENU mode:
•Press the NEXT control to move
the cursor one position upward
•Press the PREV control to move
the cursor one position downward
•Press the REV control to move
the cursor left one position
NEXT
PREV REV
FWDNEXT
PREV REV
FWDNEXT
PREV REV
FWD
Entertainment Systems
43
Page 47 of 272
20815.psp Ford O/G 2002 Excursion English 4th Print 2C3J-19A321-HB 04/24/2003 09:14:57 24 A
Rear seat controls
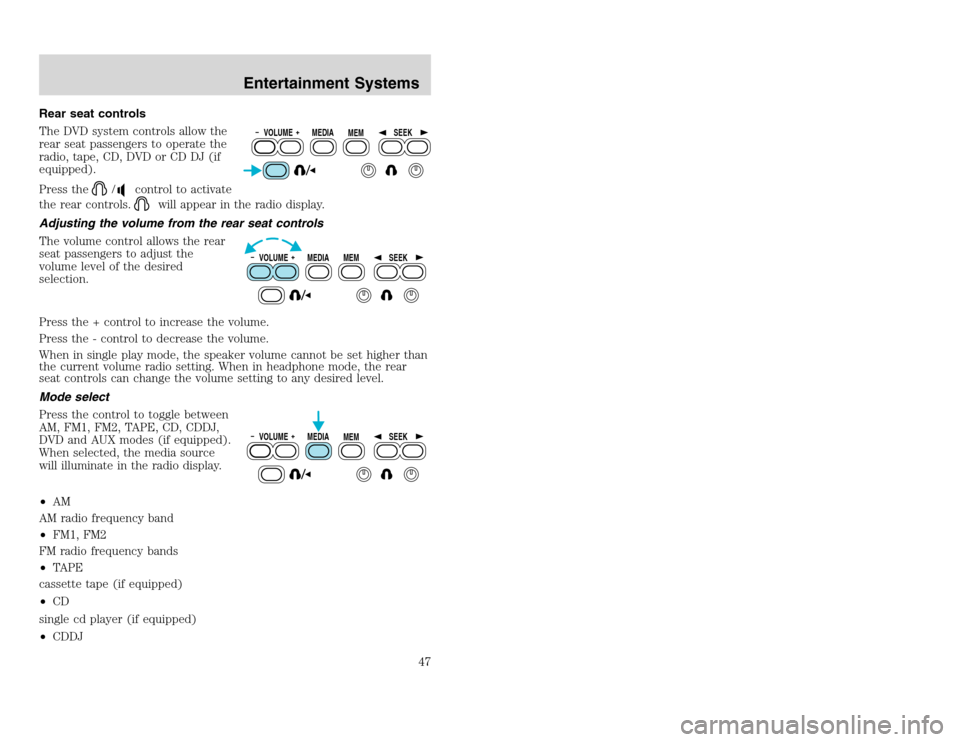
The DVD system controls allow the
rear seat passengers to operate the
radio, tape, CD, DVD or CD DJ (if
equipped).
Press the
/
control to activate
the rear controls.
will appear in the radio display.
Adjusting the volume from the rear seat controls
The volume control allows the rear
seat passengers to adjust the
volume level of the desired
selection.
Press the + control to increase the volume.
Press the - control to decrease the volume.
When in single play mode, the speaker volume cannot be set higher than
the current volume radio setting. When in headphone mode, the rear
seat controls can change the volume setting to any desired level.
Mode select
Press the control to toggle between
AM, FM1, FM2, TAPE, CD, CDDJ,
DVD and AUX modes (if equipped).
When selected, the media source
will illuminate in the radio display.
•AM
AM radio frequency band
•FM1, FM2
FM radio frequency bands
•TAPE
cassette tape (if equipped)
•CD
single cd player (if equipped)
•CDDJ
VOLUME MEDIA
MEMSEEKVOLUME MEDIA
MEMSEEKVOLUME MEDIA
MEMSEEK
Entertainment Systems
47
Page 48 of 272
20815.psp Ford O/G 2002 Excursion English 4th Print 2C3J-19A321-HB 04/24/2003 09:14:57 24 B
compact disc changer (if equipped)
•DVD/AUX
DVD player / Auxiliary line input
Memory preset control
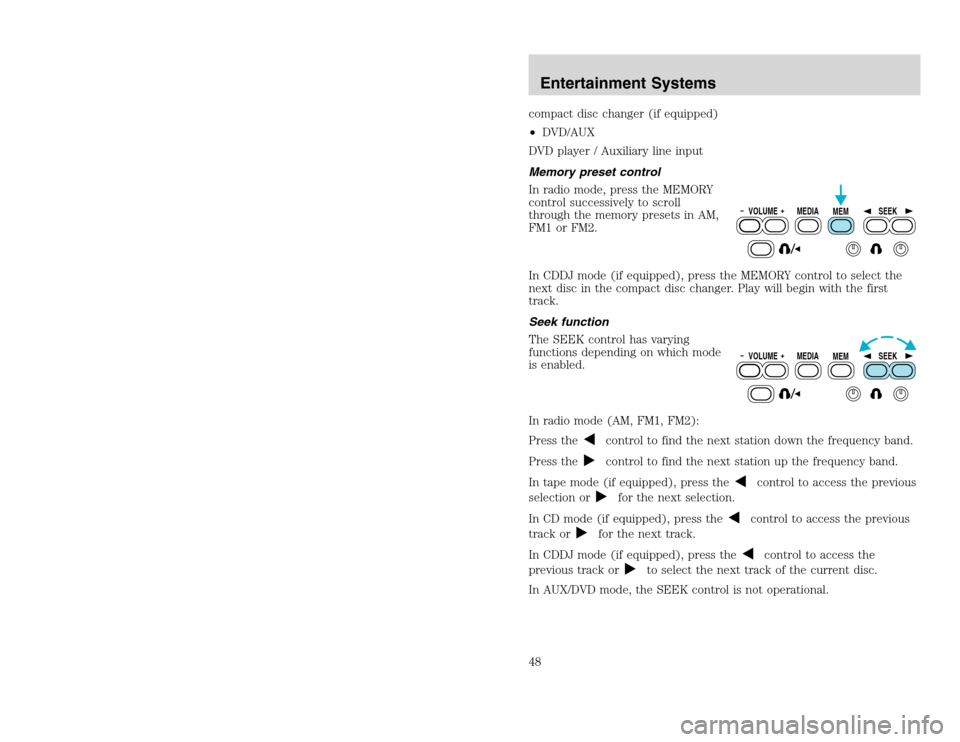
In radio mode, press the MEMORY
control successively to scroll
through the memory presets in AM,
FM1 or FM2.
In CDDJ mode (if equipped), press the MEMORY control to select the
next disc in the compact disc changer. Play will begin with the first
track.
Seek function
The SEEK control has varying
functions depending on which mode
is enabled.
In radio mode (AM, FM1, FM2):
Press the
control to find the next station down the frequency band.
Press thecontrol to find the next station up the frequency band.
In tape mode (if equipped), press the
control to access the previous
selection or
for the next selection.
In CD mode (if equipped), press the
control to access the previous
track or
for the next track.
In CDDJ mode (if equipped), press the
control to access the
previous track or
to select the next track of the current disc.
In AUX/DVD mode, the SEEK control is not operational.
VOLUME MEDIA
MEMSEEKVOLUME MEDIA
MEMSEEK
Entertainment Systems48
Page 49 of 272
20815.psp Ford O/G 2002 Excursion English 4th Print 2C3J-19A321-HB 04/24/2003 09:14:57 25 A
Using headphones/Personal Audio Feature
Single play mode will allow all
passengers to listen to the same
media source through all speakers.
The Personal Audio Feature allows
the front seat passengers to listen to
one source (radio, TAPE, CD, CDDJ, DVD, or AUX) while the rear seat
passengers listen to another.
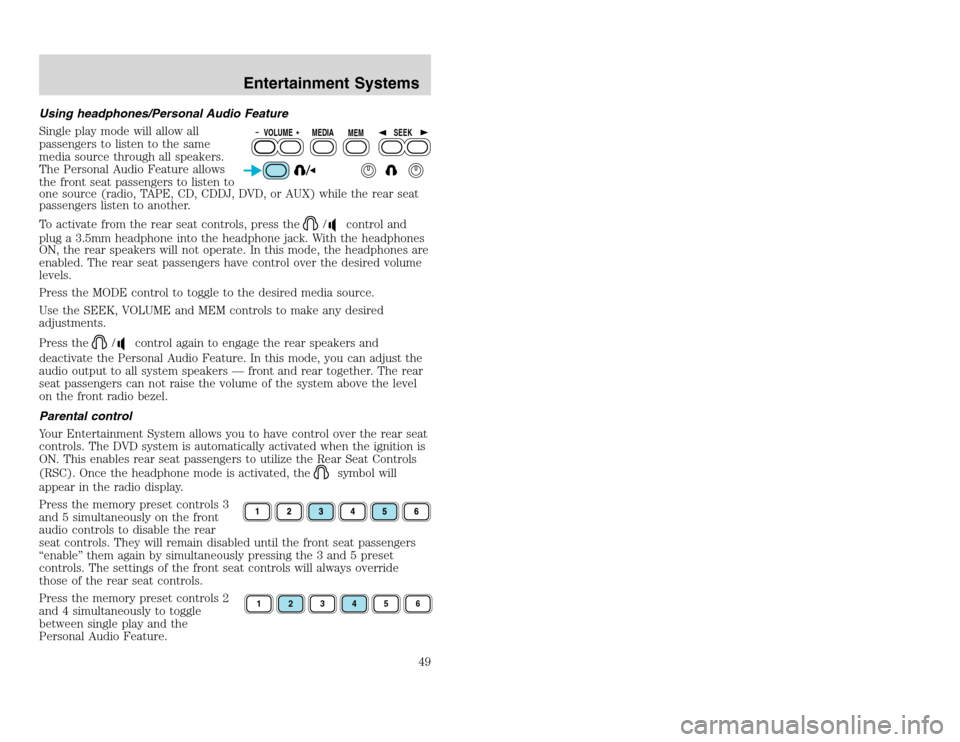
To activate from the rear seat controls, press the
/
control and
plug a 3.5mm headphone into the headphone jack. With the headphones
ON, the rear speakers will not operate. In this mode, the headphones are
enabled. The rear seat passengers have control over the desired volume
levels.
Press the MODE control to toggle to the desired media source.
Use the SEEK, VOLUME and MEM controls to make any desired
adjustments.
Press the
/
control again to engage the rear speakers and
deactivate the Personal Audio Feature. In this mode, you can adjust the
audio output to all system speakers — front and rear together. The rear
seat passengers can not raise the volume of the system above the level
on the front radio bezel.
Parental control
Your Entertainment System allows you to have control over the rear seat
controls. The DVD system is automatically activated when the ignition is
ON. This enables rear seat passengers to utilize the Rear Seat Controls
(RSC). Once the headphone mode is activated, the
symbol will
appear in the radio display.
Press the memory preset controls 3
and 5 simultaneously on the front
audio controls to disable the rear
seat controls. They will remain disabled until the front seat passengers
“enable” them again by simultaneously pressing the 3 and 5 preset
controls. The settings of the front seat controls will always override
those of the rear seat controls.
Press the memory preset controls 2
and 4 simultaneously to toggle
between single play and the
Personal Audio Feature.
VOLUME MEDIA
MEMSEEK1
2
3
4
5
6
Entertainment Systems
49
Page 52 of 272
20815.psp Ford O/G 2002 Excursion English 4th Print 2C3J-19A321-HB 04/24/2003 09:14:57 26 B
If the CD/DVD is not removed within the allotted time, the system will
pull the CD/DVD back into the system for safety purposes. If the
CD/DVD will not eject from the system, press and hold the EJECT
control for approximately 2 seconds. The disc should eject whether the
vehicle ignition is ON or OFF.
Playing a video game/auxiliary device
1. Connect the video line from your video game device to the YELLOW
auxiliary input jack.
2. Connect the left and right audio lines to the WHITE and RED auxiliary
input jacks respectively.
3. Press the MODE control until DVD/CD AUX (no disc in player) or
DVD/CD play (disc in player) illuminates in the radio display. If a disc is
in the system, playback should begin. To enable the aux inputs, press the
STOP control or press the AUX control on the DVD player.
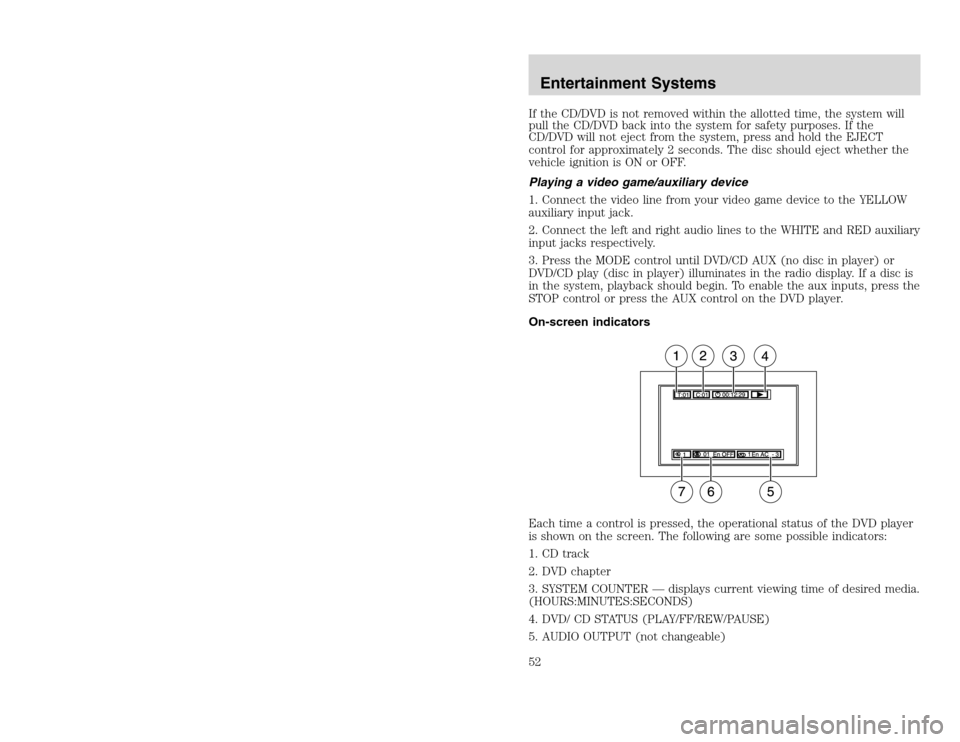
On-screen indicators
Each time a control is pressed, the operational status of the DVD player
is shown on the screen. The following are some possible indicators:
1. CD track
2. DVD chapter
3. SYSTEM COUNTER — displays current viewing time of desired media.
(HOURS:MINUTES:SECONDS)
4. DVD/ CD STATUS (PLAY/FF/REW/PAUSE)
5. AUDIO OUTPUT (not changeable)Entertainment Systems52
Page 53 of 272
20815.psp Ford O/G 2002 Excursion English 4th Print 2C3J-19A321-HB 04/24/2003 09:14:57 27 A
6. Subtitles (specific language type - English or Spanish, dependent of
disc capability and ON/OFF selection.)
7. Camera angle (of picture) - Adjustable with cursor controls and
ENTER control.
Safety information
Read all of the safety and operating instructions before operating the
system and retain for future reference.
Do not attempt to service, repair or modify the Rear Seat Entertainment
DVD System. See your Ford or Lincoln Mercury dealer.
Do not insert foreign objects into the DVD compartment.
The front glass on the liquid crystal display (LCD) flip-down
screen may break when hit with a hard surface. If the glass
breaks, do not touch the liquid crystalline material. In case of contact
with skin, wash immediately with soap and water.
Do not expose the liquid crystal display (LCD) flip-down screen
to direct sunlight or intensive ultraviolet rays for extensive
periods of time. Ultraviolet rays deteriorate the liquid crystal.
Be sure to review User Manuals for video games and video game
equipment when used as auxiliary inputs for your Rear Seat
Entertainment DVD System.
Do not operate video games or video equipment if the power cords
and/or cables are broken, split or damaged. Carefully place cords and/or
cables where they will not be stepped on or interfere with the operation
of seats and/or compartments.
Disconnect video games and video equipment power cords and/or cables
when not in use.
Avoid touching auxiliary input jacks with your fingers. Do not blow on
them or allow them to get wet or dirty.
Do not clean any part of the DVD layer with benzene, paint thinner or
any other solvent.
Federal Communication Commission (FCC) Compliance
Changes or modifications not approved by Ford Lincoln Mercury could void
user’s authority to operate the equipment. This equipment has been tested
and found to comply with the limits for a Class B digital device, pursuant
to Part 15 of the FCC Rules. These limits are designed to provide
Entertainment Systems
53
Page 68 of 272
20815.psp Ford O/G 2002 Excursion English 4th Print 2C3J-19A321-HB 04/24/2003 09:14:57 34 B
AUXILIARY A/C-HEATER CONTROLS (IF EQUIPPED)
Depending upon the equipment package of your vehicle, your vehicle
may be equipped with auxiliary climate controls. The auxiliary climate
control feature provides increased capacity to quickly heat or cool the
vehicle.
Your auxiliary climate controls are located in the overhead console of the
first row seating and in the headliner of the second row seating. The
auxiliary climate controls are dependent on the main climate control
system. If the main climate control system is in the OFF position, the
auxiliary climate controls will not work. In addition, if the main climate
control system is operating at a full cool temperature (MAX A/C
or
), the auxiliary temperature control becomes non-functional and
also operates at a full cool temperature.
The auxiliary unit can be controlled either by the front seat using the
front auxiliary control or by the rear seat passenger using the rear
auxiliary control, but not both. To control the auxiliary unit using the
rear control, the front control must be in the REAR position.
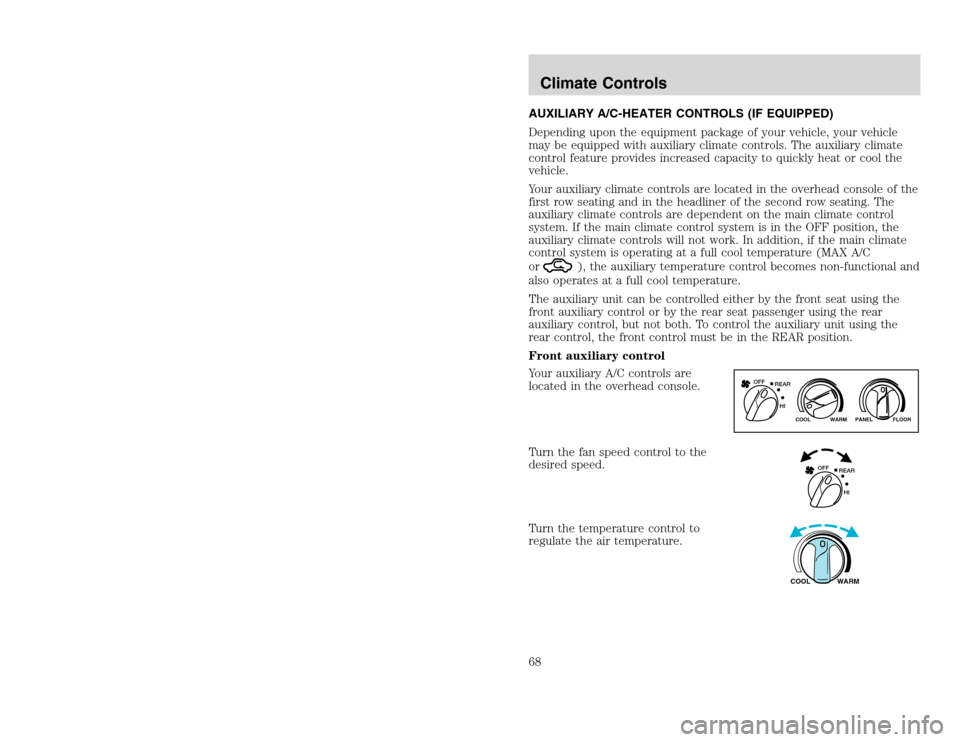
Front auxiliary control
Your auxiliary A/C controls are
located in the overhead console.
Turn the fan speed control to the
desired speed.
Turn the temperature control to
regulate the air temperature.
WARM PANEL FLOOR COOL
REAR OFF
HI
REAR OFF
HIWARM COOL
Climate Controls68
Page 69 of 272
20815.psp Ford O/G 2002 Excursion English 4th Print 2C3J-19A321-HB 04/24/2003 09:14:57 35 A
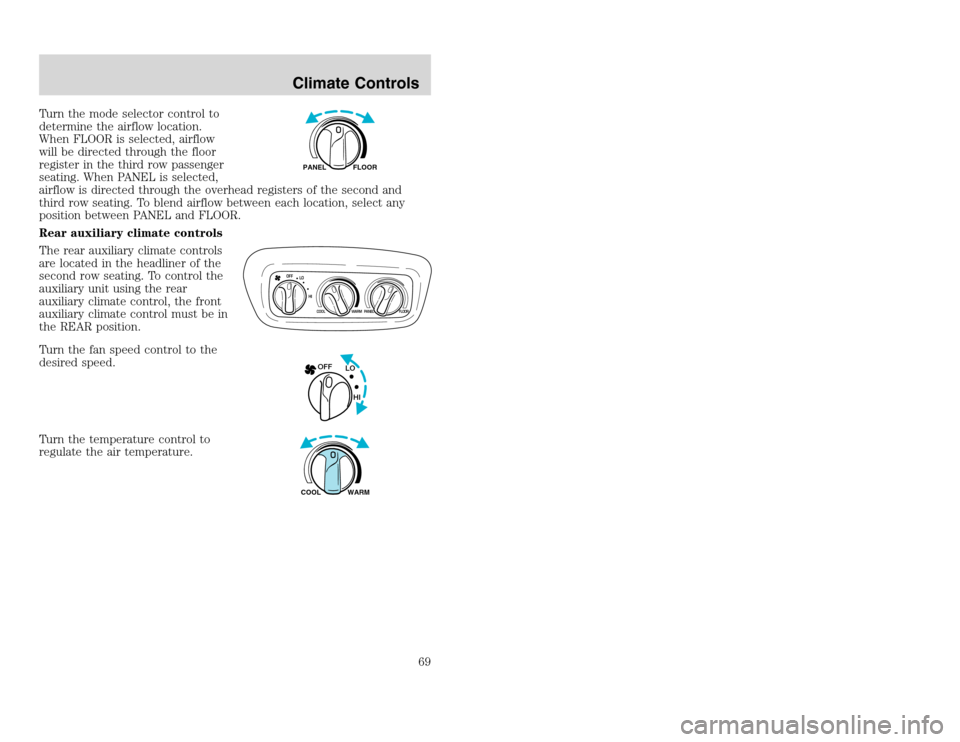
Turn the mode selector control to
determine the airflow location.
When FLOOR is selected, airflow
will be directed through the floor
register in the third row passenger
seating. When PANEL is selected,
airflow is directed through the overhead registers of the second and
third row seating. To blend airflow between each location, select any
position between PANEL and FLOOR.
Rear auxiliary climate controls
The rear auxiliary climate controls
are located in the headliner of the
second row seating. To control the
auxiliary unit using the rear
auxiliary climate control, the front
auxiliary climate control must be in
the REAR position.
Turn the fan speed control to the
desired speed.
Turn the temperature control to
regulate the air temperature.
FLOOR PANEL
OFF
LO
HI
COOL
WARM PANEL FLOORLO OFF
HIWARM COOL
Climate Controls
69
Page 83 of 272
20815.psp Ford O/G 2002 Excursion English 4th Print 2C3J-19A321-HB 04/24/2003 09:14:57 42 A
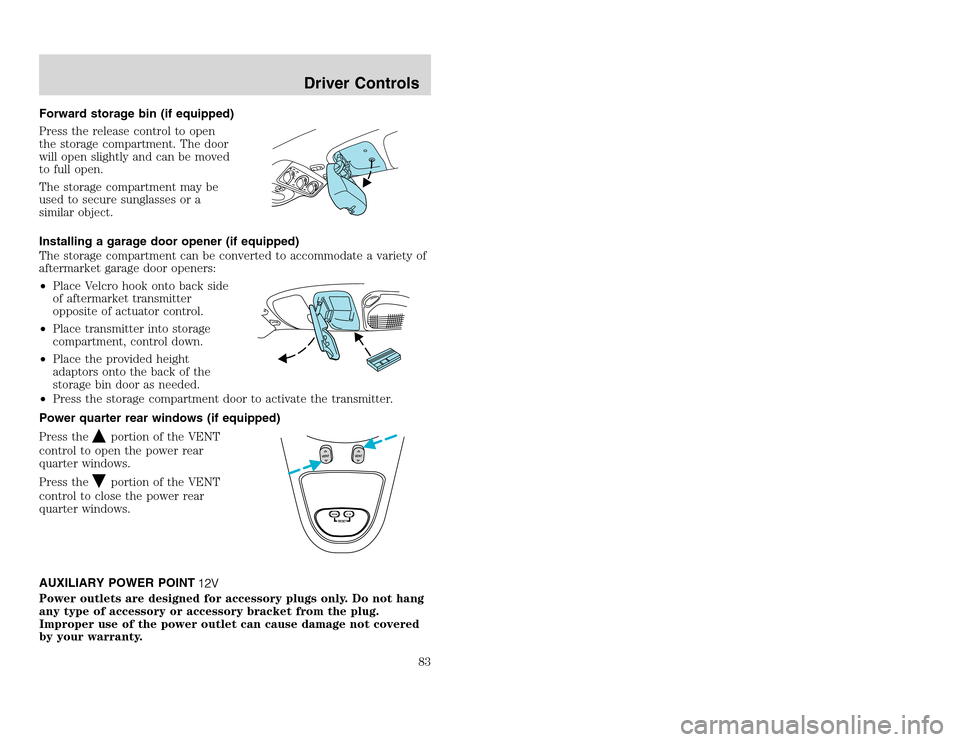
Forward storage bin (if equipped)
Press the release control to open
the storage compartment. The door
will open slightly and can be moved
to full open.
The storage compartment may be
used to secure sunglasses or a
similar object.
Installing a garage door opener (if equipped)
The storage compartment can be converted to accommodate a variety of
aftermarket garage door openers:
•Place Velcro hook onto back side
of aftermarket transmitter
opposite of actuator control.
•Place transmitter into storage
compartment, control down.
•Place the provided height
adaptors onto the back of the
storage bin door as needed.
•Press the storage compartment door to activate the transmitter.
Power quarter rear windows (if equipped)
Press the
portion of the VENT
control to open the power rear
quarter windows.
Press theportion of the VENT
control to close the power rear
quarter windows.
AUXILIARY POWER POINT
Power outlets are designed for accessory plugs only. Do not hang
any type of accessory or accessory bracket from the plug.
Improper use of the power outlet can cause damage not covered
by your warranty.
RESET
VENT
VENT
MODE E/M
Driver Controls
83