fuel FORD EXPEDITION 2001 1.G User Guide
[x] Cancel search | Manufacturer: FORD, Model Year: 2001, Model line: EXPEDITION, Model: FORD EXPEDITION 2001 1.GPages: 280, PDF Size: 1.79 MB
Page 155 of 280
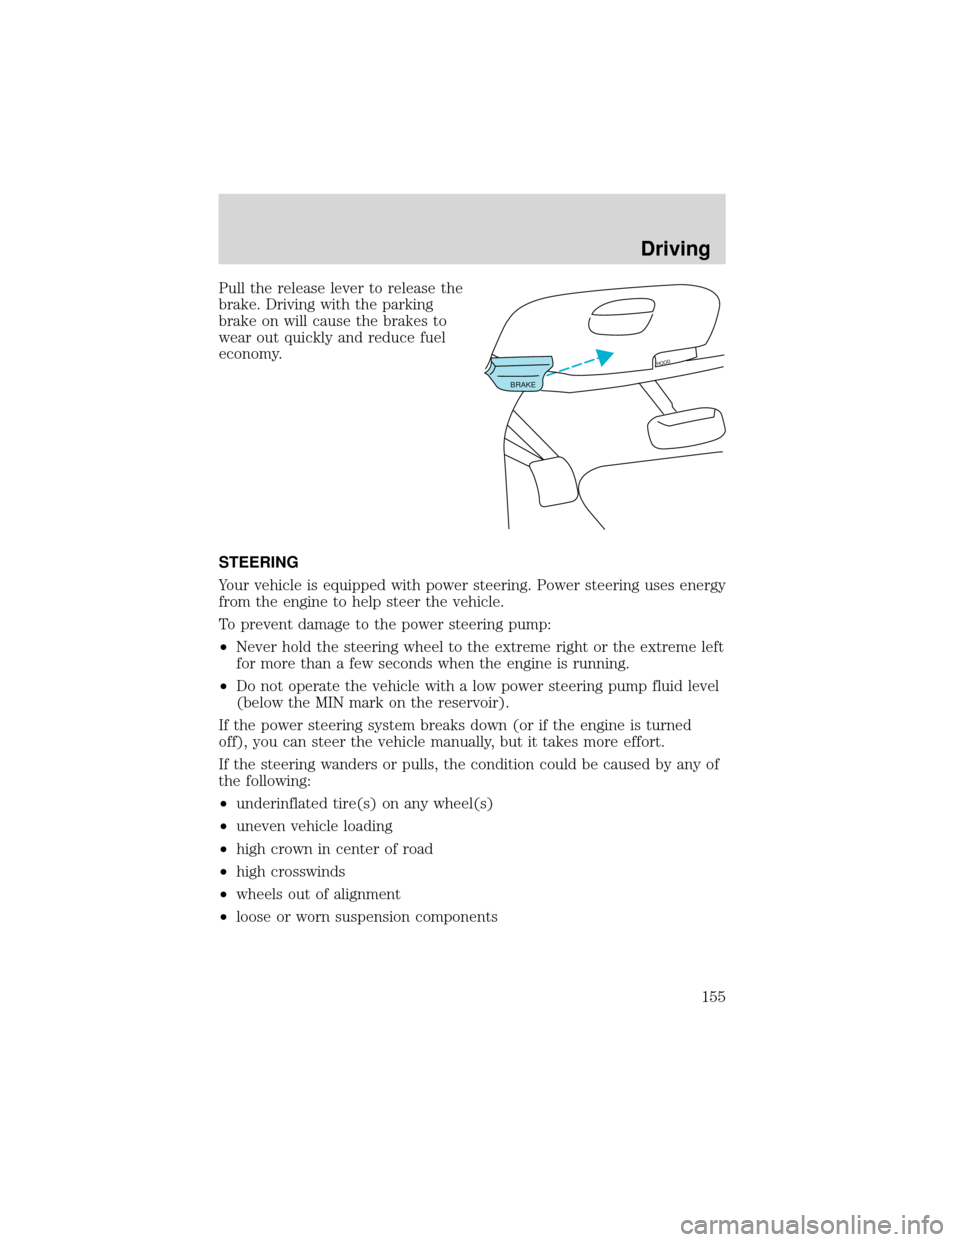
Pull the release lever to release the
brake. Driving with the parking
brake on will cause the brakes to
wear out quickly and reduce fuel
economy.
STEERING
Your vehicle is equipped with power steering. Power steering uses energy
from the engine to help steer the vehicle.
To prevent damage to the power steering pump:
•Never hold the steering wheel to the extreme right or the extreme left
for more than a few seconds when the engine is running.
•Do not operate the vehicle with a low power steering pump fluid level
(below the MIN mark on the reservoir).
If the power steering system breaks down (or if the engine is turned
off), you can steer the vehicle manually, but it takes more effort.
If the steering wanders or pulls, the condition could be caused by any of
the following:
•underinflated tire(s) on any wheel(s)
•uneven vehicle loading
•high crown in center of road
•high crosswinds
•wheels out of alignment
•loose or worn suspension components
BRAKE
HOOD
Driving
155
Page 161 of 280
R (Reverse)
With the gearshift lever in R
(Reverse), the vehicle will move
backward. Always come to a
complete stop before shifting into
and out of R (Reverse).
N (Neutral)
With the gearshift lever in N
(Neutral), the vehicle can be started
and is free to roll. Hold the brake
pedal down while in this gear.
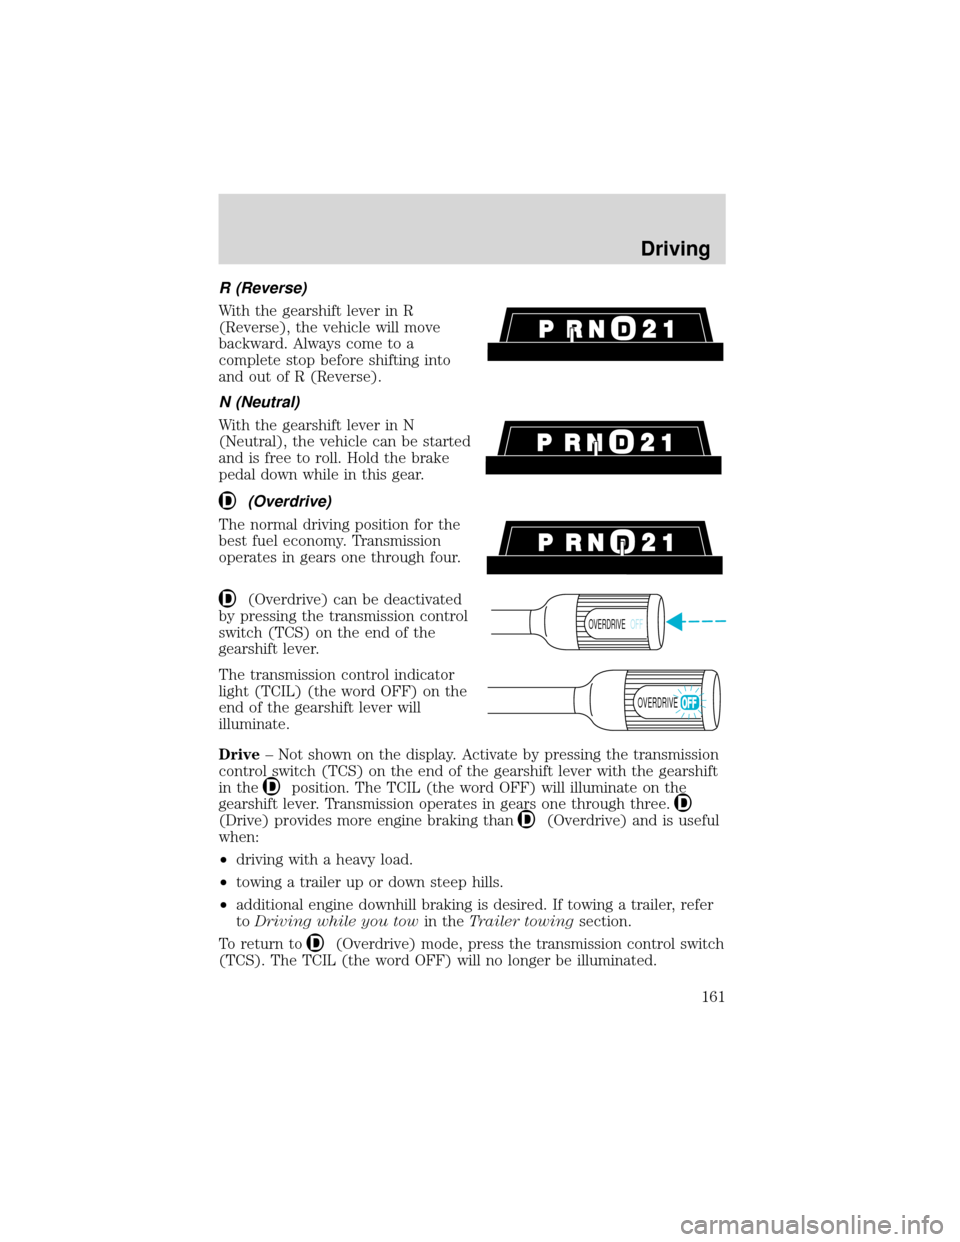
(Overdrive)
The normal driving position for the
best fuel economy. Transmission
operates in gears one through four.
(Overdrive) can be deactivated
by pressing the transmission control
switch (TCS) on the end of the
gearshift lever.
The transmission control indicator
light (TCIL) (the word OFF) on the
end of the gearshift lever will
illuminate.
Drive–Not shown on the display. Activate by pressing the transmission
control switch (TCS) on the end of the gearshift lever with the gearshift
in the
position. The TCIL (the word OFF) will illuminate on the
gearshift lever. Transmission operates in gears one through three.
(Drive) provides more engine braking than(Overdrive) and is useful
when:
•driving with a heavy load.
•towing a trailer up or down steep hills.
•additional engine downhill braking is desired. If towing a trailer, refer
toDriving while you towin theTrailer towingsection.
To return to
(Overdrive) mode, press the transmission control switch
(TCS). The TCIL (the word OFF) will no longer be illuminated.
OVERDRIVEOFF
OVERDRIVE
Driving
161
Page 163 of 280
FOUR-WHEEL DRIVE (4WD) OPERATION (IF EQUIPPED)
For important information regarding safe operation of this type
of vehicle, seePreparing to drive your vehiclein this chapter.
When Four–wheel drive (4WD) is engaged, power is supplied to all four
wheels through a transfer case. 4WD power can be selected when
additional driving power is desired.
If equipped with the Electronic Shift 4WD System, and the
instrument panel control is moved to 4WD Low while the vehicle
is moving, the system will not engage and no damage will occur to
the 4WD system. Before 4WD Low can be engaged, the vehicle
must be at a complete stop with the brake pedal depressed and
the transmission in N (Neutral).
4H or 4L operation is not recommended on dry pavement. Doing
so could result in difficult disengagement of the transfer case,
damage to the transfer case, increased tire wear, decreased fuel
economy and difficulty turning.
CONTROL-TRAC AUTOMATIC FOUR-WHEEL DRIVE SYSTEM
(IF EQUIPPED)
Your 4x4 features the heavy-duty Control-Trac system which includes a
computer-operated transfer case. This unique system is interactive with
the road, continually monitoring and adjusting torque delivery to the
front and rear wheels to optimize vehicle control.
Driving
163
Page 175 of 280
Driving while you tow
When towing a trailer:
•Ensure that you turn off your speed control. The speed control may
shut off automatically when you are towing on long, steep grades.
•Consult your local motor vehicle speed regulations for towing a trailer.
•Use a lower gear when towing up or down steep hills. This will
eliminate excessive downshifting and upshifting for optimum fuel
economy and transmission cooling.
•Anticipate stops and brake gradually.
Exceeding the GCWR rating may cause internal transmission
damage and void your warranty coverage.
Servicing after towing
If you tow a trailer for long distances, your vehicle will require more
frequent service intervals. Refer to your scheduled maintenance guide for
more information.
Recreational towing (all wheels on the ground)
An example of recreational towing would be towing your vehicle behind
a Motorhome. Follow these guidelines if you have the need for
recreational towing your vehicle with all four wheels on the ground.
These guidelines are designed to ensure that your transmission is not
damaged.
2WD vehicles (with automatic transmissions)
•Place the transmission in N (Neutral)
•Maximum speed is 56 km (35 mph)
•Maximum distance is 80 km (50 miles)
If a distance of 80 km (50 miles) or a speed of 56 km (35 mph) must be
exceeded, the drive shaft will have to be removed while the vehicle is
being towed.
Ford recommends the driveshaft be removed/installed only by a qualified
technician. See your local dealer for driveshaft removal/installation.
Improper removal/installation of the driveshaft can cause
transmission fluid loss, damage to the driveshaft and internal
transmission components.
Driving
175
Page 178 of 280
GETTING ROADSIDE ASSISTANCE
To fully assist you should you have a vehicle concern, Ford offers a
complimentary roadside assistance program. This program is separate
from the New Vehicle Limited Warranty. The service is available:
•24–hours, seven days a week
•for the Basic warranty period (Canada) or New Vehicle Limited
Warranty period (U.S.) of three years or 60 000 km (36 000 miles),
whichever comes first on Ford and Mercury vehicles, and four years or
80 000 km (50 000 miles) on Lincoln vehicles
Roadside assistance will cover:
•changing a flat tire
•jump-starts
•lock-out assistance
•fuel delivery
•towing of your disabled vehicle up to 56.3 kms (35 miles) from the
point of pickup (this can include to the nearest Ford dealership, or
your selling dealer if within the specified distance.) One tow per
disablement. Even non-warranty related tows, like accidents or getting
stuck in the mud or snow, are covered (some exclusions apply, such
as impound towing or repossession).
Using roadside assistance
Complete the roadside assistance identification card and place it in your
wallet for quick reference. In the United States, this card is found in the
Owner Guide portfolio in the glove compartment in Ford vehicles and is
mailed to you if you own a Mercury or Lincoln. In Canada, the card is
found in the Roadside Assistance book in the glove compartment.
To receive roadside assistance in the United States for Ford or Mercury
vehicles, call 1–800–241–3673 or if you own a Lincoln vehicle, call
1–800–521–4140. In Canada call 1–800–665–2006.
Should you need to arrange roadside assistance for yourself, Ford will
reimburse a reasonable amount. To obtain information about
reimbursement, call 1–800–241–3673 in the United States for Ford or
Mercury vehicles; or if you own a Lincoln vehicle, call 1–800–521–4140.
Call 1–800–665–2006 in Canada.
Roadside emergencies
178
Page 179 of 280
Roadside coverage beyond basic warranty
In the United States, you may purchase additional roadside assistance
coverage beyond this period through the Ford Auto Club by contacting
your Ford or Lincoln Mercury dealer.
Similarly in Canada, for uninterrupted Roadside Assistance coverage, you
may purchase extended coverage prior to your Basic Warranty’s Roadside
Assistance expiring. For more information and enrollment, contact
1–877–294–2582 or visit our website at www.ford.ca.
HAZARD FLASHER
Use only in an emergency to warn traffic of vehicle breakdown,
approaching danger, etc. The hazard flashers can be operated when the
ignition is off.
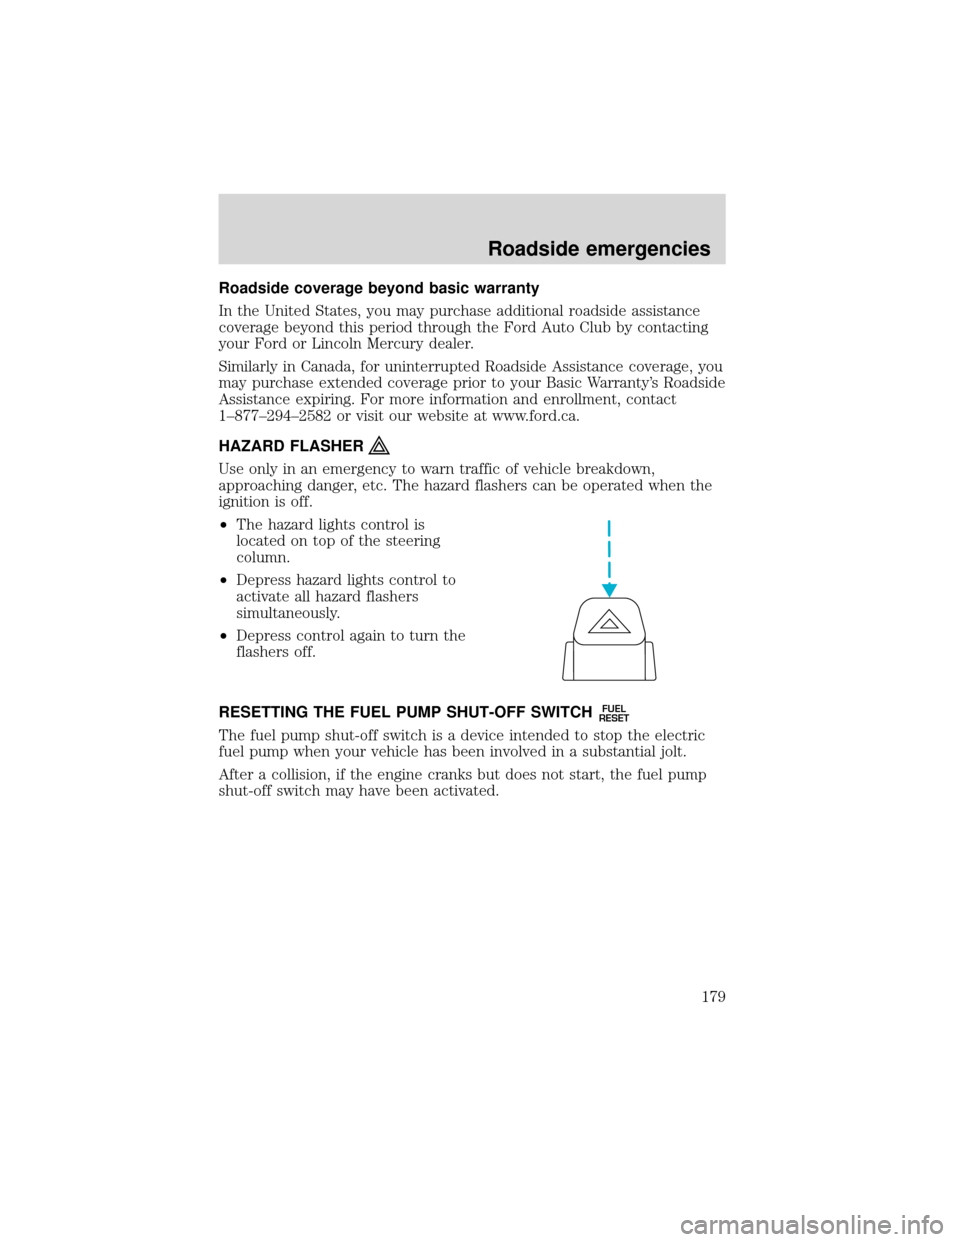
•The hazard lights control is
located on top of the steering
column.
•Depress hazard lights control to
activate all hazard flashers
simultaneously.
•Depress control again to turn the
flashers off.
RESETTING THE FUEL PUMP SHUT-OFF SWITCH
FUEL
RESET
The fuel pump shut-off switch is a device intended to stop the electric
fuel pump when your vehicle has been involved in a substantial jolt.
After a collision, if the engine cranks but does not start, the fuel pump
shut-off switch may have been activated.
Roadside emergencies
179
Page 180 of 280
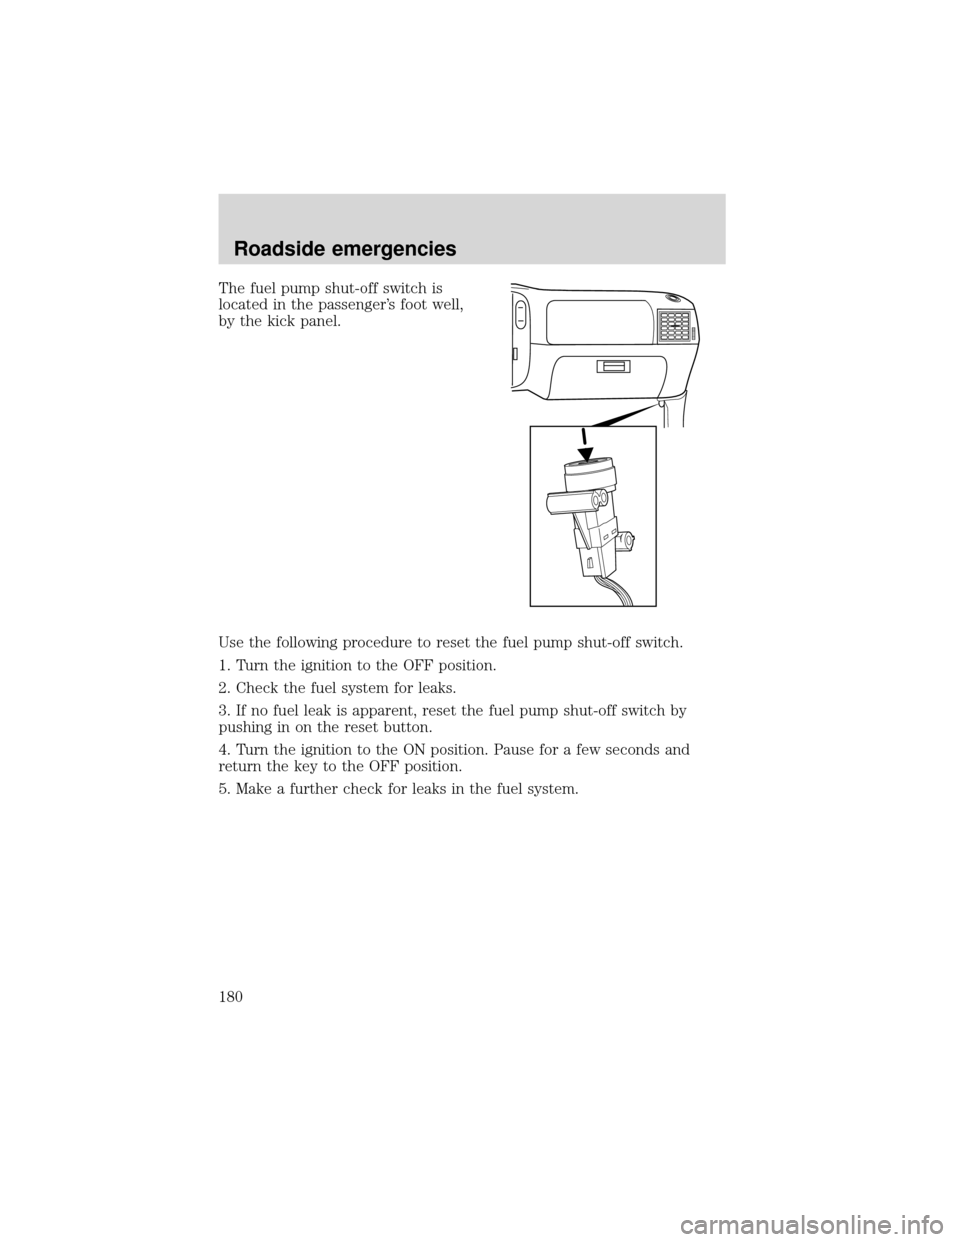
The fuel pump shut-off switch is
located in the passenger’s foot well,
by the kick panel.
Use the following procedure to reset the fuel pump shut-off switch.
1. Turn the ignition to the OFF position.
2. Check the fuel system for leaks.
3. If no fuel leak is apparent, reset the fuel pump shut-off switch by
pushing in on the reset button.
4. Turn the ignition to the ON position. Pause for a few seconds and
return the key to the OFF position.
5. Make a further check for leaks in the fuel system.
Roadside emergencies
180
Page 186 of 280
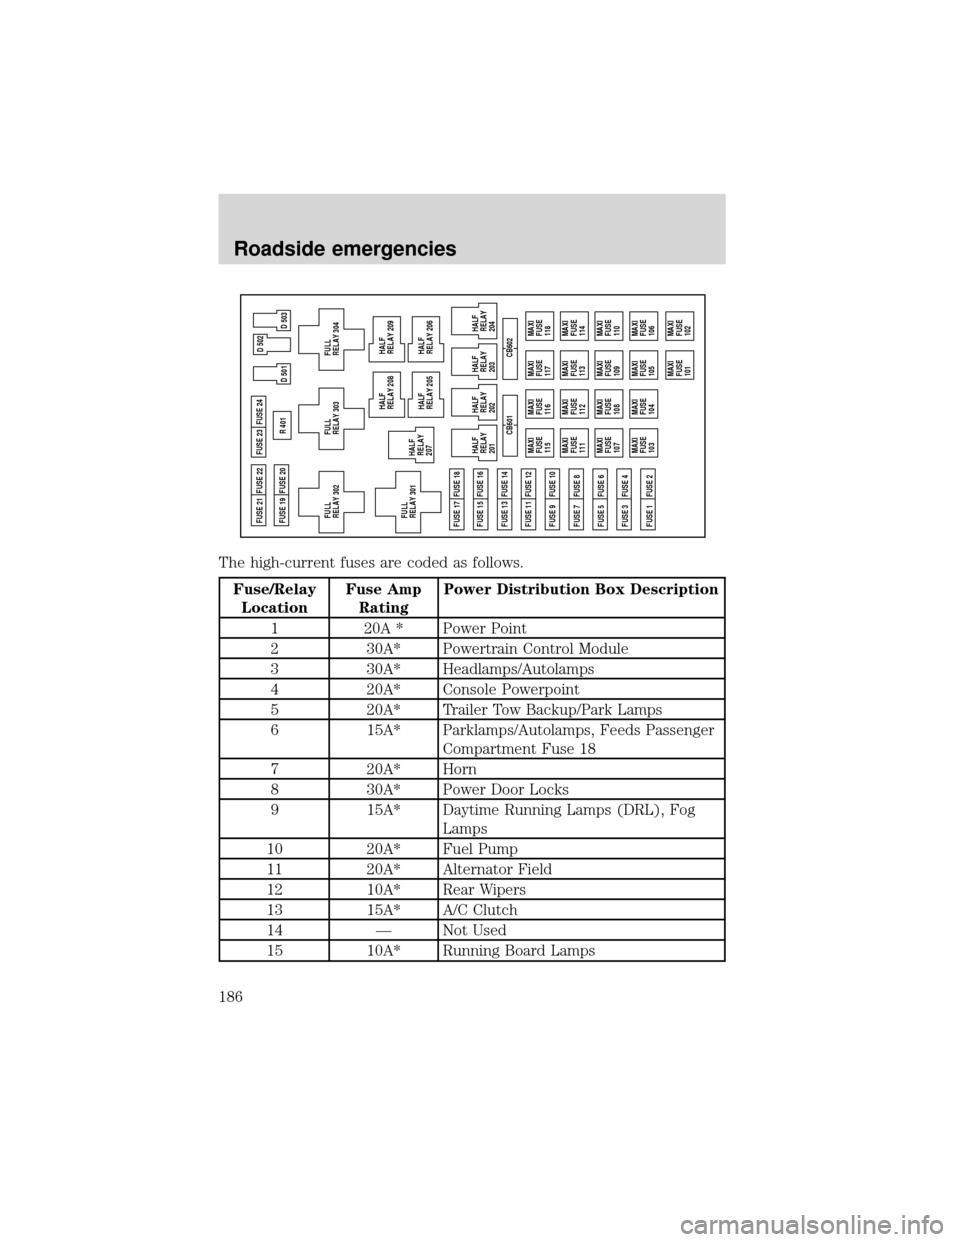
The high-current fuses are coded as follows.
Fuse/Relay
LocationFuse Amp
RatingPower Distribution Box Description
1 20A * Power Point
2 30A* Powertrain Control Module
3 30A* Headlamps/Autolamps
4 20A* Console Powerpoint
5 20A* Trailer Tow Backup/Park Lamps
6 15A* Parklamps/Autolamps, Feeds Passenger
Compartment Fuse 18
7 20A* Horn
8 30A* Power Door Locks
9 15A* Daytime Running Lamps (DRL), Fog
Lamps
10 20A* Fuel Pump
11 20A* Alternator Field
12 10A* Rear Wipers
13 15A* A/C Clutch
14—Not Used
15 10A* Running Board Lamps
MAXI
FUSE
115MAXI
FUSE
116MAXI
FUSE
117
MAXI
FUSE
118
MAXI
FUSE
111MAXI
FUSE
112MAXI
FUSE
113
MAXI
FUSE
114
MAXI
FUSE
107MAXI
FUSE
108MAXI
FUSE
109
MAXI
FUSE
110
MAXI
FUSE
103MAXI
FUSE
104MAXI
FUSE
105
MAXI
FUSE
106
MAXI
FUSE
101MAXI
FUSE
102 CB601 CB602 FUSE 17 FUSE 18FUSE 21 FUSE 22
FUSE 19 FUSE 20FUSE 23
FULL
RELAY 302R 401
D 501 FUSE 24
FUSE 15 FUSE 16
FUSE 13 FUSE 14
FUSE 11 FUSE 12
FUSE 9 FUSE 10
FUSE 7 FUSE 8
FUSE 5 FUSE 6
FUSE 3 FUSE 4
FUSE 1 FUSE 2
D 503 D 502
FULL
RELAY 301HALF
RELAY
207
FULL
RELAY 303
FULL
RELAY 304
HALF
RELAY
201
HALF
RELAY
202HALF
RELAY 208
HALF
RELAY 209
HALF
RELAY 205
HALF
RELAY 206
HALF
RELAY
203
HALF
RELAY
204
Roadside emergencies
186
Page 187 of 280
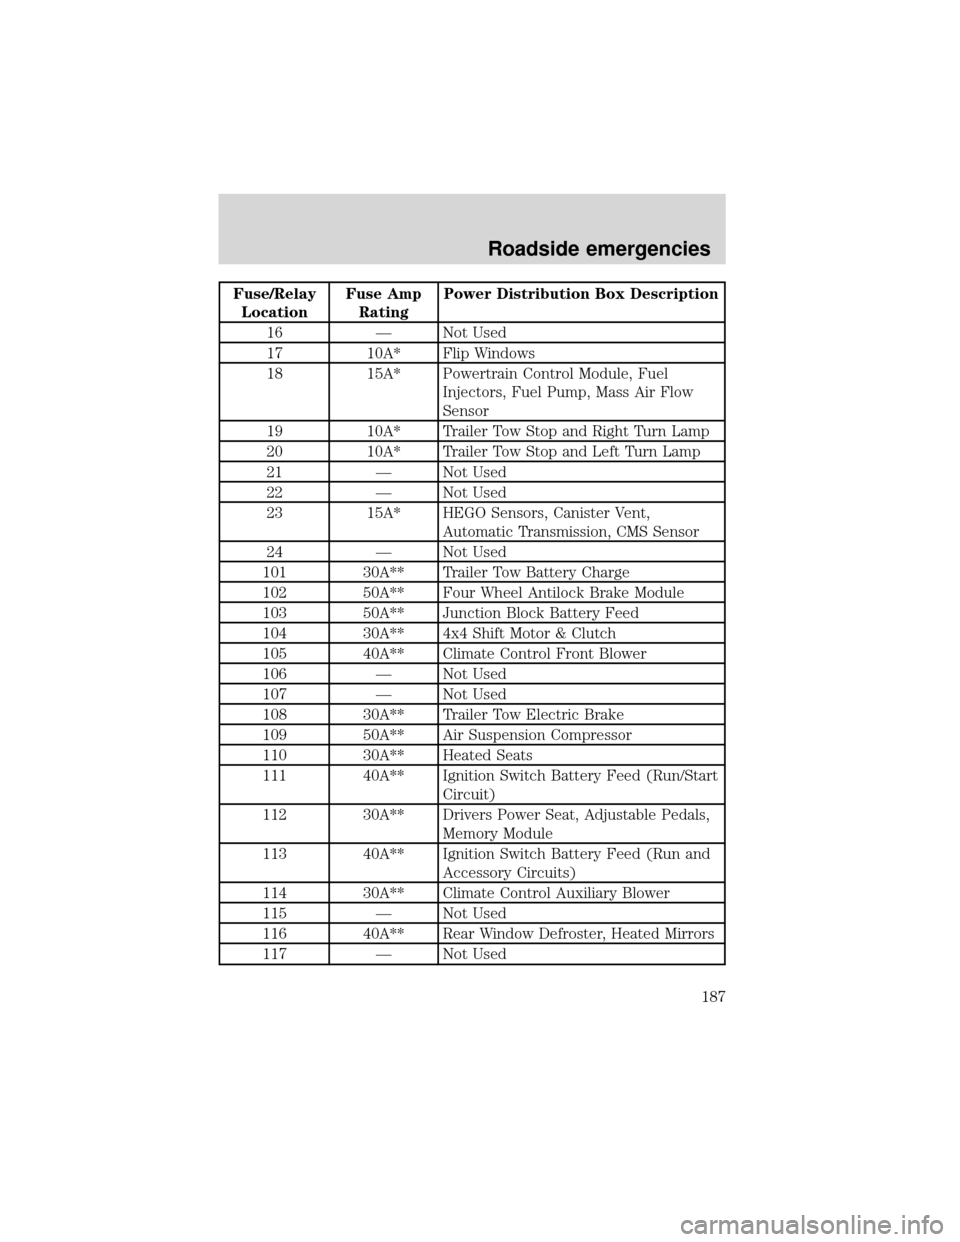
Fuse/Relay
LocationFuse Amp
RatingPower Distribution Box Description
16—Not Used
17 10A* Flip Windows
18 15A* Powertrain Control Module, Fuel
Injectors, Fuel Pump, Mass Air Flow
Sensor
19 10A* Trailer Tow Stop and Right Turn Lamp
20 10A* Trailer Tow Stop and Left Turn Lamp
21—Not Used
22—Not Used
23 15A* HEGO Sensors, Canister Vent,
Automatic Transmission, CMS Sensor
24—Not Used
101 30A** Trailer Tow Battery Charge
102 50A** Four Wheel Antilock Brake Module
103 50A** Junction Block Battery Feed
104 30A** 4x4 Shift Motor & Clutch
105 40A** Climate Control Front Blower
106—Not Used
107—Not Used
108 30A** Trailer Tow Electric Brake
109 50A** Air Suspension Compressor
110 30A** Heated Seats
111 40A** Ignition Switch Battery Feed (Run/Start
Circuit)
112 30A** Drivers Power Seat, Adjustable Pedals,
Memory Module
113 40A** Ignition Switch Battery Feed (Run and
Accessory Circuits)
114 30A** Climate Control Auxiliary Blower
115—Not Used
116 40A** Rear Window Defroster, Heated Mirrors
117—Not Used
Roadside emergencies
187
Page 188 of 280
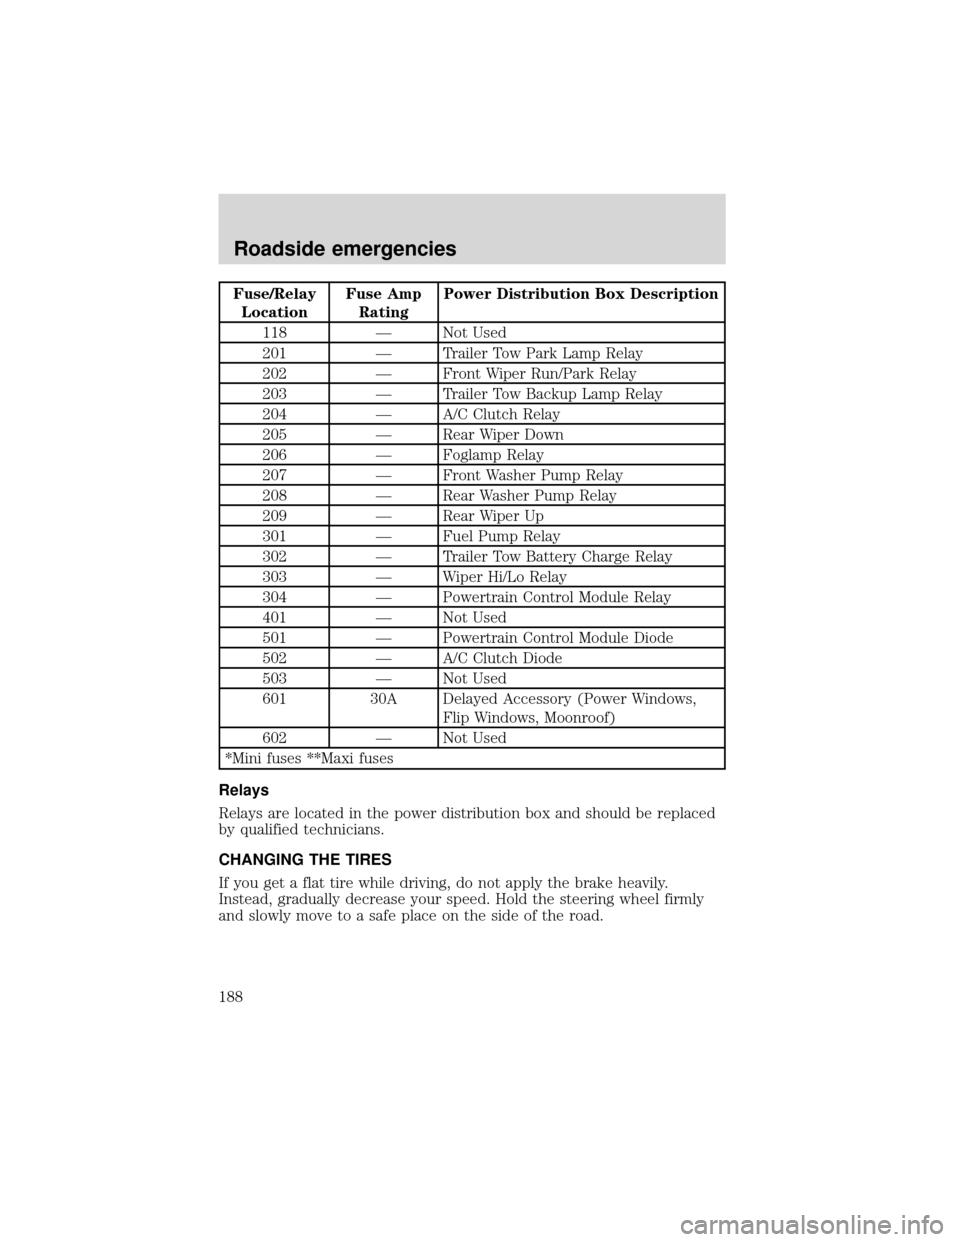
Fuse/Relay
LocationFuse Amp
RatingPower Distribution Box Description
118—Not Used
201—Trailer Tow Park Lamp Relay
202—Front Wiper Run/Park Relay
203—Trailer Tow Backup Lamp Relay
204—A/C Clutch Relay
205—Rear Wiper Down
206—Foglamp Relay
207—Front Washer Pump Relay
208—Rear Washer Pump Relay
209—Rear Wiper Up
301—Fuel Pump Relay
302—Trailer Tow Battery Charge Relay
303—Wiper Hi/Lo Relay
304—Powertrain Control Module Relay
401—Not Used
501—Powertrain Control Module Diode
502—A/C Clutch Diode
503—Not Used
601 30A Delayed Accessory (Power Windows,
Flip Windows, Moonroof)
602—Not Used
*Mini fuses **Maxi fuses
Relays
Relays are located in the power distribution box and should be replaced
by qualified technicians.
CHANGING THE TIRES
If you get a flat tire while driving, do not apply the brake heavily.
Instead, gradually decrease your speed. Hold the steering wheel firmly
and slowly move to a safe place on the side of the road.
Roadside emergencies
188