power steering FORD EXPEDITION 2002 1.G Owners Manual
[x] Cancel search | Manufacturer: FORD, Model Year: 2002, Model line: EXPEDITION, Model: FORD EXPEDITION 2002 1.GPages: 280, PDF Size: 2.32 MB
Page 1 of 280
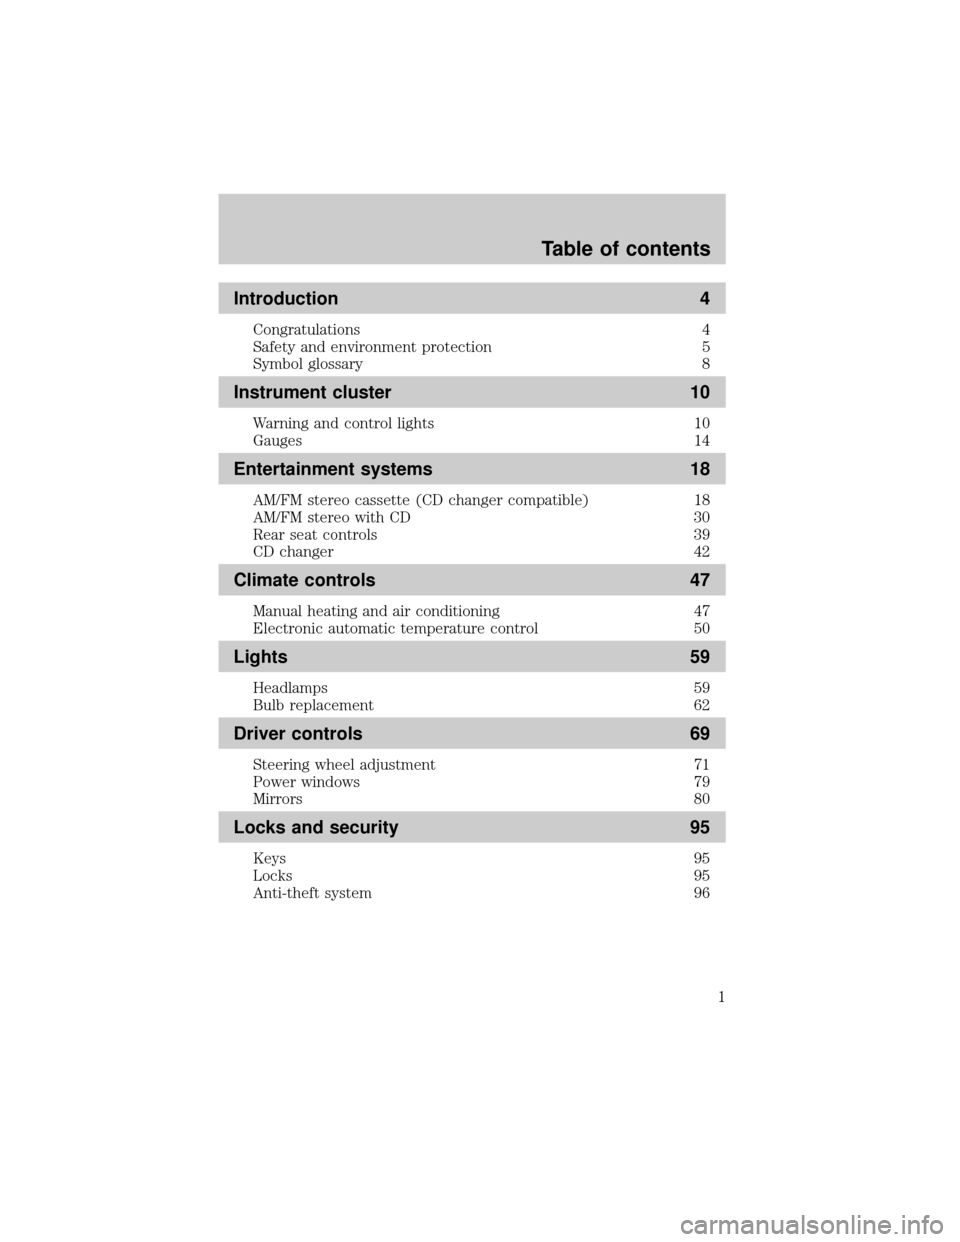
Introduction 4
Congratulations 4
Safety and environment protection 5
Symbol glossary 8
Instrument cluster 10
Warning and control lights 10
Gauges 14
Entertainment systems 18
AM/FM stereo cassette (CD changer compatible) 18
AM/FM stereo with CD 30
Rear seat controls 39
CD changer 42
Climate controls 47
Manual heating and air conditioning 47
Electronic automatic temperature control 50
Lights 59
Headlamps 59
Bulb replacement 62
Driver controls 69
Steering wheel adjustment 71
Power windows 79
Mirrors 80
Locks and security 95
Keys 95
Locks 95
Anti-theft system 96
Table of contents
1
Page 9 of 280
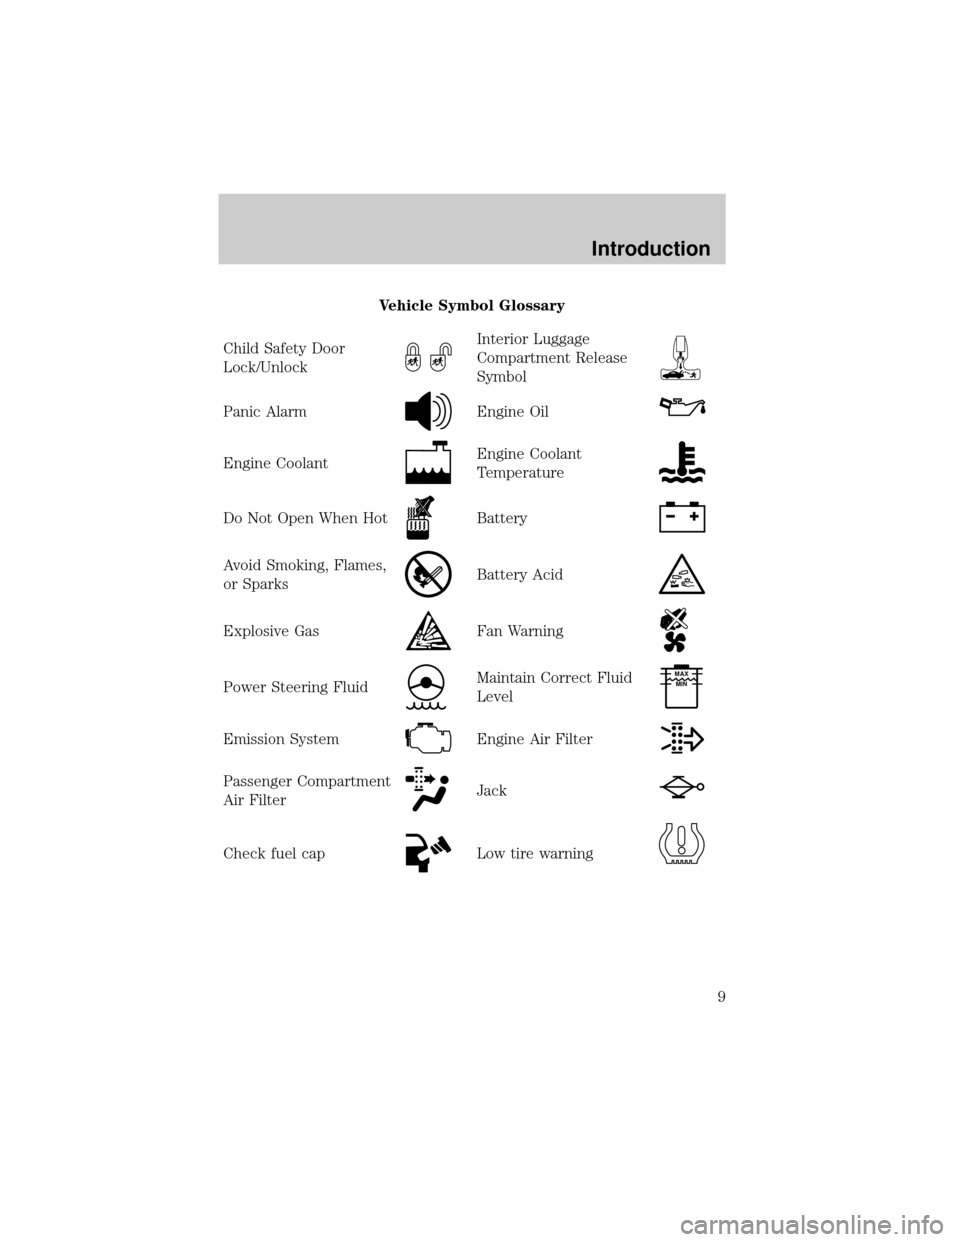
Vehicle Symbol Glossary
Child Safety Door
Lock/Unlock
Interior Luggage
Compartment Release
Symbol
Panic AlarmEngine Oil
Engine CoolantEngine Coolant
Temperature
Do Not Open When HotBattery
Avoid Smoking, Flames,
or SparksBattery Acid
Explosive GasFan Warning
Power Steering FluidMaintain Correct Fluid
LevelMAX
MIN
Emission SystemEngine Air Filter
Passenger Compartment
Air FilterJack
Check fuel capLow tire warning
Introduction
9
Page 150 of 280
STARTING
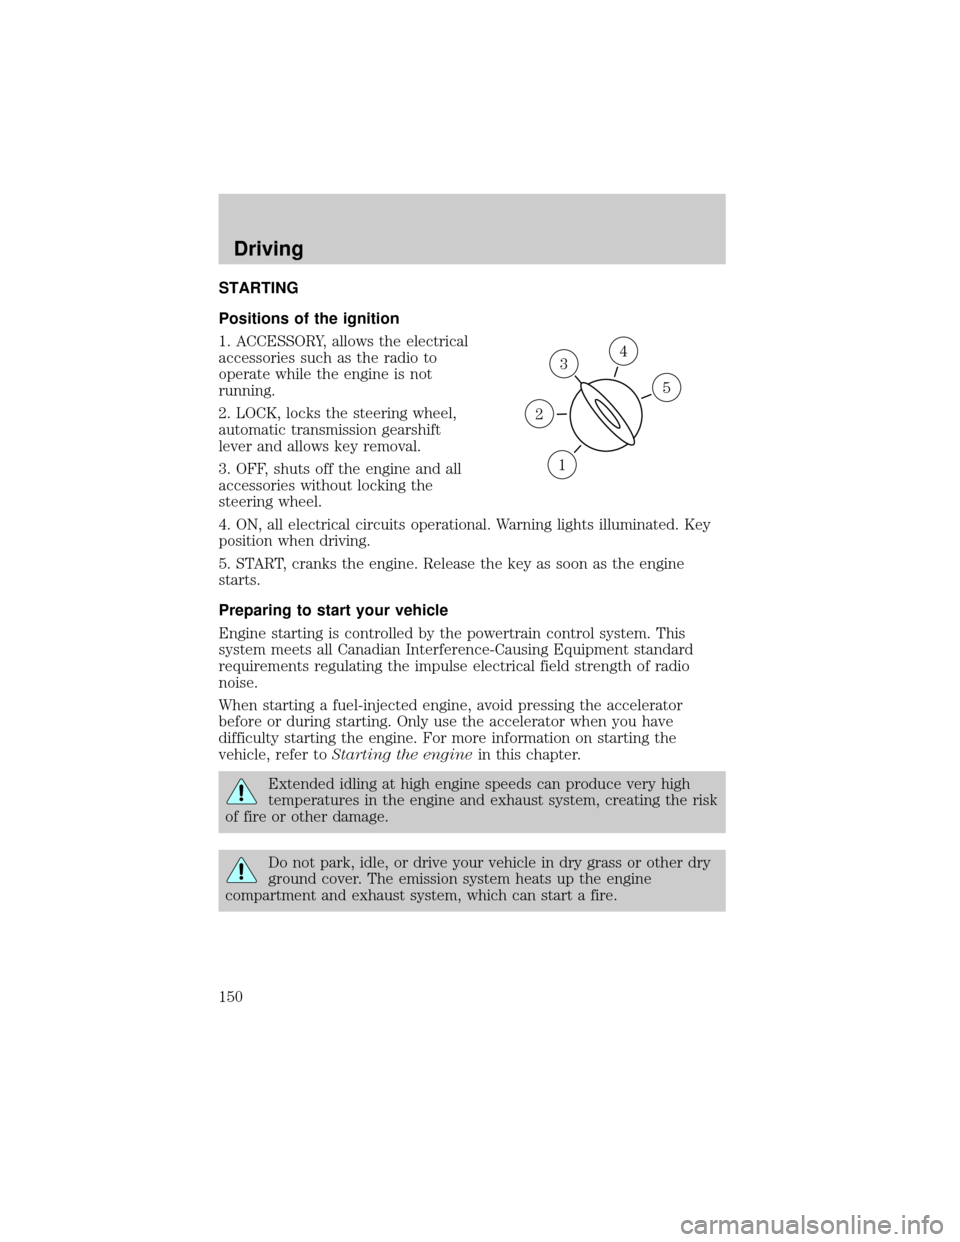
Positions of the ignition
1. ACCESSORY, allows the electrical
accessories such as the radio to
operate while the engine is not
running.
2. LOCK, locks the steering wheel,
automatic transmission gearshift
lever and allows key removal.
3. OFF, shuts off the engine and all
accessories without locking the
steering wheel.
4. ON, all electrical circuits operational. Warning lights illuminated. Key
position when driving.
5. START, cranks the engine. Release the key as soon as the engine
starts.
Preparing to start your vehicle
Engine starting is controlled by the powertrain control system. This
system meets all Canadian Interference-Causing Equipment standard
requirements regulating the impulse electrical field strength of radio
noise.
When starting a fuel-injected engine, avoid pressing the accelerator
before or during starting. Only use the accelerator when you have
difficulty starting the engine. For more information on starting the
vehicle, refer toStarting the enginein this chapter.
Extended idling at high engine speeds can produce very high
temperatures in the engine and exhaust system, creating the risk
of fire or other damage.
Do not park, idle, or drive your vehicle in dry grass or other dry
ground cover. The emission system heats up the engine
compartment and exhaust system, which can start a fire.
3
1
2
5
4
Driving
150
Page 157 of 280
The parking brake is not recommended to stop a moving vehicle.
However, if the normal brakes fail, the parking brake can be used to stop
your vehicle in an emergency. Since the parking brake applies only the
rear brakes, the vehicle's stopping distance will increase greatly and the
handling of your vehicle will be adversely affected.
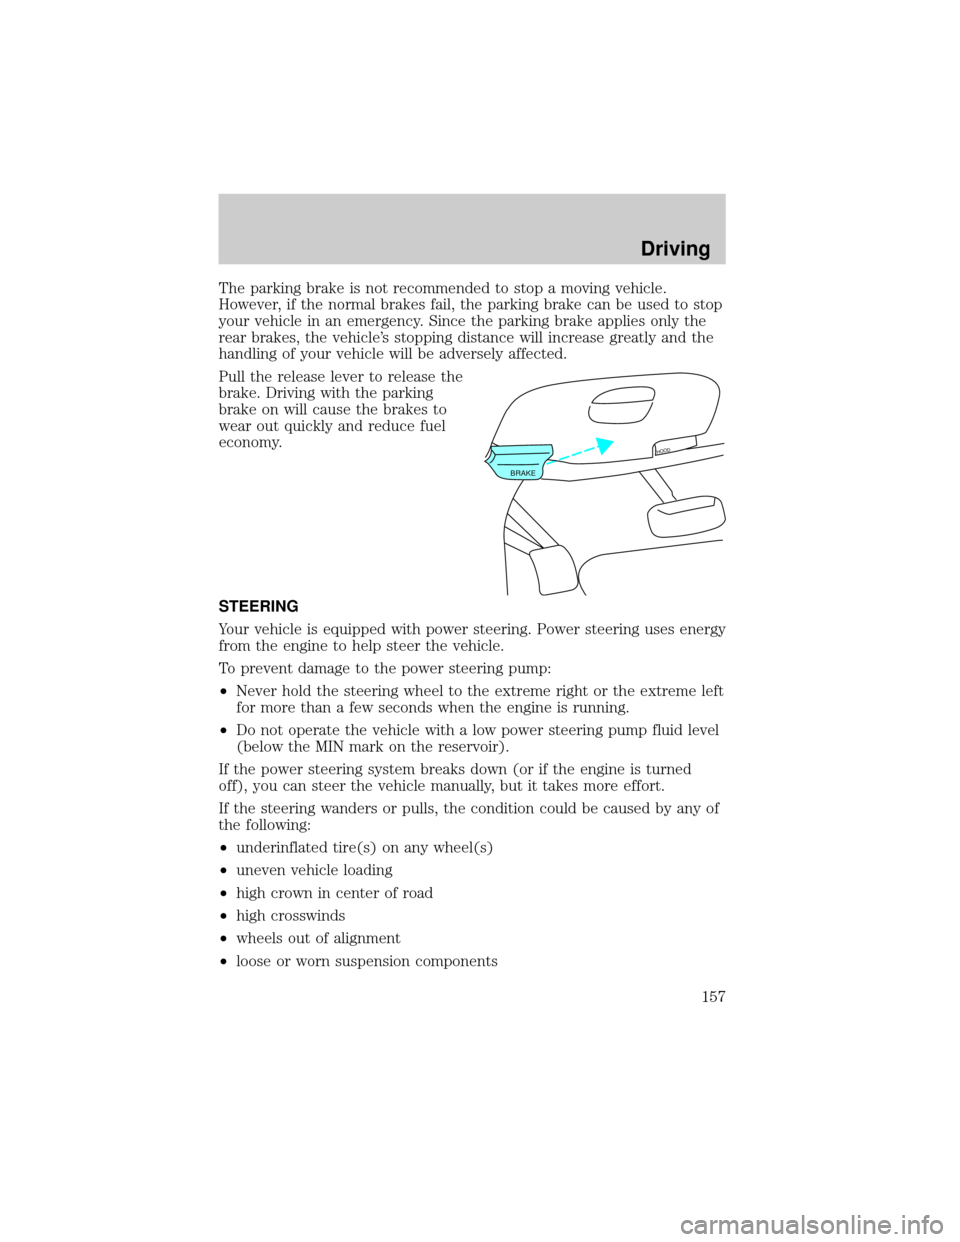
Pull the release lever to release the
brake. Driving with the parking
brake on will cause the brakes to
wear out quickly and reduce fuel
economy.
STEERING
Your vehicle is equipped with power steering. Power steering uses energy
from the engine to help steer the vehicle.
To prevent damage to the power steering pump:
²Never hold the steering wheel to the extreme right or the extreme left
for more than a few seconds when the engine is running.
²Do not operate the vehicle with a low power steering pump fluid level
(below the MIN mark on the reservoir).
If the power steering system breaks down (or if the engine is turned
off), you can steer the vehicle manually, but it takes more effort.
If the steering wanders or pulls, the condition could be caused by any of
the following:
²underinflated tire(s) on any wheel(s)
²uneven vehicle loading
²high crown in center of road
²high crosswinds
²wheels out of alignment
²loose or worn suspension components
BRAKE
HOOD
Driving
157
Page 158 of 280

Speed sensitive steering
The steering in your vehicle is speed sensitive. At high speeds, steering
assist will decrease to improve steering feel.
If the amount of effort required to steer your vehicle changes while
driving at a constant vehicle speed, have the power steering system
checked by your dealer or a qualified service technician.
AIR SUSPENSION SYSTEM (IF EQUIPPED)
The air suspension system is designed to improve ride, handling and
general vehicle performance for static, on and off-road driving conditions.
²The load leveling feature of the air suspension automatically keeps the
vehicle at a constant level if a load is added or removed from the
vehicle.
²The height adjustment feature automatically controls the vehicle
height over a range of approximately 5 cm (2 inches) based on vehicle
speed, ignition position and selection of two or four-wheel drive
modes.
²The air suspension automatically puts the vehicle at its lowest height
when ignition is OFF to provide easy entry and exit. Whenever a door
is opened (including the liftgate) the system memorizes and maintains
the height of the vehicle until all doors are closed or until vehicle
exceeds 16 km/h (10 mph).
²The air suspension system raises the vehicle to its normal ride
position when the ignition is turned on, all doors are closed and the
transmission is shifted into gear.
²In 4WD Low the air suspension system will not move to its lowest
height. In 4WD Low, the air suspension system raises the vehicle
above the normal ride height at speeds below 40 km/h (25 mph) to
improve ground clearance. In 4WD Low, do not exceed 56 km/h (35
mph).
²When the vehicle is in motion, the air suspension system will adjust
the vehicle's height according to ground clearance and speed to
maximize ride comfort.
²It is normal to occasionally hear a buzz or clicking from the vehicle's
air suspension system when the ignition is turned off. The system
stays energized for 40 minutes after the ignition is turned off to
compensate for any load changes made after the vehicle is parked.
Driving
158
Page 171 of 280
²In the event of an emergency stop, avoid skidding the tires and do not
attempt any sharp steering wheel movements.
²If the vehicle goes from one type of surface to another (i.e., from
concrete to gravel) there will be a change in the way the vehicle
responds to a maneuver (steering, acceleration or barking). Again,
avoid these abrupt inputs.
Parking
On some 4WD vehicles, when the transfer case is in the N (Neutral)
position, the engine and transmission are disconnected from the rest of
the driveline. Therefore, the vehicle is free to roll even if the automatic
transmission is in P (Park) or the manual transmission is in gear. Do not
leave the vehicle unattended with the transfer case in N (Neutral)
position. Always set the parking brake fully and turn off the ignition
when leaving the vehicle.
4WD Systems (if equipped)
4WD (when you select the 4WD mode), uses all four wheels to power
itself. This increases traction, enabling you to drive over terrain and road
conditions that a conventional two-wheel drive vehicle can't.
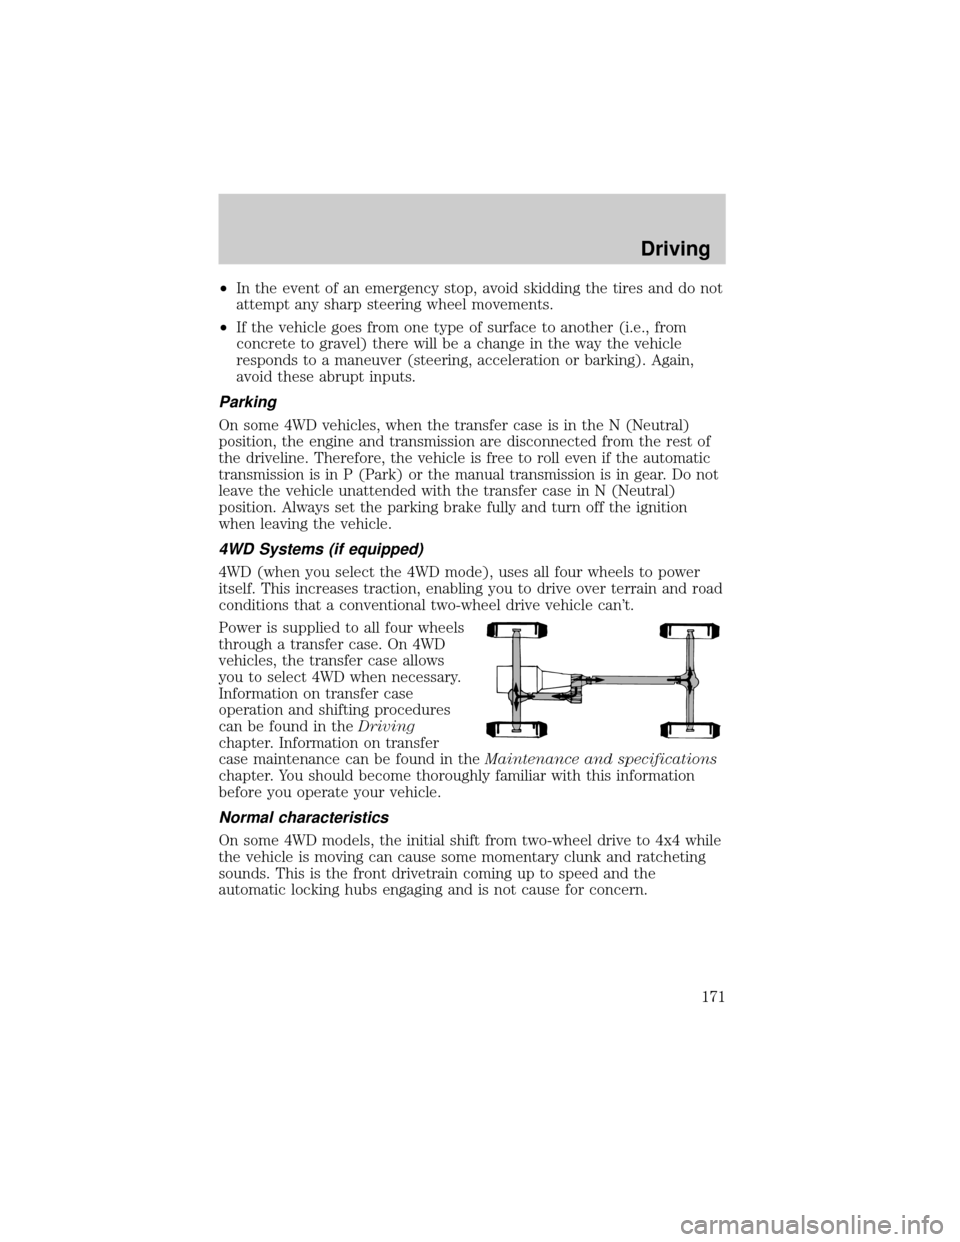
Power is supplied to all four wheels
through a transfer case. On 4WD
vehicles, the transfer case allows
you to select 4WD when necessary.
Information on transfer case
operation and shifting procedures
can be found in theDriving
chapter. Information on transfer
case maintenance can be found in theMaintenance and specifications
chapter. You should become thoroughly familiar with this information
before you operate your vehicle.
Normal characteristics
On some 4WD models, the initial shift from two-wheel drive to 4x4 while
the vehicle is moving can cause some momentary clunk and ratcheting
sounds. This is the front drivetrain coming up to speed and the
automatic locking hubs engaging and is not cause for concern.
Driving
171
Page 174 of 280
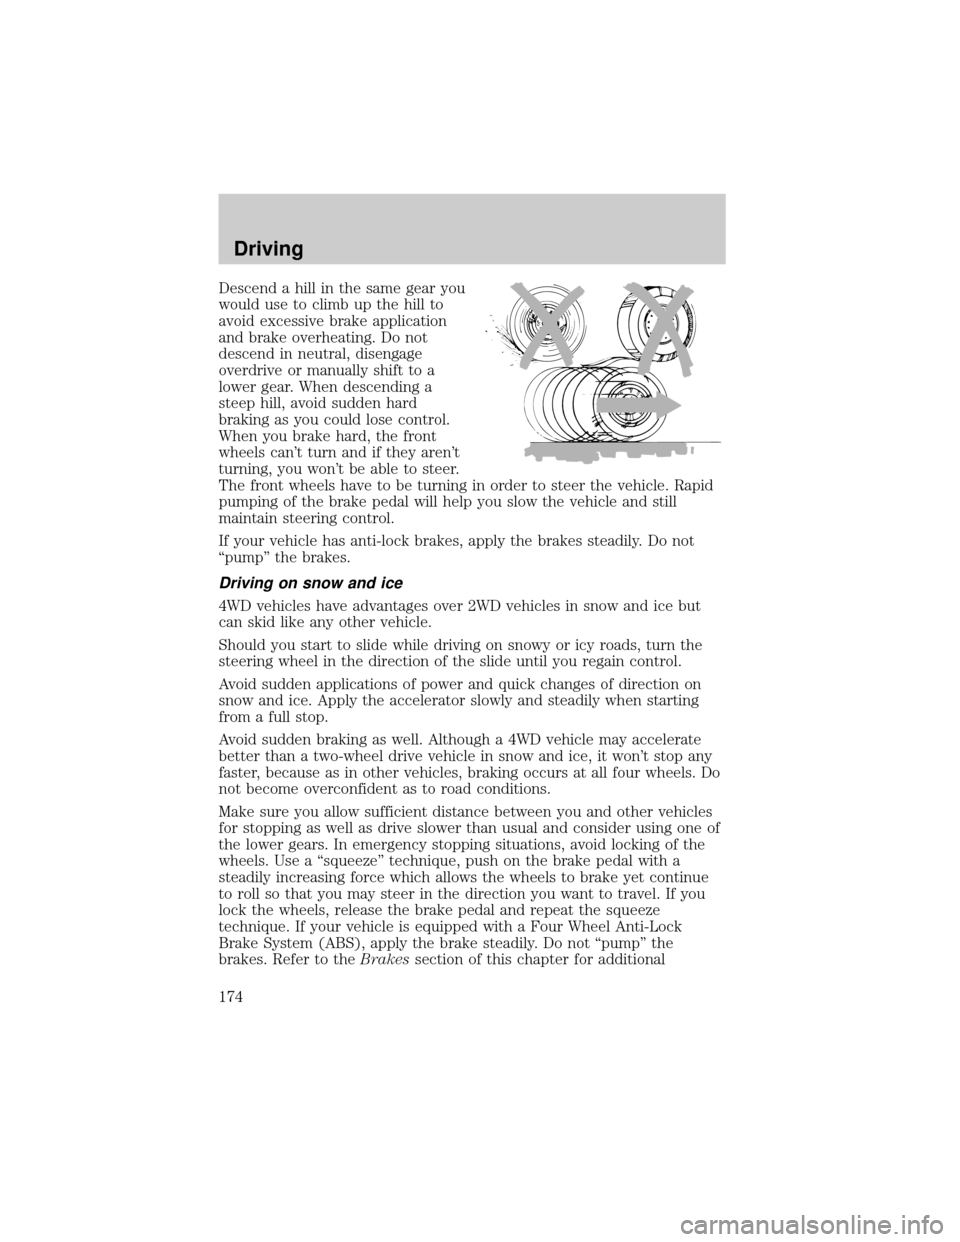
Descend a hill in the same gear you
would use to climb up the hill to
avoid excessive brake application
and brake overheating. Do not
descend in neutral, disengage
overdrive or manually shift to a
lower gear. When descending a
steep hill, avoid sudden hard
braking as you could lose control.
When you brake hard, the front
wheels can't turn and if they aren't
turning, you won't be able to steer.
The front wheels have to be turning in order to steer the vehicle. Rapid
pumping of the brake pedal will help you slow the vehicle and still
maintain steering control.
If your vehicle has anti-lock brakes, apply the brakes steadily. Do not
ªpumpº the brakes.
Driving on snow and ice
4WD vehicles have advantages over 2WD vehicles in snow and ice but
can skid like any other vehicle.
Should you start to slide while driving on snowy or icy roads, turn the
steering wheel in the direction of the slide until you regain control.
Avoid sudden applications of power and quick changes of direction on
snow and ice. Apply the accelerator slowly and steadily when starting
from a full stop.
Avoid sudden braking as well. Although a 4WD vehicle may accelerate
better than a two-wheel drive vehicle in snow and ice, it won't stop any
faster, because as in other vehicles, braking occurs at all four wheels. Do
not become overconfident as to road conditions.
Make sure you allow sufficient distance between you and other vehicles
for stopping as well as drive slower than usual and consider using one of
the lower gears. In emergency stopping situations, avoid locking of the
wheels. Use a ªsqueezeº technique, push on the brake pedal with a
steadily increasing force which allows the wheels to brake yet continue
to roll so that you may steer in the direction you want to travel. If you
lock the wheels, release the brake pedal and repeat the squeeze
technique. If your vehicle is equipped with a Four Wheel Anti-Lock
Brake System (ABS), apply the brake steadily. Do not ªpumpº the
brakes. Refer to theBrakessection of this chapter for additional
Driving
174
Page 190 of 280
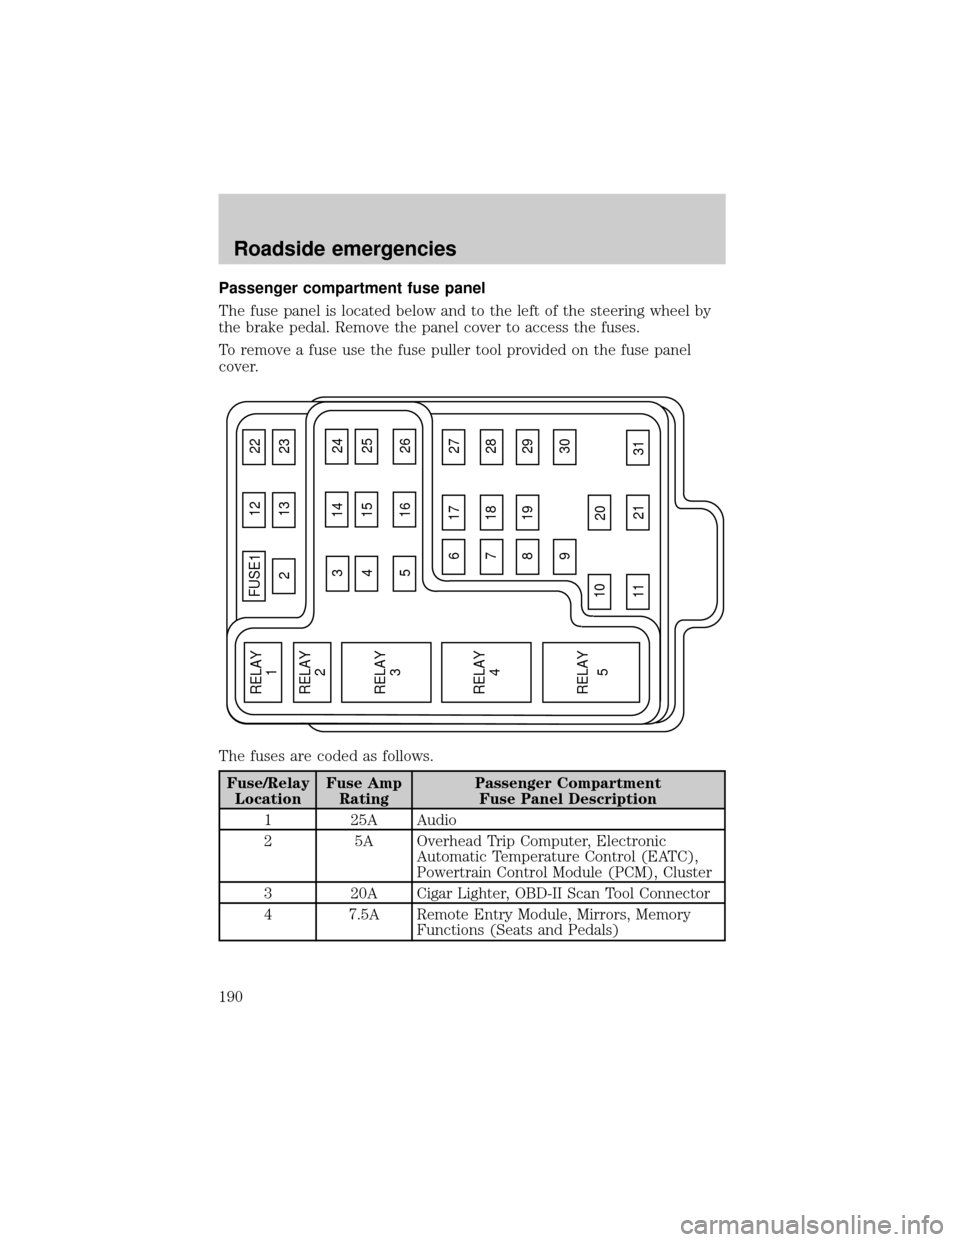
Passenger compartment fuse panel
The fuse panel is located below and to the left of the steering wheel by
the brake pedal. Remove the panel cover to access the fuses.
To remove a fuse use the fuse puller tool provided on the fuse panel
cover.
The fuses are coded as follows.
Fuse/Relay
LocationFuse Amp
RatingPassenger Compartment
Fuse Panel Description
1 25A Audio
2 5A Overhead Trip Computer, Electronic
Automatic Temperature Control (EATC),
Powertrain Control Module (PCM), Cluster
3 20A Cigar Lighter, OBD-II Scan Tool Connector
4 7.5A Remote Entry Module, Mirrors, Memory
Functions (Seats and Pedals)
FUSE1 12 22
21323
617 27
718 28
819 29
930
20
31 21 11 10
RELAY
5 RELAY
4 RELAY
3 RELAY
2 RELAY
1
31424
41525
51626
Roadside emergencies
190
Page 191 of 280
Fuse/Relay
LocationFuse Amp
RatingPassenger Compartment
Fuse Panel Description
5 15A Speed Control Module, Reverse Lamp, EVO
Module, Climate Mode Switch (Front
Blower Relay), Daytime Running Lamp
Relay, Reverse Sensing System, Autolock,
E/C Mirror
6 5A Cluster, Overhead Trip Computer, Compass,
Brake Shift Interlock Solenoid, Air
Suspension Module, GEM Module, EVO
Steering Sensor, Heated Mirror, Rear
Defroster, Reverse Sensing System
7 5A Aux A/C Blower Relay (via fuse 22)
8 5A Radio, Remote Entry Module, GEM Module
9 Ð Not Used
10 Ð Not Used
11 30A Front Washer Pump Relay, Wiper Run/Park
Relay, Wiper Hi/LO Relay, Windshield Wiper
Motor, Rear Washer Pump Relay
12 15A Air Suspension Switch
13 20A Stop Lamp Switch (Lamps), Turn/Hazard
Flasher, Speed Control Module
14 15A Rear Wipers, Running Board Lamps,
Battery Saver Relay, Interior Lamp Relay,
Accessory Delay Relay (Power Windows,
Moonroof, Flip Windows)
15 5A Stop Lamp Switch, (Speed Control, Brake
Shift Interlock, ABS, PCM Module Inputs,
Air Suspension Module, Autolock), GEM
Module
16 20A Headlamps (Hi Beams), Cluster (Hi Beam
Indicator)
17 10A Heated Mirrors, Heated Grid Switch
Indicator
18 5A Instrument Illumination (Dimmer Switch
Power)
19 Ð Not Used
Roadside emergencies
191
Page 196 of 280
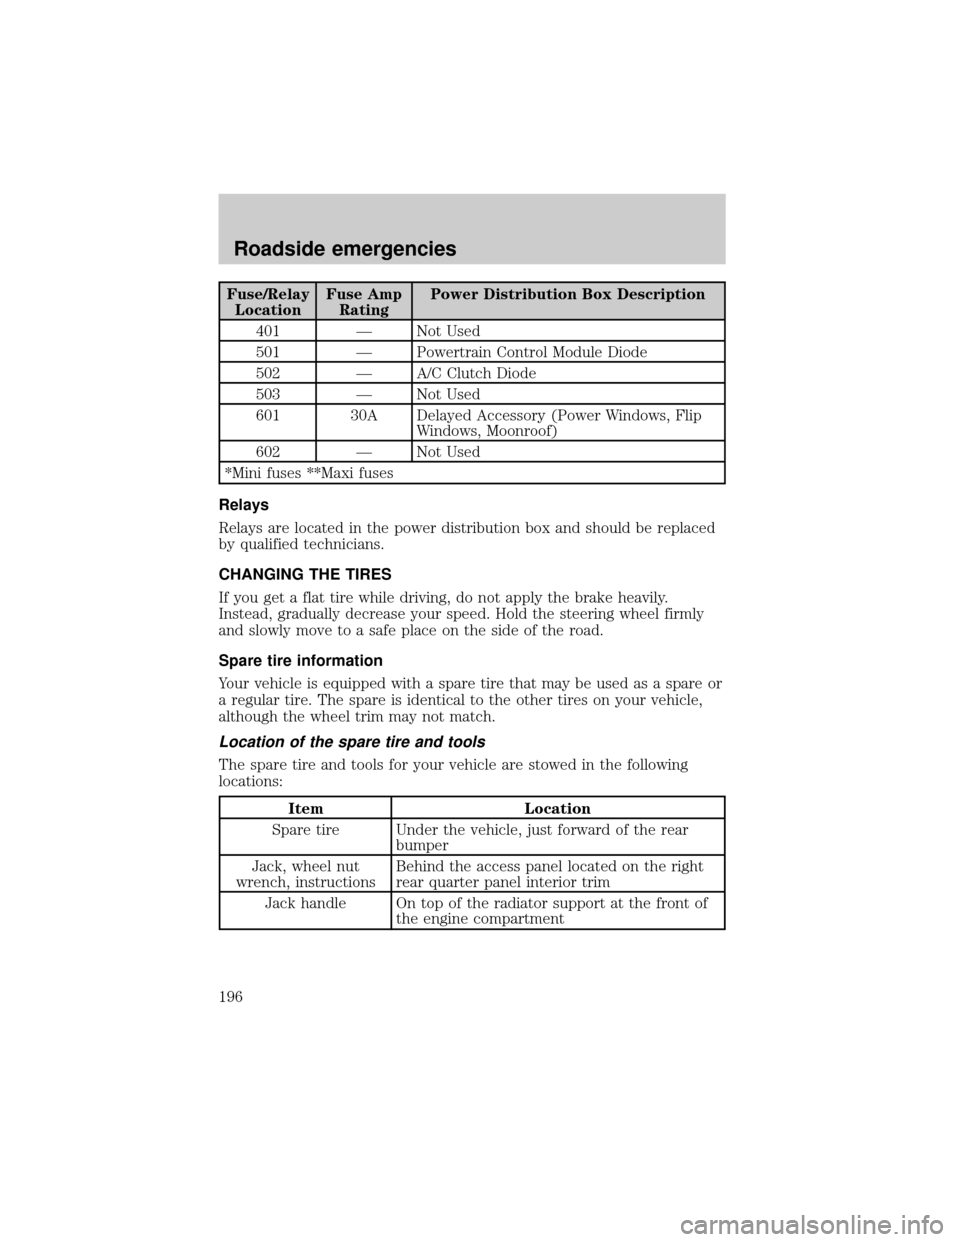
Fuse/Relay
LocationFuse Amp
RatingPower Distribution Box Description
401 Ð Not Used
501 Ð Powertrain Control Module Diode
502 Ð A/C Clutch Diode
503 Ð Not Used
601 30A Delayed Accessory (Power Windows, Flip
Windows, Moonroof)
602 Ð Not Used
*Mini fuses **Maxi fuses
Relays
Relays are located in the power distribution box and should be replaced
by qualified technicians.
CHANGING THE TIRES
If you get a flat tire while driving, do not apply the brake heavily.
Instead, gradually decrease your speed. Hold the steering wheel firmly
and slowly move to a safe place on the side of the road.
Spare tire information
Your vehicle is equipped with a spare tire that may be used as a spare or
a regular tire. The spare is identical to the other tires on your vehicle,
although the wheel trim may not match.
Location of the spare tire and tools
The spare tire and tools for your vehicle are stowed in the following
locations:
Item Location
Spare tire Under the vehicle, just forward of the rear
bumper
Jack, wheel nut
wrench, instructionsBehind the access panel located on the right
rear quarter panel interior trim
Jack handle On top of the radiator support at the front of
the engine compartment
Roadside emergencies
196