parking brake FORD EXPEDITION 2009 3.G User Guide
[x] Cancel search | Manufacturer: FORD, Model Year: 2009, Model line: EXPEDITION, Model: FORD EXPEDITION 2009 3.GPages: 416, PDF Size: 3.39 MB
Page 302 of 416
Brake-shift interlock – floor-shift transmission
This vehicle is equipped with a brake-shift interlock feature that prevents
the gearshift lever from being moved from P (Park) when the ignition is
in the ON position unless the brake pedal is depressed.
If you cannot move the gearshift lever out of P (Park) with ignition in
the on position and the brake pedal depressed, or when the ignition is in
the off position, it is possible that a fuse has blown or the vehicle’s
brakelamps are not operating properly. Refer toFuses and relaysin the
Roadside Emergencieschapter.
If the fuse is not blown, perform the following procedure:
1. Apply the parking brake, turn the ignition to off, then remove the key.
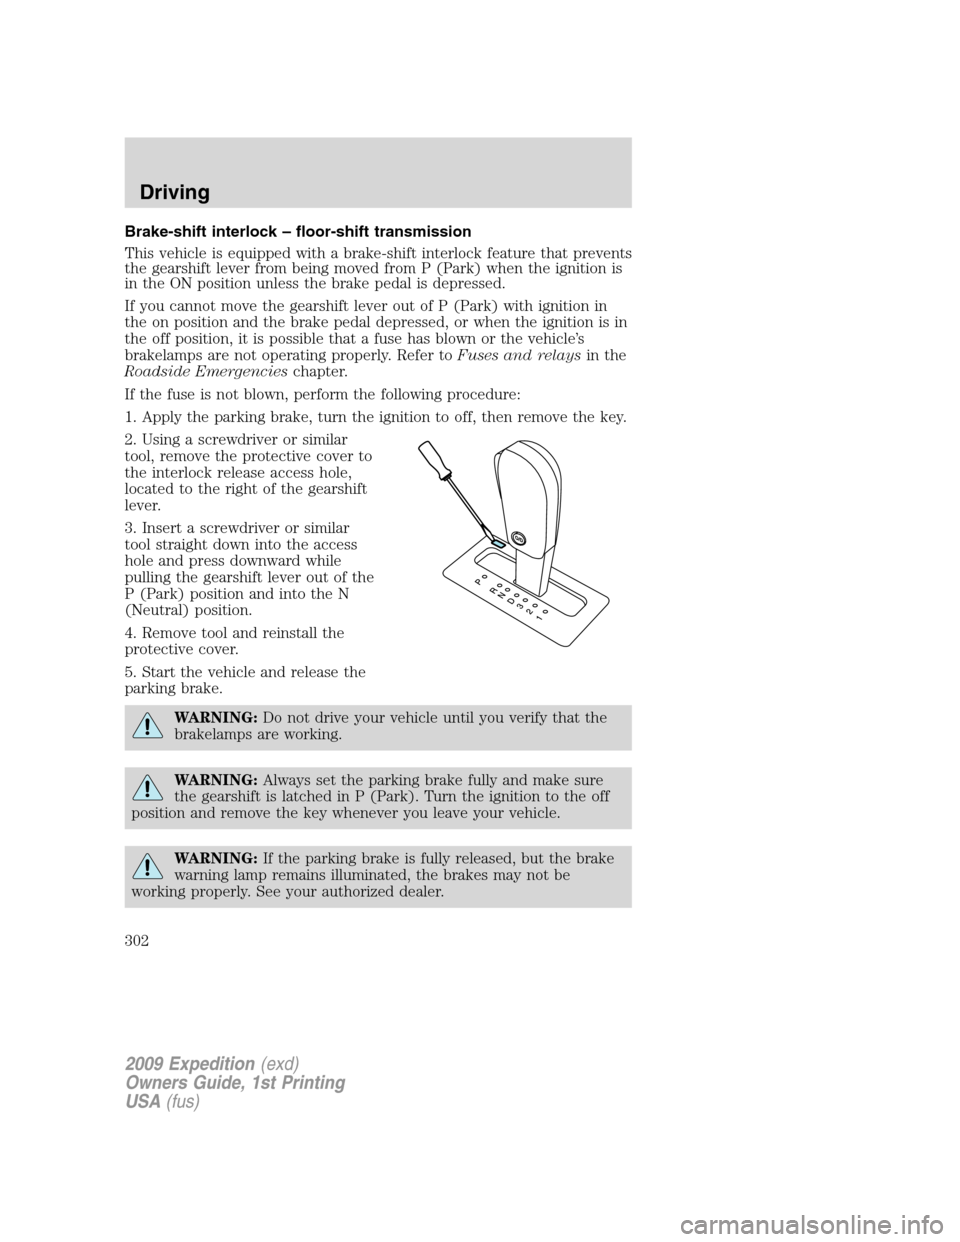
2. Using a screwdriver or similar
tool, remove the protective cover to
the interlock release access hole,
located to the right of the gearshift
lever.
3. Insert a screwdriver or similar
tool straight down into the access
hole and press downward while
pulling the gearshift lever out of the
P (Park) position and into the N
(Neutral) position.
4. Remove tool and reinstall the
protective cover.
5. Start the vehicle and release the
parking brake.
WARNING:Do not drive your vehicle until you verify that the
brakelamps are working.
WARNING:Always set the parking brake fully and make sure
the gearshift is latched in P (Park). Turn the ignition to the off
position and remove the key whenever you leave your vehicle.
WARNING:If the parking brake is fully released, but the brake
warning lamp remains illuminated, the brakes may not be
working properly. See your authorized dealer.
2009 Expedition(exd)
Owners Guide, 1st Printing
USA(fus)
Driving
302
Page 303 of 416
Driving with a 6–speed automatic transmission
This vehicle is equipped with an
Adaptive Transmission Shift
Strategy. The Adaptive Transmission
Shift Strategy offers the optimal
transmission operation and shift
quality. When the engine is turned
off, the shift data which includes the
adaptive information will be stored
automatically in the Powertrain
Control Module (PCM). If the
battery is disconnected for any
reason, the stored information from
the last time the key was turned to
OFF will be read. This way, no
information will be lost with any
battery removal or battery
disconnect.
P (Park)
This position locks the transmission and prevents the rear wheels from
turning.
To put your vehicle in gear:
•Depress the brake pedal
•Start the engine
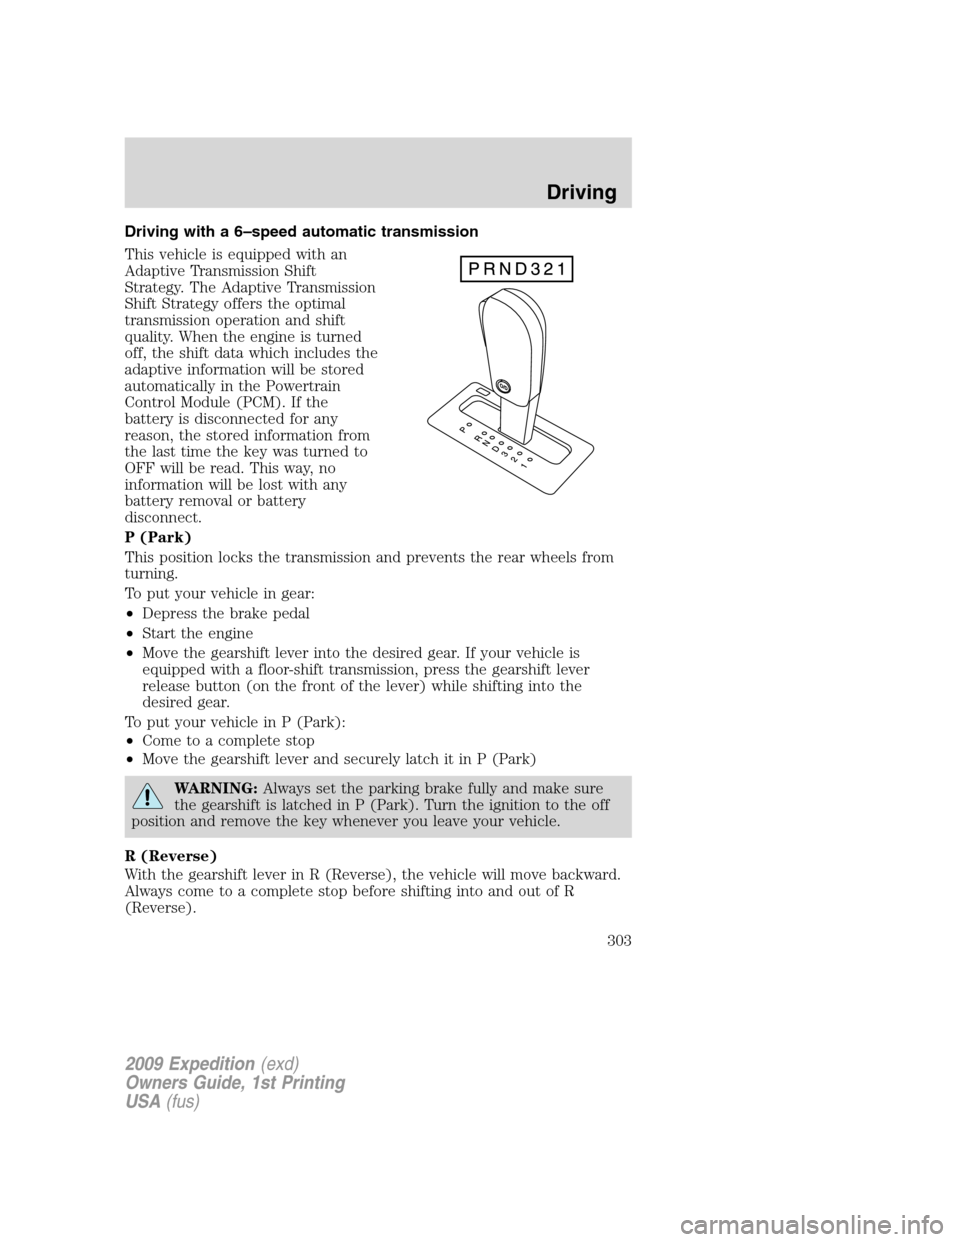
•Move the gearshift lever into the desired gear. If your vehicle is
equipped with a floor-shift transmission, press the gearshift lever
release button (on the front of the lever) while shifting into the
desired gear.
To put your vehicle in P (Park):
•Come to a complete stop
•Move the gearshift lever and securely latch it in P (Park)
WARNING:Always set the parking brake fully and make sure
the gearshift is latched in P (Park). Turn the ignition to the off
position and remove the key whenever you leave your vehicle.
R (Reverse)
With the gearshift lever in R (Reverse), the vehicle will move backward.
Always come to a complete stop before shifting into and out of R
(Reverse).
2009 Expedition(exd)
Owners Guide, 1st Printing
USA(fus)
Driving
303
Page 315 of 416
•It often may be less risky to strike small objects, such as highway
reflectors, with minor damage to your vehicle rather than attempt a
sudden return to the pavement which could cause the vehicle to slide
sideways out of control or roll over. Remember, your safety and the
safety of others should be your primary concern.
WARNING:Vehicles with a higher center of gravity such as
utility and four-wheel drive vehicles handle differently than
vehicles with a lower center of gravity. Utility and four-wheel drive
vehicles arenotdesigned for cornering at speeds as high as passenger
cars any more than low-slung sports cars are designed to perform
satisfactorily under off-road conditions. Avoid sharp turns, excessive
speed and abrupt maneuvers in these vehicles. Failure to drive
cautiously could result in an increased risk of loss of vehicle control,
vehicle rollover, personal injury and death.
If your vehicle gets stuck
If your vehicle gets stuck in mud or snow it may be rocked out by
shifting between forward and reverse gears, stopping between shifts, in a
steady pattern. Press lightly on the accelerator in each gear.
Do not rock the vehicle if the engine is not at normal operating
temperature or damage to the transmission may occur.
Do not rock the vehicle for more than a few minutes or damage
to the transmission and tires may occur or the engine may
overheat.
WARNING:Always set the parking brake fully and make sure
the gearshift is latched in P (Park). Turn the ignition to the
LOCK position and remove the key whenever you leave your vehicle.
WARNING:If the parking brake is fully released, but the brake
warning lamp remains illuminated, the brakes may not be
working properly. See your authorized dealer.
WARNING:Do not spin the wheels at over 35 mph (56 km/h).
The tires may fail and injure a passenger or bystander.
2009 Expedition(exd)
Owners Guide, 1st Printing
USA(fus)
Driving
315
Page 334 of 416
Stopping and securing the vehicle
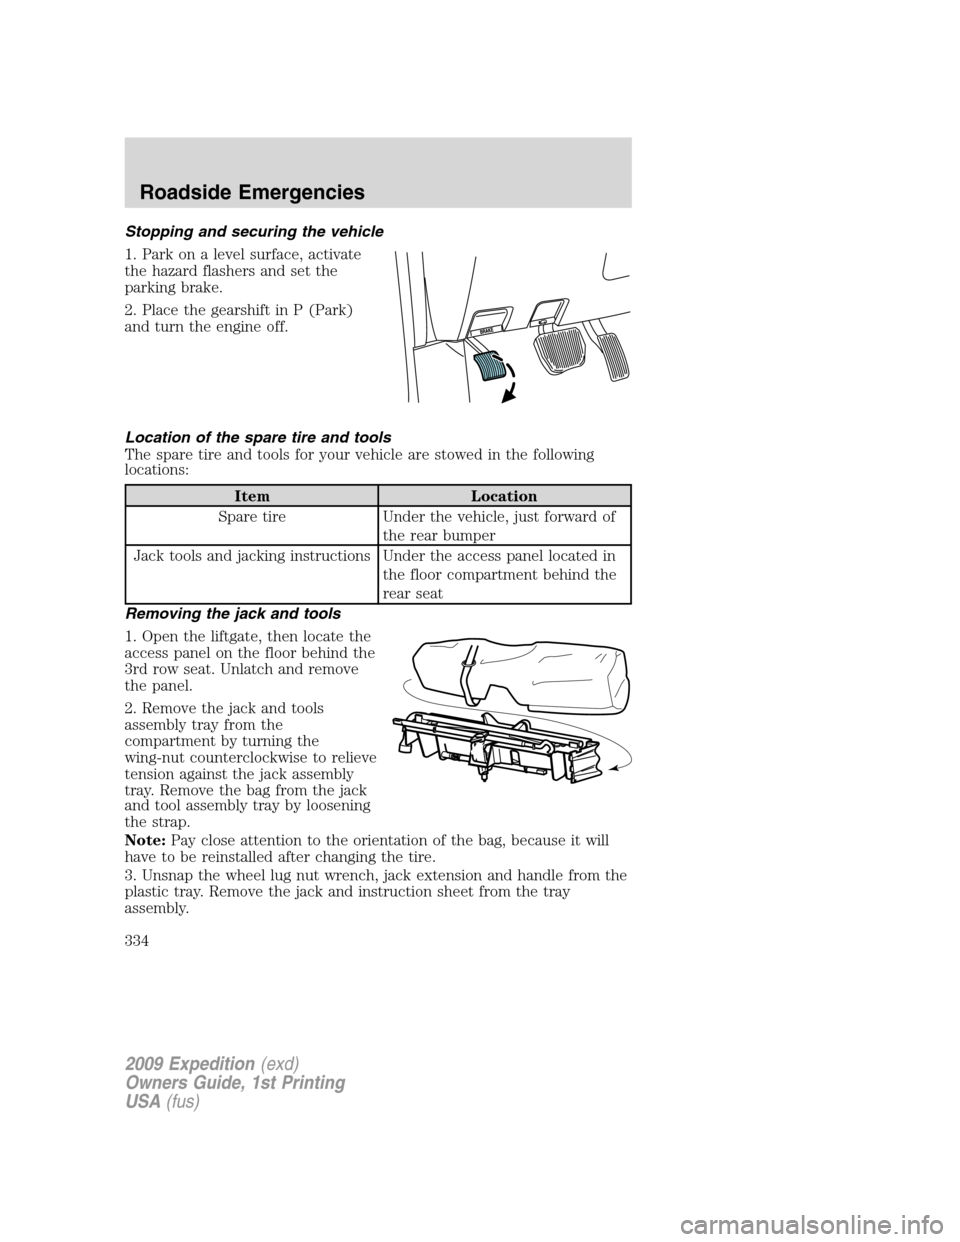
1. Park on a level surface, activate
the hazard flashers and set the
parking brake.
2. Place the gearshift in P (Park)
and turn the engine off.
Location of the spare tire and tools
The spare tire and tools for your vehicle are stowed in the following
locations:
Item Location
Spare tire Under the vehicle, just forward of
the rear bumper
Jack tools and jacking instructions Under the access panel located in
the floor compartment behind the
rear seat
Removing the jack and tools
1. Open the liftgate, then locate the
access panel on the floor behind the
3rd row seat. Unlatch and remove
the panel.
2. Remove the jack and tools
assembly tray from the
compartment by turning the
wing-nut counterclockwise to relieve
tension against the jack assembly
tray. Remove the bag from the jack
and tool assembly tray by loosening
the strap.
Note:Pay close attention to the orientation of the bag, because it will
have to be reinstalled after changing the tire.
3. Unsnap the wheel lug nut wrench, jack extension and handle from the
plastic tray. Remove the jack and instruction sheet from the tray
assembly.
2009 Expedition(exd)
Owners Guide, 1st Printing
USA(fus)
Roadside Emergencies
334
Page 335 of 416
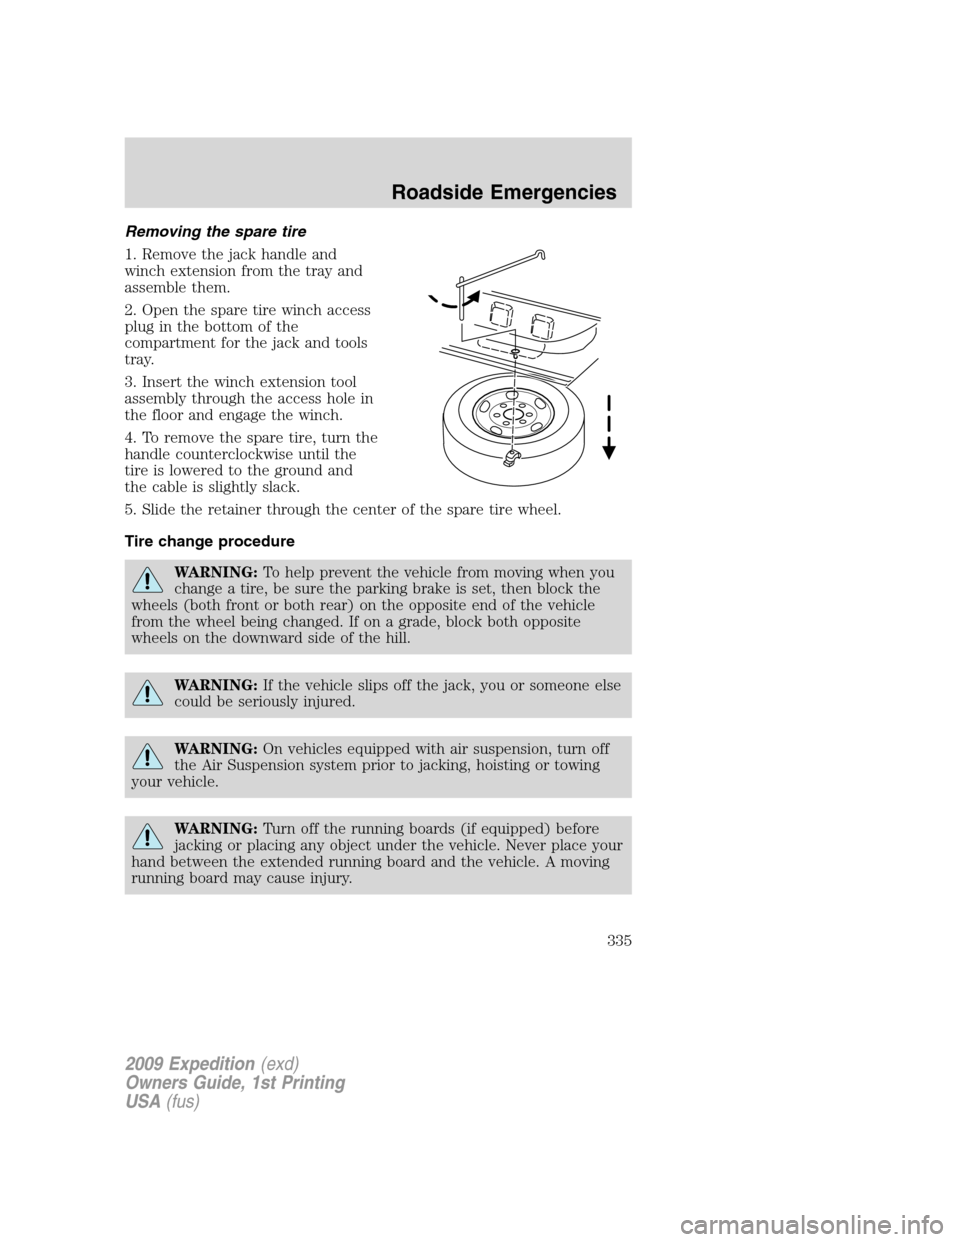
Removing the spare tire
1. Remove the jack handle and
winch extension from the tray and
assemble them.
2. Open the spare tire winch access
plug in the bottom of the
compartment for the jack and tools
tray.
3. Insert the winch extension tool
assembly through the access hole in
the floor and engage the winch.
4. To remove the spare tire, turn the
handle counterclockwise until the
tire is lowered to the ground and
the cable is slightly slack.
5. Slide the retainer through the center of the spare tire wheel.
Tire change procedure
WARNING:To help prevent the vehicle from moving when you
change a tire, be sure the parking brake is set, then block the
wheels (both front or both rear) on the opposite end of the vehicle
from the wheel being changed. If on a grade, block both opposite
wheels on the downward side of the hill.
WARNING:If the vehicle slips off the jack, you or someone else
could be seriously injured.
WARNING:On vehicles equipped with air suspension, turn off
the Air Suspension system prior to jacking, hoisting or towing
your vehicle.
WARNING:Turn off the running boards (if equipped) before
jacking or placing any object under the vehicle. Never place your
hand between the extended running board and the vehicle. A moving
running board may cause injury.
2009 Expedition(exd)
Owners Guide, 1st Printing
USA(fus)
Roadside Emergencies
335
Page 337 of 416
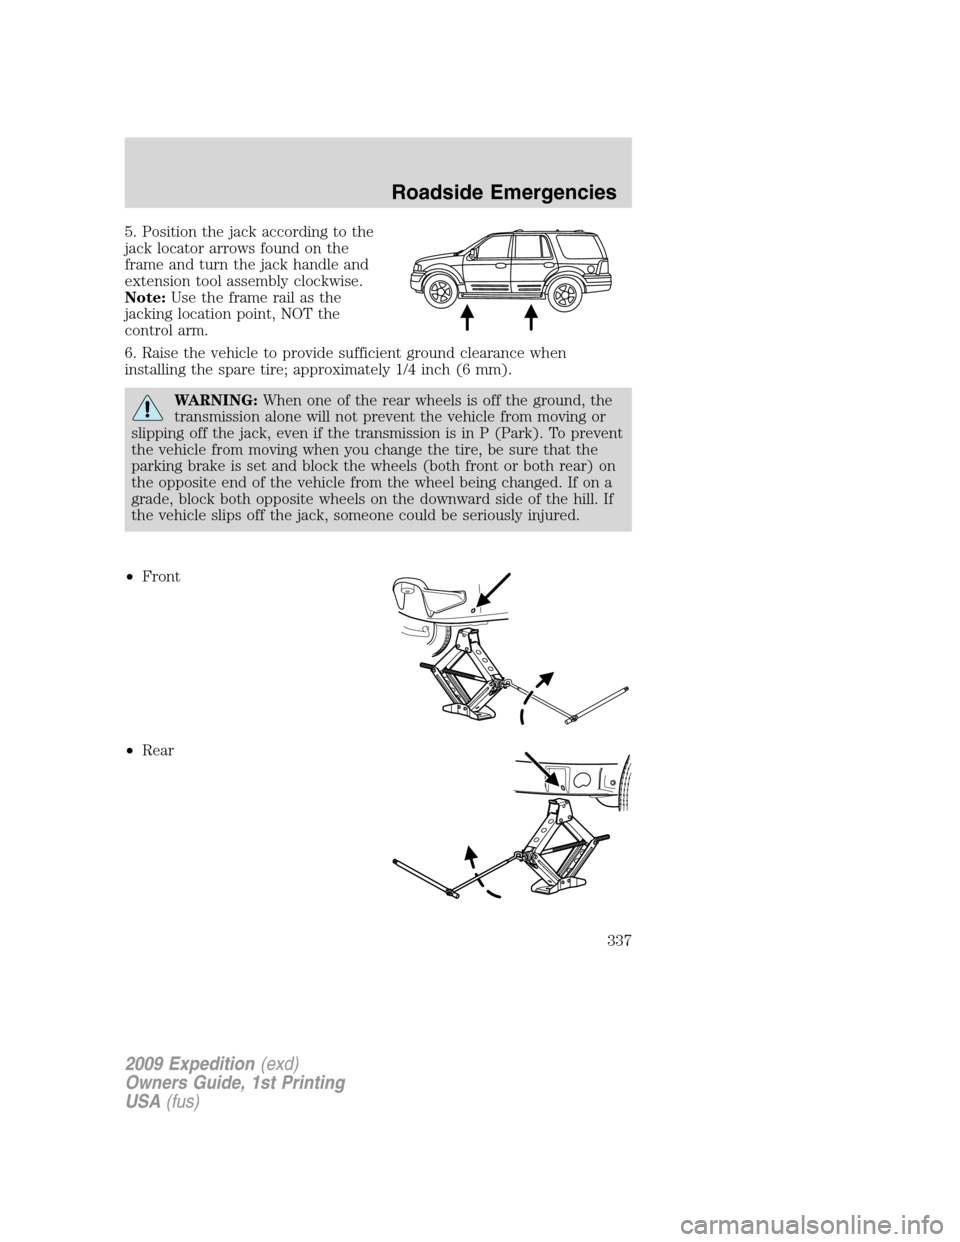
5. Position the jack according to the
jack locator arrows found on the
frame and turn the jack handle and
extension tool assembly clockwise.
Note:Use the frame rail as the
jacking location point, NOT the
control arm.
6. Raise the vehicle to provide sufficient ground clearance when
installing the spare tire; approximately 1/4 inch (6 mm).
WARNING:When one of the rear wheels is off the ground, the
transmission alone will not prevent the vehicle from moving or
slipping off the jack, even if the transmission is in P (Park). To prevent
the vehicle from moving when you change the tire, be sure that the
parking brake is set and block the wheels (both front or both rear) on
the opposite end of the vehicle from the wheel being changed. If on a
grade, block both opposite wheels on the downward side of the hill. If
the vehicle slips off the jack, someone could be seriously injured.
•Front
•Rear
2009 Expedition(exd)
Owners Guide, 1st Printing
USA(fus)
Roadside Emergencies
337
Page 342 of 416
1.Use only a 12–volt supply to start your vehicle.
2. Do not disconnect the battery of the disabled vehicle as this could
damage the vehicle’s electrical system.
3. Park the booster vehicle close to the hood of the disabled vehicle
making sure the two vehiclesdo nottouch. Set the parking brake on
both vehicles and stay clear of the engine cooling fan and other moving
parts.
4. Check all battery terminals and remove any excessive corrosion before
you attach the battery cables. Ensure that vent caps are tight and level.
5. Turn the heater fan on in both vehicles to protect from any electrical
surges. Turn all other accessories off.
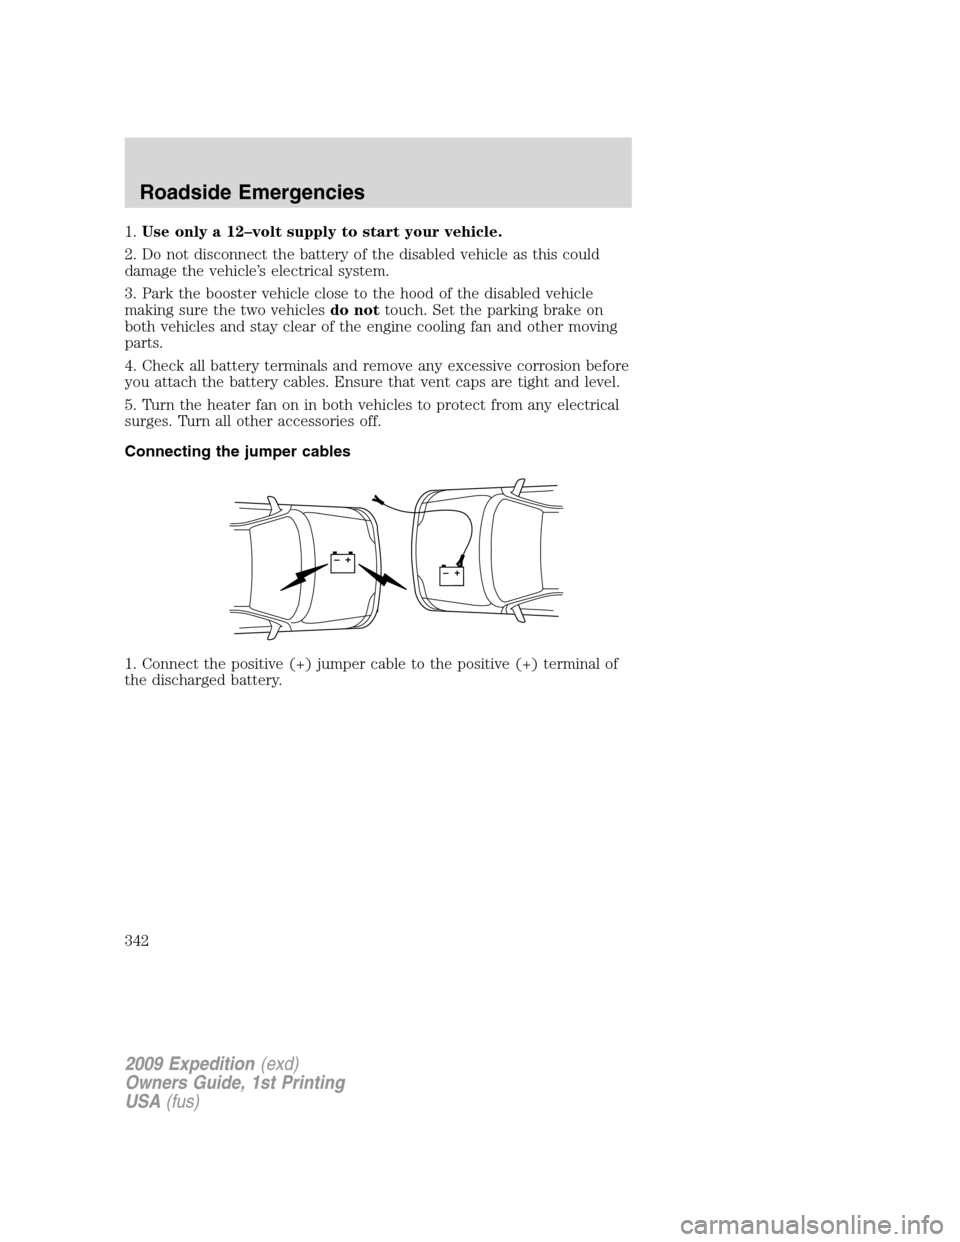
Connecting the jumper cables
1. Connect the positive (+) jumper cable to the positive (+) terminal of
the discharged battery.
+–+–
2009 Expedition(exd)
Owners Guide, 1st Printing
USA(fus)
Roadside Emergencies
342
Page 367 of 416
SERVICE RECOMMENDATIONS
To help you service your vehicle, we providescheduled maintenance
informationwhich makes tracking routine service easy.
If your vehicle requires professional service, your authorized dealer can
provide the necessary parts and service. Check yourWarranty
Guide/Customer Information Guideto find out which parts and
services are covered.
Use only recommended fuels, lubricants, fluids and service parts
conforming to specifications. Motorcraft parts are designed and built to
provide the best performance in your vehicle.
PRECAUTIONS WHEN SERVICING YOUR VEHICLE
•Do not work on a hot engine.
•Make sure that nothing gets caught in moving parts.
•Do not work on a vehicle with the engine running in an enclosed
space, unless you are sure you have enough ventilation.
•Keep all open flames and other lit material away from the battery and
all fuel related parts.
WARNING:Turn off the power running boards, if equipped,
before working under the vehicle, jacking or placing any object
under the vehicle. Never place your hand between the extended
running board and the vehicle. A moving running board may cause
injury.
Working with the engine off
1. Set the parking brake and ensure the gearshift is securely latched in P
(Park).
2. Turn off the engine and remove the key.
3. Block the wheels to prevent the vehicle from moving unexpectedly.
2009 Expedition(exd)
Owners Guide, 1st Printing
USA(fus)
Maintenance and Specifications
367
Page 368 of 416
Working with the engine on
1. Set the parking brake and shift to P (Park).
2. Block the wheels.
WARNING:To reduce the risk of vehicle damage and/or
personal burn injuries, do not start your engine with the air
cleaner removed and do not remove it while the engine is running.
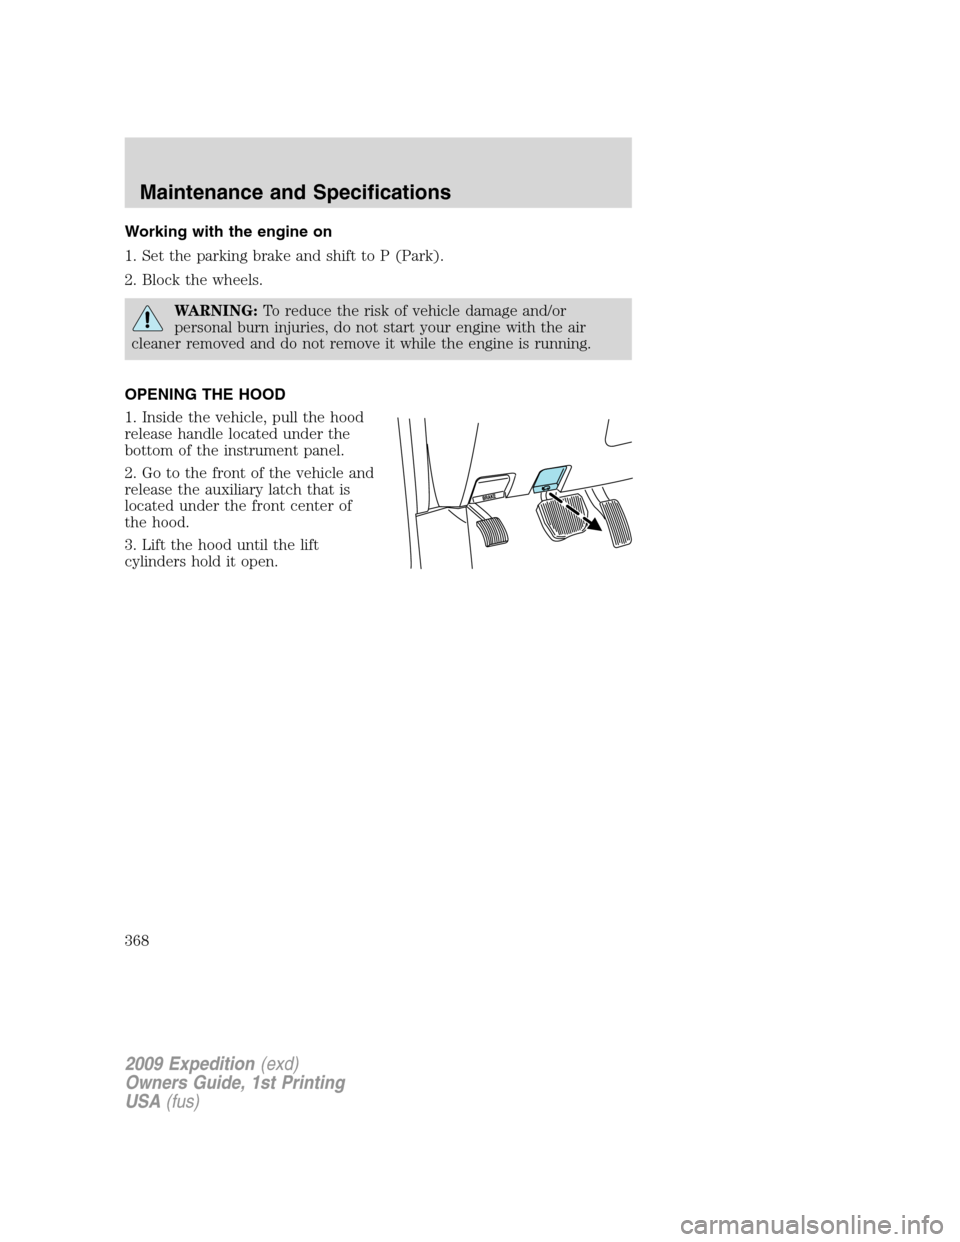
OPENING THE HOOD
1. Inside the vehicle, pull the hood
release handle located under the
bottom of the instrument panel.
2. Go to the front of the vehicle and
release the auxiliary latch that is
located under the front center of
the hood.
3. Lift the hood until the lift
cylinders hold it open.
2009 Expedition(exd)
Owners Guide, 1st Printing
USA(fus)
Maintenance and Specifications
368
Page 372 of 416
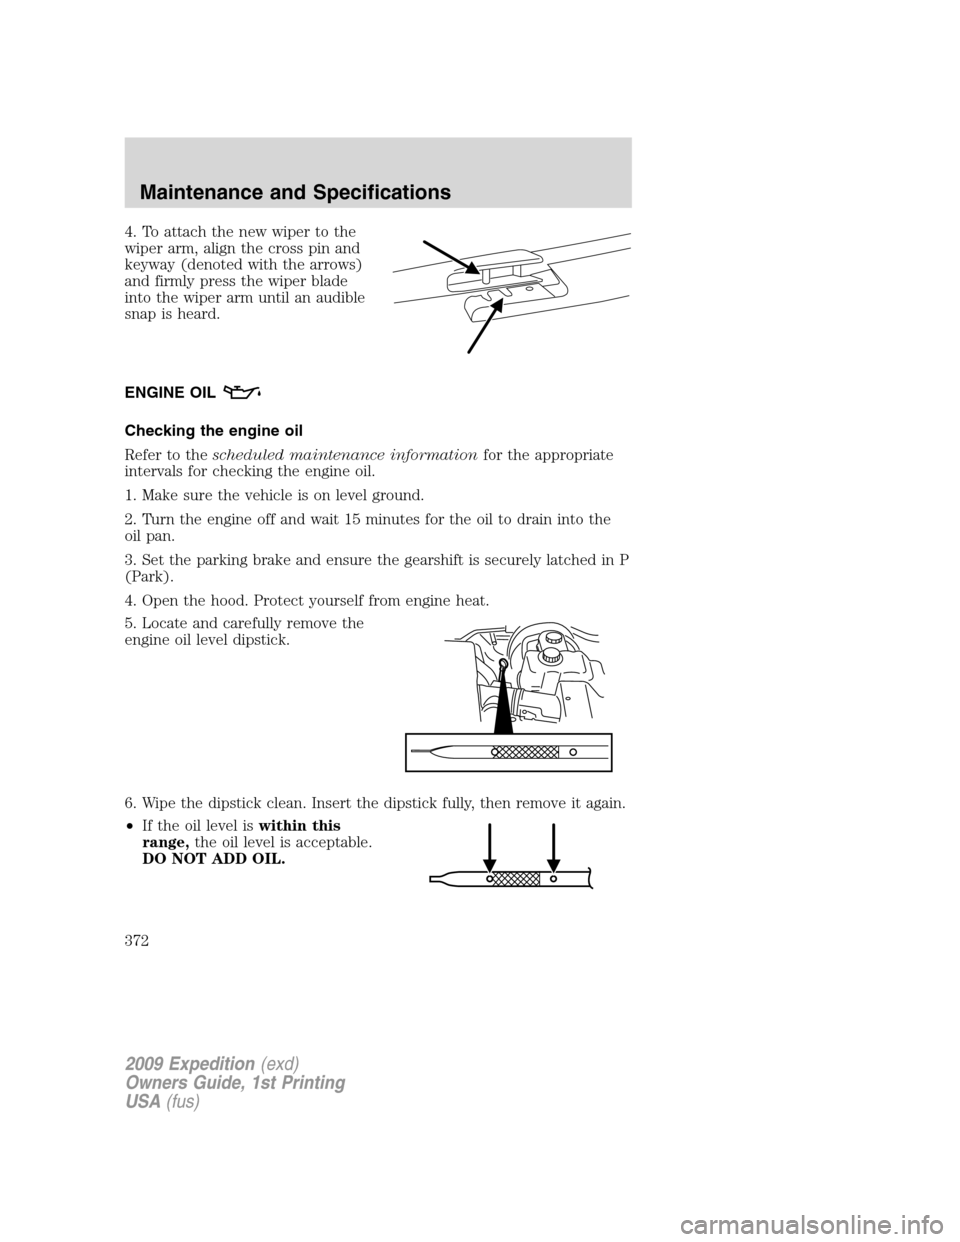
4. To attach the new wiper to the
wiper arm, align the cross pin and
keyway (denoted with the arrows)
and firmly press the wiper blade
into the wiper arm until an audible
snap is heard.
ENGINE OIL
Checking the engine oil
Refer to thescheduled maintenance informationfor the appropriate
intervals for checking the engine oil.
1. Make sure the vehicle is on level ground.
2. Turn the engine off and wait 15 minutes for the oil to drain into the
oil pan.
3. Set the parking brake and ensure the gearshift is securely latched in P
(Park).
4. Open the hood. Protect yourself from engine heat.
5. Locate and carefully remove the
engine oil level dipstick.
6. Wipe the dipstick clean. Insert the dipstick fully, then remove it again.
•If the oil level iswithin this
range,the oil level is acceptable.
DO NOT ADD OIL.
2009 Expedition(exd)
Owners Guide, 1st Printing
USA(fus)
Maintenance and Specifications
372