low beam FORD EXPEDITION 2018 Owners Manual
[x] Cancel search | Manufacturer: FORD, Model Year: 2018, Model line: EXPEDITION, Model: FORD EXPEDITION 2018Pages: 571, PDF Size: 25.8 MB
Page 93 of 571
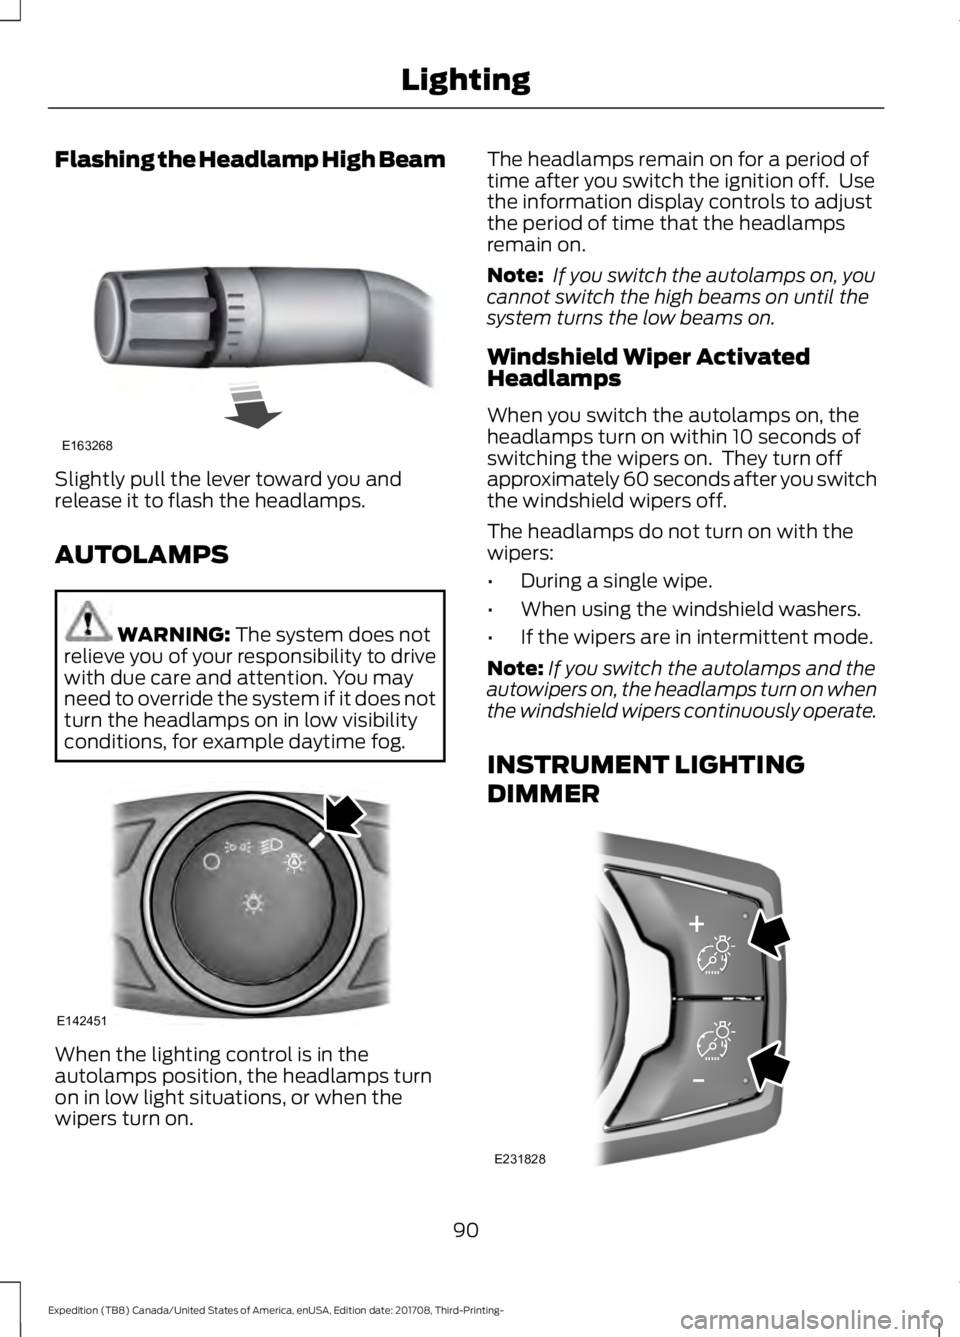
Flashing the Headlamp High Beam
Slightly pull the lever toward you and
release it to flash the headlamps.
AUTOLAMPS
WARNING: The system does not
relieve you of your responsibility to drive
with due care and attention. You may
need to override the system if it does not
turn the headlamps on in low visibility
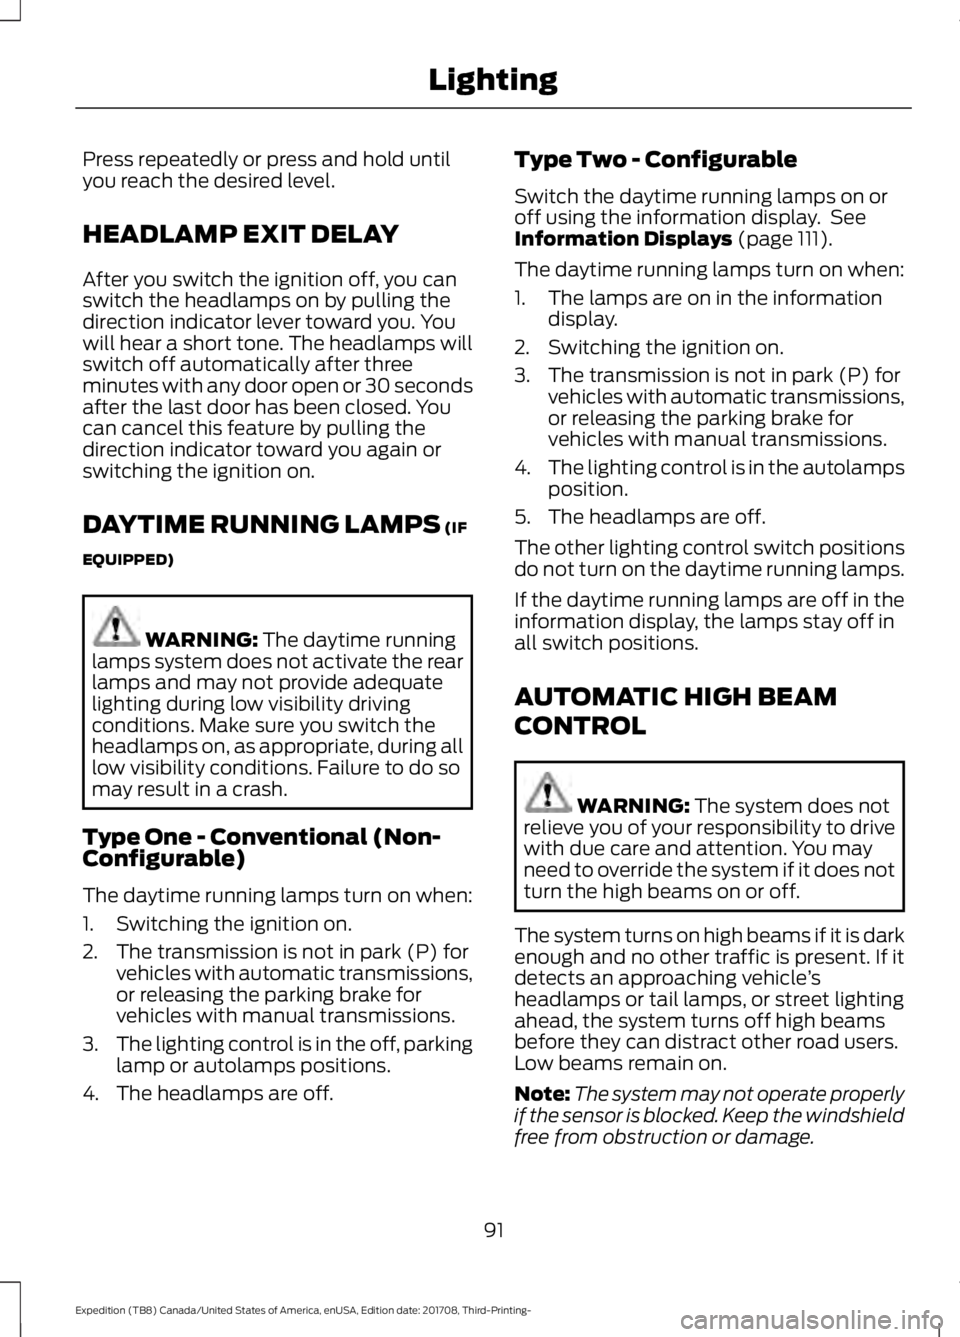
conditions, for example daytime fog. When the lighting control is in the
autolamps position, the headlamps turn
on in low light situations, or when the
wipers turn on. The headlamps remain on for a period of
time after you switch the ignition off. Use
the information display controls to adjust
the period of time that the headlamps
remain on.
Note:
If you switch the autolamps on, you
cannot switch the high beams on until the
system turns the low beams on.
Windshield Wiper Activated
Headlamps
When you switch the autolamps on, the
headlamps turn on within 10 seconds of
switching the wipers on. They turn off
approximately 60 seconds after you switch
the windshield wipers off.
The headlamps do not turn on with the
wipers:
• During a single wipe.
• When using the windshield washers.
• If the wipers are in intermittent mode.
Note: If you switch the autolamps and the
autowipers on, the headlamps turn on when
the windshield wipers continuously operate.
INSTRUMENT LIGHTING
DIMMER 90
Expedition (TB8) Canada/United States of America, enUSA, Edition date: 201708, Third-Printing- LightingE163268 E142451 E231828
Page 94 of 571
Press repeatedly or press and hold until
you reach the desired level.
HEADLAMP EXIT DELAY
After you switch the ignition off, you can
switch the headlamps on by pulling the
direction indicator lever toward you. You
will hear a short tone. The headlamps will
switch off automatically after three
minutes with any door open or 30 seconds
after the last door has been closed. You
can cancel this feature by pulling the
direction indicator toward you again or
switching the ignition on.
DAYTIME RUNNING LAMPS (IF
EQUIPPED) WARNING:
The daytime running
lamps system does not activate the rear
lamps and may not provide adequate
lighting during low visibility driving
conditions. Make sure you switch the
headlamps on, as appropriate, during all
low visibility conditions. Failure to do so
may result in a crash.
Type One - Conventional (Non-
Configurable)
The daytime running lamps turn on when:
1. Switching the ignition on.
2. The transmission is not in park (P) for vehicles with automatic transmissions,
or releasing the parking brake for
vehicles with manual transmissions.
3. The lighting control is in the off, parking
lamp or autolamps positions.
4. The headlamps are off. Type Two - Configurable
Switch the daytime running lamps on or
off using the information display. See
Information Displays
(page 111).
The daytime running lamps turn on when:
1. The lamps are on in the information display.
2. Switching the ignition on.
3. The transmission is not in park (P) for vehicles with automatic transmissions,
or releasing the parking brake for
vehicles with manual transmissions.
4. The lighting control is in the autolamps
position.
5. The headlamps are off.
The other lighting control switch positions
do not turn on the daytime running lamps.
If the daytime running lamps are off in the
information display, the lamps stay off in
all switch positions.
AUTOMATIC HIGH BEAM
CONTROL WARNING:
The system does not
relieve you of your responsibility to drive
with due care and attention. You may
need to override the system if it does not
turn the high beams on or off.
The system turns on high beams if it is dark
enough and no other traffic is present. If it
detects an approaching vehicle ’s
headlamps or tail lamps, or street lighting
ahead, the system turns off high beams
before they can distract other road users.
Low beams remain on.
Note: The system may not operate properly
if the sensor is blocked. Keep the windshield
free from obstruction or damage.
91
Expedition (TB8) Canada/United States of America, enUSA, Edition date: 201708, Third-Printing- Lighting
Page 95 of 571
Note:
The system may not operate properly
in cold or inclement conditions. You can
switch on the high beams by overriding the
system.
Note: If the system detects a blockage, for
example bird droppings, bug splatter, snow
or ice, the system goes into low beam mode
until you clear the blockage. A message may
appear in the information display if the
camera is blocked.
Note: Using much larger tires or equipping
vehicle accessories such as snowplows can
modify your vehicle's ride height and
degrade automatic high beam control
performance.
A camera sensor, centrally mounted
behind the windshield of your vehicle,
continuously monitors conditions to turn
the high beams on and off.
Once the system is active, the high beams
turn on if:
• The ambient light level is low enough.
• There is no traffic in front of your
vehicle.
• The vehicle speed is greater than
approximately 32 mph (51 km/h).
The high beams turn off if:
• The ambient light level is high enough
that high beams are not required.
• The system detects an approaching
vehicle's headlamps or tail lamps.
• The vehicle speed falls below
approximately
27 mph (44 km/h).
• The system detects severe rain, snow
or fog.
• The camera is blocked.
Switching the System On and Off
Switch the system on using the information
display. See Information Displays (page
111
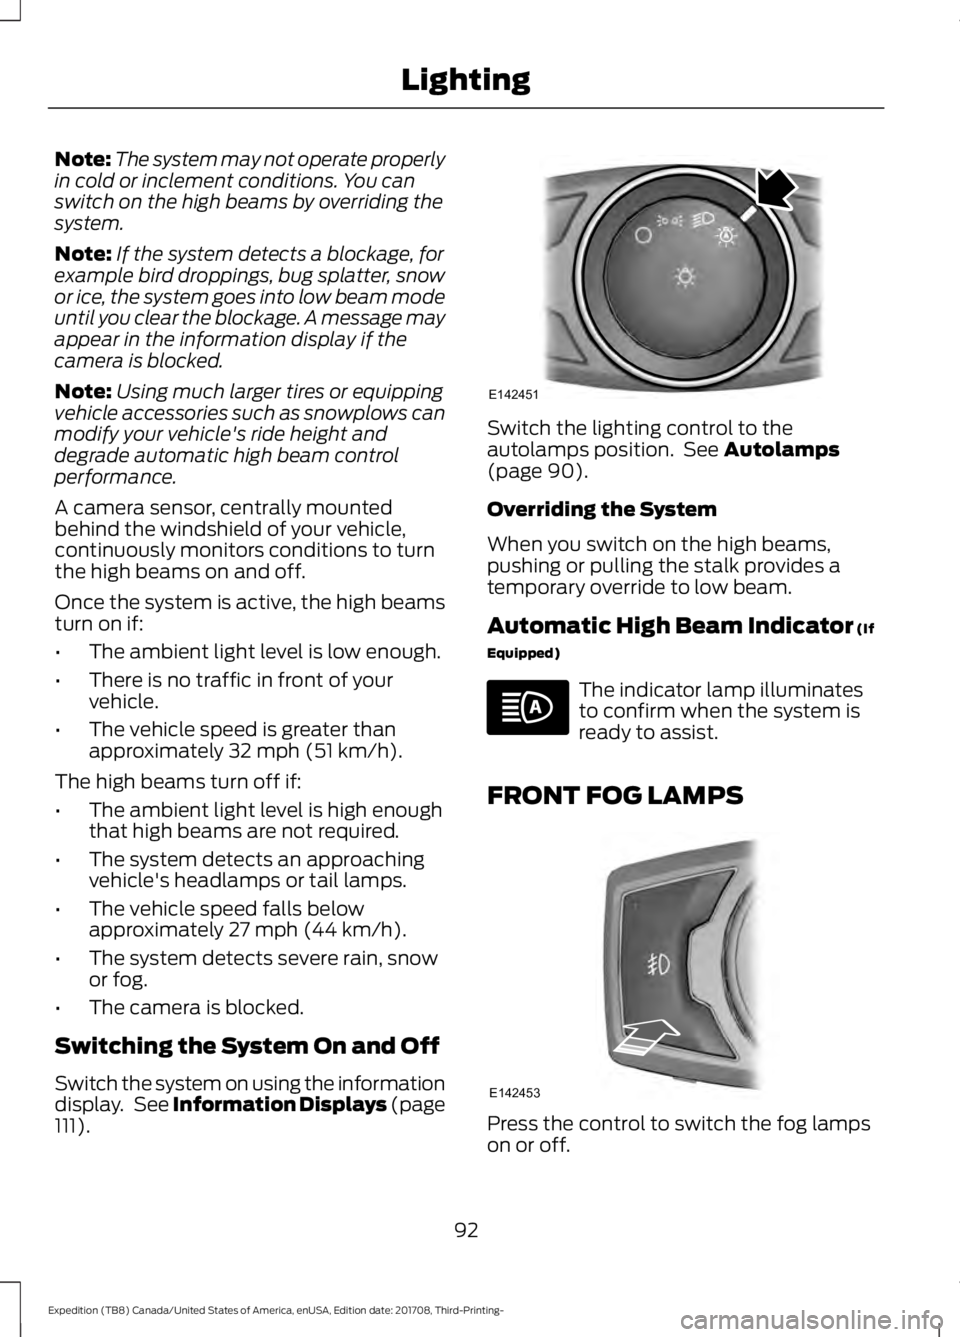
). Switch the lighting control to the
autolamps position. See
Autolamps
(page 90).
Overriding the System
When you switch on the high beams,
pushing or pulling the stalk provides a
temporary override to low beam.
Automatic High Beam Indicator
(If
Equipped) The indicator lamp illuminates
to confirm when the system is
ready to assist.
FRONT FOG LAMPS Press the control to switch the fog lamps
on or off.
92
Expedition (TB8) Canada/United States of America, enUSA, Edition date: 201708, Third-Printing- LightingE142451 E142453
Page 96 of 571
You can switch the fog lamps on when the
lighting control is in any position except
Off and the high beams are not on.
DIRECTION INDICATORS
Push the lever up or down to use
the direction indicators.
Note: Tap the lever up or down to make the
direction indicators flash three times.
INTERIOR LAMPS
The lamps turn on under the following
conditions:
• You open any door.
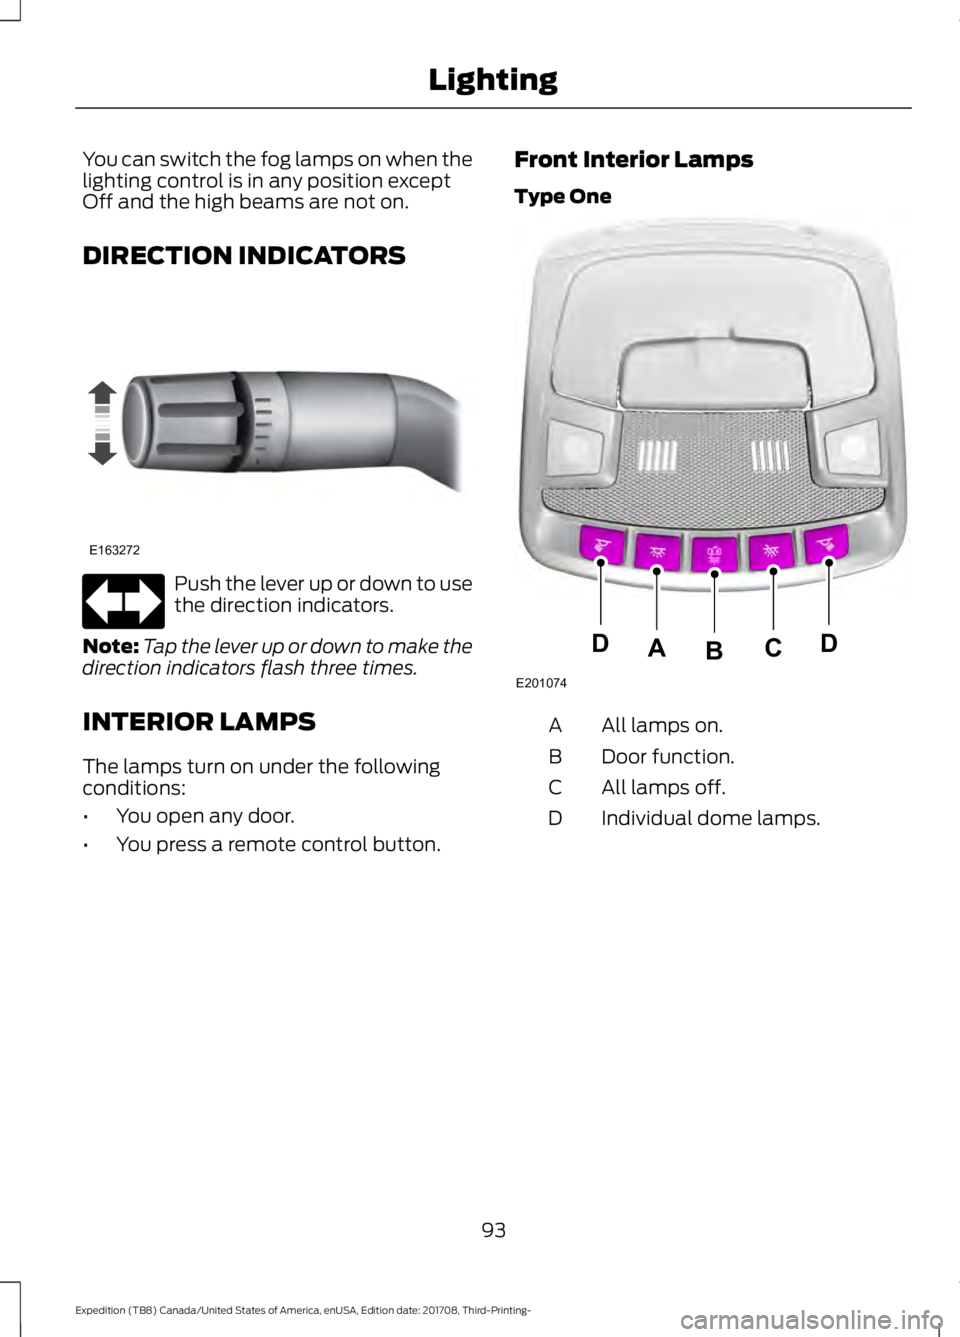
• You press a remote control button. Front Interior Lamps
Type One
All lamps on.
A
Door function.
B
All lamps off.
C
Individual dome lamps.
D
93
Expedition (TB8) Canada/United States of America, enUSA, Edition date: 201708, Third-Printing- LightingE163272 E201074
DDCAB
Page 110 of 571

Adaptive Cruise Control Indicator
(If Equipped)
It illuminates when you switch
the system on.
It illuminates white when the
system is in standby mode. It illuminates
green when you set the adaptive cruise
speed.
See Using Adaptive Cruise Control
(page 238).
Airbag Warning Lamp If it does not illuminate when you
switch the ignition on, continues
to flash or remains on when the
engine is running, this indicates a
malfunction. Have your vehicle checked
as soon as possible.
Anti-Lock Brake System Warning
Lamp If it illuminates when you are
driving, this indicates a
malfunction. Your vehicle
continues to have normal braking without
the anti-lock brake system function. Have
your vehicle checked as soon as possible.
Automatic Headlamp High Beam
Indicator
(If Equipped) It illuminates when the system
automatically turns the
headlamp high beam on.
Auto-Start-Stop Indicator (If Equipped) It illuminates when the engine
has automatically stopped. It
flashes to inform you when the
engine needs to restart. The
indicator is shown with a
strikethrough if the system is not
available. See
Auto-Start-Stop (page 181).
Battery If it illuminates while driving, it
indicates a malfunction. Switch
off all unnecessary electrical
equipment and have the system checked
by your authorized dealer immediately.
Blind Spot Information System
Indicator
(If Equipped) It illuminates when you switch
the system off.
See
Blind Spot Information
System (page 250).
Brake System Warning Lamp WARNING:
Driving your vehicle
with the warning lamp on is dangerous.
A significant decrease in braking
performance may occur. It may take you
longer to stop your vehicle. Have your
vehicle checked as soon as possible.
Driving extended distances with the
parking brake engaged can cause brake
failure and the risk of personal injury. It illuminates when you engage
the parking brake and the
ignition is on.
If it illuminates when your vehicle is
moving, make sure the parking brake is
disengaged. If the parking brake is
disengaged, this indicates low brake fluid
level or a brake system fault. Have your
vehicle checked as soon as possible.
107
Expedition (TB8) Canada/United States of America, enUSA, Edition date: 201708, Third-Printing- Instrument ClusterE144524 E67017 E146361 E151262 E138644
Page 111 of 571
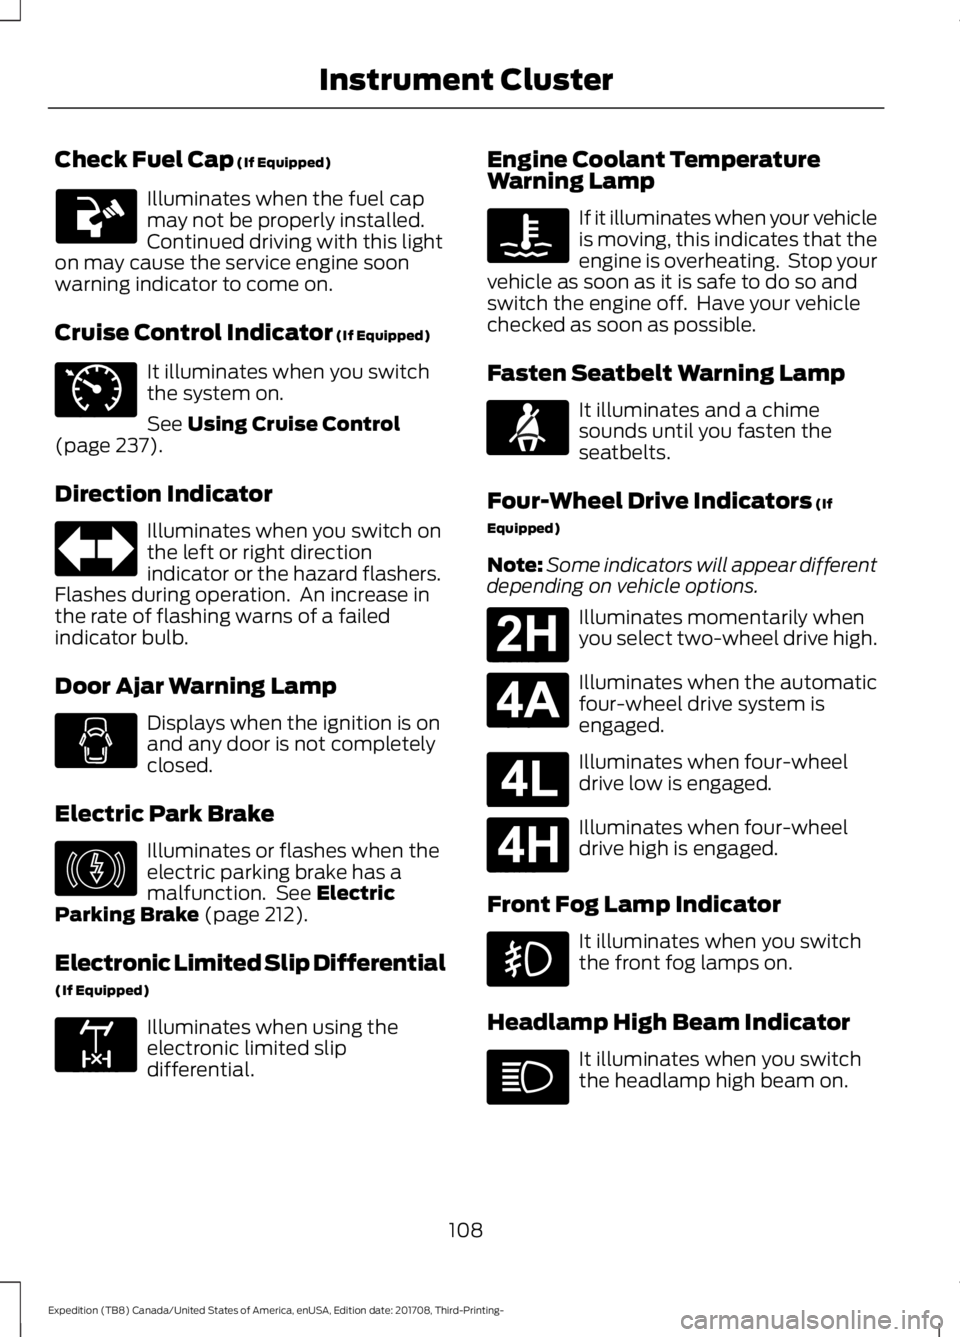
Check Fuel Cap (If Equipped)
Illuminates when the fuel cap
may not be properly installed.
Continued driving with this light
on may cause the service engine soon
warning indicator to come on.
Cruise Control Indicator
(If Equipped) It illuminates when you switch
the system on.
See
Using Cruise Control
(page 237).
Direction Indicator Illuminates when you switch on
the left or right direction
indicator or the hazard flashers.
Flashes during operation. An increase in
the rate of flashing warns of a failed
indicator bulb.
Door Ajar Warning Lamp Displays when the ignition is on
and any door is not completely
closed.
Electric Park Brake Illuminates or flashes when the
electric parking brake has a
malfunction. See
Electric
Parking Brake (page 212).
Electronic Limited Slip Differential
(If Equipped) Illuminates when using the
electronic limited slip
differential. Engine Coolant Temperature
Warning Lamp If it illuminates when your vehicle
is moving, this indicates that the
engine is overheating. Stop your
vehicle as soon as it is safe to do so and
switch the engine off. Have your vehicle
checked as soon as possible.
Fasten Seatbelt Warning Lamp It illuminates and a chime
sounds until you fasten the
seatbelts.
Four-Wheel Drive Indicators
(If
Equipped)
Note: Some indicators will appear different
depending on vehicle options. Illuminates momentarily when
you select two-wheel drive high.
Illuminates when the automatic
four-wheel drive system is
engaged.
Illuminates when four-wheel
drive low is engaged.
Illuminates when four-wheel
drive high is engaged.
Front Fog Lamp Indicator It illuminates when you switch
the front fog lamps on.
Headlamp High Beam Indicator It illuminates when you switch
the headlamp high beam on.
108
Expedition (TB8) Canada/United States of America, enUSA, Edition date: 201708, Third-Printing- Instrument Cluster E71340 E146190 E163170 E71880 E181778 E181781 E181780 E181779
Page 241 of 571
USING ADAPTIVE CRUISE
CONTROL (IF EQUIPPED)
WARNING:
Always pay close
attention to changing road conditions
when using adaptive cruise control. The
system does not replace attentive
driving. Failing to pay attention to the
road may result in a crash, serious injury
or death. WARNING:
Do not use the
adaptive cruise control when entering or
leaving a highway, on roads with
intersections or roundabouts or
non-vehicular traffic or roads that are
winding, slippery, unpaved, or steep
slopes. WARNING:
Do not use the system
in poor visibility, for example fog, heavy
rain, spray or snow. WARNING:
Do not use the system
when towing a trailer with aftermarket
trailer brake controls. Aftermarket trailer
brakes will not function properly when
you switch the system on because the
brakes are electronically controlled.
Failing to do so may result in loss of
vehicle control, which could result in
serious injury. WARNING:
Do not use tire sizes
other than those recommended because
this can affect the normal operation of
the system. Failure to do so may result
in a loss of vehicle control, which could
result in serious injury. WARNING: Adaptive cruise control
may not detect stationary or slow
moving vehicles below 6 mph (10 km/h). WARNING: Adaptive cruise control
does not detect pedestrians or objects
in the road. WARNING: Adaptive cruise control
does not detect oncoming vehicles in the
same lane. WARNING: Adaptive cruise control
is not a crash warning or avoidance
system. WARNING:
Do not use adaptive
cruise control with a snow plow blade
installed.
Note: It is your responsibility to stay alert,
drive safely and be in control of the vehicle
at all times.
The system adjusts your vehicle speed to
maintain the set gap between you and the
vehicle in front of you in the same lane.
You can select four gap settings.
The system uses a radar sensor that
projects a beam directly in front of your
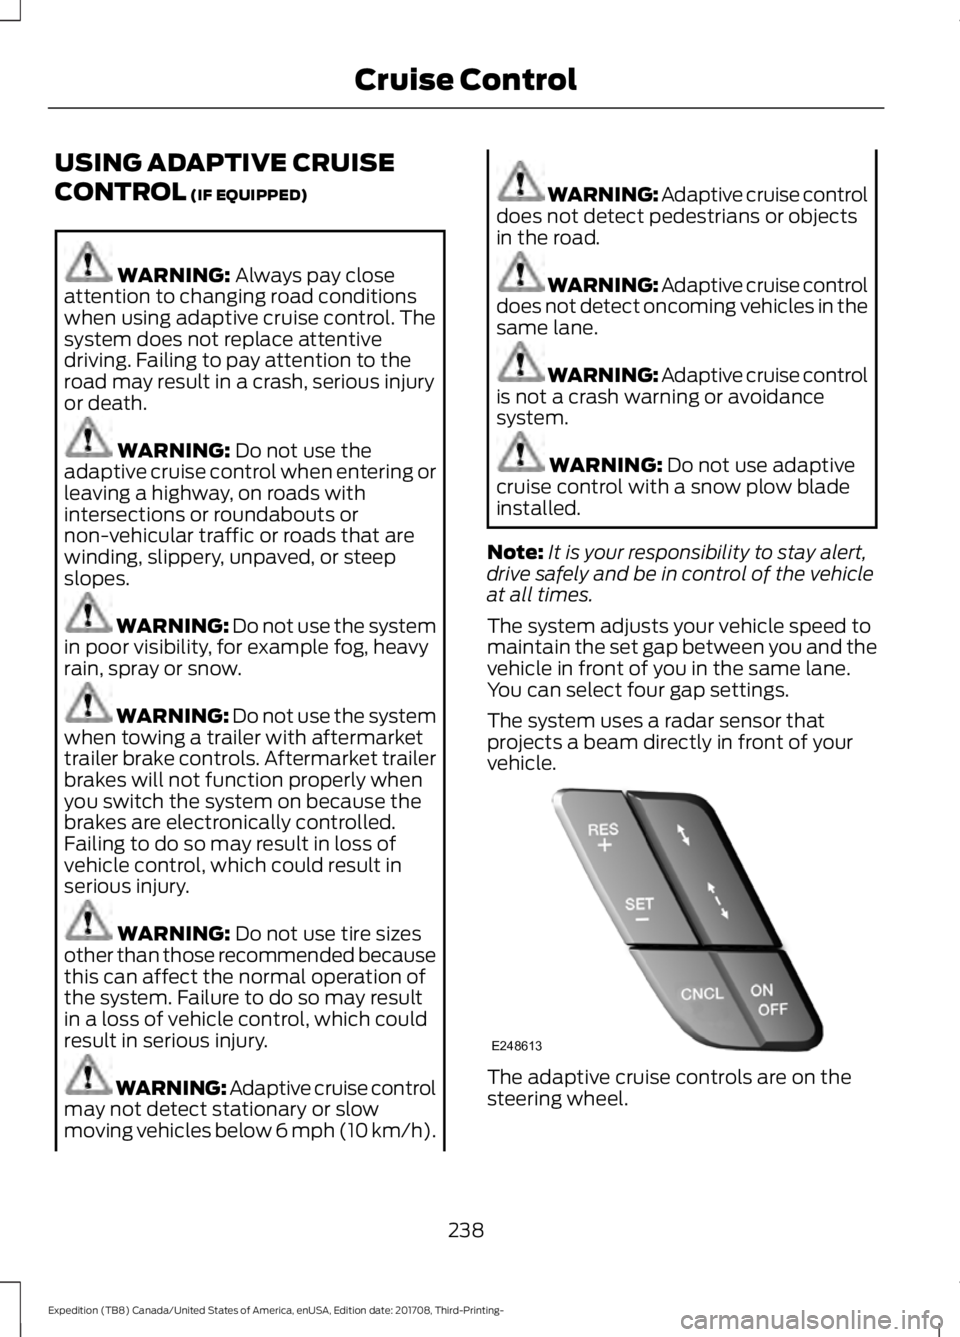
vehicle. The adaptive cruise controls are on the
steering wheel.
238
Expedition (TB8) Canada/United States of America, enUSA, Edition date: 201708, Third-Printing- Cruise ControlE248613
Page 341 of 571
3. Press the wiper blade secondary
locking clip.
4. Remove the wiper blade.
Note: Make sure that the wiper arm does
not spring back against the glass when the
wiper blade is not attached.
5. Install in the reverse order.
Note: Make sure that the wiper blade locks
into place.
ADJUSTING THE HEADLAMPS
Vertical Aim Adjustment
The headlamps on your vehicle are
properly aimed at the assembly plant. If
your vehicle has been in an accident,
contact an authorized dealer to check and
realign your headlamps.
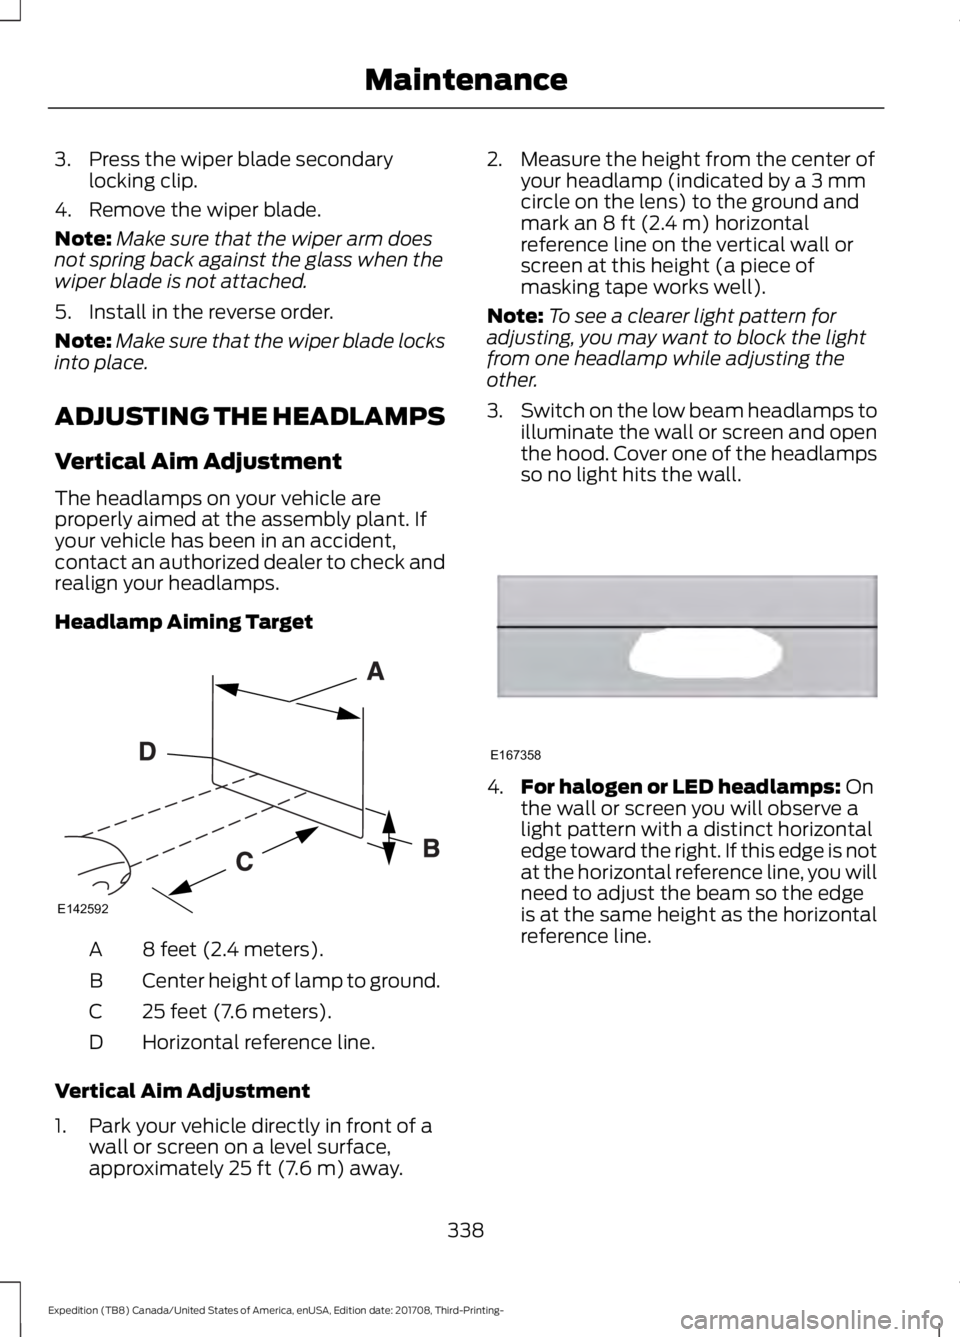
Headlamp Aiming Target 8 feet (2.4 meters).
A
Center height of lamp to ground.
B
25 feet (7.6 meters).
C
Horizontal reference line.
D
Vertical Aim Adjustment
1. Park your vehicle directly in front of a wall or screen on a level surface,
approximately 25 ft (7.6 m) away. 2. Measure the height from the center of
your headlamp (indicated by a 3 mm
circle on the lens) to the ground and
mark an
8 ft (2.4 m) horizontal
reference line on the vertical wall or
screen at this height (a piece of
masking tape works well).
Note: To see a clearer light pattern for
adjusting, you may want to block the light
from one headlamp while adjusting the
other.
3. Switch on the low beam headlamps to
illuminate the wall or screen and open
the hood. Cover one of the headlamps
so no light hits the wall. 4.
For halogen or LED headlamps:
On
the wall or screen you will observe a
light pattern with a distinct horizontal
edge toward the right. If this edge is not
at the horizontal reference line, you will
need to adjust the beam so the edge
is at the same height as the horizontal
reference line.
338
Expedition (TB8) Canada/United States of America, enUSA, Edition date: 201708, Third-Printing- MaintenanceE142592 E167358
Page 344 of 571
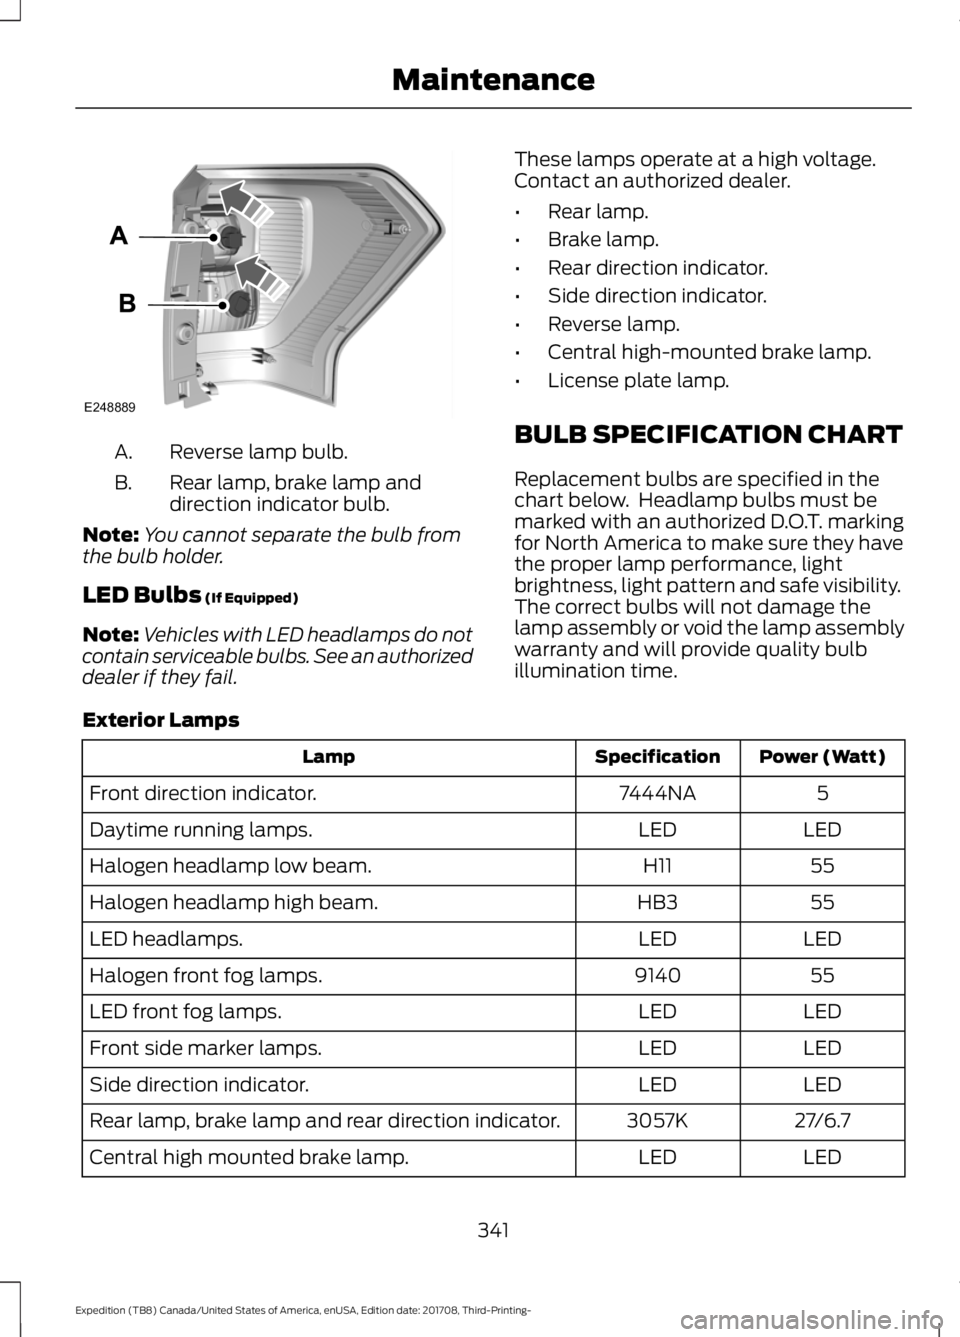
Reverse lamp bulb.
A.
Rear lamp, brake lamp and
direction indicator bulb.
B.
Note: You cannot separate the bulb from
the bulb holder.
LED Bulbs (If Equipped)
Note: Vehicles with LED headlamps do not
contain serviceable bulbs. See an authorized
dealer if they fail. These lamps operate at a high voltage.
Contact an authorized dealer.
•
Rear lamp.
• Brake lamp.
• Rear direction indicator.
• Side direction indicator.
• Reverse lamp.
• Central high-mounted brake lamp.
• License plate lamp.
BULB SPECIFICATION CHART
Replacement bulbs are specified in the
chart below. Headlamp bulbs must be
marked with an authorized D.O.T. marking
for North America to make sure they have
the proper lamp performance, light
brightness, light pattern and safe visibility.
The correct bulbs will not damage the
lamp assembly or void the lamp assembly
warranty and will provide quality bulb
illumination time.
Exterior Lamps Power (Watt)
Specification
Lamp
5
7444NA
Front direction indicator.
LED
LED
Daytime running lamps.
55
H11
Halogen headlamp low beam.
55
HB3
Halogen headlamp high beam.
LED
LED
LED headlamps.
55
9140
Halogen front fog lamps.
LED
LED
LED front fog lamps.
LED
LED
Front side marker lamps.
LED
LED
Side direction indicator.
27/6.7
3057K
Rear lamp, brake lamp and rear direction indicator.
LED
LED
Central high mounted brake lamp.
341
Expedition (TB8) Canada/United States of America, enUSA, Edition date: 201708, Third-Printing- MaintenanceE248889
Page 565 of 571
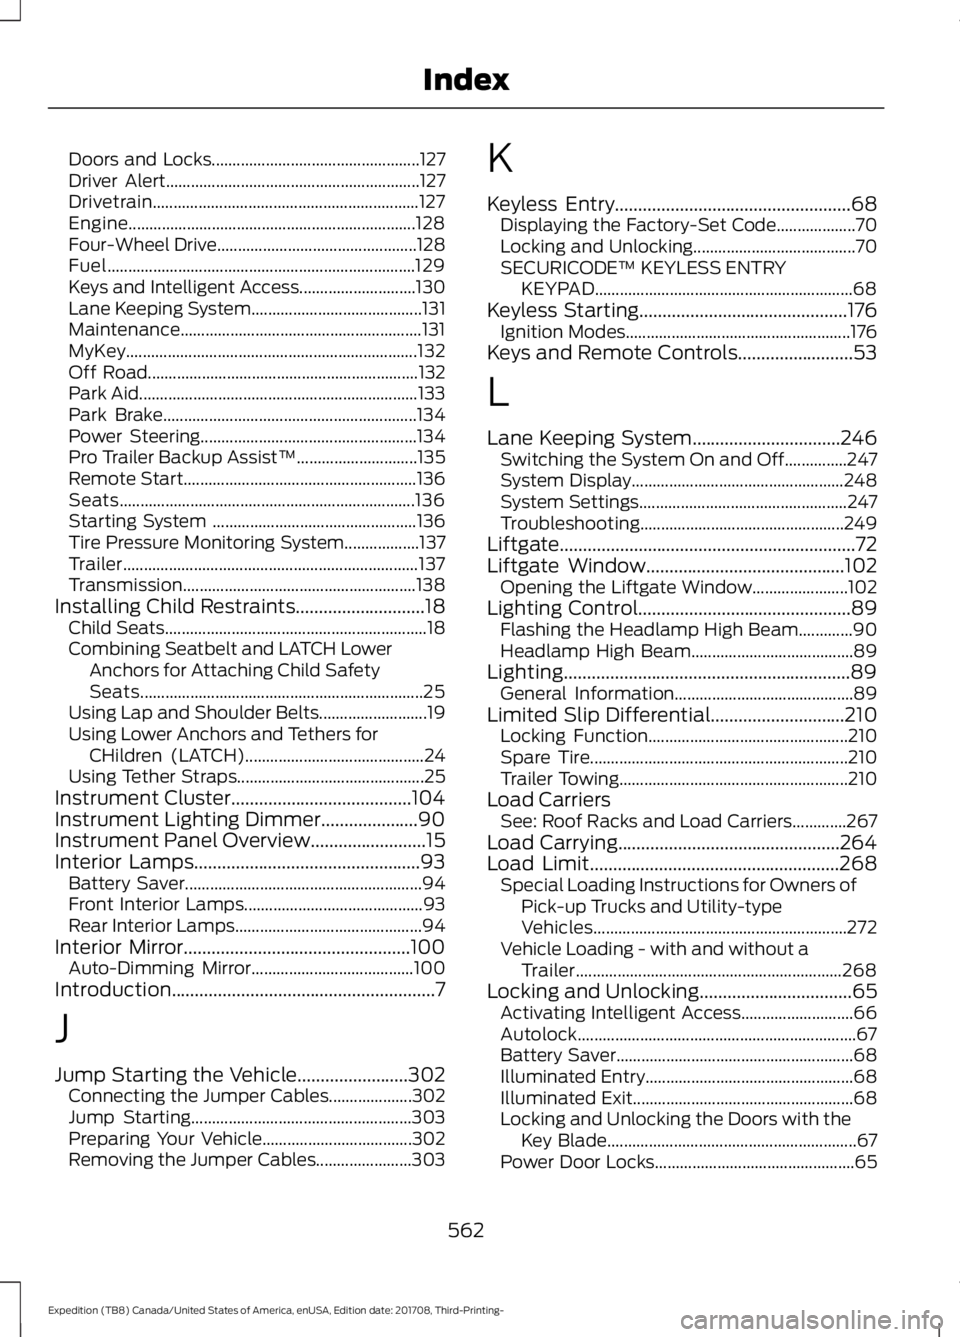
Doors and Locks..................................................
127
Driver Alert............................................................. 127
Drivetrain................................................................ 127
Engine..................................................................... 128
Four-Wheel Drive................................................ 128
Fuel........................................................................\
.. 129
Keys and Intelligent Access............................ 130
Lane Keeping System......................................... 131
Maintenance.......................................................... 131
MyKey...................................................................... 132
Off Road................................................................. 132
Park Aid................................................................... 133
Park Brake............................................................. 134
Power Steering.................................................... 134
Pro Trailer Backup Assist™............................. 135
Remote Start........................................................ 136
Seats....................................................................... 136
Starting System ................................................. 136
Tire Pressure Monitoring System.................. 137
Trailer....................................................................... 137
Transmission........................................................ 138
Installing Child Restraints............................18
Child Seats............................................................... 18
Combining Seatbelt and LATCH Lower Anchors for Attaching Child Safety
Seats.................................................................... 25
Using Lap and Shoulder Belts.......................... 19
Using Lower Anchors and Tethers for CHildren (LATCH)........................................... 24
Using Tether Straps............................................. 25
Instrument Cluster.......................................104
Instrument Lighting Dimmer.....................90
Instrument Panel Overview
.........................15
Interior Lamps.................................................93
Battery Saver......................................................... 94
Front Interior Lamps........................................... 93
Rear Interior Lamps............................................. 94
Interior Mirror
.................................................100
Auto-Dimming Mirror....................................... 100
Introduction.........................................................7
J
Jump Starting the Vehicle........................302 Connecting the Jumper Cables.................... 302
Jump Starting..................................................... 303
Preparing Your Vehicle.................................... 302
Removing the Jumper Cables....................... 303K
Keyless Entry
...................................................68
Displaying the Factory-Set Code................... 70
Locking and Unlocking....................................... 70
SECURICODE™ KEYLESS ENTRY KEYPAD.............................................................. 68
Keyless Starting.............................................176 Ignition Modes...................................................... 176
Keys and Remote Controls.........................53
L
Lane Keeping System
................................246
Switching the System On and Off...............247
System Display................................................... 248
System Settings.................................................. 247
Troubleshooting................................................. 249
Liftgate................................................................72
Liftgate Window...........................................102 Opening the Liftgate Window....................... 102
Lighting Control
..............................................89
Flashing the Headlamp High Beam.............90
Headlamp High Beam....................................... 89
Lighting..............................................................89 General Information........................................... 89
Limited Slip Differential
.............................210
Locking Function................................................ 210
Spare Tire.............................................................. 210
Trailer Towing....................................................... 210
Load Carriers See: Roof Racks and Load Carriers.............267
Load Carrying................................................264
Load Limit
......................................................268
Special Loading Instructions for Owners of
Pick-up Trucks and Utility-type
Vehicles............................................................. 272
Vehicle Loading - with and without a Trailer................................................................ 268
Locking and Unlocking.................................65 Activating Intelligent Access........................... 66
Autolock................................................................... 67
Battery Saver......................................................... 68
Illuminated Entry.................................................. 68
Illuminated Exit..................................................... 68
Locking and Unlocking the Doors with the Key Blade............................................................ 67
Power Door Locks................................................ 65
562
Expedition (TB8) Canada/United States of America, enUSA, Edition date: 201708, Third-Printing- Index