belt FORD EXPEDITION EL 2016 Owners Manual
[x] Cancel search | Manufacturer: FORD, Model Year: 2016, Model line: EXPEDITION EL, Model: FORD EXPEDITION EL 2016Pages: 421, PDF Size: 7.39 MB
Page 4 of 421
Introduction
About This Manual...........................................7
Symbols Glossary.............................................7
Data Recording..................................................9
California Proposition 65..............................11
Perchlorate.........................................................11
Ford Credit..........................................................11
Replacement PartsRecommendation........................................11
Special Notices................................................12
Mobile CommunicationsEquipment.....................................................12
Export Unique Options..................................13
Environment
Protecting the Environment........................14
Child Safety
General Information.......................................15
Installing Child Restraints............................16
Booster Seats..................................................23
Child Restraint Positioning.........................25
Child Safety Locks.........................................26
Seatbelts
Principle of Operation..................................28
Fastening the Seatbelts..............................29
Seatbelt Height Adjustment.......................31
Seatbelt Warning Lamp and IndicatorChime..............................................................32
Seatbelt Reminder.........................................33
Child Restraint and SeatbeltMaintenance................................................34
Supplementary RestraintsSystem
Principle of Operation..................................35
Driver and Passenger Airbags...................36
Side Airbags......................................................37
Safety Canopy™............................................38
Crash Sensors and Airbag Indicator........39
Airbag Disposal..............................................40
Keys and Remote Controls
Principle of Operation...................................41
General Information on RadioFrequencies...................................................41
Remote Control..............................................42
Replacing a Lost Key or RemoteControl...........................................................45
MyKey™
Principle of Operation..................................46
Creating a MyKey............................................47
Clearing All MyKeys.......................................48
Checking MyKey System Status..............49
Using MyKey With Remote StartSystems.........................................................50
MyKey Troubleshooting................................51
Locks
Locking and Unlocking.................................53
Manual Liftgate...............................................55
Power Liftgate..................................................57
Keyless Entry...................................................59
Security
Passive Anti-Theft System.........................62
Anti-Theft Alarm............................................63
Power Running Boards
Using Power Running Boards....................64
Steering Wheel
Adjusting the Steering Wheel - VehiclesWith: Column Shift/Manual AdjustableSteering Column........................................66
Adjusting the Steering Wheel - VehiclesWith: Floor Shift/Manual AdjustableSteering Column........................................66
1
Expedition (TB7) Canada/United States of America, enUSA, First Printing
Table of Contents
Page 11 of 421
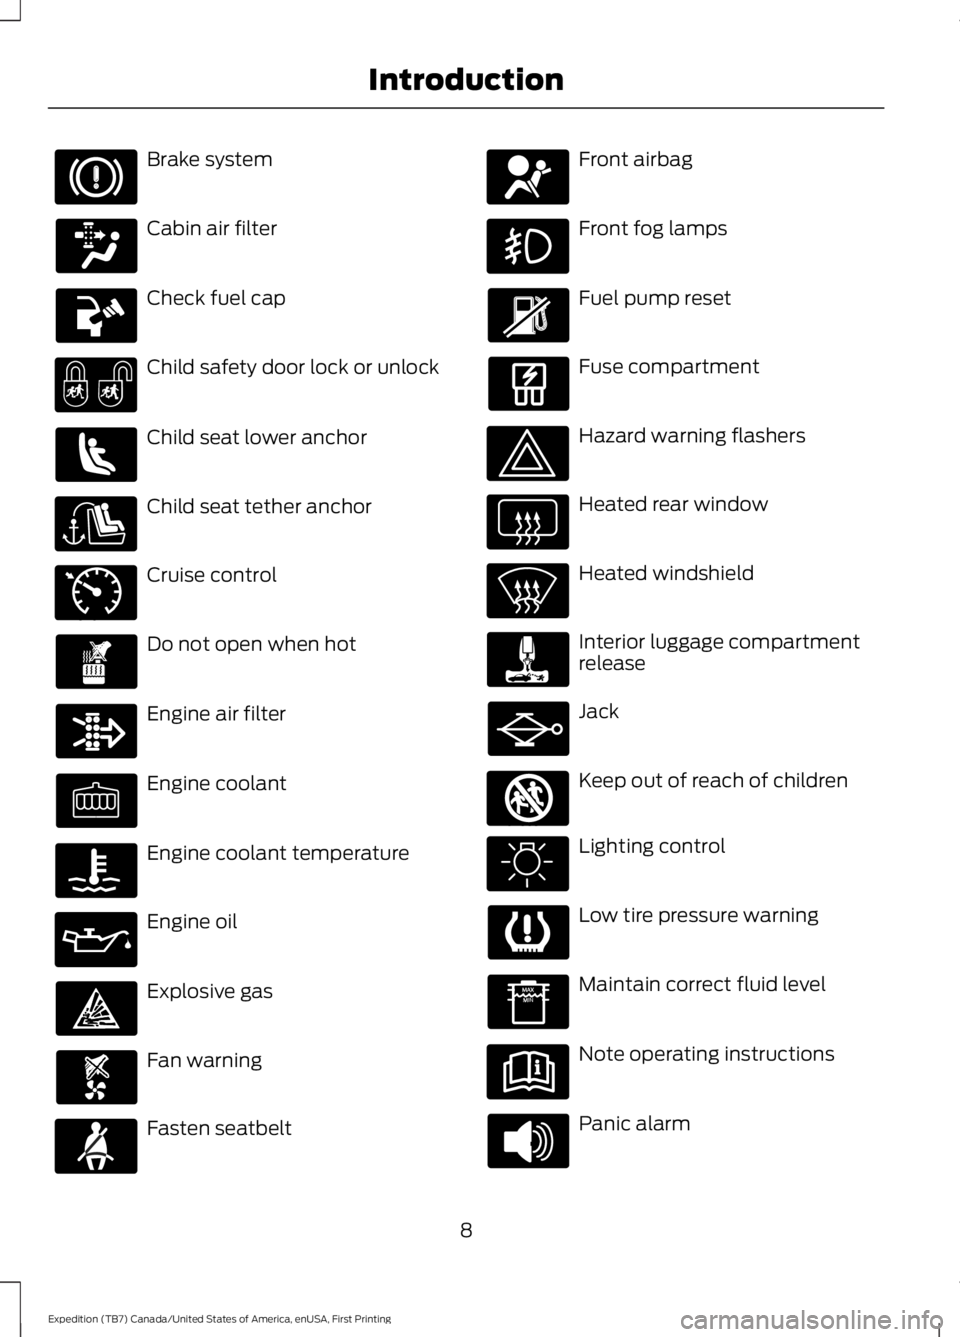
Brake system
Cabin air filter
Check fuel cap
Child safety door lock or unlock
Child seat lower anchor
Child seat tether anchor
Cruise control
Do not open when hot
Engine air filter
Engine coolant
Engine coolant temperature
Engine oil
Explosive gas
Fan warning
Fasten seatbelt
Front airbag
Front fog lamps
Fuel pump reset
Fuse compartment
Hazard warning flashers
Heated rear window
Heated windshield
Interior luggage compartmentrelease
Jack
Keep out of reach of children
Lighting control
Low tire pressure warning
Maintain correct fluid level
Note operating instructions
Panic alarm
8
Expedition (TB7) Canada/United States of America, enUSA, First Printing
Introduction E71340 E161353
Page 12 of 421
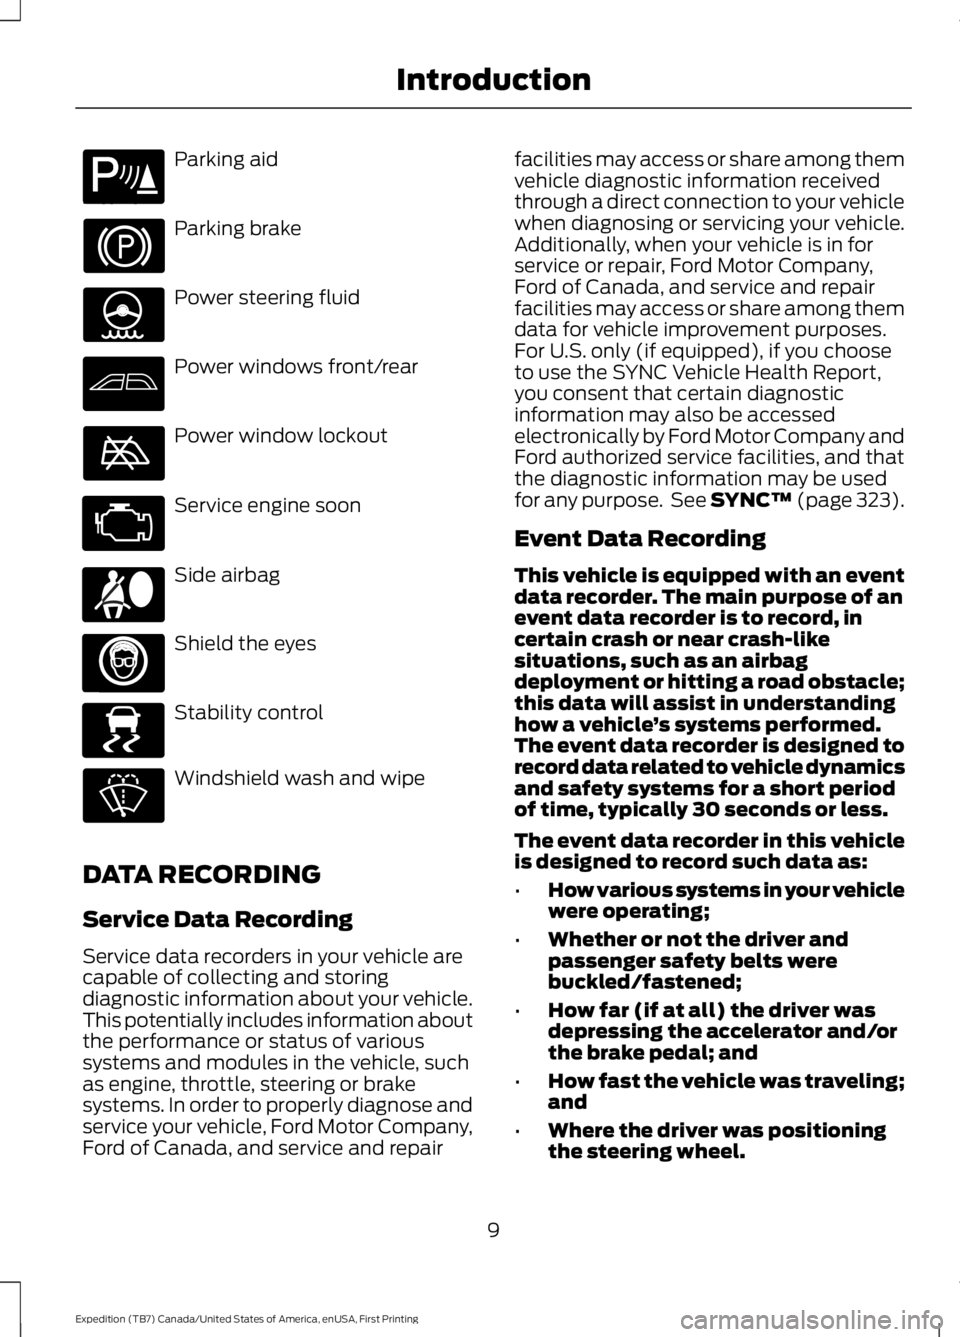
Parking aid
Parking brake
Power steering fluid
Power windows front/rear
Power window lockout
Service engine soon
Side airbag
Shield the eyes
Stability control
Windshield wash and wipe
DATA RECORDING
Service Data Recording
Service data recorders in your vehicle arecapable of collecting and storingdiagnostic information about your vehicle.This potentially includes information aboutthe performance or status of varioussystems and modules in the vehicle, suchas engine, throttle, steering or brakesystems. In order to properly diagnose andservice your vehicle, Ford Motor Company,Ford of Canada, and service and repair
facilities may access or share among themvehicle diagnostic information receivedthrough a direct connection to your vehiclewhen diagnosing or servicing your vehicle.Additionally, when your vehicle is in forservice or repair, Ford Motor Company,Ford of Canada, and service and repairfacilities may access or share among themdata for vehicle improvement purposes.For U.S. only (if equipped), if you chooseto use the SYNC Vehicle Health Report,you consent that certain diagnosticinformation may also be accessedelectronically by Ford Motor Company andFord authorized service facilities, and thatthe diagnostic information may be usedfor any purpose. See SYNC™ (page 323).
Event Data Recording
This vehicle is equipped with an eventdata recorder. The main purpose of anevent data recorder is to record, incertain crash or near crash-likesituations, such as an airbagdeployment or hitting a road obstacle;this data will assist in understandinghow a vehicle’s systems performed.The event data recorder is designed torecord data related to vehicle dynamicsand safety systems for a short periodof time, typically 30 seconds or less.
The event data recorder in this vehicleis designed to record such data as:
•How various systems in your vehiclewere operating;
•Whether or not the driver andpassenger safety belts werebuckled/fastened;
•How far (if at all) the driver wasdepressing the accelerator and/orthe brake pedal; and
•How fast the vehicle was traveling;and
•Where the driver was positioningthe steering wheel.
9
Expedition (TB7) Canada/United States of America, enUSA, First Printing
IntroductionE139213 E167012 E138639
Page 14 of 421
CALIFORNIA PROPOSITION 65
WARNING
Some constituents of engineexhaust, certain vehicle components,certain fluids contained in vehiclesand certain products of component wearcontain or emit chemicals known to theState of California to cause cancer andbirth defects or other reproductive harm.
PERCHLORATE
Certain components in your vehicle suchas airbag modules, safety beltpretensioners and remote control batteriesmay contain perchlorate material. Specialhandling may apply for service or vehicleend of life disposal.
For more information visit:
Web Address
www.dtsc.ca.gov/hazardouswaste/perchlorate
FORD CREDIT
(U.S. Only)
Ford Credit offers a full range of financingand lease plans to help you acquire yourvehicle. If you have financed or leased yourvehicle through Ford Credit, thank you foryour business.
For your convenience we offer a numberof ways to contact us, as well as to helpmanage your account.
Phone: 1-800-727-7000
For more information regarding Ford Credit,as well as to access Account Manager,please go to www.fordcredit.com.
REPLACEMENT PARTS
RECOMMENDATION
Your vehicle has been built to the higheststandards using quality parts. Werecommend that you demand the use ofgenuine Ford and Motorcraft partswhenever your vehicle requires scheduledmaintenance or repair. You can clearlyidentify genuine Ford and Motorcraft partsby looking for the Ford, FoMoCo orMotorcraft branding on the parts or theirpackaging.
Scheduled Maintenance andMechanical Repairs
One of the best ways for you to make surethat your vehicle provides years of serviceis to have it maintained in line with ourrecommendations using parts thatconform to the specifications detailed inthis Owner’s Manual. Genuine Ford andMotorcraft parts meet or exceed thesespecifications.
Collision Repairs
We hope that you never experience acollision, but accidents do happen. GenuineFord replacement collision parts meet ourstringent requirements for fit, finish,structural integrity, corrosion protectionand dent resistance. During vehicledevelopment we validate these partsdeliver the intended level of protection asa whole system. A great way to know forsure you are getting this level of protectionis to use genuine Ford replacementcollision parts.
11
Expedition (TB7) Canada/United States of America, enUSA, First Printing
Introduction
Page 19 of 421
Recommendations for Safety Restraints for Children
Recommended restrainttypeChild size, height, weight, or ageChild
Use a child safety seat(sometimes called aninfant carrier, convertibleseat, or toddler seat).
Children weighing 40 lb (18 kg) or less(generally age four or younger).Infants ortoddlers
Use a belt-positioningbooster seat.Children who have outgrown or no longerproperly fit in a child safety seat (gener-ally children who are less than 4 ft. 9 in.(1.45 m) tall, are greater than age fourand less than age 12, and between 40 lb(18 kg) and 80 lb (36 kg) and upward to100 lb (45 kg) if recommended by yourchild restraint manufacturer).
Small children
Use a vehicle safety belthaving the lap belt snugand low across the hips,shoulder belt centeredacross the shoulder andchest, and seat backupright.
Children who have outgrown or no longerproperly fit in a belt-positioning boosterseat (generally children who are at least4 ft. 9 in. (1.45 m) tall or greater than 80lb (36 kg) or 100 lb (45 kg) if recom-mended by child restraint manufacturer).
Larger children
•You are required by law to properly usesafety seats for infants and toddlers inthe United States and Canada.
•Many states and provinces require thatsmall children use approved boosterseats until they reach age eight, aheight of 4 feet 9 inches (1.45 meters)tall, or 80 pounds (36 kilograms).Check your local and state or provinciallaws for specific requirements aboutthe safety of children in your vehicle.
•When possible, always properlyrestrain children 12 years of age andunder in a rear seating position of yourvehicle. Accident statistics suggest thatchildren are safer when properlyrestrained in the rear seating positionsthan in a front seating position.
INSTALLING CHILD
RESTRAINTS
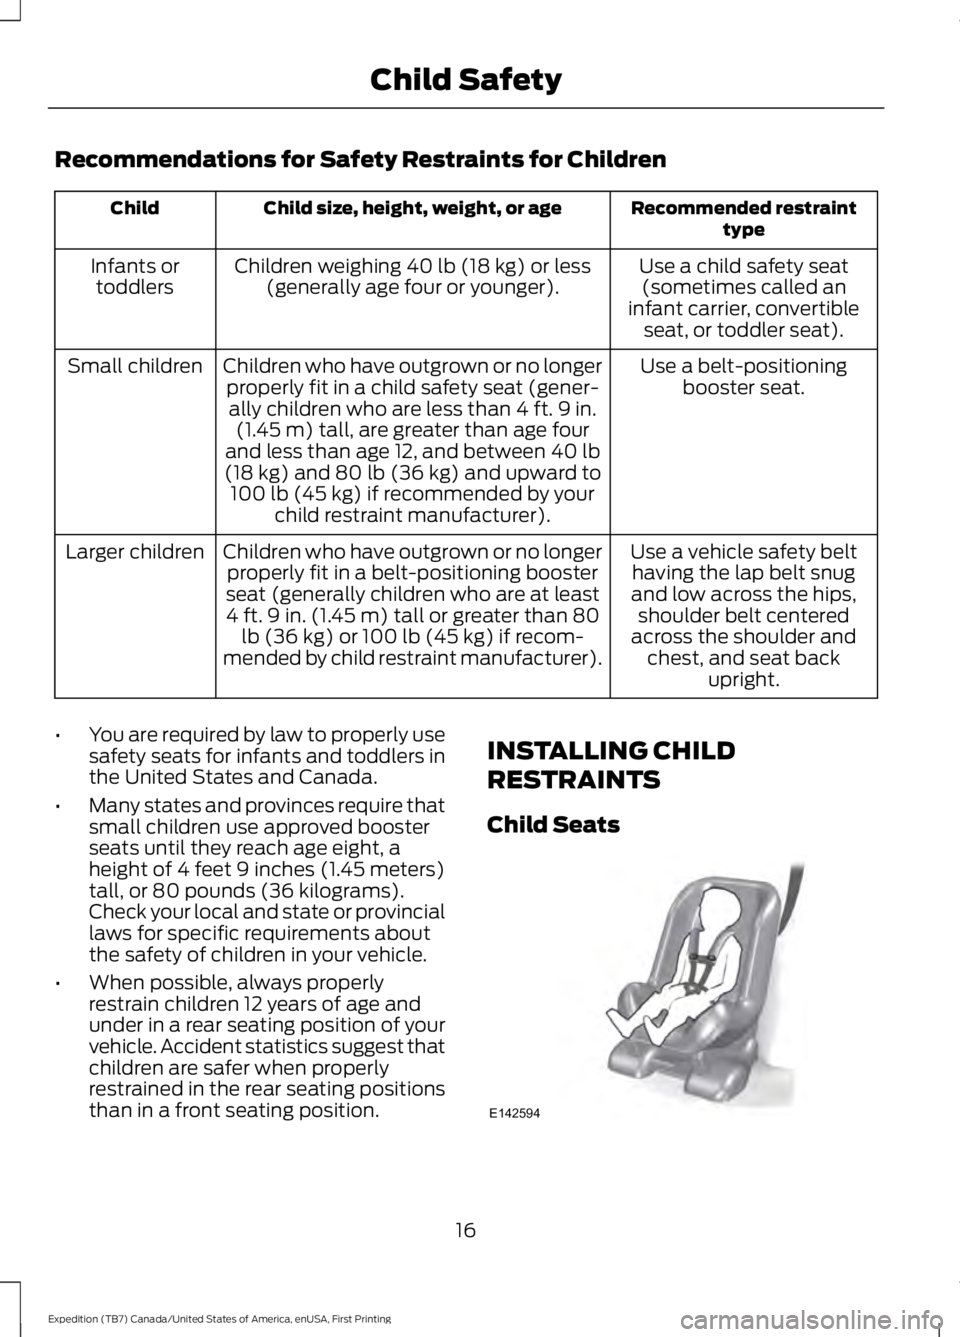
Child Seats
16
Expedition (TB7) Canada/United States of America, enUSA, First Printing
Child SafetyE142594
Page 20 of 421
Use a child safety seat (sometimes calledan infant carrier, convertible seat, ortoddler seat) for infants, toddlers, orchildren weighing 40 pounds (18kilograms) or less (generally age four oryounger).
Using Lap and Shoulder Belts
WARNINGS
Airbags can kill or injure a child in achild seat. Never place a rear-facingchild seat in front of an active airbag.If you must use a forward-facing child seatin the front seat, move the vehicle seatupon which the seat is installed all the wayback.
Airbags can kill or injure a child in achild seat. Children 12 and undershould be properly restrained in therear seat whenever possible.
Depending on where you secure achild restraint, and depending on thechild restraint design, you may blockaccess to certain safety belt buckleassemblies and LATCH lower anchors,rendering those features potentiallyunusable. To avoid risk of injury, occupantsshould only use seating positions wherethey are able to be properly restrained.
When installing a child safety seat withcombination lap and shoulder belts:
•Use the correct safety belt buckle forthat seating position.
•Insert the belt tongue into the properbuckle until you hear a snap and feel itlatch. Make sure the tongue is securelyfastened in the buckle.
•Keep the buckle release buttonpointing up and away from the safetyseat, with the tongue between the childseat and the release button, to preventaccidental unbuckling.
•Place the vehicle seat upon which thechild seat will be installed in the uprightposition.
•Put the safety belt in the automaticlocking mode. This vehicle does notrequire the use of a locking clip.
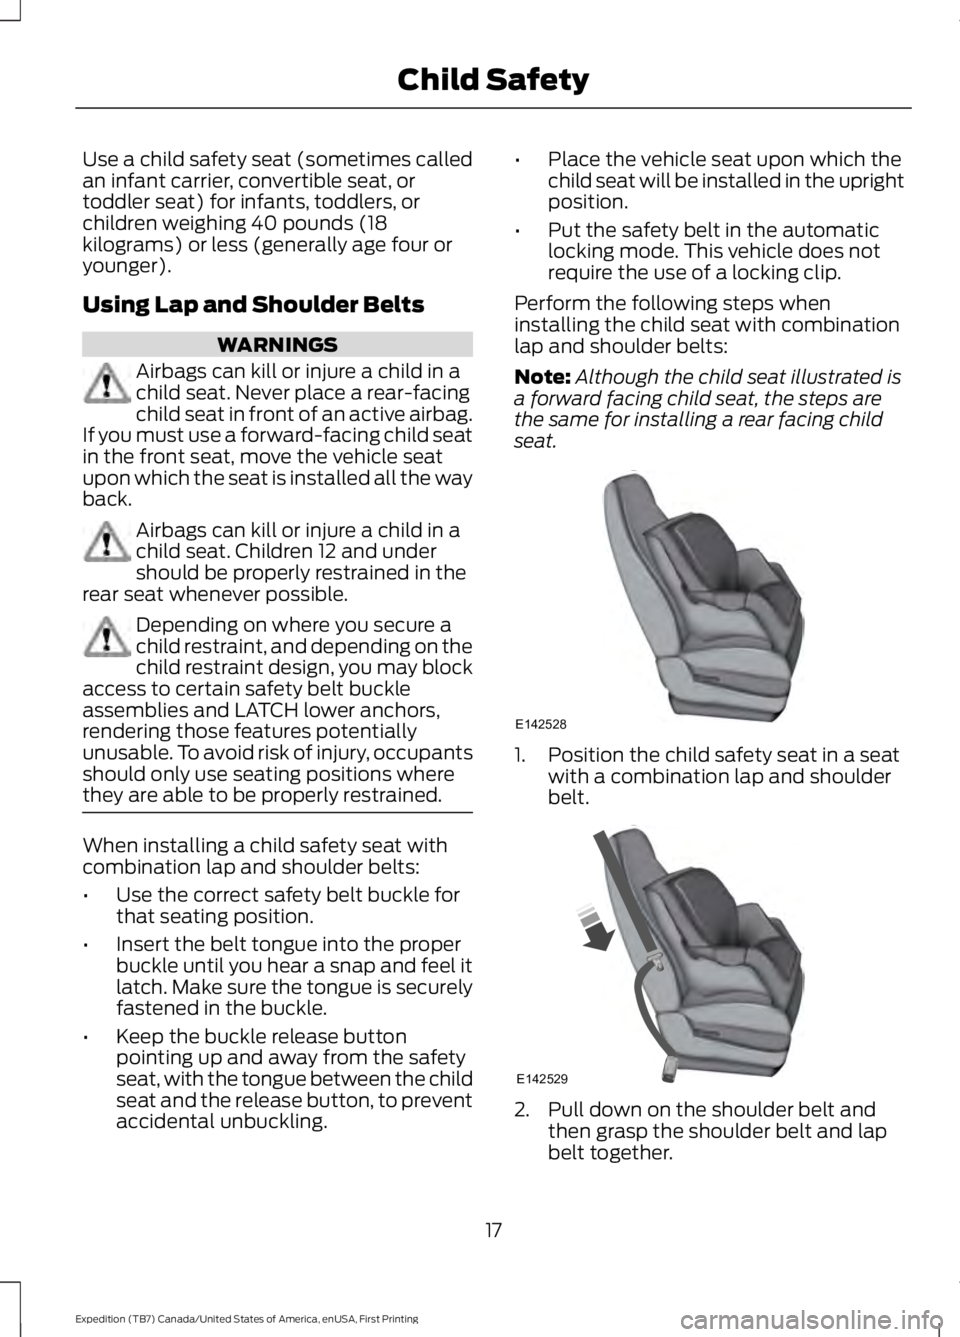
Perform the following steps wheninstalling the child seat with combinationlap and shoulder belts:
Note:Although the child seat illustrated isa forward facing child seat, the steps arethe same for installing a rear facing childseat.
1. Position the child safety seat in a seatwith a combination lap and shoulderbelt.
2. Pull down on the shoulder belt andthen grasp the shoulder belt and lapbelt together.
17
Expedition (TB7) Canada/United States of America, enUSA, First Printing
Child SafetyE142528 E142529
Page 21 of 421
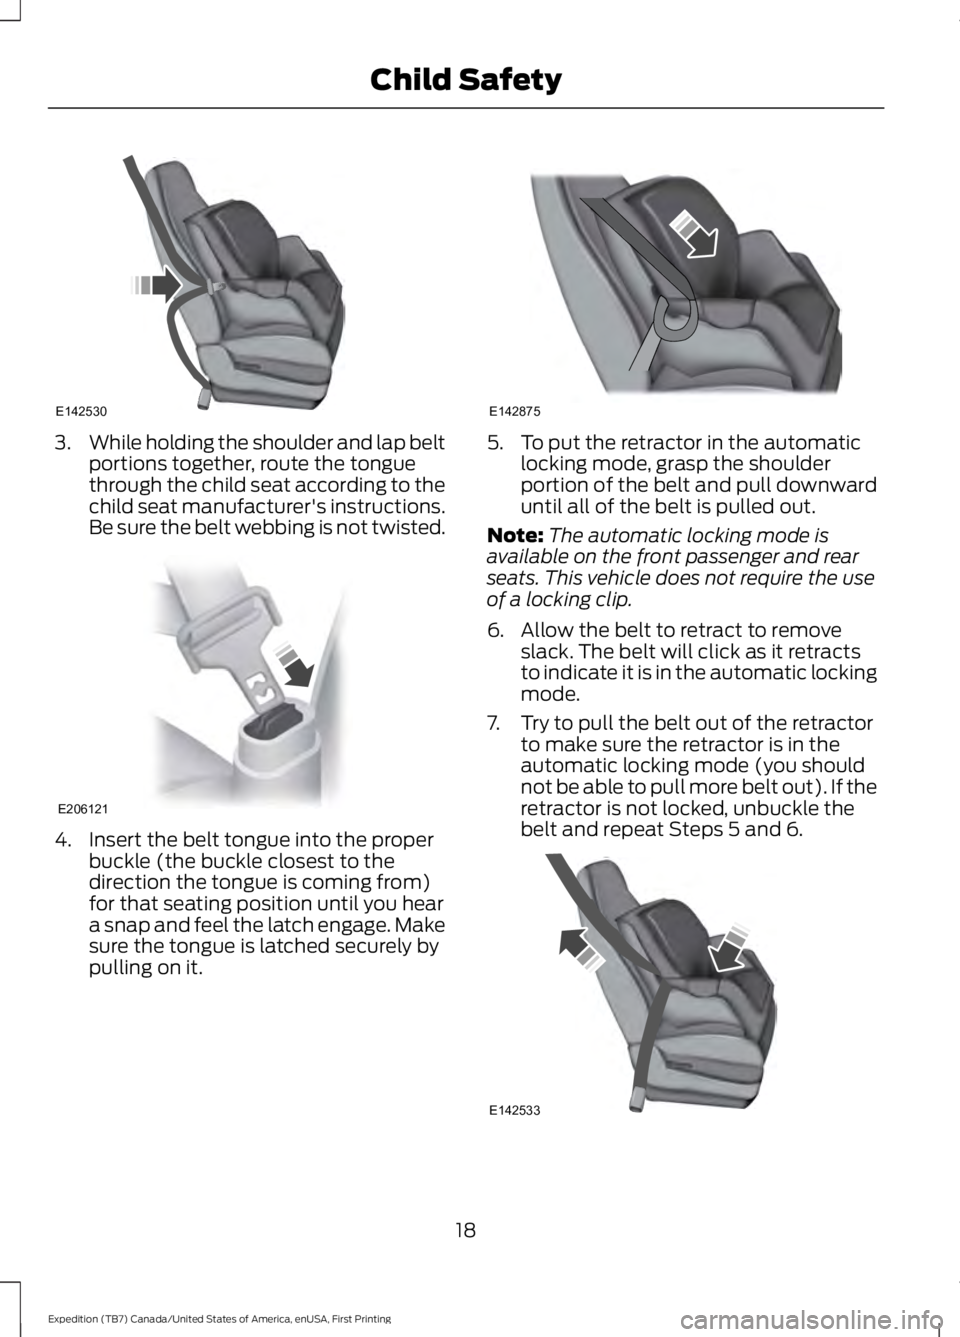
3.While holding the shoulder and lap beltportions together, route the tonguethrough the child seat according to thechild seat manufacturer's instructions.Be sure the belt webbing is not twisted.
4. Insert the belt tongue into the properbuckle (the buckle closest to thedirection the tongue is coming from)for that seating position until you heara snap and feel the latch engage. Makesure the tongue is latched securely bypulling on it.
5. To put the retractor in the automaticlocking mode, grasp the shoulderportion of the belt and pull downwarduntil all of the belt is pulled out.
Note:The automatic locking mode isavailable on the front passenger and rearseats. This vehicle does not require the useof a locking clip.
6. Allow the belt to retract to removeslack. The belt will click as it retractsto indicate it is in the automatic lockingmode.
7. Try to pull the belt out of the retractorto make sure the retractor is in theautomatic locking mode (you shouldnot be able to pull more belt out). If theretractor is not locked, unbuckle thebelt and repeat Steps 5 and 6.
18
Expedition (TB7) Canada/United States of America, enUSA, First Printing
Child SafetyE142530 E206121 E142875 E142533
Page 22 of 421
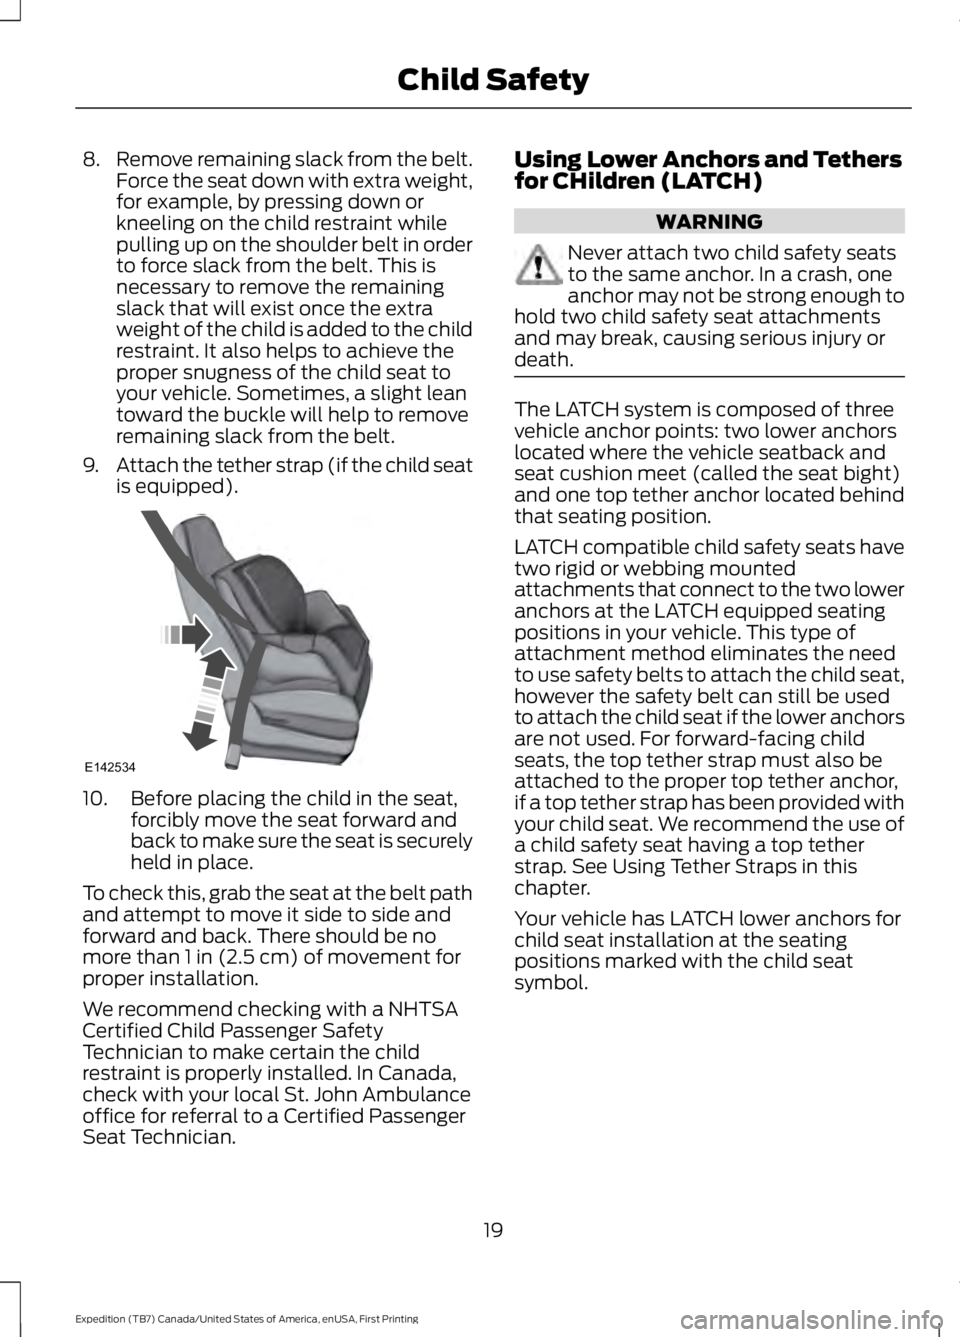
8.Remove remaining slack from the belt.Force the seat down with extra weight,for example, by pressing down orkneeling on the child restraint whilepulling up on the shoulder belt in orderto force slack from the belt. This isnecessary to remove the remainingslack that will exist once the extraweight of the child is added to the childrestraint. It also helps to achieve theproper snugness of the child seat toyour vehicle. Sometimes, a slight leantoward the buckle will help to removeremaining slack from the belt.
9.Attach the tether strap (if the child seatis equipped).
10. Before placing the child in the seat,forcibly move the seat forward andback to make sure the seat is securelyheld in place.
To check this, grab the seat at the belt pathand attempt to move it side to side andforward and back. There should be nomore than 1 in (2.5 cm) of movement forproper installation.
We recommend checking with a NHTSACertified Child Passenger SafetyTechnician to make certain the childrestraint is properly installed. In Canada,check with your local St. John Ambulanceoffice for referral to a Certified PassengerSeat Technician.
Using Lower Anchors and Tethersfor CHildren (LATCH)
WARNING
Never attach two child safety seatsto the same anchor. In a crash, oneanchor may not be strong enough tohold two child safety seat attachmentsand may break, causing serious injury ordeath.
The LATCH system is composed of threevehicle anchor points: two lower anchorslocated where the vehicle seatback andseat cushion meet (called the seat bight)and one top tether anchor located behindthat seating position.
LATCH compatible child safety seats havetwo rigid or webbing mountedattachments that connect to the two loweranchors at the LATCH equipped seatingpositions in your vehicle. This type ofattachment method eliminates the needto use safety belts to attach the child seat,however the safety belt can still be usedto attach the child seat if the lower anchorsare not used. For forward-facing childseats, the top tether strap must also beattached to the proper top tether anchor,if a top tether strap has been provided withyour child seat. We recommend the use ofa child safety seat having a top tetherstrap. See Using Tether Straps in thischapter.
Your vehicle has LATCH lower anchors forchild seat installation at the seatingpositions marked with the child seatsymbol.
19
Expedition (TB7) Canada/United States of America, enUSA, First Printing
Child SafetyE142534
Page 23 of 421
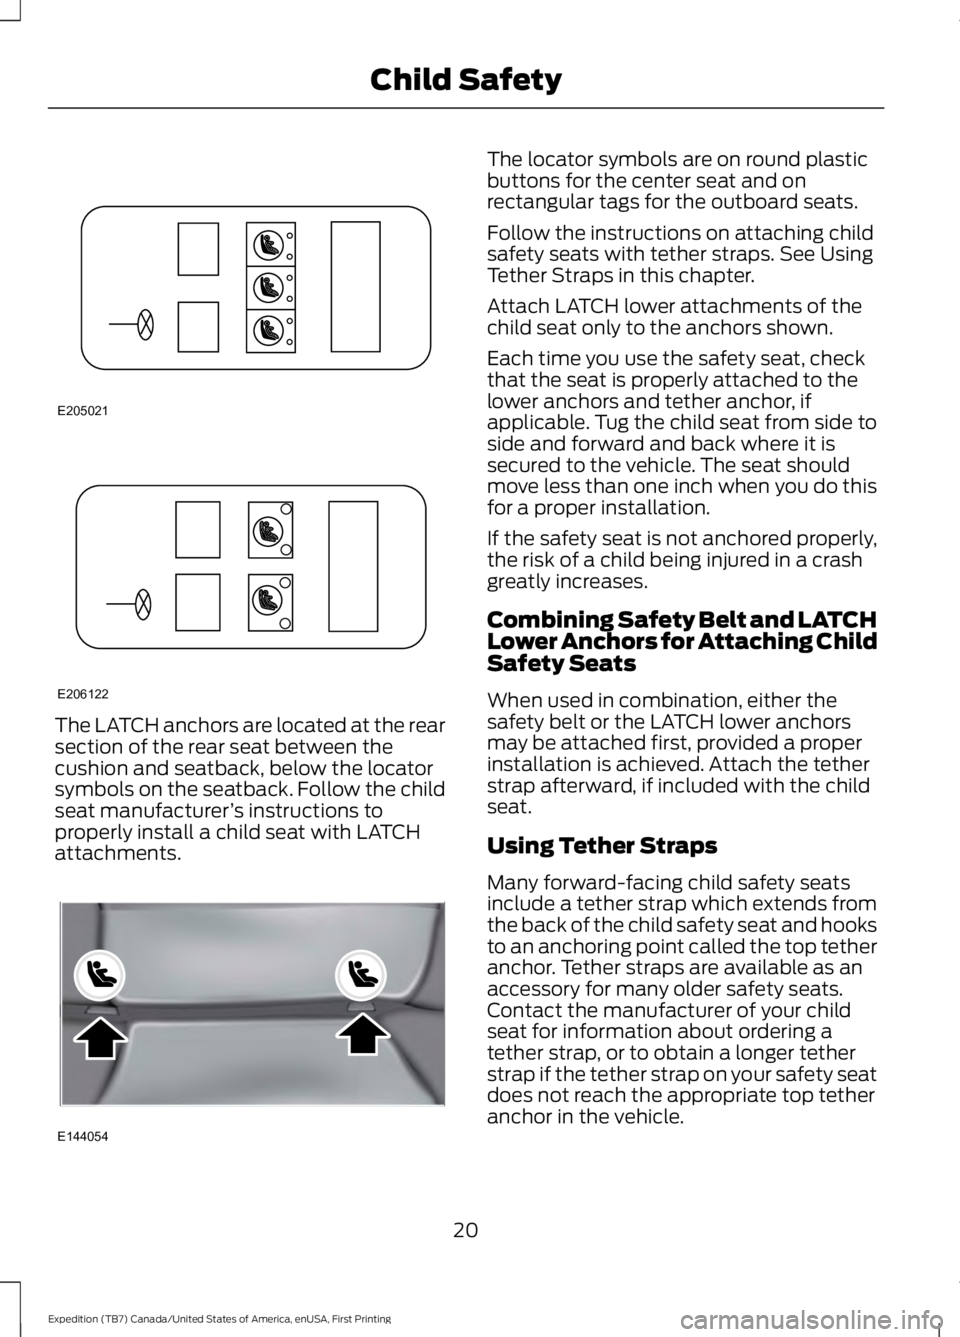
The LATCH anchors are located at the rearsection of the rear seat between thecushion and seatback, below the locatorsymbols on the seatback. Follow the childseat manufacturer’s instructions toproperly install a child seat with LATCHattachments.
The locator symbols are on round plasticbuttons for the center seat and onrectangular tags for the outboard seats.
Follow the instructions on attaching childsafety seats with tether straps. See UsingTether Straps in this chapter.
Attach LATCH lower attachments of thechild seat only to the anchors shown.
Each time you use the safety seat, checkthat the seat is properly attached to thelower anchors and tether anchor, ifapplicable. Tug the child seat from side toside and forward and back where it issecured to the vehicle. The seat shouldmove less than one inch when you do thisfor a proper installation.
If the safety seat is not anchored properly,the risk of a child being injured in a crashgreatly increases.
Combining Safety Belt and LATCHLower Anchors for Attaching ChildSafety Seats
When used in combination, either thesafety belt or the LATCH lower anchorsmay be attached first, provided a properinstallation is achieved. Attach the tetherstrap afterward, if included with the childseat.
Using Tether Straps
Many forward-facing child safety seatsinclude a tether strap which extends fromthe back of the child safety seat and hooksto an anchoring point called the top tetheranchor. Tether straps are available as anaccessory for many older safety seats.Contact the manufacturer of your childseat for information about ordering atether strap, or to obtain a longer tetherstrap if the tether strap on your safety seatdoes not reach the appropriate top tetheranchor in the vehicle.
20
Expedition (TB7) Canada/United States of America, enUSA, First Printing
Child SafetyE205021 E206122 E144054
Page 24 of 421
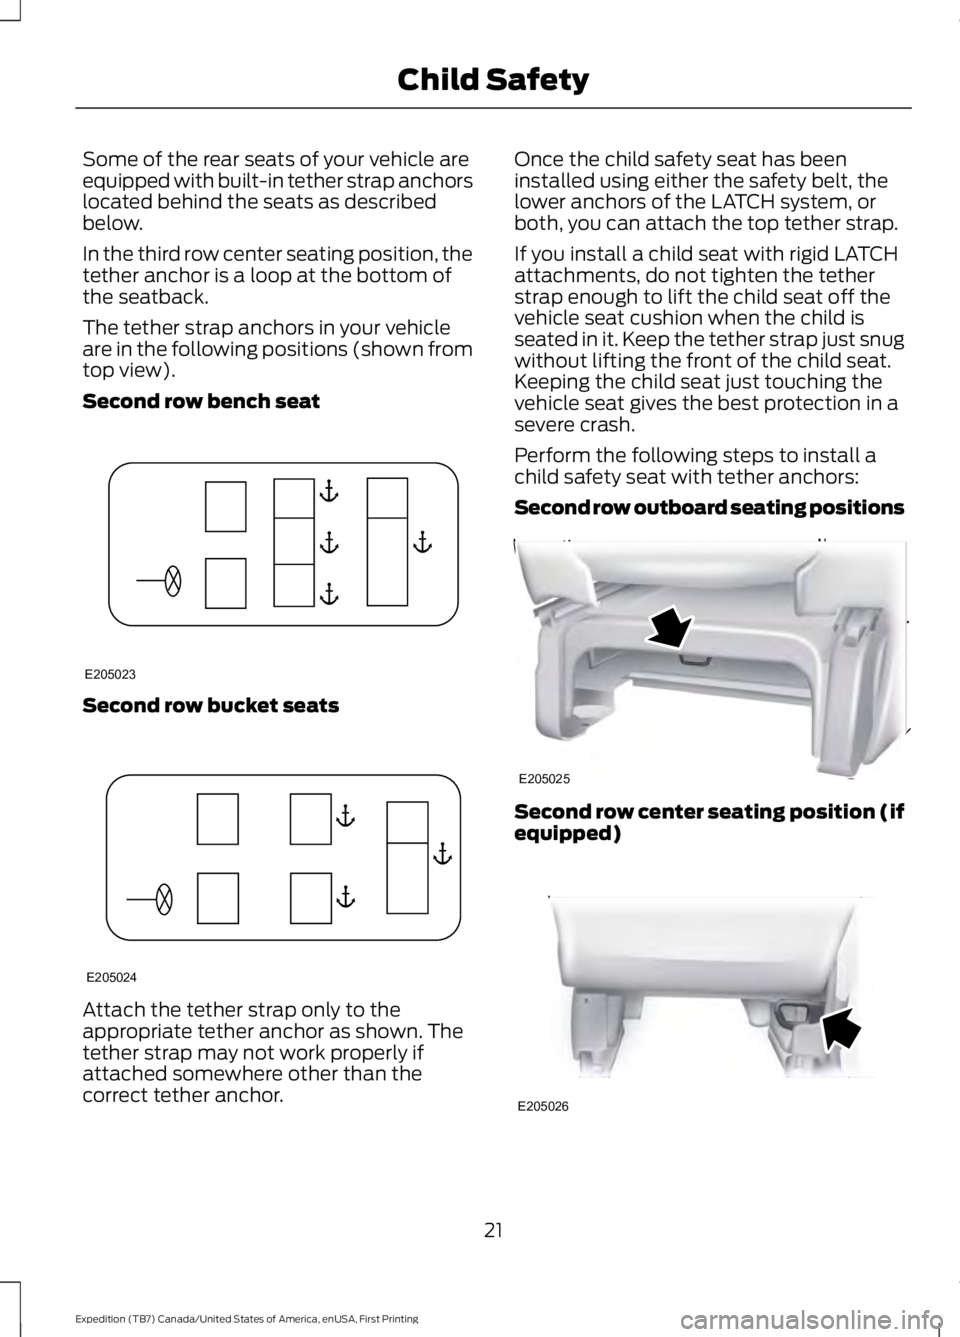
Some of the rear seats of your vehicle areequipped with built-in tether strap anchorslocated behind the seats as describedbelow.
In the third row center seating position, thetether anchor is a loop at the bottom ofthe seatback.
The tether strap anchors in your vehicleare in the following positions (shown fromtop view).
Second row bench seat
Second row bucket seats
Attach the tether strap only to theappropriate tether anchor as shown. Thetether strap may not work properly ifattached somewhere other than thecorrect tether anchor.
Once the child safety seat has beeninstalled using either the safety belt, thelower anchors of the LATCH system, orboth, you can attach the top tether strap.
If you install a child seat with rigid LATCHattachments, do not tighten the tetherstrap enough to lift the child seat off thevehicle seat cushion when the child isseated in it. Keep the tether strap just snugwithout lifting the front of the child seat.Keeping the child seat just touching thevehicle seat gives the best protection in asevere crash.
Perform the following steps to install achild safety seat with tether anchors:
Second row outboard seating positions
Second row center seating position (ifequipped)
21
Expedition (TB7) Canada/United States of America, enUSA, First Printing
Child SafetyE205023 E205024 E205025 E205026