open hood FORD EXPEDITION EL 2016 Owners Manual
[x] Cancel search | Manufacturer: FORD, Model Year: 2016, Model line: EXPEDITION EL, Model: FORD EXPEDITION EL 2016Pages: 421, PDF Size: 7.39 MB
Page 7 of 421
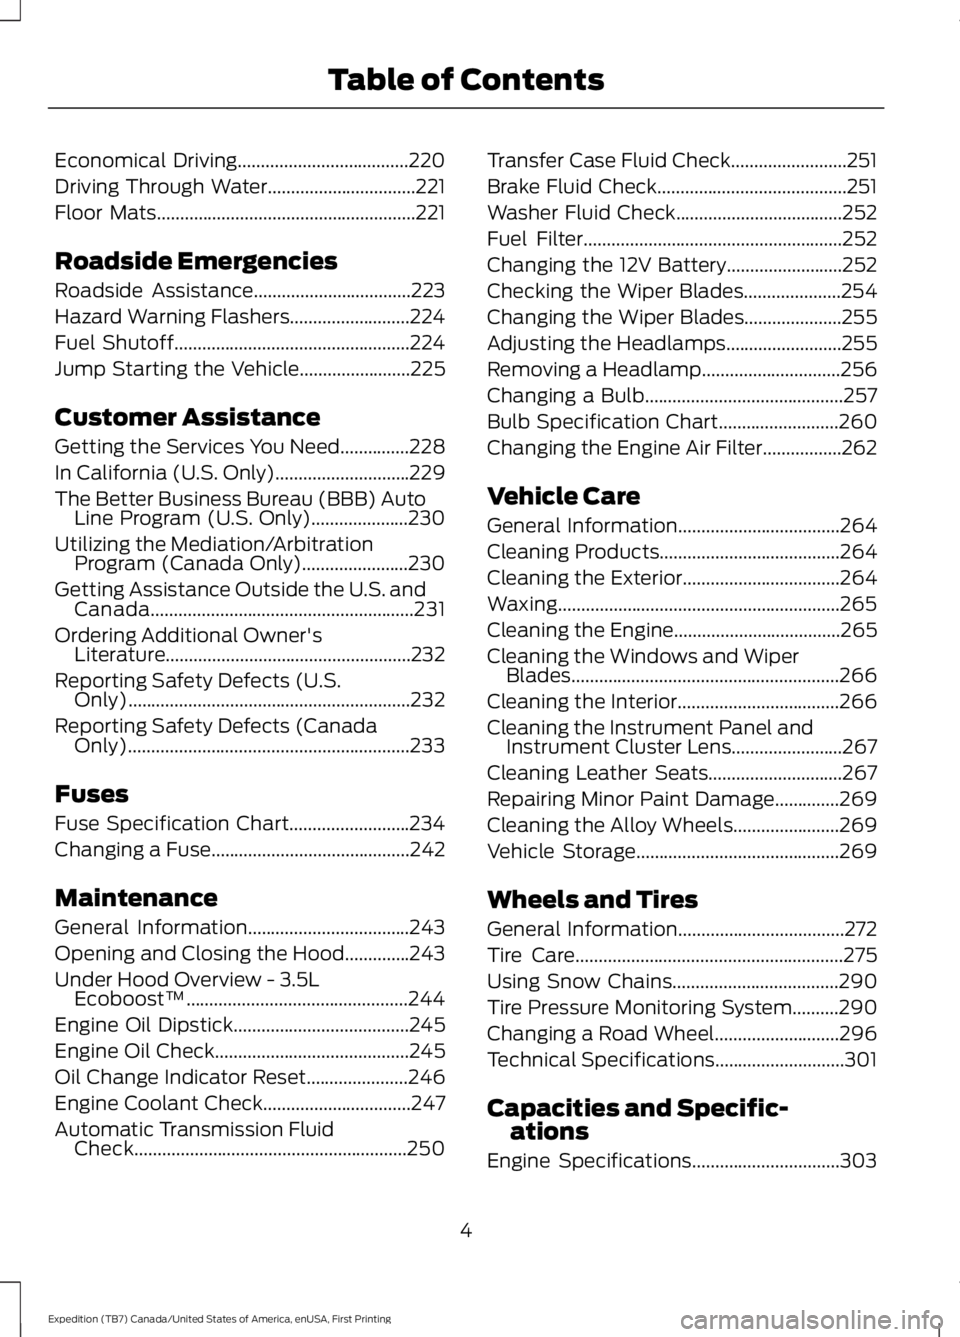
Economical Driving.....................................220
Driving Through Water................................221
Floor Mats........................................................221
Roadside Emergencies
Roadside Assistance..................................223
Hazard Warning Flashers..........................224
Fuel Shutoff...................................................224
Jump Starting the Vehicle........................225
Customer Assistance
Getting the Services You Need...............228
In California (U.S. Only).............................229
The Better Business Bureau (BBB) AutoLine Program (U.S. Only).....................230
Utilizing the Mediation/ArbitrationProgram (Canada Only).......................230
Getting Assistance Outside the U.S. andCanada.........................................................231
Ordering Additional Owner'sLiterature.....................................................232
Reporting Safety Defects (U.S.Only).............................................................232
Reporting Safety Defects (CanadaOnly).............................................................233
Fuses
Fuse Specification Chart..........................234
Changing a Fuse...........................................242
Maintenance
General Information...................................243
Opening and Closing the Hood..............243
Under Hood Overview - 3.5LEcoboost™................................................244
Engine Oil Dipstick......................................245
Engine Oil Check..........................................245
Oil Change Indicator Reset......................246
Engine Coolant Check................................247
Automatic Transmission FluidCheck...........................................................250
Transfer Case Fluid Check.........................251
Brake Fluid Check.........................................251
Washer Fluid Check....................................252
Fuel Filter........................................................252
Changing the 12V Battery.........................252
Checking the Wiper Blades.....................254
Changing the Wiper Blades.....................255
Adjusting the Headlamps.........................255
Removing a Headlamp..............................256
Changing a Bulb...........................................257
Bulb Specification Chart..........................260
Changing the Engine Air Filter.................262
Vehicle Care
General Information...................................264
Cleaning Products.......................................264
Cleaning the Exterior..................................264
Waxing.............................................................265
Cleaning the Engine....................................265
Cleaning the Windows and WiperBlades..........................................................266
Cleaning the Interior...................................266
Cleaning the Instrument Panel andInstrument Cluster Lens........................267
Cleaning Leather Seats.............................267
Repairing Minor Paint Damage..............269
Cleaning the Alloy Wheels.......................269
Vehicle Storage............................................269
Wheels and Tires
General Information....................................272
Tire Care..........................................................275
Using Snow Chains....................................290
Tire Pressure Monitoring System..........290
Changing a Road Wheel...........................296
Technical Specifications............................301
Capacities and Specific-ations
Engine Specifications................................303
4
Expedition (TB7) Canada/United States of America, enUSA, First Printing
Table of Contents
Page 29 of 421
WARNINGS
manufacturer. A safety seat that isimproperly installed or utilized, isinappropriate for your child's height, age,or weight or does not properly fit the childmay increase the risk of serious injury ordeath.
Never let a passenger hold a child onhis or her lap while your vehicle ismoving. The passenger cannotprotect the child from injury in a crash,which may result in serious injury or death.
Never use pillows, books, or towelsto boost a child. They can slidearound and increase the likelihoodof injury or death in a crash.
WARNINGS
Always restrain an unoccupied childseat or booster seat. These objectsmay become projectiles in a crash orsudden stop, which may increase the riskof serious injury.
Never place, or allow a child to place,the shoulder belt under a child's armor behind the back because itreduces the protection for the upper partof the body and may increase the risk ofinjury or death in a crash.
To avoid risk of injury, do not leavechildren or pets unattended in yourvehicle.
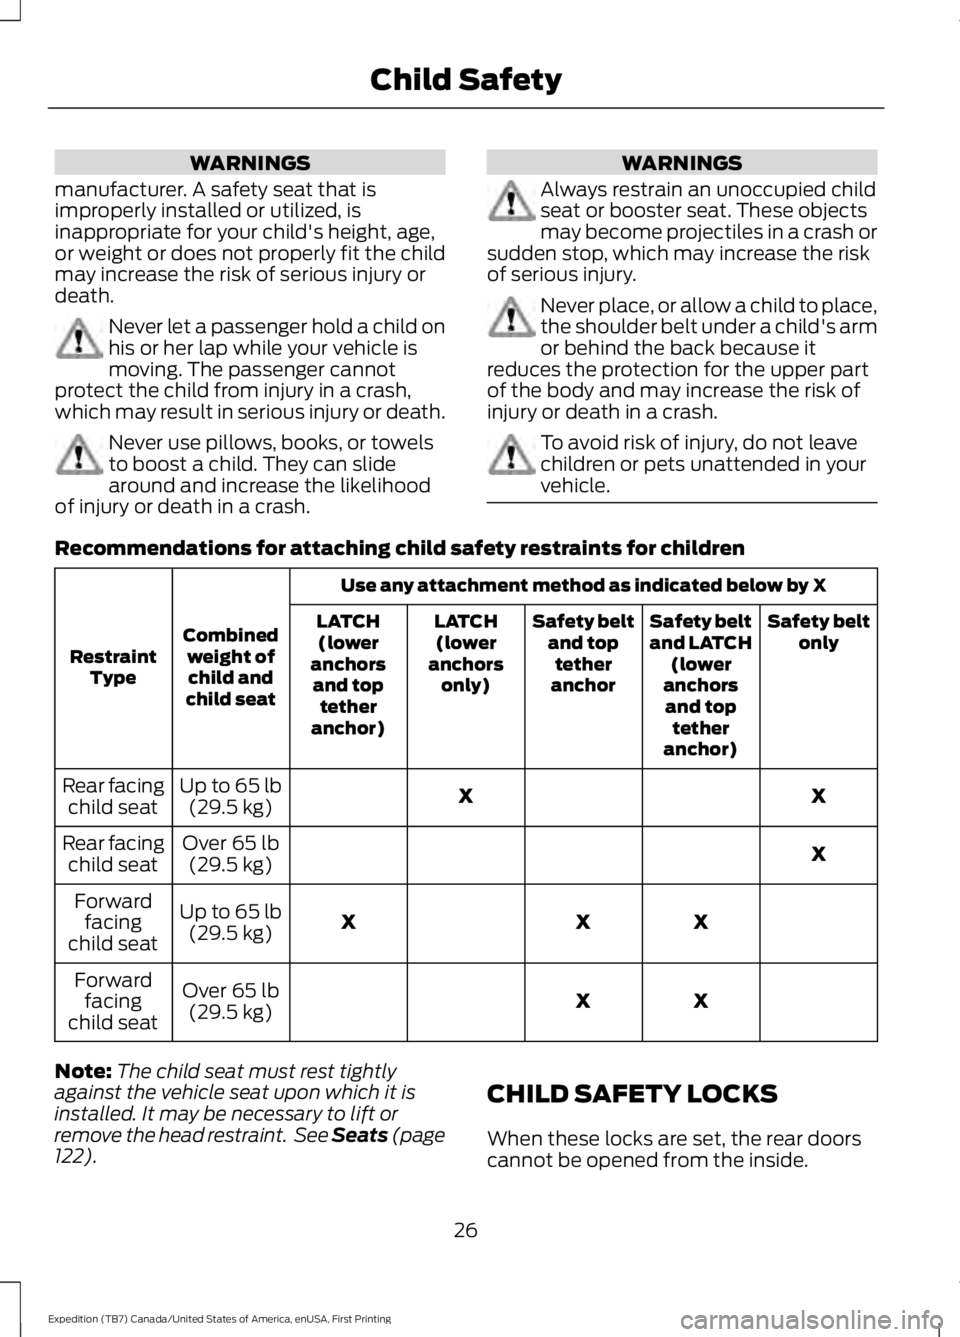
Recommendations for attaching child safety restraints for children
Use any attachment method as indicated below by X
Combinedweight ofchild andchild seat
RestraintType
Safety beltonlySafety beltand LATCH(loweranchorsand toptetheranchor)
Safety beltand toptetheranchor
LATCH(loweranchorsonly)
LATCH(loweranchorsand toptetheranchor)
XXUp to 65 lb(29.5 kg)Rear facingchild seat
XOver 65 lb(29.5 kg)Rear facingchild seat
XXXUp to 65 lb(29.5 kg)
Forwardfacingchild seat
XXOver 65 lb(29.5 kg)
Forwardfacingchild seat
Note:The child seat must rest tightlyagainst the vehicle seat upon which it isinstalled. It may be necessary to lift orremove the head restraint. See Seats (page122).
CHILD SAFETY LOCKS
When these locks are set, the rear doorscannot be opened from the inside.
26
Expedition (TB7) Canada/United States of America, enUSA, First Printing
Child Safety
Page 42 of 421
WARNINGS
To reduce risk of injury, do notobstruct or place objects in thedeployment path of the curtainairbag.
If the curtain airbags have deployed,the curtain airbags will not functionagain. The curtain airbags (includingthe A, B and C pillar trim and headliner)must be inspected and serviced by anauthorized dealer. If the curtain airbag isnot replaced, the unrepaired area willincrease the risk of injury in a crash.
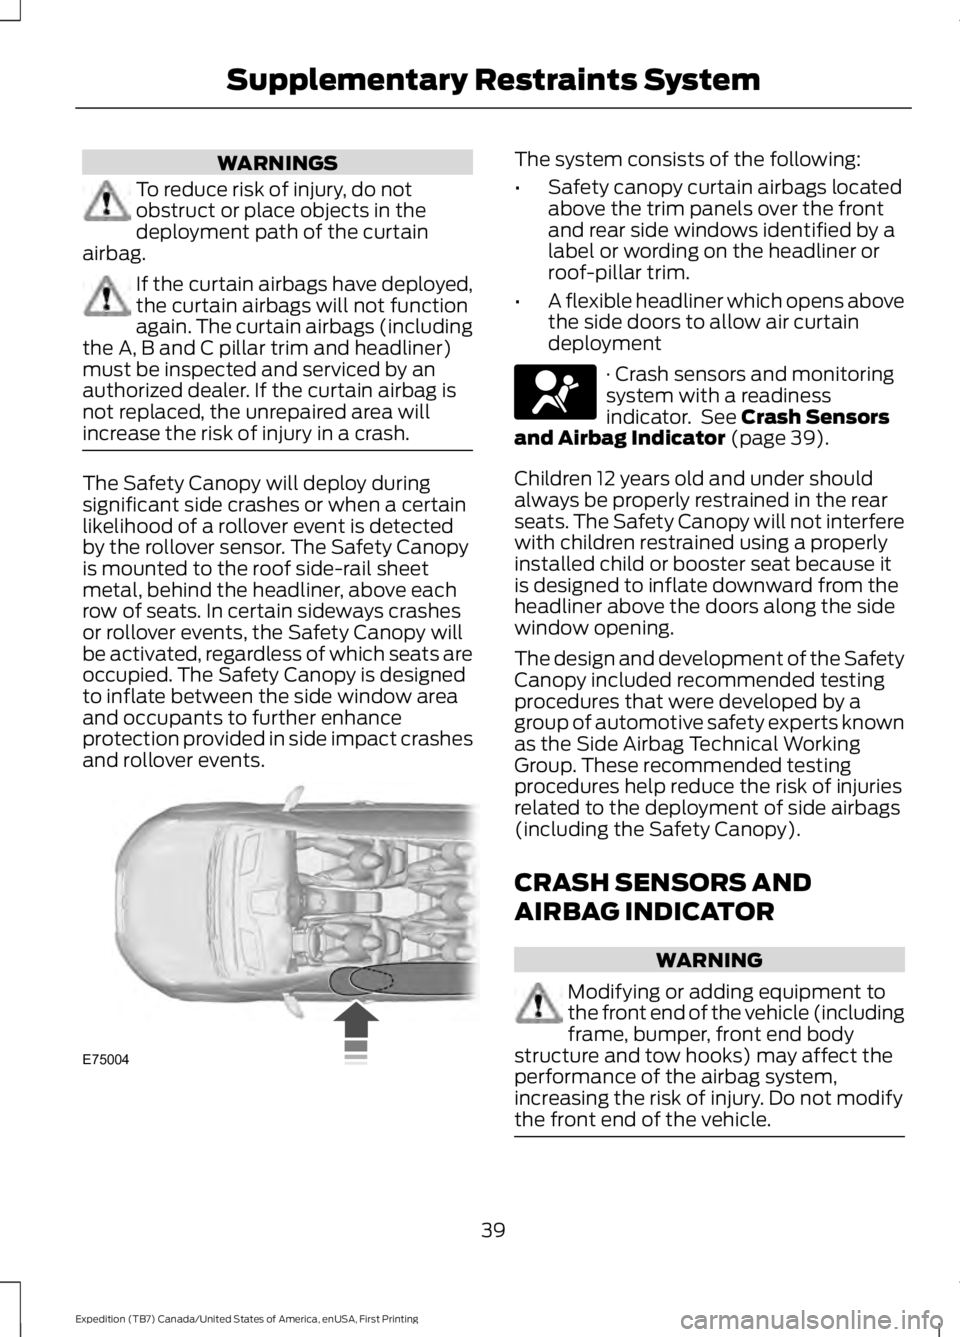
The Safety Canopy will deploy duringsignificant side crashes or when a certainlikelihood of a rollover event is detectedby the rollover sensor. The Safety Canopyis mounted to the roof side-rail sheetmetal, behind the headliner, above eachrow of seats. In certain sideways crashesor rollover events, the Safety Canopy willbe activated, regardless of which seats areoccupied. The Safety Canopy is designedto inflate between the side window areaand occupants to further enhanceprotection provided in side impact crashesand rollover events.
The system consists of the following:
•Safety canopy curtain airbags locatedabove the trim panels over the frontand rear side windows identified by alabel or wording on the headliner orroof-pillar trim.
•A flexible headliner which opens abovethe side doors to allow air curtaindeployment
· Crash sensors and monitoringsystem with a readinessindicator. See Crash Sensorsand Airbag Indicator (page 39).
Children 12 years old and under shouldalways be properly restrained in the rearseats. The Safety Canopy will not interferewith children restrained using a properlyinstalled child or booster seat because itis designed to inflate downward from theheadliner above the doors along the sidewindow opening.
The design and development of the SafetyCanopy included recommended testingprocedures that were developed by agroup of automotive safety experts knownas the Side Airbag Technical WorkingGroup. These recommended testingprocedures help reduce the risk of injuriesrelated to the deployment of side airbags(including the Safety Canopy).
CRASH SENSORS AND
AIRBAG INDICATOR
WARNING
Modifying or adding equipment tothe front end of the vehicle (includingframe, bumper, front end bodystructure and tow hooks) may affect theperformance of the airbag system,increasing the risk of injury. Do not modifythe front end of the vehicle.
39
Expedition (TB7) Canada/United States of America, enUSA, First Printing
Supplementary Restraints SystemE75004
Page 47 of 421
4. Insert a new battery with the + facingdownward. Press the battery down tomake sure it is fully in the housing.
5. Reinstall the battery housing coveronto the transmitter and install the keyblade.
Car Finder
Press the button twice withinthree seconds.
The horn sounds and the directionindicators flash. We recommend you usethis method to locate your vehicle, ratherthan using the panic alarm.
Note:If any door or the liftgate is open, orif the hood is open on vehicles with ananti-theft alarm or remote start, the hornwill sound twice and the direction indicatorswill not flash.
Sounding the Panic Alarm
Press the button to sound thepanic alarm. Press the buttonagain or switch the ignition on toturn it off.
Note:The panic alarm only operates whenthe ignition is off.
Remote Start (If Equipped)
WARNING
To avoid exhaust fumes, do not useremote start if your vehicle is parkedindoors or in areas that are not wellventilated.
Note:Do not use remote start if your fuellevel is low.
The remote start button is on thetransmitter.
This feature allows you to start yourvehicle from the outside. The transmitterhas an extended operating range.
Vehicles with automatic climate controlcan be configured to operate when thevehicle is remote started. See AutomaticClimate Control (page 116).
Many states and provinces haverestrictions for the use of remote start.Check your local and state or provinciallaws for specific requirements regardingremote start systems.
The remote start system does not work ifany of the following occur:
•The ignition is on.
•The anti-theft alarm triggers.
•You switch off the feature.
•The hood is open.
•The transmission is not in park (P).
•The battery voltage is below theminimum operating voltage.
•The service engine soon indicator wason the last time your vehicle wasdriven.
Remote Starting your Vehicle
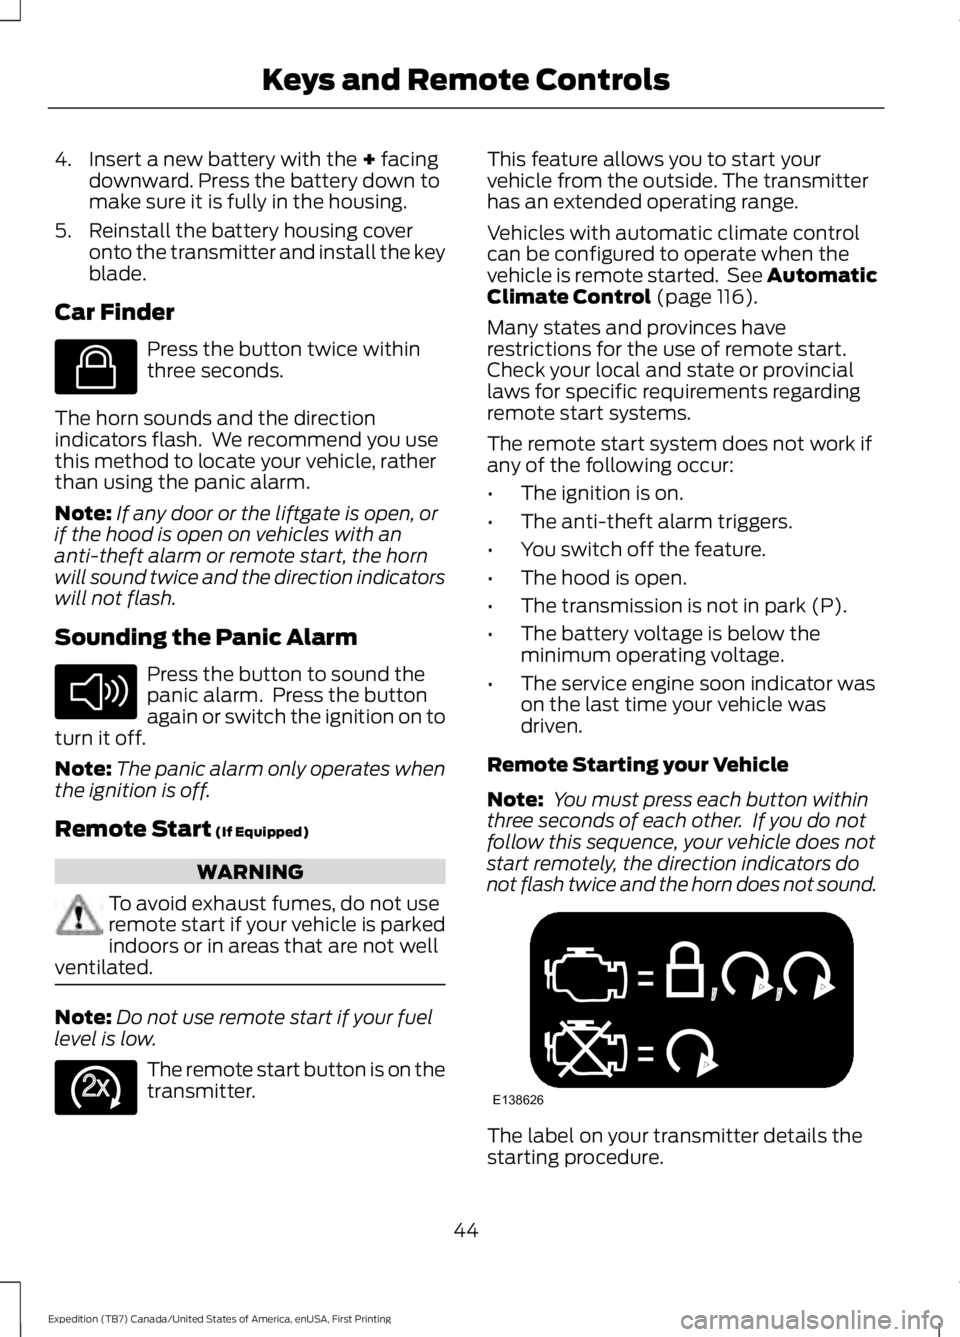
Note: You must press each button withinthree seconds of each other. If you do notfollow this sequence, your vehicle does notstart remotely, the direction indicators donot flash twice and the horn does not sound.
The label on your transmitter details thestarting procedure.
44
Expedition (TB7) Canada/United States of America, enUSA, First Printing
Keys and Remote ControlsE138623 E138624 E138625 E138626
Page 56 of 421
LOCKING AND UNLOCKING
You can use the power door lock controlor the remote control to lock and unlockyour vehicle.
Power Door Locks
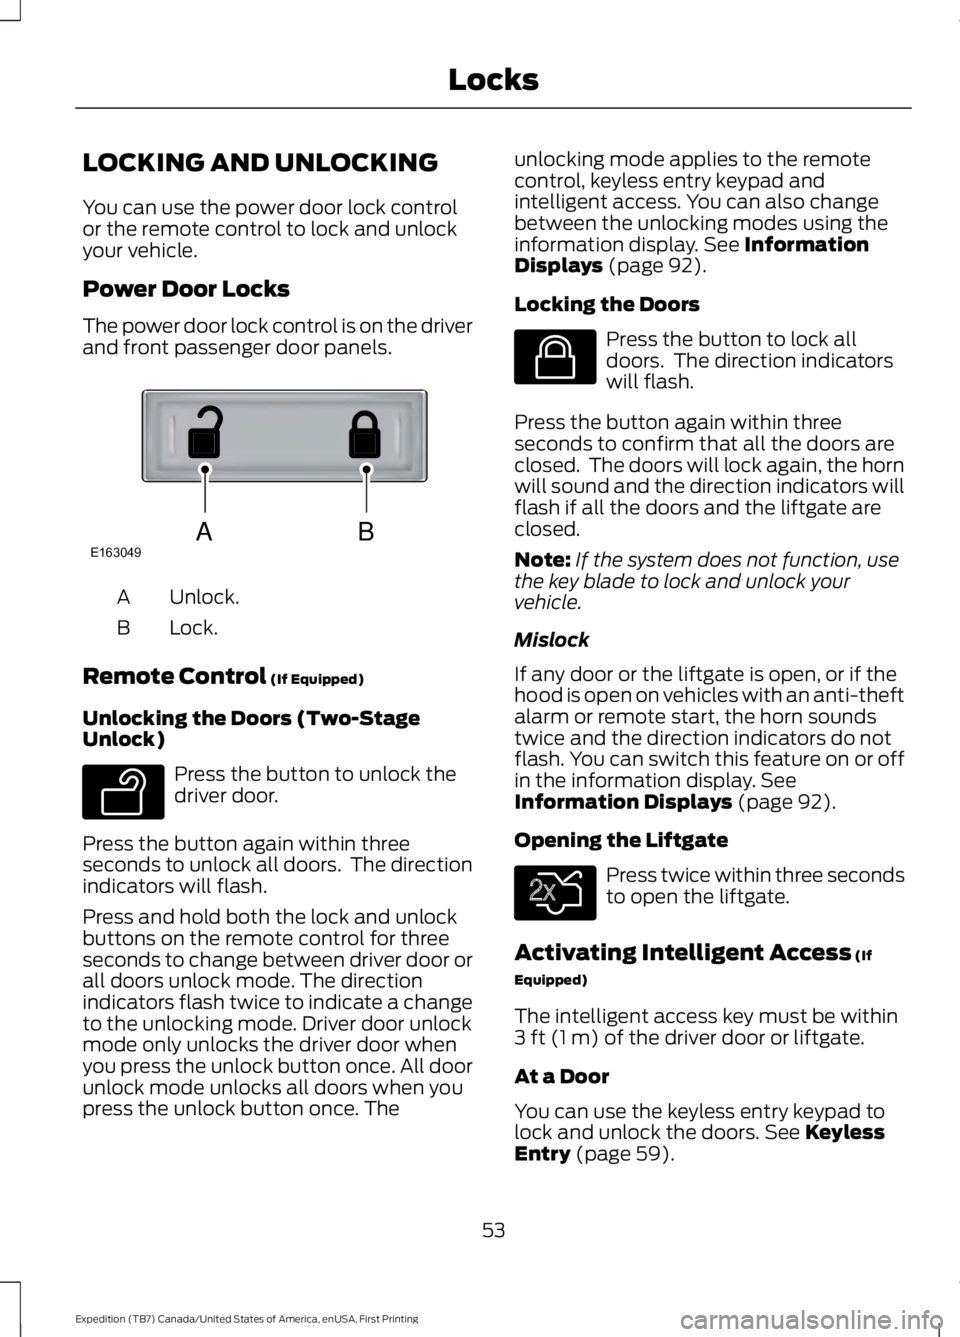
The power door lock control is on the driverand front passenger door panels.
Unlock.A
Lock.B
Remote Control (If Equipped)
Unlocking the Doors (Two-StageUnlock)
Press the button to unlock thedriver door.
Press the button again within threeseconds to unlock all doors. The directionindicators will flash.
Press and hold both the lock and unlockbuttons on the remote control for threeseconds to change between driver door orall doors unlock mode. The directionindicators flash twice to indicate a changeto the unlocking mode. Driver door unlockmode only unlocks the driver door whenyou press the unlock button once. All doorunlock mode unlocks all doors when youpress the unlock button once. The
unlocking mode applies to the remotecontrol, keyless entry keypad andintelligent access. You can also changebetween the unlocking modes using theinformation display. See InformationDisplays (page 92).
Locking the Doors
Press the button to lock alldoors. The direction indicatorswill flash.
Press the button again within threeseconds to confirm that all the doors areclosed. The doors will lock again, the hornwill sound and the direction indicators willflash if all the doors and the liftgate areclosed.
Note:If the system does not function, usethe key blade to lock and unlock yourvehicle.
Mislock
If any door or the liftgate is open, or if thehood is open on vehicles with an anti-theftalarm or remote start, the horn soundstwice and the direction indicators do notflash. You can switch this feature on or offin the information display. SeeInformation Displays (page 92).
Opening the Liftgate
Press twice within three secondsto open the liftgate.
Activating Intelligent Access (If
Equipped)
The intelligent access key must be within3 ft (1 m) of the driver door or liftgate.
At a Door
You can use the keyless entry keypad tolock and unlock the doors. See KeylessEntry (page 59).
53
Expedition (TB7) Canada/United States of America, enUSA, First Printing
LocksABE163049 E138629 E138623 E138630
Page 66 of 421

You must have two previouslyprogrammed coded keys and the newunprogrammed key readily accessible. Seeyour authorized dealer to have the sparekey programmed if two previouslyprogrammed coded keys are not available.
Read and understand the entire procedurebefore you begin.
1.Insert the first previously programmedcoded key into the ignition.
2.Switch the ignition from off to on. Keepthe ignition on for at least threeseconds, but no more than 10 seconds.
3.Switch the ignition off and remove thefirst coded key from the ignition.
4. After three seconds but within 10seconds of switching the ignition off,insert the second previously coded keyinto the ignition.
5.Switch the ignition from off to on. Keepthe ignition on for at least threeseconds, but no more than 10 seconds.
6.Switch the ignition off and remove thesecond previously programmed codedkey from the ignition.
7. After three seconds but within 10seconds of switching the ignition offand removing the previouslyprogrammed coded key, insert the newunprogrammed key into the ignition.
8.Switch the ignition from off to on. Keepthe ignition on for at least six seconds.
9.Remove the newly programmed codedkey from the ignition.
If the key has been successfullyprogrammed it will start the engine andoperate the remote entry system (if thenew key is an integrated keyheadtransmitter).
If programming was not successful, wait10 seconds and repeat Steps 1 through 8.If you are still unsuccessful, take yourvehicle to your authorized dealer.
Programming a Spare IntelligentAccess Key
See your authorized dealer to haveadditional keys programmed to yourvehicle.
ANTI-THEFT ALARM
The system will warn you of anunauthorized entry to your vehicle. It willbe triggered if any door, the luggagecompartment or the hood is openedwithout using the key, remote control orkeyless entry keypad.
The direction indicators will flash and thehorn will sound if unauthorized entry isattempted while the alarm is armed.
Take all remote controls to an authorizeddealer if there is any potential alarmproblem with your vehicle.
Arming the Alarm
The alarm is ready to arm when there isnot a key in your vehicle. Electronically lockyour vehicle to arm the alarm.
Disarming the Alarm
Disarm the alarm by any of the followingactions:
•Unlock the doors or luggagecompartment with the remote controlor keyless entry keypad.
•Switch your vehicle on or start yourvehicle.
•Use a key in the driver door to unlockyour vehicle, then switch your vehicleon within 12 seconds.
Note:Pressing the panic button on theremote control will stop the horn and signalindicators, but will not disarm the system.
63
Expedition (TB7) Canada/United States of America, enUSA, First Printing
Security
Page 152 of 421
3.Press and hold the push button ignitionswitch, or press it three times withintwo seconds.
4. Apply the parking brake.
Guarding Against Exhaust Fumes
WARNING
If you smell exhaust fumes insideyour vehicle, have your vehiclechecked by your authorized dealerimmediately. Do not drive your vehicle ifyou smell exhaust fumes. Carbonmonoxide is present in exhaust fumes.Take precautions to avoid its dangerouseffects.
Important Ventilating Information
If you stop your vehicle and then leave theengine idling for long periods, werecommend that you do one of thefollowing:
•Open the windows at least 1 in (3 cm).
•Set your climate control to outside air.
ENGINE BLOCK HEATER (If
Equipped)
WARNINGS
Failure to follow engine block heaterinstructions could result in propertydamage or serious personal injury.
Do not use your heater withungrounded electrical systems ortwo-pronged adapters. There is a riskof electrical shock.
Do not fully close the hood, or allowit to drop under its own weight whenusing the engine block heater. Thiscould damage the power cable and maycause an electrical short resulting in fire,injury and property damage.
Note:The heater is most effective whenoutdoor temperatures are below 0°F(-18°C).
The heater acts as a starting aid bywarming the engine coolant. This allowsthe climate control system to respondquickly. The equipment includes a heaterelement (installed in the engine block) anda wire harness. You can connect thesystem to a grounded 120-volt ACelectrical source.
We recommend that you do the followingfor a safe and correct operation:
•Use a 16-gauge outdoor extension cordthat is product certified byUnderwriter’s Laboratory (UL) orCanadian Standards Association(CSA). This extension cord must besuitable for use outdoors, in coldtemperatures, and be clearly markedSuitable for Use with OutdoorAppliances. Do not use an indoorextension cord outdoors. This couldresult in an electric shock or become afire hazard.
•Use as short an extension cord aspossible.
•Do not use multiple extension cords.
•Make sure that when in operation, theextension cord plug and heater cordplug connections are free and clear ofwater. This could cause an electricshock or fire.
•Make sure your vehicle is parked in aclean area, clear of combustibles.
•Make sure the heater, heater cord andextension cord are firmly connected.
•Check for heat anywhere in theelectrical hookup once the system hasbeen operating for approximately 30minutes.
149
Expedition (TB7) Canada/United States of America, enUSA, First Printing
Starting and Stopping the Engine
Page 246 of 421
GENERAL INFORMATION
Have your vehicle serviced regularly to helpmaintain its roadworthiness and resalevalue. There is a large network ofauthorized dealers that are there to helpyou with their professional servicingexpertise. We believe that their speciallytrained technicians are best qualified toservice your vehicle properly and expertly.They are supported by a wide range ofhighly specialized tools developedspecifically for servicing your vehicle.
If your vehicle requires professional service,an authorized dealer can provide thenecessary parts and service. Check yourwarranty information to find out whichparts and services are covered.
Use only recommended fuels, lubricants,fluids and service parts conforming tospecifications. Motorcraft® parts aredesigned and built to provide the bestperformance in your vehicle.
Precautions
•Do not work on a hot engine.
•Make sure that nothing gets caught inmoving parts.
•Do not work on a vehicle with theengine running in an enclosed space,unless you are sure you have enoughventilation.
•Keep all open flames and other burningmaterial (such as cigarettes) awayfrom the battery and all fuel relatedparts.
Working with the Engine Off
1.Set the parking brake and shift to park(P).
2. Switch off the engine.
3. Block the wheels.
Working with the Engine On
WARNING
To reduce the risk of vehicle damageand/or personal burn injuries, do notstart your engine with the air cleanerremoved and do not remove it while theengine is running.
1.Set the parking brake and shift to park(P).
2. Block the wheels.
OPENING AND CLOSING THE
HOOD
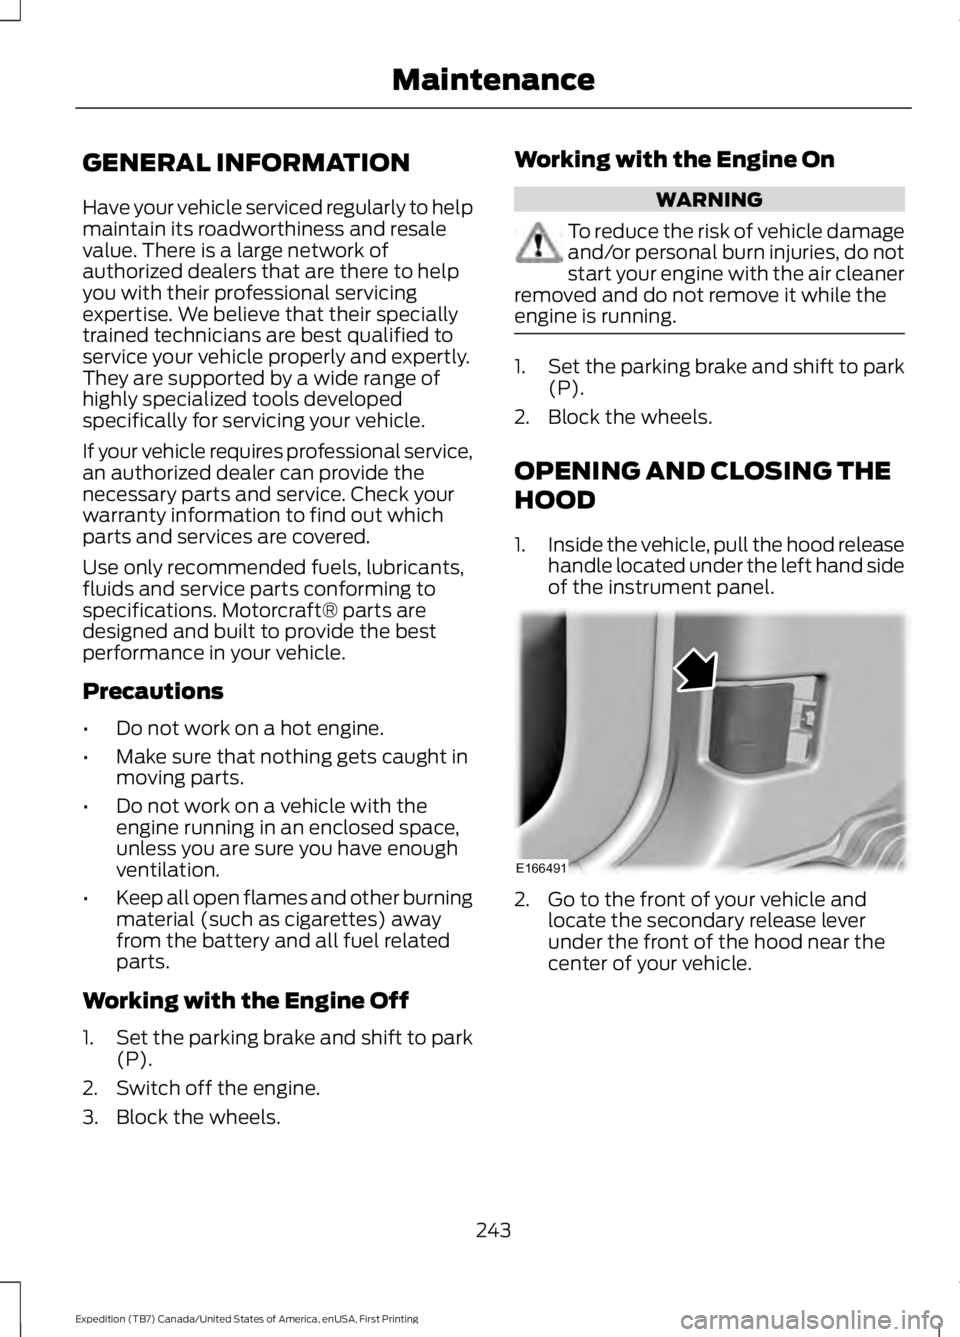
1.Inside the vehicle, pull the hood releasehandle located under the left hand sideof the instrument panel.
2. Go to the front of your vehicle andlocate the secondary release leverunder the front of the hood near thecenter of your vehicle.
243
Expedition (TB7) Canada/United States of America, enUSA, First Printing
MaintenanceE166491
Page 247 of 421
3. Raise the hood until the lift cylindershold it open.
4. To close, lower the hood and makesure that it is closed properly and fullylatched.
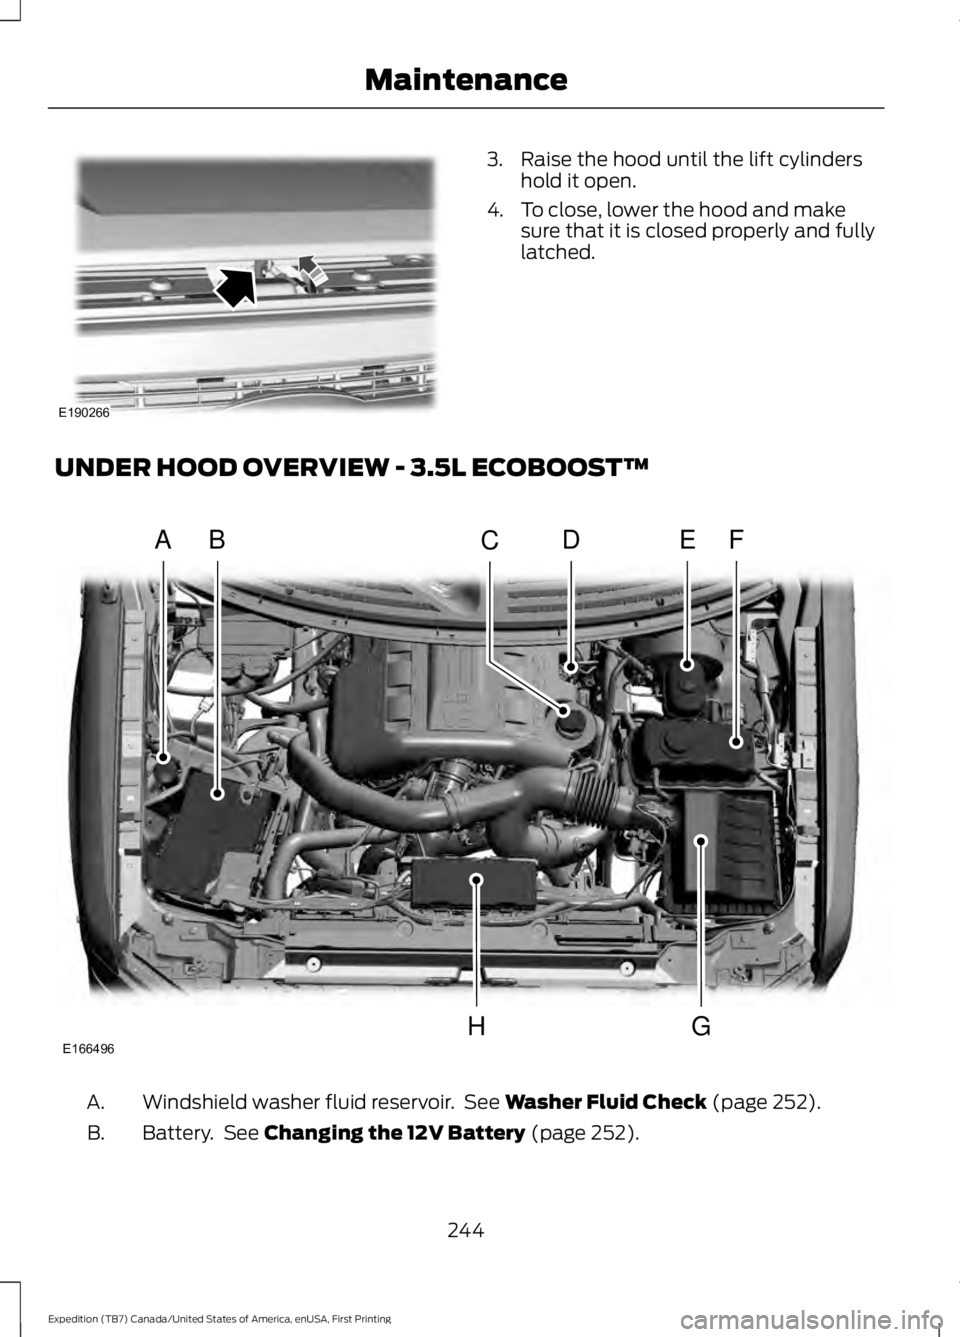
UNDER HOOD OVERVIEW - 3.5L ECOBOOST™
Windshield washer fluid reservoir. See Washer Fluid Check (page 252).A.
Battery. See Changing the 12V Battery (page 252).B.
244
Expedition (TB7) Canada/United States of America, enUSA, First Printing
MaintenanceE190266 A
A
BDEFC
GHE166496
Page 248 of 421
Engine oil filler cap. See Engine Oil Check (page 245).C.
Engine oil dipstick. See Engine Oil Dipstick (page 245).D.
Brake fluid reservoir. See Brake Fluid Check (page 251).E.
Engine coolant reservoir. See Engine Coolant Check (page 247).F.
Air filter assembly. See Changing the Engine Air Filter (page 262).G.
Power distribution box. See Fuses (page 234).H.
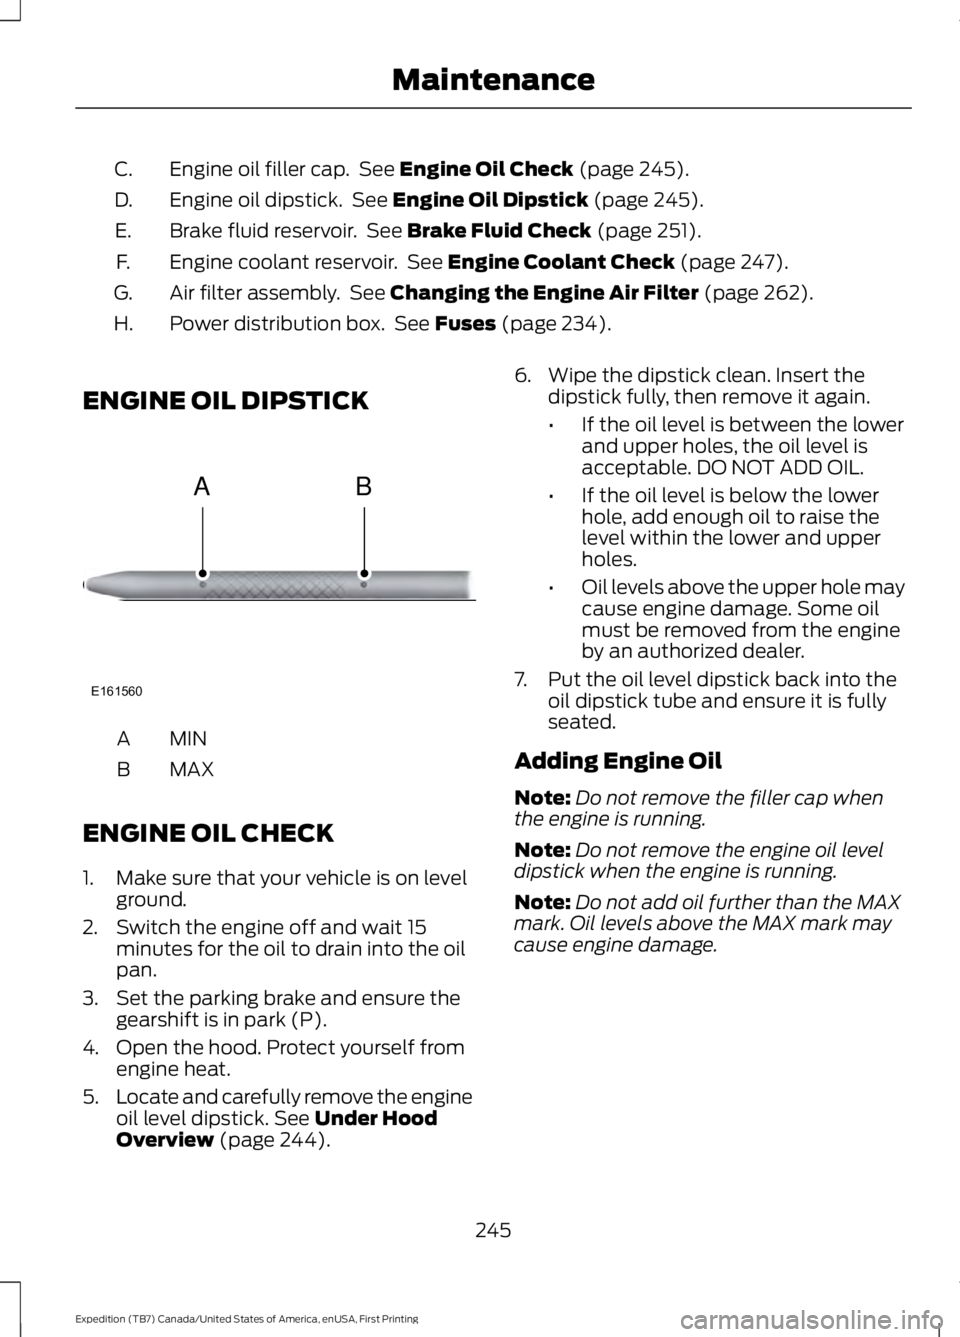
ENGINE OIL DIPSTICK
MINA
MAXB
ENGINE OIL CHECK
1. Make sure that your vehicle is on levelground.
2. Switch the engine off and wait 15minutes for the oil to drain into the oilpan.
3. Set the parking brake and ensure thegearshift is in park (P).
4. Open the hood. Protect yourself fromengine heat.
5.Locate and carefully remove the engineoil level dipstick. See Under HoodOverview (page 244).
6. Wipe the dipstick clean. Insert thedipstick fully, then remove it again.
•If the oil level is between the lowerand upper holes, the oil level isacceptable. DO NOT ADD OIL.
•If the oil level is below the lowerhole, add enough oil to raise thelevel within the lower and upperholes.
•Oil levels above the upper hole maycause engine damage. Some oilmust be removed from the engineby an authorized dealer.
7. Put the oil level dipstick back into theoil dipstick tube and ensure it is fullyseated.
Adding Engine Oil
Note:Do not remove the filler cap whenthe engine is running.
Note:Do not remove the engine oil leveldipstick when the engine is running.
Note:Do not add oil further than the MAXmark. Oil levels above the MAX mark maycause engine damage.
245
Expedition (TB7) Canada/United States of America, enUSA, First Printing
MaintenanceE161560
AB