FORD EXPLORER 1999 2.G Owners Manual
EXPLORER 1999 2.G
FORD
FORD
https://www.carmanualsonline.info/img/11/4957/w960_4957-0.png
FORD EXPLORER 1999 2.G Owners Manual
Trending: oil pressure, fuse box, homelink, fuel additives, fuse, catalytic converter, air conditioning
Page 201 of 264
²Manual transmission:
1. Set the parking brake.
2. Depress the clutch and place the gearshift in 1 (First).
3. Turn off the engine and remove the key.
4. Block the wheels to prevent the vehicle from moving unexpectedly.
Working with the engine on
²Automatic transmission:
1. Set the parking brake and ensure the gearshift is securely latched in P
(Park).
2. Block the wheels to prevent the vehicle from moving unexpectedly.
Do not start your engine with the air cleaner removed and do
not remove it while the engine is running.
²Manual transmission:
1. Set the parking brake, depress the clutch and place the gearshift in N
(Neutral).
2. Block the wheels to prevent the vehicle from moving unexpectedly.
Do not start your engine with the air cleaner removed and do
not remove it while the engine is running.
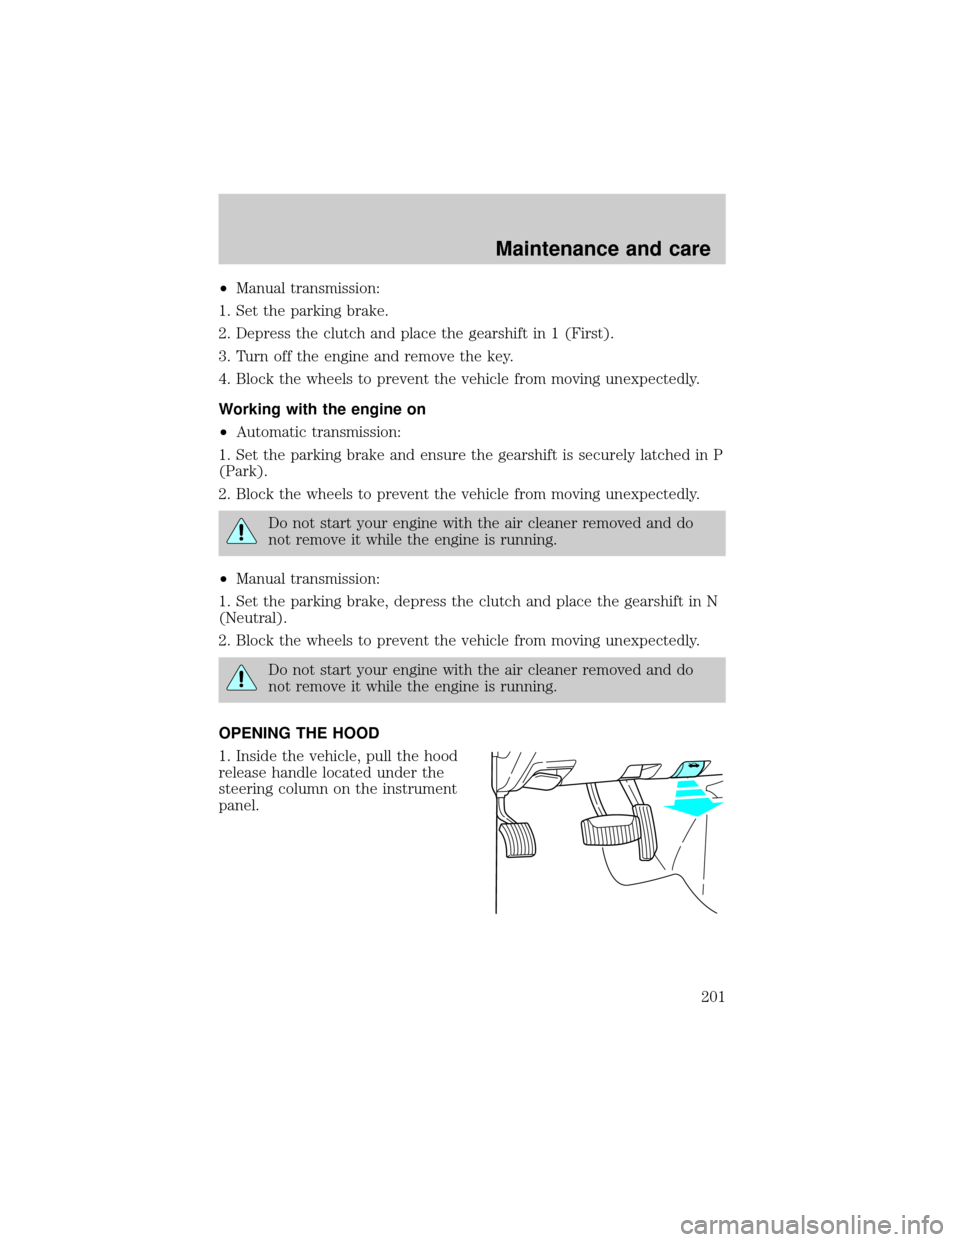
OPENING THE HOOD
1. Inside the vehicle, pull the hood
release handle located under the
steering column on the instrument
panel.
Maintenance and care
201
Page 202 of 264
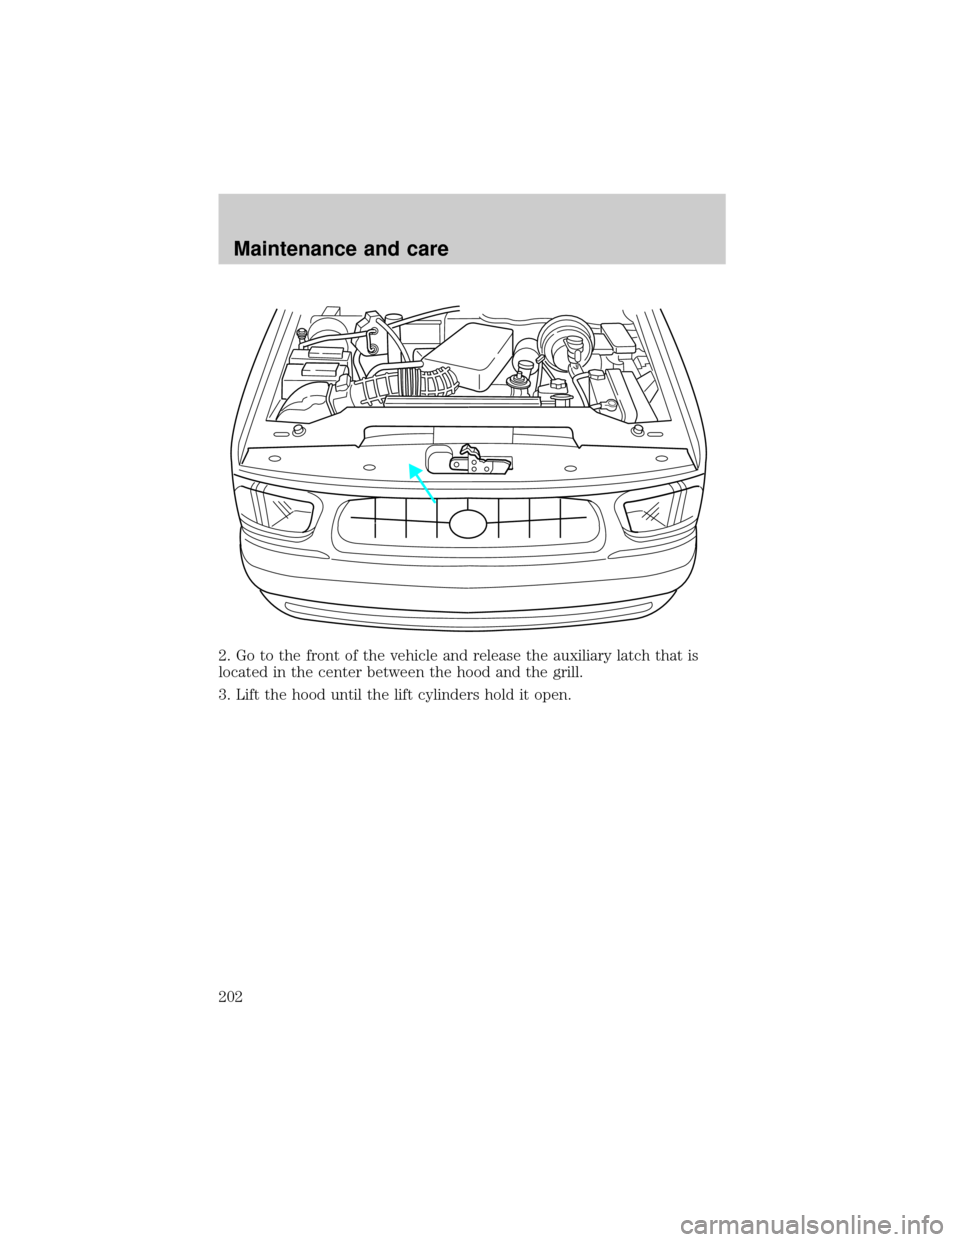
2. Go to the front of the vehicle and release the auxiliary latch that is
located in the center between the hood and the grill.
3. Lift the hood until the lift cylinders hold it open.
Maintenance and care
202
Page 203 of 264
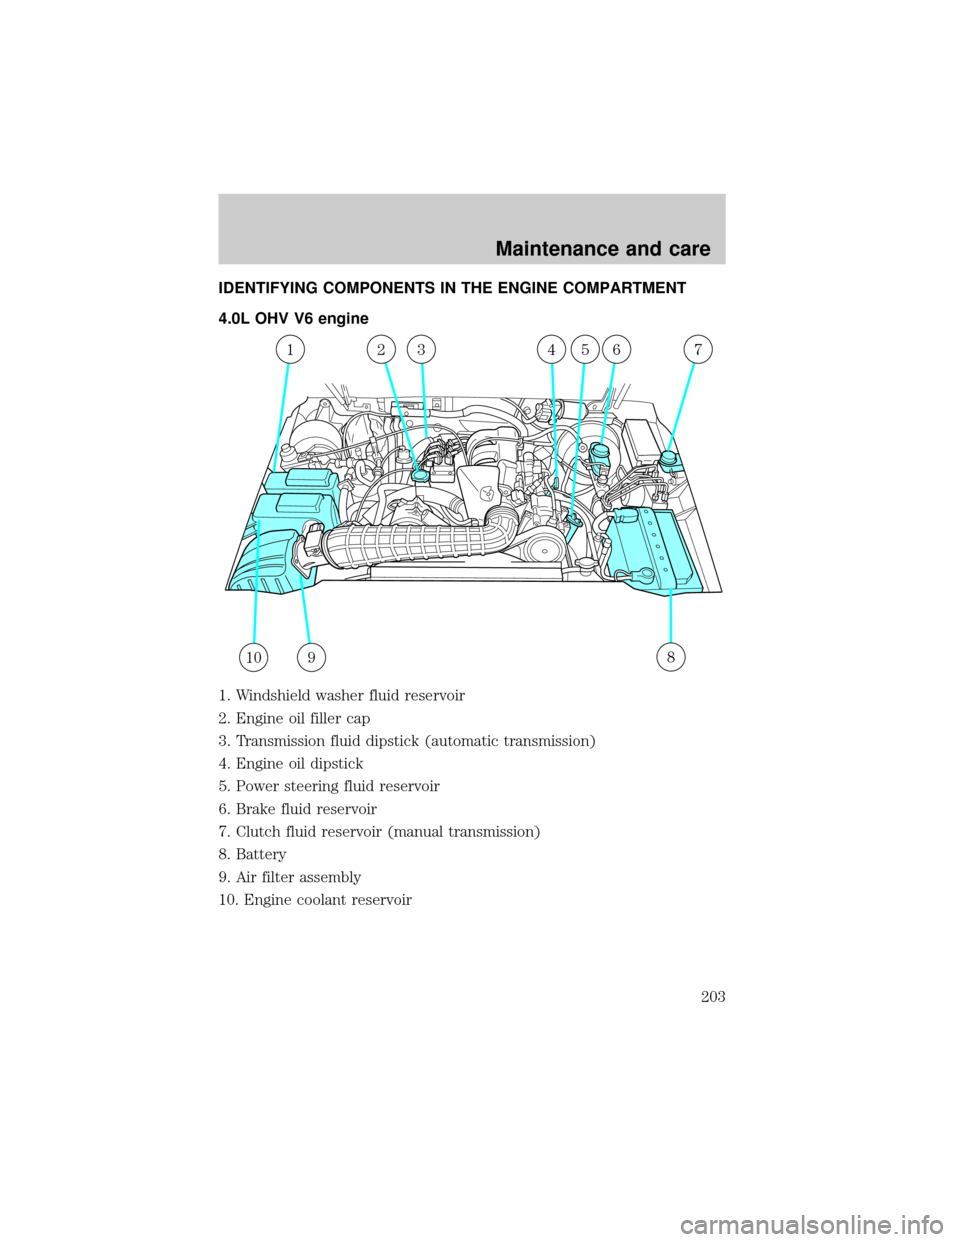
IDENTIFYING COMPONENTS IN THE ENGINE COMPARTMENT
4.0L OHV V6 engine
1. Windshield washer fluid reservoir
2. Engine oil filler cap
3. Transmission fluid dipstick (automatic transmission)
4. Engine oil dipstick
5. Power steering fluid reservoir
6. Brake fluid reservoir
7. Clutch fluid reservoir (manual transmission)
8. Battery
9. Air filter assembly
10. Engine coolant reservoir
10
1235674
89
Maintenance and care
203
Page 204 of 264
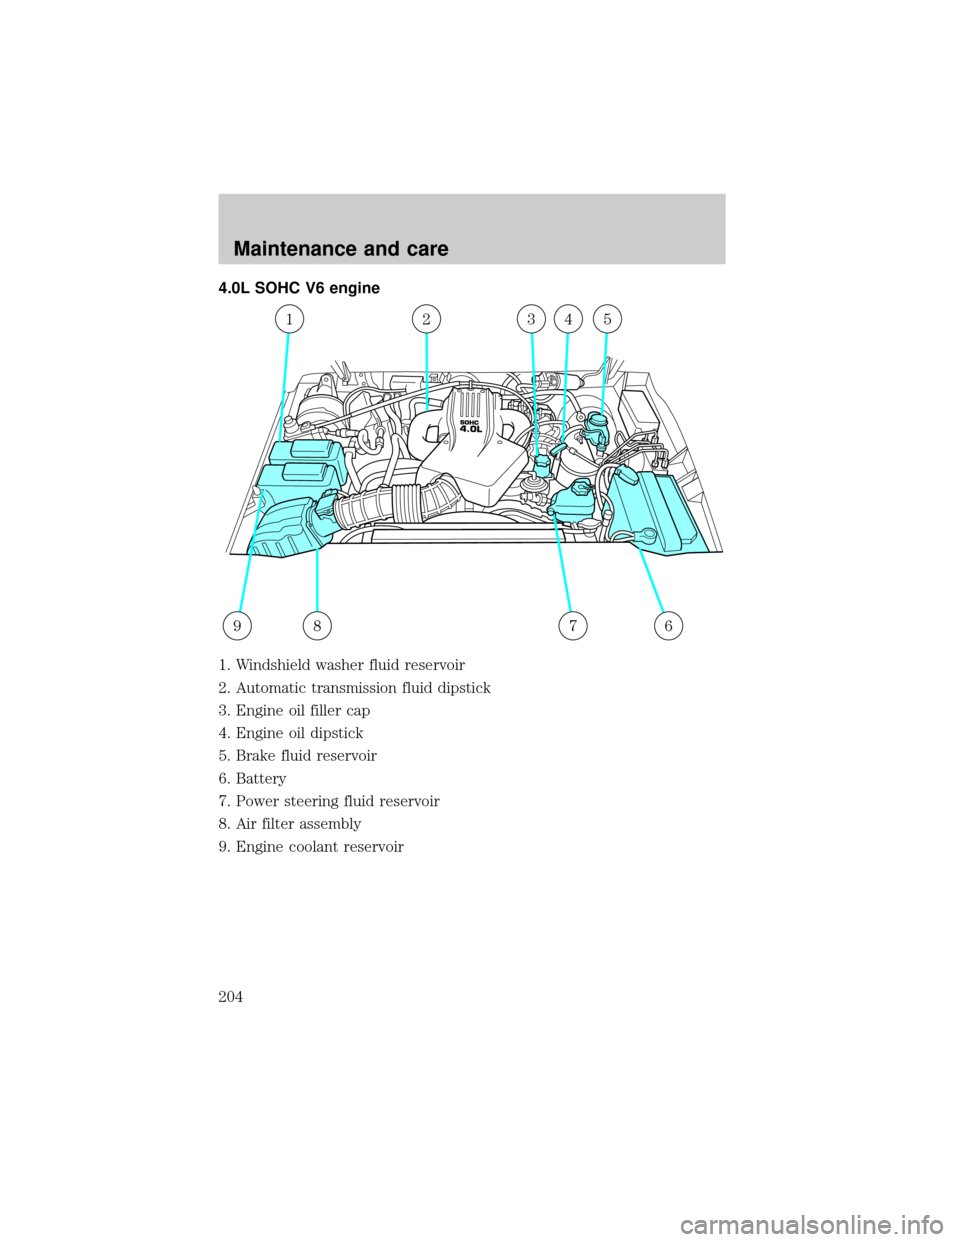
4.0L SOHC V6 engine
1. Windshield washer fluid reservoir
2. Automatic transmission fluid dipstick
3. Engine oil filler cap
4. Engine oil dipstick
5. Brake fluid reservoir
6. Battery
7. Power steering fluid reservoir
8. Air filter assembly
9. Engine coolant reservoir
9
13425
867
Maintenance and care
204
Page 205 of 264
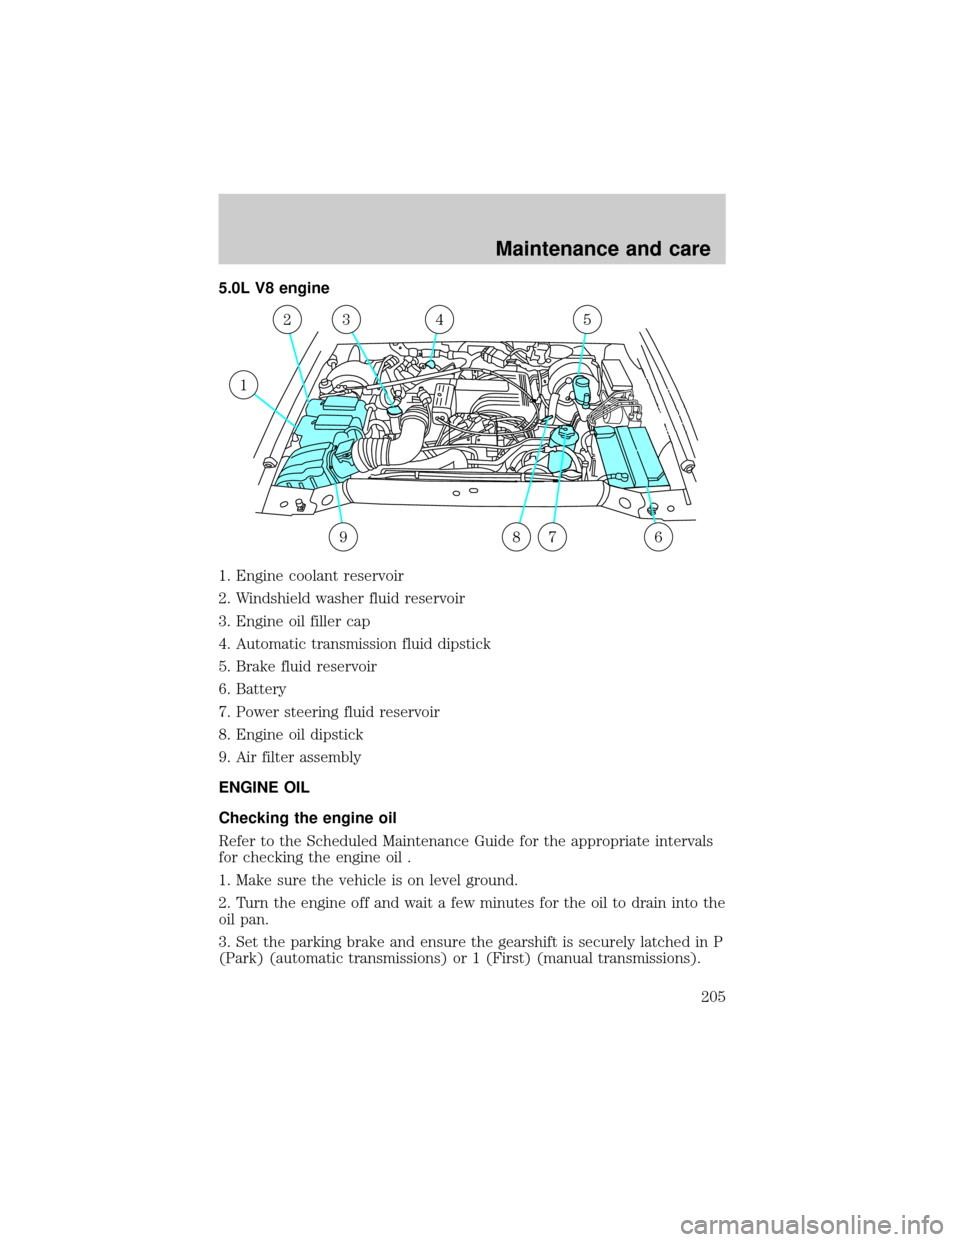
5.0L V8 engine
1. Engine coolant reservoir
2. Windshield washer fluid reservoir
3. Engine oil filler cap
4. Automatic transmission fluid dipstick
5. Brake fluid reservoir
6. Battery
7. Power steering fluid reservoir
8. Engine oil dipstick
9. Air filter assembly
ENGINE OIL
Checking the engine oil
Refer to the Scheduled Maintenance Guide for the appropriate intervals
for checking the engine oil .
1. Make sure the vehicle is on level ground.
2. Turn the engine off and wait a few minutes for the oil to drain into the
oil pan.
3. Set the parking brake and ensure the gearshift is securely latched in P
(Park) (automatic transmissions) or 1 (First) (manual transmissions).
1
23
6
54
879
Maintenance and care
205
Page 206 of 264
4. Open the hood. Protect yourself from engine heat.
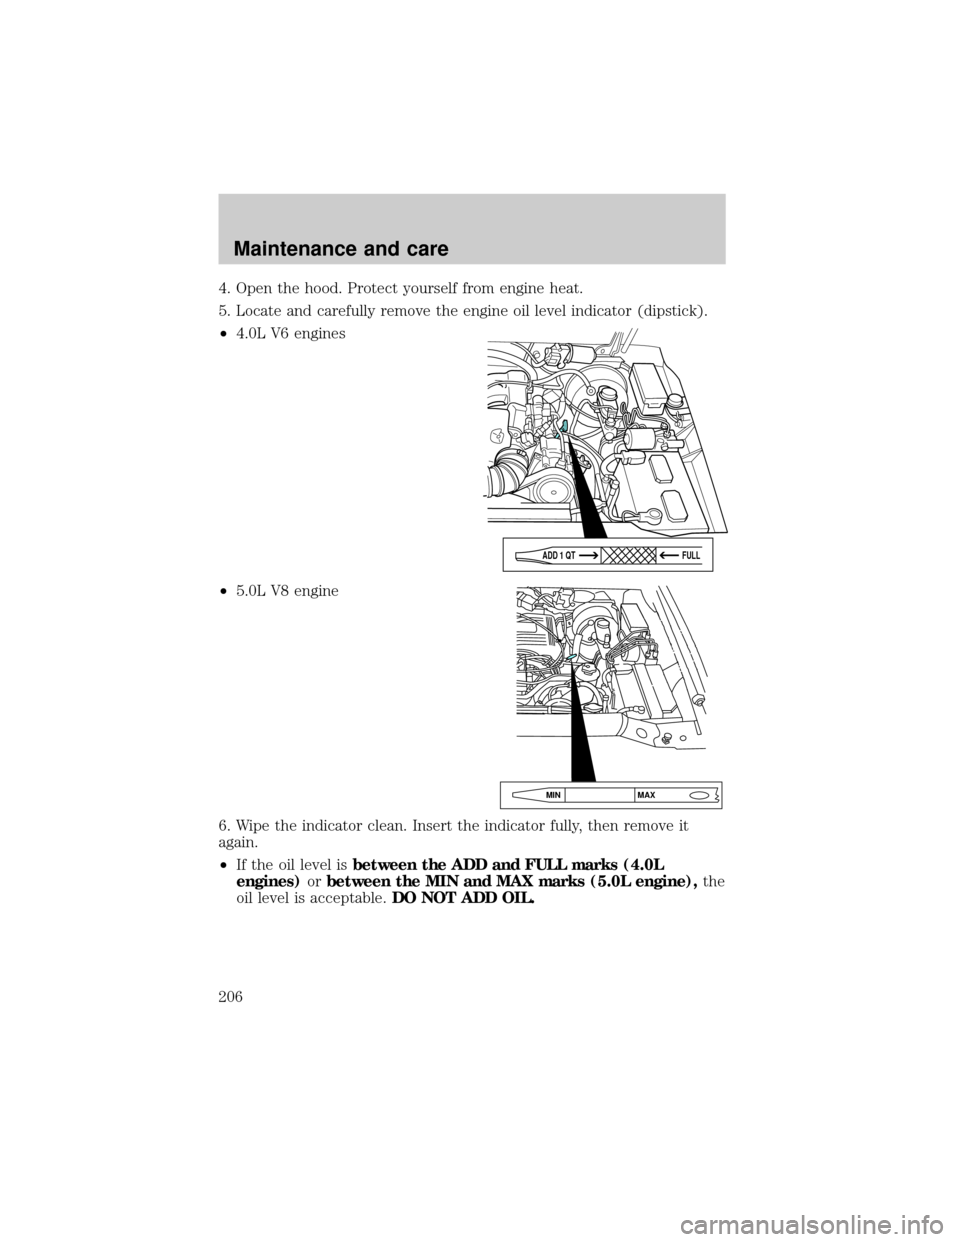
5. Locate and carefully remove the engine oil level indicator (dipstick).
²4.0L V6 engines
²5.0L V8 engine
6. Wipe the indicator clean. Insert the indicator fully, then remove it
again.
²If the oil level isbetween the ADD and FULL marks (4.0L
engines)orbetween the MIN and MAX marks (5.0L engine),the
oil level is acceptable.DO NOT ADD OIL.
ADD 1 QTFULL
MAX MIN
Maintenance and care
206
Page 207 of 264
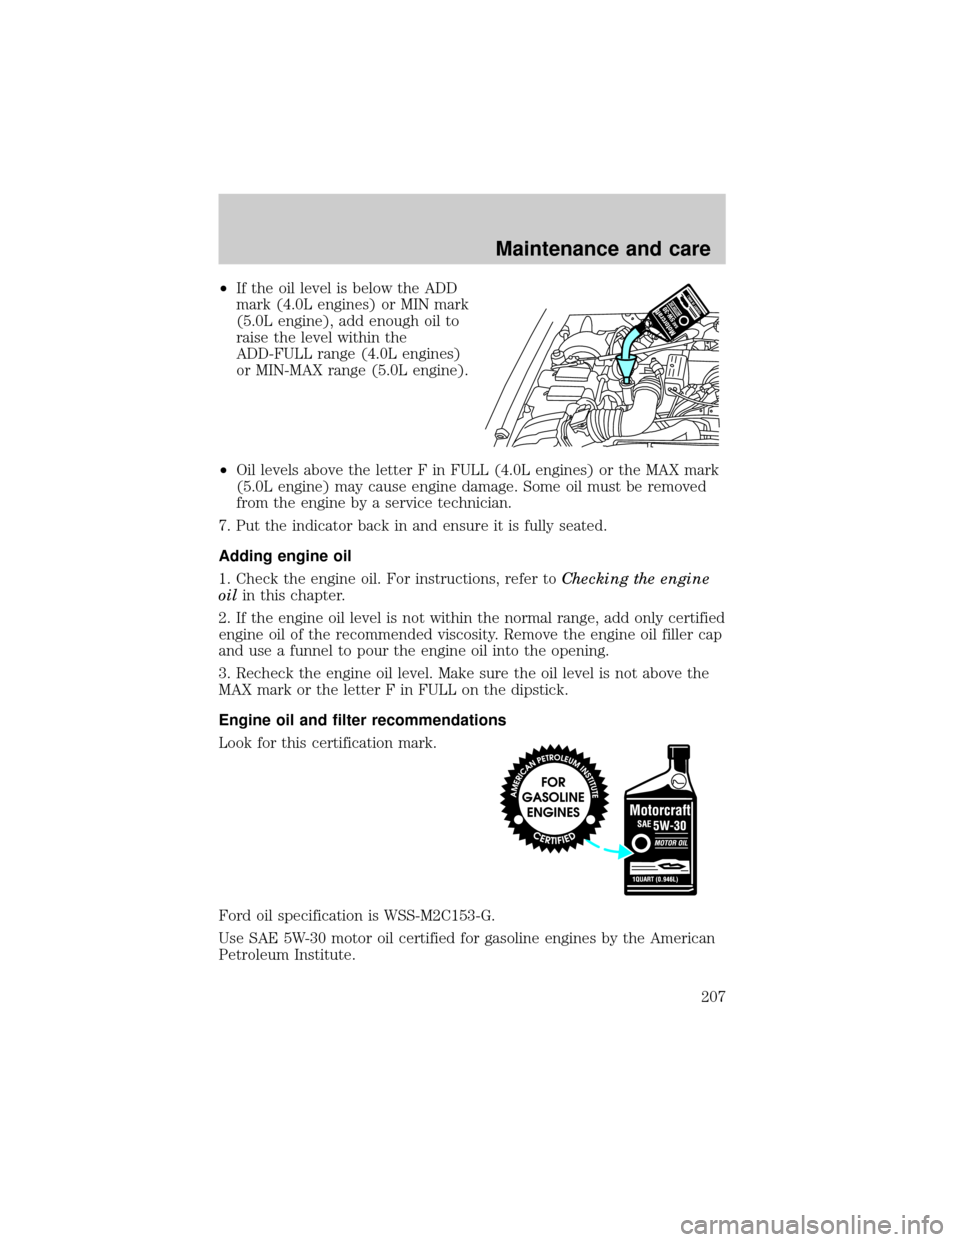
²If the oil level is below the ADD
mark (4.0L engines) or MIN mark
(5.0L engine), add enough oil to
raise the level within the
ADD-FULL range (4.0L engines)
or MIN-MAX range (5.0L engine).
²Oil levels above the letter F in FULL (4.0L engines) or the MAX mark
(5.0L engine) may cause engine damage. Some oil must be removed
from the engine by a service technician.
7. Put the indicator back in and ensure it is fully seated.
Adding engine oil
1. Check the engine oil. For instructions, refer toChecking the engine
oilin this chapter.
2. If the engine oil level is not within the normal range, add only certified
engine oil of the recommended viscosity. Remove the engine oil filler cap
and use a funnel to pour the engine oil into the opening.
3. Recheck the engine oil level. Make sure the oil level is not above the
MAX mark or the letter F in FULL on the dipstick.
Engine oil and filter recommendations
Look for this certification mark.
Ford oil specification is WSS-M2C153-G.
Use SAE 5W-30 motor oil certified for gasoline engines by the American
Petroleum Institute.
Maintenance and care
207
Page 208 of 264
Do not use supplemental engine oil additives, oil treatments or engine
treatments. They are unnecessary and could, under certain conditions,
lead to engine damage which is not covered by your warranty.
Change your engine oil and filter according to the appropriate schedule
listed in the Scheduled Maintenance Guide.
Ford production and aftermarket (Motorcraft) oil filters are designed for
added engine protection and long life. If a replacement oil filter is used
that does not meet Ford material and design specifications, startup
engine noises or knock may be experienced.
It is recommended you use the appropriate Motorcraft oil filter (or
another brand meeting Ford specifications) for your engine application.
BRAKE FLUID
Checking and adding brake fluid
Brake fluid should be checked and
refilled as needed. Refer to the
Scheduled Maintenance Guide for
the service interval schedules:
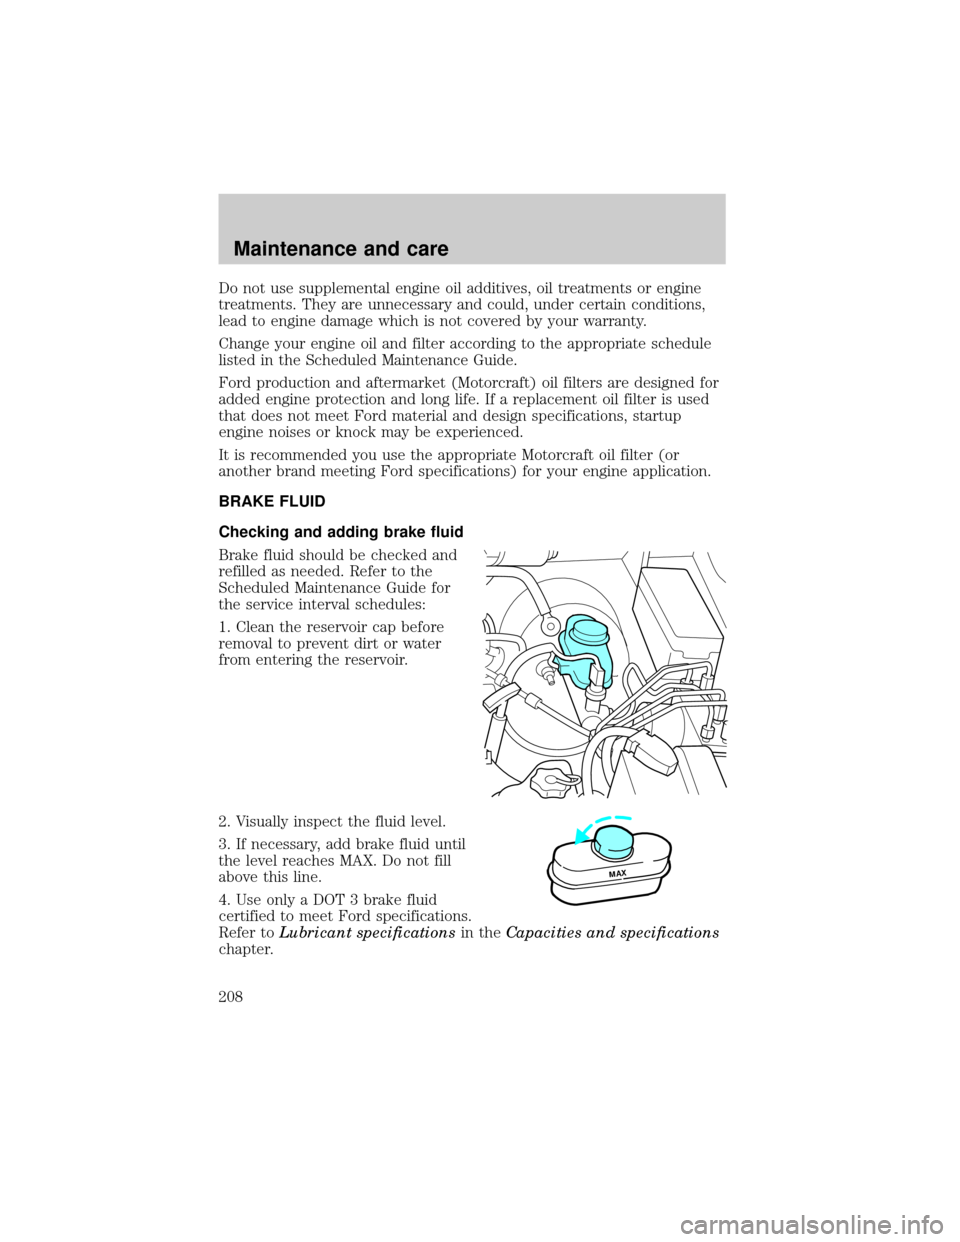
1. Clean the reservoir cap before
removal to prevent dirt or water
from entering the reservoir.
2. Visually inspect the fluid level.
3. If necessary, add brake fluid until
the level reaches MAX. Do not fill
above this line.
4. Use only a DOT 3 brake fluid
certified to meet Ford specifications.
Refer toLubricant specificationsin theCapacities and specifications
chapter.
MAX
Maintenance and care
208
Page 209 of 264
Brake fluid is toxic.
If you use a brake fluid that is not DOT 3, you will cause
permanent damage to your brakes.
Do not let the reservoir for the master cylinder run dry. This
may cause the brakes to fail.
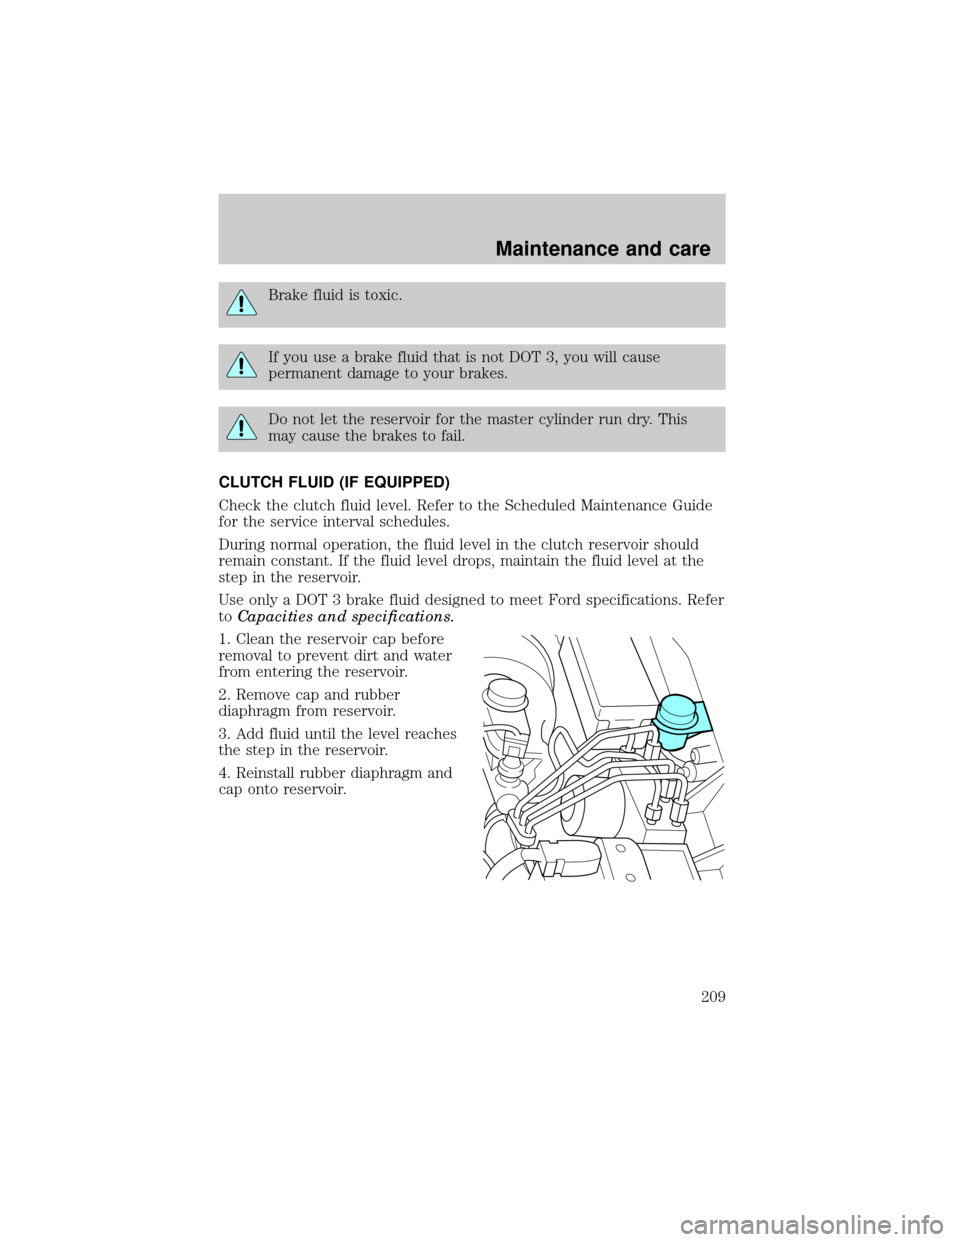
CLUTCH FLUID (IF EQUIPPED)
Check the clutch fluid level. Refer to the Scheduled Maintenance Guide
for the service interval schedules.
During normal operation, the fluid level in the clutch reservoir should
remain constant. If the fluid level drops, maintain the fluid level at the
step in the reservoir.
Use only a DOT 3 brake fluid designed to meet Ford specifications. Refer
toCapacities and specifications.
1. Clean the reservoir cap before
removal to prevent dirt and water
from entering the reservoir.
2. Remove cap and rubber
diaphragm from reservoir.
3. Add fluid until the level reaches
the step in the reservoir.
4. Reinstall rubber diaphragm and
cap onto reservoir.
Maintenance and care
209
Page 210 of 264
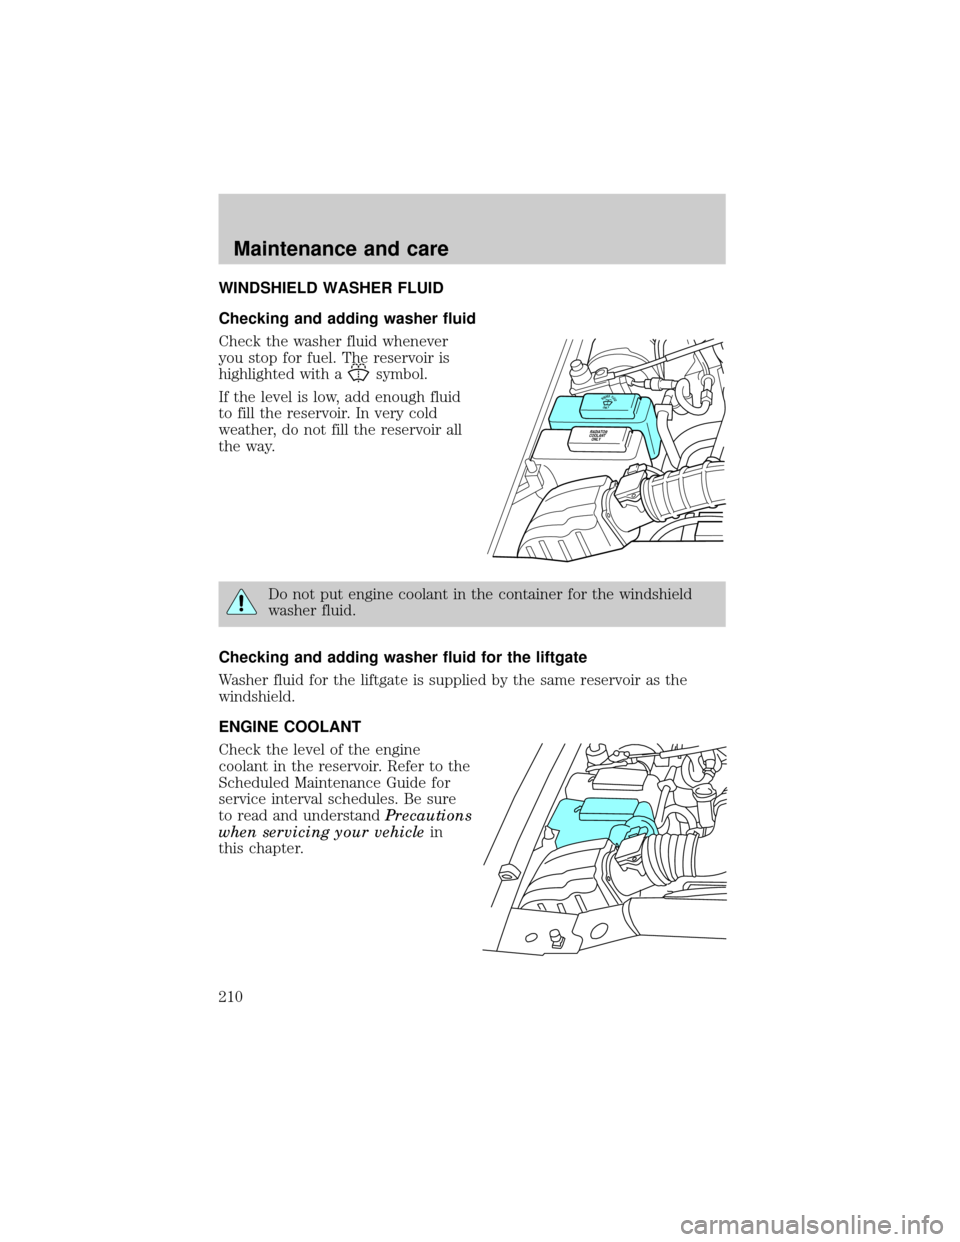
WINDSHIELD WASHER FLUID
Checking and adding washer fluid
Check the washer fluid whenever
you stop for fuel. The reservoir is
highlighted with a
symbol.
If the level is low, add enough fluid
to fill the reservoir. In very cold
weather, do not fill the reservoir all
the way.
Do not put engine coolant in the container for the windshield
washer fluid.
Checking and adding washer fluid for the liftgate
Washer fluid for the liftgate is supplied by the same reservoir as the
windshield.
ENGINE COOLANT
Check the level of the engine
coolant in the reservoir. Refer to the
Scheduled Maintenance Guide for
service interval schedules. Be sure
to read and understandPrecautions
when servicing your vehiclein
this chapter.
RADIATOR
COOLANT
ONLY
WASHERFLUIDONLY
Maintenance and care
210
Trending: turn signal bulb, odometer, fuel cap, instrument cluster, wheel, coolant capacity, fuel
