head restraint FORD EXPLORER 2000 2.G Owners Manual
[x] Cancel search | Manufacturer: FORD, Model Year: 2000, Model line: EXPLORER, Model: FORD EXPLORER 2000 2.GPages: 296, PDF Size: 2.17 MB
Page 13 of 296

Speed control
This light comes on when either the
SET/ACCEL or RESUME controls
are pressed. It turns off when the
speed control OFF control is
pressed, the brake or clutch (if equipped) is applied or the ignition is
turned to the OFF position.
Safety belt warning chime
Sounds to remind you to fasten your safety belts.
For information on the safety belt warning chime, refer to theSeating
and safety restraintschapter.
Supplemental restraint system (SRS) warning chime
For information on the SRS warning chime, refer to theSeating and
safety restraintschapter.
Key-in-ignition warning chime
Sounds when the key is left in the ignition in the OFF/LOCK or ACC
position and the driver's door is opened.
Headlamps on warning chime
Sounds when the headlamps or parking lamps are on, the ignition is off
(and the key is not in the ignition) and the driver's door is opened.
SPEED
CONT
Instrumentation
13
Page 119 of 296
SEATING
Adjustable head restraints (if equipped)
Your vehicle's seats may be equipped with head restraints which are
vertically adjustable. The purpose of these head restraints is to help limit
head motion in the event of a rear collision. To properly adjust your head
restraints, lift the head restraint so that it is located directly behind your
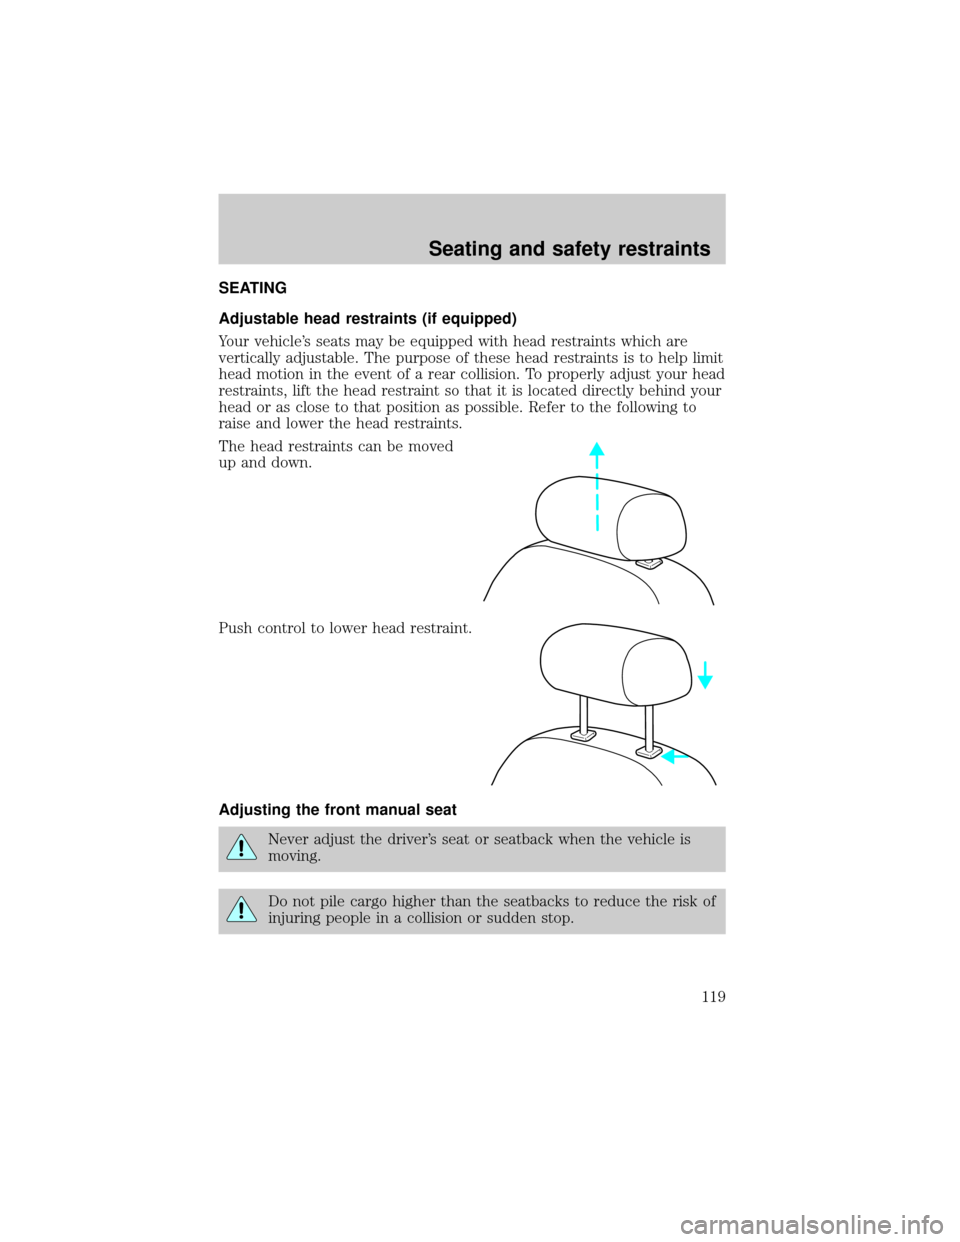
head or as close to that position as possible. Refer to the following to
raise and lower the head restraints.
The head restraints can be moved
up and down.
Push control to lower head restraint.
Adjusting the front manual seat
Never adjust the driver's seat or seatback when the vehicle is
moving.
Do not pile cargo higher than the seatbacks to reduce the risk of
injuring people in a collision or sudden stop.
Seating and safety restraints
119
Page 123 of 296
Using the power lumbar support (if equipped)
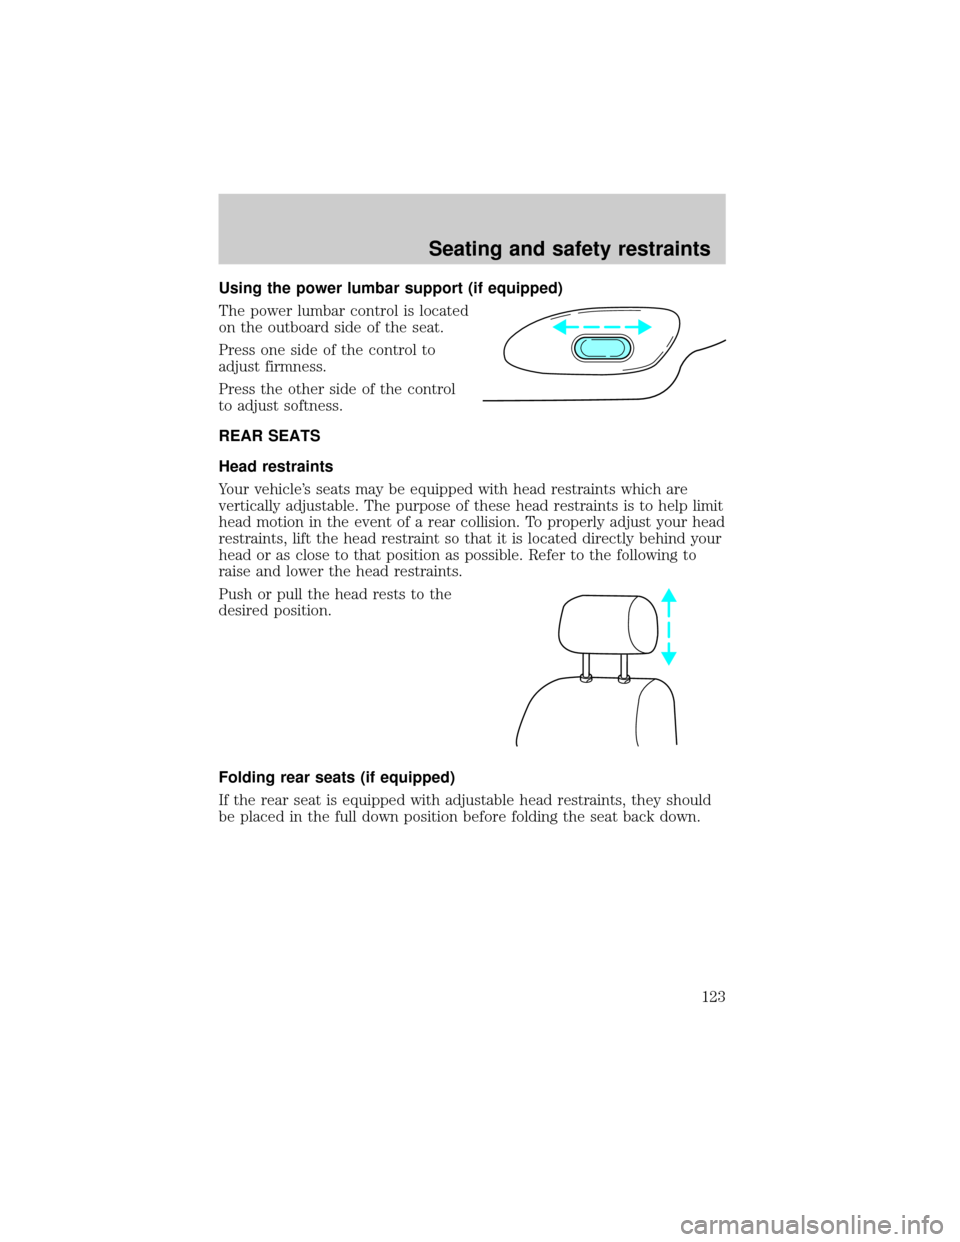
The power lumbar control is located
on the outboard side of the seat.
Press one side of the control to
adjust firmness.
Press the other side of the control
to adjust softness.
REAR SEATS
Head restraints
Your vehicle's seats may be equipped with head restraints which are
vertically adjustable. The purpose of these head restraints is to help limit
head motion in the event of a rear collision. To properly adjust your head
restraints, lift the head restraint so that it is located directly behind your
head or as close to that position as possible. Refer to the following to
raise and lower the head restraints.
Push or pull the head rests to the
desired position.
Folding rear seats (if equipped)
If the rear seat is equipped with adjustable head restraints, they should
be placed in the full down position before folding the seat back down.
Seating and safety restraints
123
Page 126 of 296
All occupants of the vehicle, including the driver, should always
properly wear their safety belts, even when an air bag SRS is
provided.
It is extremely dangerous to ride in a cargo area, inside or
outside of a vehicle. In a collision, people riding in these areas
are more likely to be seriously injured or killed. Do not allow people to
ride in any area of your vehicle that is not equipped with seats and
safety belts. Be sure everyone in your vehicle is in a seat and using a
safety belt properly.
In a rollover crash, an unbelted person is significantly more likely
to die than a person wearing a safety belt.
Each seating position in your vehicle has a specific safety belt
assembly which is made up of one buckle and one tongue that
are designed to be used as a pair. 1) Use the shoulder belt on the
outside shoulder only. Never wear the shoulder belt under the arm. 2)
Never swing the safety belt around your neck over the inside shoulder.
3) Never use a single belt for more than one person.
Always transport children 12 years old and under in the back
seat and always properly use appropriate child restraints.
Energy Management Feature
²This vehicle has a safety belt system with an energy management
feature at the front passenger seating position to help further reduce
the risk of injury in the event of a head-on collision.
²This safety belt system has a retractor assembly that is designed to
pay out webbing in a controlled manner. This feature is designed to
help reduce the belt force acting on the occupant's chest.
Seating and safety restraints
126
Page 134 of 296
²the driver's safety belt is unbuckled
²the parklamps/headlamps are in OFF position (If vehicle is equipped
with Autolamps, the Autolamps featureMUSTbe turned off.)
To reduce the risk of injury, do not deactivate/activate the Belt
Minder feature while driving the vehicle.
1. Turn the ignition switch to the RUN (or ON) position. (DO NOT
START THE ENGINE)
2. Wait until the safety belt warning light turns off. (Approximately 1±2
minutes)
²Steps 3±5 must be completed within 60 seconds or the procedure will
have to be repeated.
3. Buckle then unbuckle the safety belt three times, ending with the
safety belt unbuckled. This can be done before or during Belt Minder
warning activation.
4. Turn on the parklamps/headlamps, turn off the parklamps/headlamps.
5. Buckle then unbuckle the safety belt three times, ending with the
safety belt unbuckled.
²After step 5 the safety belt warning light will be turned on for three
seconds.
6. Within seven seconds of the safety belt warning light turning off,
buckle then unbuckle the safety belt.
²This will disable Belt Minder if it is currently enabled, or enable Belt
Minder if it is currently disabled.
7. Confirmation of disabling Belt Minder is provided by flashing the
safety belt warning light four times per second for three seconds.
8. Confirmation of enabling Belt Minder is provided by flashing the safety
belt warning light four times per second for three seconds, followed by
three seconds with the safety belt warning light off, then followed by
flashing the safety belt warning light four times per second for three
seconds again.
9. After receiving confirmation, the deactivation/activation procedure is
complete.
Seating and safety restraints
134
Page 140 of 296
If any of these things happen, even intermittently, have the SRS serviced
at your dealership or by a qualified technician immediately. Unless
serviced, the system may not function properly in the event of a
collision.
Side air bag system (if equipped)
Do not place objects or mount equipment on or near the air bag
cover on the side of the seatbacks of the front seats or in front
seat areas that may come into contact with a deploying air bag. Failure
to follow these instructions may increase the risk of personal injury in
the event of a collision.
Do not use accessory seat covers. The use of accessory seat
covers may prevent the deployment of the side air bags and
increase the risk of injury in an accident.
Do not lean your head on the door. The side air bag could injure
you as it deploys from the side of the seatback.
Do not attempt to service, repair, or modify the air bag
Supplemental Restraint System, its fuses or the seat cover on a
seat containing an air bag. See your Ford or Lincoln Mercury dealer.
All occupants of the vehicle including the driver should always
wear their safety belts even when an air bag SRS is provided.
Seating and safety restraints
140
Page 264 of 296
Do not use chemical solvents or strong detergents when cleaning
the steering wheel or instrument panel to avoid contamination of
the air bag system.
Cleaning the instrument cluster lens
Clean with a damp cloth, then dry with a dry cloth.
Do not use household or glass cleaners as these may damage the lens.
Cleaning the overhead console
Clean with a damp cloth, then wipe dry with a dry cloth.
Avoid cleaner or polish that increases the gloss of the console. The dull
finish in this area helps protect the driver from undesirable windshield
reflection.
Cleaning the interior fabric
Remove dust and loose dirt with a whisk broom or a vacuum cleaner.
Remove fresh spots immediately. Do not use household or glass cleaners.
These agents can stain and discolor the fabric. Use a mild soap and
water solution if necessary.
Cleaning and maintaining the safety belts
Clean the safety belts with a mild soap solution recommended for
cleaning upholstery or carpets. Do not bleach or dye the belts, because
these actions may weaken the belt webbing.
Check the safety belt system periodically to make sure there are no
nicks, wear or cuts. If your vehicle has been involved in an accident,
refer to theSafety belt maintenancesection in theSeating and safety
restraintschapter.
Cleaning leather seats (if equipped)
To clean, simply use a soft cloth dampened with water and a mild soap.
Wipe the leather again with a damp cloth to remove soap residue. Dry
with a soft cloth. For tougher soiling concerns, Ford recommends using
the Deluxe Leather Care Kit F8AZ-19G253±AA, which is available from
your Ford Dealer. This mild cleaner and special pad, cleans the leather
and maintains its natural beauty. Follow the instructions on the cleaner
label. Regular cleaning of your leather upholstery helps maintain its
resiliency and color.
Maintenance and care
264
Page 289 of 296

Certification Label ....................274
Child safety restraints ..............143
child safety belts ....................143
Child safety seats ......................144
in front seat ............................146
in rear seat ..............................146
tether anchorage hardware ...148
Cleaning your vehicle ...............259
engine compartment ..............260
exterior ............................260, 262
exterior lamps .........................263
instrument cluster lens ..........264
instrument panel ....................263
interior .............................263±264
mirrors .....................................265
plastic parts ............................262
safety belts ..............................264
washing ....................................259
waxing .....................................259
wheels ......................................262
windows ..................................265
wiper blades ............................263
woodtone trim ........................265
Climate control (see Air
conditioning or Heating) ............22
Clock ..........................41, 47, 57, 70
Clutch
fluid ..........................................222
operation while driving ..........166
recommended shift speeds ....167
Compass, electronic ....................92
calibration .................................94
set zone adjustment .................93
Console ......................................103
overhead ....................................90
rear ..........................................104
Controls
power seat ...............................120steering column ........................89
Coolant
checking and adding ..............223
refill capacities ................227, 266
specifications ..................269, 272
Cruise control
(see Speed control) ....................82
Customer Assistance ................189
Ford accessories for your
vehicle .....................................282
Ford Extended Service Plan...275
Getting assistance outside
the U.S. and Canada ..............281
Getting roadside assistance ...189
Getting the service
you need .................................275
Ordering additional owner's
literature .................................286
The Dispute Settlement
Board .......................................278
Utilizing the
Mediation/Arbitration
Program ...................................281
D
Daytime running lamps
(see Lamps) ................................21
Defrost
rear window ..............................33
Dipstick
automatic transmission
fluid ..................................229, 231
engine oil .................................217
Doors
door ajar warning .....................12
lubricant specifications ..........269
Driveline universal joint
and slip yoke .............................235
Index
289
Page 291 of 296

odometer ...................................15
speedometer .............................14
tachometer ................................15
trip odometer ............................15
GAWR (Gross Axle Weight
Rating) .......................................176
calculating ...............................178
definition .................................176
driving with a heavy load ......176
location ....................................176
GVWR (Gross Vehicle Weight
Rating) .......................................176
calculating .......................176, 178
definition .................................176
driving with a heavy load ......176
location ....................................176
H
Hazard flashers .........................190
Head restraints .................119, 123
Headlamps ...................................21
aiming ......................................259
autolamp system .......................99
bulb specifications ..................258
daytime running lights .............21
flash to pass ..............................22
high beam ...........................11, 21
replacing bulbs .......................254
turning on and off ....................21
warning chime ..........................13
Heating ........................................22
heating and air conditioning
system .......................................22
HomeLink universal
transceiver (see Garage
door opener) .........................94±98
Hood ..........................................213I
Ignition .................................81, 272
Infant seats
(see Safety seats) .....................144
Inspection/maintenance
(I/M) testing ..............................253
Instrument panel
cleaning ...................................263
cluster ..................................8, 264
lighting up panel
and interior ...............................22
location of components ..............8
J
Jack ............................................199
positioning ...............................199
storage .....................................199
Jump-starting your vehicle ......204
K
Keyless entry system ...............112
autolock ...................................114
keypad .....................................112
locking and unlocking
doors ................................113±114
programming entry code .......113
Keys
key in ignition chime ...............13
positions of the ignition ...........81
L
Lamps
bulb replacement
specifications chart ................258
cargo lamps ...............................22
daytime running light ...............21
Index
291