wheel FORD EXPLORER 2016 5.G Owner's Manual
[x] Cancel search | Manufacturer: FORD, Model Year: 2016, Model line: EXPLORER, Model: FORD EXPLORER 2016 5.GPages: 541, PDF Size: 6.51 MB
Page 118 of 541
Settings
Fahrenheit (°F) or Celsius (°C)
Temper-
ature
psi, kPa or bar
Tire Pres-
sure
Choose your applicable setting
Language
Speedometer km/h - check enabled or uncheck disabled
Speedo-
meter
Note: Some MyKey items only appear if a
MyKey is set.
INFORMATION MESSAGES
Note: Depending on the vehicle options
equipped with your vehicle, not all of the
messages will display or be available.
Certain messages may display abbreviated
or shortened depending upon which cluster
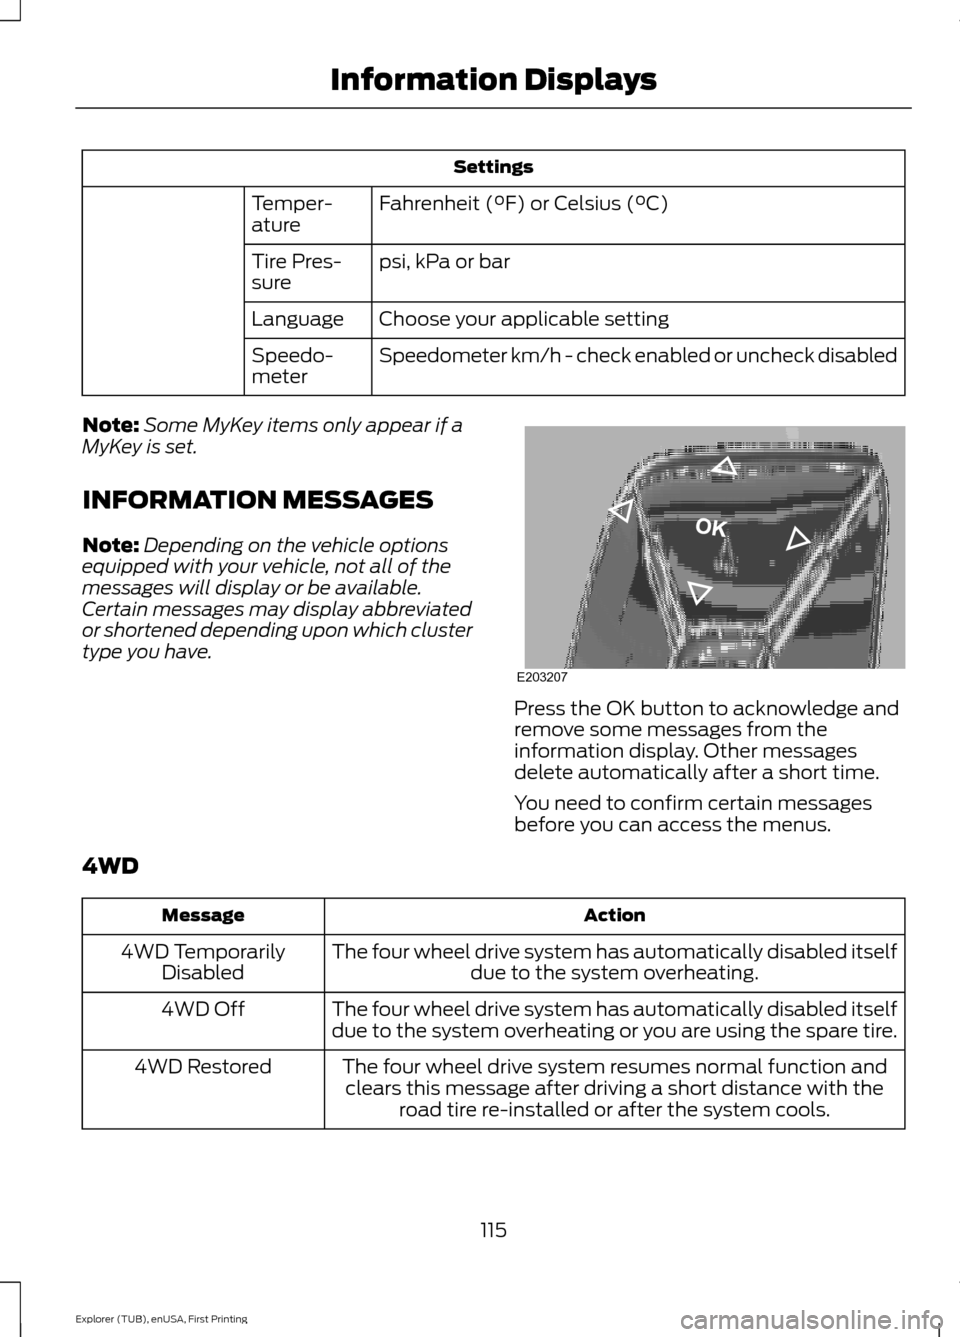
type you have. Press the OK button to acknowledge and
remove some messages from the
information display. Other messages
delete automatically after a short time.
You need to confirm certain messages
before you can access the menus.
4WD Action
Message
The four wheel drive system has automatically disabled itselfdue to the system overheating.
4WD Temporarily
Disabled
The four wheel drive system has automatically disabled itself
due to the system overheating or you are using the spare tire.
4WD Off
The four wheel drive system resumes normal function andclears this message after driving a short distance with the road tire re-installed or after the system cools.
4WD Restored
115
Explorer (TUB), enUSA, First Printing Information DisplaysE203207
Page 119 of 541
Action
Message
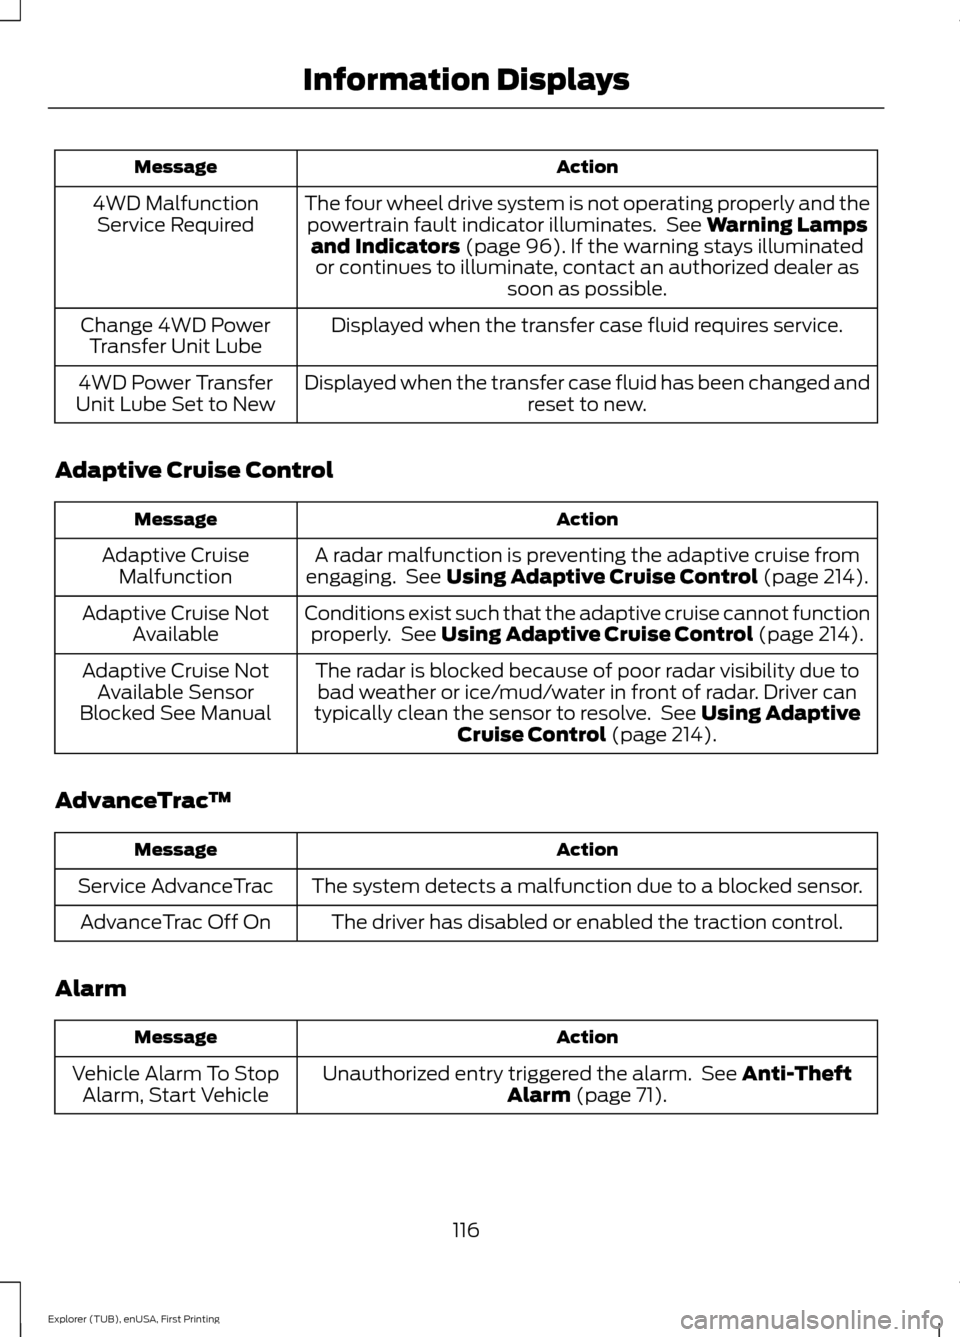
The four wheel drive system is not operating properly and thepowertrain fault indicator illuminates. See Warning Lamps
and Indicators (page 96). If the warning stays illuminated
or continues to illuminate, contact an authorized dealer as soon as possible.
4WD Malfunction
Service Required
Displayed when the transfer case fluid requires service.
Change 4WD Power
Transfer Unit Lube
Displayed when the transfer case fluid has been changed and reset to new.
4WD Power Transfer
Unit Lube Set to New
Adaptive Cruise Control Action
Message
A radar malfunction is preventing the adaptive cruise from
engaging. See
Using Adaptive Cruise Control (page 214).
Adaptive Cruise
Malfunction
Conditions exist such that the adaptive cruise cannot functionproperly. See
Using Adaptive Cruise Control (page 214).
Adaptive Cruise Not
Available
The radar is blocked because of poor radar visibility due tobad weather or ice/mud/water in front of radar. Driver can
typically clean the sensor to resolve. See
Using Adaptive
Cruise Control (page 214).
Adaptive Cruise Not
Available Sensor
Blocked See Manual
AdvanceTrac ™ Action
Message
The system detects a malfunction due to a blocked sensor.
Service AdvanceTrac
The driver has disabled or enabled the traction control.
AdvanceTrac Off On
Alarm Action
Message
Unauthorized entry triggered the alarm. See
Anti-Theft
Alarm (page 71).
Vehicle Alarm To Stop
Alarm, Start Vehicle
116
Explorer (TUB), enUSA, First Printing Information Displays
Page 120 of 541
Automatic Engine Shutdown
Action
Message
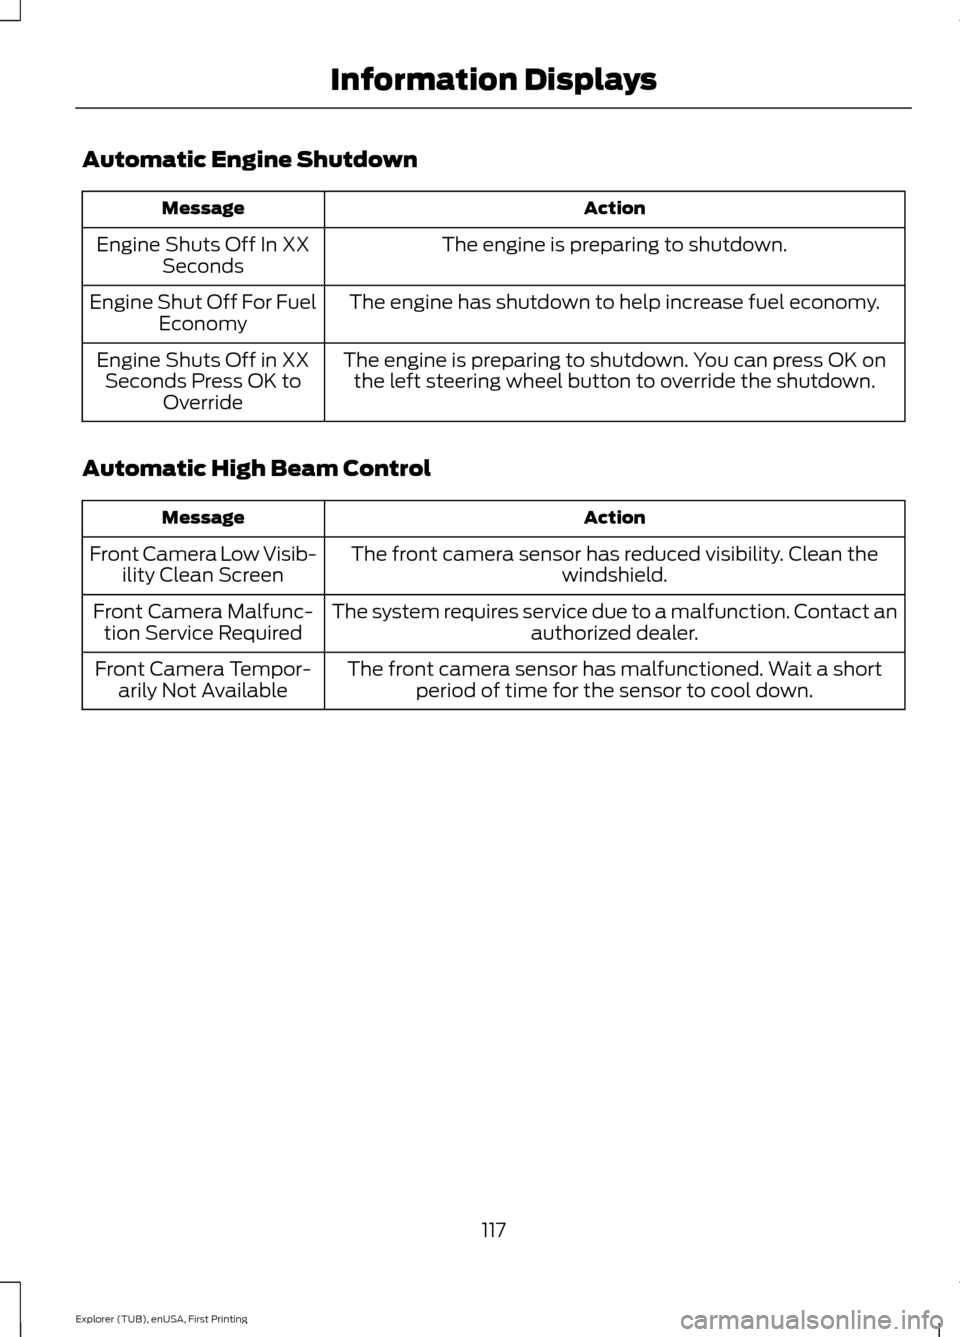
The engine is preparing to shutdown.
Engine Shuts Off In XX
Seconds
The engine has shutdown to help increase fuel economy.
Engine Shut Off For Fuel
Economy
The engine is preparing to shutdown. You can press OK onthe left steering wheel button to override the shutdown.
Engine Shuts Off in XX
Seconds Press OK to Override
Automatic High Beam Control Action
Message
The front camera sensor has reduced visibility. Clean the windshield.
Front Camera Low Visib-
ility Clean Screen
The system requires service due to a malfunction. Contact anauthorized dealer.
Front Camera Malfunc-
tion Service Required
The front camera sensor has malfunctioned. Wait a shortperiod of time for the sensor to cool down.
Front Camera Tempor-
arily Not Available
117
Explorer (TUB), enUSA, First Printing Information Displays
Page 126 of 541
Lane Keeping System
Action
Message
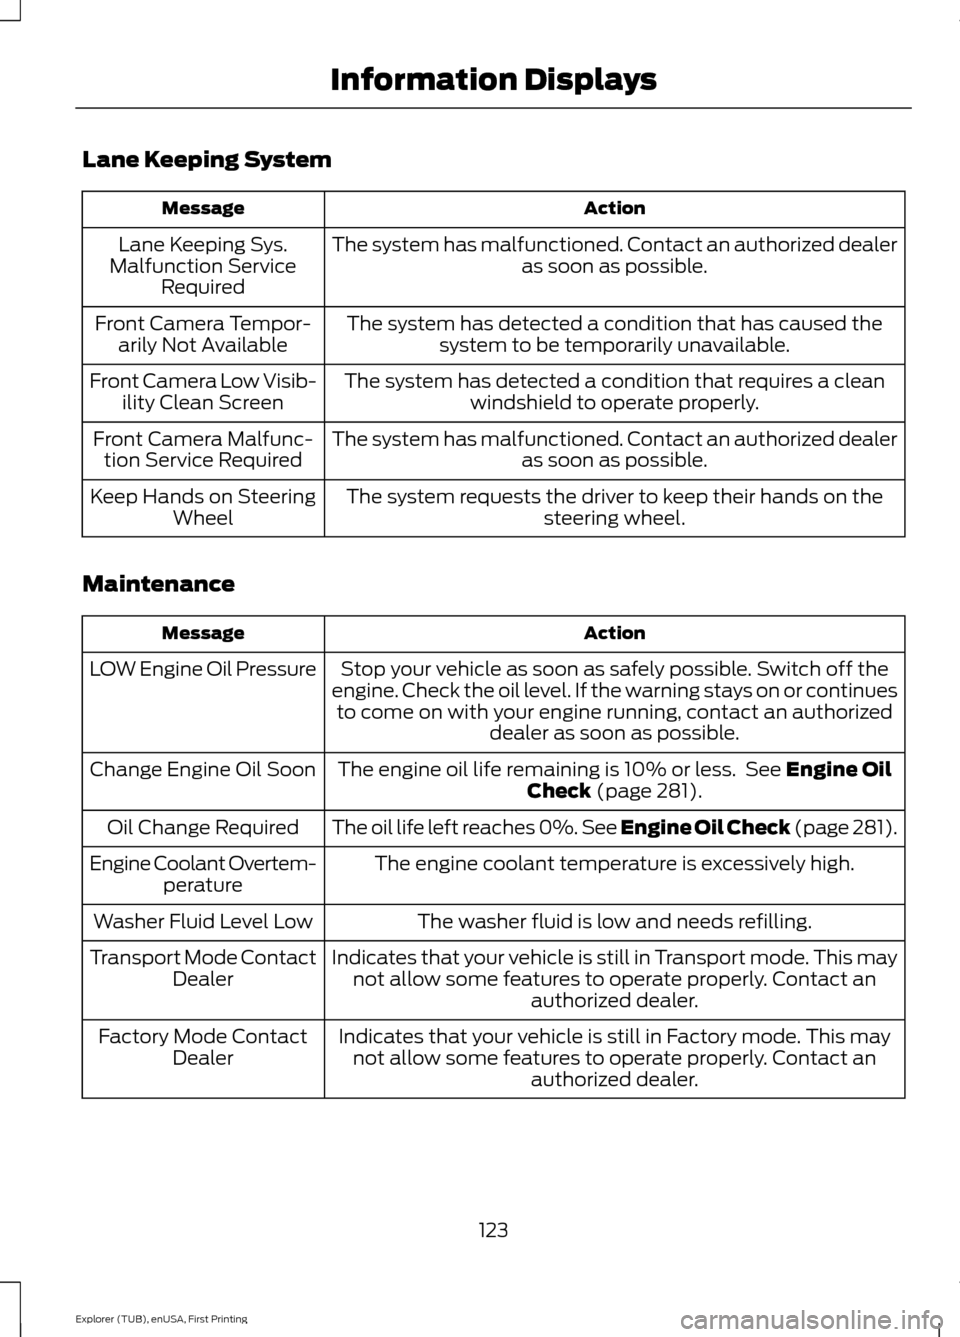
The system has malfunctioned. Contact an authorized dealer as soon as possible.
Lane Keeping Sys.
Malfunction Service Required
The system has detected a condition that has caused thesystem to be temporarily unavailable.
Front Camera Tempor-
arily Not Available
The system has detected a condition that requires a cleanwindshield to operate properly.
Front Camera Low Visib-
ility Clean Screen
The system has malfunctioned. Contact an authorized dealeras soon as possible.
Front Camera Malfunc-
tion Service Required
The system requests the driver to keep their hands on thesteering wheel.
Keep Hands on Steering
Wheel
Maintenance Action
Message
Stop your vehicle as soon as safely possible. Switch off the
engine. Check the oil level. If the warning stays on or continues to come on with your engine running, contact an authorized dealer as soon as possible.
LOW Engine Oil Pressure
The engine oil life remaining is 10% or less. See Engine Oil
Check (page 281).
Change Engine Oil Soon
The oil life left reaches 0%. See
Engine Oil Check (page 281).
Oil Change Required
The engine coolant temperature is excessively high.
Engine Coolant Overtem-
perature
The washer fluid is low and needs refilling.
Washer Fluid Level Low
Indicates that your vehicle is still in Transport mode. This maynot allow some features to operate properly. Contact an authorized dealer.
Transport Mode Contact
Dealer
Indicates that your vehicle is still in Factory mode. This maynot allow some features to operate properly. Contact an authorized dealer.
Factory Mode Contact
Dealer
123
Explorer (TUB), enUSA, First Printing Information Displays
Page 128 of 541
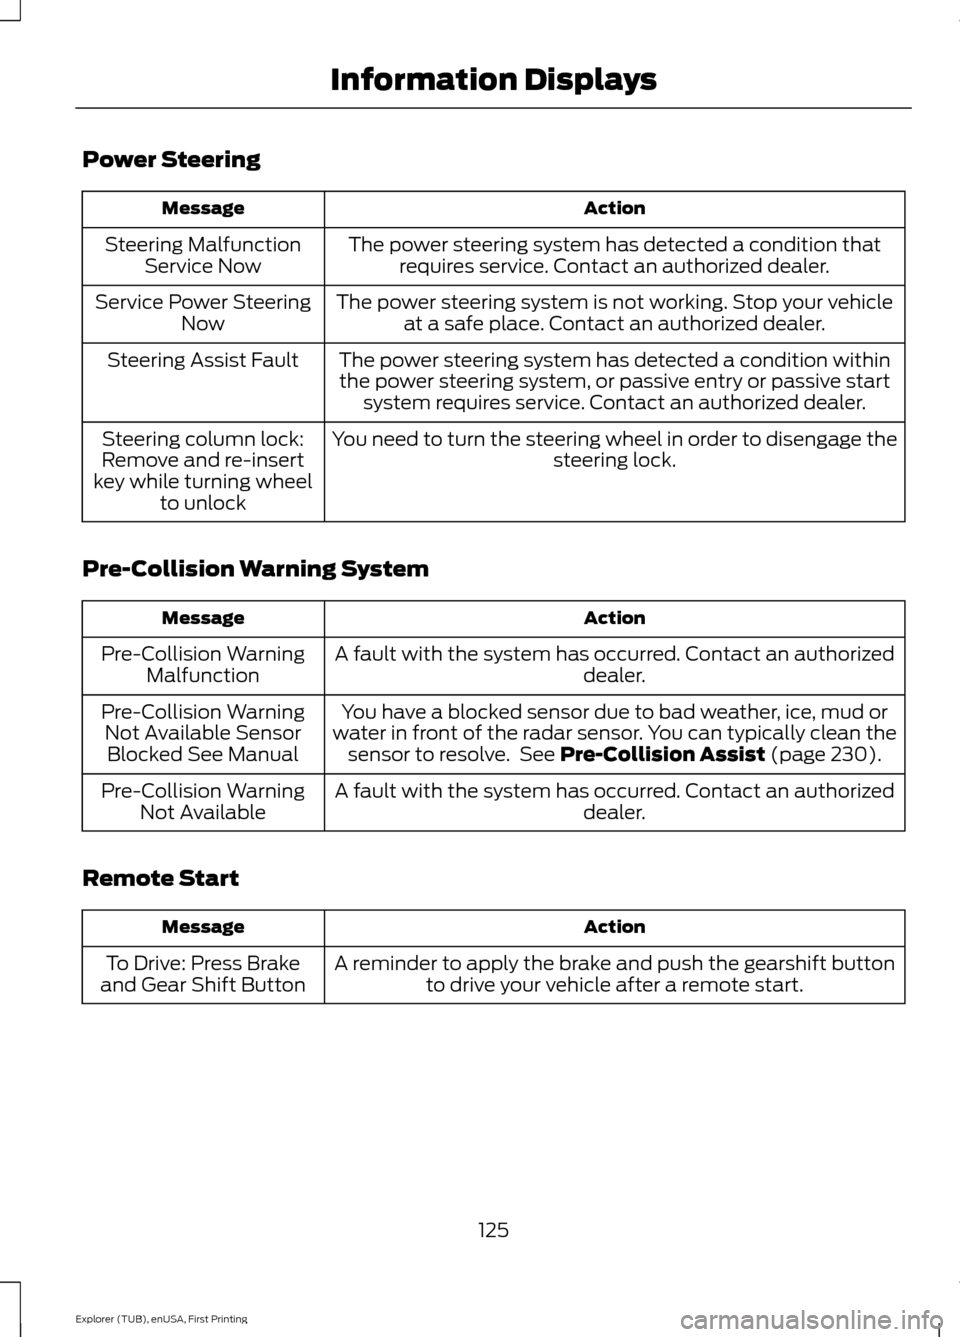
Power Steering
Action
Message
The power steering system has detected a condition thatrequires service. Contact an authorized dealer.
Steering Malfunction
Service Now
The power steering system is not working. Stop your vehicleat a safe place. Contact an authorized dealer.
Service Power Steering
Now
The power steering system has detected a condition withinthe power steering system, or passive entry or passive start system requires service. Contact an authorized dealer.
Steering Assist Fault
You need to turn the steering wheel in order to disengage thesteering lock.
Steering column lock:
Remove and re-insert
key while turning wheel to unlock
Pre-Collision Warning System Action
Message
A fault with the system has occurred. Contact an authorized dealer.
Pre-Collision Warning
Malfunction
You have a blocked sensor due to bad weather, ice, mud or
water in front of the radar sensor. You can typically clean the sensor to resolve. See Pre-Collision Assist (page 230).
Pre-Collision Warning
Not Available SensorBlocked See Manual
A fault with the system has occurred. Contact an authorized dealer.
Pre-Collision Warning
Not Available
Remote Start Action
Message
A reminder to apply the brake and push the gearshift buttonto drive your vehicle after a remote start.
To Drive: Press Brake
and Gear Shift Button
125
Explorer (TUB), enUSA, First Printing Information Displays
Page 142 of 541
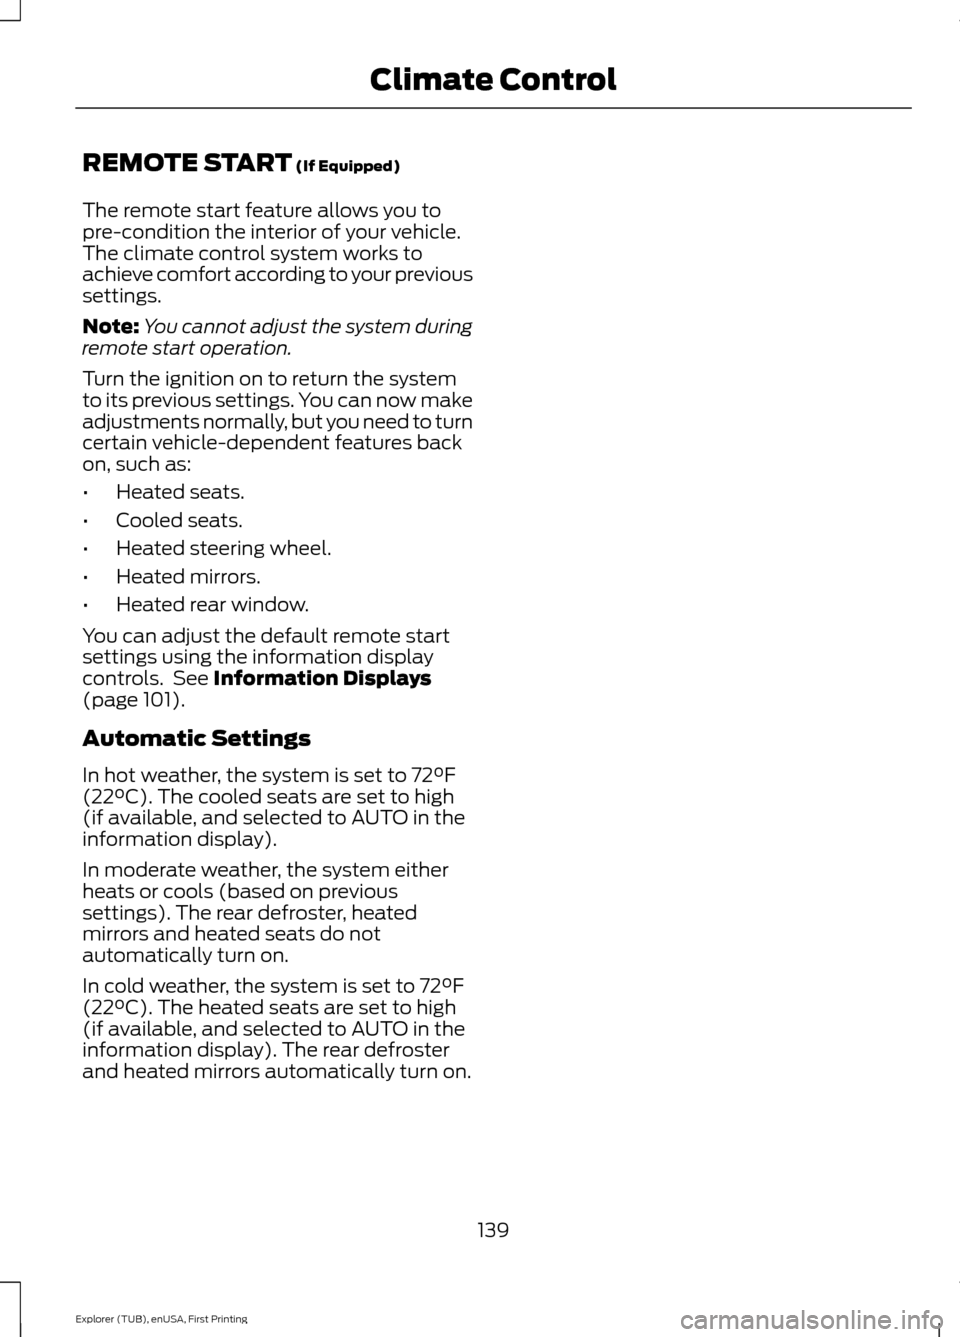
REMOTE START (If Equipped)
The remote start feature allows you to
pre-condition the interior of your vehicle.
The climate control system works to
achieve comfort according to your previous
settings.
Note: You cannot adjust the system during
remote start operation.
Turn the ignition on to return the system
to its previous settings. You can now make
adjustments normally, but you need to turn
certain vehicle-dependent features back
on, such as:
• Heated seats.
• Cooled seats.
• Heated steering wheel.
• Heated mirrors.
• Heated rear window.
You can adjust the default remote start
settings using the information display
controls. See
Information Displays
(page 101).
Automatic Settings
In hot weather, the system is set to 72°F
(22°C). The cooled seats are set to high
(if available, and selected to AUTO in the
information display).
In moderate weather, the system either
heats or cools (based on previous
settings). The rear defroster, heated
mirrors and heated seats do not
automatically turn on.
In cold weather, the system is set to 72°F
(22°C). The heated seats are set to high
(if available, and selected to AUTO in the
information display). The rear defroster
and heated mirrors automatically turn on.
139
Explorer (TUB), enUSA, First Printing Climate Control
Page 143 of 541
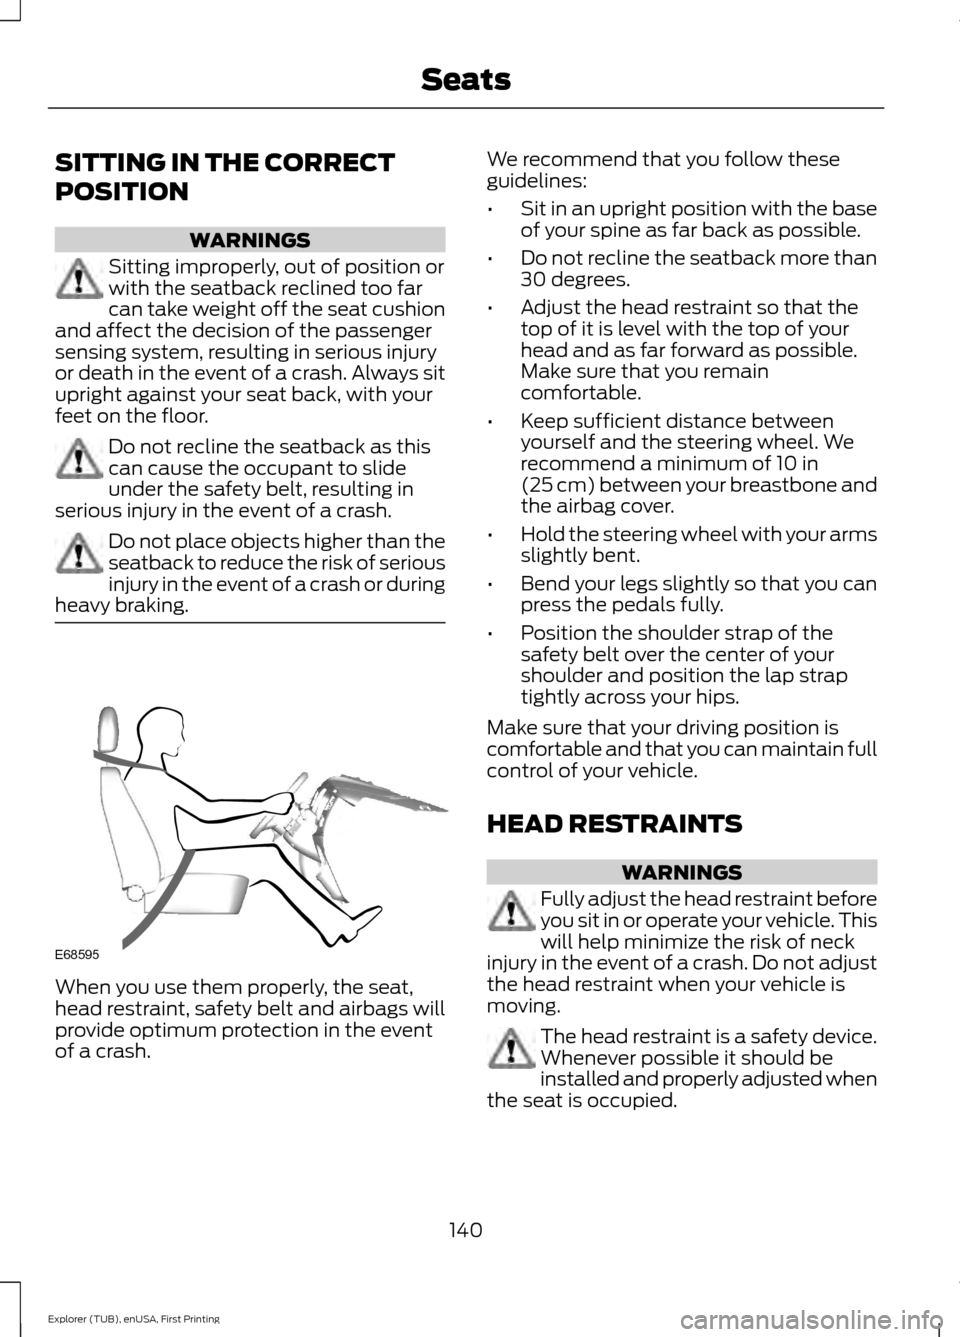
SITTING IN THE CORRECT
POSITION
WARNINGS
Sitting improperly, out of position or
with the seatback reclined too far
can take weight off the seat cushion
and affect the decision of the passenger
sensing system, resulting in serious injury
or death in the event of a crash. Always sit
upright against your seat back, with your
feet on the floor. Do not recline the seatback as this
can cause the occupant to slide
under the safety belt, resulting in
serious injury in the event of a crash. Do not place objects higher than the
seatback to reduce the risk of serious
injury in the event of a crash or during
heavy braking. When you use them properly, the seat,
head restraint, safety belt and airbags will
provide optimum protection in the event
of a crash. We recommend that you follow these
guidelines:
•
Sit in an upright position with the base
of your spine as far back as possible.
• Do not recline the seatback more than
30 degrees.
• Adjust the head restraint so that the
top of it is level with the top of your
head and as far forward as possible.
Make sure that you remain
comfortable.
• Keep sufficient distance between
yourself and the steering wheel. We
recommend a minimum of 10 in
(25 cm) between your breastbone and
the airbag cover.
• Hold the steering wheel with your arms
slightly bent.
• Bend your legs slightly so that you can
press the pedals fully.
• Position the shoulder strap of the
safety belt over the center of your
shoulder and position the lap strap
tightly across your hips.
Make sure that your driving position is
comfortable and that you can maintain full
control of your vehicle.
HEAD RESTRAINTS WARNINGS
Fully adjust the head restraint before
you sit in or operate your vehicle. This
will help minimize the risk of neck
injury in the event of a crash. Do not adjust
the head restraint when your vehicle is
moving. The head restraint is a safety device.
Whenever possible it should be
installed and properly adjusted when
the seat is occupied.
140
Explorer (TUB), enUSA, First Printing SeatsE68595
Page 176 of 541
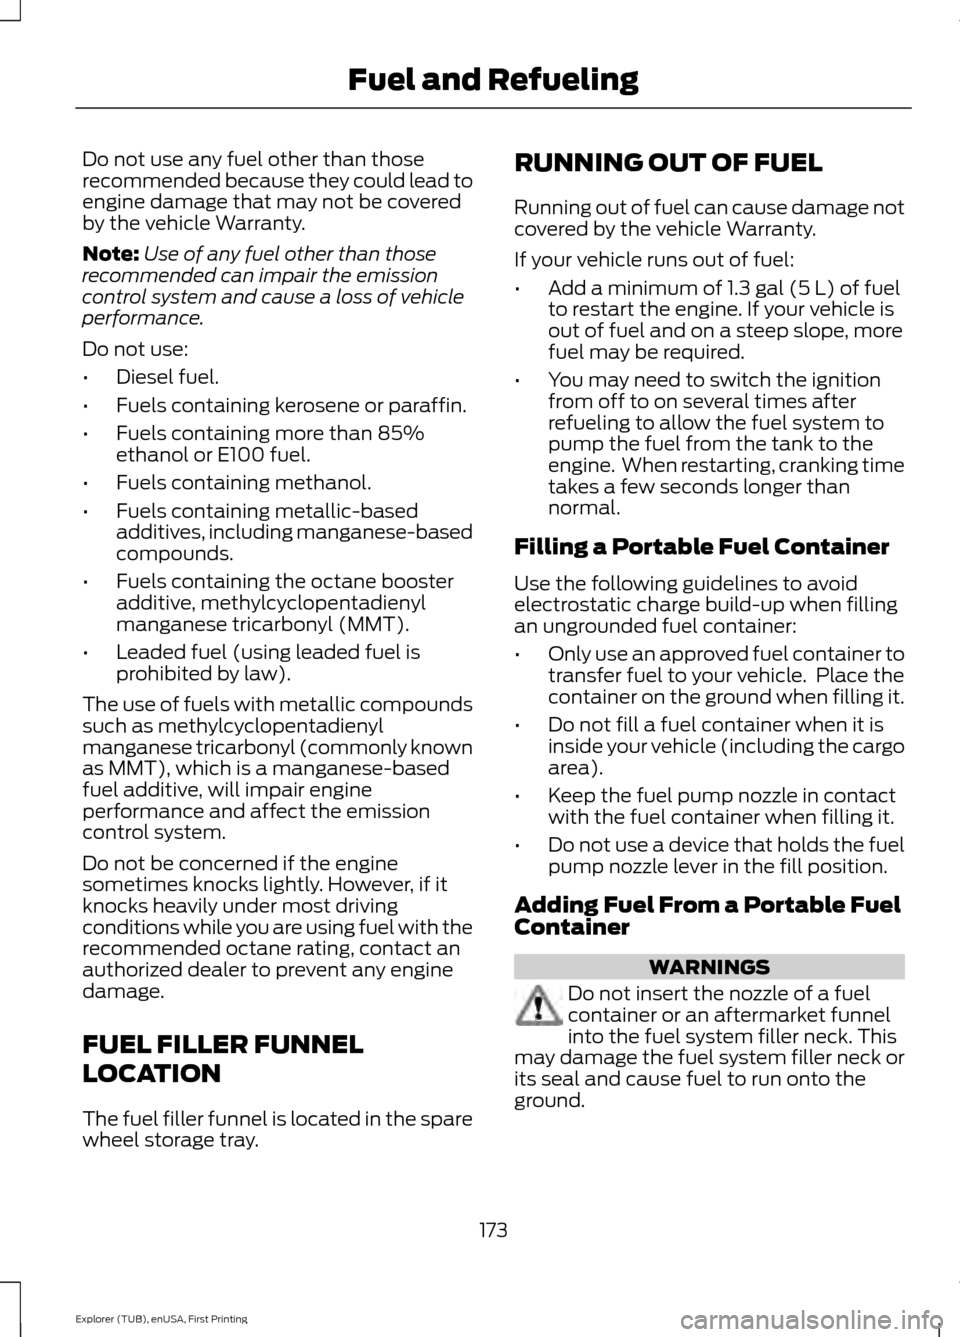
Do not use any fuel other than those
recommended because they could lead to
engine damage that may not be covered
by the vehicle Warranty.
Note:
Use of any fuel other than those
recommended can impair the emission
control system and cause a loss of vehicle
performance.
Do not use:
• Diesel fuel.
• Fuels containing kerosene or paraffin.
• Fuels containing more than 85%
ethanol or E100 fuel.
• Fuels containing methanol.
• Fuels containing metallic-based
additives, including manganese-based
compounds.
• Fuels containing the octane booster
additive, methylcyclopentadienyl
manganese tricarbonyl (MMT).
• Leaded fuel (using leaded fuel is
prohibited by law).
The use of fuels with metallic compounds
such as methylcyclopentadienyl
manganese tricarbonyl (commonly known
as MMT), which is a manganese-based
fuel additive, will impair engine
performance and affect the emission
control system.
Do not be concerned if the engine
sometimes knocks lightly. However, if it
knocks heavily under most driving
conditions while you are using fuel with the
recommended octane rating, contact an
authorized dealer to prevent any engine
damage.
FUEL FILLER FUNNEL
LOCATION
The fuel filler funnel is located in the spare
wheel storage tray. RUNNING OUT OF FUEL
Running out of fuel can cause damage not
covered by the vehicle Warranty.
If your vehicle runs out of fuel:
•
Add a minimum of 1.3 gal (5 L) of fuel
to restart the engine. If your vehicle is
out of fuel and on a steep slope, more
fuel may be required.
• You may need to switch the ignition
from off to on several times after
refueling to allow the fuel system to
pump the fuel from the tank to the
engine. When restarting, cranking time
takes a few seconds longer than
normal.
Filling a Portable Fuel Container
Use the following guidelines to avoid
electrostatic charge build-up when filling
an ungrounded fuel container:
• Only use an approved fuel container to
transfer fuel to your vehicle. Place the
container on the ground when filling it.
• Do not fill a fuel container when it is
inside your vehicle (including the cargo
area).
• Keep the fuel pump nozzle in contact
with the fuel container when filling it.
• Do not use a device that holds the fuel
pump nozzle lever in the fill position.
Adding Fuel From a Portable Fuel
Container WARNINGS
Do not insert the nozzle of a fuel
container or an aftermarket funnel
into the fuel system filler neck. This
may damage the fuel system filler neck or
its seal and cause fuel to run onto the
ground.
173
Explorer (TUB), enUSA, First Printing Fuel and Refueling
Page 183 of 541
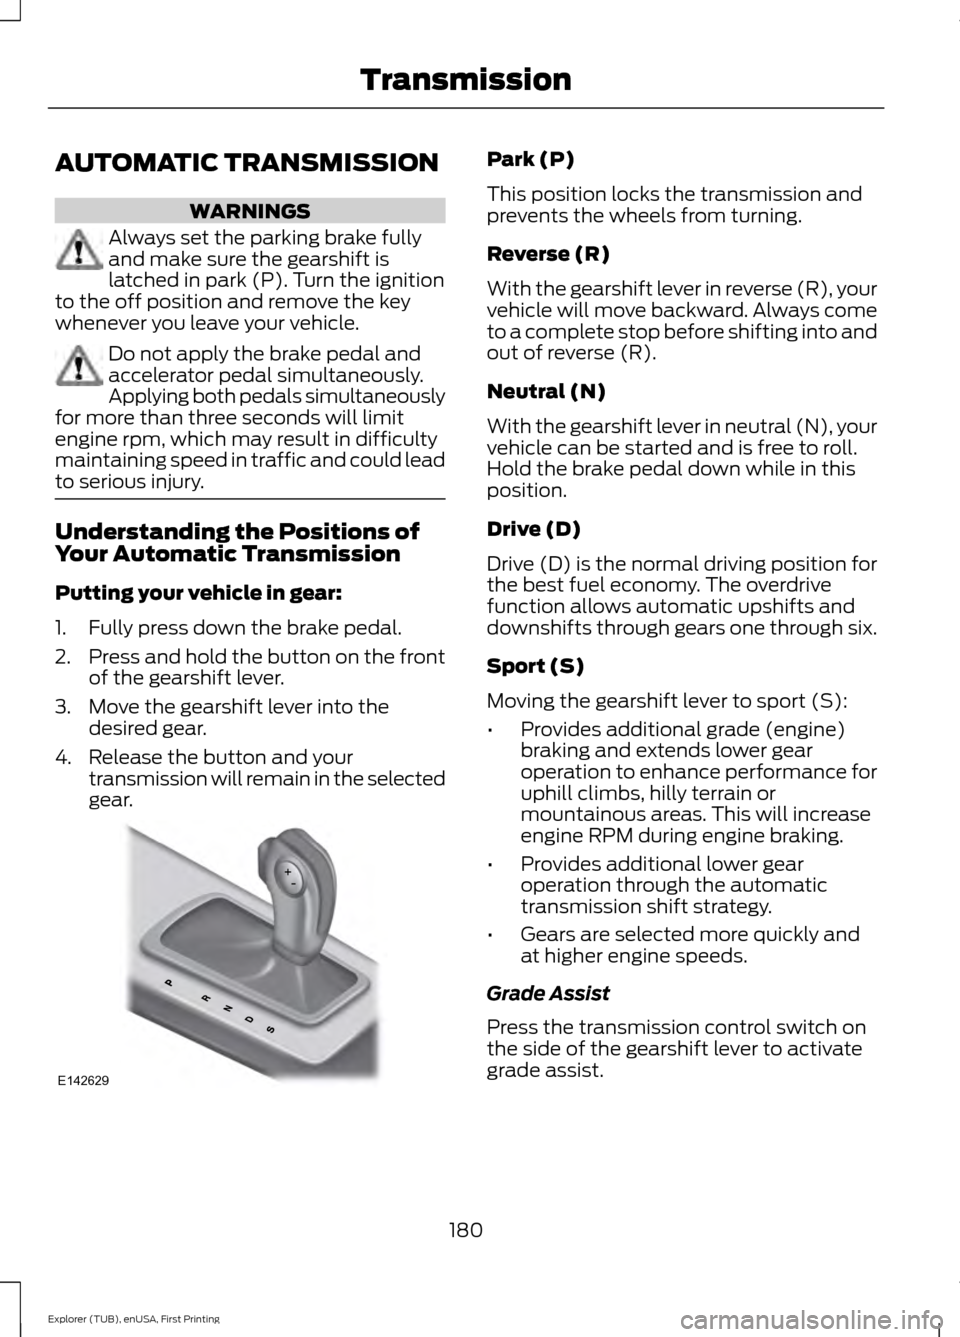
AUTOMATIC TRANSMISSION
WARNINGS
Always set the parking brake fully
and make sure the gearshift is
latched in park (P). Turn the ignition
to the off position and remove the key
whenever you leave your vehicle. Do not apply the brake pedal and
accelerator pedal simultaneously.
Applying both pedals simultaneously
for more than three seconds will limit
engine rpm, which may result in difficulty
maintaining speed in traffic and could lead
to serious injury. Understanding the Positions of
Your Automatic Transmission
Putting your vehicle in gear:
1. Fully press down the brake pedal.
2.
Press and hold the button on the front
of the gearshift lever.
3. Move the gearshift lever into the desired gear.
4. Release the button and your transmission will remain in the selected
gear. Park (P)
This position locks the transmission and
prevents the wheels from turning.
Reverse (R)
With the gearshift lever in reverse (R), your
vehicle will move backward. Always come
to a complete stop before shifting into and
out of reverse (R).
Neutral (N)
With the gearshift lever in neutral (N), your
vehicle can be started and is free to roll.
Hold the brake pedal down while in this
position.
Drive (D)
Drive (D) is the normal driving position for
the best fuel economy. The overdrive
function allows automatic upshifts and
downshifts through gears one through six.
Sport (S)
Moving the gearshift lever to sport (S):
•
Provides additional grade (engine)
braking and extends lower gear
operation to enhance performance for
uphill climbs, hilly terrain or
mountainous areas. This will increase
engine RPM during engine braking.
• Provides additional lower gear
operation through the automatic
transmission shift strategy.
• Gears are selected more quickly and
at higher engine speeds.
Grade Assist
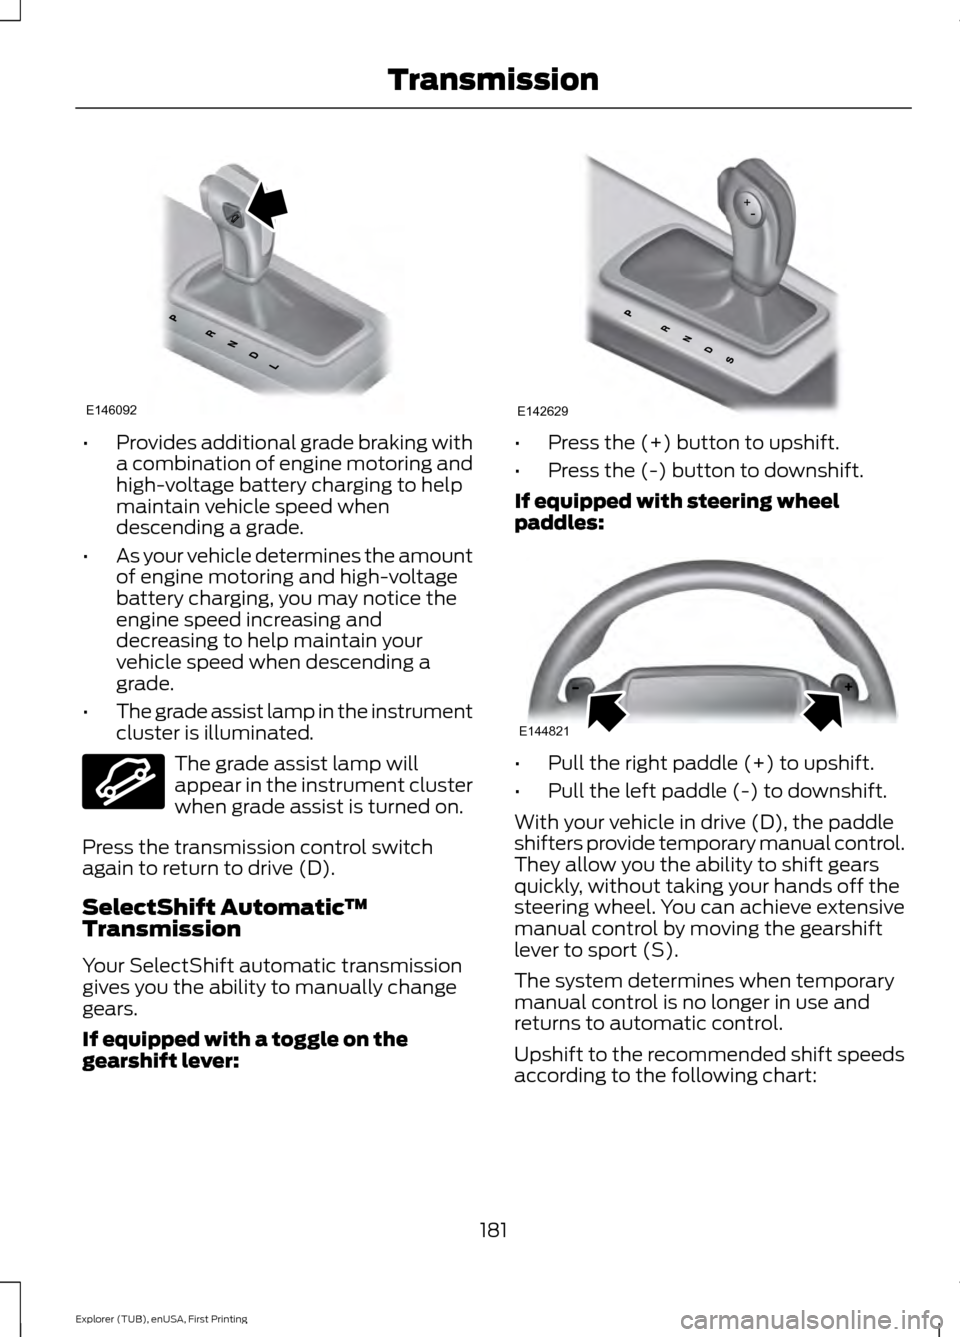
Press the transmission control switch on
the side of the gearshift lever to activate
grade assist.
180
Explorer (TUB), enUSA, First Printing TransmissionE142629
Page 184 of 541
•
Provides additional grade braking with
a combination of engine motoring and
high-voltage battery charging to help
maintain vehicle speed when
descending a grade.
• As your vehicle determines the amount
of engine motoring and high-voltage
battery charging, you may notice the
engine speed increasing and
decreasing to help maintain your
vehicle speed when descending a
grade.
• The grade assist lamp in the instrument
cluster is illuminated. The grade assist lamp will
appear in the instrument cluster
when grade assist is turned on.
Press the transmission control switch
again to return to drive (D).
SelectShift Automatic ™
Transmission
Your SelectShift automatic transmission
gives you the ability to manually change
gears.
If equipped with a toggle on the
gearshift lever: •
Press the (+) button to upshift.
• Press the (-) button to downshift.
If equipped with steering wheel
paddles: •
Pull the right paddle (+) to upshift.
• Pull the left paddle (-) to downshift.
With your vehicle in drive (D), the paddle
shifters provide temporary manual control.
They allow you the ability to shift gears
quickly, without taking your hands off the
steering wheel. You can achieve extensive
manual control by moving the gearshift
lever to sport (S).
The system determines when temporary
manual control is no longer in use and
returns to automatic control.
Upshift to the recommended shift speeds
according to the following chart:
181
Explorer (TUB), enUSA, First Printing TransmissionE146092 E144523 E142629 E144821