hood open FORD EXPLORER 2016 5.G Owners Manual
[x] Cancel search | Manufacturer: FORD, Model Year: 2016, Model line: EXPLORER, Model: FORD EXPLORER 2016 5.GPages: 541, PDF Size: 6.51 MB
Page 7 of 541
Trailer Sway Control...................................244
Recommended Towing Weights...........244
Essential Towing Checks..........................246
Transporting the Vehicle
..........................248
Towing the Vehicle on Four Wheels - 2.3L EcoBoost™......................................249
Towing the Vehicle on Four Wheels - 3.5L Duratec/
3.5L Ecoboost™..........250
Driving Hints
Breaking-In.....................................................252
Economical Driving
.....................................252
Driving Through Water...............................253
Floor Mats
.......................................................253
Roadside Emergencies
Roadside Assistance..................................255
Hazard Warning Flashers.........................256
Fuel Shutoff...................................................256
Jump Starting the Vehicle.........................257
Post-Crash Alert System..........................259
Customer Assistance
Getting the Services You Need..............260
In California (U.S. Only).............................261
The Better Business Bureau (BBB) Auto Line Program (U.S. Only)......................262
Utilizing the Mediation/Arbitration Program (Canada Only).......................262
Getting Assistance Outside the U.S. and Canada........................................................263
Ordering Additional Owner's Literature....................................................264
Reporting Safety Defects (U.S. Only)............................................................264
Reporting Safety Defects (Canada Only)............................................................265
Fuses
Fuse Specification Chart..........................266
Changing a Fuse
...........................................274 Maintenance
General Information....................................275
Opening and Closing the Hood..............276
Under Hood Overview -
2.3L
EcoBoost™................................................278
Under Hood Overview -
3.5L
Duratec........................................................279
Under Hood Overview -
3.5L
Ecoboost™...............................................280
Engine Oil Dipstick -
2.3L
EcoBoost™.................................................281
Engine Oil Dipstick -
3.5L Duratec/3.5L
Ecoboost™.................................................281
Engine Oil Check...........................................281
Oil Change Indicator Reset......................282
Engine Coolant Check...............................282
Automatic Transmission Fluid Check - 2.3L EcoBoost™......................................286
Automatic Transmission Fluid Check - 3.5L Duratec/
3.5L Ecoboost™..........286
Brake Fluid Check........................................288
Power Steering Fluid Check....................288
Washer Fluid Check
....................................288
Fuel Filter
........................................................289
Changing the 12V Battery.........................289
Checking the Wiper Blades.....................290
Changing the Wiper Blades......................291
Adjusting the Headlamps..........................291
Removing a Headlamp..............................293
Changing a Bulb
...........................................293
Bulb Specification Chart...........................297
Changing the Engine Air Filter................299
Vehicle Care
General Information
..................................300
Cleaning Products
......................................300
Cleaning the Exterior
.................................300
Waxing
..............................................................301
Cleaning the Engine
....................................301
Cleaning the Windows and Wiper Blades..........................................................302
4
Explorer (TUB), enUSA, First Printing Table of Contents
Page 32 of 541
WARNINGS
manufacturer. A safety seat that is
improperly installed or utilized, is
inappropriate for your child's height, age,
or weight or does not properly fit the child
may increase the risk of serious injury or
death. Never let a passenger hold a child on
his or her lap while your vehicle is
moving. The passenger cannot
protect the child from injury in a crash,
which may result in serious injury or death. Never use pillows, books, or towels
to boost a child. They can slide
around and increase the likelihood
of injury or death in a crash. WARNINGS
Always restrain an unoccupied child
seat or booster seat. These objects
may become projectiles in a crash or
sudden stop, which may increase the risk
of serious injury. Never place, or allow a child to place,
the shoulder belt under a child's arm
or behind the back because it
reduces the protection for the upper part
of the body and may increase the risk of
injury or death in a crash. To avoid risk of injury, do not leave
children or pets unattended in your
vehicle.
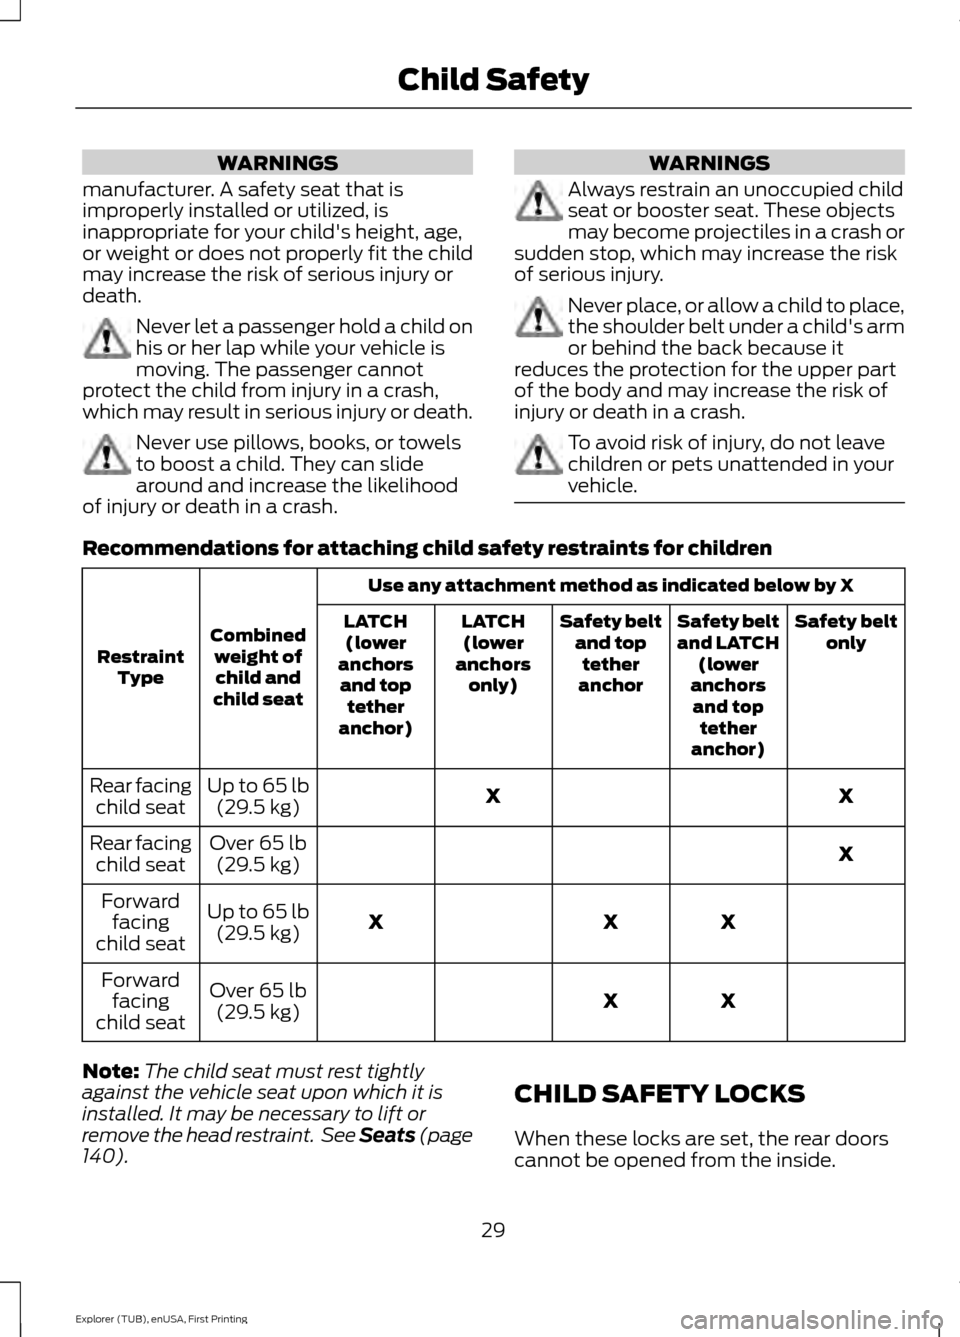
Recommendations for attaching child safety restraints for children
Use any attachment method as indicated below by X
Combined weight ofchild and
child seat
Restraint
Type Safety belt
only
Safety belt
and LATCH
(lower
anchors and top tether
anchor)
Safety belt
and toptether
anchor
LATCH
(lower
anchors only)
LATCH
(lower
anchors and top tether
anchor)
X
X
Up to 65 lb
(29.5 kg)
Rear facing
child seat
X
Over
65 lb
(29.5 kg)
Rear facing
child seat
X
X
X
Up to
65 lb
(29.5 kg)
Forward
facing
child seat
X
X
Over
65 lb
(29.5 kg)
Forward
facing
child seat
Note: The child seat must rest tightly
against the vehicle seat upon which it is
installed. It may be necessary to lift or
remove the head restraint. See Seats (page
140
). CHILD SAFETY LOCKS
When these locks are set, the rear doors
cannot be opened from the inside.
29
Explorer (TUB), enUSA, First Printing Child Safety
Page 49 of 541
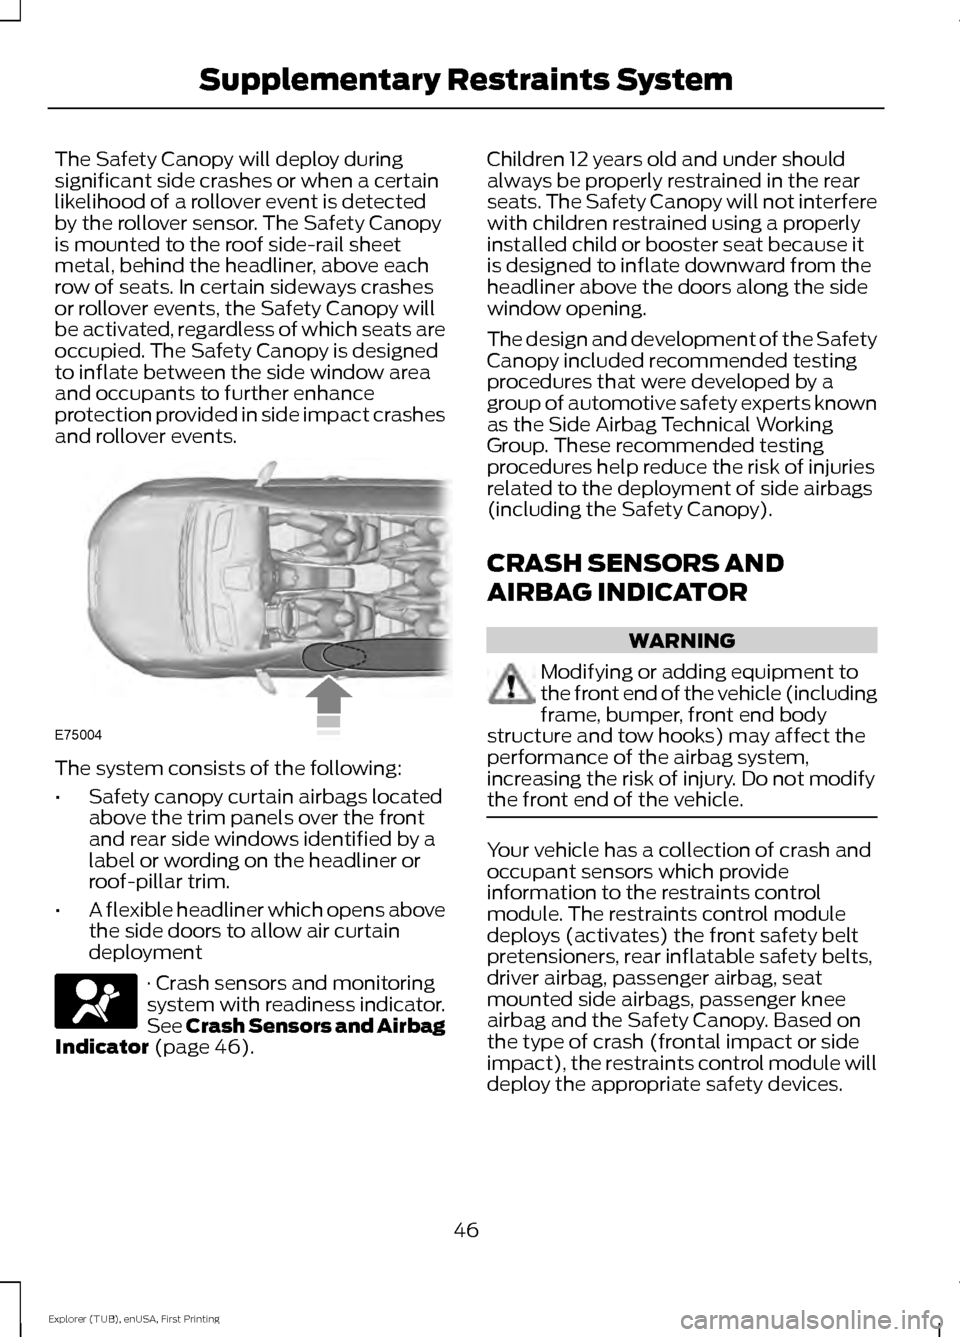
The Safety Canopy will deploy during
significant side crashes or when a certain
likelihood of a rollover event is detected
by the rollover sensor. The Safety Canopy
is mounted to the roof side-rail sheet
metal, behind the headliner, above each
row of seats. In certain sideways crashes
or rollover events, the Safety Canopy will
be activated, regardless of which seats are
occupied. The Safety Canopy is designed
to inflate between the side window area
and occupants to further enhance
protection provided in side impact crashes
and rollover events.
The system consists of the following:
•
Safety canopy curtain airbags located
above the trim panels over the front
and rear side windows identified by a
label or wording on the headliner or
roof-pillar trim.
• A flexible headliner which opens above
the side doors to allow air curtain
deployment · Crash sensors and monitoring
system with readiness indicator.
See Crash Sensors and Airbag
Indicator (page 46). Children 12 years old and under should
always be properly restrained in the rear
seats. The Safety Canopy will not interfere
with children restrained using a properly
installed child or booster seat because it
is designed to inflate downward from the
headliner above the doors along the side
window opening.
The design and development of the Safety
Canopy included recommended testing
procedures that were developed by a
group of automotive safety experts known
as the Side Airbag Technical Working
Group. These recommended testing
procedures help reduce the risk of injuries
related to the deployment of side airbags
(including the Safety Canopy).
CRASH SENSORS AND
AIRBAG INDICATOR
WARNING
Modifying or adding equipment to
the front end of the vehicle (including
frame, bumper, front end body
structure and tow hooks) may affect the
performance of the airbag system,
increasing the risk of injury. Do not modify
the front end of the vehicle. Your vehicle has a collection of crash and
occupant sensors which provide
information to the restraints control
module. The restraints control module
deploys (activates) the front safety belt
pretensioners, rear inflatable safety belts,
driver airbag, passenger airbag, seat
mounted side airbags, passenger knee
airbag and the Safety Canopy. Based on
the type of crash (frontal impact or side
impact), the restraints control module will
deploy the appropriate safety devices.
46
Explorer (TUB), enUSA, First Printing Supplementary Restraints SystemE75004
Page 55 of 541
Press the unlock button on a linked remote
control to recall the memory positions. If
you enable the easy-entry-and-exit
feature, the seat moves to the easy-entry
position. The seat moves to the driver
memory position when you put the key in
the ignition.
Linking a Preset Position to your
Remote Control or Intelligent Access
Key Fob
See Memory Function (page 146).
Car Finder Press the button twice within
three seconds. The horn sounds
and the direction indicators
flash. We recommend you use this method
to locate your vehicle, rather than using
the panic alarm.
Sounding a Panic Alarm
Note: The panic alarm only operates when
the ignition is off. Press the button to activate the
alarm. Press the button again or
switch the ignition on to
deactivate.
Remote Start
(If Equipped) WARNING
To avoid exhaust fumes, do not use
remote start if your vehicle is parked
indoors or areas that are not well
ventilated. Note:
Do not use remote start if your vehicle
is low on fuel. The remote start button is on the
transmitter. This feature allows you to start your
vehicle from outside the vehicle. The
transmitter has an extended operating
range.
You can configure vehicles with automatic
climate control to turn on the automatic
climate control when you remote start your
vehicle. See Automatic Climate Control
(page
131). A manual climate control
system runs at the setting you set it to
when you switched off the vehicle.
Many states and provinces restrict the use
of remote start. Check your local and state
or provincial laws for specific requirements
regarding remote start systems.
The remote start system does not work if:
• The ignition is on.
• The alarm system triggers.
• You disable the feature.
• The hood is open.
• The transmission is not in
P.
• The vehicle battery voltage is too low.
• The service engine soon light is on.
Remote Control Feedback
An LED on the remote control provides
status feedback of remote start or stop
commands. Status
LED
Remote start orextension
successful
Solid green
Remote stop
successful; vehicle off
Solid red
Remote start orstop failed
Blinking red
Waiting for statusupdate
Blinking green
52
Explorer (TUB), enUSA, First Printing Keys and Remote ControlsE138623 E138624 E138625
Page 63 of 541
LOCKING AND UNLOCKING
You can use the power door lock control
or the remote control to lock and unlock
your vehicle.
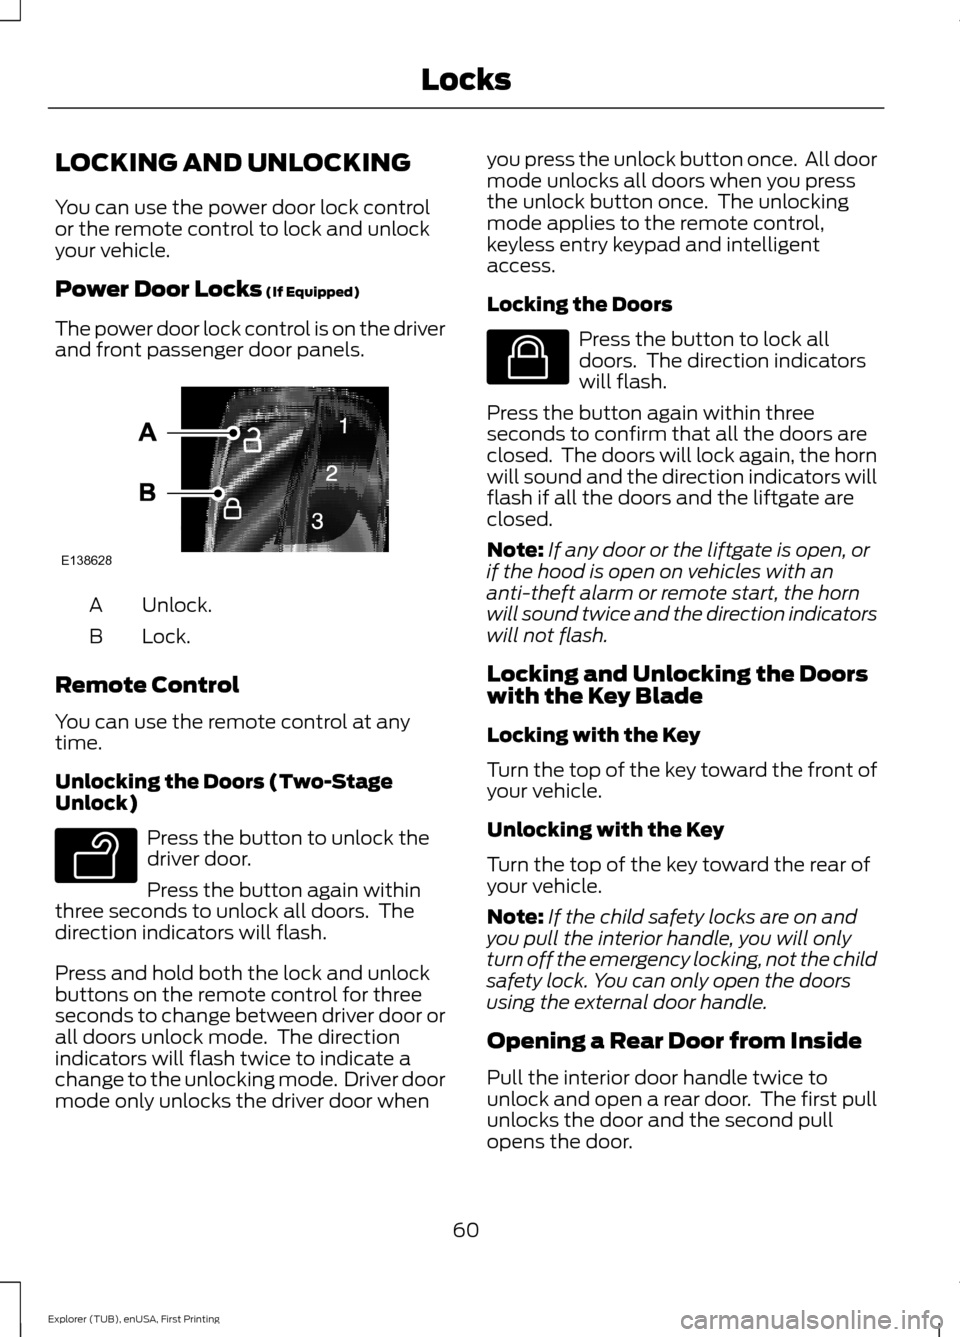
Power Door Locks (If Equipped)
The power door lock control is on the driver
and front passenger door panels. Unlock.
A
Lock.
B
Remote Control
You can use the remote control at any
time.
Unlocking the Doors (Two-Stage
Unlock) Press the button to unlock the
driver door.
Press the button again within
three seconds to unlock all doors. The
direction indicators will flash.
Press and hold both the lock and unlock
buttons on the remote control for three
seconds to change between driver door or
all doors unlock mode. The direction
indicators will flash twice to indicate a
change to the unlocking mode. Driver door
mode only unlocks the driver door when you press the unlock button once. All door
mode unlocks all doors when you press
the unlock button once. The unlocking
mode applies to the remote control,
keyless entry keypad and intelligent
access.
Locking the Doors
Press the button to lock all
doors. The direction indicators
will flash.
Press the button again within three
seconds to confirm that all the doors are
closed. The doors will lock again, the horn
will sound and the direction indicators will
flash if all the doors and the liftgate are
closed.
Note: If any door or the liftgate is open, or
if the hood is open on vehicles with an
anti-theft alarm or remote start, the horn
will sound twice and the direction indicators
will not flash.
Locking and Unlocking the Doors
with the Key Blade
Locking with the Key
Turn the top of the key toward the front of
your vehicle.
Unlocking with the Key
Turn the top of the key toward the rear of
your vehicle.
Note: If the child safety locks are on and
you pull the interior handle, you will only
turn off the emergency locking, not the child
safety lock. You can only open the doors
using the external door handle.
Opening a Rear Door from Inside
Pull the interior door handle twice to
unlock and open a rear door. The first pull
unlocks the door and the second pull
opens the door.
60
Explorer (TUB), enUSA, First Printing LocksE138628 E138629 E138623
Page 74 of 541
You must have two previously
programmed coded keys and the new
unprogrammed key readily accessible. See
your authorized dealer to have the spare
key programmed if two previously
programmed coded keys are not available.
Read and understand the entire procedure
before you begin.
1.
Insert the first previously programmed
coded key into the ignition.
2. Switch the ignition from off to on. Keep
the ignition on for at least three
seconds, but no more than 10 seconds.
3. Switch the ignition off and remove the
first coded key from the ignition.
4. After three seconds but within 10 seconds of switching the ignition off,
insert the second previously coded key
into the ignition.
5. Switch the ignition from off to on. Keep
the ignition on for at least three
seconds, but no more than 10 seconds.
6. Switch the ignition off and remove the
second previously programmed coded
key from the ignition.
7. After three seconds but within 10 seconds of switching the ignition off
and removing the previously
programmed coded key, insert the new
unprogrammed key into the ignition.
8. Switch the ignition from off to on. Keep
the ignition on for at least six seconds.
9. Remove the newly programmed coded
key from the ignition.
If the key has been successfully
programmed it will start the engine and
operate the remote entry system (if the
new key is an integrated keyhead
transmitter).
If programming was not successful, wait
10 seconds and repeat Steps 1 through 8.
If you are still unsuccessful, take your
vehicle to your authorized dealer. Programming a Spare Intelligent
Access Key
See your authorized dealer to have
additional keys programmed to your
vehicle.
ANTI-THEFT ALARM
The system will warn you of an
unauthorized entry to your vehicle. It will
be triggered if any door, the luggage
compartment or the hood is opened
without using the key, remote control or
keyless entry keypad.
The direction indicators will flash and the
horn will sound if unauthorized entry is
attempted while the alarm is armed.
Take all remote controls to an authorized
dealer if there is any potential alarm
problem with your vehicle.
Arming the Alarm
The alarm is ready to arm when there is
not a key in your vehicle. Electronically lock
your vehicle to arm the alarm.
Disarming the Alarm
Disarm the alarm by any of the following
actions:
•
Unlock the doors or luggage
compartment with the remote control
or keyless entry keypad.
• Switch your vehicle on or start your
vehicle.
• Use a key in the driver door to unlock
your vehicle, then switch your vehicle
on within 12 seconds.
Note: Pressing the panic button on the
remote control will stop the horn and signal
indicators, but will not disarm the system.
71
Explorer (TUB), enUSA, First Printing Security
Page 172 of 541
3.
Press and hold the push button ignition
switch, or press it three times within
two seconds.
4. Apply the parking brake.
Guarding Against Exhaust Fumes WARNING
If you smell exhaust fumes inside
your vehicle, have your vehicle
checked by your authorized dealer
immediately. Do not drive your vehicle if
you smell exhaust fumes. Carbon
monoxide is present in exhaust fumes.
Take precautions to avoid its dangerous
effects. Important Ventilating Information
If you stop your vehicle and then leave the
engine idling for long periods, we
recommend that you do one of the
following:
•
Open the windows at least 1 in (3 cm).
• Set your climate control to outside air.
ENGINE BLOCK HEATER (If
Equipped) WARNINGS
Failure to follow engine block heater
instructions could result in property
damage or serious personal injury.
Do not use your heater with
ungrounded electrical systems or
two-pronged adapters. There is a risk
of electrical shock. Do not fully close the hood, or allow
it to drop under its own weight when
using the engine block heater. This
could damage the power cable and may
cause an electrical short resulting in fire,
injury and property damage. Note:
The heater is most effective when
outdoor temperatures are below 0°F
(-18°C).
The heater acts as a starting aid by
warming the engine coolant. This allows
the climate control system to respond
quickly. The equipment includes a heater
element (installed in the engine block) and
a wire harness. You can connect the
system to a grounded 120-volt AC
electrical source.
We recommend that you do the following
for a safe and correct operation:
• Use a 16-gauge outdoor extension cord
that is product certified by
Underwriter ’s Laboratory (UL) or
Canadian Standards Association
(CSA). This extension cord must be
suitable for use outdoors, in cold
temperatures, and be clearly marked
Suitable for Use with Outdoor
Appliances. Do not use an indoor
extension cord outdoors. This could
result in an electric shock or become a
fire hazard.
• Use as short an extension cord as
possible.
• Do not use multiple extension cords.
• Make sure that when in operation, the
extension cord plug and heater cord
plug connections are free and clear of
water. This could cause an electric
shock or fire.
• Make sure your vehicle is parked in a
clean area, clear of combustibles.
• Make sure the heater, heater cord and
extension cord are firmly connected.
• Check for heat anywhere in the
electrical hookup once the system has
been operating for approximately 30
minutes.
169
Explorer (TUB), enUSA, First Printing Starting and Stopping the Engine
Page 279 of 541
OPENING AND CLOSING THE
HOOD
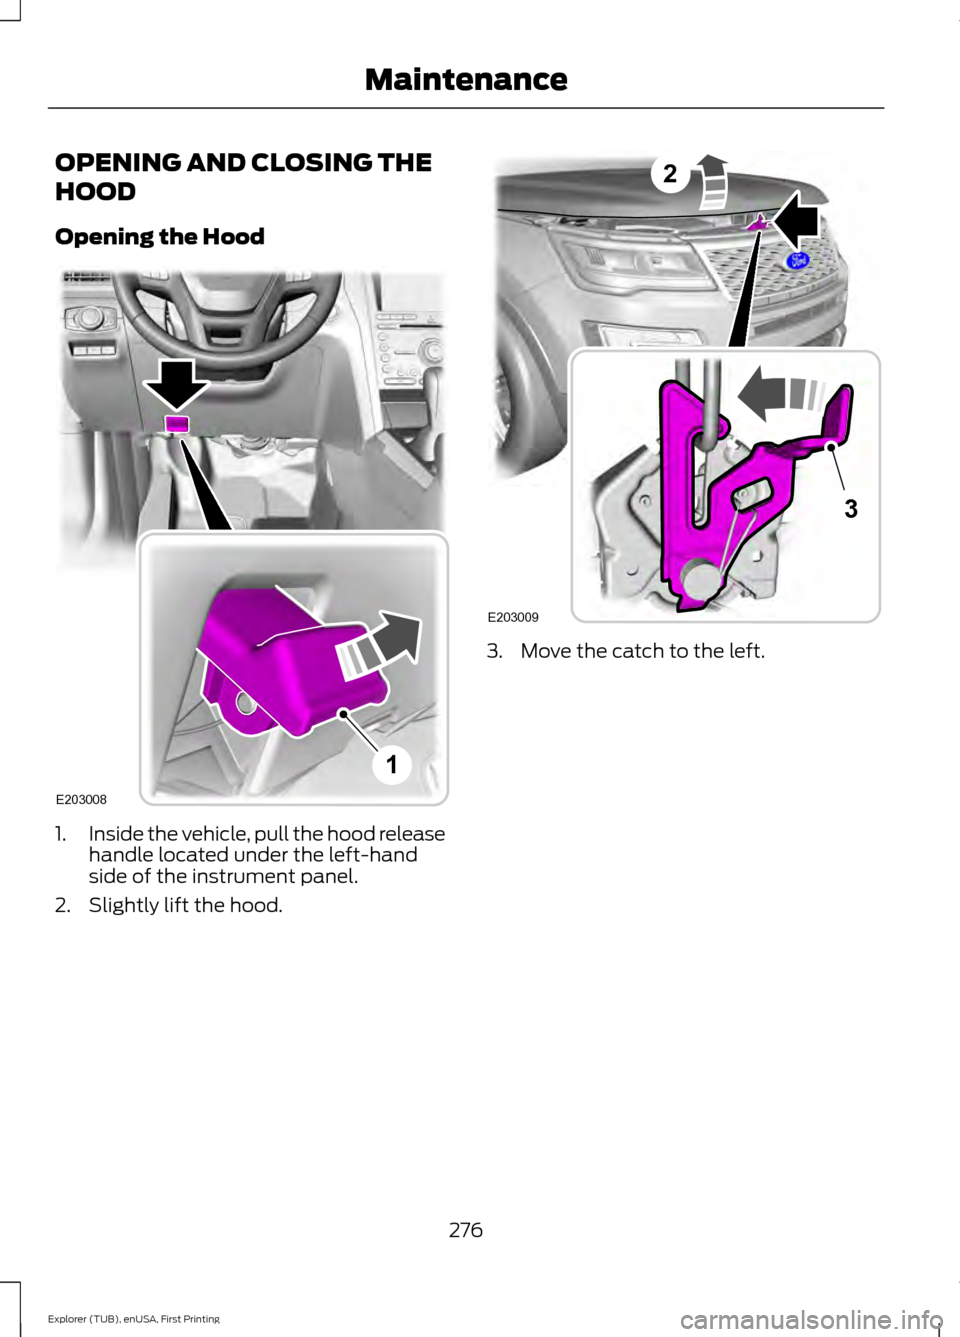
Opening the Hood
1.
Inside the vehicle, pull the hood release
handle located under the left-hand
side of the instrument panel.
2. Slightly lift the hood. 3. Move the catch to the left.
276
Explorer (TUB), enUSA, First Printing MaintenanceE203008
1 2
E203009
3
Page 280 of 541
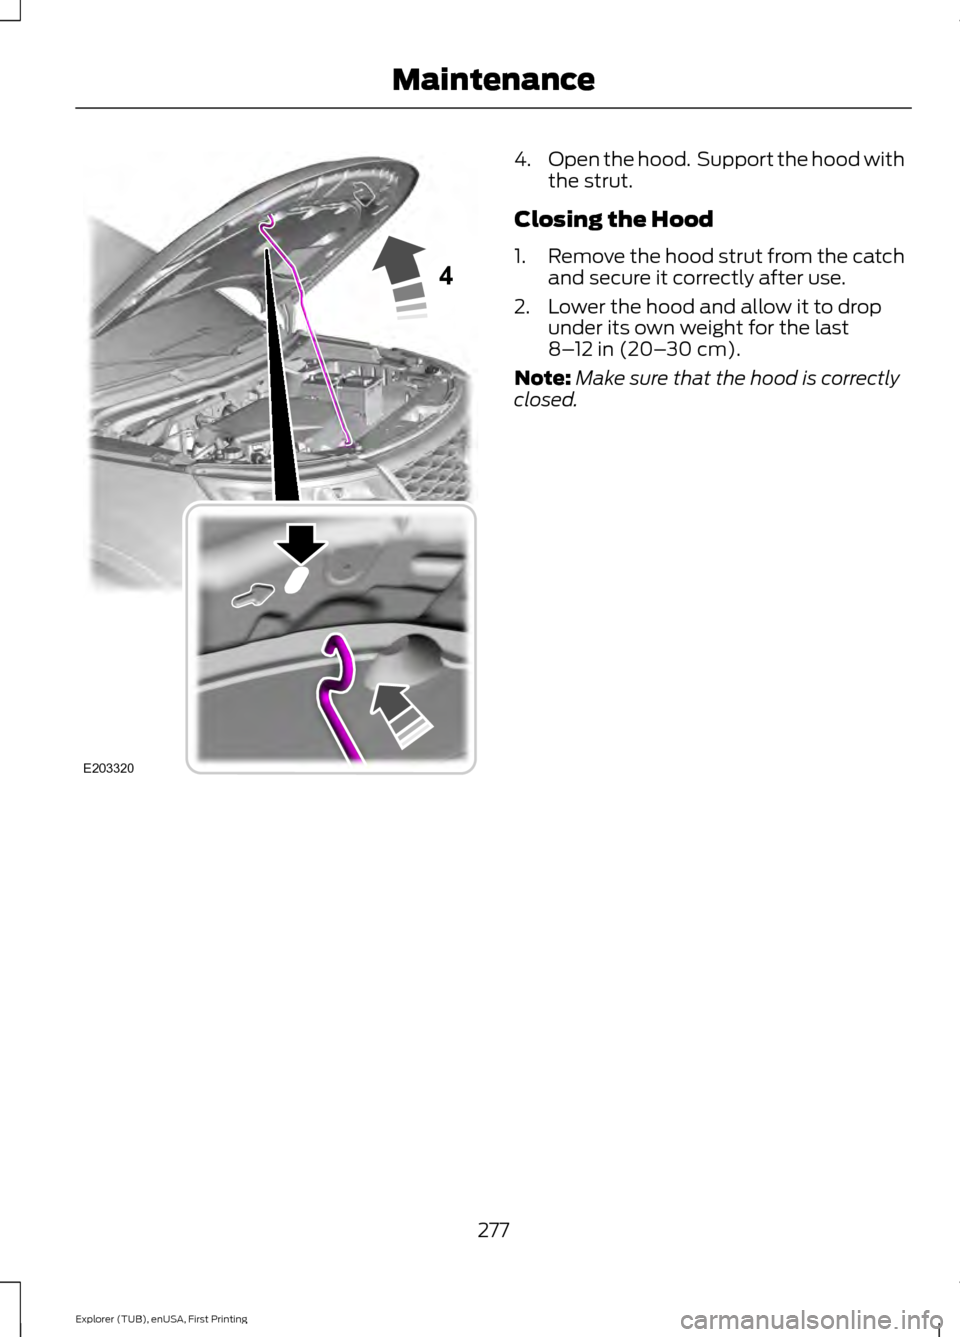
4.
Open the hood. Support the hood with
the strut.
Closing the Hood
1. Remove the hood strut from the catch
and secure it correctly after use.
2. Lower the hood and allow it to drop under its own weight for the last
8–12 in (20– 30 cm).
Note: Make sure that the hood is correctly
closed.
277
Explorer (TUB), enUSA, First Printing Maintenance4
E203320
Page 295 of 541
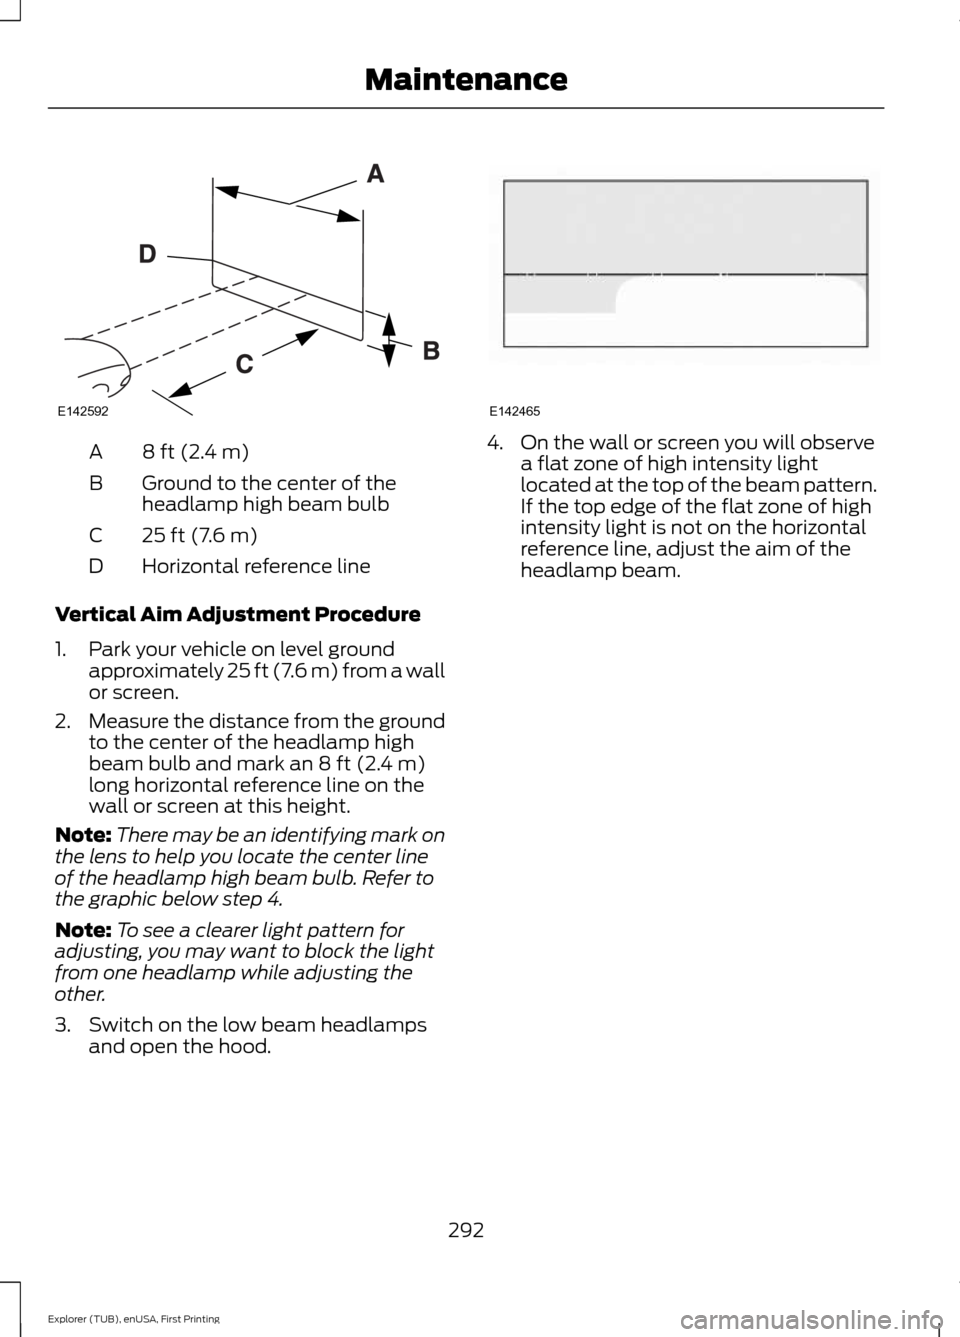
8 ft (2.4 m)
A
Ground to the center of the
headlamp high beam bulb
B
25 ft (7.6 m)
C
Horizontal reference line
D
Vertical Aim Adjustment Procedure
1. Park your vehicle on level ground approximately 25 ft (7.6 m) from a wall
or screen.
2. Measure the distance from the ground
to the center of the headlamp high
beam bulb and mark an 8 ft (2.4 m)
long horizontal reference line on the
wall or screen at this height.
Note: There may be an identifying mark on
the lens to help you locate the center line
of the headlamp high beam bulb. Refer to
the graphic below step 4.
Note: To see a clearer light pattern for
adjusting, you may want to block the light
from one headlamp while adjusting the
other.
3. Switch on the low beam headlamps and open the hood. 4. On the wall or screen you will observe
a flat zone of high intensity light
located at the top of the beam pattern.
If the top edge of the flat zone of high
intensity light is not on the horizontal
reference line, adjust the aim of the
headlamp beam.
292
Explorer (TUB), enUSA, First Printing MaintenanceE142592 E142465