lights FORD EXPLORER 2016 5.G Owners Manual
[x] Cancel search | Manufacturer: FORD, Model Year: 2016, Model line: EXPLORER, Model: FORD EXPLORER 2016 5.GPages: 541, PDF Size: 6.51 MB
Page 42 of 541
The Personal Safety System provides an
improved overall level of frontal crash
protection to front seat occupants and is
designed to help further reduce the risk of
airbag-related injuries. The system is able
to analyze different occupant conditions
and crash severity before activating the
appropriate safety devices to help better
protect a range of occupants in a variety
of frontal crash situations.
Your vehicle's Personal Safety System
consists of:
•
Driver and passenger dual-stage airbag
supplemental restraints.
• Front seat outboard safety belts with
pretensioners, energy management
retractors (first row only) and safety
belt usage sensors.
• Driver seat position sensor.
• Front passenger sensing system.
• Passenger airbag off and on indicator
lamp.
• Front crash severity sensors.
• Restraints control module with impact
and safing sensors.
• Restraint system warning light and
backup tone.
• The electrical wiring for the airbags,
crash sensors, safety belt
pretensioners, front safety belt usage
sensors, driver seat position sensor,
front passenger sensing system and
indicator lights. How Does the Personal Safety
System Work?
The Personal Safety System can adapt the
deployment strategy of the safety devices
according to crash severity and occupant
conditions. A collection of crash and
occupant sensors provides information to
the restraints control module. During a
crash, the restraints control module may
deploy the safety belt pretensioners, one
or both stages of the dual-stage airbags
based on crash severity and occupant
conditions.
39
Explorer (TUB), enUSA, First Printing Personal Safety System
™
Page 86 of 541
Type 1 - Conventional (Non-
Configurable)
The daytime running lamps turn on when:
1. The ignition is switched to the on
position.
2. The transmission is not in park (P) for vehicles with automatic transmissions
or the parking brake is released for
vehicles with manual transmissions.
3. The lighting control is in the off, parking
lamp or autolamps positions.
Type 2 - Configurable
Switch the daytime running lamps on or
off using the information display controls.
See Information Displays (page 101).
The daytime running lamps turn on when:
1. They are switched on in the information
display. See
Information Displays
(page 101).
2. The ignition is switched to the on position.
3. The transmission is not in park (P) for vehicles with automatic transmissions
or the parking brake is released for
vehicles with manual transmissions.
4. The lighting control is in the autolamps
position.
5. The lighting control sensor detects daylight, and the headlamps or parking
lamps are off.
The other lighting control switch positions
do not activate the daytime running lamps,
and you can use them to temporarily
override autolamp control.
When switched off in the information
display, the daytime running lamps are off
in all lighting control switch positions. AUTOMATIC HIGH BEAM
CONTROL
(If Equipped)
The system automatically turns on the high
beams if it is dark enough and no other
traffic is present. When it detects the
headlights of an approaching vehicle, the
tail lamps of the preceding vehicle or street
lighting, the system turns off the high
beams before they distract other drivers.
The low beams remain on.
Note: If it appears that automatic high
beam is not functioning properly, check the
windshield in front of the camera for a
blockage. A clear view of the road is required
for proper system operation. Make sure that
authorized personnel repair any windshield
damage in the area of the camera's field of
view.
Note: If the system detects a blockage such
as bird droppings, bug splatter, snow or ice,
and you do not observe changes, the system
may go into low beam mode until you clear
the blockage. A message may also appear
in the information display noting the front
camera is blocked.
Note: Typical road dust, dirt and water
spots do not affect the performance of the
automatic high beam control. However, in
cold or inclement weather conditions, you
may notice a decrease in the availability of
the automatic high beam control, especially
at start up. If you want to change the beam
state independently of the system, you may
switch the high beams on or off using the
lighting control switch. Automatic high
beam control resumes when conditions are
correct.
Note: Using much larger tires or equipping
vehicle accessories such as snowplows can
modify your vehicle's ride height and
degrade automatic high beam control
performance.
83
Explorer (TUB), enUSA, First Printing Lighting
Page 91 of 541
EXTERIOR MIRRORS
Power Exterior Mirrors
WARNING
Do not adjust the mirrors when your
vehicle is moving.
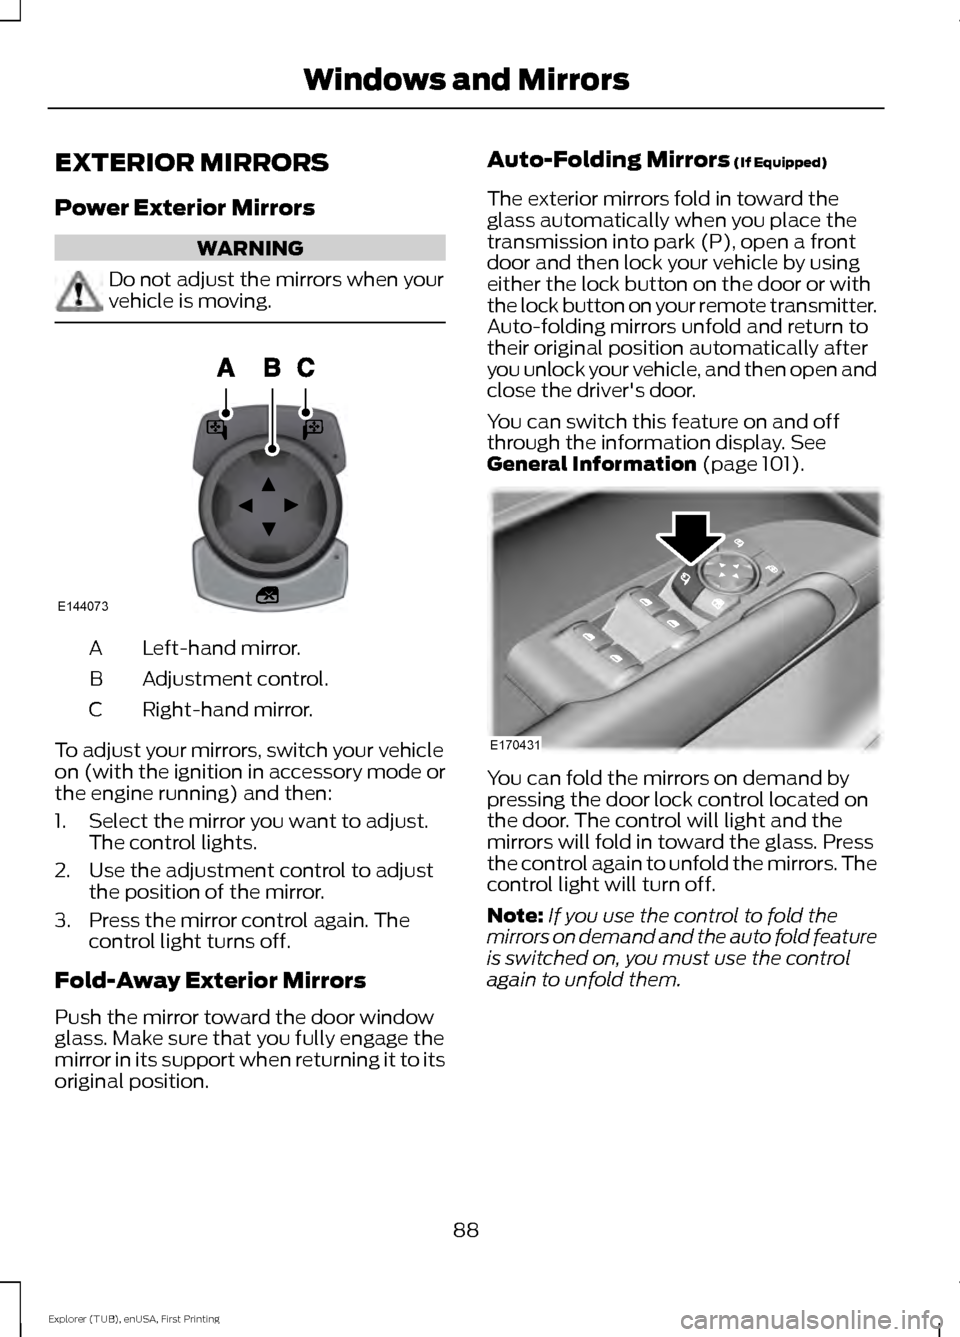
Left-hand mirror.
A
Adjustment control.
B
Right-hand mirror.
C
To adjust your mirrors, switch your vehicle
on (with the ignition in accessory mode or
the engine running) and then:
1. Select the mirror you want to adjust. The control lights.
2. Use the adjustment control to adjust the position of the mirror.
3. Press the mirror control again. The control light turns off.
Fold-Away Exterior Mirrors
Push the mirror toward the door window
glass. Make sure that you fully engage the
mirror in its support when returning it to its
original position. Auto-Folding Mirrors (If Equipped)
The exterior mirrors fold in toward the
glass automatically when you place the
transmission into park (P), open a front
door and then lock your vehicle by using
either the lock button on the door or with
the lock button on your remote transmitter.
Auto-folding mirrors unfold and return to
their original position automatically after
you unlock your vehicle, and then open and
close the driver's door.
You can switch this feature on and off
through the information display.
See
General Information (page 101). You can fold the mirrors on demand by
pressing the door lock control located on
the door. The control will light and the
mirrors will fold in toward the glass. Press
the control again to unfold the mirrors. The
control light will turn off.
Note:
If you use the control to fold the
mirrors on demand and the auto fold feature
is switched on, you must use the control
again to unfold them.
88
Explorer (TUB), enUSA, First Printing Windows and MirrorsE144073 E170431
Page 93 of 541
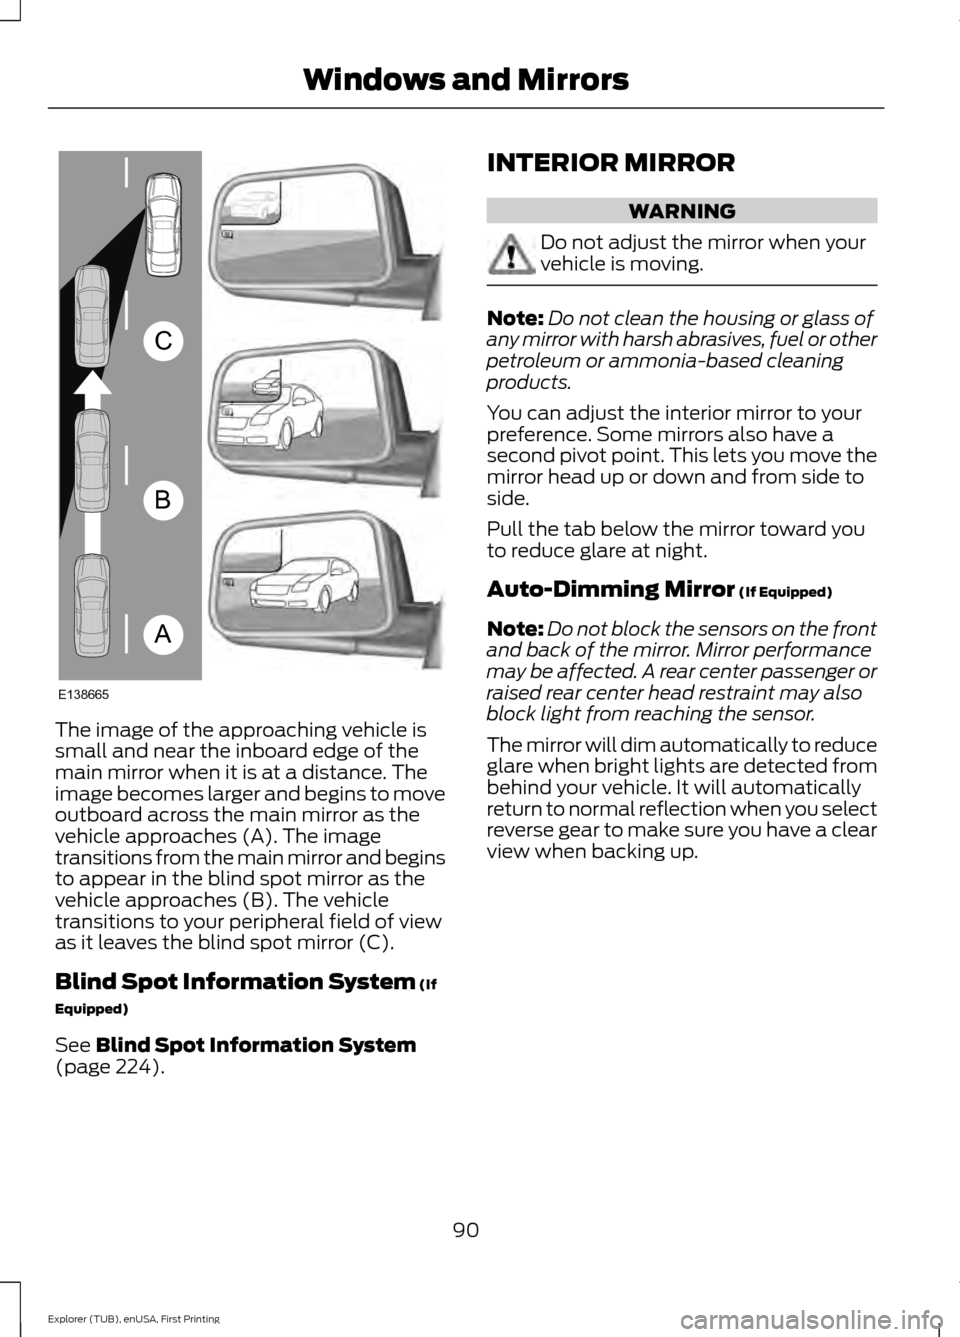
The image of the approaching vehicle is
small and near the inboard edge of the
main mirror when it is at a distance. The
image becomes larger and begins to move
outboard across the main mirror as the
vehicle approaches (A). The image
transitions from the main mirror and begins
to appear in the blind spot mirror as the
vehicle approaches (B). The vehicle
transitions to your peripheral field of view
as it leaves the blind spot mirror (C).
Blind Spot Information System (If
Equipped)
See
Blind Spot Information System
(page 224). INTERIOR MIRROR WARNING
Do not adjust the mirror when your
vehicle is moving.
Note:
Do not clean the housing or glass of
any mirror with harsh abrasives, fuel or other
petroleum or ammonia-based cleaning
products.
You can adjust the interior mirror to your
preference. Some mirrors also have a
second pivot point. This lets you move the
mirror head up or down and from side to
side.
Pull the tab below the mirror toward you
to reduce glare at night.
Auto-Dimming Mirror
(If Equipped)
Note: Do not block the sensors on the front
and back of the mirror. Mirror performance
may be affected. A rear center passenger or
raised rear center head restraint may also
block light from reaching the sensor.
The mirror will dim automatically to reduce
glare when bright lights are detected from
behind your vehicle. It will automatically
return to normal reflection when you select
reverse gear to make sure you have a clear
view when backing up.
90
Explorer (TUB), enUSA, First Printing Windows and MirrorsA
B
C
E138665
Page 101 of 541
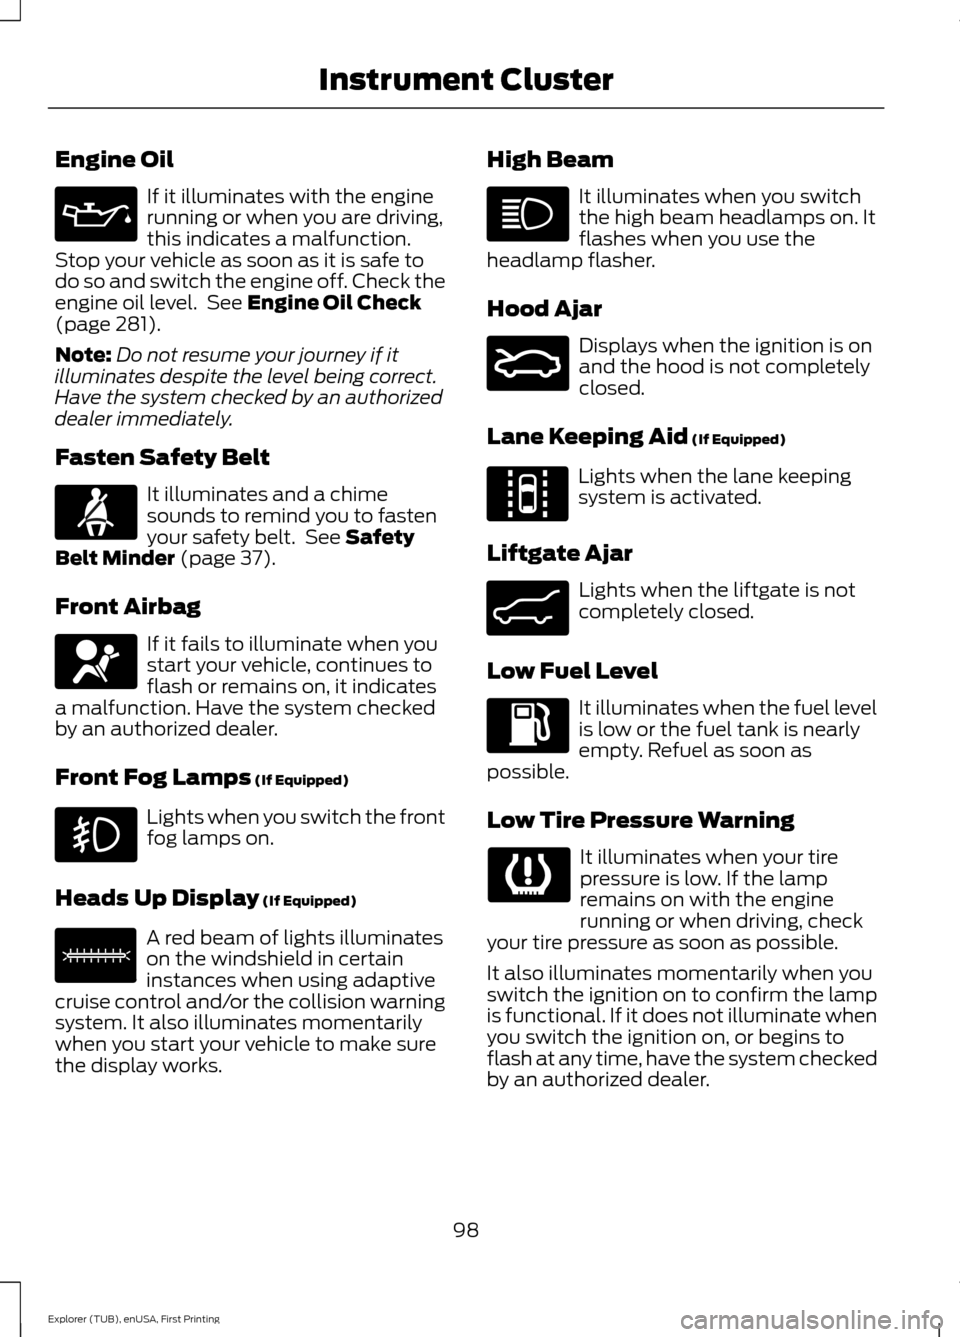
Engine Oil
If it illuminates with the engine
running or when you are driving,
this indicates a malfunction.
Stop your vehicle as soon as it is safe to
do so and switch the engine off. Check the
engine oil level. See Engine Oil Check
(page 281).
Note: Do not resume your journey if it
illuminates despite the level being correct.
Have the system checked by an authorized
dealer immediately.
Fasten Safety Belt It illuminates and a chime
sounds to remind you to fasten
your safety belt. See
Safety
Belt Minder (page 37).
Front Airbag If it fails to illuminate when you
start your vehicle, continues to
flash or remains on, it indicates
a malfunction. Have the system checked
by an authorized dealer.
Front Fog Lamps
(If Equipped) Lights when you switch the front
fog lamps on.
Heads Up Display
(If Equipped) A red beam of lights illuminates
on the windshield in certain
instances when using adaptive
cruise control and/or the collision warning
system. It also illuminates momentarily
when you start your vehicle to make sure
the display works. High Beam It illuminates when you switch
the high beam headlamps on. It
flashes when you use the
headlamp flasher.
Hood Ajar Displays when the ignition is on
and the hood is not completely
closed.
Lane Keeping Aid
(If Equipped) Lights when the lane keeping
system is activated.
Liftgate Ajar Lights when the liftgate is not
completely closed.
Low Fuel Level It illuminates when the fuel level
is low or the fuel tank is nearly
empty. Refuel as soon as
possible.
Low Tire Pressure Warning It illuminates when your tire
pressure is low. If the lamp
remains on with the engine
running or when driving, check
your tire pressure as soon as possible.
It also illuminates momentarily when you
switch the ignition on to confirm the lamp
is functional. If it does not illuminate when
you switch the ignition on, or begins to
flash at any time, have the system checked
by an authorized dealer.
98
Explorer (TUB), enUSA, First Printing Instrument Cluster E156133 E159324 E144813 E162453
Page 107 of 541
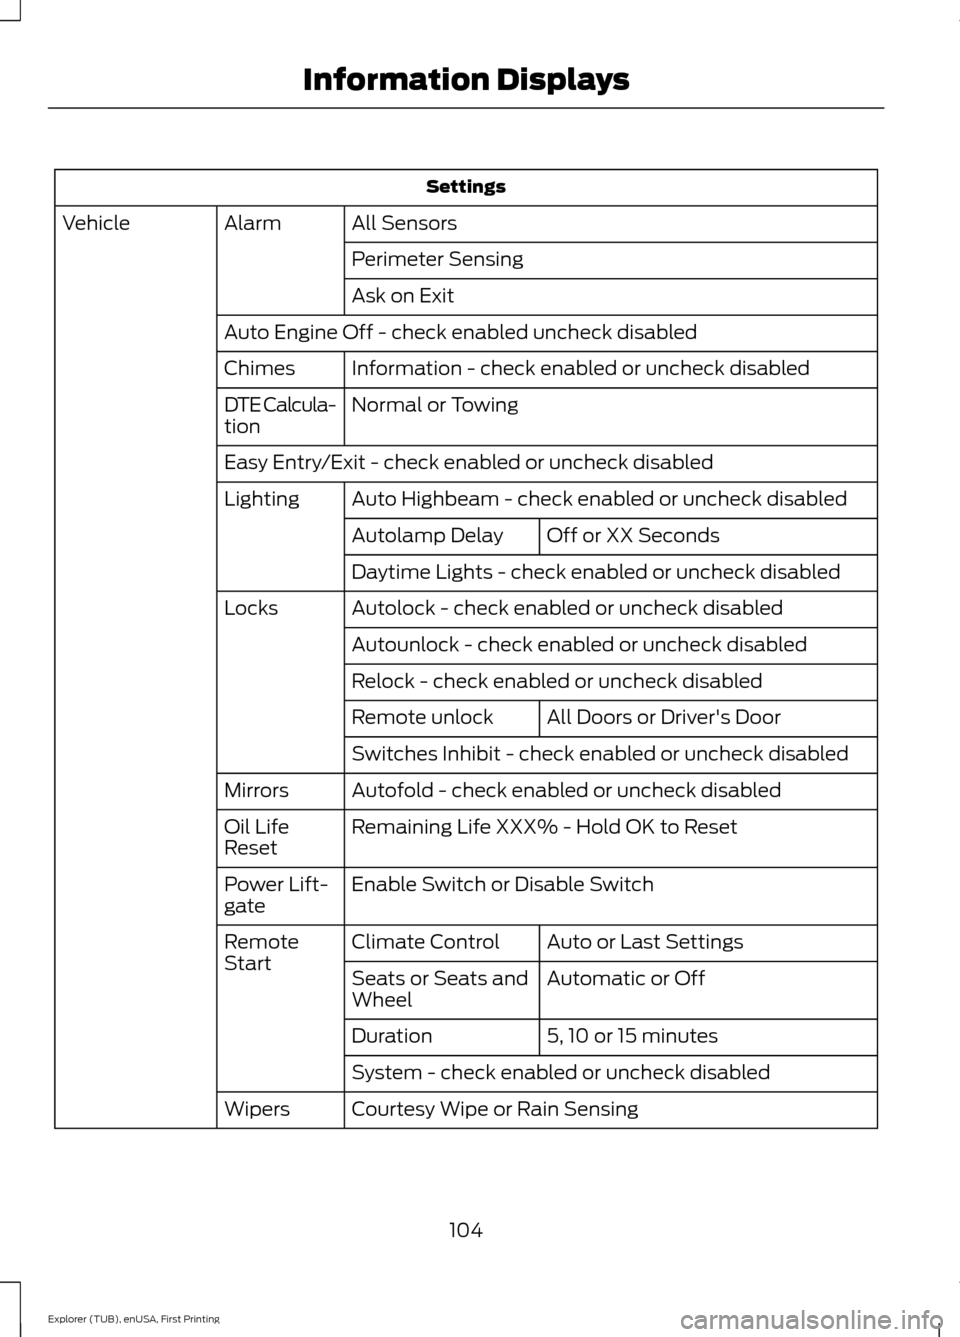
Settings
All Sensors
Alarm
Vehicle
Perimeter Sensing
Ask on Exit
Auto Engine Off - check enabled uncheck disabled Information - check enabled or uncheck disabled
Chimes
Normal or Towing
DTE Calcula-
tion
Easy Entry/Exit - check enabled or uncheck disabled
Auto Highbeam - check enabled or uncheck disabled
Lighting
Off or XX Seconds
Autolamp Delay
Daytime Lights - check enabled or uncheck disabled
Autolock - check enabled or uncheck disabled
Locks
Autounlock - check enabled or uncheck disabled
Relock - check enabled or uncheck disabled All Doors or Driver's Door
Remote unlock
Switches Inhibit - check enabled or uncheck disabled
Autofold - check enabled or uncheck disabled
Mirrors
Remaining Life XXX% - Hold OK to Reset
Oil Life
Reset
Enable Switch or Disable Switch
Power Lift-
gate
Auto or Last Settings
Climate Control
Remote
Start
Automatic or Off
Seats or Seats and
Wheel
5, 10 or 15 minutes
Duration
System - check enabled or uncheck disabled
Courtesy Wipe or Rain Sensing
Wipers
104
Explorer (TUB), enUSA, First Printing Information Displays
Page 112 of 541
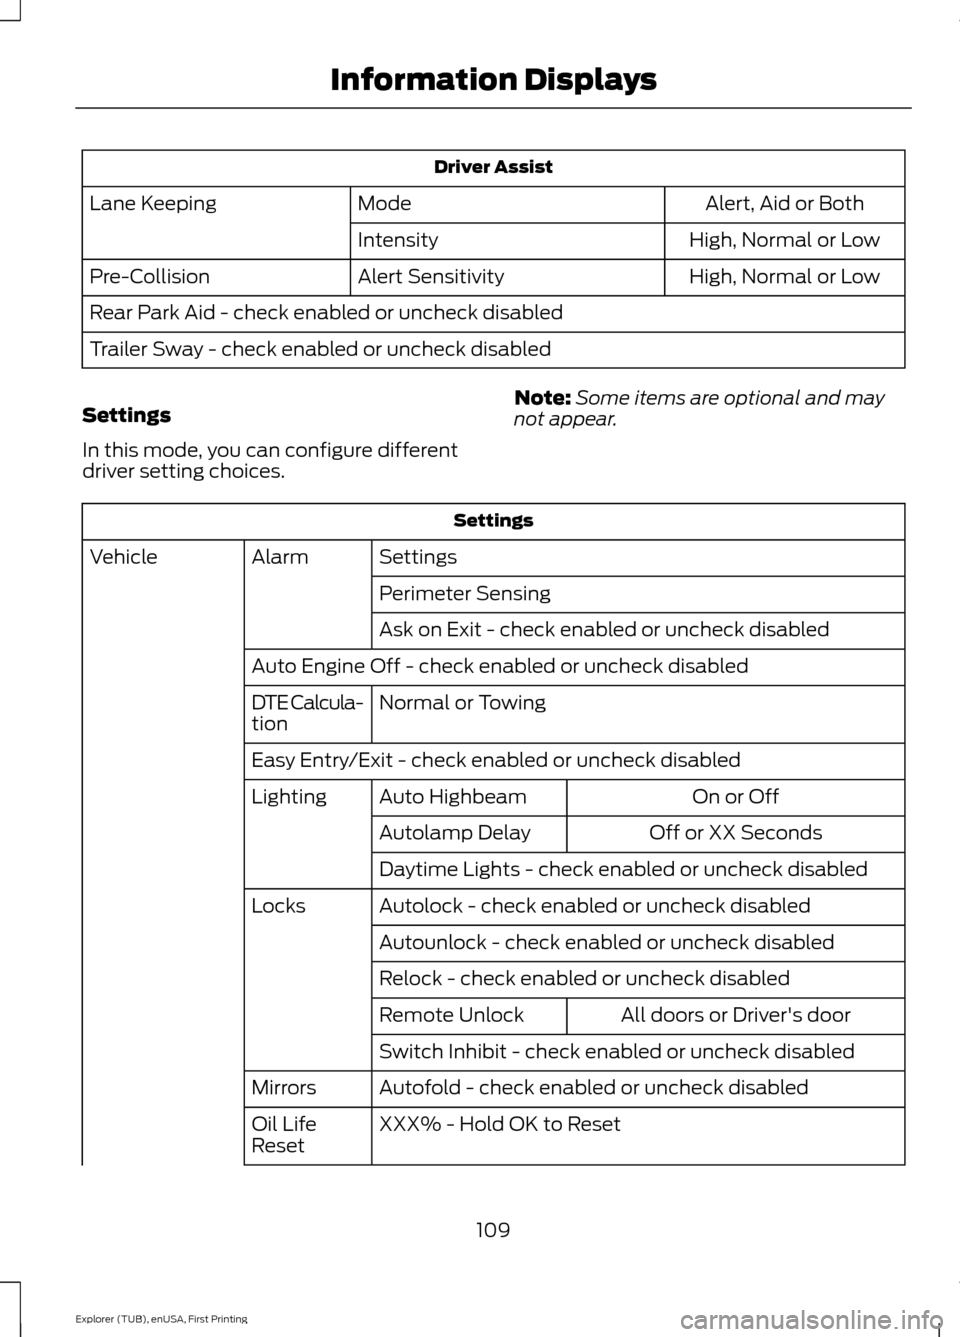
Driver Assist
Alert, Aid or Both
Mode
Lane Keeping
High, Normal or Low
Intensity
High, Normal or Low
Alert Sensitivity
Pre-Collision
Rear Park Aid - check enabled or uncheck disabled
Trailer Sway - check enabled or uncheck disabled
Settings
In this mode, you can configure different
driver setting choices. Note:
Some items are optional and may
not appear. Settings
Settings
Alarm
Vehicle
Perimeter Sensing
Ask on Exit - check enabled or uncheck disabled
Auto Engine Off - check enabled or uncheck disabled Normal or Towing
DTE Calcula-
tion
Easy Entry/Exit - check enabled or uncheck disabled
On or Off
Auto Highbeam
Lighting
Off or XX Seconds
Autolamp Delay
Daytime Lights - check enabled or uncheck disabled
Autolock - check enabled or uncheck disabled
Locks
Autounlock - check enabled or uncheck disabled
Relock - check enabled or uncheck disabled All doors or Driver's door
Remote Unlock
Switch Inhibit - check enabled or uncheck disabled
Autofold - check enabled or uncheck disabled
Mirrors
XXX% - Hold OK to Reset
Oil Life
Reset
109
Explorer (TUB), enUSA, First Printing Information Displays
Page 116 of 541
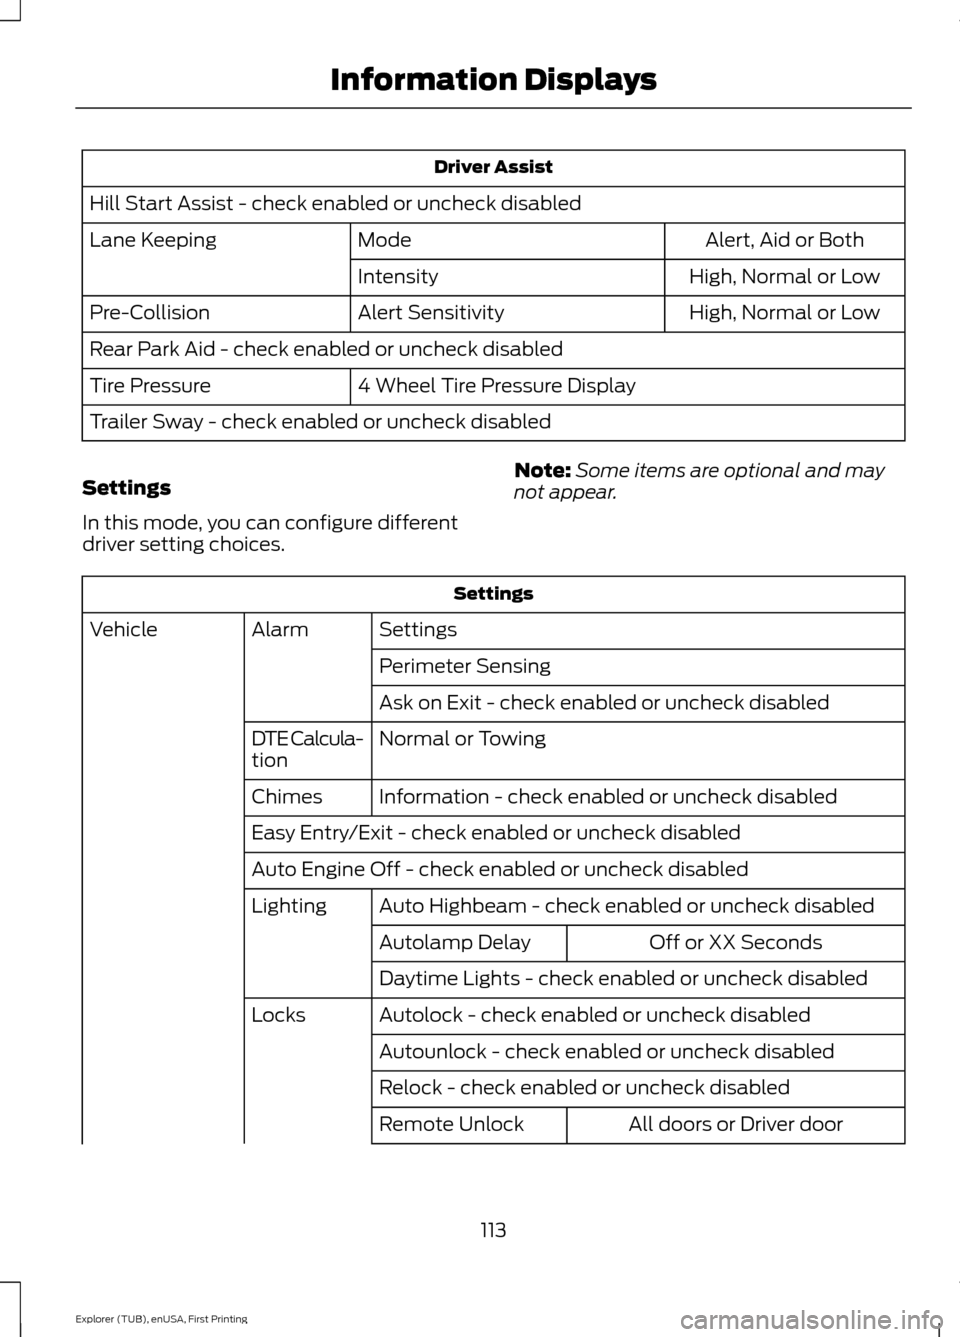
Driver Assist
Hill Start Assist - check enabled or uncheck disabled Alert, Aid or Both
Mode
Lane Keeping
High, Normal or Low
Intensity
High, Normal or Low
Alert Sensitivity
Pre-Collision
Rear Park Aid - check enabled or uncheck disabled
4 Wheel Tire Pressure Display
Tire Pressure
Trailer Sway - check enabled or uncheck disabled
Settings
In this mode, you can configure different
driver setting choices. Note:
Some items are optional and may
not appear. Settings
Settings
Alarm
Vehicle
Perimeter Sensing
Ask on Exit - check enabled or uncheck disabled
Normal or Towing
DTE Calcula-
tion
Information - check enabled or uncheck disabled
Chimes
Easy Entry/Exit - check enabled or uncheck disabled
Auto Engine Off - check enabled or uncheck disabled
Auto Highbeam - check enabled or uncheck disabled
Lighting
Off or XX Seconds
Autolamp Delay
Daytime Lights - check enabled or uncheck disabled
Autolock - check enabled or uncheck disabled
Locks
Autounlock - check enabled or uncheck disabled
Relock - check enabled or uncheck disabled All doors or Driver door
Remote Unlock
113
Explorer (TUB), enUSA, First Printing Information Displays
Page 158 of 541
Press the heated seat symbol to cycle
through the various heat settings and off.
More indicator lights indicate warmer
settings.
Rear Seats (If Equipped)
WARNING
Persons who are unable to feel pain
to the skin because of advanced age,
chronic illness, diabetes, spinal cord
injury, medication, alcohol use, exhaustion,
or other physical conditions, must exercise
care when using the seat heater. The seat
heater may cause burns even at low
temperatures, especially if used for long
periods of time. Do not place anything on
the seat that insulates against heat, such
as a blanket or cushion, because this may
cause the seat heater to overheat. Do not
puncture the seat with pins, needles, or
other pointed objects because this may
damage the heating element which may
cause the seat heater to overheat. An
overheated seat may cause serious
personal injury. Do not do the following:
•
Place heavy objects on the seat.
• Operate the seat heater if water or any
other liquid is spilled on the seat. Allow
the seat to dry thoroughly.
• Operate the heated seats unless the
engine is running. Doing so can cause
the battery to lose charge. The rear seat heat controls are located on
the rear of the center console.
Press the heated seat symbol to cycle
through the various heat settings and off.
More indicator lights indicate warmer
settings.
The heated seat module resets at every
ignition run cycle. While the ignition is on,
press the high or low heated seat switch
to enable heating mode. When activated,
they will turn off automatically when you
turn the engine off.
CLIMATE CONTROLLED SEATS
(If Equipped)
Heated Seats
155
Explorer (TUB), enUSA, First Printing SeatsE146322 E146322
Page 159 of 541
WARNING
Persons who are unable to feel pain
to the skin because of advanced age,
chronic illness, diabetes, spinal cord
injury, medication, alcohol use, exhaustion,
or other physical conditions, must exercise
care when using the seat heater. The seat
heater may cause burns even at low
temperatures, especially if used for long
periods of time. Do not place anything on
the seat that insulates against heat, such
as a blanket or cushion, because this may
cause the seat heater to overheat. Do not
puncture the seat with pins, needles, or
other pointed objects because this may
damage the heating element which may
cause the seat heater to overheat. An
overheated seat may cause serious
personal injury. Note:
Do not do the following:
• Place heavy objects on the seat.
• Operate the seat heater if water or any
other liquid spills on the seat. Allow the
seat to dry thoroughly.
• Operate the heated seats unless the
engine is running. Doing so can cause
the battery to lose charge. Touch the heated seat symbol to cycle
through the various heat settings and off.
More indicator lights indicate warmer
settings. Cooled Seats
The cooled seats only function when the
engine is running.
To operate the cooled seats:
Touch the cooled seat symbol to cycle
through the various cooling settings and
off. More indicator lights indicate cooler
settings.
If the engine falls below 350 RPM while
the cooled seats are on, the feature turns
itself off. You need to reactivate it.
Climate controlled seat air filter
replacement
Your vehicle is equipped with lifetime air
filters that are integrated with the seats.
Regular maintenance or replacement is
not needed.
156
Explorer (TUB), enUSA, First Printing SeatsE146322 E146309