turn signal FORD EXPLORER 2016 5.G Owners Manual
[x] Cancel search | Manufacturer: FORD, Model Year: 2016, Model line: EXPLORER, Model: FORD EXPLORER 2016 5.GPages: 541, PDF Size: 6.51 MB
Page 92 of 541
Loose Mirror
If you manually fold your power-folding
mirrors, they may not work properly even
after you re-position them. You need to
reset them if:
•
The mirrors vibrate when you drive.
• The mirrors feel loose.
• The mirrors do not stay in the folded or
unfolded position.
• One of the mirrors is not in its normal
driving position.
To reset the power-fold feature, use the
power-folding mirror control to fold and
unfold the mirrors. You may hear a loud
noise as you reset the power-folding
mirrors. This sound is normal. Repeat this
process as needed each time you manually
fold the mirrors.
Heated Exterior Mirrors (If Equipped)
See Heated Windows and Mirrors (page
138
).
Memory Mirrors
(If Equipped)
You can save and recall the mirror
positions through the memory function.
See
Memory Function (page 146).
Auto-dimming Feature
(If Equipped)
The driver exterior mirror automatically
dims when the interior auto-dimming
mirror turns on.
Direction Indicator Mirrors (If Equipped)
While the vehicle is running, the
forward-facing portion of the appropriate
mirror housing blinks when you switch on
the direction indicator. Integrated Blind Spot Mirror
(If
Equipped) WARNING
Objects in the blind spot mirror are
closer than they appear.
Blind spot mirrors have an integrated
convex mirror built into the upper outboard
corner of the exterior mirrors. They can
assist you by increasing visibility along the
side of your vehicle.
Check the main mirror first before a lane
change, then check the blind spot mirror.
If no vehicles are present in the blind spot
mirror and the traffic in the adjacent lane
is at a safe distance, signal that you are
going to change lanes. Glance over your
shoulder to verify traffic is clear, and
carefully change lanes.
89
Explorer (TUB), enUSA, First Printing Windows and Mirrors
Page 226 of 541
•
The road has no or poor lane markings
in the camera field-of-view.
• The camera is obscured or unable to
detect the lane markings due to
environmental conditions (significant
sun angles, shadows, snow, heavy rain
or fog), traffic conditions (following a
large vehicle that is blocking or
shadowing the lane), or vehicle
conditions (poor headlamp
illumination).
See Troubleshooting for additional
information.
Green: Indicates that the system is
available or ready to provide a warning or
intervention, on the indicated side(s). Yellow: Indicates that the system is
providing or has just provided a lane
keeping aid intervention.
Red: Indicates that the system is providing
or has just provided a lane keeping alert
warning.
The system can be temporarily suppressed
at any time by the following:
•
Quick braking.
• Fast acceleration.
• Using the turn signal indicator.
• Evasive steering maneuver.
Troubleshooting Why is the feature not available (line markings are gray) when I can see the lane markings
on the road?
Vehicle speed is outside the operational range of the feature
Sun is shining directly into the camera lens
Quick intentional lane change
Staying too close to the lane marking
Driving at high speeds in curves
The last Alert warning or Aid intervention occurred a short time ago
Ambiguous lane markings (mainly in construction zones)
Rapid transition from light to dark or vice versa
Sudden offset in lane markings
ABS or AdvanceTrac activation
Camera blockage due to dirt, grime, fog, frost or water on the windshield
Driving too close to the vehicle in front of you
Transitioning between no lane markings to lane markings or vice versa
Standing water on the road
Faint lane markings (partial yellow lane markings on concrete roads)
223
Explorer (TUB), enUSA, First Printing Driving Aids
Page 228 of 541
Note:
The Blind Spot Information System
does not prevent contact with other vehicles
or objects; nor detect parked vehicles,
people, animals or infrastructure (fences,
guardrails, trees). It's only designed to alert
you to vehicles in the blind zones.
Note: Vehicles that pass through the blind
spot zone quickly (typically less than 2
seconds) will not trigger the alert.
Using the System
The Blind Spot Information System turns
on when you start the engine and you drive
your vehicle forward above approximately
6 mph (10 km/h).
Note: The Blind Spot Information System
does not function in reverse (R) or park (P)
or provide any additional warning when a
turn signal is on.
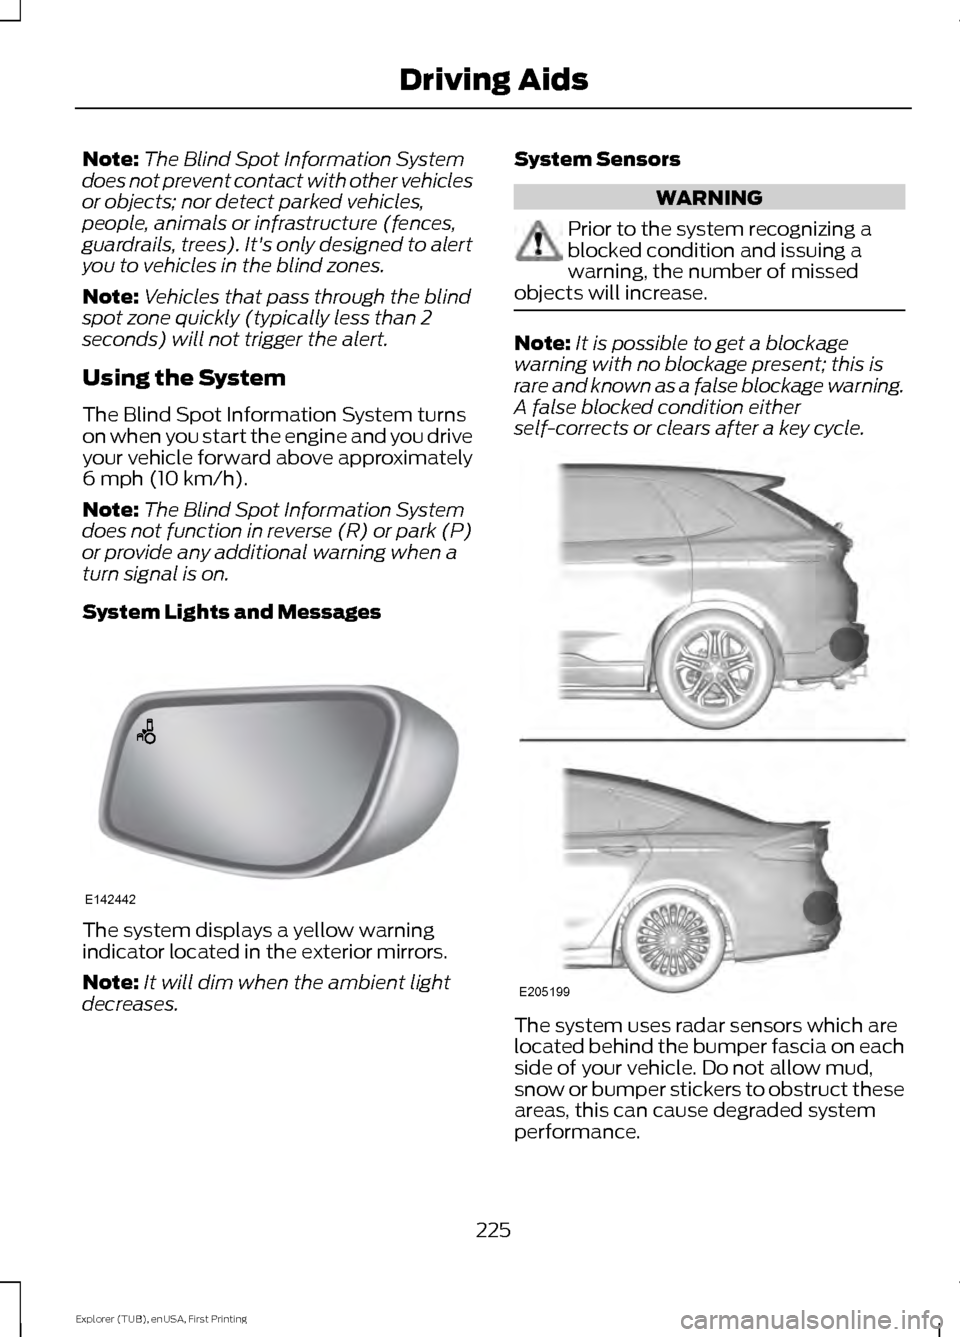
System Lights and Messages The system displays a yellow warning
indicator located in the exterior mirrors.
Note:
It will dim when the ambient light
decreases. System Sensors WARNING
Prior to the system recognizing a
blocked condition and issuing a
warning, the number of missed
objects will increase. Note:
It is possible to get a blockage
warning with no blockage present; this is
rare and known as a false blockage warning.
A false blocked condition either
self-corrects or clears after a key cycle. The system uses radar sensors which are
located behind the bumper fascia on each
side of your vehicle. Do not allow mud,
snow or bumper stickers to obstruct these
areas, this can cause degraded system
performance.
225
Explorer (TUB), enUSA, First Printing Driving AidsE142442 E205199
Page 229 of 541
If the system detects a degraded
performance condition, a message warning
of a blocked sensor or low visibility will
appear in the information display along
with a warning indicator. You can clear the
information display warning but the
warning indicator will remain illuminated.
When you remove a blockage, you can
reset the system in two ways:
•
While driving, the system detects at
least two objects.
• You cycle the ignition from on to off
and then back on.
If the blockage is still present after the key
cycle and driving in traffic, check again for
a blockage. Reasons for messages being displayed
Clean the fascia area in front
of the radar or remove the
obstruction.
The radar
surface is
dirty or
obstructed
Drive normally in traffic for
a few minutes to allow the
radar to detect passing
vehicles so it can clear the
blocked state.
The radar
surface is
not dirty or
obstructed
No action required. The
system automatically resets
to an unblocked state once
the rainfall or snowfall rate
decreases or stops. Do not
use the Blind Spot Informa-
tion System in these condi-
tions.
Heavy rain-
fall or
snowfall
interferes
with the
radar
signals
Detection Limitations
There may be instances where the system
will not always detect vehicles entering
and exiting the blind spot zone. Instances which may cause non-detection:
•
Debris build up on the rear bumper
panels in the area of the sensors.
• Certain maneuvering of vehicles
entering and exiting the blind spot
zone.
• Vehicles passing through the blind spot
zone at high speed.
• Severe weather conditions.
• Several vehicles passing through the
blind spot zone following each other
closely.
False Alerts
Note: If your vehicle has a trailer tow
module approved by us, the system will
detect a connected trailer and turn off. For
non-factory equipped tow bars, you may
want to turn the Blind Spot Information
System off manually.
There may be certain instances when there
is a false alert by the system that
illuminates the alert indicator with no
vehicle in the coverage zone. Some
amount of false alerts are normal; they are
temporary and self-correct.
Detection Errors
If the system senses a problem with the
left or right sensor, the Blind Spot
Information System warning indicator will
illuminate and a message will appear in
the information display.
All other system faults will display only
with a message in the information display.
See Information Messages (page 115).
226
Explorer (TUB), enUSA, First Printing Driving Aids
Page 250 of 541
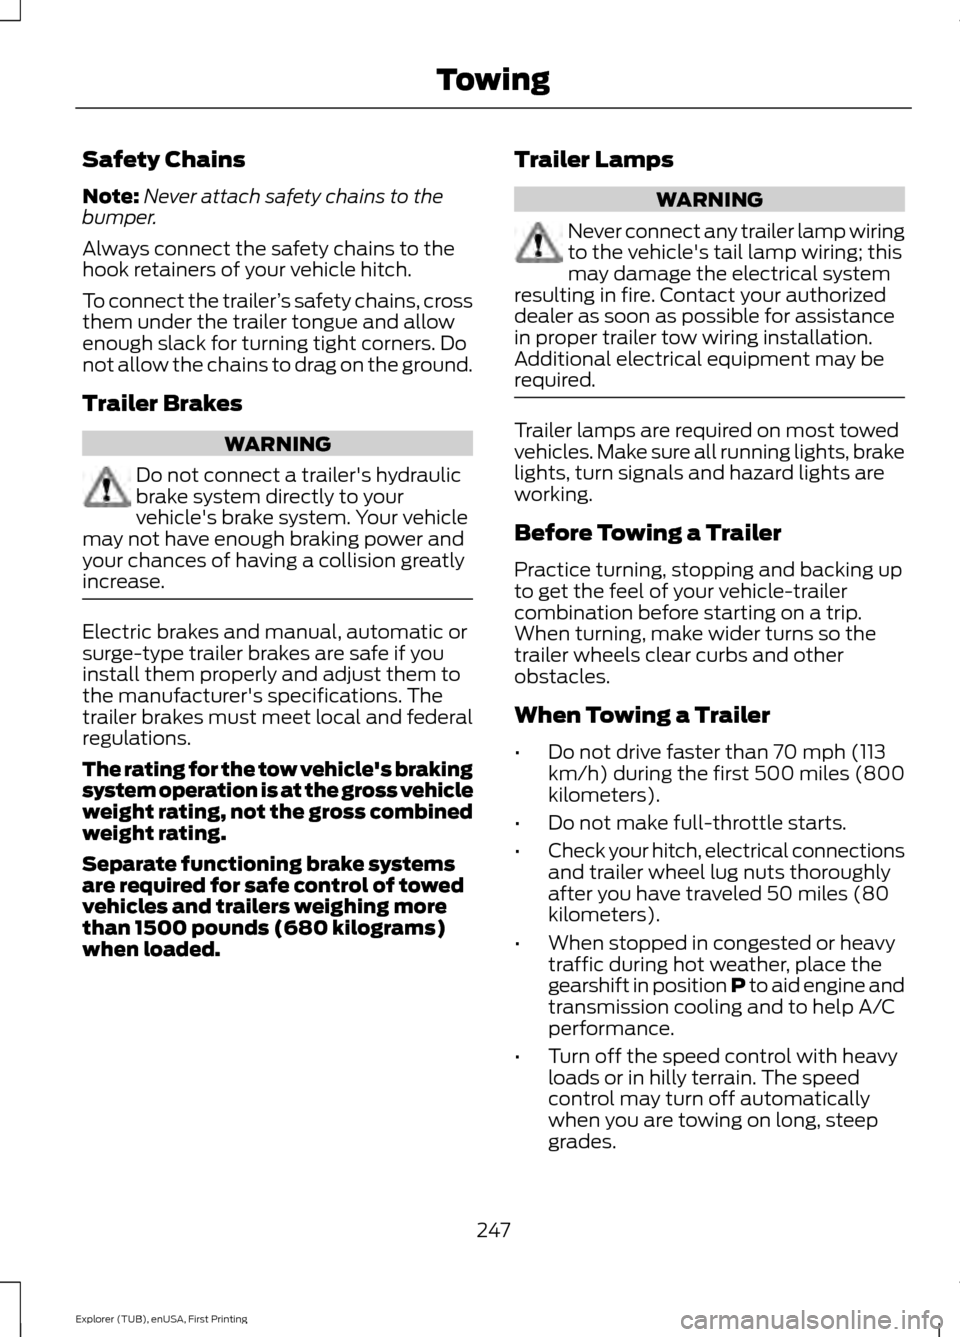
Safety Chains
Note:
Never attach safety chains to the
bumper.
Always connect the safety chains to the
hook retainers of your vehicle hitch.
To connect the trailer ’s safety chains, cross
them under the trailer tongue and allow
enough slack for turning tight corners. Do
not allow the chains to drag on the ground.
Trailer Brakes WARNING
Do not connect a trailer's hydraulic
brake system directly to your
vehicle's brake system. Your vehicle
may not have enough braking power and
your chances of having a collision greatly
increase. Electric brakes and manual, automatic or
surge-type trailer brakes are safe if you
install them properly and adjust them to
the manufacturer's specifications. The
trailer brakes must meet local and federal
regulations.
The rating for the tow vehicle's braking
system operation is at the gross vehicle
weight rating, not the gross combined
weight rating.
Separate functioning brake systems
are required for safe control of towed
vehicles and trailers weighing more
than 1500 pounds (680 kilograms)
when loaded. Trailer Lamps WARNING
Never connect any trailer lamp wiring
to the vehicle's tail lamp wiring; this
may damage the electrical system
resulting in fire. Contact your authorized
dealer as soon as possible for assistance
in proper trailer tow wiring installation.
Additional electrical equipment may be
required. Trailer lamps are required on most towed
vehicles. Make sure all running lights, brake
lights, turn signals and hazard lights are
working.
Before Towing a Trailer
Practice turning, stopping and backing up
to get the feel of your vehicle-trailer
combination before starting on a trip.
When turning, make wider turns so the
trailer wheels clear curbs and other
obstacles.
When Towing a Trailer
•
Do not drive faster than 70 mph (113
km/h) during the first 500 miles (800
kilometers).
• Do not make full-throttle starts.
• Check your hitch, electrical connections
and trailer wheel lug nuts thoroughly
after you have traveled 50 miles (80
kilometers).
• When stopped in congested or heavy
traffic during hot weather, place the
gearshift in position P to aid engine and
transmission cooling and to help A/C
performance.
• Turn off the speed control with heavy
loads or in hilly terrain. The speed
control may turn off automatically
when you are towing on long, steep
grades.
247
Explorer (TUB), enUSA, First Printing Towing
Page 365 of 541
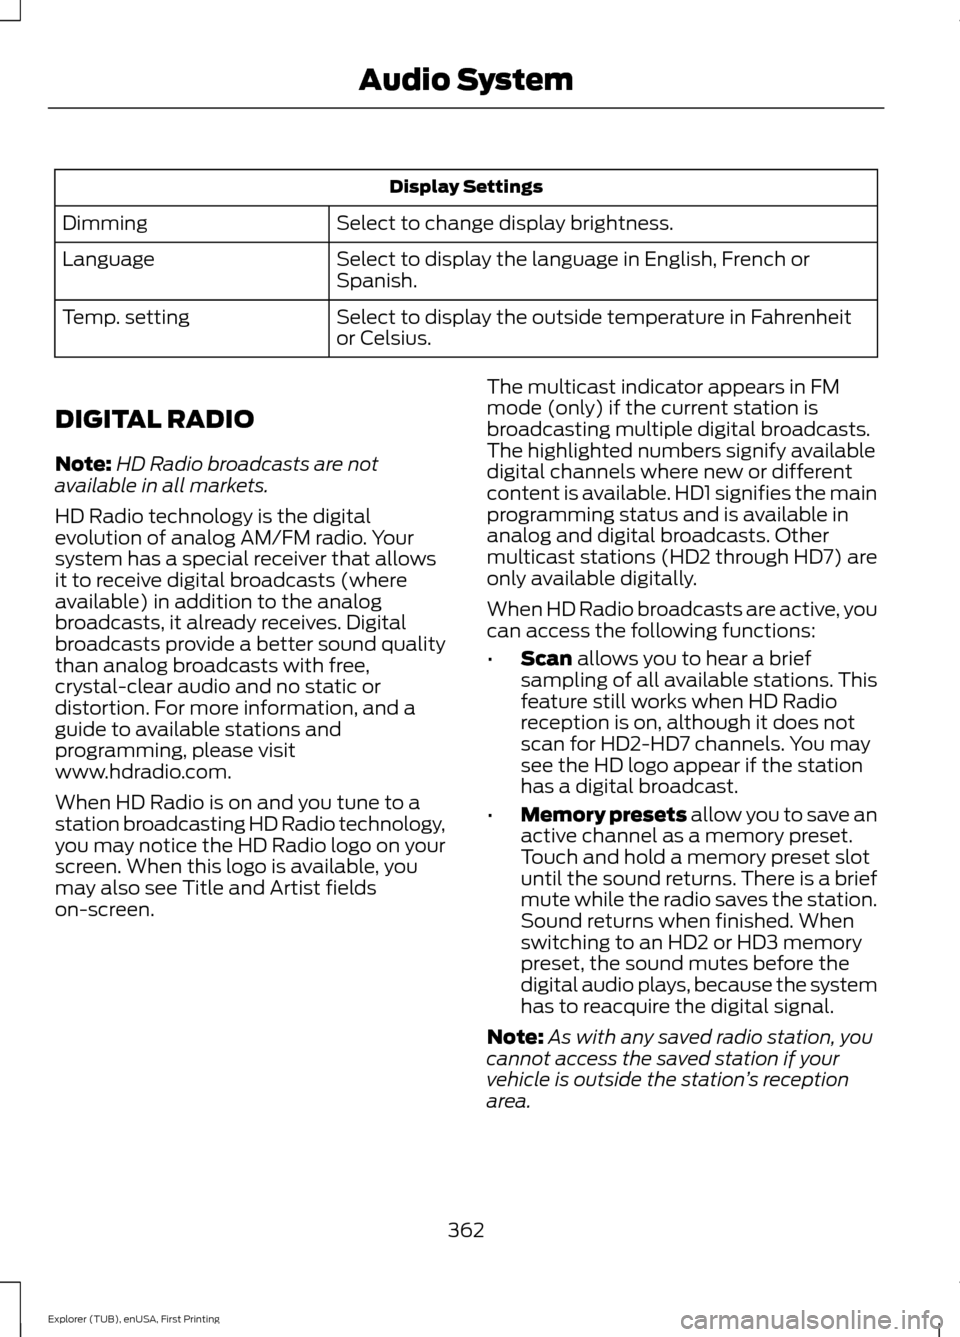
Display Settings
Select to change display brightness.
Dimming
Select to display the language in English, French or
Spanish.
Language
Select to display the outside temperature in Fahrenheit
or Celsius.
Temp. setting
DIGITAL RADIO
Note: HD Radio broadcasts are not
available in all markets.
HD Radio technology is the digital
evolution of analog AM/FM radio. Your
system has a special receiver that allows
it to receive digital broadcasts (where
available) in addition to the analog
broadcasts, it already receives. Digital
broadcasts provide a better sound quality
than analog broadcasts with free,
crystal-clear audio and no static or
distortion. For more information, and a
guide to available stations and
programming, please visit
www.hdradio.com.
When HD Radio is on and you tune to a
station broadcasting HD Radio technology,
you may notice the HD Radio logo on your
screen. When this logo is available, you
may also see Title and Artist fields
on-screen. The multicast indicator appears in FM
mode (only) if the current station is
broadcasting multiple digital broadcasts.
The highlighted numbers signify available
digital channels where new or different
content is available. HD1 signifies the main
programming status and is available in
analog and digital broadcasts. Other
multicast stations (HD2 through HD7) are
only available digitally.
When HD Radio broadcasts are active, you
can access the following functions:
•
Scan allows you to hear a brief
sampling of all available stations. This
feature still works when HD Radio
reception is on, although it does not
scan for HD2-HD7 channels. You may
see the HD logo appear if the station
has a digital broadcast.
• Memory presets
allow you to save an
active channel as a memory preset.
Touch and hold a memory preset slot
until the sound returns. There is a brief
mute while the radio saves the station.
Sound returns when finished. When
switching to an HD2 or HD3 memory
preset, the sound mutes before the
digital audio plays, because the system
has to reacquire the digital signal.
Note: As with any saved radio station, you
cannot access the saved station if your
vehicle is outside the station ’s reception
area.
362
Explorer (TUB), enUSA, First Printing Audio System
Page 369 of 541
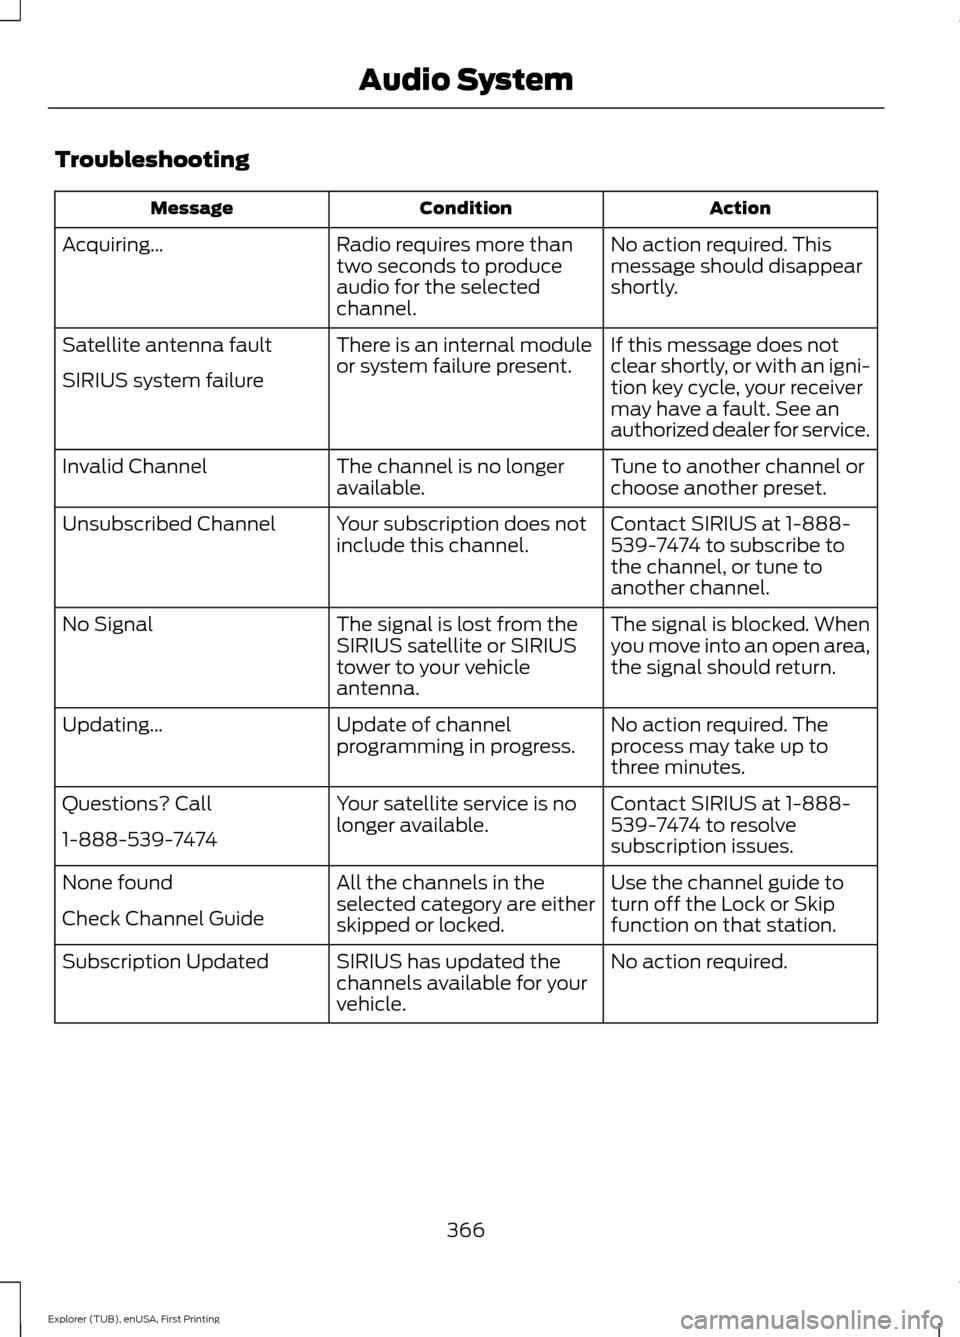
Troubleshooting
Action
Condition
Message
No action required. This
message should disappear
shortly.
Radio requires more than
two seconds to produce
audio for the selected
channel.
Acquiring…
If this message does not
clear shortly, or with an igni-
tion key cycle, your receiver
may have a fault. See an
authorized dealer for service.
There is an internal module
or system failure present.
Satellite antenna fault
SIRIUS system failure
Tune to another channel or
choose another preset.
The channel is no longer
available.
Invalid Channel
Contact SIRIUS at 1-888-
539-7474 to subscribe to
the channel, or tune to
another channel.
Your subscription does not
include this channel.
Unsubscribed Channel
The signal is blocked. When
you move into an open area,
the signal should return.
The signal is lost from the
SIRIUS satellite or SIRIUS
tower to your vehicle
antenna.
No Signal
No action required. The
process may take up to
three minutes.
Update of channel
programming in progress.
Updating…
Contact SIRIUS at 1-888-
539-7474 to resolve
subscription issues.
Your satellite service is no
longer available.
Questions? Call
1-888-539-7474
Use the channel guide to
turn off the Lock or Skip
function on that station.
All the channels in the
selected category are either
skipped or locked.
None found
Check Channel Guide
No action required.
SIRIUS has updated the
channels available for your
vehicle.
Subscription Updated
366
Explorer (TUB), enUSA, First Printing Audio System
Page 383 of 541
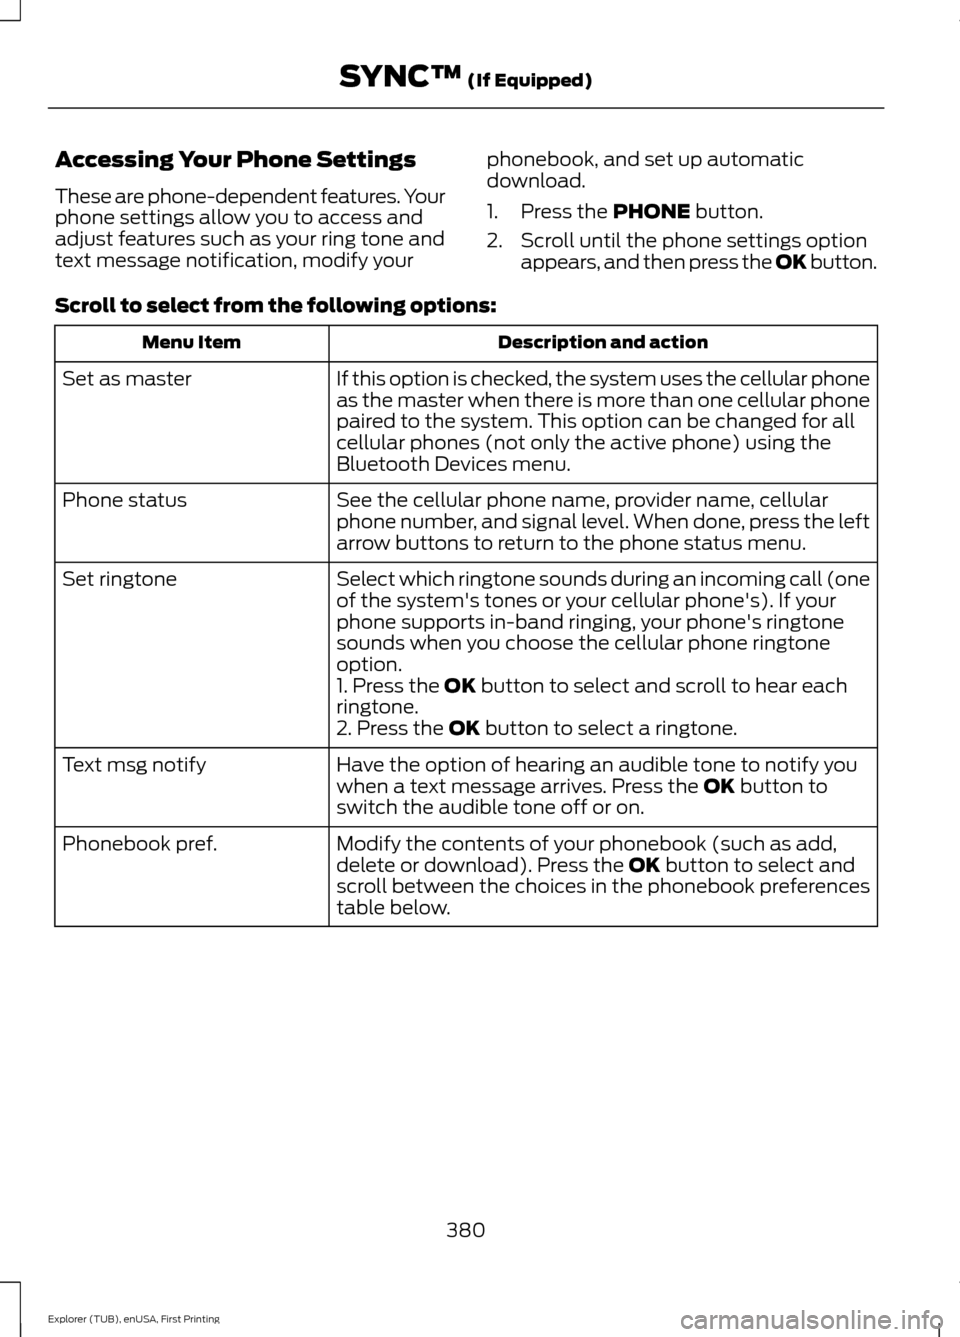
Accessing Your Phone Settings
These are phone-dependent features. Your
phone settings allow you to access and
adjust features such as your ring tone and
text message notification, modify your
phonebook, and set up automatic
download.
1. Press the PHONE button.
2. Scroll until the phone settings option appears, and then press the OK button.
Scroll to select from the following options: Description and action
Menu Item
If this option is checked, the system uses the cellular phone
as the master when there is more than one cellular phone
paired to the system. This option can be changed for all
cellular phones (not only the active phone) using the
Bluetooth Devices menu.
Set as master
See the cellular phone name, provider name, cellular
phone number, and signal level. When done, press the left
arrow buttons to return to the phone status menu.
Phone status
Select which ringtone sounds during an incoming call (one
of the system's tones or your cellular phone's). If your
phone supports in-band ringing, your phone's ringtone
sounds when you choose the cellular phone ringtone
option.
Set ringtone
1. Press the
OK button to select and scroll to hear each
ringtone.
2. Press the
OK button to select a ringtone.
Have the option of hearing an audible tone to notify you
when a text message arrives. Press the
OK button to
switch the audible tone off or on.
Text msg notify
Modify the contents of your phonebook (such as add,
delete or download). Press the
OK button to select and
scroll between the choices in the phonebook preferences
table below.
Phonebook pref.
380
Explorer (TUB), enUSA, First Printing SYNC™
(If Equipped)
Page 429 of 541
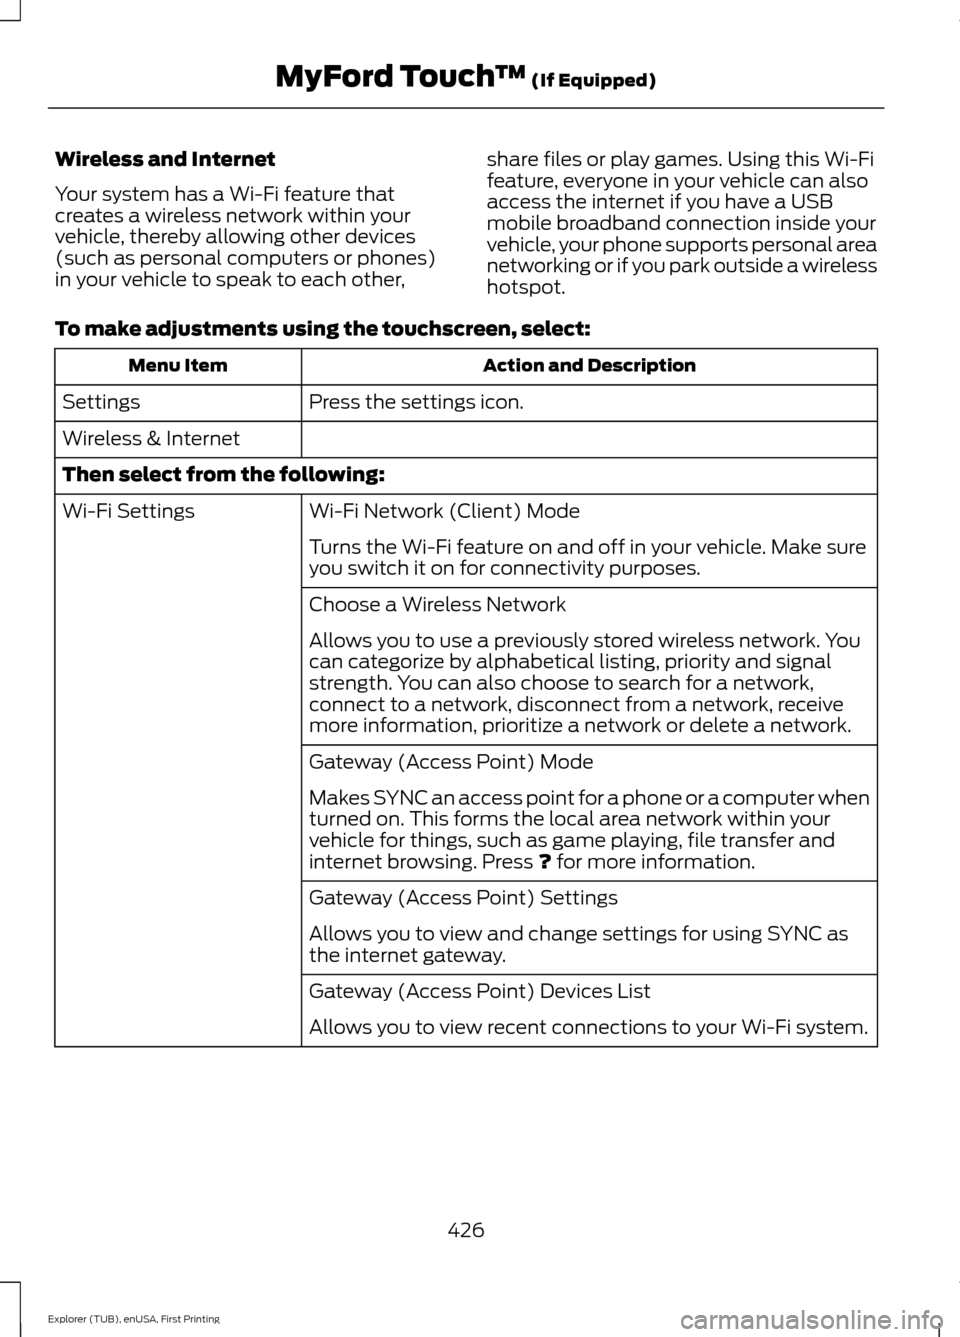
Wireless and Internet
Your system has a Wi-Fi feature that
creates a wireless network within your
vehicle, thereby allowing other devices
(such as personal computers or phones)
in your vehicle to speak to each other,
share files or play games. Using this Wi-Fi
feature, everyone in your vehicle can also
access the internet if you have a USB
mobile broadband connection inside your
vehicle, your phone supports personal area
networking or if you park outside a wireless
hotspot.
To make adjustments using the touchscreen, select: Action and Description
Menu Item
Press the settings icon.
Settings
Wireless & Internet
Then select from the following:
Wi-Fi Network (Client) Mode
Wi-Fi Settings
Turns the Wi-Fi feature on and off in your vehicle. Make sure
you switch it on for connectivity purposes.
Choose a Wireless Network
Allows you to use a previously stored wireless network. You
can categorize by alphabetical listing, priority and signal
strength. You can also choose to search for a network,
connect to a network, disconnect from a network, receive
more information, prioritize a network or delete a network.
Gateway (Access Point) Mode
Makes SYNC an access point for a phone or a computer when
turned on. This forms the local area network within your
vehicle for things, such as game playing, file transfer and
internet browsing. Press ? for more information.
Gateway (Access Point) Settings
Allows you to view and change settings for using SYNC as
the internet gateway.
Gateway (Access Point) Devices List
Allows you to view recent connections to your Wi-Fi system.
426
Explorer (TUB), enUSA, First Printing MyFord Touch
™
(If Equipped)
Page 436 of 541
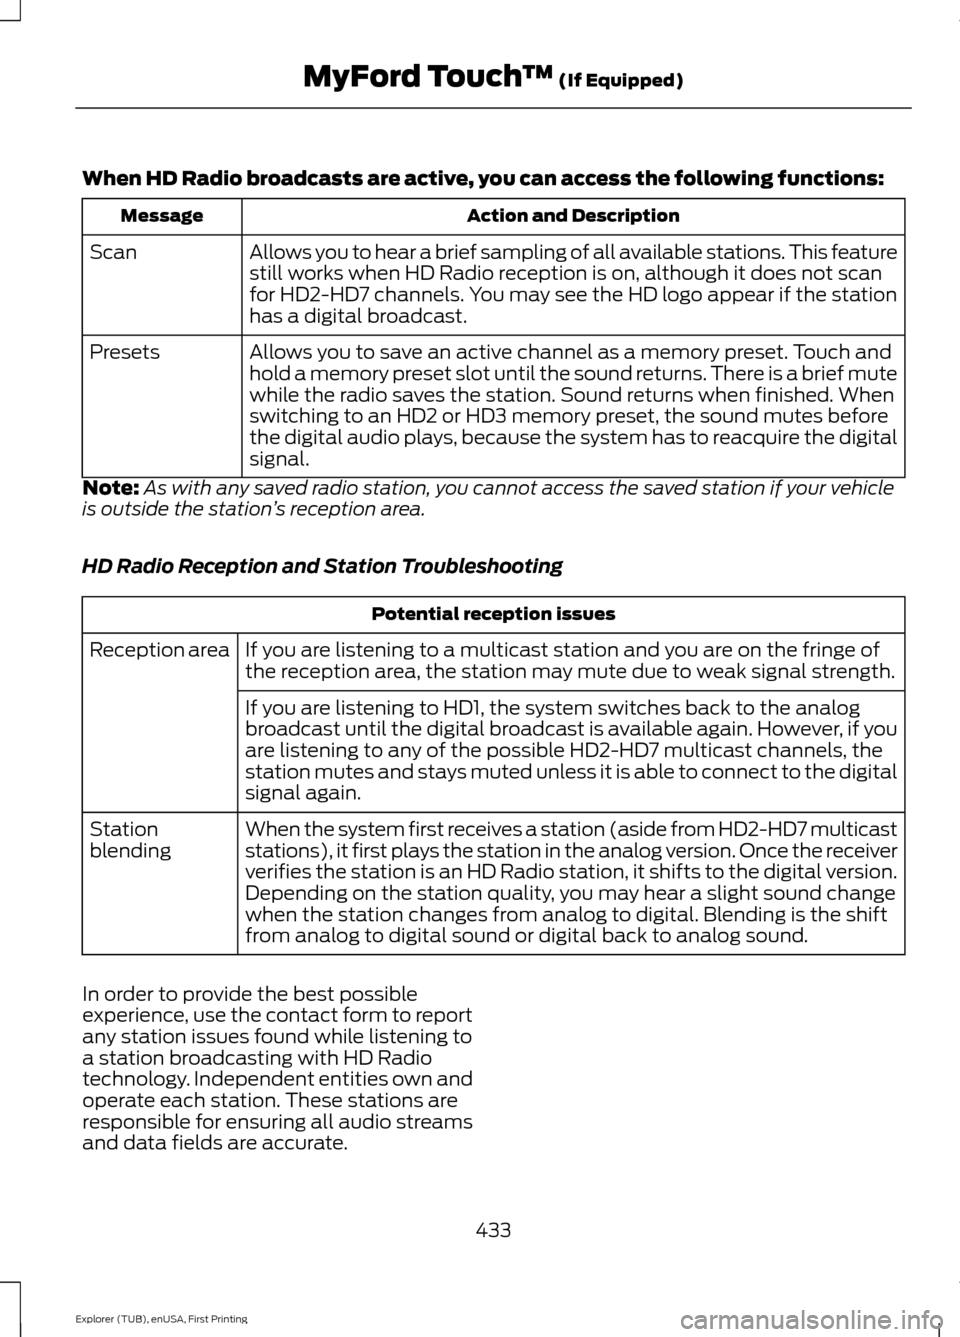
When HD Radio broadcasts are active, you can access the following functions:
Action and Description
Message
Allows you to hear a brief sampling of all available stations. This feature
still works when HD Radio reception is on, although it does not scan
for HD2-HD7 channels. You may see the HD logo appear if the station
has a digital broadcast.
Scan
Allows you to save an active channel as a memory preset. Touch and
hold a memory preset slot until the sound returns. There is a brief mute
while the radio saves the station. Sound returns when finished. When
switching to an HD2 or HD3 memory preset, the sound mutes before
the digital audio plays, because the system has to reacquire the digital
signal.
Presets
Note: As with any saved radio station, you cannot access the saved station if your vehicle
is outside the station ’s reception area.
HD Radio Reception and Station Troubleshooting Potential reception issues
If you are listening to a multicast station and you are on the fringe of
the reception area, the station may mute due to weak signal strength.
Reception area
If you are listening to HD1, the system switches back to the analog
broadcast until the digital broadcast is available again. However, if you
are listening to any of the possible HD2-HD7 multicast channels, the
station mutes and stays muted unless it is able to connect to the digital
signal again.
When the system first receives a station (aside from HD2-HD7 multicast
stations), it first plays the station in the analog version. Once the receiver
verifies the station is an HD Radio station, it shifts to the digital version.
Depending on the station quality, you may hear a slight sound change
when the station changes from analog to digital. Blending is the shift
from analog to digital sound or digital back to analog sound.
Station
blending
In order to provide the best possible
experience, use the contact form to report
any station issues found while listening to
a station broadcasting with HD Radio
technology. Independent entities own and
operate each station. These stations are
responsible for ensuring all audio streams
and data fields are accurate. 433
Explorer (TUB), enUSA, First Printing MyFord Touch
™ (If Equipped)