change wheel FORD EXPLORER 2018 User Guide
[x] Cancel search | Manufacturer: FORD, Model Year: 2018, Model line: EXPLORER, Model: FORD EXPLORER 2018Pages: 571, PDF Size: 7.3 MB
Page 203 of 571
PRINCIPLE OF OPERATION
WARNING: Vehicle modifications
involving braking system, aftermarket roof
racks, suspension, steering system, tire
construction and wheel and tire size may
change the handling characteristics of your
vehicle and may adversely affect the
performance of the electronic stability
control system. In addition, installing any
stereo loudspeakers may interfere with
and adversely affect the electronic stability
control system. Install any aftermarket
stereo loudspeaker as far as possible from
the front center console, the tunnel, and
the front seats in order to minimize the risk
of interfering with the electronic stability
control sensors. Reducing the
effectiveness of the electronic stability
control system could lead to an increased
risk of loss of vehicle control, vehicle
rollover, personal injury and death. WARNING:
Remember that even
advanced technology cannot defy the laws
of physics. It’ s always possible to lose
control of a vehicle due to inappropriate
driver input for the conditions. Aggressive
driving on any road condition can cause
you to lose control of your vehicle
increasing the risk of personal injury or
property damage. Activation of the
electronic stability control system is an
indication that at least some of the tires
have exceeded their ability to grip the road;
this could reduce the operator ’s ability to
control the vehicle potentially resulting in
a loss of vehicle control, vehicle rollover,
personal injury and death. If your electronic
stability control system activates, SLOW
DOWN.
The system automatically turns on each
time you switch the ignition on. If a driving condition activates either the
stability control or the traction control
system you may experience the following
conditions:
•
The stability and traction control light
flashes.
• Your vehicle slows down.
• Reduced engine power.
• A vibration in the brake pedal.
• The brake pedal is stiffer than usual.
• If the driving condition is severe and
your foot is not on the brake, the brake
pedal may move as the systems
applies higher brake forces.
The stability control system has several
features built into it to help you maintain
control of your vehicle:
Electronic Stability Control
The system enhances your vehicle ’s ability
to prevent skids or lateral slides by
applying brakes to one or more of the
wheels individually and, if necessary,
reducing engine power.
Roll Stability Control
The system enhances your vehicle ’s ability
to prevent rollovers by detecting your
vehicle ’s roll motion and the rate at which
it changes by applying the brakes to one
or more wheels individually.
Curve Control
The system enhances your vehicle ’s ability
to follow the road when cornering severely
or avoiding objects in the roadway. Curve
Control operates by reducing engine power
and, if necessary, applying brakes to one
or more of the wheels individually.
200
Explorer (TUB) Canada/United States of America, enUSA, Edition date: 201711, Fourth-Printing Stability Control
Page 205 of 571
USING TERRAIN CONTROL
The terrain management system optimizes
drivability and comfort as well as
maximizing traction while operating on
different types of terrain.
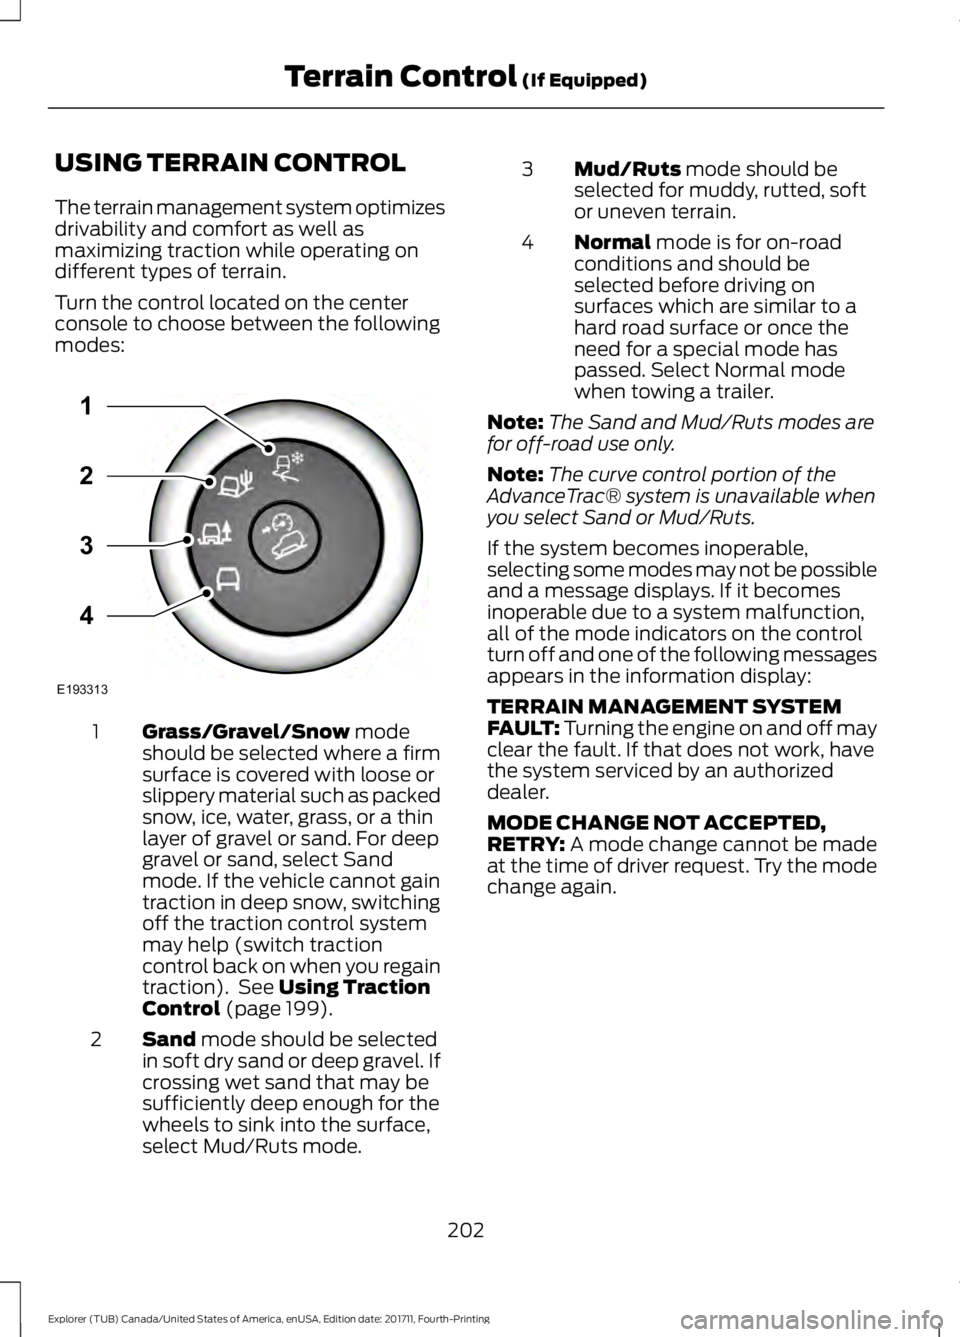
Turn the control located on the center
console to choose between the following
modes:
Grass/Gravel/Snow mode
should be selected where a firm
surface is covered with loose or
slippery material such as packed
snow, ice, water, grass, or a thin
layer of gravel or sand. For deep
1
gravel or sand, select Sand
mode. If the vehicle cannot gain
traction in deep snow, switching
off the traction control system
may help (switch traction
control back on when you regain
traction). See
Using Traction
Control (page 199).
Sand
mode should be selected
in soft dry sand or deep gravel. If
crossing wet sand that may be
sufficiently deep enough for the
wheels to sink into the surface,
select Mud/Ruts mode.
2 Mud/Ruts
mode should be
selected for muddy, rutted, soft
or uneven terrain.
3
Normal
mode is for on-road
conditions and should be
selected before driving on
surfaces which are similar to a
hard road surface or once the
need for a special mode has
passed. Select Normal mode
when towing a trailer.
4
Note: The Sand and Mud/Ruts modes are
for off-road use only.
Note: The curve control portion of the
AdvanceTrac® system is unavailable when
you select Sand or Mud/Ruts.
If the system becomes inoperable,
selecting some modes may not be possible
and a message displays. If it becomes
inoperable due to a system malfunction,
all of the mode indicators on the control
turn off and one of the following messages
appears in the information display:
TERRAIN MANAGEMENT SYSTEM
FAULT:
Turning the engine on and off may
clear the fault. If that does not work, have
the system serviced by an authorized
dealer.
MODE CHANGE NOT ACCEPTED,
RETRY:
A mode change cannot be made
at the time of driver request. Try the mode
change again.
202
Explorer (TUB) Canada/United States of America, enUSA, Edition date: 201711, Fourth-Printing Terrain Control
(If Equipped)E193313
3
2
1
4
Page 212 of 571
ACTIVE PARK ASSIST (If Equipped)
WARNING: You must remain in your
vehicle when the system turns on. At all
times, you are responsible for controlling
your vehicle, supervising the system and
intervening, if required. Failure to take care
may result in the loss of control of your
vehicle, serious personal injury or death. WARNING:
The sensors may not
detect objects in heavy rain or other
conditions that cause interference. WARNING:
Active park assist does
not apply the brakes under any
circumstances. WARNING:
You are responsible for
controlling your vehicle at all times. The
system is designed to be an aid and does
not relieve you of your responsibility to
drive with due care and attention. Failure
to follow this instruction could result in the
loss of control of your vehicle, personal
injury or death.
Active park assist is a multi-step process
and may require you to shift the
transmission multiple times. Follow the
onscreen instructions until the parking
maneuver is complete.
If you are uncomfortable with the proximity
to any vehicle or object, you may choose
to override the system by grabbing the
steering wheel, or by taking full control of
your vehicle after pressing the active park
assist button.
Keep your hands, hair, clothing and any
loose items clear of the steering wheel
when using active park assist.
The sensors are on the front and rear
bumpers. Note:
Keep the sensors free from snow, ice
and large accumulations of dirt.
Note: Do not cover up the sensors.
Note: Do not clean the sensors with sharp
objects.
Note: The sensors may not detect objects
with surfaces that absorb ultrasonic waves.
The sensors may falsely detect objects due
to ultrasonic interference caused by, for
example motorcycle exhausts, truck air
brakes or horns.
Note: If you change any tires, the system
must recalibrate and may not correctly
operate for a short time.
The system may not correctly operate in
any of the following conditions:
• You use a spare tire or a tire that is
significantly worn more than the other
tires.
• One or more tires are incorrectly
inflated.
• You try to park on a tight curve.
• Something passes between the front
bumper and the parking space. For
example, a pedestrian or cyclist.
• The edge of the neighboring parked
vehicle is high off the ground. For
example, a bus, tow truck or flatbed
truck.
• The weather conditions are poor. For
example, during heavy rain, snow, fog,
high humidity and high temperatures.
Do not use the system if:
• You have attached an add-on
accessory close to the sensors on the
front or rear of your vehicle. For
example, a bike rack or trailer.
• You have attached an overhanging
object to the roof. For example, a
surfboard.
209
Explorer (TUB) Canada/United States of America, enUSA, Edition date: 201711, Fourth-Printing Parking Aids
Page 220 of 571
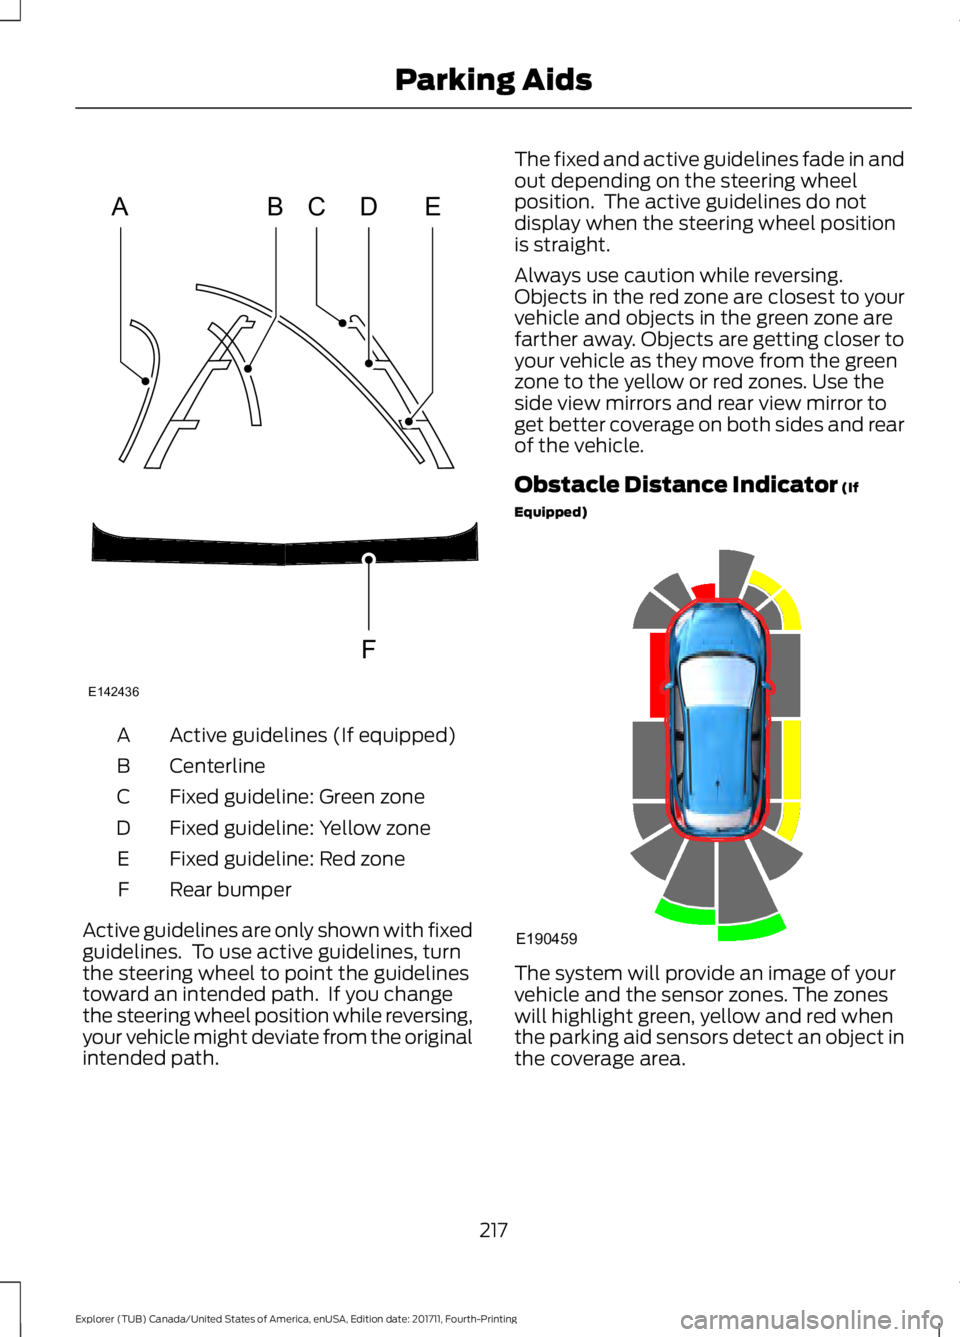
Active guidelines (If equipped)
A
Centerline
B
Fixed guideline: Green zone
C
Fixed guideline: Yellow zone
D
Fixed guideline: Red zone
E
Rear bumper
F
Active guidelines are only shown with fixed
guidelines. To use active guidelines, turn
the steering wheel to point the guidelines
toward an intended path. If you change
the steering wheel position while reversing,
your vehicle might deviate from the original
intended path. The fixed and active guidelines fade in and
out depending on the steering wheel
position. The active guidelines do not
display when the steering wheel position
is straight.
Always use caution while reversing.
Objects in the red zone are closest to your
vehicle and objects in the green zone are
farther away. Objects are getting closer to
your vehicle as they move from the green
zone to the yellow or red zones. Use the
side view mirrors and rear view mirror to
get better coverage on both sides and rear
of the vehicle.
Obstacle Distance Indicator (If
Equipped) The system will provide an image of your
vehicle and the sensor zones. The zones
will highlight green, yellow and red when
the parking aid sensors detect an object in
the coverage area.
217
Explorer (TUB) Canada/United States of America, enUSA, Edition date: 201711, Fourth-Printing Parking AidsABCD
F
E
E142436 E190459
Page 223 of 571
PRINCIPLE OF OPERATION
Cruise control lets you maintain a set
speed without keeping your foot on the
accelerator pedal. You can use cruise
control when your vehicle speed is greater
than 20 mph (30 km/h).
USING CRUISE CONTROL
(If
Equipped) WARNING: Do not use cruise control
on winding roads, in heavy traffic or when
the road surface is slippery. This could
result in loss of vehicle control, serious
injury or death. WARNING:
When you are going
downhill, your vehicle speed could increase
above the set speed. The system does not
apply the brakes.
Note: Cruise control disengages if the
vehicle speed decreases more than 10 mph
(16 km/h) below the set speed when driving
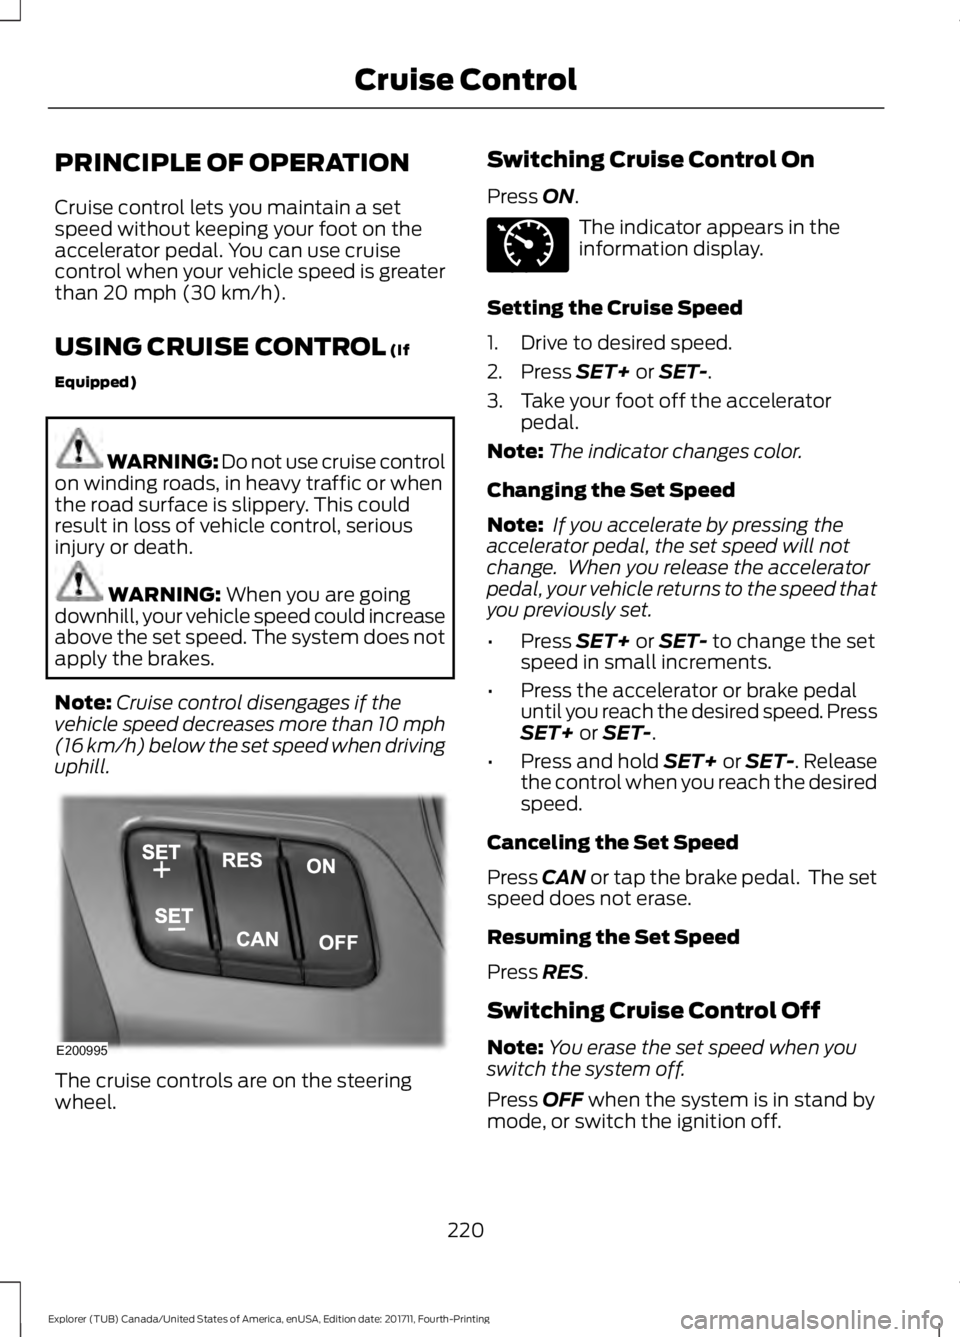
uphill. The cruise controls are on the steering
wheel. Switching Cruise Control On
Press
ON. The indicator appears in the
information display.
Setting the Cruise Speed
1. Drive to desired speed.
2. Press
SET+ or SET-.
3. Take your foot off the accelerator pedal.
Note: The indicator changes color.
Changing the Set Speed
Note: If you accelerate by pressing the
accelerator pedal, the set speed will not
change. When you release the accelerator
pedal, your vehicle returns to the speed that
you previously set.
• Press
SET+ or SET- to change the set
speed in small increments.
• Press the accelerator or brake pedal
until you reach the desired speed. Press
SET+
or SET-.
• Press and hold SET+ or SET-. Release
the control when you reach the desired
speed.
Canceling the Set Speed
Press
CAN or tap the brake pedal. The set
speed does not erase.
Resuming the Set Speed
Press
RES.
Switching Cruise Control Off
Note: You erase the set speed when you
switch the system off.
Press
OFF when the system is in stand by
mode, or switch the ignition off.
220
Explorer (TUB) Canada/United States of America, enUSA, Edition date: 201711, Fourth-Printing Cruise ControlE200995 E71340
Page 232 of 571
Note:
The system works above 40 mph
(64 km/h).
Note: The system works as long as the
camera can detect one lane marking.
Note: When you select aid or alert and aid
mode and the system detects no steering
activity for a short period, the system alerts
you to put your hands on the steering wheel.
The system may detect a light grip or touch
on the steering wheel as hands off driving.
Note: The system may not function if the
camera is blocked, or if the windshield is
damaged or dirty. When you switch the system on and it
detects an unintentional drift out of your
lane is likely to occur, the system notifies
or assists you to stay in your lane through
the steering system and information
display. Depending on the feature
operation mode you select, the system
provides a warning by vibrating the steering
wheel or a steering assistance by gently
counter steering your vehicle back into the
lane.
Switching the System On and Off
Note:
The system on or off setting is stored
until it is manually changed, unless a MyKey
is detected. If the system detects a MyKey,
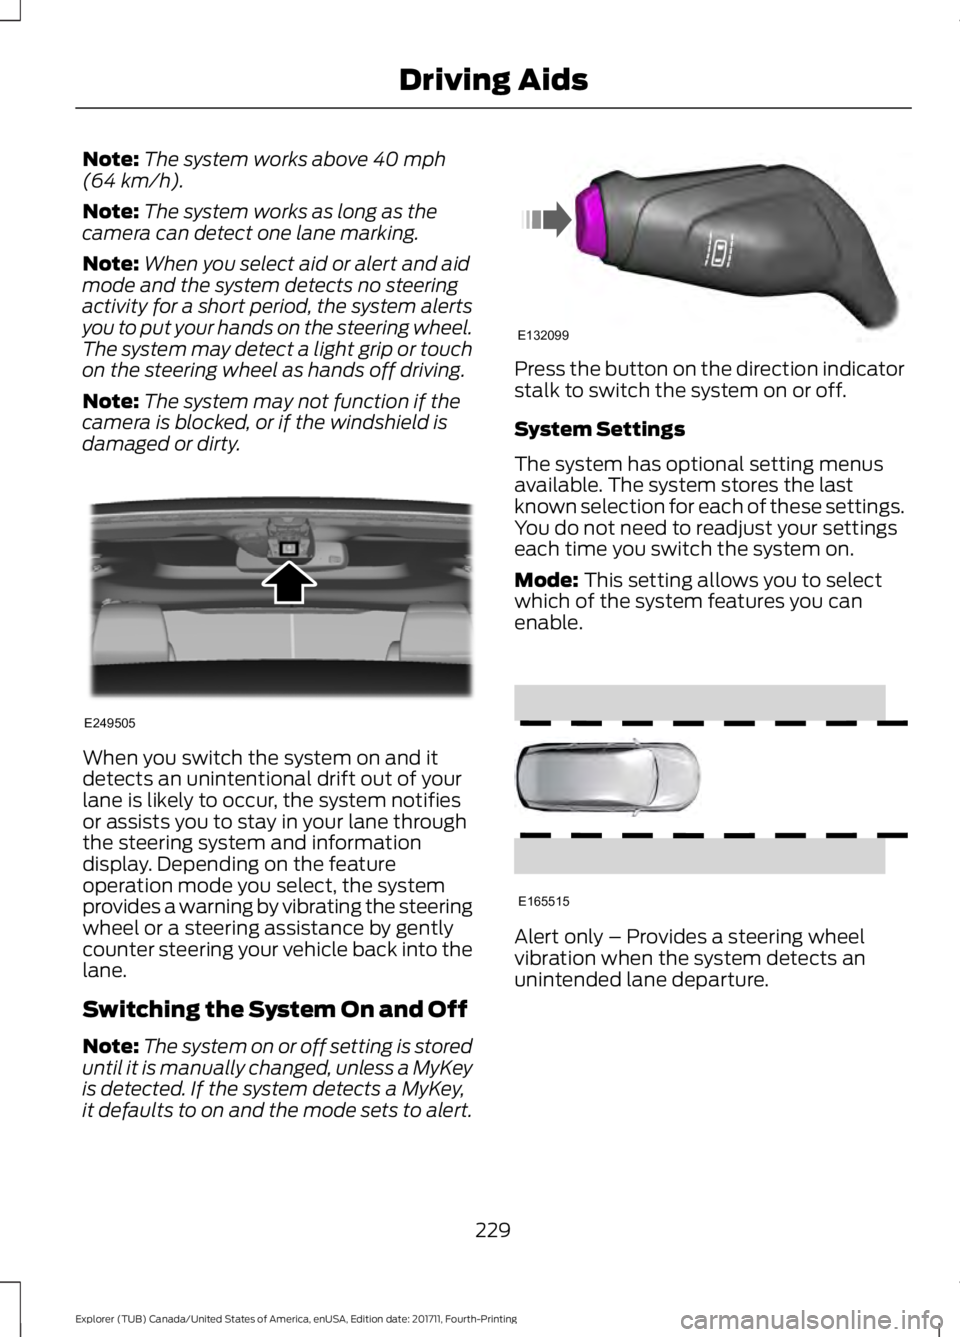
it defaults to on and the mode sets to alert. Press the button on the direction indicator
stalk to switch the system on or off.
System Settings
The system has optional setting menus
available. The system stores the last
known selection for each of these settings.
You do not need to readjust your settings
each time you switch the system on.
Mode:
This setting allows you to select
which of the system features you can
enable. Alert only – Provides a steering wheel
vibration when the system detects an
unintended lane departure.
229
Explorer (TUB) Canada/United States of America, enUSA, Edition date: 201711, Fourth-Printing Driving AidsE249505 E132099 E165515
Page 233 of 571
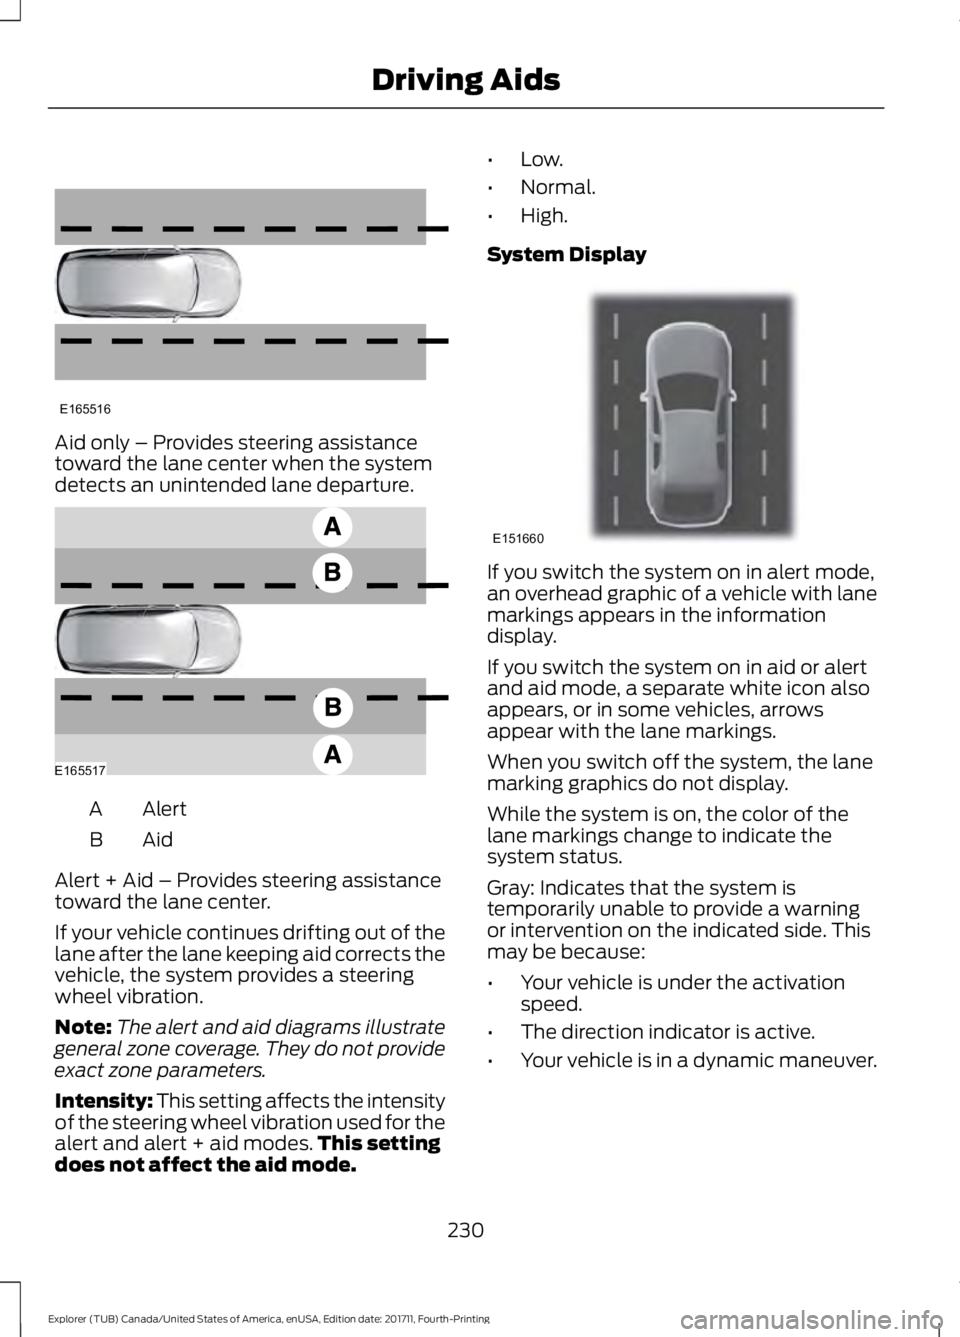
Aid only – Provides steering assistance
toward the lane center when the system
detects an unintended lane departure.
Alert
A
AidB
Alert + Aid – Provides steering assistance
toward the lane center.
If your vehicle continues drifting out of the
lane after the lane keeping aid corrects the
vehicle, the system provides a steering
wheel vibration.
Note: The alert and aid diagrams illustrate
general zone coverage. They do not provide
exact zone parameters.
Intensity: This setting affects the intensity
of the steering wheel vibration used for the
alert and alert + aid modes. This setting
does not affect the aid mode. •
Low.
• Normal.
• High.
System Display If you switch the system on in alert mode,
an overhead graphic of a vehicle with lane
markings appears in the information
display.
If you switch the system on in aid or alert
and aid mode, a separate white icon also
appears, or in some vehicles, arrows
appear with the lane markings.
When you switch off the system, the lane
marking graphics do not display.
While the system is on, the color of the
lane markings change to indicate the
system status.
Gray: Indicates that the system is
temporarily unable to provide a warning
or intervention on the indicated side. This
may be because:
•
Your vehicle is under the activation
speed.
• The direction indicator is active.
• Your vehicle is in a dynamic maneuver.
230
Explorer (TUB) Canada/United States of America, enUSA, Edition date: 201711, Fourth-Printing Driving AidsE165516 E165517 E151660
Page 257 of 571
2. Set your vehicle parking brake.
3. Place the automatic transmission in
park (P).
4. Place wheel chocks in front and back of the trailer wheels. (Chocks not
included with vehicle.)
Launching or Retrieving a Boat or
Personal Watercraft (PWC)
Note: Disconnect the wiring to the trailer
before backing the trailer into the water.
Note: Reconnect the wiring to the trailer
after
removing the trailer from the water.
When backing down a ramp during boat
launching or retrieval:
• Do not allow the static water level to
rise above the bottom edge of the rear
bumper.
• Do not allow waves to break higher
than
6 in (15 cm) above the bottom
edge of the rear bumper.
Exceeding these limits may allow water to
enter vehicle components:
• Causing internal damage to the
components.
• Affecting driveability, emissions, and
reliability.
Replace the rear axle lubricant anytime
the rear axle has been submerged in water.
Water may have contaminated the rear
axle lubricant, which is not normally
checked or changed unless a leak is
suspected or other axle repair is required. TOWING THE VEHICLE ON
FOUR WHEELS - 2.3L
ECOBOOST™
Emergency Towing
If your vehicle becomes inoperable
(without access to wheel dollies,
car-hauling trailer, or flatbed transport
vehicle), it can be flat-towed (all wheels
on the ground, regardless of the powertrain
and transmission configuration) under the
following conditions:
•
Your vehicle is facing forward for
towing in a forward direction.
• Place the transmission in position
N. If
you cannot move the transmission into
N
, you may need to override it. See
Transmission (page 187).
• Maximum speed is 35 mph (56 km/h).
• Maximum distance is
50 mi (80 km). WARNING:
If your vehicle has a
steering wheel lock make sure the ignition
is in the accessory or on position when
being towed.
Recreational Towing
Note: Put your climate control system in
recirculated air mode to prevent exhaust
fumes from entering the vehicle. See
Climate Control
(page 133).
Follow these guidelines if you have a need
for recreational (RV) towing. An example
of recreational towing would be towing
your vehicle behind a motorhome. We
designed these guidelines to prevent
damage to your transmission.
254
Explorer (TUB) Canada/United States of America, enUSA, Edition date: 201711, Fourth-Printing Towing
Page 260 of 571
BREAKING-IN
You need to break in new tires for
approximately 300 mi (480 km). During
this time, your vehicle may exhibit some
unusual driving characteristics.
Avoid driving too fast during the first
1,000 mi (1,600 km)
. Vary your speed
frequently and change up through the
gears early. Do not labor the engine.
Do not tow during the first
1,000 mi
(1,600 km).
ECONOMICAL DRIVING
Your fuel economy is affected by several
things, such as how you drive, the
conditions you drive under, and how you
maintain your vehicle.
You may improve your fuel economy by
keeping these things in mind:
• Accelerate and slow down in a smooth,
moderate fashion.
• Drive at steady speeds without
stopping.
• Anticipate stops; slowing down may
eliminate the need to stop.
• Combine errands and minimize
stop-and-go driving.
• Close the windows for high-speed
driving.
• Drive at reasonable speeds (traveling
at 55 mph [88 km/h] uses 15% less
fuel than traveling at 65 mph [105
km/h]).
• Keep the tires properly inflated and use
only the recommended size.
• Use the recommended engine oil.
• Perform all regularly scheduled
maintenance. Avoid these actions; they reduce your fuel
economy:
•
Sudden accelerations or hard
accelerations.
• Revving the engine before turning it off.
• Idle for periods longer than one minute.
• Warm up your vehicle on cold
mornings.
• Use the air conditioner or front
defroster.
• Use the speed control in hilly terrain.
• Rest your foot on the brake pedal while
driving.
• Drive a heavily loaded vehicle or tow a
trailer.
• Carry unnecessary weight
(approximately 1 mpg [0.4 km/L] is
lost for every 400 lb [180 kilogram] of
weight carried).
• Driving with the wheels out of
alignment.
Conditions
• Heavily loading a vehicle or towing a
trailer may reduce fuel economy at any
speed.
• Adding certain accessories to your
vehicle (for example bug deflectors,
rollbars, light bars, running boards, ski
racks or luggage racks) may reduce
fuel economy.
• To maximize the fuel economy, drive
with the tonneau cover installed (if
equipped).
• Using fuel blended with alcohol may
lower fuel economy.
• Fuel economy may decrease with lower
temperatures during the first
5–10 mi
(12 –16 km) of driving.
• Driving on flat terrain offers improved
fuel economy as compared to driving
on hilly terrain.
257
Explorer (TUB) Canada/United States of America, enUSA, Edition date: 201711, Fourth-Printing Driving Hints
Page 293 of 571
Only use oils certified for gasoline engines
by the American Petroleum Institute (API).
An oil with this trademark symbol
conforms to the current engine and
emission system protection standards and
fuel economy requirements of the
International Lubricants Specification
Advisory Committee (ILSAC).
To top up the engine oil level do the
following:
1. Clean the area surrounding the engine
oil filler cap before you remove it.
2. Remove the engine oil filler cap. See Under Hood Overview (page 285).
Turn it counterclockwise and remove
it.
3. Add engine oil that meets Ford specifications. See
Capacities and
Specifications (page 354). You may
have to use a funnel to pour the engine
oil into the opening.
4. Recheck the oil level.
5. If the oil level is correct, replace the dipstick and make sure it is fully seated.
6. Replace the engine oil filler cap. Turn it clockwise until you feel a strong
resistance.
Note: Do not add oil further than the
maximum mark. Oil levels above the
maximum mark may cause engine damage.
Note: Make sure you install the oil filler cap
correctly.
Note: Soak up any spillage with an
absorbent cloth immediately.
OIL CHANGE INDICATOR
RESET
Use the information display controls on
the steering wheel to reset the oil change
indicator. From the main menu scroll to: Action and description
Message
Press the right arrow button,
then from this menu scroll
to the following message.
Settings
Press the right arrow button,
then from this menu scroll
to the following message.
Vehicle
Press the right arrow button,
then from this menu scroll
to the following message.
Oil Life
Press and hold the
OK
button until the instrument
cluster displays the
following message.
Hold OK to
Reset
Reset Successful
When the oil change indic-
ator resets the instrument
cluster displays 100%.
Remaining Life
{00}%
If the instrument cluster
displays one of the following
messages, repeat the
process.
Not Reset
Reset Cancelled
290
Explorer (TUB) Canada/United States of America, enUSA, Edition date: 201711, Fourth-Printing Maintenance