height FORD EXPLORER 2018 User Guide
[x] Cancel search | Manufacturer: FORD, Model Year: 2018, Model line: EXPLORER, Model: FORD EXPLORER 2018Pages: 571, PDF Size: 7.3 MB
Page 74 of 571
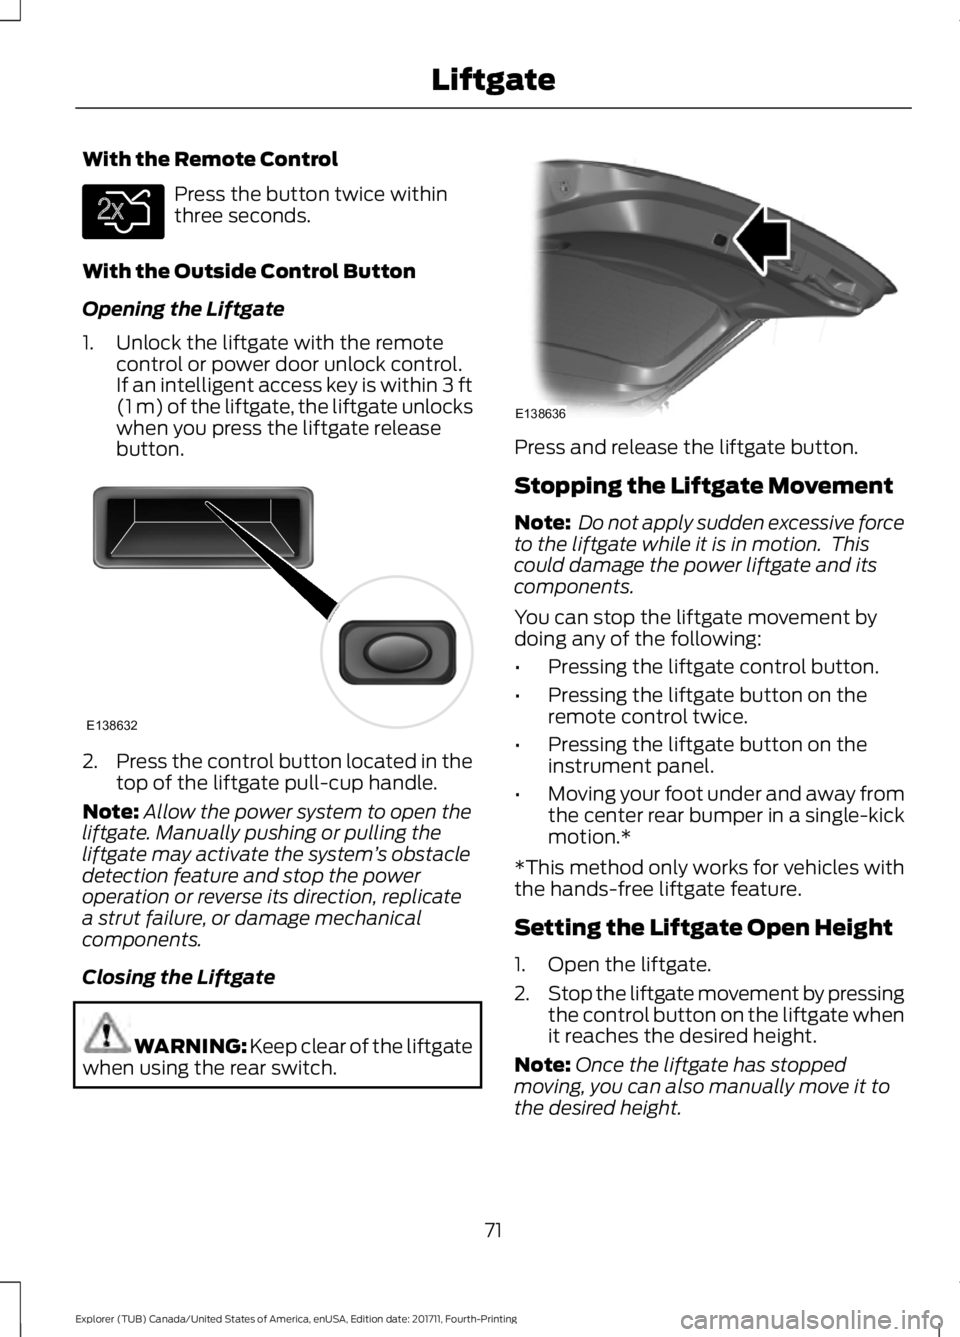
With the Remote Control
Press the button twice within
three seconds.
With the Outside Control Button
Opening the Liftgate
1. Unlock the liftgate with the remote control or power door unlock control.
If an intelligent access key is within 3 ft
(1 m) of the liftgate, the liftgate unlocks
when you press the liftgate release
button. 2.
Press the control button located in the
top of the liftgate pull-cup handle.
Note: Allow the power system to open the
liftgate. Manually pushing or pulling the
liftgate may activate the system ’s obstacle
detection feature and stop the power
operation or reverse its direction, replicate
a strut failure, or damage mechanical
components.
Closing the Liftgate WARNING:
Keep clear of the liftgate
when using the rear switch. Press and release the liftgate button.
Stopping the Liftgate Movement
Note:
Do not apply sudden excessive force
to the liftgate while it is in motion. This
could damage the power liftgate and its
components.
You can stop the liftgate movement by
doing any of the following:
• Pressing the liftgate control button.
• Pressing the liftgate button on the
remote control twice.
• Pressing the liftgate button on the
instrument panel.
• Moving your foot under and away from
the center rear bumper in a single-kick
motion.*
*This method only works for vehicles with
the hands-free liftgate feature.
Setting the Liftgate Open Height
1. Open the liftgate.
2. Stop the liftgate movement by pressing
the control button on the liftgate when
it reaches the desired height.
Note: Once the liftgate has stopped
moving, you can also manually move it to
the desired height.
71
Explorer (TUB) Canada/United States of America, enUSA, Edition date: 201711, Fourth-Printing LiftgateE138630 E138632 E138636
Page 75 of 571
3. Press and hold the liftgate control
button on the liftgate until you hear a
tone, indicating programming is
complete.
Note: You can only use the liftgate control
button to program the height.
Note: You cannot program the height if the
liftgate position is too low.
The new open liftgate height is recalled
when the power liftgate is opened. To
change the programmed height, repeat the
above procedure. Once you open the
power liftgate, you can manually move it
to a different height.
Note: The system recalls the new
programmed height until you reprogram it,
even if you disconnect the battery.
When operating the power liftgate after
you have programmed a lower height than
fully open, you can fully open the liftgate
by manually pushing it upward to the
maximum open position.
Obstacle Detection
When Closing
The system stops when it detects an
obstacle. A tone sounds and the system
reverses to open. Once you remove the
obstacle, you can power close the liftgate.
Note: Entering your vehicle while the
liftgate is closing can cause your vehicle to
bounce and activate obstacle detection. To
prevent this, let the power liftgate close
completely before you enter your vehicle.
Before driving off, check the instrument
cluster for a liftgate or door ajar message or
warning indicator. Failure to do this could
result in unintentionally leaving the liftgate
open while driving. When Opening
The system stops when it detects an
obstacle and a tone sounds. Once you
remove the obstacle, you can continue to
operate the liftgate.
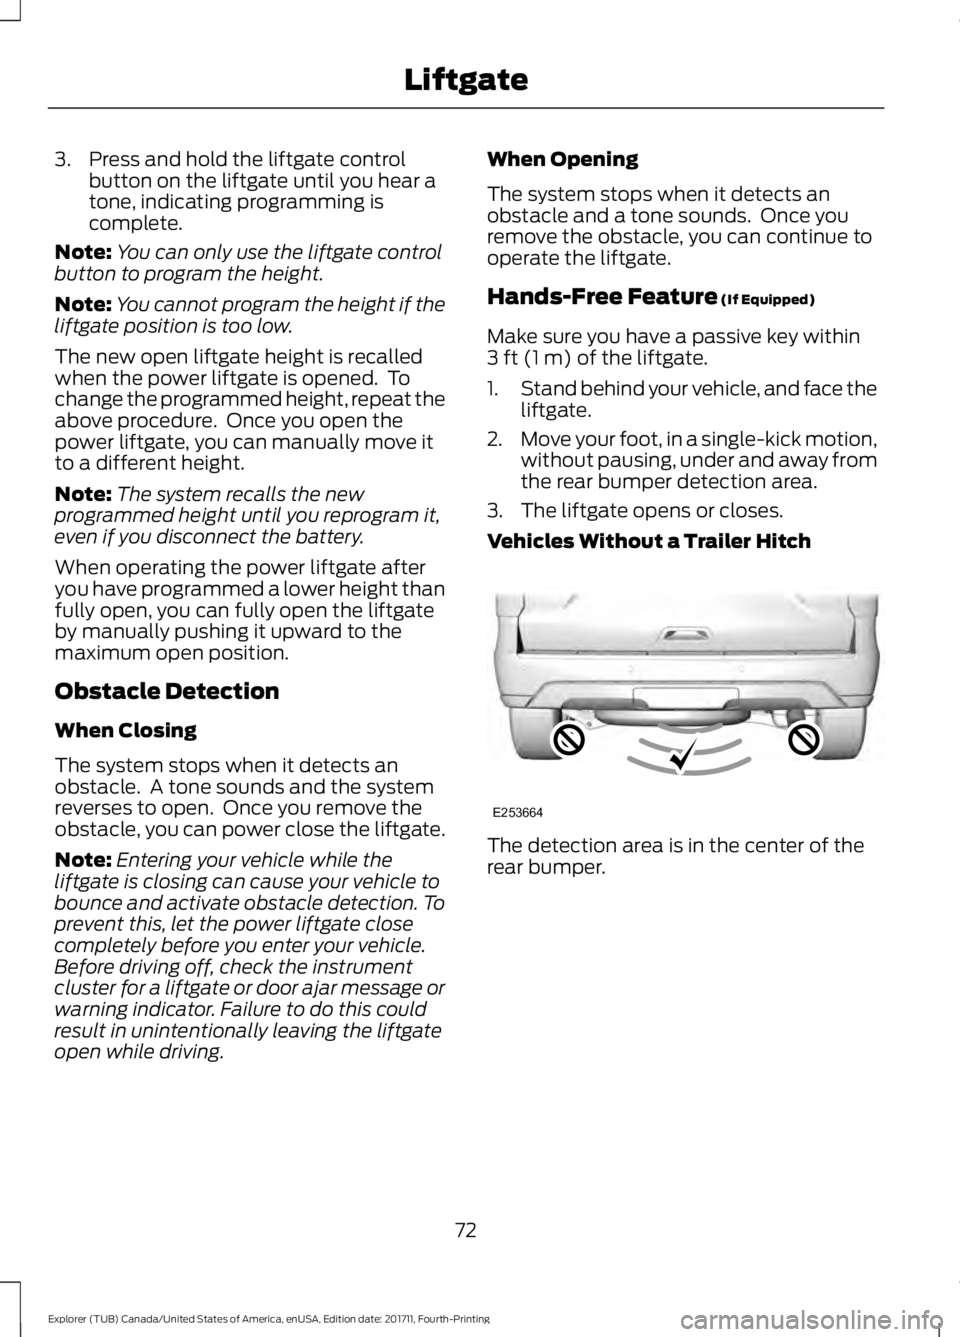
Hands-Free Feature (If Equipped)
Make sure you have a passive key within
3 ft (1 m)
of the liftgate.
1. Stand behind your vehicle, and face the
liftgate.
2. Move your foot, in a single-kick motion,
without pausing, under and away from
the rear bumper detection area.
3. The liftgate opens or closes.
Vehicles Without a Trailer Hitch The detection area is in the center of the
rear bumper.
72
Explorer (TUB) Canada/United States of America, enUSA, Edition date: 201711, Fourth-Printing LiftgateE253664
Page 89 of 571
The other lighting control switch positions
do not turn on the daytime running lamps.
If the daytime running lamps are off in the
information display, the lamps stay off in
all switch positions.
AUTOMATIC HIGH BEAM
CONTROL (If Equipped)
WARNING:
The system does not
relieve you of your responsibility to drive
with due care and attention. You may need
to override the system if it does not turn
the high beams on or off.
The system turns on high beams if it is dark
enough and no other traffic is present. If it
detects an approaching vehicle ’s
headlamps or tail lamps, or street lighting
ahead, the system turns off high beams
before they can distract other road users.
Low beams remain on.
Note: The system may not operate properly
if the sensor is blocked. Keep the windshield
free from obstruction or damage.
Note: The system may not operate properly
in cold or inclement conditions. You can
switch on the high beams by overriding the
system.
Note: If the system detects a blockage, for
example bird droppings, bug splatter, snow
or ice, the system goes into low beam mode
until you clear the blockage. A message may
appear in the information display if the
camera is blocked.
Note: Using much larger tires or equipping
vehicle accessories such as snowplows can
modify your vehicle's ride height and
degrade automatic high beam control
performance. A camera sensor, centrally mounted
behind the windshield of your vehicle,
continuously monitors conditions to turn
the high beams on and off.
Once the system is active, the high beams
turn on if:
•
The ambient light level is low enough.
• There is no traffic in front of your
vehicle.
• The vehicle speed is greater than
approximately 32 mph (51 km/h).
The high beams turn off if:
• The ambient light level is high enough
that high beams are not required.
• The system detects an approaching
vehicle's headlamps or tail lamps.
• The vehicle speed falls below
approximately
27 mph (44 km/h).
• The system detects severe rain, snow
or fog.
• The camera is blocked.
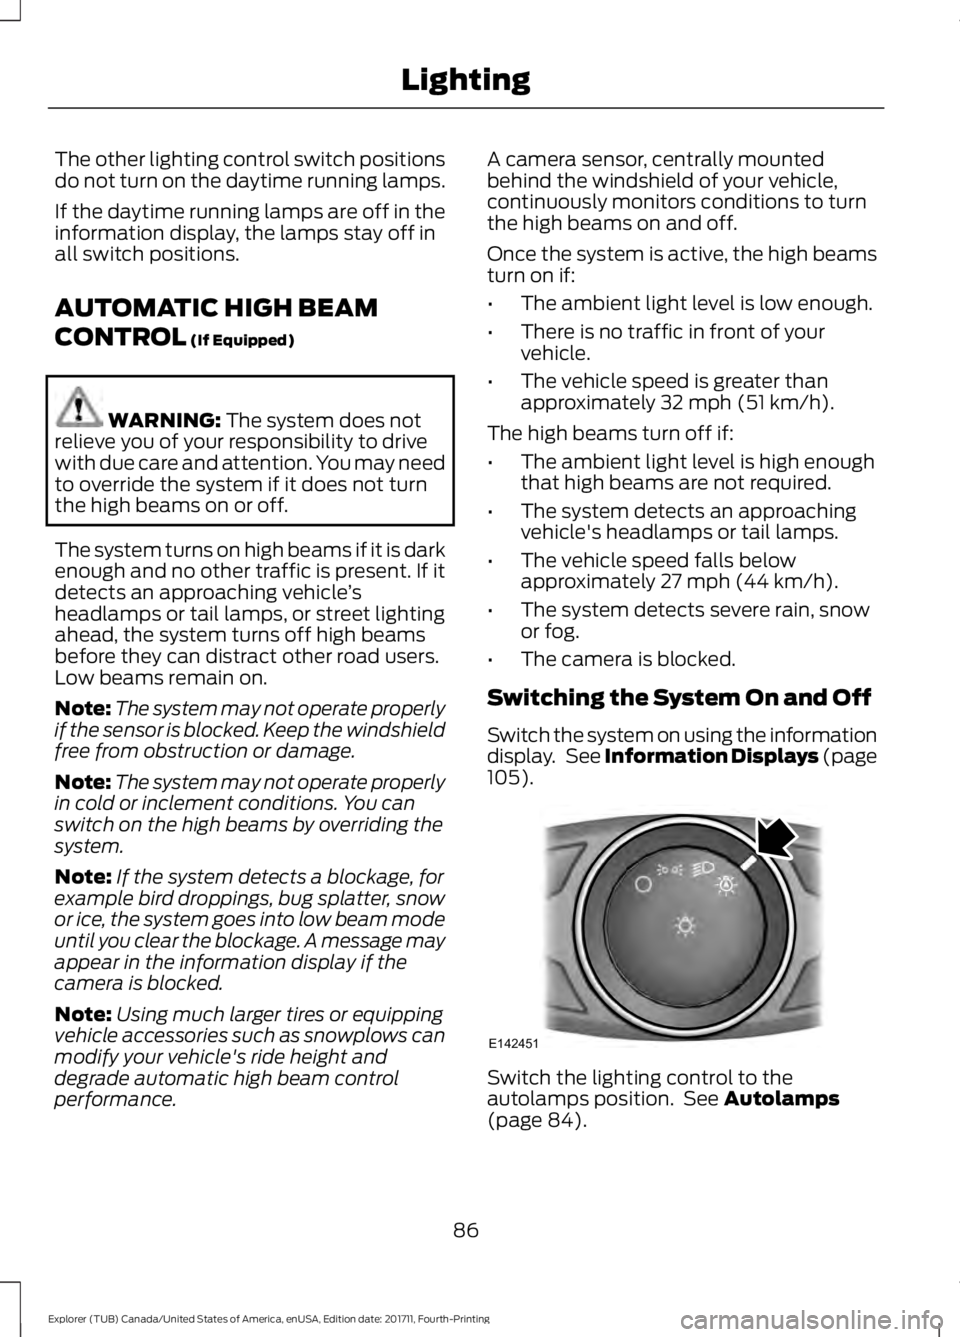
Switching the System On and Off
Switch the system on using the information
display. See Information Displays (page
105
). Switch the lighting control to the
autolamps position. See
Autolamps
(page 84).
86
Explorer (TUB) Canada/United States of America, enUSA, Edition date: 201711, Fourth-Printing LightingE142451
Page 255 of 571
ESSENTIAL TOWING CHECKS
Follow these guidelines for safe towing:
•
Do not tow a trailer until you drive your
vehicle at least 1,000 mi (1,600 km).
• Consult your local motor vehicle laws
for towing a trailer.
• See the instructions included with
towing accessories for the proper
installation and adjustment
specifications.
• Service your vehicle more frequently if
you tow a trailer. See your scheduled
maintenance information.
• If you use a rental trailer, follow the
instructions the rental agency gives
you.
You can find information on load
specification terms found on the tire label
and Safety Compliance label as well as
instructions on calculating your vehicle's
load in the Load Carrying chapter. See
Load Limit
(page 243).
Remember to account for the trailer
tongue weight as part of your vehicle load
when calculating the total vehicle weight.
Hitches
Do not use a hitch that either clamps onto
the bumper or attaches to the axle.
Distribute the trailer load so 10-15% of the
total trailer weight is on the tongue.
Weight-distributing Hitches WARNING:
Do not adjust the spring
bars so that your vehicle's rear bumper is
higher than before attaching the trailer.
Doing so will defeat the function of the
weight-distributing hitch, which may cause
unpredictable handling, and could result
in serious personal injury. When hooking-up a trailer using a
weight-distributing hitch, always use the
following procedure:
1. Park the loaded vehicle, without the
trailer, on a level surface.
2. Measure the height to the top of your vehicle's front wheel opening on the
fender. This is H1.
3. Attach the loaded trailer to your vehicle
without the weight-distributing bars
connected.
4. Measure the height to the top of your vehicle's front wheel opening on the
fender a second time. This is H2.
5. Install and adjust the tension in the weight-distributing bars so that the
height of your vehicle's front wheel
opening on the fender is approximately
half the way down from H2, toward H1.
6. Check that the trailer is level or slightly
nose down toward your vehicle. If not,
adjust the ball height accordingly and
repeat Steps 2-6.
When the trailer is level or slightly nose
down toward the vehicle:
• Lock the bar tension adjuster in place.
• Check that the trailer tongue securely
attaches and locks onto the hitch.
• Install safety chains, lighting, and trailer
brake controls as required by law or the
trailer manufacturer.
Safety Chains
Note: Never attach safety chains to the
bumper.
Always connect the safety chains to the
hook retainers of your vehicle hitch.
To connect the trailer ’s safety chains, cross
them under the trailer tongue and allow
enough slack for turning tight corners. Do
not allow the chains to drag on the ground.
252
Explorer (TUB) Canada/United States of America, enUSA, Edition date: 201711, Fourth-Printing Towing
Page 304 of 571
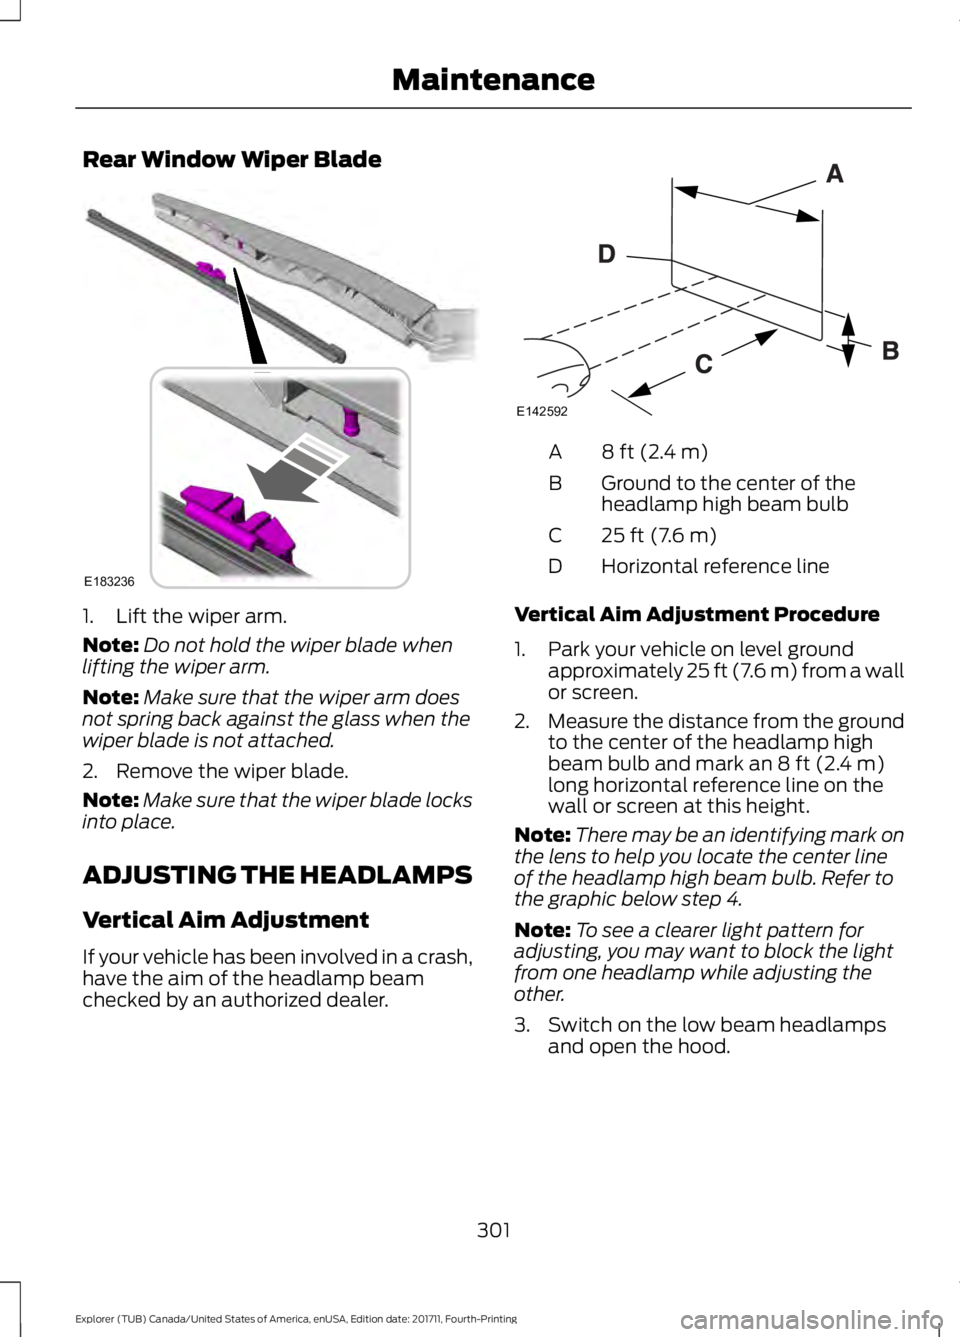
Rear Window Wiper Blade
1. Lift the wiper arm.
Note:
Do not hold the wiper blade when
lifting the wiper arm.
Note: Make sure that the wiper arm does
not spring back against the glass when the
wiper blade is not attached.
2. Remove the wiper blade.
Note: Make sure that the wiper blade locks
into place.
ADJUSTING THE HEADLAMPS
Vertical Aim Adjustment
If your vehicle has been involved in a crash,
have the aim of the headlamp beam
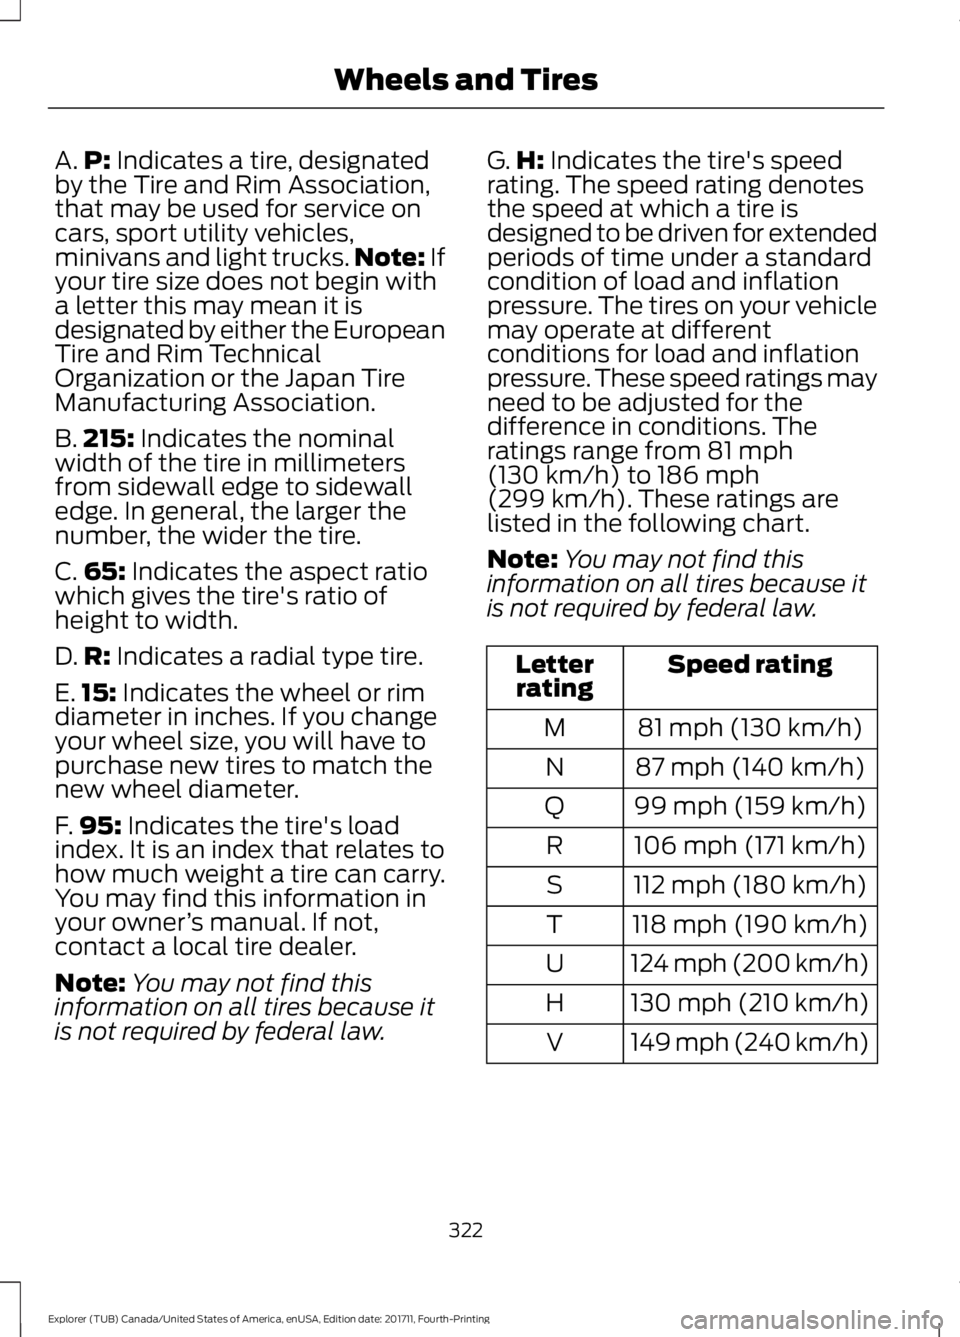
checked by an authorized dealer. 8 ft (2.4 m)
A
Ground to the center of the
headlamp high beam bulb
B
25 ft (7.6 m)
C
Horizontal reference line
D
Vertical Aim Adjustment Procedure
1. Park your vehicle on level ground approximately 25 ft (7.6 m) from a wall
or screen.
2. Measure the distance from the ground
to the center of the headlamp high
beam bulb and mark an
8 ft (2.4 m)
long horizontal reference line on the
wall or screen at this height.
Note: There may be an identifying mark on
the lens to help you locate the center line
of the headlamp high beam bulb. Refer to
the graphic below step 4.
Note: To see a clearer light pattern for
adjusting, you may want to block the light
from one headlamp while adjusting the
other.
3. Switch on the low beam headlamps and open the hood.
301
Explorer (TUB) Canada/United States of America, enUSA, Edition date: 201711, Fourth-Printing MaintenanceE183236 E142592
Page 325 of 571
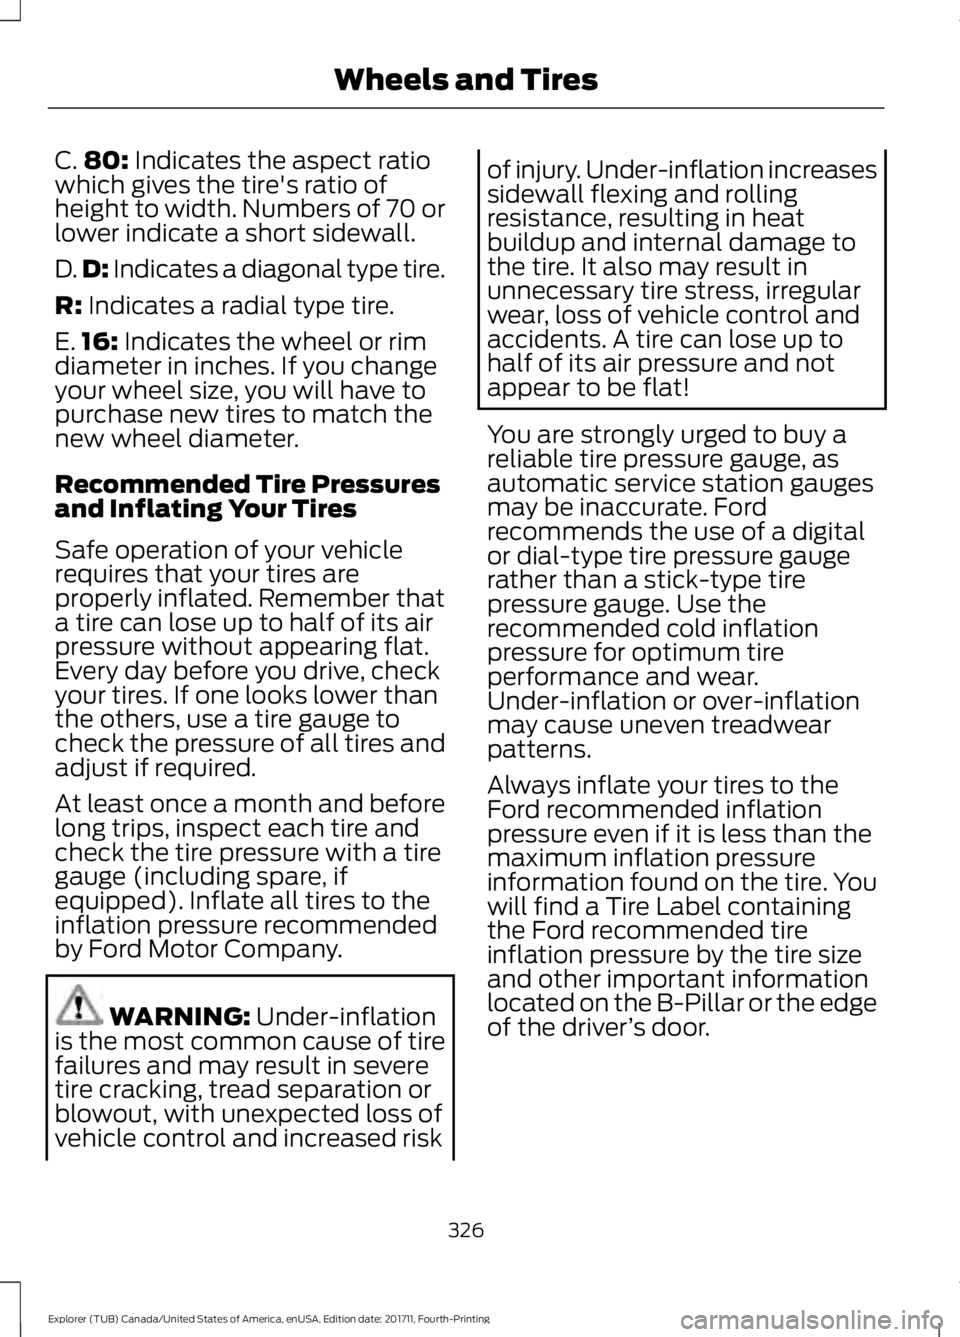
A.
P: Indicates a tire, designated
by the Tire and Rim Association,
that may be used for service on
cars, sport utility vehicles,
minivans and light trucks. Note:
If
your tire size does not begin with
a letter this may mean it is
designated by either the European
Tire and Rim Technical
Organization or the Japan Tire
Manufacturing Association.
B. 215:
Indicates the nominal
width of the tire in millimeters
from sidewall edge to sidewall
edge. In general, the larger the
number, the wider the tire.
C. 65:
Indicates the aspect ratio
which gives the tire's ratio of
height to width.
D. R:
Indicates a radial type tire.
E. 15:
Indicates the wheel or rim
diameter in inches. If you change
your wheel size, you will have to
purchase new tires to match the
new wheel diameter.
F. 95:
Indicates the tire's load
index. It is an index that relates to
how much weight a tire can carry.
You may find this information in
your owner ’s manual. If not,
contact a local tire dealer.
Note: You may not find this
information on all tires because it
is not required by federal law. G.
H:
Indicates the tire's speed
rating. The speed rating denotes
the speed at which a tire is
designed to be driven for extended
periods of time under a standard
condition of load and inflation
pressure. The tires on your vehicle
may operate at different
conditions for load and inflation
pressure. These speed ratings may
need to be adjusted for the
difference in conditions. The
ratings range from
81 mph
(130 km/h) to 186 mph
(299 km/h). These ratings are
listed in the following chart.
Note: You may not find this
information on all tires because it
is not required by federal law. Speed rating
Letter
rating
81 mph (130 km/h)
M
87 mph (140 km/h)
N
99 mph (159 km/h)
Q
106 mph (171 km/h)
R
112 mph (180 km/h)
S
118 mph (190 km/h)
T
124 mph (200 km/h)
U
130 mph (210 km/h)
H
149 mph (240 km/h)
V
322
Explorer (TUB) Canada/United States of America, enUSA, Edition date: 201711, Fourth-Printing Wheels and Tires
Page 329 of 571
C.
80: Indicates the aspect ratio
which gives the tire's ratio of
height to width. Numbers of 70 or
lower indicate a short sidewall.
D. D:
Indicates a diagonal type tire.
R:
Indicates a radial type tire.
E. 16:
Indicates the wheel or rim
diameter in inches. If you change
your wheel size, you will have to
purchase new tires to match the
new wheel diameter.
Recommended Tire Pressures
and Inflating Your Tires
Safe operation of your vehicle
requires that your tires are
properly inflated. Remember that
a tire can lose up to half of its air
pressure without appearing flat.
Every day before you drive, check
your tires. If one looks lower than
the others, use a tire gauge to
check the pressure of all tires and
adjust if required.
At least once a month and before
long trips, inspect each tire and
check the tire pressure with a tire
gauge (including spare, if
equipped). Inflate all tires to the
inflation pressure recommended
by Ford Motor Company. WARNING:
Under-inflation
is the most common cause of tire
failures and may result in severe
tire cracking, tread separation or
blowout, with unexpected loss of
vehicle control and increased risk of injury. Under-inflation increases
sidewall flexing and rolling
resistance, resulting in heat
buildup and internal damage to
the tire. It also may result in
unnecessary tire stress, irregular
wear, loss of vehicle control and
accidents. A tire can lose up to
half of its air pressure and not
appear to be flat!
You are strongly urged to buy a
reliable tire pressure gauge, as
automatic service station gauges
may be inaccurate. Ford
recommends the use of a digital
or dial-type tire pressure gauge
rather than a stick-type tire
pressure gauge. Use the
recommended cold inflation
pressure for optimum tire
performance and wear.
Under-inflation or over-inflation
may cause uneven treadwear
patterns.
Always inflate your tires to the
Ford recommended inflation
pressure even if it is less than the
maximum inflation pressure
information found on the tire. You
will find a Tire Label containing
the Ford recommended tire
inflation pressure by the tire size
and other important information
located on the B-Pillar or the edge
of the driver
’s door.
326
Explorer (TUB) Canada/United States of America, enUSA, Edition date: 201711, Fourth-Printing Wheels and Tires
Page 330 of 571
The Ford recommended tire
inflation pressure is also found on
the Safety Compliance
Certification Label (affixed to
either the door hinge pillar,
door-latch post, or the door edge
that meets the door-latch on the
B-pillar, or on the edge of the
driver
’s door.
Failure to follow the tire pressure
recommendations can cause
uneven treadwear patterns and
adversely affect the way your
vehicle handles.
Inspecting Your Tires and
Wheel Valve Stems
Periodically inspect the tire treads
for uneven or excessive wear and
remove objects such as stones,
nails or glass that may be wedged
in the tread grooves. Check the tire
and valve stems for holes, cracks,
or cuts that may permit air
leakage and repair or replace the
tire and replace the valve stem.
Inspect the tire sidewalls for
cracking, cuts, bruises and other
signs of damage or excessive
wear. If internal damage to the tire
is suspected, have the tire
demounted and inspected in case
it needs to be repaired or replaced.
For your safety, tires that are
damaged or show signs of
excessive wear should not be used
because they are more likely to
blow out or fail. Improper or inadequate vehicle
maintenance can cause tires to
wear abnormally. Inspect all your
tires, including the spare,
frequently, and replace them if
one or more of the following
conditions exist:
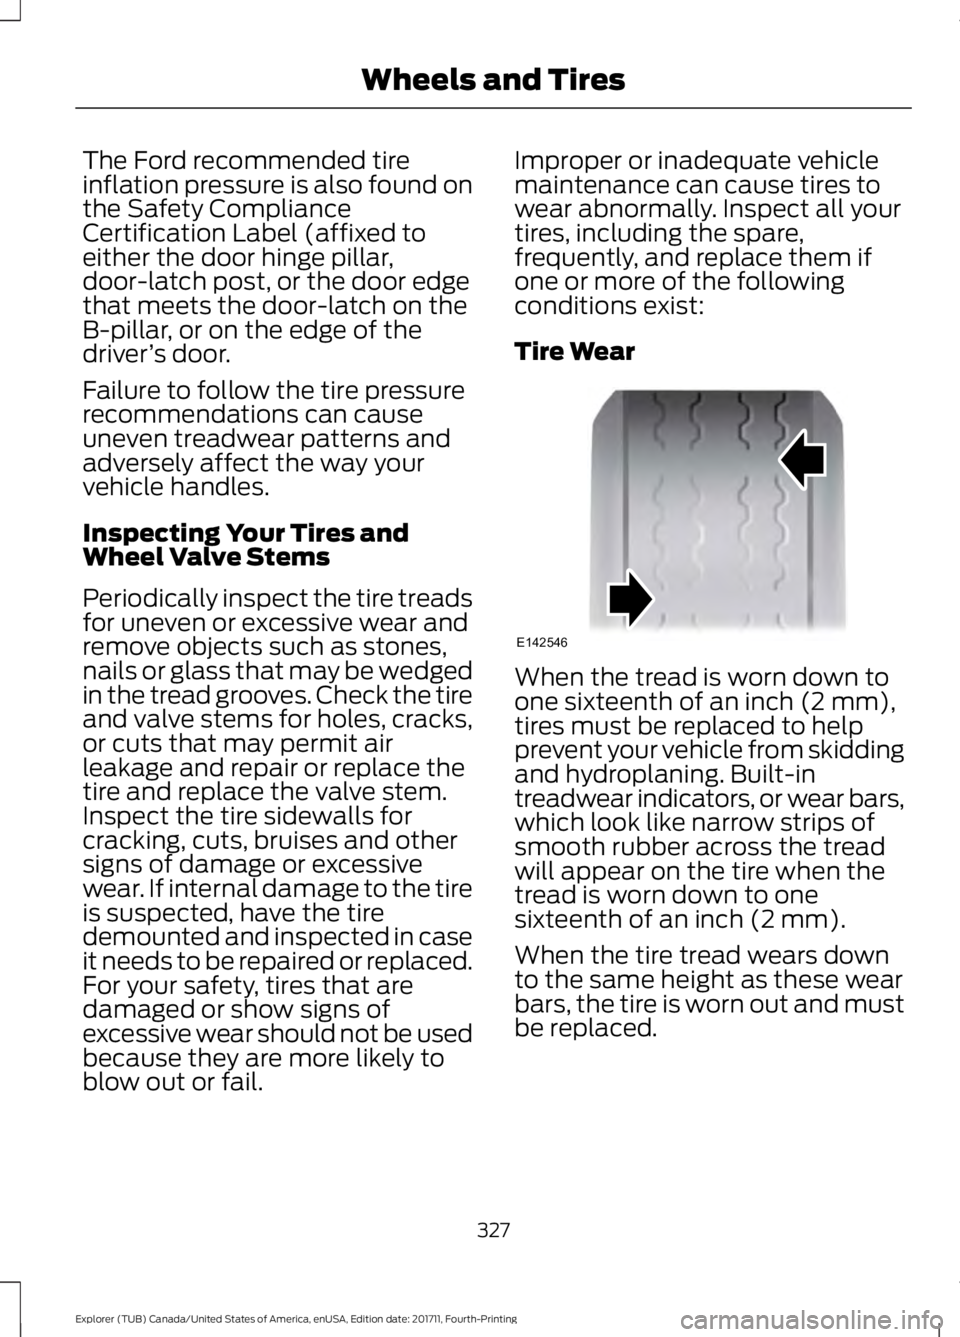
Tire Wear
When the tread is worn down to
one sixteenth of an inch (2 mm),
tires must be replaced to help
prevent your vehicle from skidding
and hydroplaning. Built-in
treadwear indicators, or wear bars,
which look like narrow strips of
smooth rubber across the tread
will appear on the tire when the
tread is worn down to one
sixteenth of an inch (2 mm).
When the tire tread wears down
to the same height as these wear
bars, the tire is worn out and must
be replaced.
327
Explorer (TUB) Canada/United States of America, enUSA, Edition date: 201711, Fourth-Printing Wheels and TiresE142546
Page 567 of 571
Phone Menu.........................................................
452
Receiving Calls................................................... 454
Smartphone Connectivity.............................. 455
Text Messaging................................................... 455
Post-Crash Alert System..........................264
Power Door Locks See: Locking and Unlocking............................. 64
Power Liftgate.................................................70 Hands-Free Feature............................................. 72
Obstacle Detection.............................................. 72
Opening and Closing the Liftgate.................. 70
Setting the Liftgate Open Height.................... 71
Stopping the Liftgate Movement.................... 71
Power Seats
...................................................148
Adjusting the Lumbar Support..................... 149
Adjusting the Multi-Contour Front Seats With Active Motion ...................................... 149
Power Steering Fluid Check....................298
Power Windows...............................................91 Accessory Delay.................................................... 92
Bounce-Back.......................................................... 91
One-Touch Down.................................................. 91
One-Touch Up........................................................ 91
Window Lock......................................................... 92
Pre-Collision Assist
.....................................238
Using the Pre-Collision Assist
System.............................................................. 238
Protecting the Environment........................15
Puncture See: Changing a Road Wheel........................ 337
R
Rear Parking Aid...........................................205 Obstacle Distance Indicator......................... 206
Rear Passenger Climate Controls..........140
Rear Seats........................................................151 Adjusting the Rear Seats.................................. 151
Rear Under Floor Storage..........................241 Adjustable Load Floor....................................... 241
Cargo Management System........................... 241
Rear View Camera
........................................215
Camera Guidelines............................................. 216
Manual Zoom....................................................... 218
Obstacle Distance Indicator............................ 217
Rear Camera Delay............................................ 218
Using the Rear View Camera System.........216 Rear View Camera
See: Rear View Camera.................................... 215
Rear Window Wiper and Washers...........82 Rear Camera Washer.......................................... 82
Rear Window Washer......................................... 82
Rear Window Wiper Blade............................... 82
Recommended Towing Weights...........250
Refueling..........................................................179 Refueling System Overview............................ 179
Refueling System Warning.............................. 181
Refueling Your Vehicle...................................... 179
Remote Control..............................................53 Car Finder................................................................ 57
Integrated Keyhead Transmitter..................... 53
Intelligent Access Key......................................... 53
Memory Feature................................................... 56
Remote Start.......................................................... 57
Replacing the Battery......................................... 54
Sounding the Panic Alarm................................ 57
Remote Start
..................................................142
Automatic Settings............................................ 142
Removing a Headlamp
.............................303
Repairing Minor Paint Damage...............314
Replacement Parts Recommendation........................................12
Collision Repairs.................................................... 12
Scheduled Maintenance and Mechanical Repairs.................................................................. 12
Warranty on Replacement Parts..................... 12
Replacing a Lost Key or Remote Control............................................................58
Reporting Safety Defects (Canada Only)...............................................................271
Reporting Safety Defects (U.S. Only)...............................................................271
Roadside Assistance
.................................260
Vehicles Sold in Canada: Getting Roadside
Assistance........................................................ 261
Vehicles Sold in Canada: Roadside Assistance Program Coverage.................. 261
Vehicles Sold in Canada: Using Roadside Assistance........................................................ 261
Vehicles Sold in the United States: Getting Roadside Assistance................................... 260
Vehicles Sold in the United States: Using Roadside Assistance................................... 260
Roadside Emergencies
.............................260
564
Explorer (TUB) Canada/United States of America, enUSA, Edition date: 201711, Fourth-Printing Index
Page 568 of 571
Roof Racks and Load Carriers.................242
Adjusting the Crossbar.................................... 243
Thumbwheel Kit................................................. 242
Running-In See: Breaking-In.................................................. 257
Running Out of Fuel......................................177
Adding Fuel From a Portable Fuel
Container........................................................... 178
Filling a Portable Fuel Container................... 178
S
Safety Canopy ™
............................................49
Safety Precautions.......................................175
Satellite Radio...............................................375
Satellite Radio Electronic Serial Number
(ESN)................................................................. 376
Satellite Radio Reception Factors...............375
SiriusXM Satellite Radio Service.................. 375
Troubleshooting................................................. 376
Scheduled Maintenance Record...........507
Scheduled Maintenance
..........................499
Seatbelt Extension........................................42
Seatbelt Height Adjustment......................39
Seatbelt Reminder
........................................40
Belt-Minder™....................................................... 40
Seatbelts...........................................................35 Principle of Operation......................................... 35
Seatbelt Warning Lamp and Indicator Chime..............................................................40
Conditions of operation.................................... 40
Seats.................................................................144
Security...............................................................74
Settings...........................................................467 911 Assist................................................................ 472
Ambient Lighting............................................... 479
Bluetooth............................................................. 469
Clock...................................................................... 469
Display
.................................................................. 480
General................................................................... 477
Media Player....................................................... 468
Mobile Apps......................................................... 475
Navigation............................................................. 473
Phone
.................................................................... 469
Radio....................................................................... 472
Sound..................................................................... 467
Valet Mode............................................................ 481
Vehicle .................................................................... 479Voice Control......................................................
480
Wi-Fi & Hotspot.................................................. 477
Side Airbags
.....................................................48
Side Sensing System..................................207 Obstacle Distance Indicator......................... 208
Sitting in the Correct Position
..................144
Snow Chains See: Using Snow Chains................................. 332
Spare Wheel See: Changing a Road Wheel........................ 337
Special Notices................................................12 New Vehicle Limited Warranty......................... 12
Notice to Owners of Pickup Trucks and Utility Type Vehicles........................................ 13
On Board Diagnostics Data Link Connector............................................................ 13
Special Instructions.............................................. 12
Using Your Vehicle as an Ambulance............13
Using Your Vehicle With a Snowplow............13
Special Operating Conditions Scheduled Maintenance..............................................505
Exceptions........................................................... 506
Speed Control See: Cruise Control........................................... 220
Stability Control
..........................................200
Principle of Operation..................................... 200
Starter Switch See: Ignition Switch........................................... 169
Starting a Gasoline Engine........................170 Automatic Engine Shutdown......................... 172
Failure to Start....................................................... 171
Guarding Against Exhaust Fumes................173
Important Ventilating Information...............173
Stopping the Engine When Your Vehicle is Moving................................................................ 172
Stopping the Engine When Your Vehicle is Stationary.......................................................... 172
Vehicles with an Ignition Key.......................... 170
Vehicles with Keyless Start............................. 170
Starting and Stopping the Engine.........169 General Information.......................................... 169
Steering............................................................237 Electric Power Steering.................................... 237
Steering Wheel
................................................76
Storage Compartments.............................167
Sunroof See: Moonroof....................................................... 95
565
Explorer (TUB) Canada/United States of America, enUSA, Edition date: 201711, Fourth-Printing Index