Valve FORD EXPLORER 2018 Owners Manual
[x] Cancel search | Manufacturer: FORD, Model Year: 2018, Model line: EXPLORER, Model: FORD EXPLORER 2018Pages: 571, PDF Size: 7.3 MB
Page 178 of 571
SAFETY PRECAUTIONS
WARNING: Do not overfill the fuel
tank. The pressure in an overfilled tank may
cause leakage and lead to fuel spray and
fire. WARNING: The fuel system may be
under pressure. If you hear a hissing sound
near the fuel filler inlet, do not refuel until
the sound stops. Otherwise, fuel may spray
out, which could cause serious personal
injury. WARNING: Fuels can cause serious
injury or death if misused or mishandled. WARNING:
Fuel may contain
benzene, which is a cancer-causing agent. WARNING:
When refueling always
shut the engine off and never allow sparks
or open flames near the fuel tank filler
valve. Never smoke or use a cell phone
while refueling. Fuel vapor is extremely
hazardous under certain conditions. Avoid
inhaling excess fumes.
Follow these guidelines when refueling:
• Extinguish all smoking materials and
any open flames before refueling your
vehicle.
• Always switch the engine off before
refueling.
• Automotive fuels can be harmful or
fatal if swallowed. Fuel is highly toxic
and if swallowed can cause death or
permanent injury. If fuel is swallowed
immediately call a physician, even if no
symptoms are immediately apparent.
The toxic effects of fuel may not be
apparent for hours. •
Avoid inhaling fuel vapors. Inhaling fuel
vapor can lead to eye and respiratory
tract irritation. In severe cases,
excessive or prolonged breathing of
fuel vapor can cause serious illness and
permanent injury.
• Avoid getting fuel in your eyes. If you
splash fuel in your eyes, immediately
remove contact lenses (if worn), flush
with water for 15 minutes and seek
medical attention. Failure to seek
proper medical attention could lead to
permanent injury.
• Fuels can be harmful if absorbed
through the skin. If you splash fuel on
your skin, clothing or both, promptly
remove contaminated clothing and
thoroughly wash your skin with soap
and water. Repeated or prolonged skin
contact causes skin irritation.
• Be particularly careful if you are taking
Antabuse or other forms of Disulfiram
for the treatment of alcoholism.
Breathing fuel vapors could cause an
adverse reaction, serious personal
injury or sickness. Immediately call a
physician if you experience any adverse
reactions.
FUEL QUALITY - GASOLINE
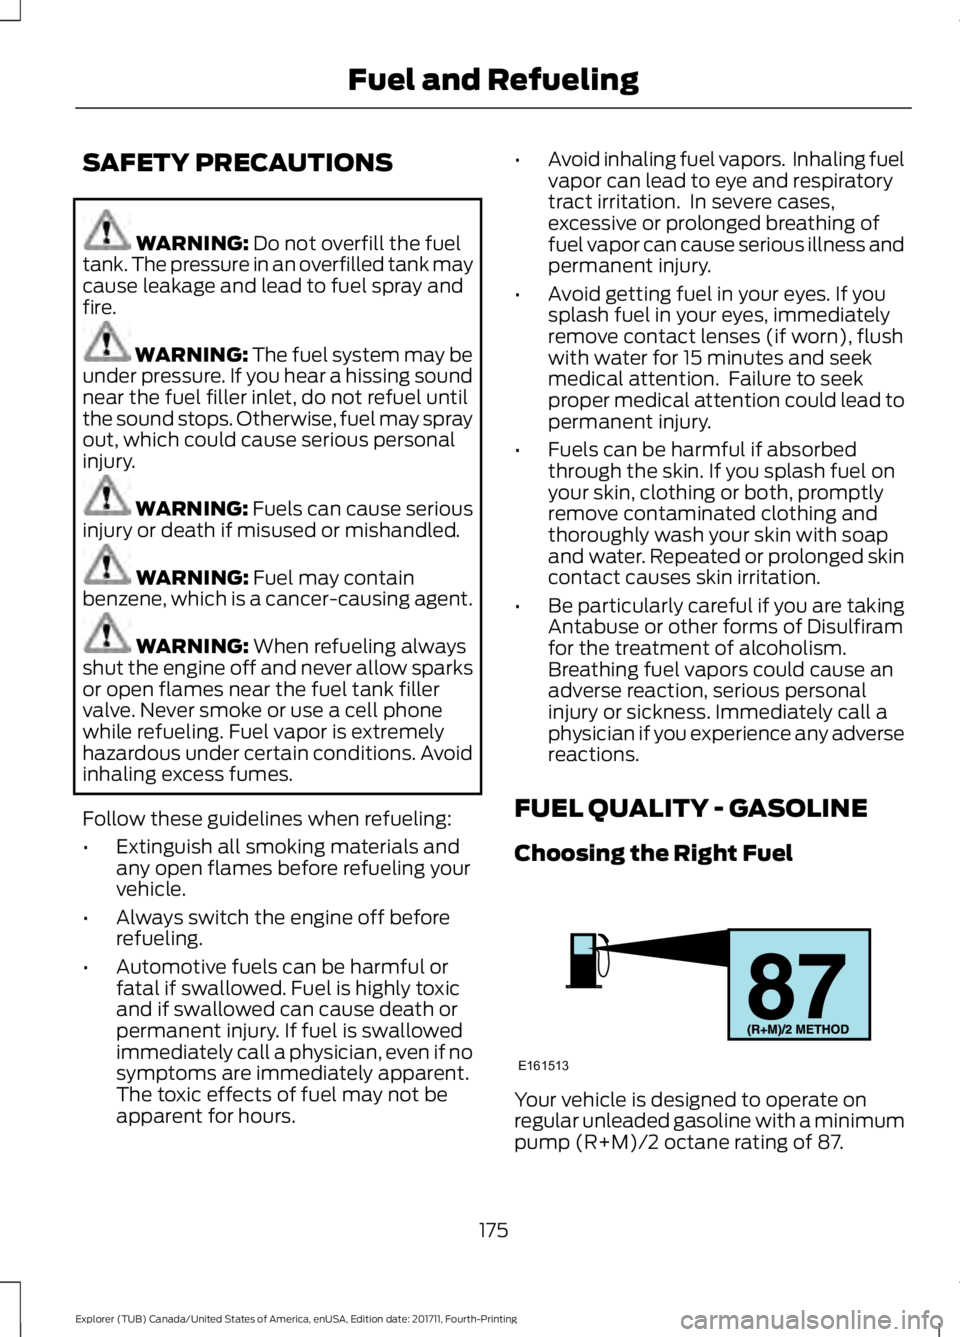
Choosing the Right Fuel Your vehicle is designed to operate on
regular unleaded gasoline with a minimum
pump (R+M)/2 octane rating of 87.
175
Explorer (TUB) Canada/United States of America, enUSA, Edition date: 201711, Fourth-Printing Fuel and RefuelingE161513
Page 182 of 571
5. Fully close the fuel filler door.
6. Clean the fuel filler funnel and place it
back in your vehicle or correctly dispose
of it.
Note: Extra funnels can be purchased from
an authorized dealer if you choose to
dispose of the funnel.
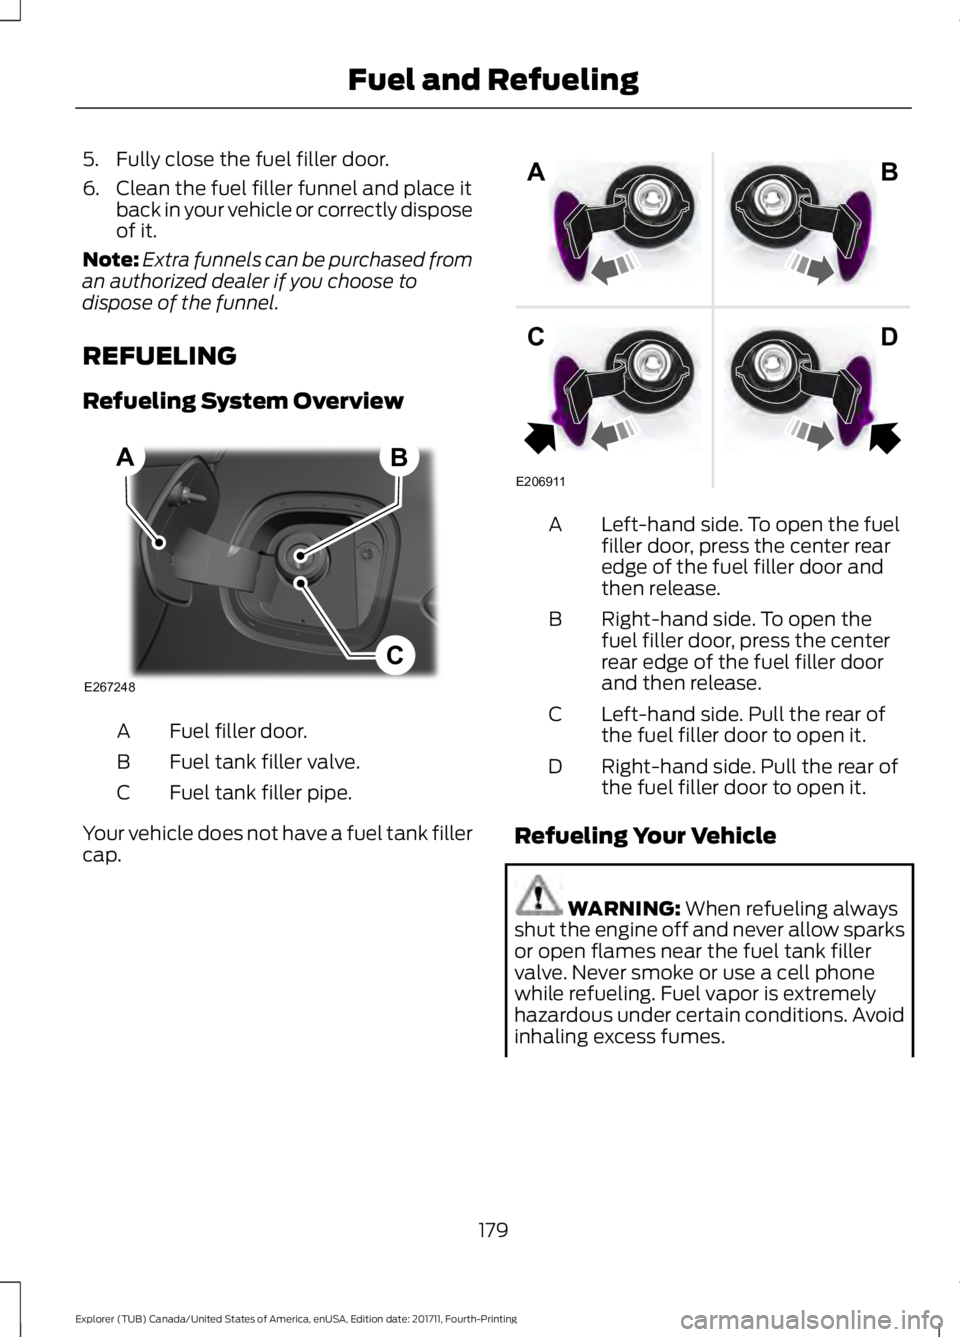
REFUELING
Refueling System Overview Fuel filler door.
A
Fuel tank filler valve.
B
Fuel tank filler pipe.
C
Your vehicle does not have a fuel tank filler
cap. Left-hand side. To open the fuel
filler door, press the center rear
edge of the fuel filler door and
then release.
A
Right-hand side. To open the
fuel filler door, press the center
rear edge of the fuel filler door
and then release.
B
Left-hand side. Pull the rear of
the fuel filler door to open it.
C
Right-hand side. Pull the rear of
the fuel filler door to open it.
D
Refueling Your Vehicle WARNING: When refueling always
shut the engine off and never allow sparks
or open flames near the fuel tank filler
valve. Never smoke or use a cell phone
while refueling. Fuel vapor is extremely
hazardous under certain conditions. Avoid
inhaling excess fumes.
179
Explorer (TUB) Canada/United States of America, enUSA, Edition date: 201711, Fourth-Printing Fuel and RefuelingE267248
B
C
A E206911
AB
CD
Page 183 of 571
WARNING: The fuel system may be
under pressure. If you hear a hissing sound
near the fuel filler inlet, do not refuel until
the sound stops. Otherwise, fuel may spray
out, which could cause serious personal
injury. WARNING: Do not pry open the fuel
tank filler valve. This could damage the
fuel system. Failure to follow this
instruction could result in fire, personal
injury or death. WARNING:
Do not remove the fuel
pump nozzle from its fully inserted position
when refueling. WARNING: Stop refueling when the
fuel pump nozzle automatically shuts off
for the first time. Failure to follow this will
fill the expansion space in the fuel tank and
could lead to fuel overflowing. WARNING:
Do not overfill the fuel
tank. The pressure in an overfilled tank may
cause leakage and lead to fuel spray and
fire. WARNING:
Wait at least five
seconds before removing the fuel pump
nozzle to allow any residual fuel to drain
into the fuel tank.
1. Fully open the fuel filler door.
2. Select the correct fuel pump nozzle for
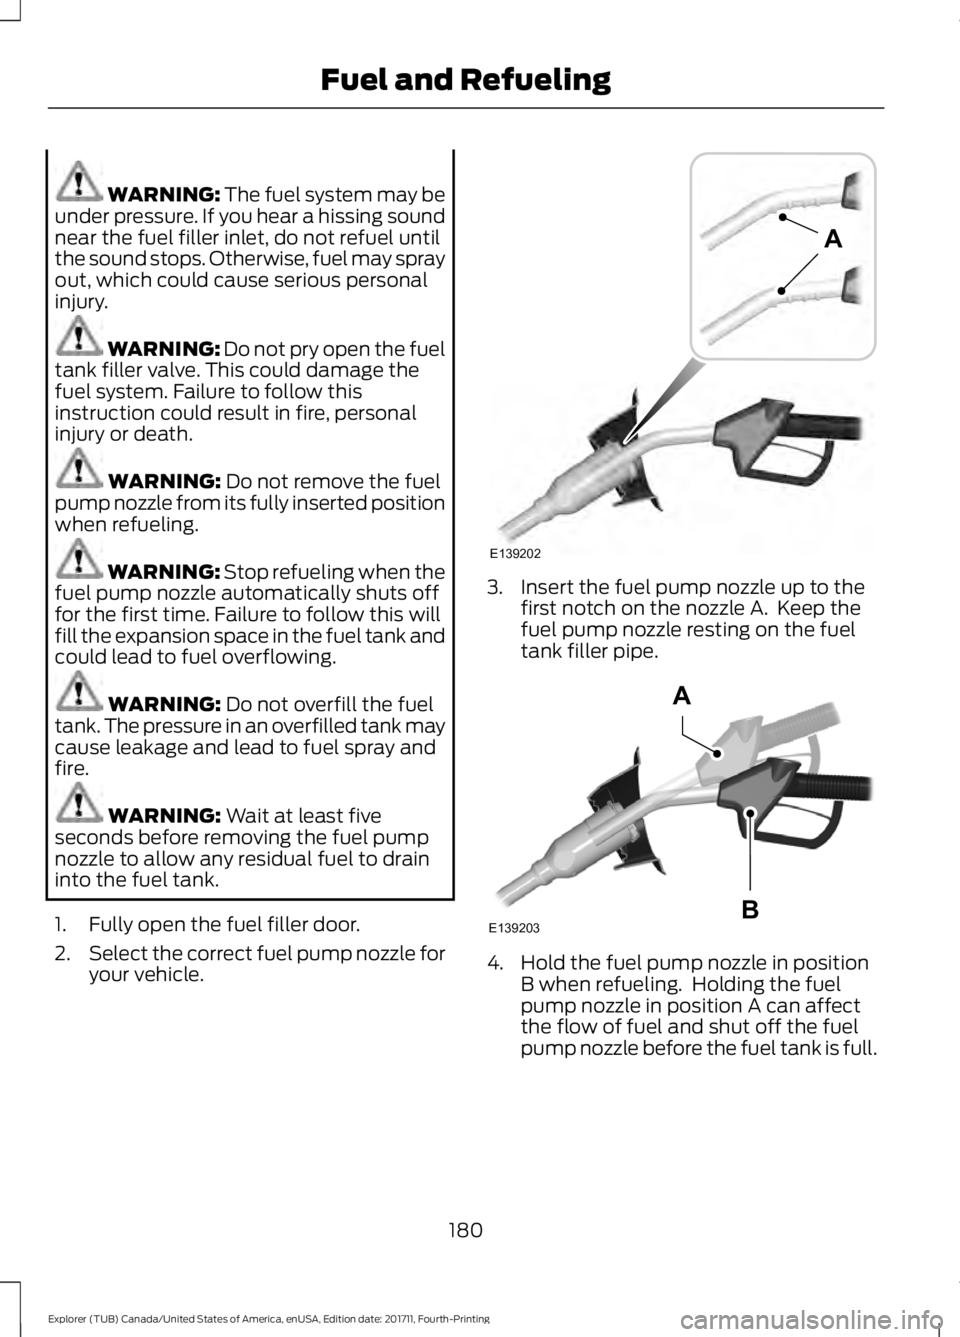
your vehicle. 3. Insert the fuel pump nozzle up to the
first notch on the nozzle A. Keep the
fuel pump nozzle resting on the fuel
tank filler pipe. 4. Hold the fuel pump nozzle in position
B when refueling. Holding the fuel
pump nozzle in position A can affect
the flow of fuel and shut off the fuel
pump nozzle before the fuel tank is full.
180
Explorer (TUB) Canada/United States of America, enUSA, Edition date: 201711, Fourth-Printing Fuel and RefuelingE139202
A E139203
A
B
Page 184 of 571
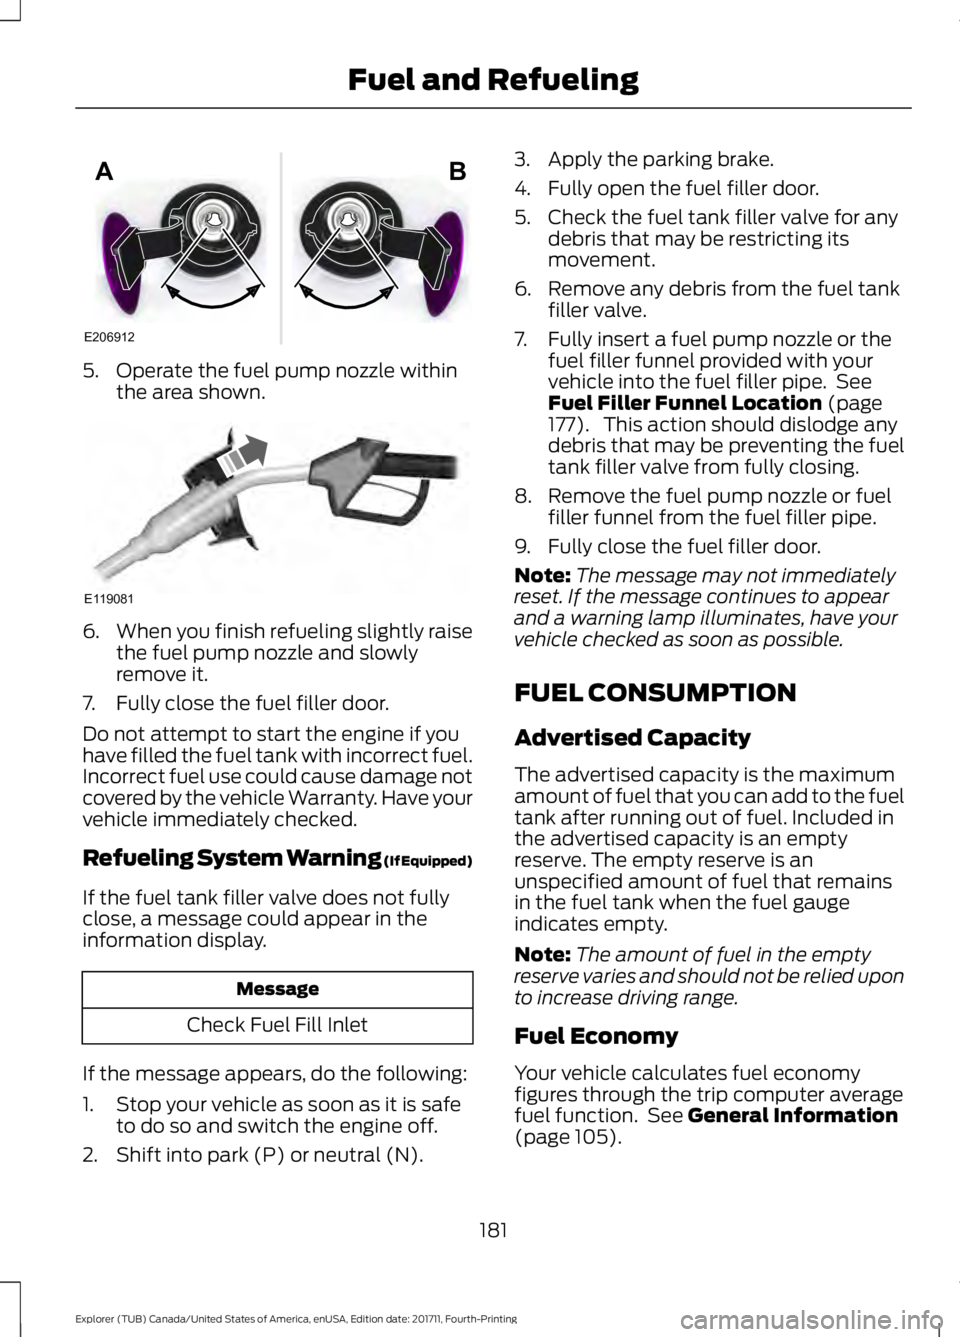
5. Operate the fuel pump nozzle within
the area shown. 6.
When you finish refueling slightly raise
the fuel pump nozzle and slowly
remove it.
7. Fully close the fuel filler door.
Do not attempt to start the engine if you
have filled the fuel tank with incorrect fuel.
Incorrect fuel use could cause damage not
covered by the vehicle Warranty. Have your
vehicle immediately checked.
Refueling System Warning (If Equipped)
If the fuel tank filler valve does not fully
close, a message could appear in the
information display. Message
Check Fuel Fill Inlet
If the message appears, do the following:
1. Stop your vehicle as soon as it is safe to do so and switch the engine off.
2. Shift into park (P) or neutral (N). 3. Apply the parking brake.
4. Fully open the fuel filler door.
5. Check the fuel tank filler valve for any
debris that may be restricting its
movement.
6. Remove any debris from the fuel tank filler valve.
7. Fully insert a fuel pump nozzle or the fuel filler funnel provided with your
vehicle into the fuel filler pipe. See
Fuel Filler Funnel Location (page
177). This action should dislodge any
debris that may be preventing the fuel
tank filler valve from fully closing.
8. Remove the fuel pump nozzle or fuel filler funnel from the fuel filler pipe.
9. Fully close the fuel filler door.
Note: The message may not immediately
reset. If the message continues to appear
and a warning lamp illuminates, have your
vehicle checked as soon as possible.
FUEL CONSUMPTION
Advertised Capacity
The advertised capacity is the maximum
amount of fuel that you can add to the fuel
tank after running out of fuel. Included in
the advertised capacity is an empty
reserve. The empty reserve is an
unspecified amount of fuel that remains
in the fuel tank when the fuel gauge
indicates empty.
Note: The amount of fuel in the empty
reserve varies and should not be relied upon
to increase driving range.
Fuel Economy
Your vehicle calculates fuel economy
figures through the trip computer average
fuel function. See
General Information
(page 105).
181
Explorer (TUB) Canada/United States of America, enUSA, Edition date: 201711, Fourth-Printing Fuel and RefuelingE206912
AB E119081
Page 278 of 571
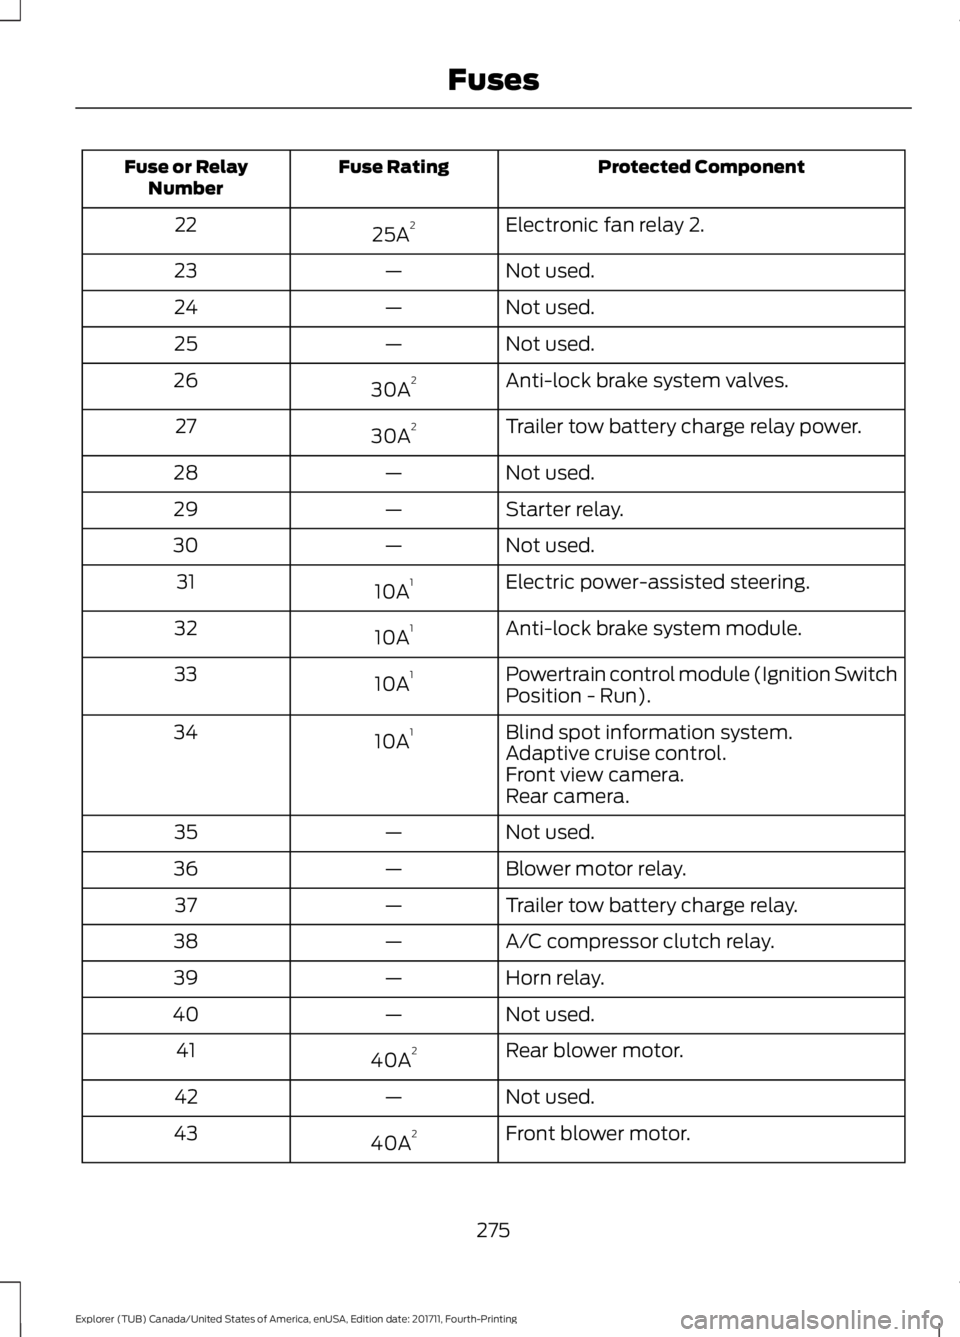
Protected Component
Fuse Rating
Fuse or Relay
Number
Electronic fan relay 2.
25A 2
22
Not used.
—
23
Not used.
—
24
Not used.
—
25
Anti-lock brake system valves.
30A 2
26
Trailer tow battery charge relay power.
30A 2
27
Not used.
—
28
Starter relay.
—
29
Not used.
—
30
Electric power-assisted steering.
10A 1
31
Anti-lock brake system module.
10A 1
32
Powertrain control module (Ignition Switch
Position - Run).
10A 1
33
Blind spot information system.
10A 1
34
Adaptive cruise control.
Front view camera.
Rear camera.
Not used.
—
35
Blower motor relay.
—
36
Trailer tow battery charge relay.
—
37
A/C compressor clutch relay.
—
38
Horn relay.
—
39
Not used.
—
40
Rear blower motor.
40A 2
41
Not used.
—
42
Front blower motor.
40A 2
43
275
Explorer (TUB) Canada/United States of America, enUSA, Edition date: 201711, Fourth-Printing Fuses
Page 330 of 571
The Ford recommended tire
inflation pressure is also found on
the Safety Compliance
Certification Label (affixed to
either the door hinge pillar,
door-latch post, or the door edge
that meets the door-latch on the
B-pillar, or on the edge of the
driver
’s door.
Failure to follow the tire pressure
recommendations can cause
uneven treadwear patterns and
adversely affect the way your
vehicle handles.
Inspecting Your Tires and
Wheel Valve Stems
Periodically inspect the tire treads
for uneven or excessive wear and
remove objects such as stones,
nails or glass that may be wedged
in the tread grooves. Check the tire
and valve stems for holes, cracks,
or cuts that may permit air
leakage and repair or replace the
tire and replace the valve stem.
Inspect the tire sidewalls for
cracking, cuts, bruises and other
signs of damage or excessive
wear. If internal damage to the tire
is suspected, have the tire
demounted and inspected in case
it needs to be repaired or replaced.
For your safety, tires that are
damaged or show signs of
excessive wear should not be used
because they are more likely to
blow out or fail. Improper or inadequate vehicle
maintenance can cause tires to
wear abnormally. Inspect all your
tires, including the spare,
frequently, and replace them if
one or more of the following
conditions exist:
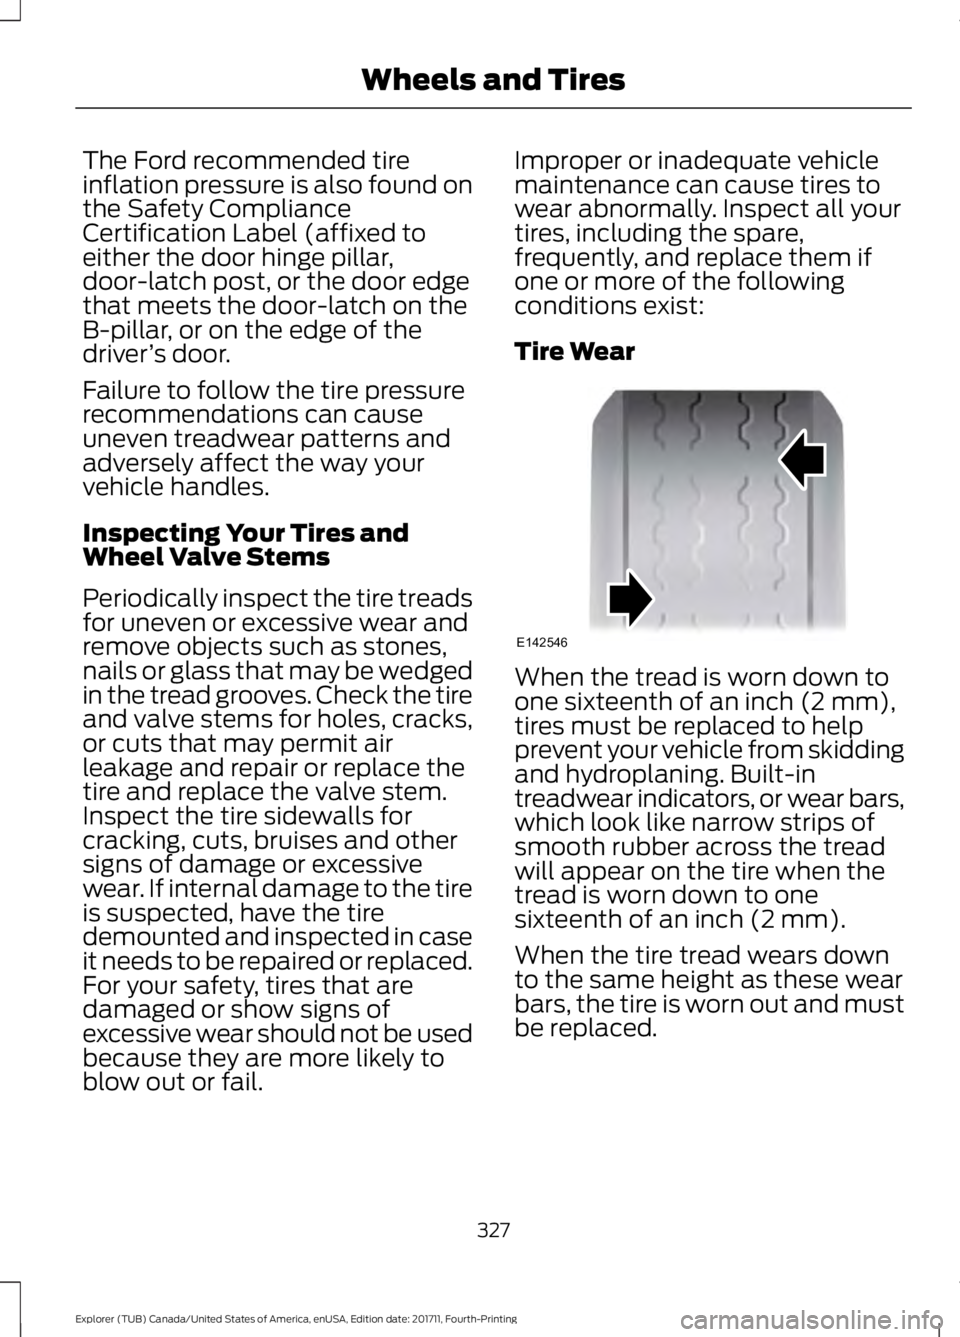
Tire Wear
When the tread is worn down to
one sixteenth of an inch (2 mm),
tires must be replaced to help
prevent your vehicle from skidding
and hydroplaning. Built-in
treadwear indicators, or wear bars,
which look like narrow strips of
smooth rubber across the tread
will appear on the tire when the
tread is worn down to one
sixteenth of an inch (2 mm).
When the tire tread wears down
to the same height as these wear
bars, the tire is worn out and must
be replaced.
327
Explorer (TUB) Canada/United States of America, enUSA, Edition date: 201711, Fourth-Printing Wheels and TiresE142546
Page 332 of 571
WARNING: Only use
replacement tires and wheels that
are the same size, load index,
speed rating and type (such as
P-metric versus LT-metric or
all-season versus all-terrain) as
those originally provided by Ford.
The recommended tire and wheel
size may be found on either the
Safety Compliance Certification
Label (affixed to either the door
hinge pillar, door-latch post, or the
door edge that meets the
door-latch post, next to the
driver's seating position), or the
Tire Label which is located on the
B-Pillar or edge of the driver's
door. If this information is not
found on these labels, then you
should contact your authorized
dealer as soon as possible. Use of
any tire or wheel not
recommended by Ford can affect
the safety and performance of
your vehicle, which could result in
an increased risk of loss of vehicle
control, vehicle rollover, personal
injury and death. WARNING:
To reduce the
risk of serious injury, when
mounting replacement tires and
wheels, you should not exceed the
maximum pressure indicated on
the sidewall of the tire to set the
beads without additional
precautions listed below. If the
beads do not seat at the
maximum pressure indicated,
re-lubricate and try again. WARNING:
For a mounting
pressure more than 20 psi
(1.38 bar) greater than the
maximum pressure, a Ford dealer
or other tire service professional
should do the mounting. WARNING:
Always inflate
steel carcass tires with a remote
air fill with the person inflating
standing at a minimum of
12 ft
(3.66 m) away from the wheel
and tire assembly. WARNING:
When inflating
the tire for mounting pressures up
to
20 psi (1.38 bar) greater than
the maximum pressure on the tire
sidewall, the following
precautions must be taken to
protect the person mounting the
tire:
• Make sure that you have the
correct tire and wheel size.
• Lubricate the tire bead and
wheel bead seat area again.
• Stand at a minimum of
12 ft
(3.66 m) away from the wheel
and tire assembly.
• Use both eye and ear
protection.
Important: Remember to replace
the wheel valve stems when the
road tires are replaced on your
vehicle.
It is recommended that the two
front tires or two rear tires
generally be replaced as a pair.
329
Explorer (TUB) Canada/United States of America, enUSA, Edition date: 201711, Fourth-Printing Wheels and Tires
Page 337 of 571
them to the proper pressure. Driving on a
significantly under-inflated tire causes the
tire to overheat and can lead to tire failure.
Under-inflation also reduces fuel efficiency
and tire tread life, and may affect the
vehicle
’s handling and stopping ability.
Please note that the TPMS is not a
substitute for proper tire maintenance, and
it is the driver ’s responsibility to maintain
correct tire pressure, even if under-inflation
has not reached the level to trigger
illumination of the TPMS low tire pressure
telltale.
Your vehicle has also been equipped with
a TPMS malfunction indicator to indicate
when the system is not operating properly.
The TPMS malfunction indicator is
combined with the low tire pressure
telltale. When the system detects a
malfunction, the telltale will flash for
approximately one minute and then remain
continuously illuminated. This sequence
will continue upon subsequent vehicle
start-ups as long as the malfunction exists.
When the malfunction indicator is
illuminated, the system may not be able
to detect or signal low tire pressure as
intended. TPMS malfunctions may occur
for a variety of reasons, including the
installation of replacement or alternate
tires or wheels on the vehicle that prevent
the TPMS from functioning properly.
Always check the TPMS malfunction
telltale after replacing one or more tires or
wheels on your vehicle to ensure that the
replacement or alternate tires and wheels
allow the TPMS to continue to function
properly.
This device complies with Part 15 of the
FCC Rules and with License exempt RSS
Standards of Industry Canada. Operation
is subject to the following two conditions:
1. This device may not cause harmful interference, and 2. This device must accept any
interference received, including
interference that may cause undesired
operation.
Note: Changes or modifications not
expressively approved by the party
responsible for compliance could void the
user's authority to operate the equipment.
The term "IC:" before the radio certification
number only signifies that Industry Canada
technical specifications were met.
Changing Tires With a Tire
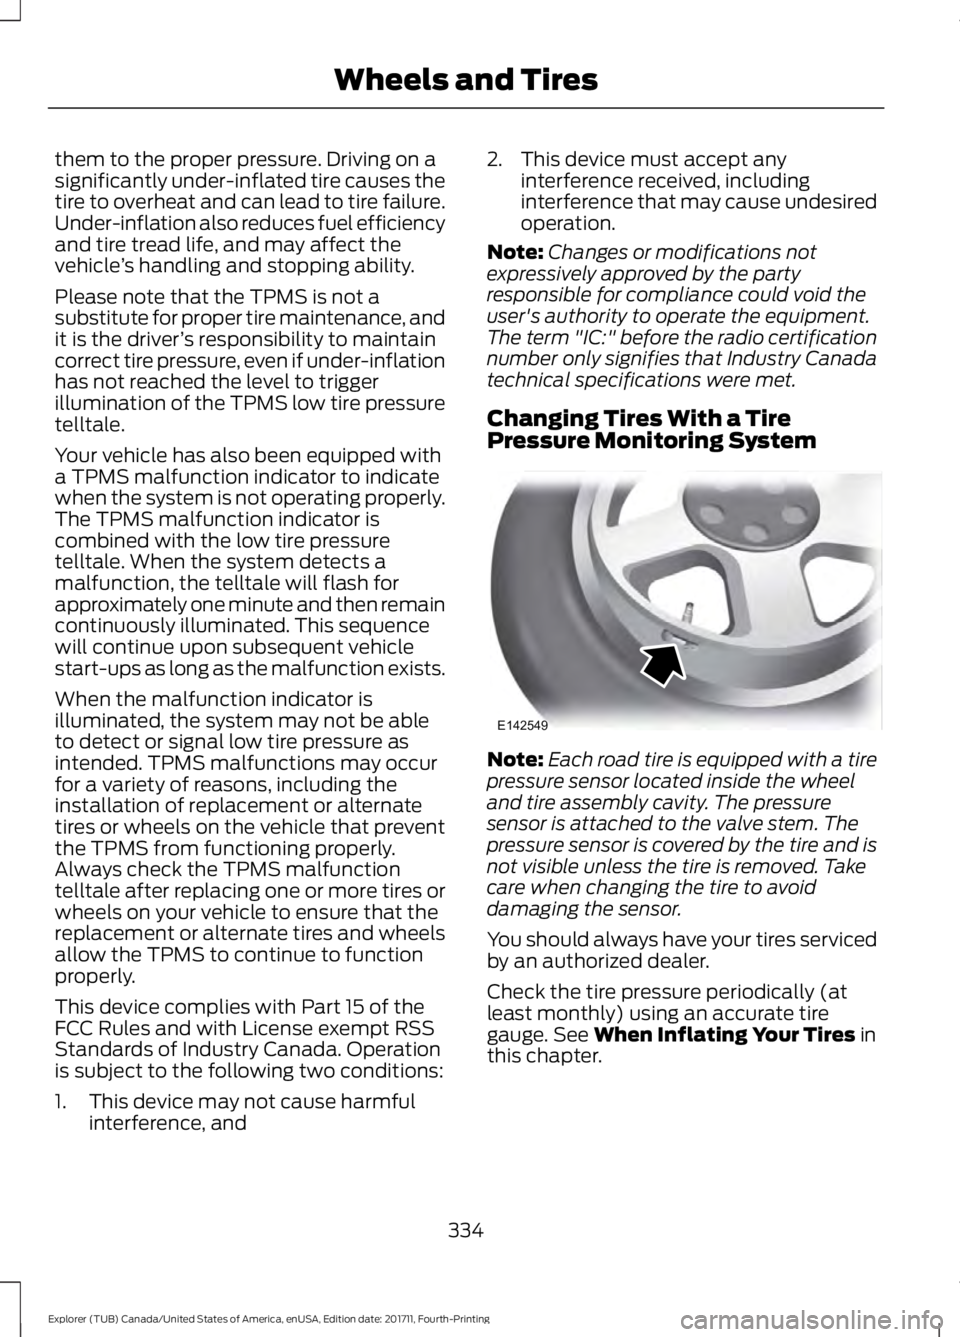
Pressure Monitoring System Note:
Each road tire is equipped with a tire
pressure sensor located inside the wheel
and tire assembly cavity. The pressure
sensor is attached to the valve stem. The
pressure sensor is covered by the tire and is
not visible unless the tire is removed. Take
care when changing the tire to avoid
damaging the sensor.
You should always have your tires serviced
by an authorized dealer.
Check the tire pressure periodically (at
least monthly) using an accurate tire
gauge. See When Inflating Your Tires in
this chapter.
334
Explorer (TUB) Canada/United States of America, enUSA, Edition date: 201711, Fourth-Printing Wheels and TiresE142549
Page 343 of 571
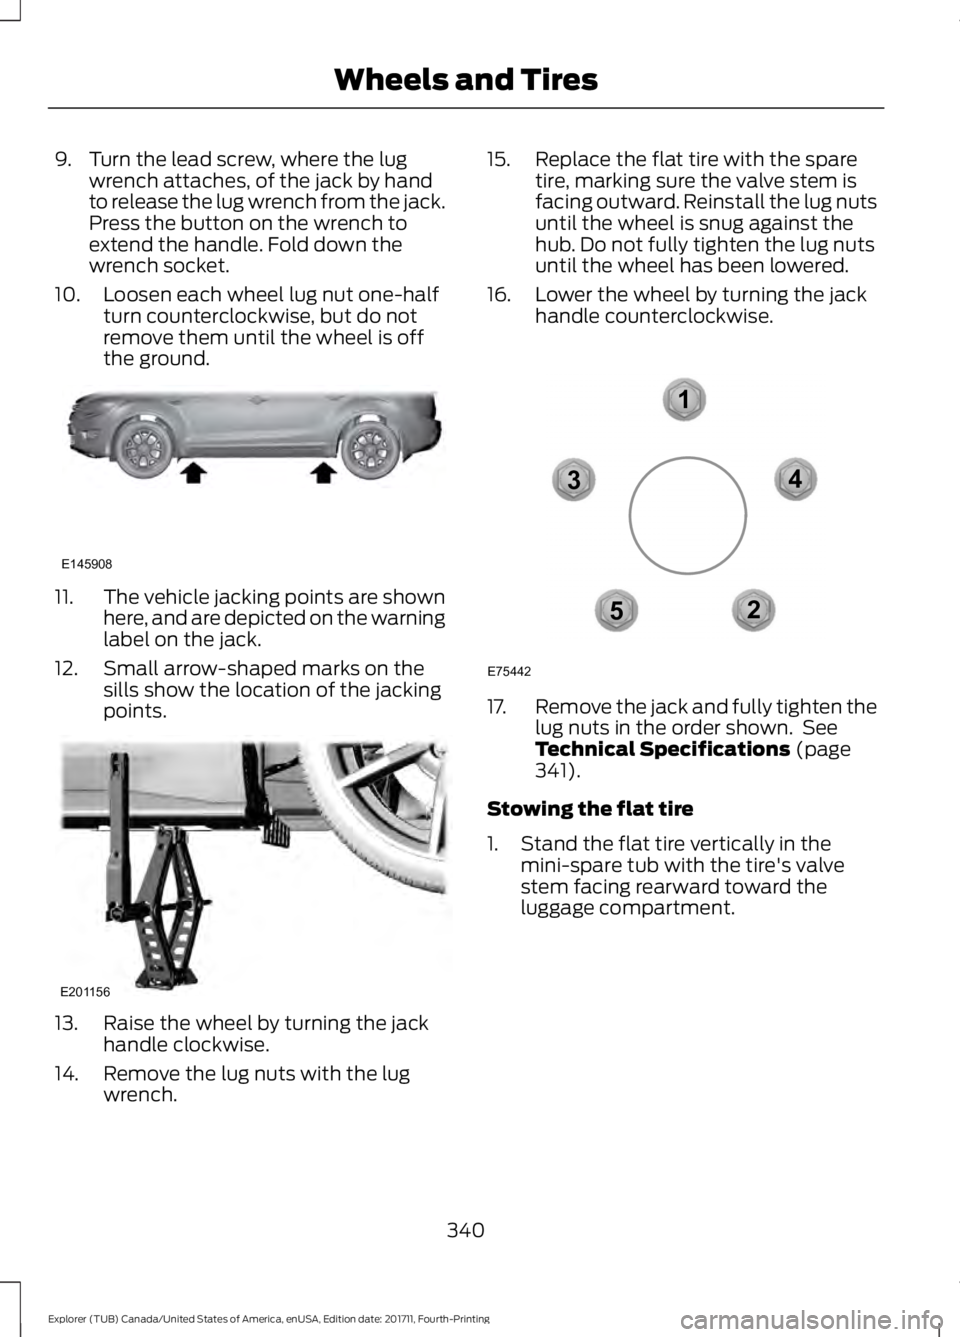
9. Turn the lead screw, where the lug
wrench attaches, of the jack by hand
to release the lug wrench from the jack.
Press the button on the wrench to
extend the handle. Fold down the
wrench socket.
10. Loosen each wheel lug nut one-half turn counterclockwise, but do not
remove them until the wheel is off
the ground.11.
The vehicle jacking points are shown
here, and are depicted on the warning
label on the jack.
12. Small arrow-shaped marks on the sills show the location of the jacking
points.13. Raise the wheel by turning the jack
handle clockwise.
14. Remove the lug nuts with the lug wrench. 15. Replace the flat tire with the spare
tire, marking sure the valve stem is
facing outward. Reinstall the lug nuts
until the wheel is snug against the
hub. Do not fully tighten the lug nuts
until the wheel has been lowered.
16. Lower the wheel by turning the jack handle counterclockwise. 17.
Remove the jack and fully tighten the
lug nuts in the order shown. See
Technical Specifications (page
341).
Stowing the flat tire
1. Stand the flat tire vertically in the mini-spare tub with the tire's valve
stem facing rearward toward the
luggage compartment.
340
Explorer (TUB) Canada/United States of America, enUSA, Edition date: 201711, Fourth-Printing Wheels and TiresE145908 E201156 12
3
4
5
E75442