manual transmission FORD EXPLORER 2018 Owners Manual
[x] Cancel search | Manufacturer: FORD, Model Year: 2018, Model line: EXPLORER, Model: FORD EXPLORER 2018Pages: 571, PDF Size: 7.3 MB
Page 60 of 571
Car Finder
Press the button twice within
three seconds. The horn sounds
and the direction indicators
flash. We recommend you use this method
to locate your vehicle, rather than using
the panic alarm.
Sounding the Panic Alarm
Note: The panic alarm only operates when
the ignition is off. Press the button to sound the
panic alarm. Press the button
again or switch the ignition on to
turn it off.
Remote Start (If Equipped) WARNING:
To avoid exhaust fumes,
do not use remote start if your vehicle is
parked indoors or in areas that are not well
ventilated.
Note: Do not use remote start if your fuel
level is low. The remote start button is on the
remote control.
This feature allows you to start your
vehicle from the outside. Your remote
control has an extended operating range.
If your vehicle has automatic climate
control, you can configure it to operate
when you remote start your vehicle.
See
Climate Control (page 133). A manual
climate control system runs at the setting
it was set to when you switched your
vehicle off. Many states and provinces have
restrictions for the use of remote start.
Check your local and state or provincial
laws for specific requirements regarding
remote start systems.
The system does not work if:
•
The ignition is on.
• The anti-theft alarm triggers.
• You disable the feature.
• The hood is open.
• The transmission is not in park (P).
• The battery voltage is below the
minimum operating voltage.
• The service engine soon light is on.
Remote Control Feedback (If
Equipped)
An LED on the remote control provides
status feedback of remote start or stop
commands. Status
LED
Remote startsuccessful
Solid green
Remote stopsuccessful
Solid red
Request failed or
status not received
Blinking red
Status incomplete
Blinking green
Remote Starting Your Vehicle
Note: You must press each button within
three seconds of each other. If you do not
follow this sequence, your vehicle does not
start remotely, the direction indicators do
not flash twice and the horn does not sound.
57
Explorer (TUB) Canada/United States of America, enUSA, Edition date: 201711, Fourth-Printing Keys and Remote ControlsE138623 E138624 E138625
Page 88 of 571
Press repeatedly or press and hold until
you reach the desired level.
HEADLAMP EXIT DELAY
Set the delay time to keep the headlamps
on for up to three minutes after switching
off the ignition.
Follow the steps below to change the
delay time:
Note:
Complete steps 1 through 6 within 10
seconds.
1. Switch the ignition off.
2. Select the autolamp position on the lighting control.
3. Switch the lighting control to the off position.
4. Switch the ignition on.
5. Switch the ignition off.
6. Select the autolamp position on the lighting control. The headlamps and
parking lamps turn on.
7. Switch the lighting control to the off position when reaching the required
delay time. The headlamps and parking
lamps turn off.
Set the headlamp exit delay to one of the
following settings:
• Off.
• 10 seconds.
• 20 seconds.
• 120 seconds.
Note: Adjust the time delay using the
display controls in the information display.
See Information Displays (page 105). DAYTIME RUNNING LAMPS
(If
Equipped) WARNING:
The daytime running
lamps system does not activate the rear
lamps and may not provide adequate
lighting during low visibility driving
conditions. Make sure you switch the
headlamps on, as appropriate, during all
low visibility conditions. Failure to do so
may result in a crash.
Type One - Conventional (Non-
Configurable)
The daytime running lamps turn on when:
1. Switching the ignition on.
2. The transmission is not in park (P) for vehicles with automatic transmissions,
or releasing the parking brake for
vehicles with manual transmissions.
3. The lighting control is in the off, parking
lamp or autolamps positions.
4. The headlamps are off.
Type Two - Configurable
Switch the daytime running lamps on or
off using the information display. See
Information Displays
(page 105).
The daytime running lamps turn on when:
1. The lamps are on in the information display.
2. Switching the ignition on.
3. The transmission is not in park (P) for vehicles with automatic transmissions,
or releasing the parking brake for
vehicles with manual transmissions.
4. The lighting control is in the autolamps
position.
5. The headlamps are off.
85
Explorer (TUB) Canada/United States of America, enUSA, Edition date: 201711, Fourth-Printing Lighting
Page 96 of 571
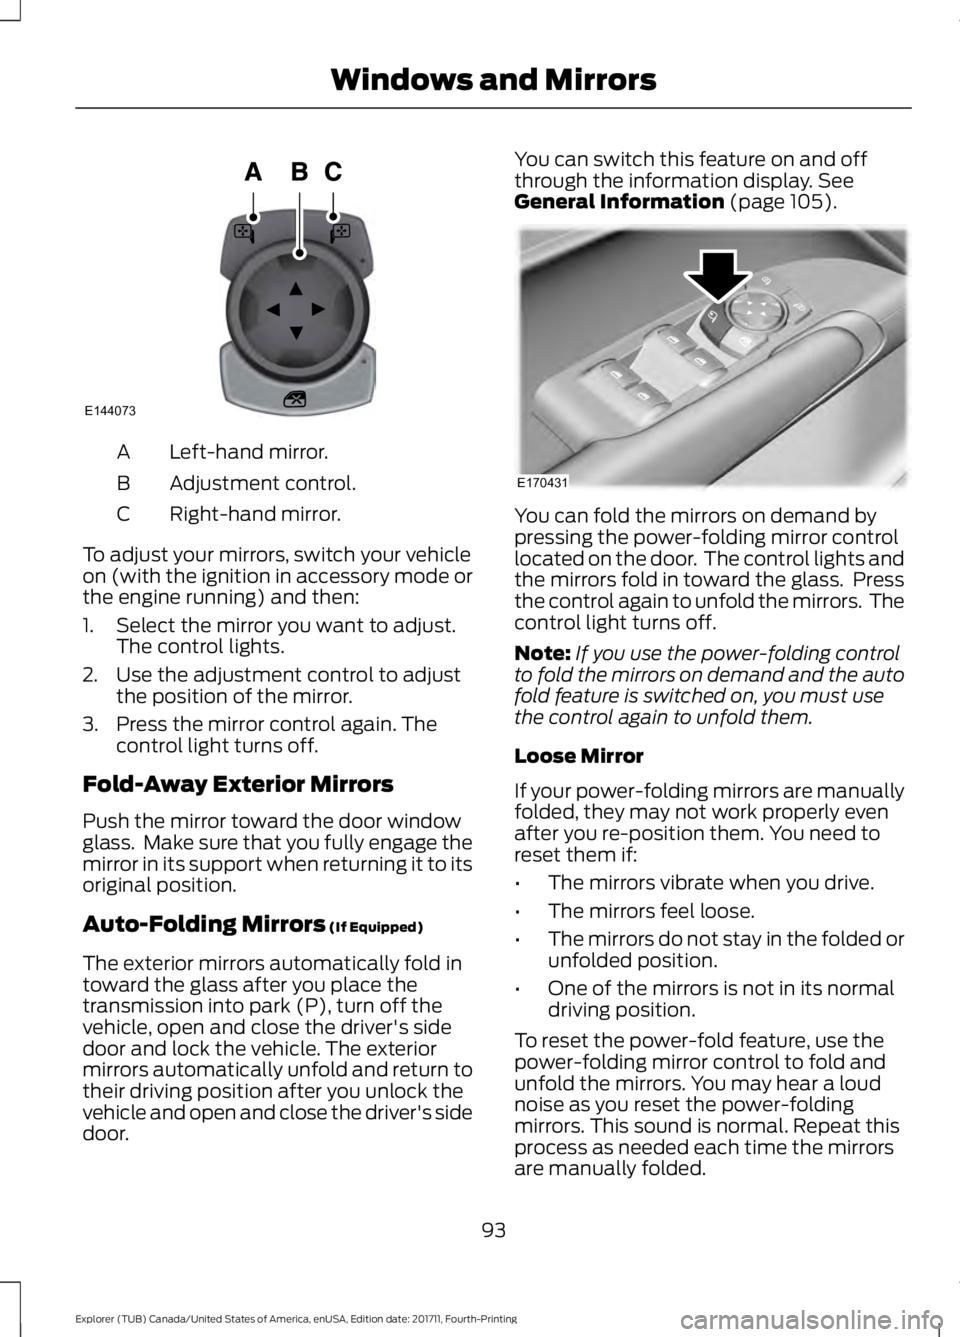
Left-hand mirror.
A
Adjustment control.
B
Right-hand mirror.
C
To adjust your mirrors, switch your vehicle
on (with the ignition in accessory mode or
the engine running) and then:
1. Select the mirror you want to adjust. The control lights.
2. Use the adjustment control to adjust the position of the mirror.
3. Press the mirror control again. The control light turns off.
Fold-Away Exterior Mirrors
Push the mirror toward the door window
glass. Make sure that you fully engage the
mirror in its support when returning it to its
original position.
Auto-Folding Mirrors (If Equipped)
The exterior mirrors automatically fold in
toward the glass after you place the
transmission into park (P), turn off the
vehicle, open and close the driver's side
door and lock the vehicle. The exterior
mirrors automatically unfold and return to
their driving position after you unlock the
vehicle and open and close the driver's side
door. You can switch this feature on and off
through the information display.
See
General Information (page 105). You can fold the mirrors on demand by
pressing the power-folding mirror control
located on the door. The control lights and
the mirrors fold in toward the glass. Press
the control again to unfold the mirrors. The
control light turns off.
Note:
If you use the power-folding control
to fold the mirrors on demand and the auto
fold feature is switched on, you must use
the control again to unfold them.
Loose Mirror
If your power-folding mirrors are manually
folded, they may not work properly even
after you re-position them. You need to
reset them if:
• The mirrors vibrate when you drive.
• The mirrors feel loose.
• The mirrors do not stay in the folded or
unfolded position.
• One of the mirrors is not in its normal
driving position.
To reset the power-fold feature, use the
power-folding mirror control to fold and
unfold the mirrors. You may hear a loud
noise as you reset the power-folding
mirrors. This sound is normal. Repeat this
process as needed each time the mirrors
are manually folded.
93
Explorer (TUB) Canada/United States of America, enUSA, Edition date: 201711, Fourth-Printing Windows and MirrorsE144073 E170431
Page 135 of 571
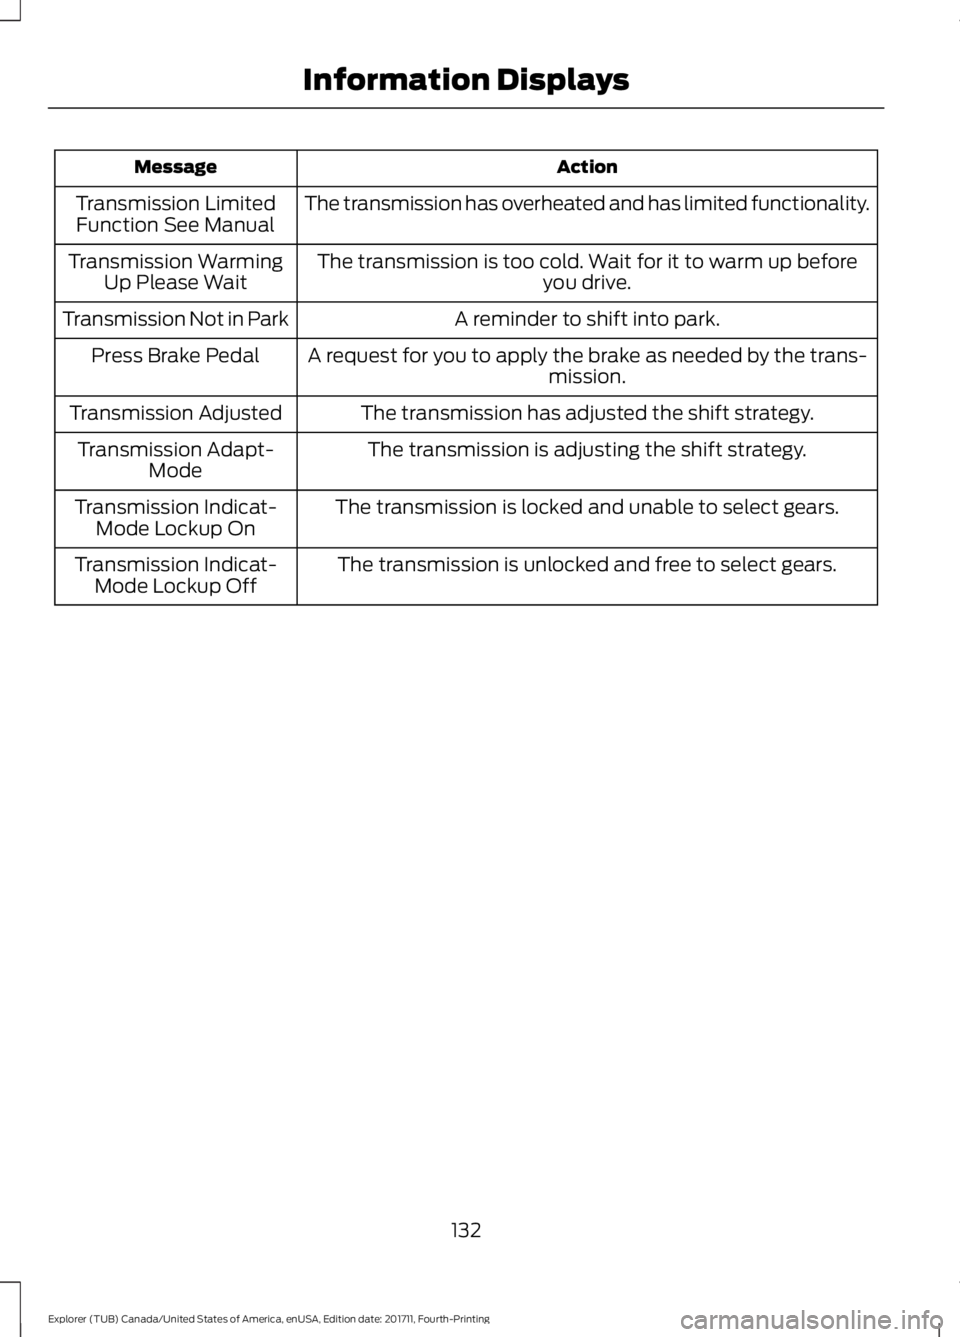
Action
Message
The transmission has overheated and has limited functionality.
Transmission Limited
Function See Manual
The transmission is too cold. Wait for it to warm up beforeyou drive.
Transmission Warming
Up Please Wait
A reminder to shift into park.
Transmission Not in Park
A request for you to apply the brake as needed by the trans-mission.
Press Brake Pedal
The transmission has adjusted the shift strategy.
Transmission Adjusted
The transmission is adjusting the shift strategy.
Transmission Adapt-
Mode
The transmission is locked and unable to select gears.
Transmission Indicat-
Mode Lockup On
The transmission is unlocked and free to select gears.
Transmission Indicat-
Mode Lockup Off
132
Explorer (TUB) Canada/United States of America, enUSA, Edition date: 201711, Fourth-Printing Information Displays
Page 191 of 571
Sport (S)
Moving the gearshift lever to sport (S):
•
Provides additional grade (engine)
braking and extends lower gear
operation to enhance performance for
uphill climbs, hilly terrain or
mountainous areas. This increases
engine RPM during engine braking.
• Provides additional lower gear
operation through the automatic
transmission shift strategy.
• Gears are selected more quickly and
at higher engine speeds.
Tow Mode (If Equipped) To activate tow mode, press the
button under the headlamp
control. The indicator light
illuminates and a message displays in the
instrument cluster when the system
becomes active. Press the button again to
turn the system off.
The Tow Mode Feature:
• Moves upshifts to higher engine speeds
to reduce the frequency of
transmission shifting.
• Provides engine braking in all forward
gears, which slows your vehicle and
assist you in controlling your vehicle
when descending a grade.
• Depending on driving conditions and
load conditions, may downshift the
transmission, slow your vehicle and
control your vehicle speed when
descending a hill, without pressing the
accelerator pedal. The amount of
downshift braking provided varies
based upon the amount the brake
pedal is pressed.
The tow mode feature improves
transmission operation when towing a
trailer or a heavy load. All transmission
gear ranges are available when using tow
mode. SelectShift Automatic
™
Transmission
Your vehicle is equipped with a SelectShift
Automatic transmission. The SelectShift
Automatic transmission gives you the
ability to change gears up or down
(without a clutch) as desired.
In order to prevent the engine from running
at too low an RPM, which may cause it to
stall, SelectShift still automatically makes
some downshifts if it has determined that
you have not downshifted in time.
Although SelectShift makes some
downshifts for you, it still allows you to
downshift at any time as long as the
SelectShift determines that damage to
the engine from over-revving does not
occur.
Note: Engine damage may occur if you
maintain excessive engine revving without
shifting.
Note: Vehicles may have either steering
wheel controls or gearshift lever controls.
SelectShift does not automatically upshift,
even if the engine is approaching the RPM
limit. It must be shifted manually by
pressing the + button. Notice should be
taken of the shift indicator lamp, which
alerts you when to shift to make sure you
achieve the highest level or efficiency and
fuel economy.
Pull the + paddle on the steering wheel
or push the + button on the gearshift
lever to activate SelectShift.
• Pull the right paddle (+) to upshift.
• Pull the left paddle (–) to downshift.
188
Explorer (TUB) Canada/United States of America, enUSA, Edition date: 201711, Fourth-Printing TransmissionE161509
Page 192 of 571
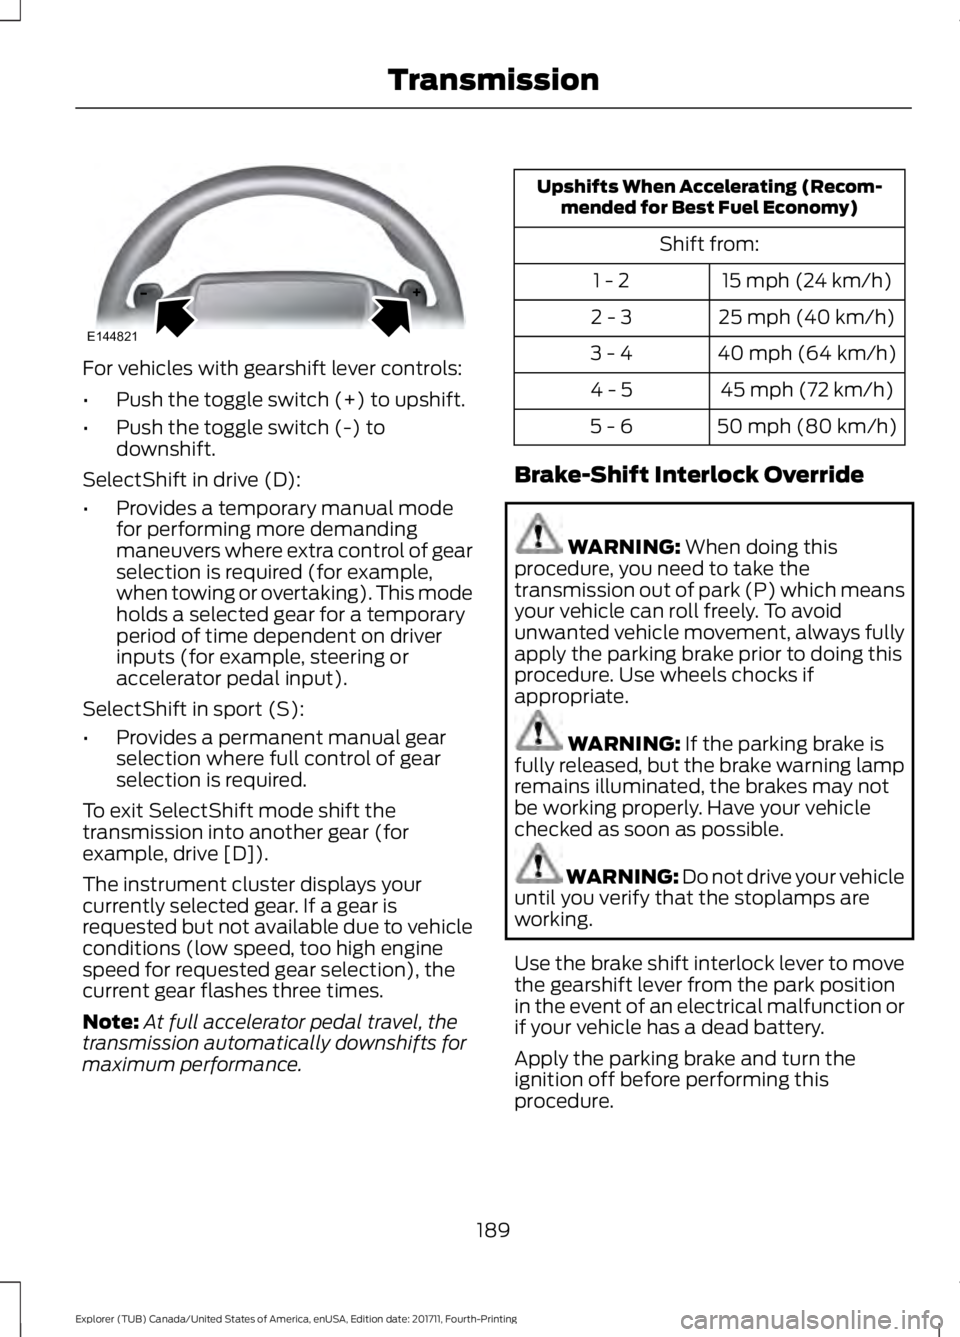
For vehicles with gearshift lever controls:
•
Push the toggle switch (+) to upshift.
• Push the toggle switch (-) to
downshift.
SelectShift in drive (D):
• Provides a temporary manual mode
for performing more demanding
maneuvers where extra control of gear
selection is required (for example,
when towing or overtaking). This mode
holds a selected gear for a temporary
period of time dependent on driver
inputs (for example, steering or
accelerator pedal input).
SelectShift in sport (S):
• Provides a permanent manual gear
selection where full control of gear
selection is required.
To exit SelectShift mode shift the
transmission into another gear (for
example, drive [D]).
The instrument cluster displays your
currently selected gear. If a gear is
requested but not available due to vehicle
conditions (low speed, too high engine
speed for requested gear selection), the
current gear flashes three times.
Note: At full accelerator pedal travel, the
transmission automatically downshifts for
maximum performance. Upshifts When Accelerating (Recom-
mended for Best Fuel Economy)
Shift from:15 mph (24 km/h)
1 - 2
25 mph (40 km/h)
2 - 3
40 mph (64 km/h)
3 - 4
45 mph (72 km/h)
4 - 5
50 mph (80 km/h)
5 - 6
Brake-Shift Interlock Override WARNING: When doing this
procedure, you need to take the
transmission out of park (P) which means
your vehicle can roll freely. To avoid
unwanted vehicle movement, always fully
apply the parking brake prior to doing this
procedure. Use wheels chocks if
appropriate. WARNING:
If the parking brake is
fully released, but the brake warning lamp
remains illuminated, the brakes may not
be working properly. Have your vehicle
checked as soon as possible. WARNING: Do not drive your vehicle
until you verify that the stoplamps are
working.
Use the brake shift interlock lever to move
the gearshift lever from the park position
in the event of an electrical malfunction or
if your vehicle has a dead battery.
Apply the parking brake and turn the
ignition off before performing this
procedure.
189
Explorer (TUB) Canada/United States of America, enUSA, Edition date: 201711, Fourth-Printing TransmissionE144821
Page 201 of 571
The system activates on any slope that
causes your vehicle to roll.
Note:
There is no warning light to indicate
the system is either on or off.
Using Hill Start Assist
1. Press the brake pedal to bring your vehicle to a complete standstill.Keep
the brake pedal pressed and shift into
first gear when facing uphill or reverse
(R) when facing downhill.
2. If the sensors detect that your vehicle is on a slope, the system activates
automatically.
3. When you remove your foot from the brake pedal, your vehicle remains on
the slope without rolling away for
about two to three seconds. This hold
time automatically extends if you are
in the process of driving off.
4. Drive off in the normal manner. The system releases the brakes
automatically.
Note: When you remove your foot from the
brake pedal and press the pedal again when
the system is active, you will experience
significantly reduced brake pedal travel. This
is normal.
Switching the System On and Off
Vehicles with Manual Transmission
You can switch this feature on or off in the
information display. The system
remembers the last setting when you start
your vehicle.
Vehicles with Automatic Transmission
You cannot turn the system on or off.
When you switch the ignition on, the
system automatically turns on.
198
Explorer (TUB) Canada/United States of America, enUSA, Edition date: 201711, Fourth-Printing Brakes
Page 210 of 571
You can switch the system off through the
information display menu or from the
pop-up message that appears once you
shift the transmission into reverse (R). See
General Information (page 105). If your
vehicle has a parking aid button, you can
switch the system off by pressing the
button.
Obstacle Distance Indicator
(If
Equipped)
The system provides obstacle distance
indication through the information display.
The indicator displays:
• As the distance to the obstacle
decreases the indicator blocks
illuminate and move towards the
vehicle icon.
• If there is no obstacle detected, the
distance indicator blocks are grayed
out.
If the transmission is in reverse (R), the
front sensing system provides audio
warnings when your vehicle is moving and
the detected obstacle is moving towards
your vehicle. Once the vehicle is stationary,
the audio warning will be stopped after 2
seconds. Visual indication is always
present in reverse (R).
If the transmission is in drive (D) or any
other forward gear (for example, low (L),
sport (S) or any forward gear in a manual
transmission), the front sensing system
provides audio and visual warnings when
your vehicle is moving below a speed of
5 mph (8 km/h) and an obstacle is located
inside the detection area. Once the vehicle
is stationary, the audio warning will be
stopped after 2 seconds and the visual
indication stops after 4 seconds. If the
obstacles detected are within
12 in
(30 cm), the visual indication remains on. If the transmission is in neutral (N), the
system provides visual indication only
when your vehicle is moving at
5 mph
(8 km/h) or below and an obstacle is
located inside the detection area. Once
your vehicle is stationary, the visual
indication will stop after 4 seconds.
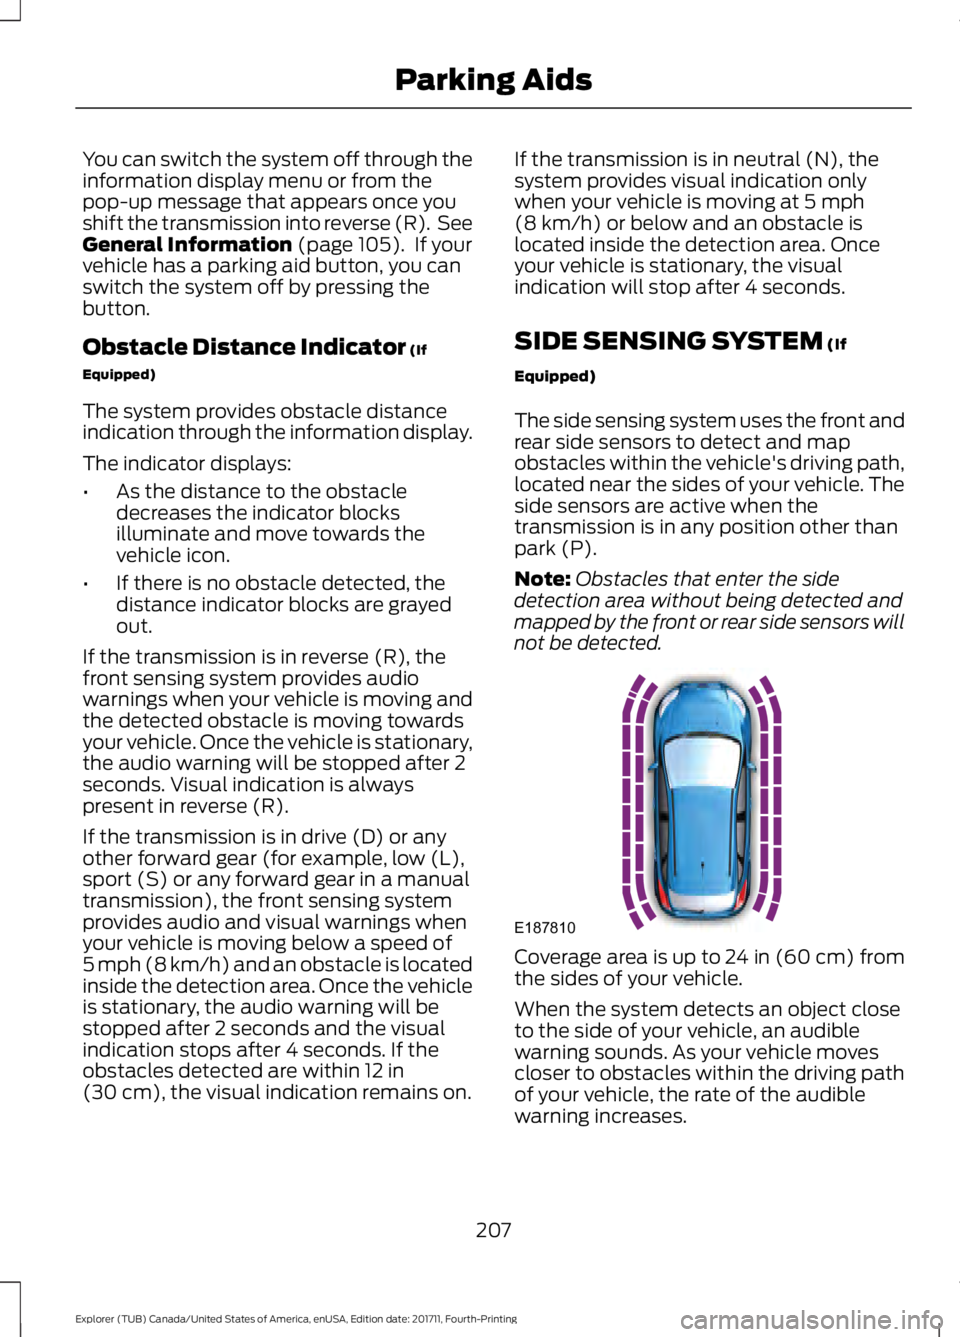
SIDE SENSING SYSTEM
(If
Equipped)
The side sensing system uses the front and
rear side sensors to detect and map
obstacles within the vehicle's driving path,
located near the sides of your vehicle. The
side sensors are active when the
transmission is in any position other than
park (P).
Note: Obstacles that enter the side
detection area without being detected and
mapped by the front or rear side sensors will
not be detected. Coverage area is up to 24 in (60 cm) from
the sides of your vehicle.
When the system detects an object close
to the side of your vehicle, an audible
warning sounds. As your vehicle moves
closer to obstacles within the driving path
of your vehicle, the rate of the audible
warning increases.
207
Explorer (TUB) Canada/United States of America, enUSA, Edition date: 201711, Fourth-Printing Parking AidsE187810
Page 211 of 571
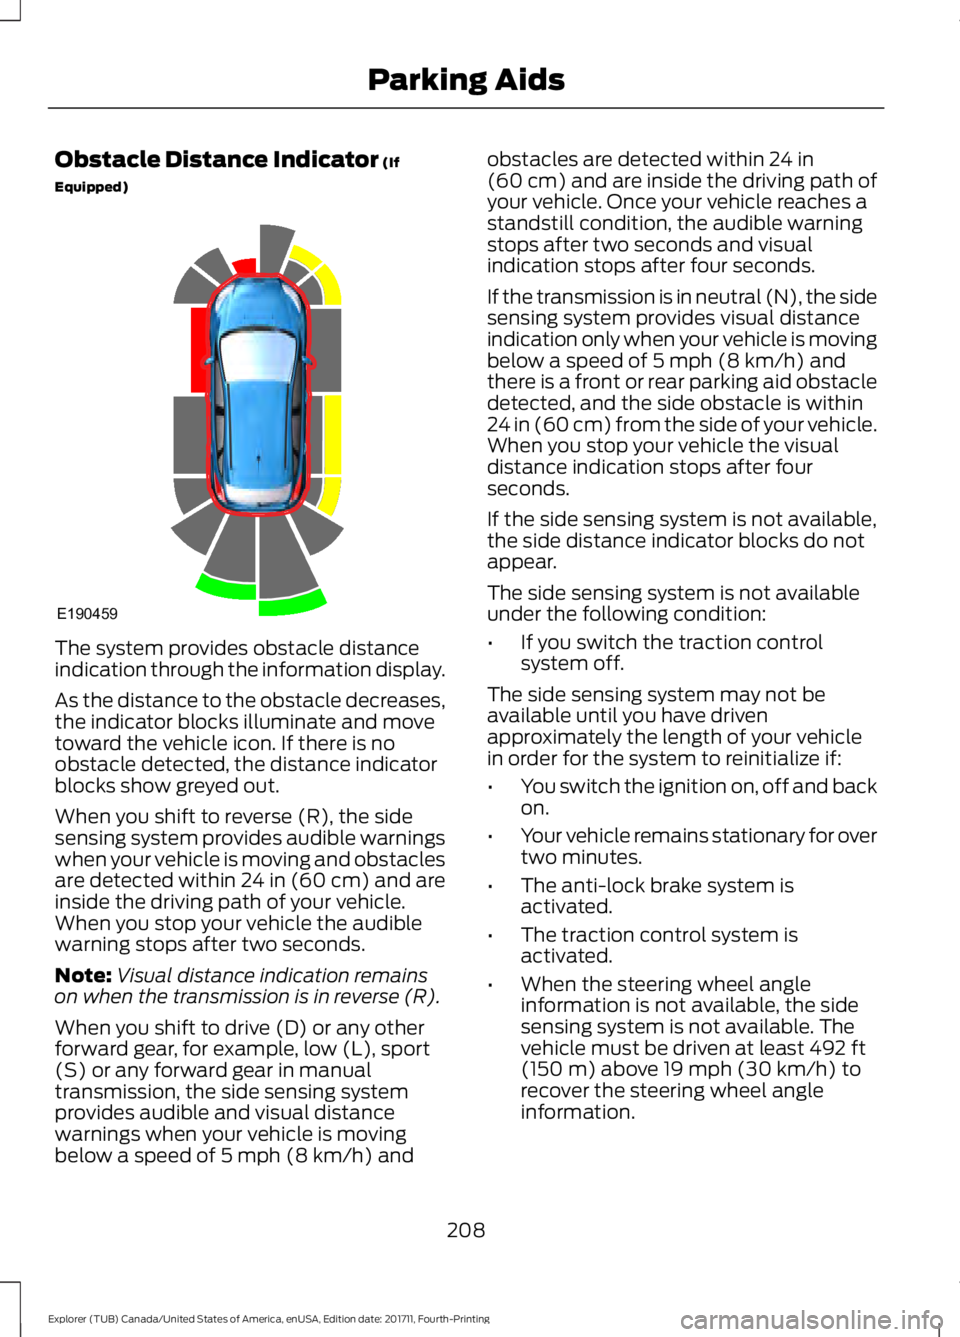
Obstacle Distance Indicator (If
Equipped) The system provides obstacle distance
indication through the information display.
As the distance to the obstacle decreases,
the indicator blocks illuminate and move
toward the vehicle icon. If there is no
obstacle detected, the distance indicator
blocks show greyed out.
When you shift to reverse (R), the side
sensing system provides audible warnings
when your vehicle is moving and obstacles
are detected within 24 in (60 cm) and are
inside the driving path of your vehicle.
When you stop your vehicle the audible
warning stops after two seconds.
Note:
Visual distance indication remains
on when the transmission is in reverse (R).
When you shift to drive (D) or any other
forward gear, for example, low (L), sport
(S) or any forward gear in manual
transmission, the side sensing system
provides audible and visual distance
warnings when your vehicle is moving
below a speed of
5 mph (8 km/h) and obstacles are detected within
24 in
(60 cm) and are inside the driving path of
your vehicle. Once your vehicle reaches a
standstill condition, the audible warning
stops after two seconds and visual
indication stops after four seconds.
If the transmission is in neutral (N), the side
sensing system provides visual distance
indication only when your vehicle is moving
below a speed of
5 mph (8 km/h) and
there is a front or rear parking aid obstacle
detected, and the side obstacle is within
24 in (60 cm) from the side of your vehicle.
When you stop your vehicle the visual
distance indication stops after four
seconds.
If the side sensing system is not available,
the side distance indicator blocks do not
appear.
The side sensing system is not available
under the following condition:
• If you switch the traction control
system off.
The side sensing system may not be
available until you have driven
approximately the length of your vehicle
in order for the system to reinitialize if:
• You switch the ignition on, off and back
on.
• Your vehicle remains stationary for over
two minutes.
• The anti-lock brake system is
activated.
• The traction control system is
activated.
• When the steering wheel angle
information is not available, the side
sensing system is not available. The
vehicle must be driven at least
492 ft
(150 m) above 19 mph (30 km/h) to
recover the steering wheel angle
information.
208
Explorer (TUB) Canada/United States of America, enUSA, Edition date: 201711, Fourth-Printing Parking AidsE190459
Page 221 of 571
Manual Zoom
WARNING: When manual zoom is
on, the full area behind your vehicle may
not show. Be aware of your surroundings
when using the manual zoom feature.
Note: Manual zoom is only available when
the transmission is in reverse (R).
Note: When you enable manual zoom, only
the centerline is shown.
Selectable settings for this feature are
Zoom in (+) and Zoom out (-). Press the
symbol in the camera screen to change the
view. The default setting is Zoom OFF.
This allows you to get a closer view of an
object behind your vehicle. The zoomed
image keeps the bumper in the image to
provide a reference. The zoom is only
active while the transmission is in reverse
(R).
Rear Camera Delay
Selectable settings for this feature are ON
and OFF.
The default setting for the rear camera
delay is OFF.
When shifting the transmission out of
reverse (R) and into any gear other than
park (P), the camera image remains in the
display until:
• Your vehicle speed reaches
approximately
5 mph (8 km/h).
• You shift your vehicle into park (P). 180 DEGREE CAMERA WARNING: The front camera system
still requires the driver to use it in
conjunction with looking out of your
vehicle. WARNING:
Objects that are close
to either corner of the bumper or under the
bumper, might not be seen on the screen
due to the limited coverage of the camera
system. WARNING:
Use caution when
turning camera features on or off when the
transmission is not in park (P). Make sure
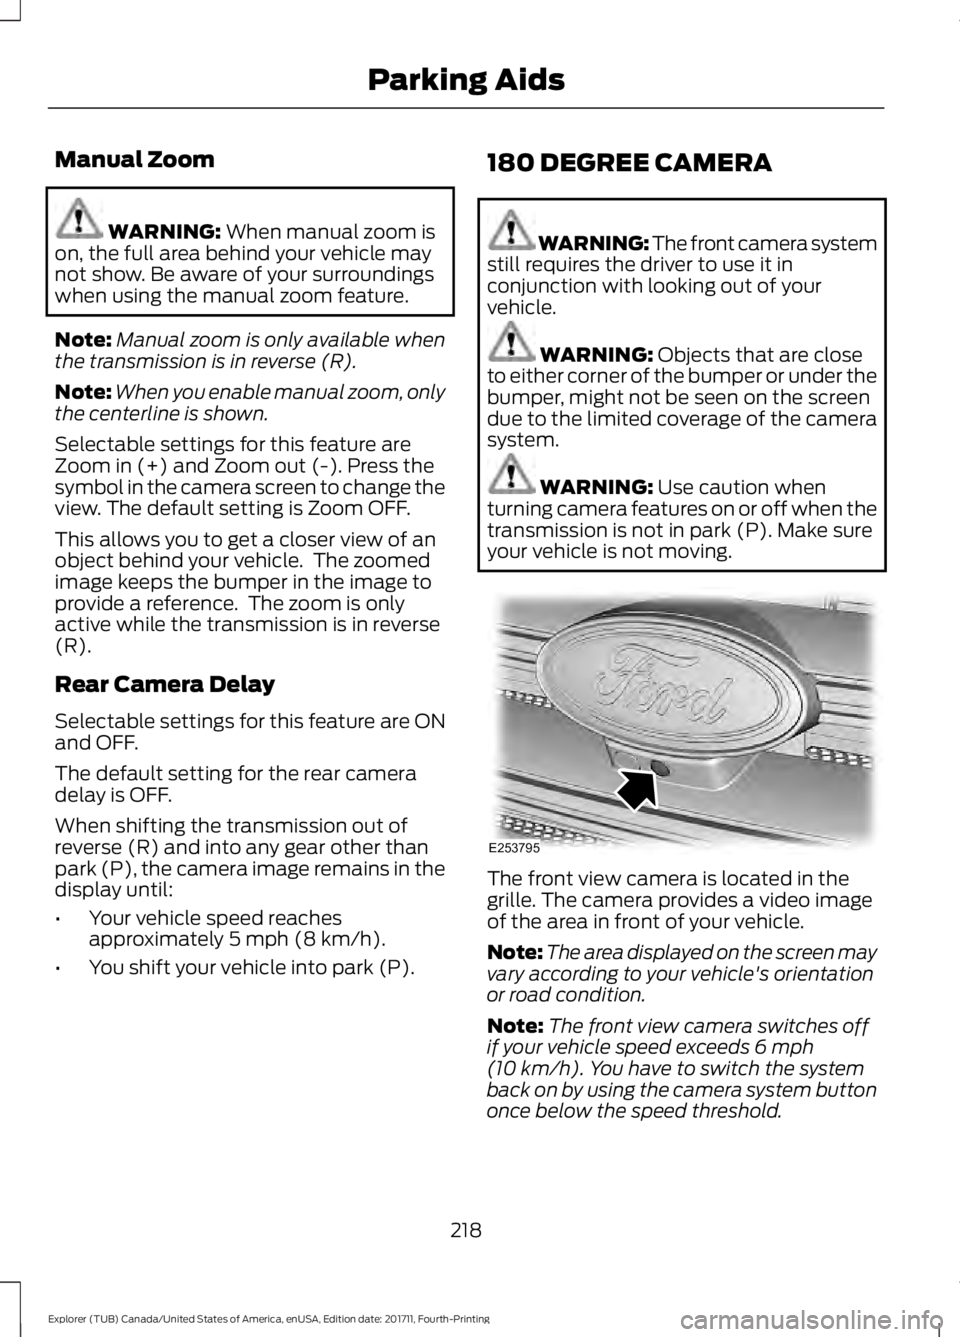
your vehicle is not moving. The front view camera is located in the
grille. The camera provides a video image
of the area in front of your vehicle.
Note:
The area displayed on the screen may
vary according to your vehicle's orientation
or road condition.
Note: The front view camera switches off
if your vehicle speed exceeds
6 mph
(10 km/h). You have to switch the system
back on by using the camera system button
once below the speed threshold.
218
Explorer (TUB) Canada/United States of America, enUSA, Edition date: 201711, Fourth-Printing Parking AidsE253795