tow FORD EXPLORER 2018 Owners Manual
[x] Cancel search | Manufacturer: FORD, Model Year: 2018, Model line: EXPLORER, Model: FORD EXPLORER 2018Pages: 571, PDF Size: 7.3 MB
Page 5 of 571
Steering Wheel
Adjusting the Steering Wheel - Vehicles
With: Manual Adjustable Steering
Column ..........................................................76
Adjusting the Steering Wheel - Vehicles With: Power Adjustable Steering
Column ..........................................................
76
Audio Control ..................................................
78
Voice Control ...................................................
78
Cruise Control .................................................
79
Information Display Control ......................
79
Heated Steering Wheel ...............................
79
Pedals
Adjusting the Pedals ...................................
80
Wipers and Washers
Windshield Wipers ........................................
81
Autowipers .......................................................
81
Windshield Washers ....................................
82
Rear Window Wiper and Washers ..........
82
Lighting
General Information .....................................
83
Lighting Control .............................................
83
Autolamps .......................................................
84
Instrument Lighting Dimmer ....................
84
Headlamp Exit Delay ...................................
85
Daytime Running Lamps ...........................
85
Automatic High Beam Control ................
86
Front Fog Lamps ...........................................
87
Direction Indicators .......................................
87
Interior Lamps ................................................
87
Ambient Lighting ..........................................
89
Windows and Mirrors
Power Windows ..............................................
91
Global Opening ..............................................
92
Exterior Mirrors ...............................................
92
Interior Mirror ..................................................
95Sun Visors
........................................................
95
Moonroof .........................................................
95
Instrument Cluster
Gauges ...............................................................
97
Warning Lamps and Indicators .............
100
Audible Warnings and Indicators ..........
103
Information Displays
General Information ...................................
105
Information Messages ................................
119
Climate Control
Manual Climate Control ............................
133
Automatic Climate Control - Vehicles With: Premium AM/FM/CD .................
134
Automatic Climate Control - Vehicles With: Sony AM/FM/CD .........................
136
Hints on Controlling the Interior Climate ........................................................................\
.
138
Rear Passenger Climate Controls .........
140
Heated Windows and Mirrors ..................
141
Cabin Air Filter ...............................................
142
Remote Start .................................................
142
Seats
Sitting in the Correct Position .................
144
Head Restraints ...........................................
144
Manual Seats ................................................
147
Power Seats ..................................................
148
Memory Function ........................................
150
Rear Seats .......................................................
151
Heated Seats ................................................
158
Climate Controlled Seats .........................
159
Universal Garage Door Opener
Universal Garage Door Opener ...............
161
2
Explorer (TUB) Canada/United States of America, enUSA, Edition date: 201711, Fourth-Printing Table of Contents
Page 7 of 571
Cargo Nets
......................................................241
Luggage Covers ...........................................
242
Roof Racks and Load Carriers ................
242
Load Limit ......................................................
243
Towing
Towing a Trailer ...........................................
249
Trailer Sway Control ..................................
250
Recommended Towing Weights ..........
250
Essential Towing Checks .........................
252
Towing the Vehicle on Four Wheels - 2.3L EcoBoost™ .....................................
254
Towing the Vehicle on Four Wheels - 3.5L Duratec/3.5L Ecoboost™ ..........
255
Driving Hints
Breaking-In ....................................................
257
Economical Driving .....................................
257
Driving Through Water ..............................
258
Floor Mats .....................................................
258
Roadside Emergencies
Roadside Assistance ................................
260
Hazard Flashers ...........................................
261
Fuel Shutoff ...................................................
261
Jump Starting the Vehicle .......................
262
Post-Crash Alert System .........................
264
Transporting the Vehicle .........................
264
Customer Assistance
Getting the Services You Need .............
266
In California (U.S. Only) ............................
267
The Better Business Bureau (BBB) Auto Line Program (U.S. Only) ....................
268
Utilizing the Mediation/Arbitration Program (Canada Only) ......................
269
Getting Assistance Outside the U.S. and Canada .......................................................
269
Ordering Additional Owner's Literature ........................................................................\
..
271 Reporting Safety Defects (U.S. Only)
........................................................................\
..
271
Reporting Safety Defects (Canada Only) ........................................................................\
..
271
Fuses
Fuse Specification Chart ..........................
273
Changing a Fuse ..........................................
282
Maintenance
General Information ..................................
284
Opening and Closing the Hood .............
284
Under Hood Overview - 2.3L EcoBoost™ ........................................................................\
285
Under Hood Overview - 3.5L Duratec ........................................................................\
286
Under Hood Overview - 3.5L Ecoboost™ ........................................................................\
287
Engine Oil Dipstick - 2.3L EcoBoost™ ........................................................................\
288
Engine Oil Dipstick - 3.5L Duratec/3.5L Ecoboost™ ...............................................
289
Engine Oil Check .........................................
289
Oil Change Indicator Reset .....................
290
Engine Coolant Check ...............................
291
Automatic Transmission Fluid Check - 2.3L EcoBoost™ .....................................
295
Automatic Transmission Fluid Check - 3.5L Duratec/3.5L Ecoboost™ .........
295
Brake Fluid Check .......................................
297
Power Steering Fluid Check ...................
298
Washer Fluid Check ...................................
298
Changing the 12V Battery ........................
298
Checking the Wiper Blades ....................
300
Changing the Wiper Blades ...................
300
Adjusting the Headlamps ........................
301
Removing a Headlamp ............................
303
Changing a Bulb .........................................
303
Bulb Specification Chart .........................
306
Changing the Engine Air Filter ...............
308
4
Explorer (TUB) Canada/United States of America, enUSA, Edition date: 201711, Fourth-Printing Table of Contents
Page 18 of 571
PROTECTING THE
ENVIRONMENT
You should play your part in protecting the
environment. Correct vehicle usage and
the authorized disposal of waste, cleaning
and lubrication materials are significant
steps toward this aim.
For details about Ford Motor
Company's sustainability progress and
initiatives visit:
Web Address
www.sustainability.ford.com
15
Explorer (TUB) Canada/United States of America, enUSA, Edition date: 201711, Fourth-Printing Environment
Page 23 of 571
INSTALLING CHILD
RESTRAINTS
Using Lap and Shoulder Belts
WARNING: Do not place a rearward
facing child restraint in front of an active
airbag. Failure to follow this instruction
could result in personal injury or death. WARNING:
Properly secure children
12 years old and under in a rear seating
position whenever possible. If you are
unable to properly secure all children in a
rear seating position, properly secure the
largest child on the front seat. If you must
use a forward facing child restraint on the
front seat, move the seat as far back as
possible. Failure to follow these
instructions could result in personal injury
or death. WARNING: Depending on where you
secure a child restraint, and depending on
the child restraint design, you may block
access to certain seatbelt buckle
assemblies and LATCH lower anchors,
rendering those features potentially
unusable. To avoid risk of injury, make sure
occupants only use seating positions
where they are able to be properly
restrained.
When installing a child safety seat with
combination lap and shoulder belts:
• Use the correct seatbelt buckle for that
seating position.
• Insert the belt tongue into the proper
buckle until you hear a snap and feel it
latch. Make sure the tongue is securely
fastened in the buckle. •
Keep the buckle release button
pointing up and away from the safety
seat, with the tongue between the child
restraint and the release button, to
prevent accidental unbuckling.
• Place the vehicle seat upon which the
child restraint will be installed in the
upright position.
• For second-row seating positions,
adjust the recliner slightly to improve
child restraint fit. If needed, remove the
head restraints.
• For third-row seating positions, stow
the head restraints to improve child
restraint fit. See
Head Restraints
(page 144).
• Put the seatbelt in the automatic
locking mode. See Step 5. This vehicle
does not require the use of a locking
clip.
Perform the following steps when
installing the child restraint with
combination lap and shoulder belts:
Note: Although the child restraint
illustrated is a forward facing child restraint,
the steps are the same for installing a rear
facing child restraint.
Note: The lock-off device on some child
restraints may not accommodate the
shoulder portion of the inflatable seatbelt.
Follow all instructions provided by the
manufacturer of the child restraint regarding
the necessary and proper use of the lock-off
device. In some instances these devices
have been provided only for use in vehicles
with seatbelt systems that would otherwise
require a locking clip.
20
Explorer (TUB) Canada/United States of America, enUSA, Edition date: 201711, Fourth-Printing Child Safety
Page 25 of 571
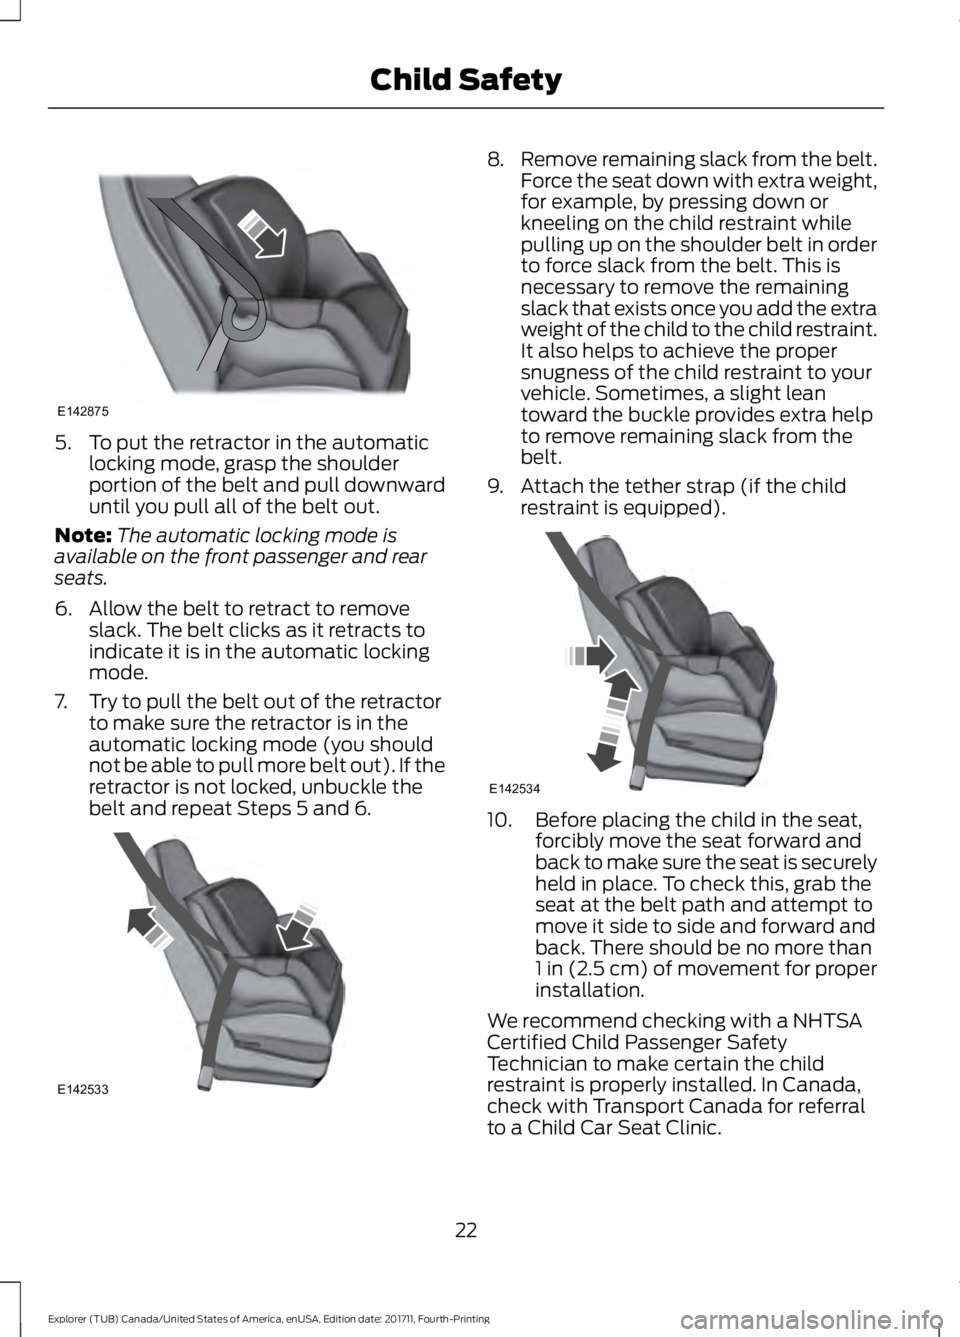
5. To put the retractor in the automatic
locking mode, grasp the shoulder
portion of the belt and pull downward
until you pull all of the belt out.
Note: The automatic locking mode is
available on the front passenger and rear
seats.
6. Allow the belt to retract to remove slack. The belt clicks as it retracts to
indicate it is in the automatic locking
mode.
7. Try to pull the belt out of the retractor to make sure the retractor is in the
automatic locking mode (you should
not be able to pull more belt out). If the
retractor is not locked, unbuckle the
belt and repeat Steps 5 and 6. 8.
Remove remaining slack from the belt.
Force the seat down with extra weight,
for example, by pressing down or
kneeling on the child restraint while
pulling up on the shoulder belt in order
to force slack from the belt. This is
necessary to remove the remaining
slack that exists once you add the extra
weight of the child to the child restraint.
It also helps to achieve the proper
snugness of the child restraint to your
vehicle. Sometimes, a slight lean
toward the buckle provides extra help
to remove remaining slack from the
belt.
9. Attach the tether strap (if the child restraint is equipped). 10. Before placing the child in the seat,
forcibly move the seat forward and
back to make sure the seat is securely
held in place. To check this, grab the
seat at the belt path and attempt to
move it side to side and forward and
back. There should be no more than
1 in (2.5 cm) of movement for proper
installation.
We recommend checking with a NHTSA
Certified Child Passenger Safety
Technician to make certain the child
restraint is properly installed. In Canada,
check with Transport Canada for referral
to a Child Car Seat Clinic.
22
Explorer (TUB) Canada/United States of America, enUSA, Edition date: 201711, Fourth-Printing Child SafetyE142875 E142533 E142534
Page 27 of 571
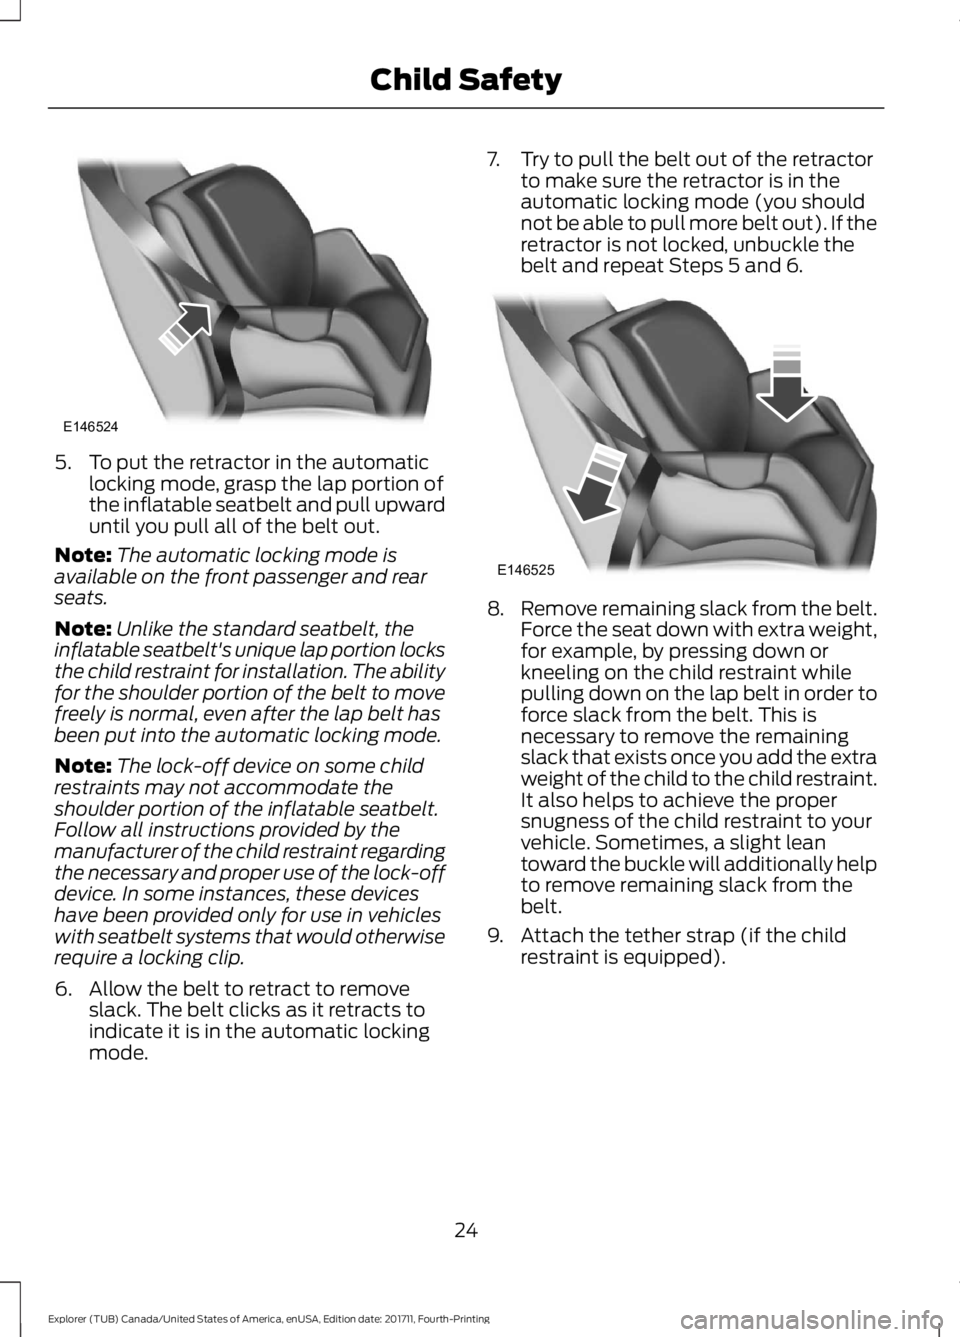
5. To put the retractor in the automatic
locking mode, grasp the lap portion of
the inflatable seatbelt and pull upward
until you pull all of the belt out.
Note: The automatic locking mode is
available on the front passenger and rear
seats.
Note: Unlike the standard seatbelt, the
inflatable seatbelt's unique lap portion locks
the child restraint for installation. The ability
for the shoulder portion of the belt to move
freely is normal, even after the lap belt has
been put into the automatic locking mode.
Note: The lock-off device on some child
restraints may not accommodate the
shoulder portion of the inflatable seatbelt.
Follow all instructions provided by the
manufacturer of the child restraint regarding
the necessary and proper use of the lock-off
device. In some instances, these devices
have been provided only for use in vehicles
with seatbelt systems that would otherwise
require a locking clip.
6. Allow the belt to retract to remove slack. The belt clicks as it retracts to
indicate it is in the automatic locking
mode. 7. Try to pull the belt out of the retractor
to make sure the retractor is in the
automatic locking mode (you should
not be able to pull more belt out). If the
retractor is not locked, unbuckle the
belt and repeat Steps 5 and 6. 8.
Remove remaining slack from the belt.
Force the seat down with extra weight,
for example, by pressing down or
kneeling on the child restraint while
pulling down on the lap belt in order to
force slack from the belt. This is
necessary to remove the remaining
slack that exists once you add the extra
weight of the child to the child restraint.
It also helps to achieve the proper
snugness of the child restraint to your
vehicle. Sometimes, a slight lean
toward the buckle will additionally help
to remove remaining slack from the
belt.
9. Attach the tether strap (if the child restraint is equipped).
24
Explorer (TUB) Canada/United States of America, enUSA, Edition date: 201711, Fourth-Printing Child SafetyE146524 E146525
Page 35 of 571
manufacturer's instructions and warnings
provided for installation and use in
conjunction with the instructions and
warnings provided by your vehicle
manufacturer. A safety seat that is
improperly installed or utilized, is
inappropriate for your child's height, age,
or weight or does not properly fit the child
may increase the risk of serious injury or
death.
WARNING: Do not allow a
passenger to hold a child on their lap when
your vehicle is moving. Failure to follow this
instruction could result in personal injury
or death in the event of a sudden stop or
crash. WARNING:
Do not use pillows,
books or towels to boost your child's
height. Failure to follow this instruction
could result in personal injury or death. WARNING:
Properly secure child
restraints or booster seats when they are
not in use. They could become projectiles
in a sudden stop or crash. Failure to follow
this instruction could result in personal
injury or death. WARNING:
Do not put the shoulder
section of the seatbelt or allow the child
to put the shoulder section of the seatbelt
under their arm or behind their back. Failure
to follow this instruction could reduce the
effectiveness of the seatbelt and increase
the risk of injury or death in a crash. WARNING: Do not leave children or
pets unattended in your vehicle. Failure to
follow this instruction could result in
personal injury or death.
32
Explorer (TUB) Canada/United States of America, enUSA, Edition date: 201711, Fourth-Printing Child Safety
Page 40 of 571
Pregnant women should always wear their
seatbelt. Position the lap belt portion of a
combination lap and shoulder belt low
across the hips below the belly and worn
as tight as comfort allows. Position the
shoulder belt to cross the middle of the
shoulder and the center of the chest.
Seatbelt Locking Modes
WARNING: If your vehicle is involved
in a crash, have the seatbelts and
associated components inspected as soon
as possible. Failure to follow this
instruction could result in personal injury
or death.
All safety restraints in the vehicle are
combination lap and shoulder belts. The
driver seatbelt has the vehicle sensitive
locking mode. The front outboard
passenger and rear seatbelts have both
the vehicle sensitive locking mode and the
automatic locking mode.
Vehicle Sensitive Mode
This is the normal retractor mode, which
allows free shoulder belt length
adjustment to your movements and
locking in response to vehicle movement.
For example, if the driver brakes suddenly
or turns a corner sharply, or the vehicle
receives an impact of about 5 mph
(8 km/h) or more, the combination
seatbelts lock to help reduce forward
movement of the driver and passengers.
In addition, the retractor is designed to lock
if you pull the webbing out too quickly. If
the seatbelt retractor locks, slowly lower
the height adjuster to allow the seatbelt
to retract. If the retractor does not unlock,
pull the seatbelt out slowly then feed a small length of webbing back toward the
stowed position. For rear seatbelts, recline
the rear seat backrest or push the seat
backrest cushion away from the seatbelt.
Feed a small length of webbing back
toward the stowed position.
Automatic Locking Mode
In this mode, the shoulder belt
automatically pre-locks. The belt still
retracts to remove any slack in the
shoulder belt. The automatic locking mode
is not available on the driver seatbelt.
When to Use the Automatic Locking
Mode
Use this mode when you install a child
safety seat, except a booster, in the
passenger front or rear seating positions.
Properly restrain children 12 years old and
under in a rear seating position whenever
possible. See
Child Safety (page 18).
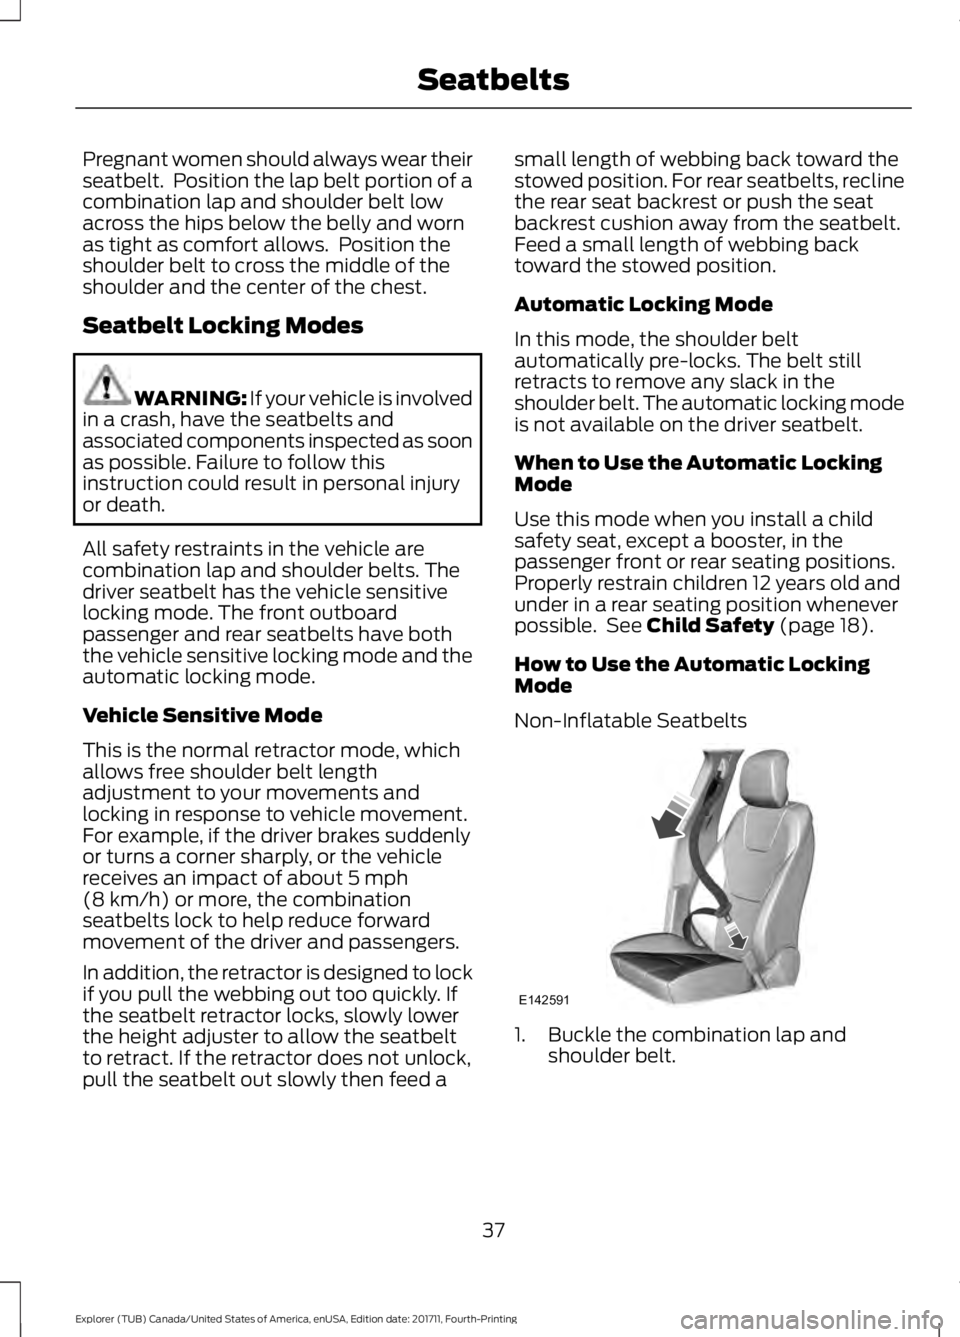
How to Use the Automatic Locking
Mode
Non-Inflatable Seatbelts 1. Buckle the combination lap and
shoulder belt.
37
Explorer (TUB) Canada/United States of America, enUSA, Edition date: 201711, Fourth-Printing SeatbeltsE142591
Page 53 of 571
WARNING: To reduce risk of injury,
do not obstruct or place objects in the
deployment path of the airbag. WARNING:
If a supplementary
restraint system component has deployed,
it will not function again. Have the system
and associated components inspected as
soon as possible. Failure to follow this
instruction could result in personal injury
or death.
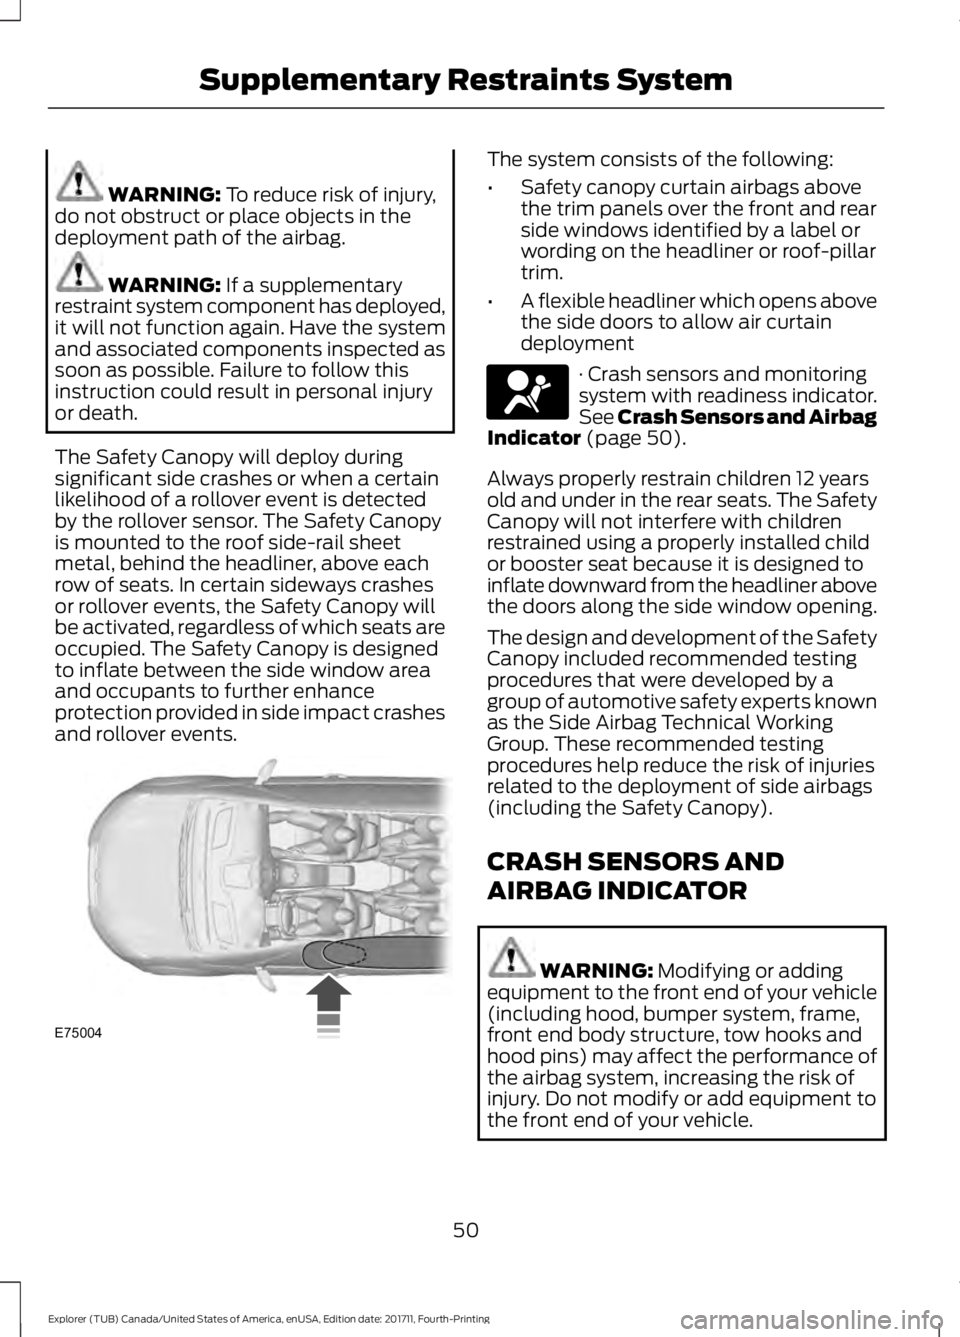
The Safety Canopy will deploy during
significant side crashes or when a certain
likelihood of a rollover event is detected
by the rollover sensor. The Safety Canopy
is mounted to the roof side-rail sheet
metal, behind the headliner, above each
row of seats. In certain sideways crashes
or rollover events, the Safety Canopy will
be activated, regardless of which seats are
occupied. The Safety Canopy is designed
to inflate between the side window area
and occupants to further enhance
protection provided in side impact crashes
and rollover events. The system consists of the following:
•
Safety canopy curtain airbags above
the trim panels over the front and rear
side windows identified by a label or
wording on the headliner or roof-pillar
trim.
• A flexible headliner which opens above
the side doors to allow air curtain
deployment · Crash sensors and monitoring
system with readiness indicator.
See Crash Sensors and Airbag
Indicator
(page 50).
Always properly restrain children 12 years
old and under in the rear seats. The Safety
Canopy will not interfere with children
restrained using a properly installed child
or booster seat because it is designed to
inflate downward from the headliner above
the doors along the side window opening.
The design and development of the Safety
Canopy included recommended testing
procedures that were developed by a
group of automotive safety experts known
as the Side Airbag Technical Working
Group. These recommended testing
procedures help reduce the risk of injuries
related to the deployment of side airbags
(including the Safety Canopy).
CRASH SENSORS AND
AIRBAG INDICATOR WARNING:
Modifying or adding
equipment to the front end of your vehicle
(including hood, bumper system, frame,
front end body structure, tow hooks and
hood pins) may affect the performance of
the airbag system, increasing the risk of
injury. Do not modify or add equipment to
the front end of your vehicle.
50
Explorer (TUB) Canada/United States of America, enUSA, Edition date: 201711, Fourth-Printing Supplementary Restraints SystemE75004 E67017
Page 55 of 571
PRINCIPLE OF OPERATION
The remote control allows you to:
•
Remotely lock or unlock the vehicle
doors.
• Unlock the doors without actively using
a key or remote control (intelligent
access only).
• Remotely open the power liftgate (if
equipped).
• Remotely start or stop the engine and
user pre-set features (if equipped).
• Arm and disarm the anti-theft system.
• Activate the panic alarm.
GENERAL INFORMATION ON
RADIO FREQUENCIES
This device complies with Part 15 of the
FCC Rules and with Industry Canada
license-exempt RSS standard(s).
Operation is subject to the following two
conditions: (1) This device may not cause
harmful interference, and (2) This device
must accept any interference received,
including interference that may cause
undesired operation.
Note: Changes or modifications not
expressively approved by the party
responsible for compliance could void the
user's authority to operate the equipment.
The term IC before the radio certification
number only signifies that Industry Canada
technical specifications were met.
The typical operating range for your
transmitter is approximately
33 ft (10 m).
Vehicles with the remote start feature will
have a greater range.
One of the following could cause a
decrease in operating range:
• Weather conditions.
• Nearby radio towers. •
Structures around the vehicle.
• Other vehicles parked next to your
vehicle.
The radio frequency used by your remote
control can also be used by other radio
transmitters, for example amateur radios,
medical equipment, wireless headphones,
wireless remote controls, cell phones,
battery chargers and alarm systems. If the
frequencies are jammed, you will not be
able to use your remote control. You can
lock and unlock the doors with the key.
Note: Make sure to lock your vehicle before
leaving it unattended.
Note: If you are in range, the remote control
will operate if you press any button
unintentionally.
Note: The remote control contains sensitive
electrical components. Exposure to moisture
or impact may cause permanent damage.
Intelligent Access
(If Equipped)
The system uses a radio frequency signal
to communicate with your vehicle and
authorize your vehicle to unlock when one
of the following conditions are met:
• You activate the front exterior door
handle switch.
• You press the luggage compartment
button.
• You press a button on the transmitter.
If excessive radio frequency interference
is present in the area or if the transmitter
battery is low, you may need to
mechanically unlock your door. You can
use the mechanical key blade in your
intelligent access key to open the driver
door in this situation. See
Remote
Control (page 53).
52
Explorer (TUB) Canada/United States of America, enUSA, Edition date: 201711, Fourth-Printing Keys and Remote Controls