wipers FORD EXPLORER 2019 Owners Manual
[x] Cancel search | Manufacturer: FORD, Model Year: 2019, Model line: EXPLORER, Model: FORD EXPLORER 2019Pages: 571, PDF Size: 6.8 MB
Page 5 of 571
Steering Wheel
Adjusting the Steering Wheel - Vehicles
With: Manual Adjustable Steering
Column ..........................................................77
Adjusting the Steering Wheel - Vehicles With: Power Adjustable Steering
Column ..........................................................
77
Audio Control ..................................................
79
Voice Control ...................................................
79
Cruise Control ................................................
80
Information Display Control .....................
80
Heated Steering Wheel ..............................
80
Pedals
Adjusting the Pedals .....................................
81
Wipers and Washers
Windshield Wipers ........................................
82
Autowipers ......................................................
82
Windshield Washers ....................................
83
Rear Window Wiper and Washers ..........
83
Lighting
General Information ....................................
84
Lighting Control .............................................
84
Autolamps .......................................................
85
Instrument Lighting Dimmer ....................
85
Headlamp Exit Delay ...................................
86
Daytime Running Lamps ...........................
86
Automatic High Beam Control .................
87
Front Fog Lamps ...........................................
88
Direction Indicators ......................................
88
Interior Lamps ................................................
88
Ambient Lighting ..........................................
89
Windows and Mirrors
Power Windows ............................................
90
Global Opening ...............................................
91
Exterior Mirrors ................................................
91
Interior Mirror ..................................................
94Sun Visors
........................................................
94
Moonroof .........................................................
94
Instrument Cluster
Gauges ..............................................................
96
Warning Lamps and Indicators ...............
99
Audible Warnings and Indicators ..........
102
Information Displays
General Information ...................................
104
Information Messages ................................
115
Climate Control
Manual Climate Control ............................
129
Automatic Climate Control - Vehicles With: Sony AM/FM/CD .........................
130
Automatic Climate Control - Vehicles With: Premium AM/FM/CD .................
132
Hints on Controlling the Interior Climate ........................................................................\
.
134
Rear Passenger Climate Controls .........
136
Heated Rear Window .................................
137
Heated Exterior Mirrors ..............................
137
Cabin Air Filter ..............................................
138
Remote Start ................................................
138
Seats
Sitting in the Correct Position .................
139
Head Restraints ...........................................
139
Manual Seats ................................................
142
Power Seats ...................................................
143
Memory Function ........................................
146
Rear Seats ......................................................
147
Heated Seats ................................................
154
Climate Controlled Seats .........................
155
Garage Door Opener
Universal Garage Door Opener ...............
157
2
Explorer (TUB) Canada/United States of America, enUSA, Edition date: 201807, Second-Printing Table of Contents
Page 19 of 571
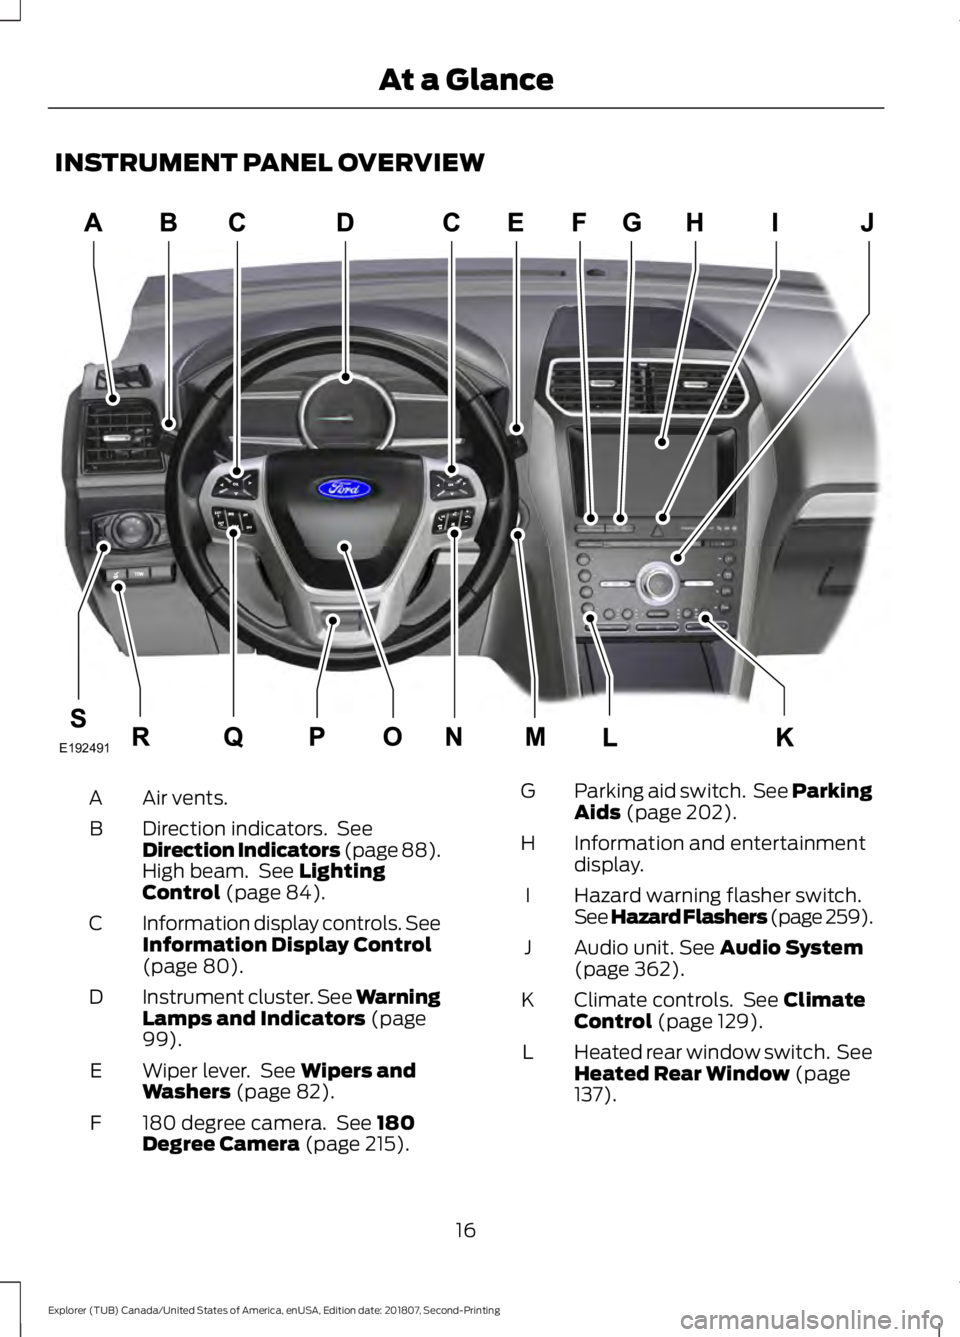
INSTRUMENT PANEL OVERVIEW
Air vents.
A
Direction indicators. See
Direction Indicators (page 88).
High beam. See Lighting
Control (page 84).
B
Information display controls. See
Information Display Control
(page
80).
C
Instrument cluster.
See Warning
Lamps and Indicators (page
99).
D
Wiper lever. See
Wipers and
Washers (page 82).
E
180 degree camera. See
180
Degree Camera (page 215).
F Parking aid switch. See Parking
Aids
(page 202).
G
Information and entertainment
display.
H
Hazard warning flasher switch.
See Hazard Flashers (page 259
).
I
Audio unit.
See Audio System
(page 362).
J
Climate controls. See
Climate
Control (page 129).
K
Heated rear window switch. See
Heated Rear Window
(page
137).
L
16
Explorer (TUB) Canada/United States of America, enUSA, Edition date: 201807, Second-Printing At a GlanceE192491
Page 85 of 571
WINDSHIELD WIPERS
Note:
Fully defrost the windshield before
you switch the windshield wipers on.
Note: Make sure you switch the windshield
wipers off before entering a car wash.
Note: If streaks or smears appear on the
windshield, clean the windshield and the
wiper blades. If that does not resolve the
issue, install new wiper blades.
Note: Do not operate the wipers on a dry
windshield. This may scratch the glass,
damage the wiper blades or cause the wiper
motor to burn out. Always use the
windshield washers before wiping a dry
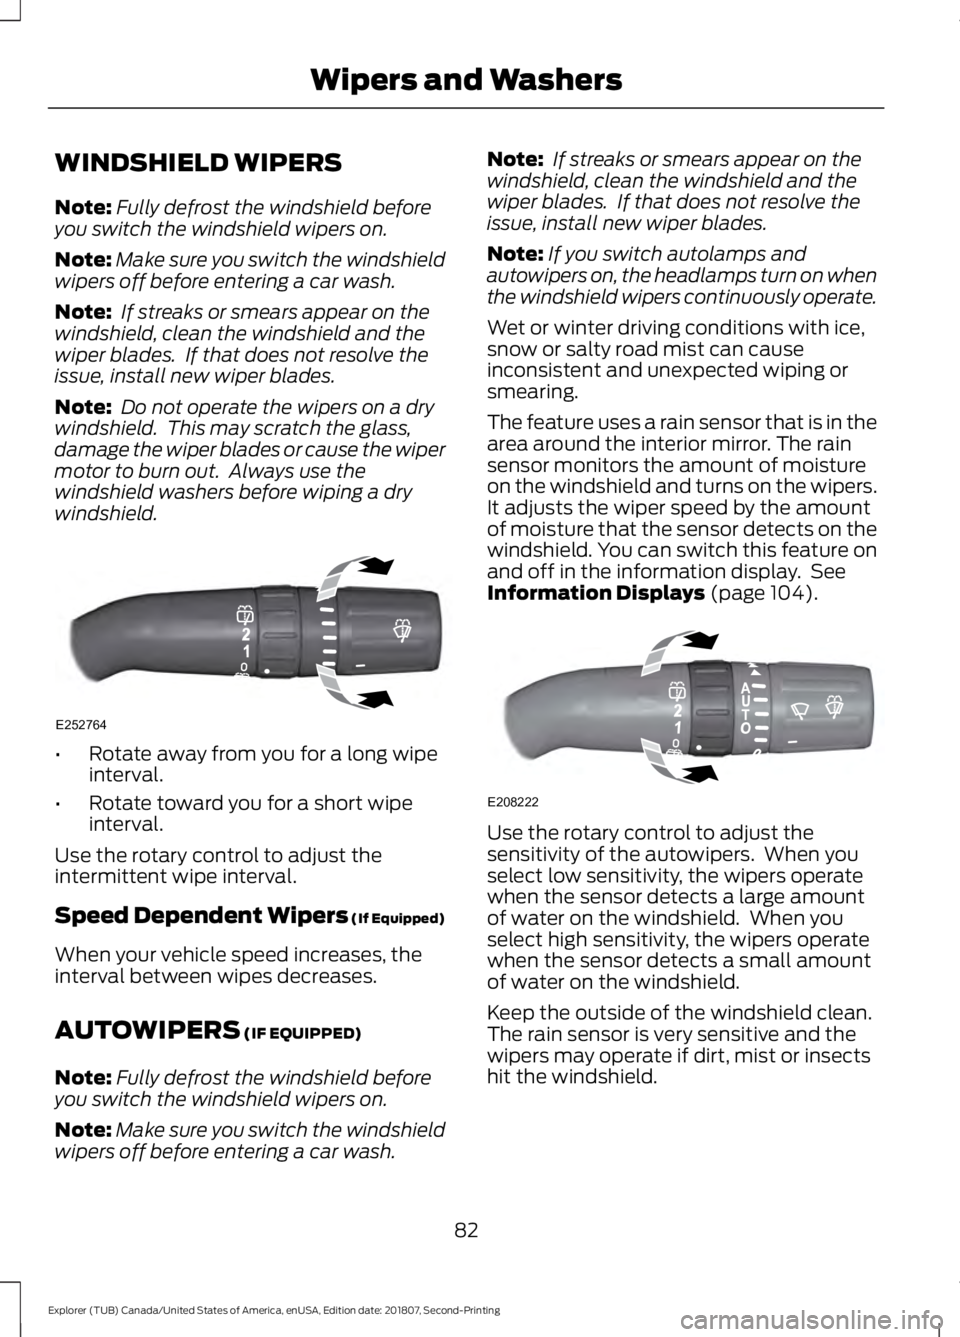
windshield. •
Rotate away from you for a long wipe
interval.
• Rotate toward you for a short wipe
interval.
Use the rotary control to adjust the
intermittent wipe interval.
Speed Dependent Wipers (If Equipped)
When your vehicle speed increases, the
interval between wipes decreases.
AUTOWIPERS (IF EQUIPPED)
Note: Fully defrost the windshield before
you switch the windshield wipers on.
Note: Make sure you switch the windshield
wipers off before entering a car wash. Note:
If streaks or smears appear on the
windshield, clean the windshield and the
wiper blades. If that does not resolve the
issue, install new wiper blades.
Note: If you switch autolamps and
autowipers on, the headlamps turn on when
the windshield wipers continuously operate.
Wet or winter driving conditions with ice,
snow or salty road mist can cause
inconsistent and unexpected wiping or
smearing.
The feature uses a rain sensor that is in the
area around the interior mirror. The rain
sensor monitors the amount of moisture
on the windshield and turns on the wipers.
It adjusts the wiper speed by the amount
of moisture that the sensor detects on the
windshield. You can switch this feature on
and off in the information display. See
Information Displays
(page 104). Use the rotary control to adjust the
sensitivity of the autowipers. When you
select low sensitivity, the wipers operate
when the sensor detects a large amount
of water on the windshield. When you
select high sensitivity, the wipers operate
when the sensor detects a small amount
of water on the windshield.
Keep the outside of the windshield clean.
The rain sensor is very sensitive and the
wipers may operate if dirt, mist or insects
hit the windshield.
82
Explorer (TUB) Canada/United States of America, enUSA, Edition date: 201807, Second-Printing Wipers and WashersE252764 E208222
Page 86 of 571
In these conditions, you can do the
following:
•
Lower the sensitivity of the autowipers
to reduce the amount of smearing on
the windshield.
• Switch to normal or high-speed wipe.
• Switch autowipers off.
Autowipers Settings
Autowipers default to on and remain on
until you switch them off in the information
display. When you switch off autowipers,
the wipers operate in intermittent mode.
WINDSHIELD WASHERS
Note: Do not operate the wipers on a dry
windshield. This may scratch the glass,
damage the wiper blades or cause the wiper
motor to burn out. Always use the
windshield washers before wiping a dry
windshield.
Note: Do not operate the washers when
the washer reservoir is empty. This may
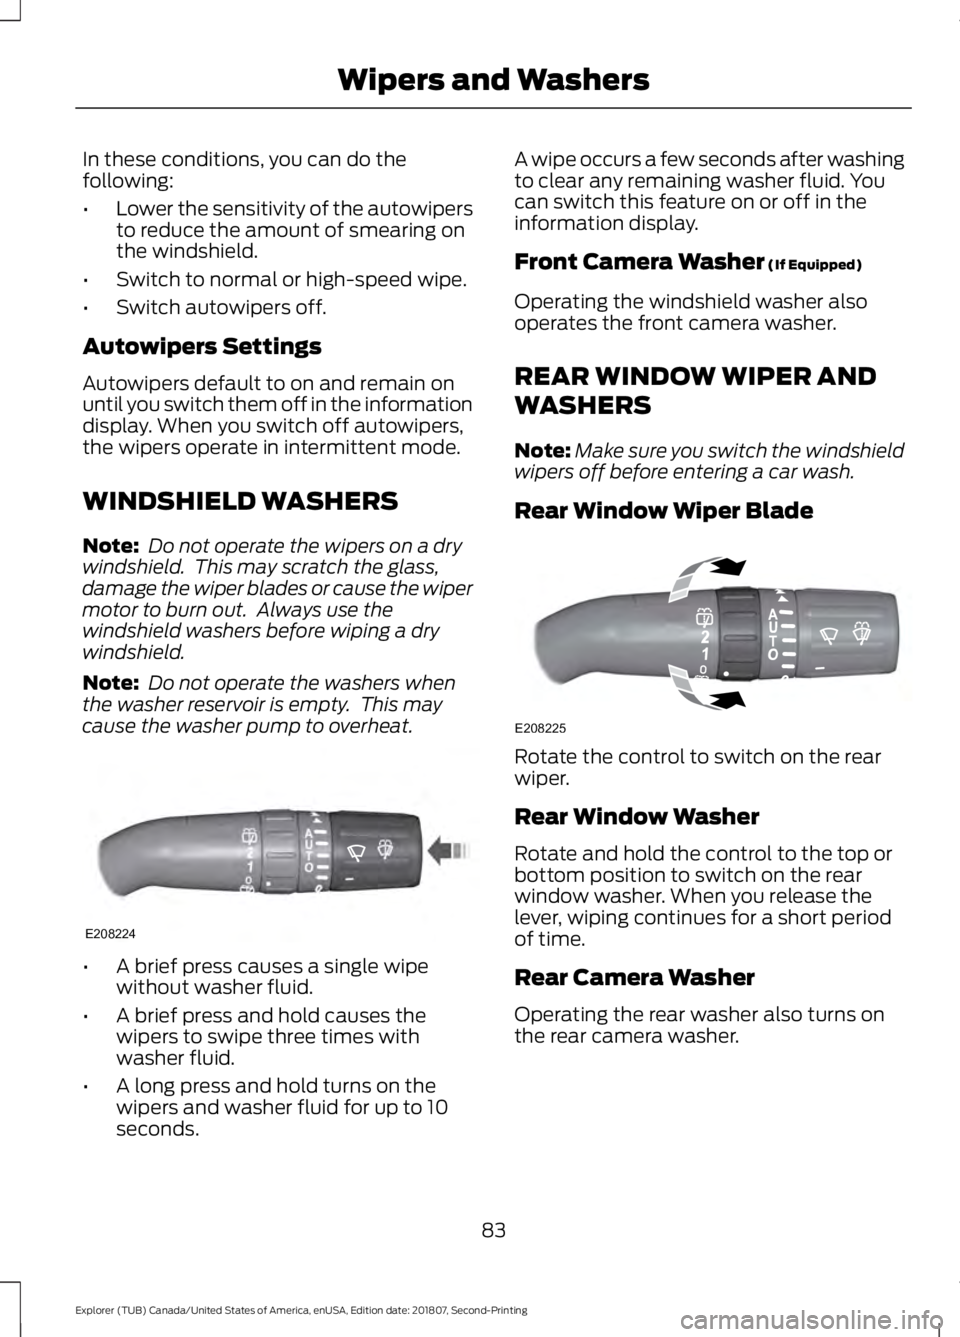
cause the washer pump to overheat. •
A brief press causes a single wipe
without washer fluid.
• A brief press and hold causes the
wipers to swipe three times with
washer fluid.
• A long press and hold turns on the
wipers and washer fluid for up to 10
seconds. A wipe occurs a few seconds after washing
to clear any remaining washer fluid. You
can switch this feature on or off in the
information display.
Front Camera Washer (If Equipped)
Operating the windshield washer also
operates the front camera washer.
REAR WINDOW WIPER AND
WASHERS
Note: Make sure you switch the windshield
wipers off before entering a car wash.
Rear Window Wiper Blade Rotate the control to switch on the rear
wiper.
Rear Window Washer
Rotate and hold the control to the top or
bottom position to switch on the rear
window washer. When you release the
lever, wiping continues for a short period
of time.
Rear Camera Washer
Operating the rear washer also turns on
the rear camera washer.
83
Explorer (TUB) Canada/United States of America, enUSA, Edition date: 201807, Second-Printing Wipers and WashersE208224 E208225
Page 88 of 571
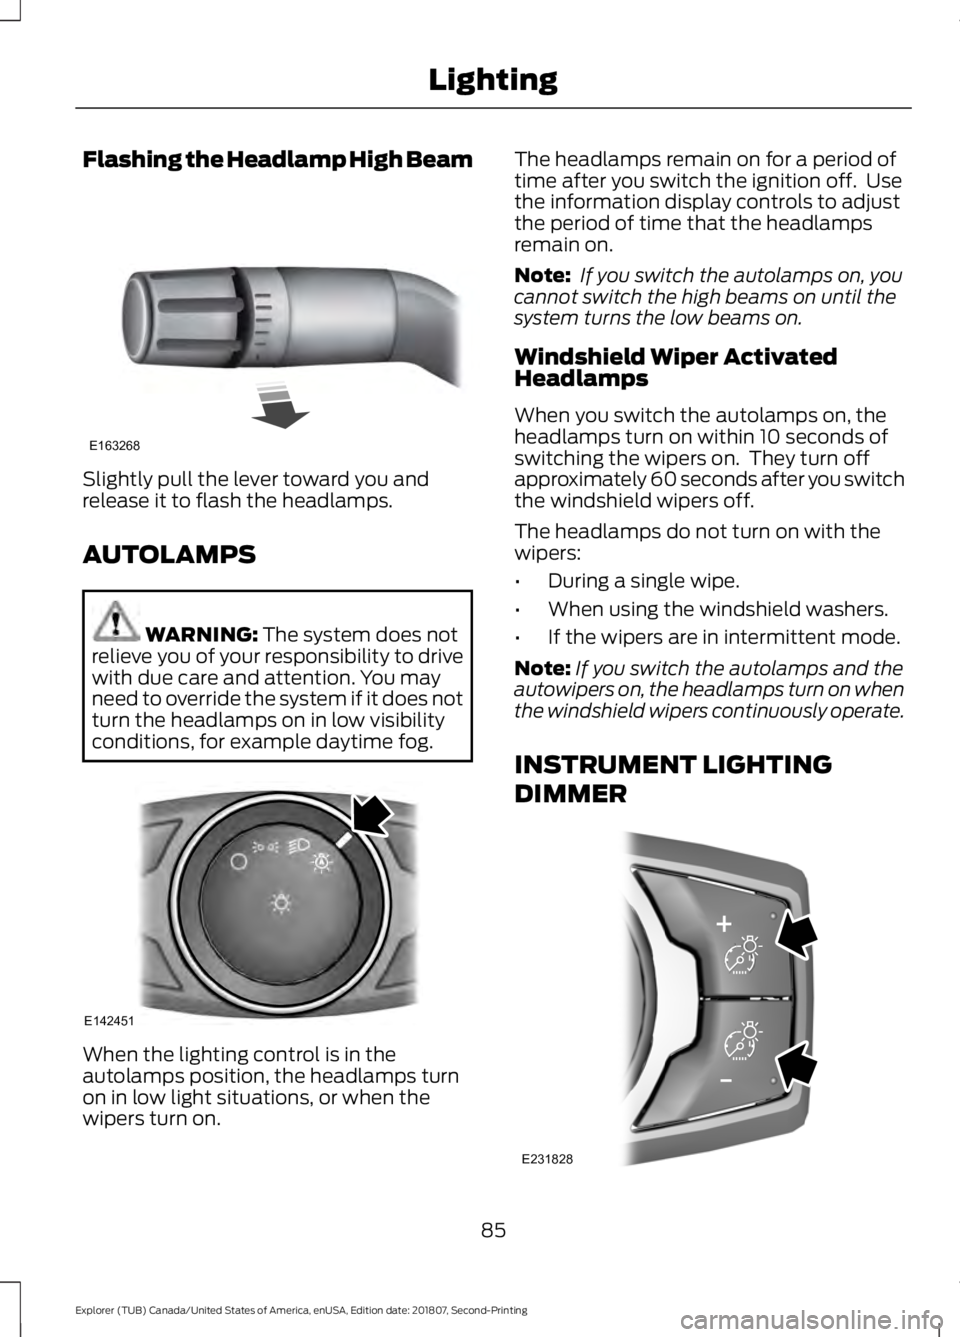
Flashing the Headlamp High Beam
Slightly pull the lever toward you and
release it to flash the headlamps.
AUTOLAMPS
WARNING: The system does not
relieve you of your responsibility to drive
with due care and attention. You may
need to override the system if it does not
turn the headlamps on in low visibility
conditions, for example daytime fog. When the lighting control is in the
autolamps position, the headlamps turn
on in low light situations, or when the
wipers turn on. The headlamps remain on for a period of
time after you switch the ignition off. Use
the information display controls to adjust
the period of time that the headlamps
remain on.
Note:
If you switch the autolamps on, you
cannot switch the high beams on until the
system turns the low beams on.
Windshield Wiper Activated
Headlamps
When you switch the autolamps on, the
headlamps turn on within 10 seconds of
switching the wipers on. They turn off
approximately 60 seconds after you switch
the windshield wipers off.
The headlamps do not turn on with the
wipers:
• During a single wipe.
• When using the windshield washers.
• If the wipers are in intermittent mode.
Note: If you switch the autolamps and the
autowipers on, the headlamps turn on when
the windshield wipers continuously operate.
INSTRUMENT LIGHTING
DIMMER 85
Explorer (TUB) Canada/United States of America, enUSA, Edition date: 201807, Second-Printing LightingE163268 E142451 E231828
Page 110 of 571
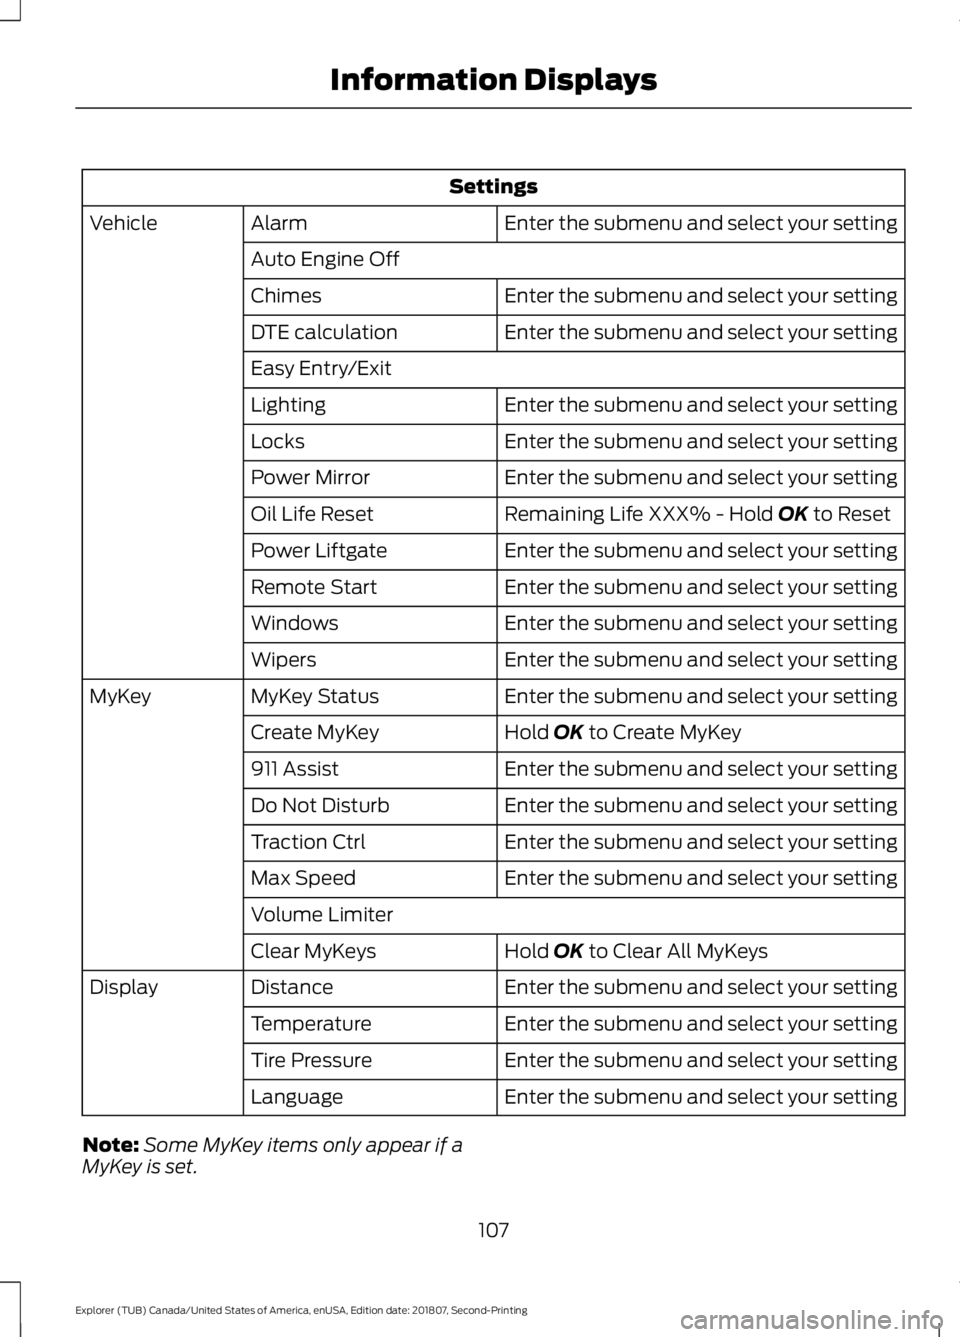
Settings
Enter the submenu and select your setting
Alarm
Vehicle
Auto Engine Off Enter the submenu and select your setting
Chimes
Enter the submenu and select your setting
DTE calculation
Easy Entry/Exit
Enter the submenu and select your setting
Lighting
Enter the submenu and select your setting
Locks
Enter the submenu and select your setting
Power Mirror
Remaining Life XXX% - Hold OK to Reset
Oil Life Reset
Enter the submenu and select your setting
Power Liftgate
Enter the submenu and select your setting
Remote Start
Enter the submenu and select your setting
Windows
Enter the submenu and select your setting
Wipers
Enter the submenu and select your setting
MyKey Status
MyKey
Hold
OK to Create MyKey
Create MyKey
Enter the submenu and select your setting
911 Assist
Enter the submenu and select your setting
Do Not Disturb
Enter the submenu and select your setting
Traction Ctrl
Enter the submenu and select your setting
Max Speed
Volume Limiter
Hold
OK to Clear All MyKeys
Clear MyKeys
Enter the submenu and select your setting
Distance
Display
Enter the submenu and select your setting
Temperature
Enter the submenu and select your setting
Tire Pressure
Enter the submenu and select your setting
Language
Note: Some MyKey items only appear if a
MyKey is set.
107
Explorer (TUB) Canada/United States of America, enUSA, Edition date: 201807, Second-Printing Information Displays
Page 114 of 571
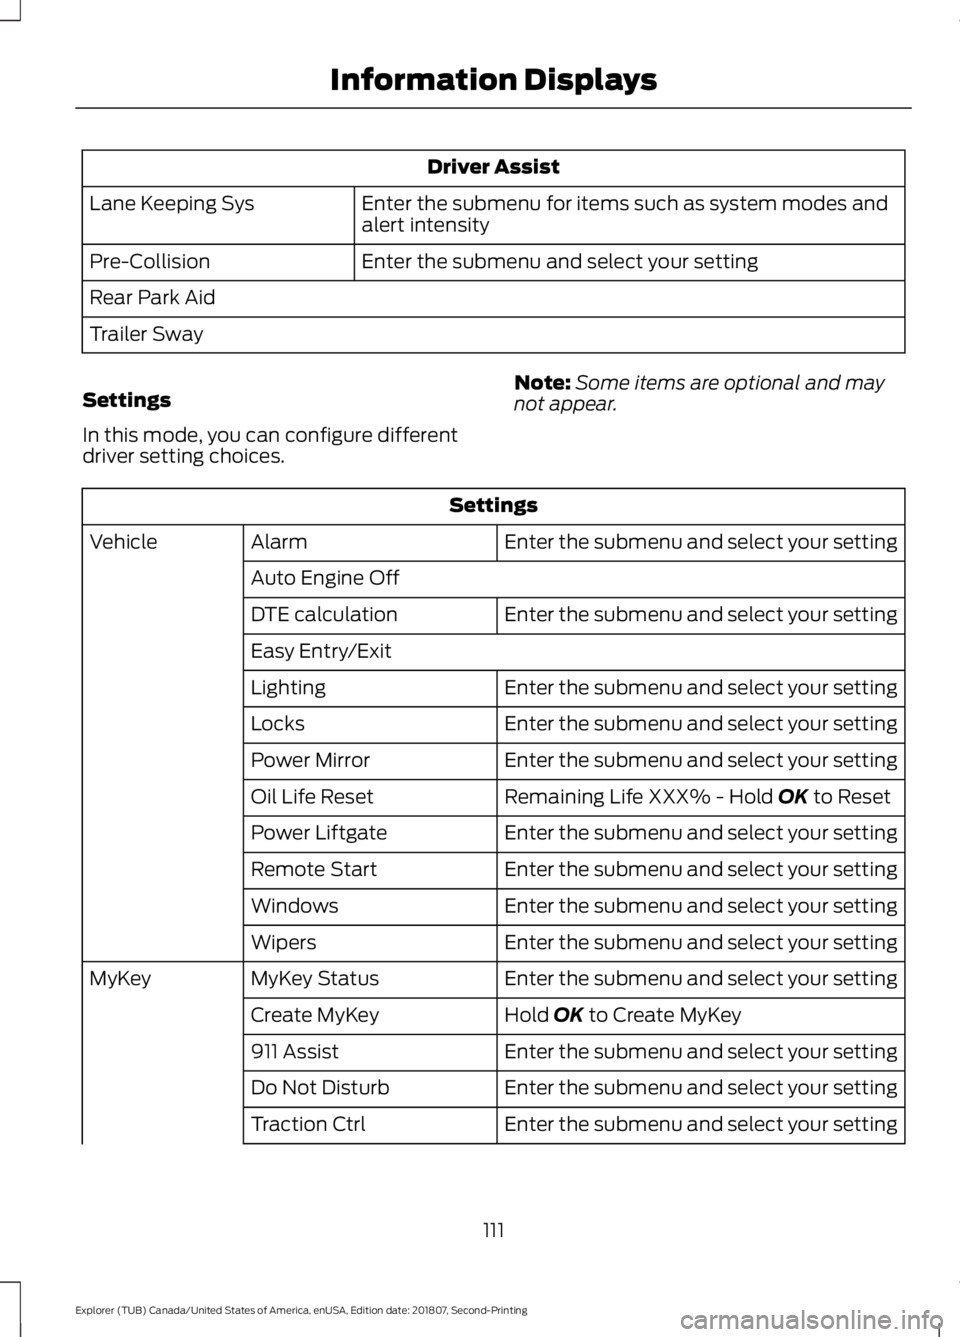
Driver Assist
Enter the submenu for items such as system modes and
alert intensity
Lane Keeping Sys
Enter the submenu and select your setting
Pre-Collision
Rear Park Aid
Trailer Sway
Settings
In this mode, you can configure different
driver setting choices. Note:
Some items are optional and may
not appear. Settings
Enter the submenu and select your setting
Alarm
Vehicle
Auto Engine Off Enter the submenu and select your setting
DTE calculation
Easy Entry/Exit
Enter the submenu and select your setting
Lighting
Enter the submenu and select your setting
Locks
Enter the submenu and select your setting
Power Mirror
Remaining Life XXX% - Hold OK to Reset
Oil Life Reset
Enter the submenu and select your setting
Power Liftgate
Enter the submenu and select your setting
Remote Start
Enter the submenu and select your setting
Windows
Enter the submenu and select your setting
Wipers
Enter the submenu and select your setting
MyKey Status
MyKey
Hold
OK to Create MyKey
Create MyKey
Enter the submenu and select your setting
911 Assist
Enter the submenu and select your setting
Do Not Disturb
Enter the submenu and select your setting
Traction Ctrl
111
Explorer (TUB) Canada/United States of America, enUSA, Edition date: 201807, Second-Printing Information Displays
Page 117 of 571
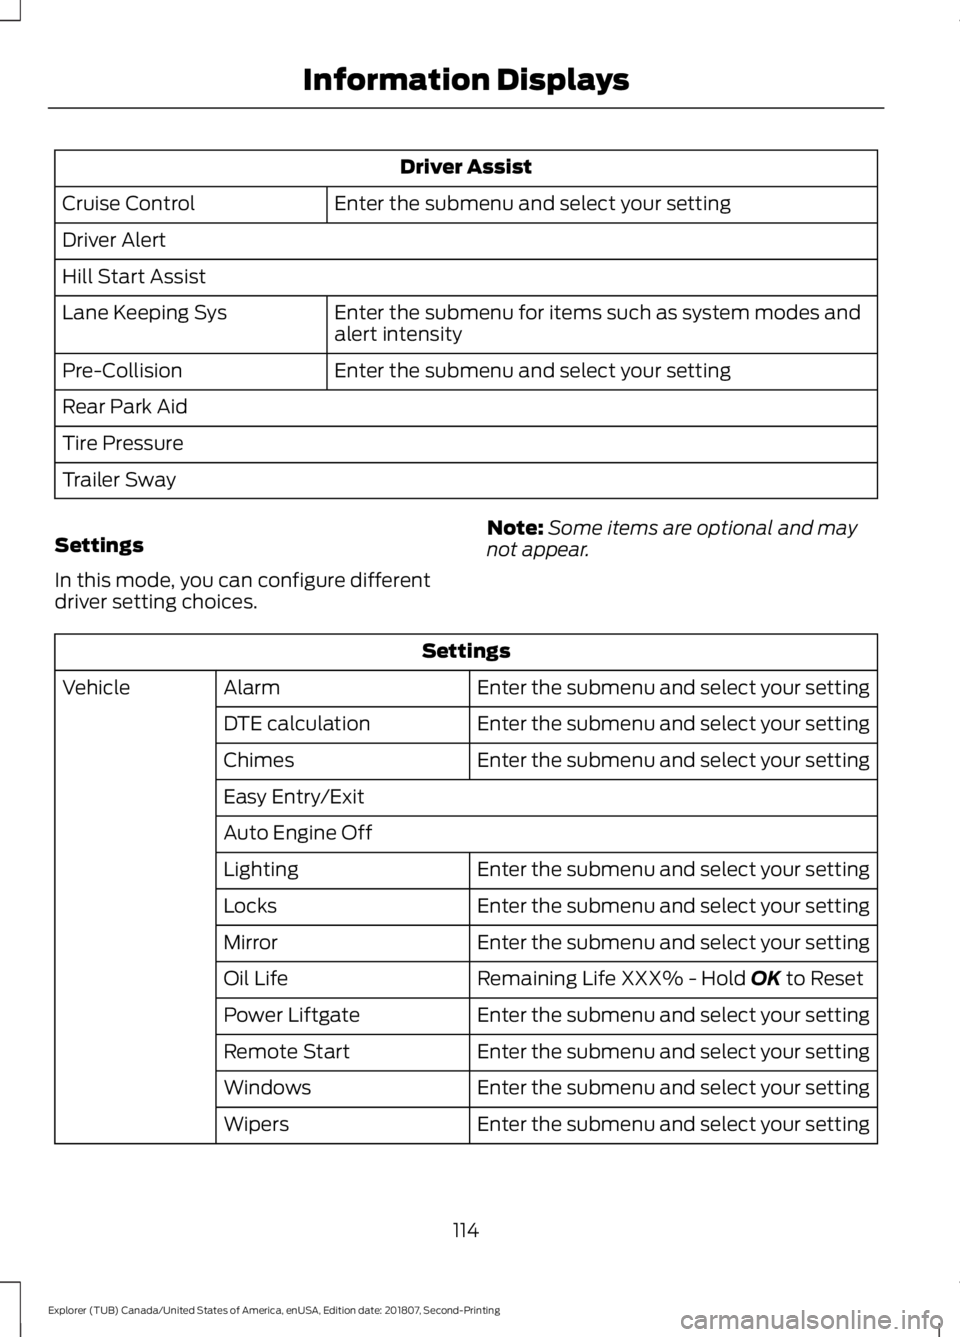
Driver Assist
Enter the submenu and select your setting
Cruise Control
Driver Alert
Hill Start Assist
Enter the submenu for items such as system modes and
alert intensity
Lane Keeping Sys
Enter the submenu and select your setting
Pre-Collision
Rear Park Aid
Tire Pressure
Trailer Sway
Settings
In this mode, you can configure different
driver setting choices. Note:
Some items are optional and may
not appear. Settings
Enter the submenu and select your setting
Alarm
Vehicle
Enter the submenu and select your setting
DTE calculation
Enter the submenu and select your setting
Chimes
Easy Entry/Exit
Auto Engine Off
Enter the submenu and select your setting
Lighting
Enter the submenu and select your setting
Locks
Enter the submenu and select your setting
Mirror
Remaining Life XXX% - Hold OK to Reset
Oil Life
Enter the submenu and select your setting
Power Liftgate
Enter the submenu and select your setting
Remote Start
Enter the submenu and select your setting
Windows
Enter the submenu and select your setting
Wipers
114
Explorer (TUB) Canada/United States of America, enUSA, Edition date: 201807, Second-Printing Information Displays
Page 219 of 571
Using the System
The 180 degree camera system consists
of front and rear cameras. The system:
•
Allows you to see what is directly in
front or behind your vehicle.
• Provides cross traffic view in front and
behind your vehicle.
• Provides visibility during parking
maneuvers. The camera system button is
located on the center stack and
allows you to toggle through
different camera views.
Note: The camera system may not operate
correctly if mud, water or debris obstructs
the camera's view. You can clean the lens
with a soft, lint-free cloth and non-abrasive
cleaner or by using your front or rear washer.
See Wipers and Washers (page 82).
Camera Views
Press the camera button to toggle
between different views.
• Normal Rear View: Provides an image
of what is directly behind your vehicle
when your vehicle is in reverse (R).
• Expanded Rear View:
Provides an
expanded 180 degree image of what
is directly behind your vehicle when
your vehicle is in reverse (R).
• Normal Front View:
Provides an
image of what is directly in front your
vehicle when your vehicle is in neutral
(N) or drive (D).
• Expanded Front View:
Provides an
expanded 180 degree image of what
is directly in front your vehicle when
your vehicle is in neutral (N) or drive
(D).
216
Explorer (TUB) Canada/United States of America, enUSA, Edition date: 201807, Second-Printing Parking AidsE188847
Page 311 of 571
WAXING
Regular waxing is necessary to protect your
car's paint from the elements. We
recommend that you wash and wax the
painted surface once or twice a year.
When washing and waxing, park your
vehicle in a shaded area out of direct
sunlight. Always wash your vehicle before
applying wax.
•
Use a quality wax that does not contain
abrasives.
• Follow the manufacturer ’s instructions
to apply and remove the wax.
• Apply a small amount of wax in a
back-and-forth motion, not in circles.
• Do not allow wax to come in contact
with any non-body (low-gloss black)
colored trim. The wax will discolor or
stain the parts over time.
•Roof racks.
• Bumpers.
• Grained door handles.
• Side moldings.
• Mirror housings.
• Windshield cowl area.
• Do not apply wax to glass areas.
• After waxing, your car's paint should
feel smooth, and be free of streaks and
smudges.
CLEANING THE ENGINE
Engines are more efficient when they are
clean because grease and dirt buildup keep
the engine warmer than normal. When washing:
•
Take care when using a power washer
to clean the engine. The high-pressure
fluid could penetrate the sealed parts
and cause damage.
• Do not spray a hot engine with cold
water to avoid cracking the engine
block or other engine components.
• Spray Motorcraft Engine Shampoo and
Degreaser on all parts that require
cleaning and pressure rinse clean. In
Canada, use Motorcraft Engine
Shampoo.
• Never wash or rinse the engine while it
is hot or running; water in the running
engine may cause internal damage.
• Never wash or rinse any ignition coil,
spark plug wire or spark plug well, or
the area in and around these locations.
• Cover the battery, power distribution
box, and air filter assembly to prevent
water damage when cleaning the
engine.
CLEANING THE WINDOWS AND
WIPER BLADES
Car wash chemicals and environmental
fallout can result in windshield and wiper
blade contamination. Dirty windshield and
wipers will result in poor windshield wiper
operation. Keep the windshield and wiper
blades clean to maintain windshield wiper
performance.
308
Explorer (TUB) Canada/United States of America, enUSA, Edition date: 201807, Second-Printing Vehicle Care