display FORD EXPLORER 2020 Repair Manual
[x] Cancel search | Manufacturer: FORD, Model Year: 2020, Model line: EXPLORER, Model: FORD EXPLORER 2020Pages: 555, PDF Size: 8.16 MB
Page 184 of 555
Note:
Note when in Sport mode it can be
enabled by pressing the Auto-Start-Stop
button. The green Auto-Start-Stop
indicator light on the instrument
cluster will illuminate to indicate
when the automatic engine stop occurs. If the instrument cluster is
equipped with a grey
Auto-Start-Stop indicator light,
it illuminates when automatic engine stop
is not available due to one of the above
noted conditions not being met.
Automatic Engine Restart
Any of the following conditions will result
in an automatic restart of the engine:
• You have removed your foot from the
brake pedal.
• You press the accelerator pedal.
• You press the accelerator and the
brake pedal at the same time.
• The driver safety belt becomes
unfastened or the driver door is ajar.
• Your vehicle is moving.
• The interior compartment does not
meet customer comfort when air
conditioning or heat is on.
• Fogging of the windows could occur
and the air conditioning is on.
• The battery is not within optimal
operating conditions.
• You have exceeded the maximum
engine off time.
• When you press the Auto-Start-Stop
button with the engine automatically
stopped.
• The front defroster is turned to the Max
setting.
• When you shift into park (P), the engine
will restart. Any of the following conditions may result
in an automatic restart of the engine:
•
You have increased the blower fan
speed or changed the climate control
temperature.
• You have an electrical accessory
turned on or plugged in.
Note: You may notice that the climate seat
fan fluctuates during an automatic restart.
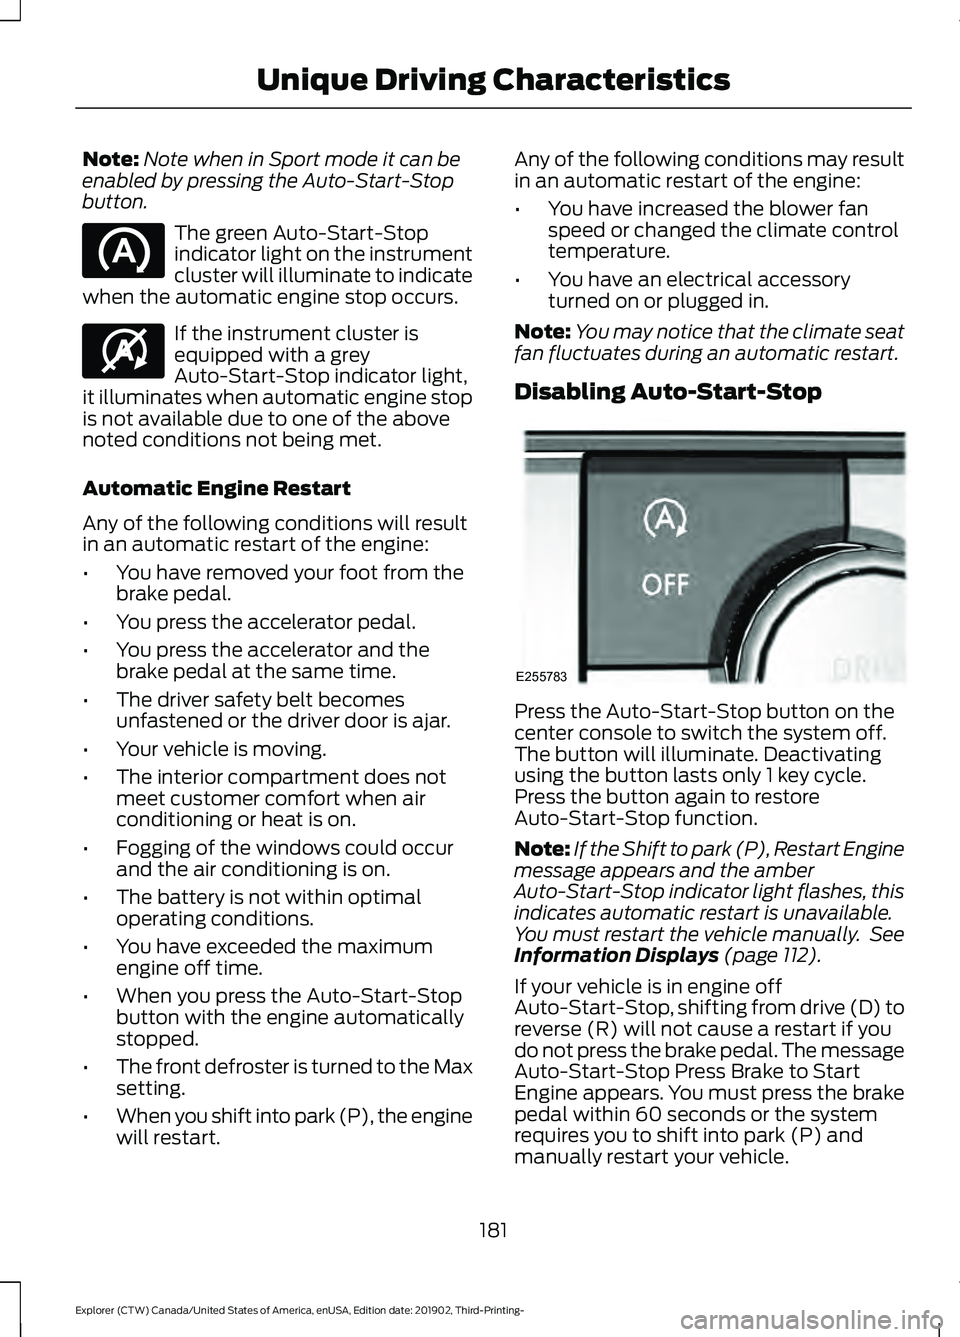
Disabling Auto-Start-Stop Press the Auto-Start-Stop button on the
center console to switch the system off.
The button will illuminate. Deactivating
using the button lasts only 1 key cycle.
Press the button again to restore
Auto-Start-Stop function.
Note:
If the Shift to park (P), Restart Engine
message appears and the amber
Auto-Start-Stop indicator light flashes, this
indicates automatic restart is unavailable.
You must restart the vehicle manually. See
Information Displays (page 112).
If your vehicle is in engine off
Auto-Start-Stop, shifting from drive (D) to
reverse (R) will not cause a restart if you
do not press the brake pedal. The message
Auto-Start-Stop Press Brake to Start
Engine appears. You must press the brake
pedal within 60 seconds or the system
requires you to shift into park (P) and
manually restart your vehicle.
181
Explorer (CTW) Canada/United States of America, enUSA, Edition date: 201902, Third-Printing- Unique Driving Characteristics E146361 E255783
Page 195 of 555
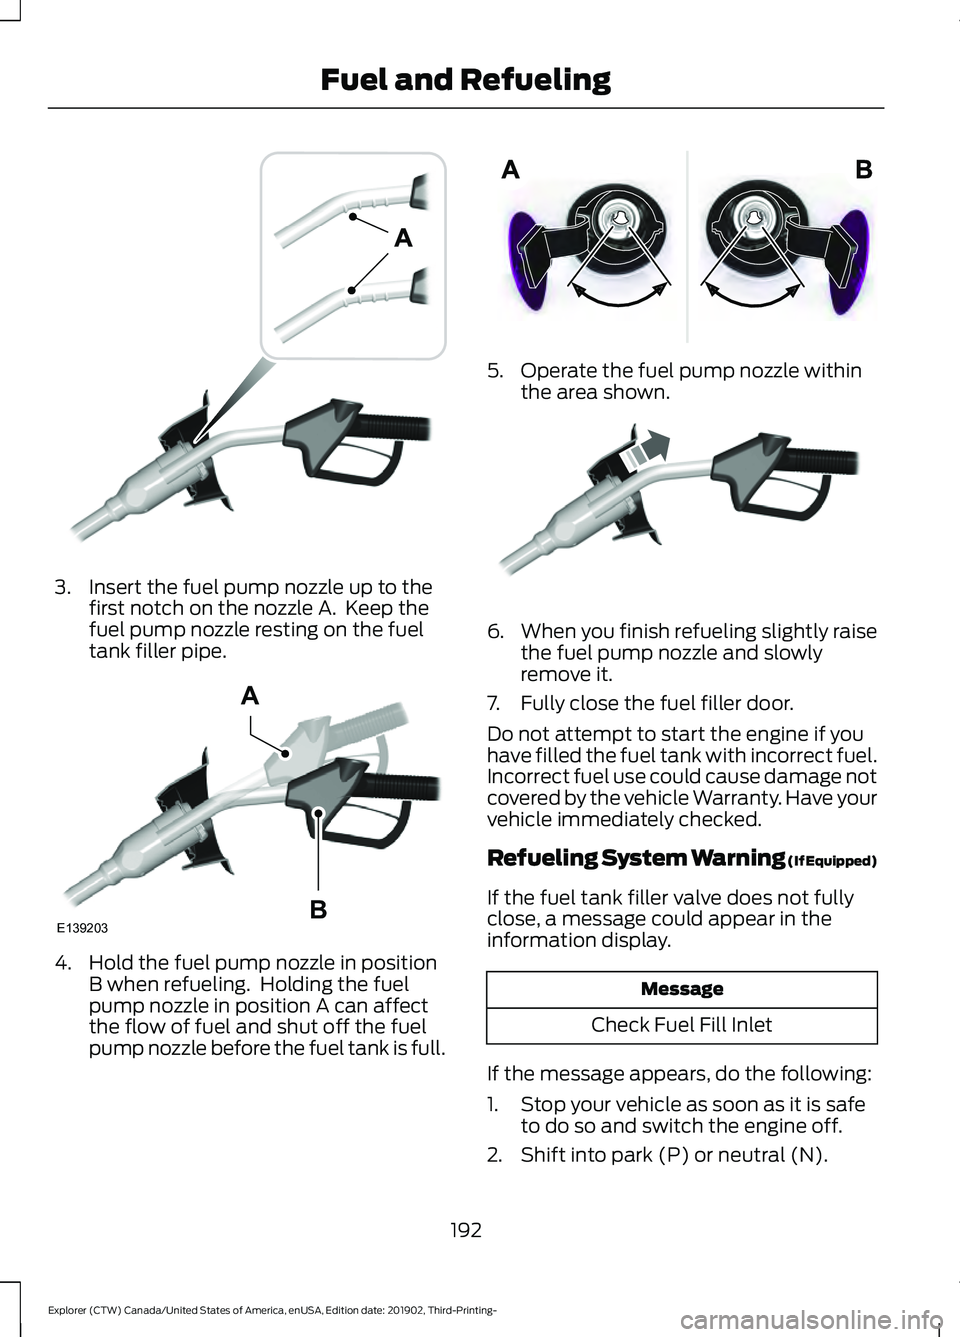
3. Insert the fuel pump nozzle up to the
first notch on the nozzle A. Keep the
fuel pump nozzle resting on the fuel
tank filler pipe. 4. Hold the fuel pump nozzle in position
B when refueling. Holding the fuel
pump nozzle in position A can affect
the flow of fuel and shut off the fuel
pump nozzle before the fuel tank is full. 5. Operate the fuel pump nozzle within
the area shown. 6.
When you finish refueling slightly raise
the fuel pump nozzle and slowly
remove it.
7. Fully close the fuel filler door.
Do not attempt to start the engine if you
have filled the fuel tank with incorrect fuel.
Incorrect fuel use could cause damage not
covered by the vehicle Warranty. Have your
vehicle immediately checked.
Refueling System Warning (If Equipped)
If the fuel tank filler valve does not fully
close, a message could appear in the
information display. Message
Check Fuel Fill Inlet
If the message appears, do the following:
1. Stop your vehicle as soon as it is safe to do so and switch the engine off.
2. Shift into park (P) or neutral (N).
192
Explorer (CTW) Canada/United States of America, enUSA, Edition date: 201902, Third-Printing- Fuel and RefuelingE139202 E139203
A
B E206912 E119081
Page 197 of 555
2.
Press the button on the left side of the
instrument panel to open the fuel filler
door. The fuel filler door can take up to
15 seconds to open before you can
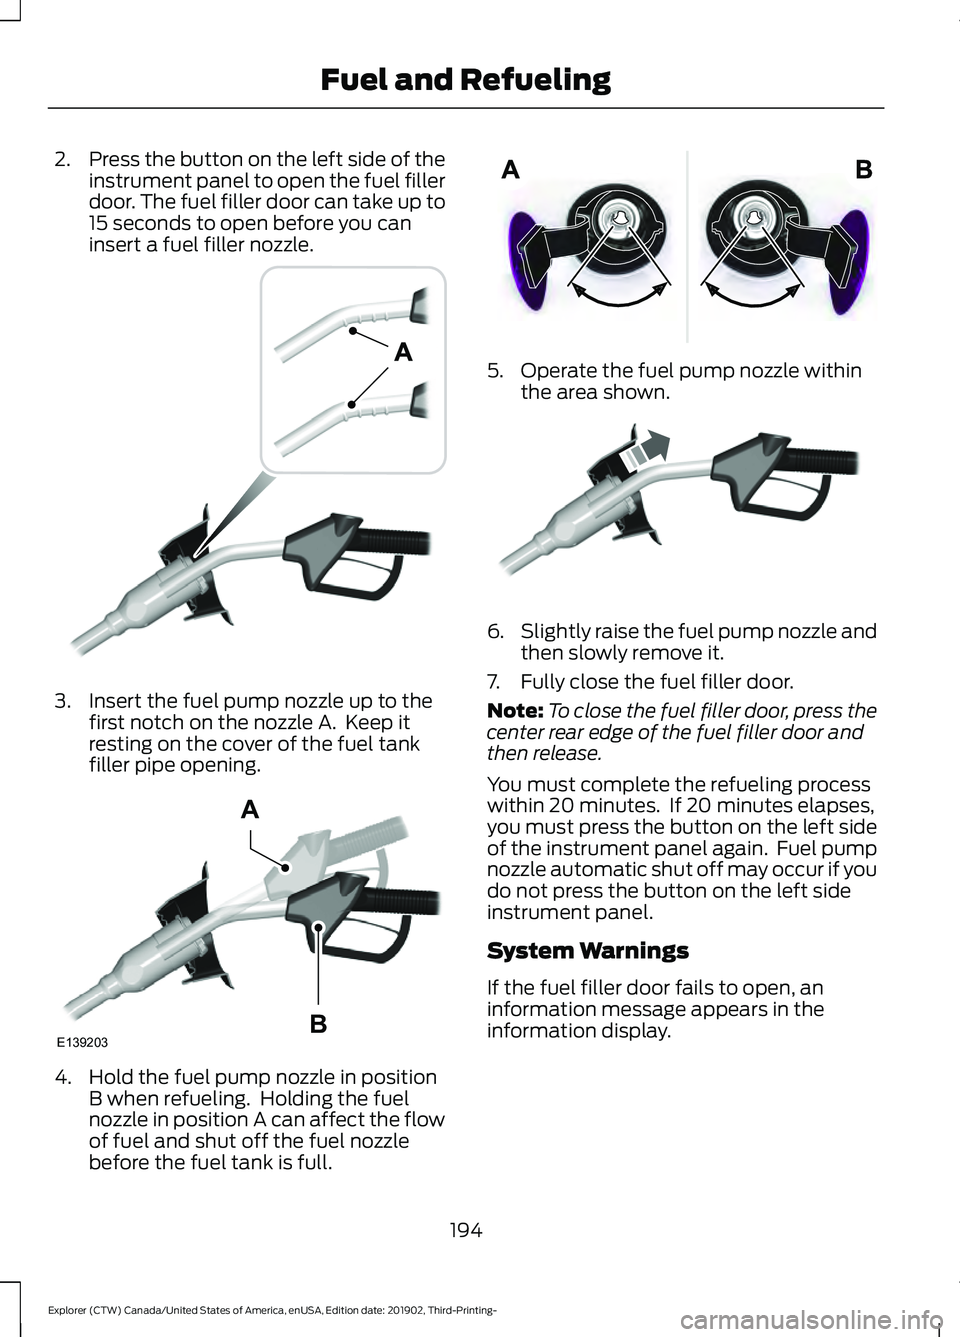
insert a fuel filler nozzle. 3. Insert the fuel pump nozzle up to the
first notch on the nozzle A. Keep it
resting on the cover of the fuel tank
filler pipe opening. 4. Hold the fuel pump nozzle in position
B when refueling. Holding the fuel
nozzle in position A can affect the flow
of fuel and shut off the fuel nozzle
before the fuel tank is full. 5. Operate the fuel pump nozzle within
the area shown. 6.
Slightly raise the fuel pump nozzle and
then slowly remove it.
7. Fully close the fuel filler door.
Note: To close the fuel filler door, press the
center rear edge of the fuel filler door and
then release.
You must complete the refueling process
within 20 minutes. If 20 minutes elapses,
you must press the button on the left side
of the instrument panel again. Fuel pump
nozzle automatic shut off may occur if you
do not press the button on the left side
instrument panel.
System Warnings
If the fuel filler door fails to open, an
information message appears in the
information display.
194
Explorer (CTW) Canada/United States of America, enUSA, Edition date: 201902, Third-Printing- Fuel and RefuelingE139202 E139203
A
B E206912 E119081
Page 198 of 555
Description and Action
Message
A warning message appears
in the information display
when the fuel system fails
to depressurize or the fuel
filler door fails to open. You
may have to use the fuel
filler door manual override
lever.
Refuel
Error See
Manual
If the information message appears, do the
following:
1. Check the fuel filler door for anything that may be obstructing its movement,
for example ice or snow.
2. Remove any obstruction from the fuel filler door.
3. Press the button on the driver door to open the fuel filler door.
4. If the fuel filler door fails to open and the information message remains in
the information display, use the fuel
filler door manual override lever.
Fuel Filler Door Manual Override
Lever WARNING: The fuel system may
be under pressure. If you hear a hissing
sound near the fuel filler inlet, do not
refuel until the sound stops. Otherwise,
fuel may spray out, which could cause
serious personal injury.
Note: The transmission must be in park (P)
or neutral (N).
When using the manual override lever do
the following:
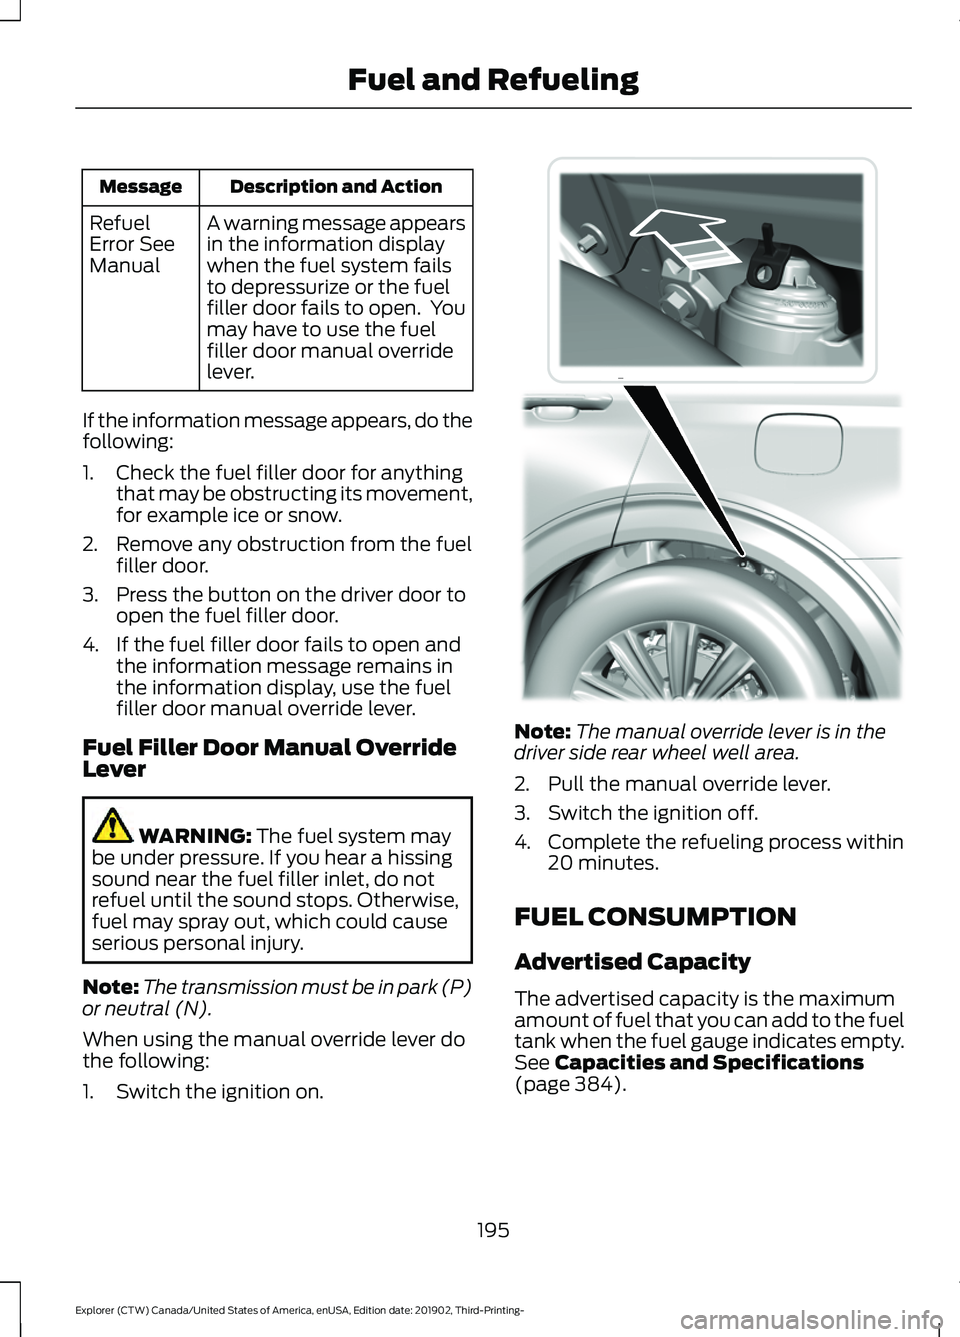
1. Switch the ignition on. Note:
The manual override lever is in the
driver side rear wheel well area.
2. Pull the manual override lever.
3. Switch the ignition off.
4. Complete the refueling process within 20 minutes.
FUEL CONSUMPTION
Advertised Capacity
The advertised capacity is the maximum
amount of fuel that you can add to the fuel
tank when the fuel gauge indicates empty.
See
Capacities and Specifications
(page 384).
195
Explorer (CTW) Canada/United States of America, enUSA, Edition date: 201902, Third-Printing- Fuel and RefuelingE297793
Page 199 of 555
In addition, the fuel tank contains an empty
reserve. The empty reserve is an
unspecified amount of fuel that remains
in the fuel tank when the fuel gauge
indicates empty.
Note:
When refueling your vehicle after the
fuel gauge indicates empty, you might not
be able to refuel the full amount of the
advertised capacity due to the empty
reserve still present in the fuel tank.
Filling the Fuel Tank
For consistent results when refueling:
• Turn the ignition off before fueling; an
inaccurate reading results if the engine
is left running.
• Use the same fill rate
(low-medium-high) each time the tank
is filled.
• Allow no more than one automatic
shut-off when refueling.
Results are most accurate when the filling
method is consistent.
Calculating Fuel Economy
Your vehicle calculates fuel economy
figures through the trip computer average
fuel function. See Information Displays
(page 112).
The first
1,000 mi (1,500 km) of driving is
the break-in period of the engine. A more
accurate measurement is obtained after
2,000 mi (3,000 km)
.
1. Completely fill the fuel tank and record
the initial odometer reading.
2. Each time you fill the fuel tank, record the amount of fuel added.
3. After at least three fill ups, fill the fuel tank and record the current odometer
reading.
4. Subtract your initial odometer reading from the current odometer reading. To calculate L/100 km (liters per 100
kilometers) fuel consumption, multiply the
liters used by 100, then divide by kilometers
traveled. To calculate MPG (miles per
gallon) fuel consumption, divide miles
traveled by gallons used.
Keep a record for at least one month and
record the type of driving, for example city
or highway. This provides an accurate
estimate of your vehicle
’s fuel economy
under current driving conditions. Keeping
records during summer and winter shows
how temperature impacts fuel economy.
Conditions
• Heavily loading your vehicle reduces
fuel economy.
• Carrying unnecessary weight in your
vehicle may reduce fuel economy.
• Avoid adding accessories that increase
aerodynamic drag to your vehicle such
as bug deflectors, car top carriers and
ski or bike racks.
• Using fuel blended with alcohol may
lower fuel economy.
• Fuel economy may decrease with lower
temperatures.
• Fuel economy may decrease when
driving short distances.
• You will get better fuel economy when
driving on flat terrain than when driving
on hilly terrain.
196
Explorer (CTW) Canada/United States of America, enUSA, Edition date: 201902, Third-Printing- Fuel and Refueling
Page 205 of 555
AUTOMATIC TRANSMISSION
WARNING: Always fully apply the
parking brake and make sure you shift
into park (P). Failure to follow this
instruction could result in personal injury
or death. WARNING:
Do not apply the brake
pedal and accelerator pedal
simultaneously. Applying both pedals
simultaneously for more than a few
seconds will limit engine performance,
which may result in difficulty maintaining
speed in traffic and could lead to serious
injury.
Note: You may not be able to shift out of
park (P) unless the intelligent access key is
inside your vehicle.
Understanding Your Transmission
Selector Positions
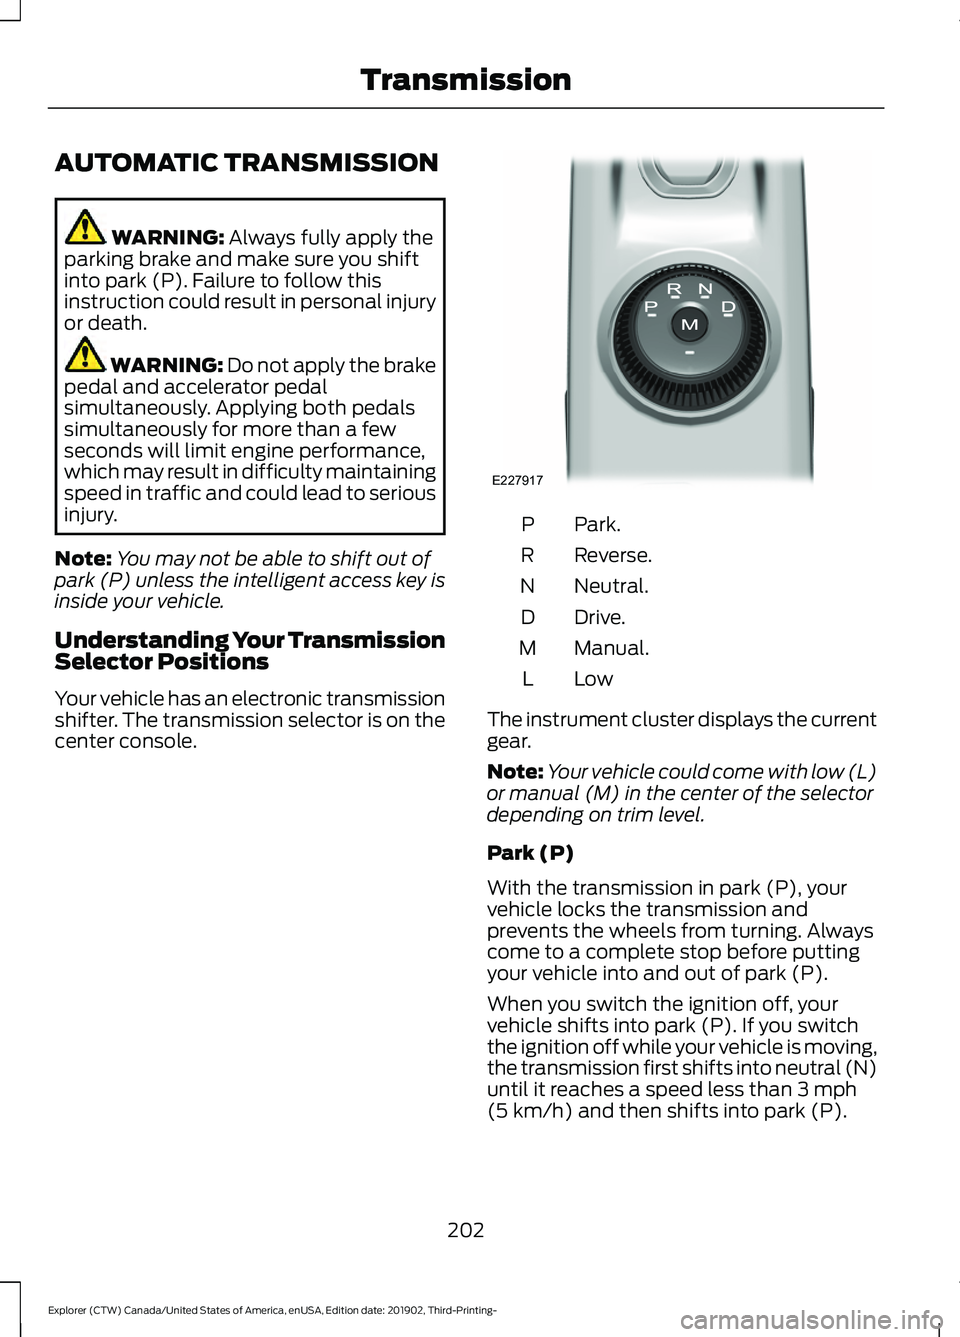
Your vehicle has an electronic transmission
shifter. The transmission selector is on the
center console. Park.
P
Reverse.
R
Neutral.
N
Drive.
D
Manual.
M
LowL
The instrument cluster displays the current
gear.
Note: Your vehicle could come with low (L)
or manual (M) in the center of the selector
depending on trim level.
Park (P)
With the transmission in park (P), your
vehicle locks the transmission and
prevents the wheels from turning. Always
come to a complete stop before putting
your vehicle into and out of park (P).
When you switch the ignition off, your
vehicle shifts into park (P). If you switch
the ignition off while your vehicle is moving,
the transmission first shifts into neutral (N)
until it reaches a speed less than
3 mph
(5 km/h) and then shifts into park (P).
202
Explorer (CTW) Canada/United States of America, enUSA, Edition date: 201902, Third-Printing- TransmissionE227917
Page 207 of 555
Note:
This feature may not work properly
if the door ajar switch is malfunctioning. If
your door ajar indicator does not illuminate
when you open the driver door, or the
indicator illuminates with the driver door
closed, or Transmission not in Park cluster
message still displays when the shifter has
already selected reverse (R), neutral (N), or
drive (D) and driver door remains closed,
see your authorized dealer.
Stay in Neutral Mode
Note: Stay in neutral mode is a temporary
vehicle state that works with the engine
being in the running or OFF state. Once in
this mode, sufficient battery voltage must
be maintained or your vehicle returns to park
if the feature is left active for extended time
when engine is OFF.
Failure to follow this instruction could
result in vehicle damage not covered by
the vehicle Warranty.
Note: When entering an automatic car
wash, always enter the Stay in Neutral
Mode. Stay in Neutral Mode must be
enabled, if you are exiting the vehicle before
the car wash.
Extended usage of Stay in Neutral mode
may result in a battery voltage reduction
to level where the vehicle may no longer
start.
Do not tow your vehicle in this mode.
With the transmission selector in Stay in
Neutral Mode, you can start your vehicle
and it is free to roll.
To enter Stay in Neutral mode, do the
following:
1. Bring your vehicle to a complete stop.
2. Shift into neutral (N).
3. Press the manual (M) or low (L) button
within five seconds after shifting to
neutral (N). Note:
Stay in Neutral Mode confirmation
message appears in the information display
when your vehicle has entered Stay in
Neutral mode and the neutral (N) button
on the transmission selector slowly blinks.
To exit Stay in Neutral mode, press the
brake pedal and shift to park (P) or start
the engine and apply brakes to shift to
another driving range, for example drive
(D) or reverse (R).
Tow Mode (If Equipped) To activate tow mode, use the
drive mode switch on the center
console.
See Selecting a Drive
Mode (page 279).
The indicator light illuminates and a
message displays in the instrument cluster
when the system becomes active. Select
a different mode to turn the system off.
The Tow Mode Feature:
• Moves upshifts to higher engine speeds
to reduce the frequency of
transmission shifting.
• Provides engine braking in all forward
gears, which slows your vehicle and
assist you in controlling your vehicle
when descending a grade.
• Depending on driving conditions and
load conditions, it may downshift the
transmission, slow your vehicle and
control your vehicle speed when
descending a hill, without pressing the
accelerator pedal. The amount of
downshift braking provided varies
based upon the amount you press the
brake pedal.
The tow mode feature improves
transmission operation when towing a
trailer or a heavy load. All transmission
gear ranges are available when using tow
mode.
204
Explorer (CTW) Canada/United States of America, enUSA, Edition date: 201902, Third-Printing- TransmissionE161509
Page 208 of 555
SelectShift Automatic
™
Transmission (If Equipped)
Your vehicle has a SelectShift Automatic
transmission, which gives you the ability
to change gears up or down, without a
clutch, as preferred.
To prevent the engine from running at too
low an RPM, which may cause it to stall,
SelectShift still automatically makes some
downshifts if it has determined that you
have not downshifted in time. Although
SelectShift makes some downshifts for
you, it still allows you to downshift at any
time if SelectShift determines that
damage to the engine from over-revving
does not occur.
Note: Engine damage may occur if you
maintain excessive engine revving without
shifting.
Note: Vehicles may have either steering
wheel controls or gearshift lever controls.
SelectShift could upshift if the engine
reaches its RPM limit. It may also be
upshifted by pressing the + button on the
steering wheel or shift lever control.
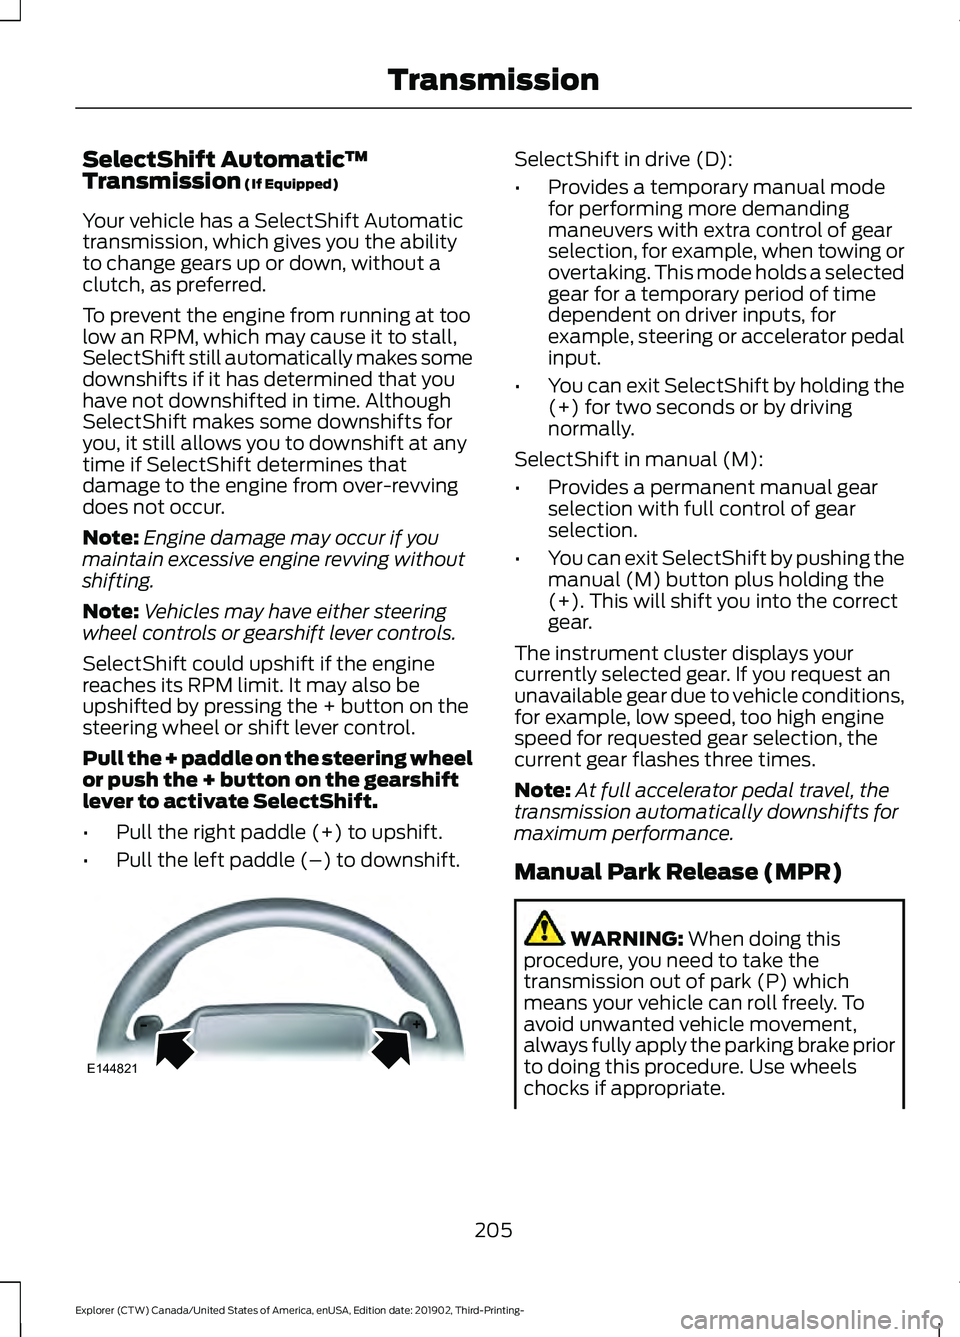
Pull the + paddle on the steering wheel
or push the + button on the gearshift
lever to activate SelectShift.
• Pull the right paddle (+) to upshift.
• Pull the left paddle (–) to downshift. SelectShift in drive (D):
•
Provides a temporary manual mode
for performing more demanding
maneuvers with extra control of gear
selection, for example, when towing or
overtaking. This mode holds a selected
gear for a temporary period of time
dependent on driver inputs, for
example, steering or accelerator pedal
input.
• You can exit SelectShift by holding the
(+) for two seconds or by driving
normally.
SelectShift in manual (M):
• Provides a permanent manual gear
selection with full control of gear
selection.
• You can exit SelectShift by pushing the
manual (M) button plus holding the
(+). This will shift you into the correct
gear.
The instrument cluster displays your
currently selected gear. If you request an
unavailable gear due to vehicle conditions,
for example, low speed, too high engine
speed for requested gear selection, the
current gear flashes three times.
Note: At full accelerator pedal travel, the
transmission automatically downshifts for
maximum performance.
Manual Park Release (MPR) WARNING:
When doing this
procedure, you need to take the
transmission out of park (P) which
means your vehicle can roll freely. To
avoid unwanted vehicle movement,
always fully apply the parking brake prior
to doing this procedure. Use wheels
chocks if appropriate.
205
Explorer (CTW) Canada/United States of America, enUSA, Edition date: 201902, Third-Printing- TransmissionE144821
Page 209 of 555
WARNING: If the parking brake is
fully released, but the brake warning
lamp remains illuminated, the brakes
may not be working properly. Have your
vehicle checked as soon as possible. WARNING:
Do not drive your
vehicle until you verify that the
stoplamps are working.
Use the manual park release to move your
transmission from the park (P) position in
the event of an electrical malfunction or
emergency.
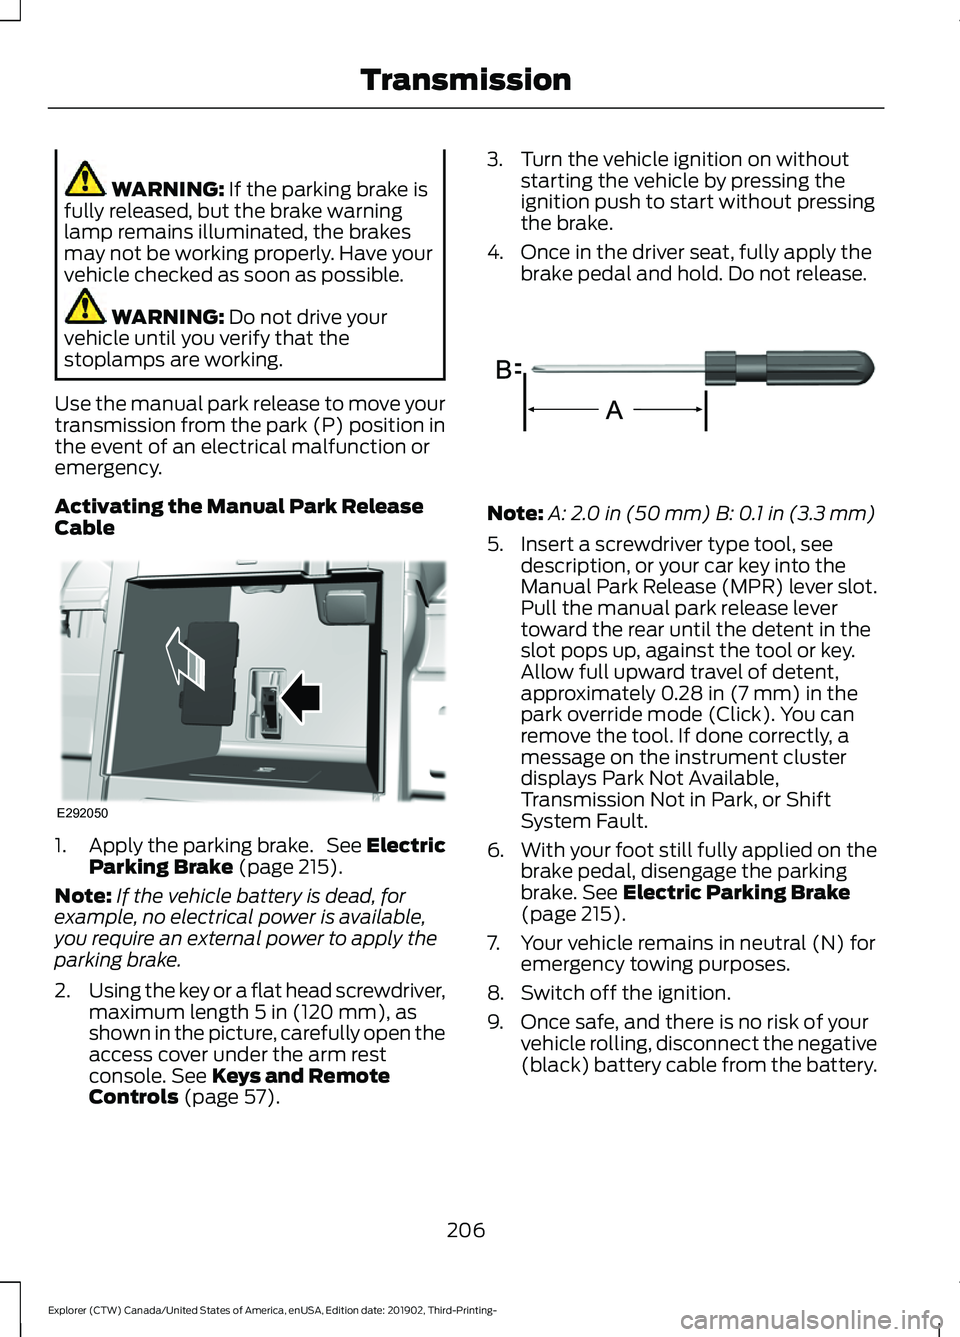
Activating the Manual Park Release
Cable 1.
Apply the parking brake. See Electric
Parking Brake
(page 215).
Note: If the vehicle battery is dead, for
example, no electrical power is available,
you require an external power to apply the
parking brake.
2. Using the key or a flat head screwdriver,
maximum length
5 in (120 mm), as
shown in the picture, carefully open the
access cover under the arm rest
console.
See Keys and Remote
Controls (page 57). 3. Turn the vehicle ignition on without
starting the vehicle by pressing the
ignition push to start without pressing
the brake.
4. Once in the driver seat, fully apply the brake pedal and hold. Do not release. Note:
A:
2.0 in (50 mm) B: 0.1 in (3.3 mm)
5. Insert a screwdriver type tool, see description, or your car key into the
Manual Park Release (MPR) lever slot.
Pull the manual park release lever
toward the rear until the detent in the
slot pops up, against the tool or key.
Allow full upward travel of detent,
approximately
0.28 in (7 mm) in the
park override mode (Click). You can
remove the tool. If done correctly, a
message on the instrument cluster
displays Park Not Available,
Transmission Not in Park, or Shift
System Fault.
6. With your foot still fully applied on the
brake pedal, disengage the parking
brake.
See Electric Parking Brake
(page 215).
7. Your vehicle remains in neutral (N) for emergency towing purposes.
8. Switch off the ignition.
9. Once safe, and there is no risk of your vehicle rolling, disconnect the negative
(black) battery cable from the battery.
206
Explorer (CTW) Canada/United States of America, enUSA, Edition date: 201902, Third-Printing- TransmissionE292050 E317360
Page 210 of 555
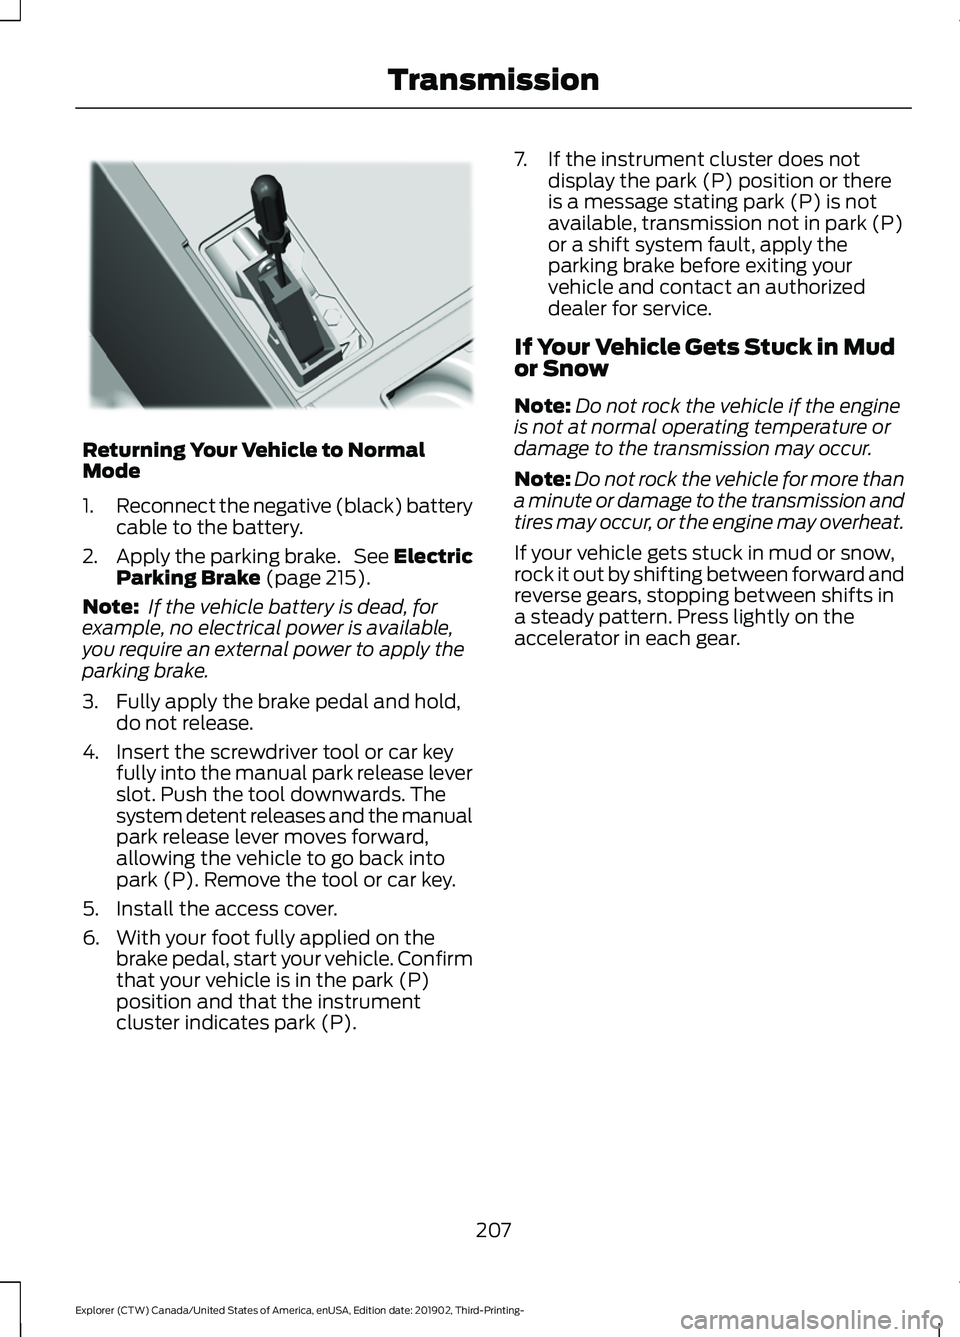
Returning Your Vehicle to Normal
Mode
1.
Reconnect the negative (black) battery
cable to the battery.
2. Apply the parking brake. See Electric
Parking Brake (page 215).
Note: If the vehicle battery is dead, for
example, no electrical power is available,
you require an external power to apply the
parking brake.
3. Fully apply the brake pedal and hold, do not release.
4. Insert the screwdriver tool or car key fully into the manual park release lever
slot. Push the tool downwards. The
system detent releases and the manual
park release lever moves forward,
allowing the vehicle to go back into
park (P). Remove the tool or car key.
5. Install the access cover.
6. With your foot fully applied on the brake pedal, start your vehicle. Confirm
that your vehicle is in the park (P)
position and that the instrument
cluster indicates park (P). 7. If the instrument cluster does not
display the park (P) position or there
is a message stating park (P) is not
available, transmission not in park (P)
or a shift system fault, apply the
parking brake before exiting your
vehicle and contact an authorized
dealer for service.
If Your Vehicle Gets Stuck in Mud
or Snow
Note: Do not rock the vehicle if the engine
is not at normal operating temperature or
damage to the transmission may occur.
Note: Do not rock the vehicle for more than
a minute or damage to the transmission and
tires may occur, or the engine may overheat.
If your vehicle gets stuck in mud or snow,
rock it out by shifting between forward and
reverse gears, stopping between shifts in
a steady pattern. Press lightly on the
accelerator in each gear.
207
Explorer (CTW) Canada/United States of America, enUSA, Edition date: 201902, Third-Printing- TransmissionE297270