inflation pressure FORD EXPLORER 2020 Owners Manual
[x] Cancel search | Manufacturer: FORD, Model Year: 2020, Model line: EXPLORER, Model: FORD EXPLORER 2020Pages: 555, PDF Size: 8.16 MB
Page 267 of 555
Why is the feature not available (line markings are gray) when I can see the lane markings
on the road?
Transitioning between no lane markings to lane markings or vice versa.
There is standing water on the road.
Faint lane markings, for example partial yellow lane markings on concrete roads.
Lane width is too narrow or too wide.
The camera has not been calibrated after a windshield replacement.
Driving on tight roads or on uneven roads. Why does the vehicle not come back toward the middle of the lane, as expected, in the
Aid or Aid + Alert mode?
High cross winds are present.
There is a large road crown.
Rough roads, grooves or shoulder drop-offs.
Heavy uneven loading of the vehicle or improper tire inflation pressure.
The tires have been changed, or the suspension has been modified.
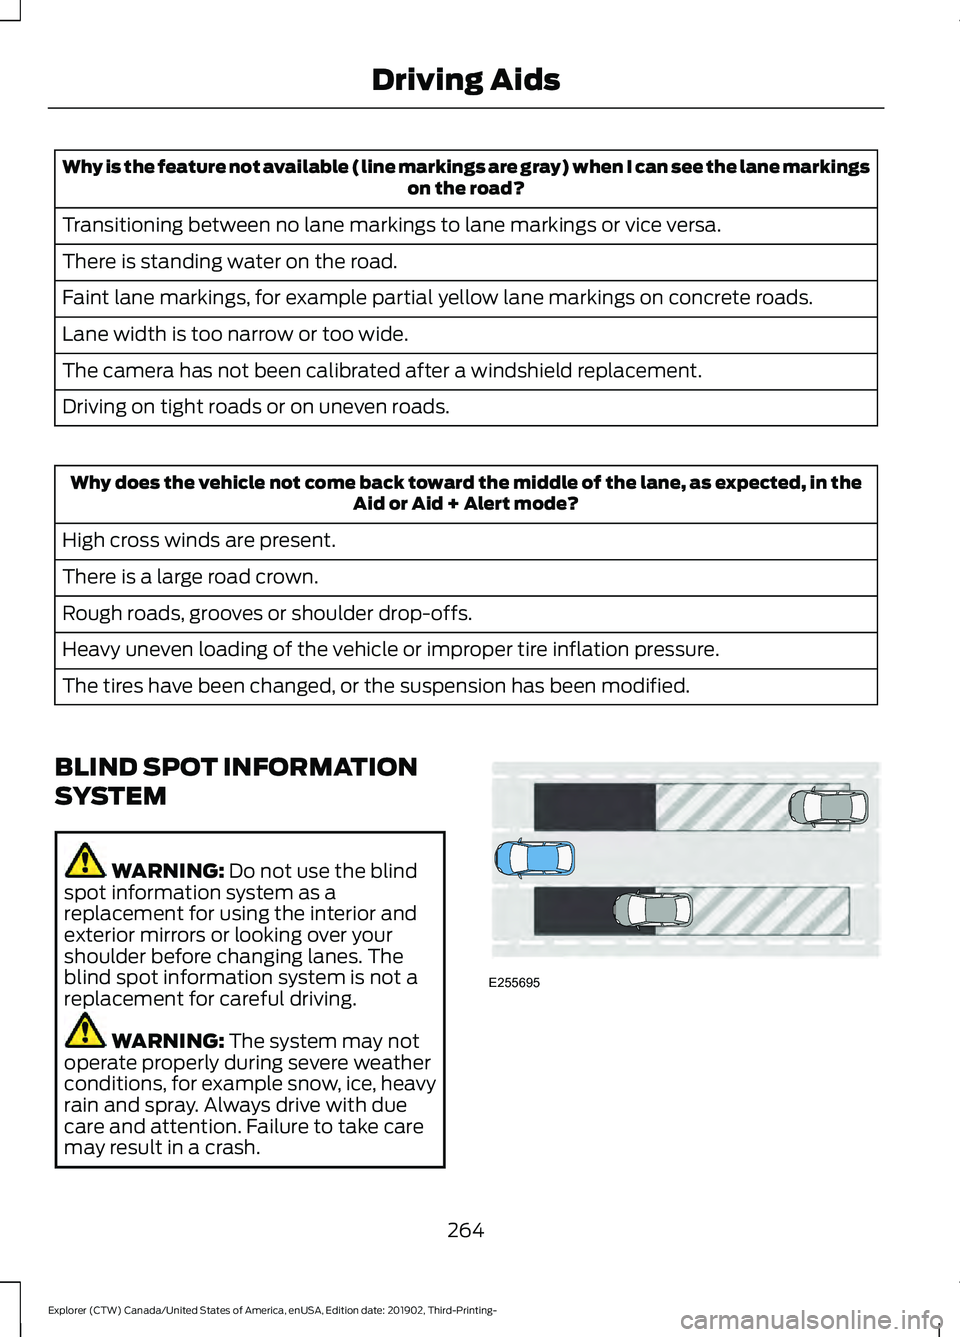
BLIND SPOT INFORMATION
SYSTEM WARNING: Do not use the blind
spot information system as a
replacement for using the interior and
exterior mirrors or looking over your
shoulder before changing lanes. The
blind spot information system is not a
replacement for careful driving. WARNING:
The system may not
operate properly during severe weather
conditions, for example snow, ice, heavy
rain and spray. Always drive with due
care and attention. Failure to take care
may result in a crash. 264
Explorer (CTW) Canada/United States of America, enUSA, Edition date: 201902, Third-Printing- Driving AidsE255695
Page 355 of 555
Removing Vehicle From Storage
When your vehicle is ready to come out of
storage, do the following:
•
Wash your vehicle to remove any dirt
or grease film build-up on window
surfaces.
• Check windshield wipers for any
deterioration.
• Check under the hood for any foreign
material that may have collected
during storage such as mice or squirrel
nests.
• Check the exhaust for any foreign
material that may have collected
during storage.
• Check tire pressures and set tire
inflation per the Tire Label.
• Check brake pedal operation. Drive
your vehicle 15 ft (4.5 m) back and
forth to remove rust build-up.
• Check fluid levels (including coolant,
oil and gas) to make sure there are no
leaks, and fluids are at recommended
levels.
• If you remove the battery, clean the
battery cable ends and check for
damage.
Contact an authorized dealer if you have
any concerns or issues.
352
Explorer (CTW) Canada/United States of America, enUSA, Edition date: 201902, Third-Printing- Vehicle Care
Page 356 of 555
GENERAL INFORMATION
The recommended tire inflation pressures
are found on the Tire Label which is
located on the B-pillar or the edge of the
driver door. This information can also be
found on the Safety Compliance
Certification Label, affixed to either the
door hinge pillar, door-latch post, or the
door edge that meets the door-latch post,
next to the driver
’s seating position.
We strongly recommend maintaining these
tire pressures at all times. Failure to follow
the tire pressure recommendations can
cause uneven treadwear patterns, reduced
fuel economy, and adversely affect the
way your vehicle handles.
Note: Check and set the tire pressure at the
ambient temperature in which you are
intending to drive your vehicle and when the
tires are cold.
Note: Check your tire pressures at least
once per month.
If your vehicle has a spare tire, set the
pressure to the highest value given for your
vehicle and tire size combination.
Use only approved wheels and tire sizes;
using other sizes could damage your
vehicle.
If you change the diameter of the factory
installed tires, the speedometer could
display the incorrect speed. This could
effect the functionality of the 4WD system
(if equipped). Take your vehicle to an
authorized dealer and have the engine
management system reprogrammed.
If you intend to change the size of the
factory installed tires, check the suitability
with an authorized dealer.
Additional information related to the
functionality and maintenance of your tires
can be found in the Wheels and Tire
section. See Tire Care (page 355). Self-Sealing Tires
(If Equipped)
Self-Sealing tires are a special type of tire
that have a material on the inside of the
tire that can seal punctures up to
0.2 in
(6 mm) in diameter in the tread area. This
material does not protect from damage or
punctures in the sidewall of the tire.
Self-sealing tires can be identified by the
tire manufacturer with a special mark.
If your TPMS warning light comes on,
inspect your tires for damage and re-inflate
your tires to the pressure indicated on the
tire placard. See
Tire Pressure
Monitoring System (page 370). If your
tires are damaged or continue to lose air,
take your vehicle to the nearest authorized
dealer to have your tires inspected and
repaired/replaced as necessary.
Note: Replace self-sealing tires with
self-sealing tires to maintain the
functionality provided.
Note: Do not drive on a deflated
self-sealing tire. This damages the tire
beyond repair.
Notice to utility vehicle and truck
owners WARNING:
Vehicles with a higher
center of gravity (utility and four-wheel
drive vehicles) handle differently than
vehicles with a lower center of gravity
(passenger cars). Avoid sharp turns,
excessive speed and abrupt steering in
these vehicles. Failure to drive cautiously
increases the risk of losing control of your
vehicle, vehicle rollover, personal injury
and death. WARNING:
In a rollover crash, an
unbelted person is significantly more
likely to die than a person wearing a
seatbelt.
353
Explorer (CTW) Canada/United States of America, enUSA, Edition date: 201902, Third-Printing- Wheels and Tires
Page 359 of 555
The traction grades, from highest
to lowest are AA, A, B, and C. The
grades represent the tire
’s ability
to stop on wet pavement as
measured under controlled
conditions on specified
government test surfaces of
asphalt and concrete. A tire
marked C may have poor traction
performance.
Temperature A B C WARNING: The
temperature grade for this tire is
established for a tire that is
properly inflated and not
overloaded. Excessive speed,
underinflation, or excessive
loading, either separately or in
combination, can cause heat
buildup and possible tire failure.
The temperature grades are A
(the highest), B and C,
representing the tire ’s resistance
to the generation of heat and its
ability to dissipate heat when
tested under controlled conditions
on a specified indoor laboratory
test wheel. Sustained high
temperature can cause the
material of the tire to degenerate
and reduce tire life, and excessive
temperature can lead to sudden
tire failure. The grade C
corresponds to a level of
performance which all passenger
car tires must meet under the Federal Motor Vehicle Safety
Standard No. 139. Grades B and A
represent higher levels of
performance on the laboratory
test wheel than the minimum
required by law.
Glossary of Tire Terminology
*
Tire label: A label showing the
original equipment tire sizes,
recommended inflation pressure
and the maximum weight the
vehicle can carry.
*
Tire Identification Number
(TIN): A number on the sidewall
of each tire providing information
about the tire brand and
manufacturing plant, tire size and
date of manufacture. Also referred
to as DOT code.
*
Inflation pressure: A measure
of the amount of air in a tire.
*
Standard load: A class of
P-metric or Metric tires designed
to carry a maximum load at set
pressure. For example: For
P-metric tires
35 psi (2.4 bar) and
for Metric tires 36 psi (2.5 bar).
Increasing the inflation pressure
beyond this pressure will not
increase the tire ’s load carrying
capability.
*
Extra load: A class of P-metric
or Metric tires designed to carry a
heavier maximum load at
42 psi
(2.9 bar). Increasing the inflation
pressure beyond this pressure will
not increase the tire ’s load
carrying capability.
356
Explorer (CTW) Canada/United States of America, enUSA, Edition date: 201902, Third-Printing- Wheels and Tires
Page 360 of 555
*kPa: Kilopascal, a metric unit of
air pressure.
*
PSI: Pounds per square inch, a
standard unit of air pressure.
*
Cold tire pressure: The tire
pressure when the vehicle has
been stationary and out of direct
sunlight for an hour or more and
prior to the vehicle being driven for
1 mi (1.6 km)
.
*
Recommended inflation
pressure: The cold inflation
pressure found on the Safety
Compliance Certification Label
(affixed to either the door hinge
pillar, door-latch post, or the door
edge that meets the door-latch
post, next to the driver's seating
position), or Tire Label located on
the B-Pillar or the edge of the
driver door.
* B-pillar: The structural member
at the side of the vehicle behind
the front door.
*
Bead area of the tire: Area of
the tire next to the rim.
*
Sidewall of the tire: Area
between the bead area and the
tread.
*
Tread area of the tire: Area of
the perimeter of the tire that
contacts the road when mounted
on the vehicle.
*Rim: The metal support (wheel)
for a tire or a tire and tube
assembly upon which the tire
beads are seated. Information Contained on the
Tire Sidewall
Both United States and Canada
Federal regulations require tire
manufacturers to place
standardized information on the
sidewall of all tires. This
information identifies and
describes the fundamental
characteristics of the tire and also
provides a U.S. DOT Tire
Identification Number for safety
standard certification and in case
of a recall.
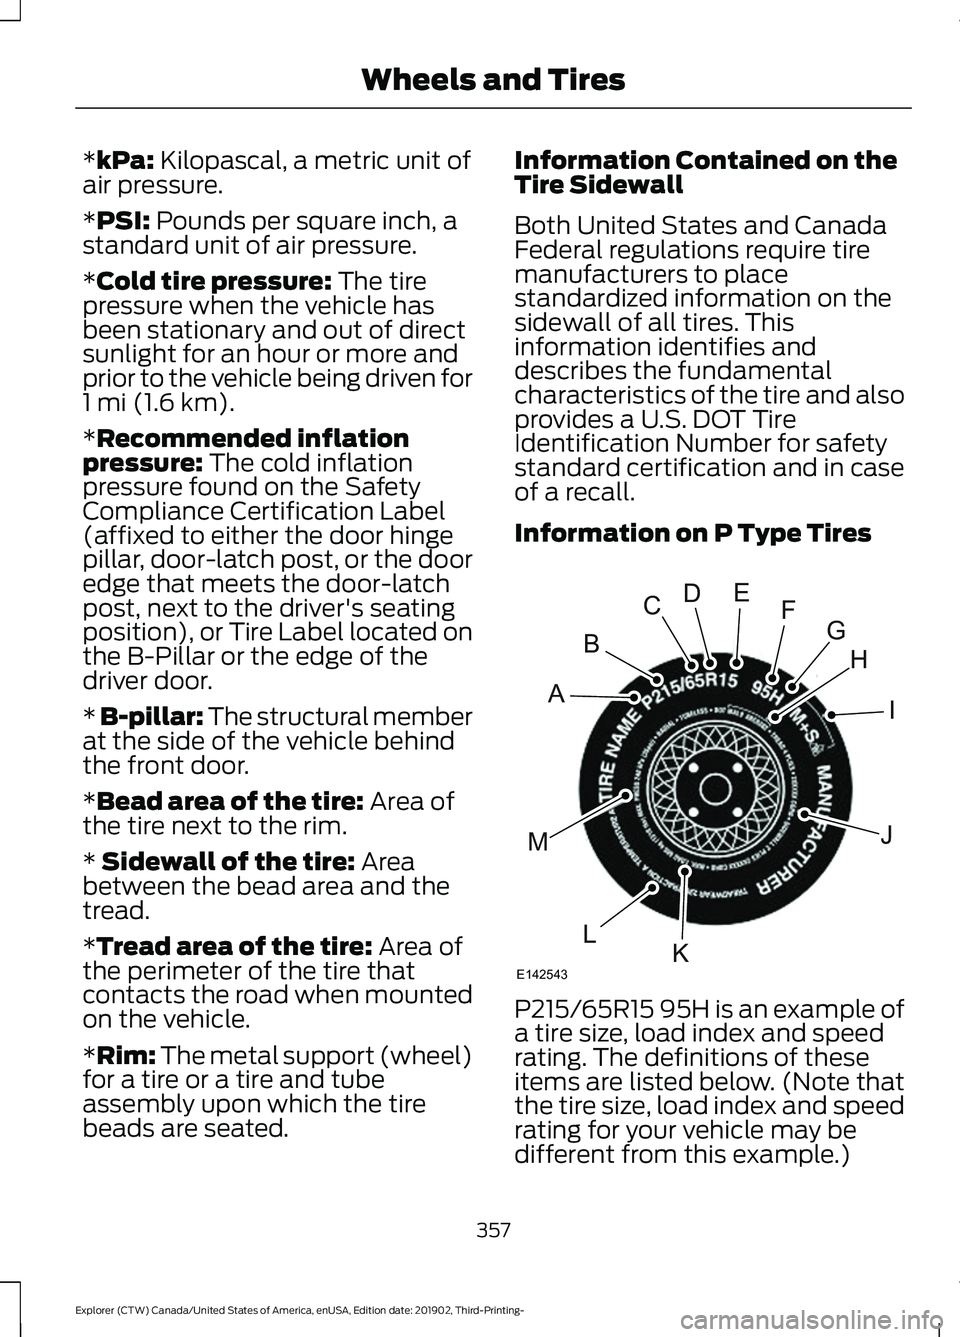
Information on P Type Tires
P215/65R15 95H is an example of
a tire size, load index and speed
rating. The definitions of these
items are listed below. (Note that
the tire size, load index and speed
rating for your vehicle may be
different from this example.)
357
Explorer (CTW) Canada/United States of America, enUSA, Edition date: 201902, Third-Printing- Wheels and TiresH
I
J
KL
M
A
B
CDEFG
E142543
Page 361 of 555
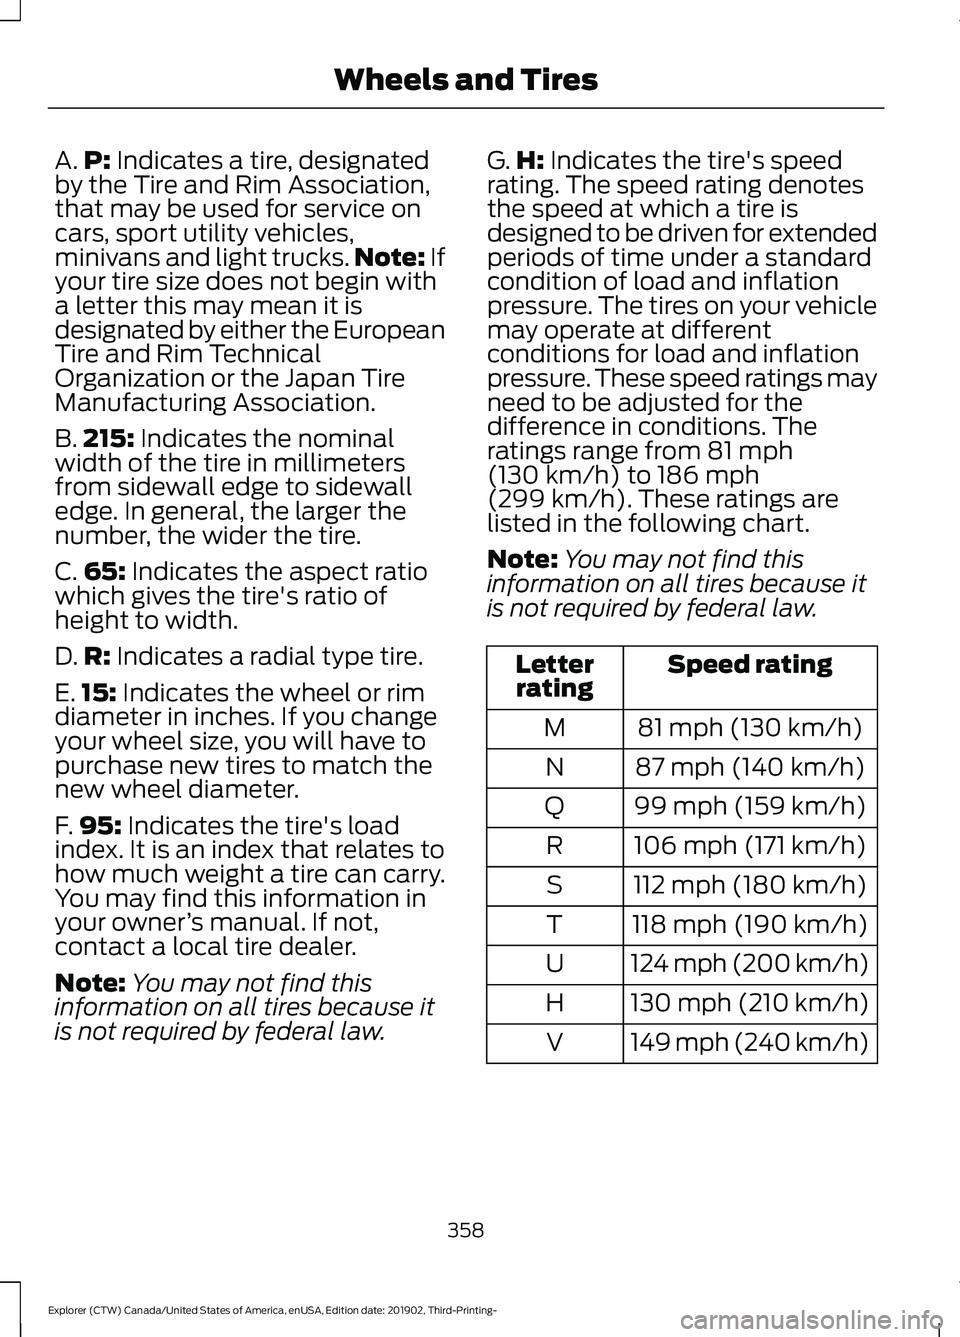
A.
P: Indicates a tire, designated
by the Tire and Rim Association,
that may be used for service on
cars, sport utility vehicles,
minivans and light trucks. Note:
If
your tire size does not begin with
a letter this may mean it is
designated by either the European
Tire and Rim Technical
Organization or the Japan Tire
Manufacturing Association.
B. 215:
Indicates the nominal
width of the tire in millimeters
from sidewall edge to sidewall
edge. In general, the larger the
number, the wider the tire.
C. 65:
Indicates the aspect ratio
which gives the tire's ratio of
height to width.
D. R:
Indicates a radial type tire.
E. 15:
Indicates the wheel or rim
diameter in inches. If you change
your wheel size, you will have to
purchase new tires to match the
new wheel diameter.
F. 95:
Indicates the tire's load
index. It is an index that relates to
how much weight a tire can carry.
You may find this information in
your owner ’s manual. If not,
contact a local tire dealer.
Note: You may not find this
information on all tires because it
is not required by federal law. G.
H:
Indicates the tire's speed
rating. The speed rating denotes
the speed at which a tire is
designed to be driven for extended
periods of time under a standard
condition of load and inflation
pressure. The tires on your vehicle
may operate at different
conditions for load and inflation
pressure. These speed ratings may
need to be adjusted for the
difference in conditions. The
ratings range from
81 mph
(130 km/h) to 186 mph
(299 km/h). These ratings are
listed in the following chart.
Note: You may not find this
information on all tires because it
is not required by federal law. Speed rating
Letter
rating
81 mph (130 km/h)
M
87 mph (140 km/h)
N
99 mph (159 km/h)
Q
106 mph (171 km/h)
R
112 mph (180 km/h)
S
118 mph (190 km/h)
T
124 mph (200 km/h)
U
130 mph (210 km/h)
H
149 mph (240 km/h)
V
358
Explorer (CTW) Canada/United States of America, enUSA, Edition date: 201902, Third-Printing- Wheels and Tires
Page 363 of 555
*Traction: The traction grades,
from highest to lowest are AA, A,
B, and C. The grades represent the
tire's ability to stop on wet
pavement as measured under
controlled conditions on specified
government test surfaces of
asphalt and concrete. A tire
marked C may have poor traction
performance.
*
Temperature: The temperature
grades are A (the highest), B and
C, representing the tire's
resistance to the generation of
heat and its ability to dissipate
heat when tested under controlled
conditions on a specified indoor
laboratory test wheel.
M. Maximum Inflation
Pressure:
Indicates the tire
manufacturers' maximum
permissible pressure or the
pressure at which the maximum
load can be carried by the tire. This
pressure is normally higher than
the vehicle manufacturer's
recommended cold inflation
pressure which can be found on
the Safety Compliance
Certification Label (affixed to
either the door hinge pillar,
door-latch post, or the door edge
that meets the door-latch post,
next to the driver's seating
position), or Tire Label which is
located on the B-Pillar or the edge
of the driver ’s door. The cold
inflation pressure should never be
set lower than the recommended
pressure on the vehicle label. The tire suppliers may have
additional markings, notes or
warnings such as standard load
or radial tubeless.
Additional Information
Contained on the Tire Sidewall
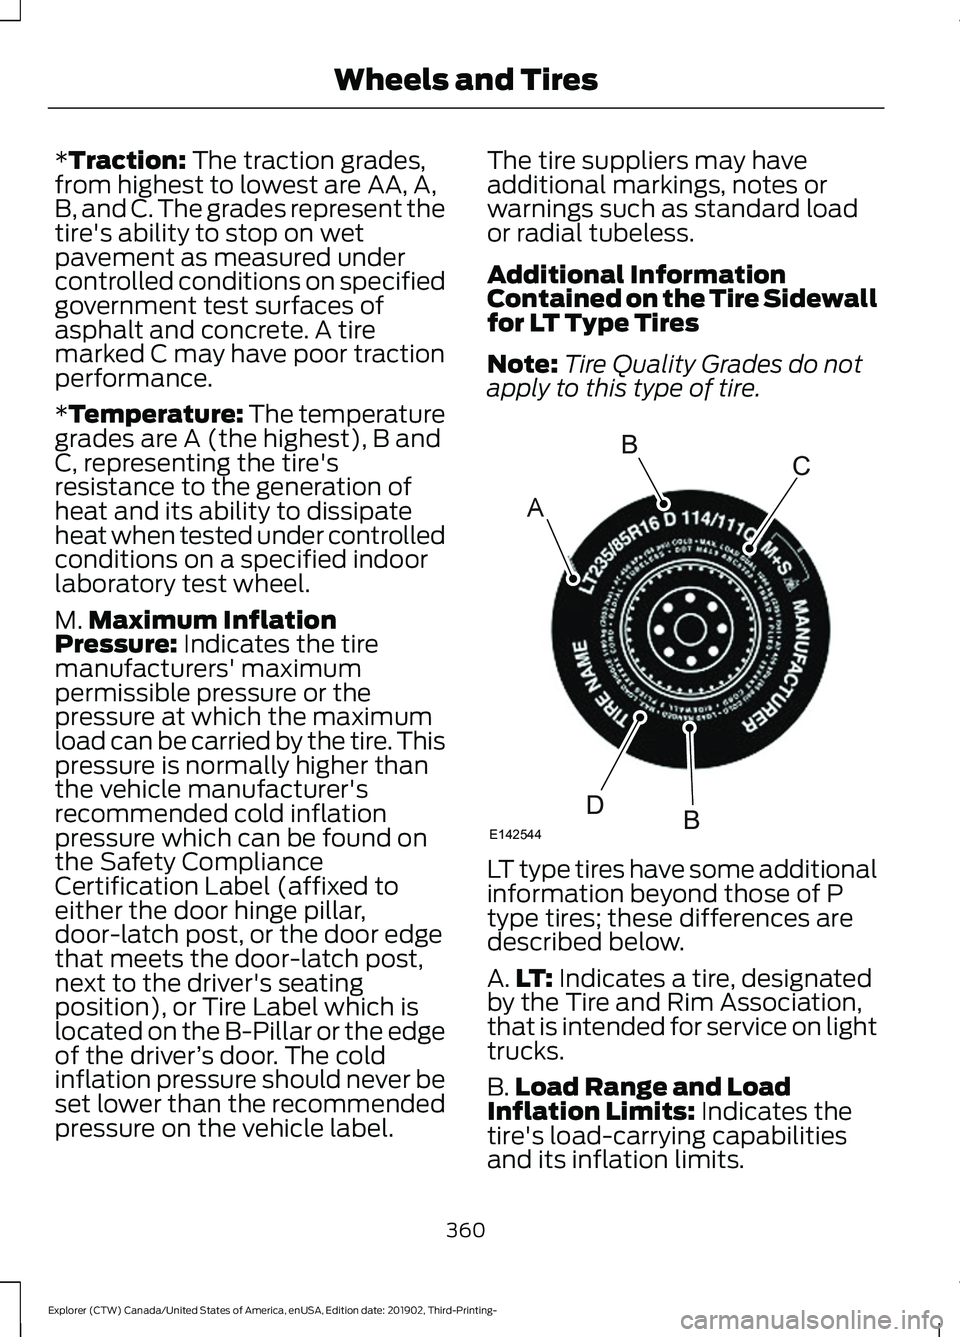
for LT Type Tires
Note:
Tire Quality Grades do not
apply to this type of tire. LT type tires have some additional
information beyond those of P
type tires; these differences are
described below.
A.
LT:
Indicates a tire, designated
by the Tire and Rim Association,
that is intended for service on light
trucks.
B. Load Range and Load
Inflation Limits:
Indicates the
tire's load-carrying capabilities
and its inflation limits.
360
Explorer (CTW) Canada/United States of America, enUSA, Edition date: 201902, Third-Printing- Wheels and TiresA
BC
BDE142544
Page 365 of 555
C.
80: Indicates the aspect ratio
which gives the tire's ratio of
height to width. Numbers of 70 or
lower indicate a short sidewall.
D. D:
Indicates a diagonal type tire.
R:
Indicates a radial type tire.
E. 16:
Indicates the wheel or rim
diameter in inches. If you change
your wheel size, you will have to
purchase new tires to match the
new wheel diameter.
Recommended Tire Pressures
and Inflating Your Tires
Safe operation of your vehicle
requires that your tires are
properly inflated. Remember that
a tire can lose up to half of its air
pressure without appearing flat.
Every day before you drive, check
your tires. If one looks lower than
the others, use a tire gauge to
check the pressure of all tires and
adjust if required.
At least once a month and before
long trips, inspect each tire and
check the tire pressure with a tire
gauge (including spare, if
equipped). Inflate all tires to the
inflation pressure recommended
by the manufacturer. WARNING: Under-inflation
is the most common cause of
tire failures and may result in
severe tire cracking, tread
separation or blowout, with
unexpected loss of vehicle control and increased risk of
injury. Under-inflation increases
sidewall flexing and rolling
resistance, resulting in heat
buildup and internal damage to
the tire. It also may result in
unnecessary tire stress, irregular
wear, loss of vehicle control and
accidents. A tire can lose up to
half of its air pressure and not
appear to be flat!
You are strongly urged to buy a
reliable tire pressure gauge, as
automatic service station gauges
may be inaccurate. We
recommend the use of a digital or
dial-type tire pressure gauge
rather than a stick-type tire
pressure gauge. Use the
recommended cold inflation
pressure for optimum tire
performance and wear.
Under-inflation or over-inflation
may cause uneven treadwear
patterns.
Always inflate your tires to the
recommended inflation pressure
even if it is less than the maximum
inflation pressure information
found on the tire. You will find a
Tire Label containing the
manufactures recommended tire
inflation pressure by the tire size
and other important information
located on the B-Pillar or the edge
of the driver ’s door).
362
Explorer (CTW) Canada/United States of America, enUSA, Edition date: 201902, Third-Printing- Wheels and Tires
Page 366 of 555
The recommended tire inflation
pressure is also found on the
Safety Compliance Certification
Label (affixed to either the door
hinge pillar, door-latch post, or the
door edge that meets the
door-latch on the B-pillar, or on
the edge of the driver
’s door.
Failure to follow the tire pressure
recommendations can cause
uneven treadwear patterns and
adversely affect the way your
vehicle handles.
Inspecting Your Tires and
Wheel Valve Stems
Periodically inspect the tire treads
for uneven or excessive wear and
remove objects such as stones,
nails or glass that may be wedged
in the tread grooves. Check the tire
and valve stems for holes, cracks,
or cuts that may permit air
leakage and repair or replace the
tire and replace the valve stem.
Inspect the tire sidewalls for
cracking, cuts, bruises and other
signs of damage or excessive
wear. If internal damage to the tire
is suspected, have the tire
dismounted and inspected in case
it needs to be repaired or replaced.
For your safety, tires that are
damaged or show signs of
excessive wear should not be used
because they are more likely to
blow out or fail. Improper or inadequate vehicle
maintenance can cause tires to
wear abnormally. Inspect all your
tires, including the spare,
frequently, and replace them if
one or more of the following
conditions exist:
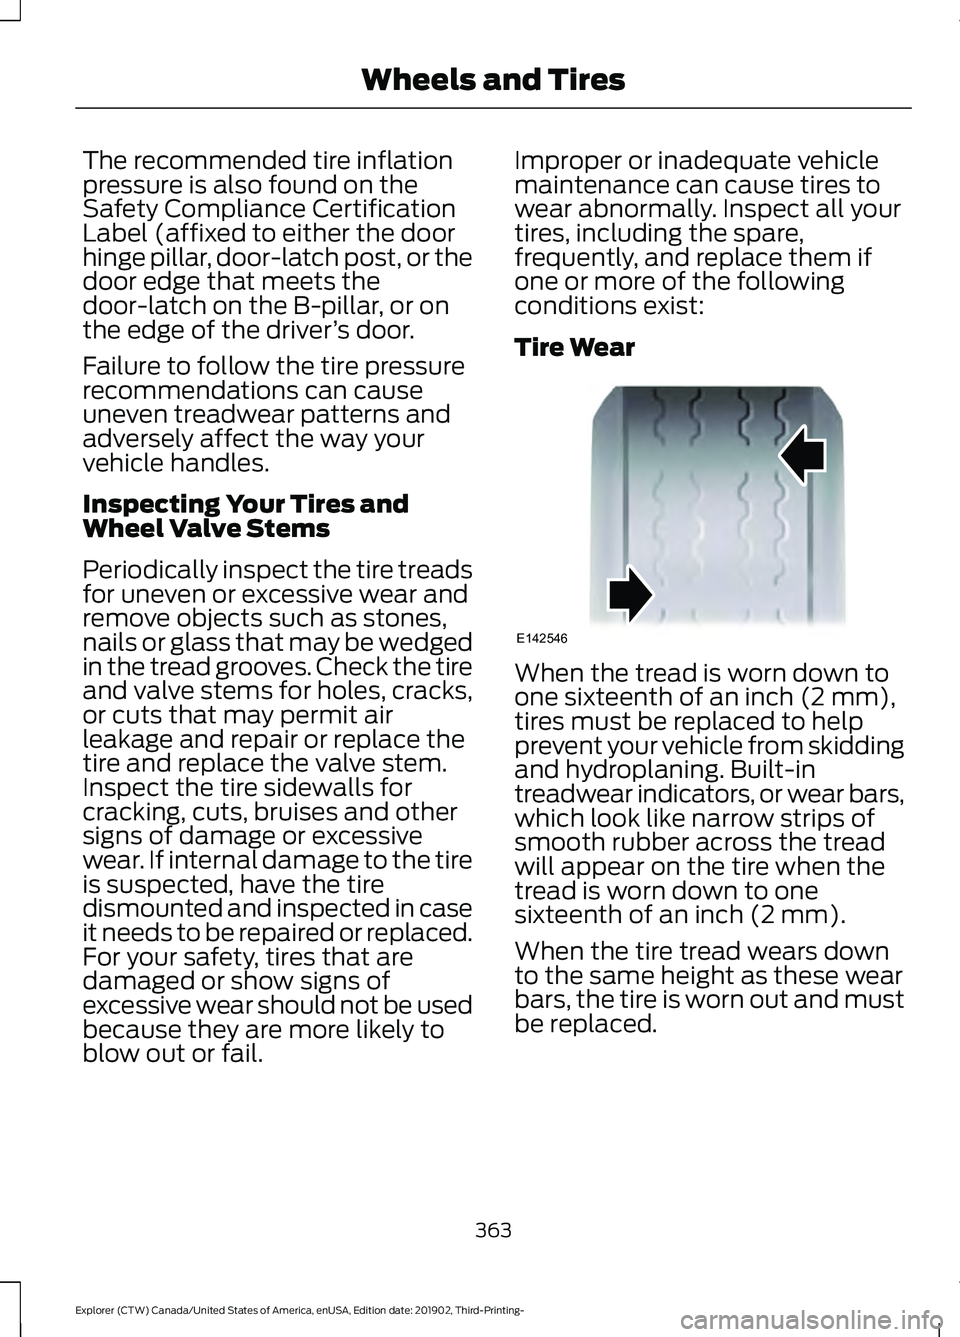
Tire Wear
When the tread is worn down to
one sixteenth of an inch (2 mm),
tires must be replaced to help
prevent your vehicle from skidding
and hydroplaning. Built-in
treadwear indicators, or wear bars,
which look like narrow strips of
smooth rubber across the tread
will appear on the tire when the
tread is worn down to one
sixteenth of an inch (2 mm).
When the tire tread wears down
to the same height as these wear
bars, the tire is worn out and must
be replaced.
363
Explorer (CTW) Canada/United States of America, enUSA, Edition date: 201902, Third-Printing- Wheels and TiresE142546
Page 367 of 555
Damage
Periodically inspect the tire treads
and sidewalls for damage (such
as bulges in the tread or sidewalls,
cracks in the tread groove and
separation in the tread or
sidewall). If damage is observed
or suspected, have the tire
inspected by a tire professional.
Tires can be damaged during
off-road use, so inspection after
off-road use is also
recommended.
Age
WARNING: Tires degrade
over time depending on many
factors such as weather, storage
conditions, and conditions of use
(load, speed, inflation pressure)
the tires experience throughout
their lives.
In general, tires should be
replaced after six years
regardless of tread wear.
However, heat caused by hot
climates or frequent high loading
conditions can accelerate the
aging process and may require
tires to be replaced more
frequently.
You should replace your spare
tire when you replace the road
tires or after six years due to
aging even if it has not been
used. U.S. DOT Tire Identification
Number
Both United States and Canada
Federal regulations require tire
manufacturers to place
standardized information on the
sidewall of all tires. This
information identifies and
describes the fundamental
characteristics of the tire and also
provides a U.S. DOT Tire
Identification Number for safety
standard certification and in case
of a recall.
This begins with the letters DOT
and indicates that the tire meets
all federal standards. The next
two numbers or letters are the
plant code designating where it
was manufactured, the next two
are the tire size code and the last
four numbers represent the week
and year the tire was built. For
example, the numbers 317 mean
the 31st week of 1997. After 2000,
the numbers go to four digits. For
example, 2501 means the 25th
week of 2001. The numbers in
between are identification codes
used for traceability. This
information is used to contact
customers if a tire defect requires
a recall.
Tire Replacement
Requirements
Your vehicle is equipped with tires
designed to provide a safe ride
and handling capability.
364
Explorer (CTW) Canada/United States of America, enUSA, Edition date: 201902, Third-Printing- Wheels and Tires